Category:Physics Experiments’
Rainy Day Science for Kids
- by KitchenPantryScientist
While you wait for the sun to come out, put away the screens and pull out some simple science! Just click on the blue experiment name for instructions and more about the science behind the fun, or click here to watch me demonstrate them on Twin Cities Live.
Fizzy Balloons are a fun way to explore chemical reactions!
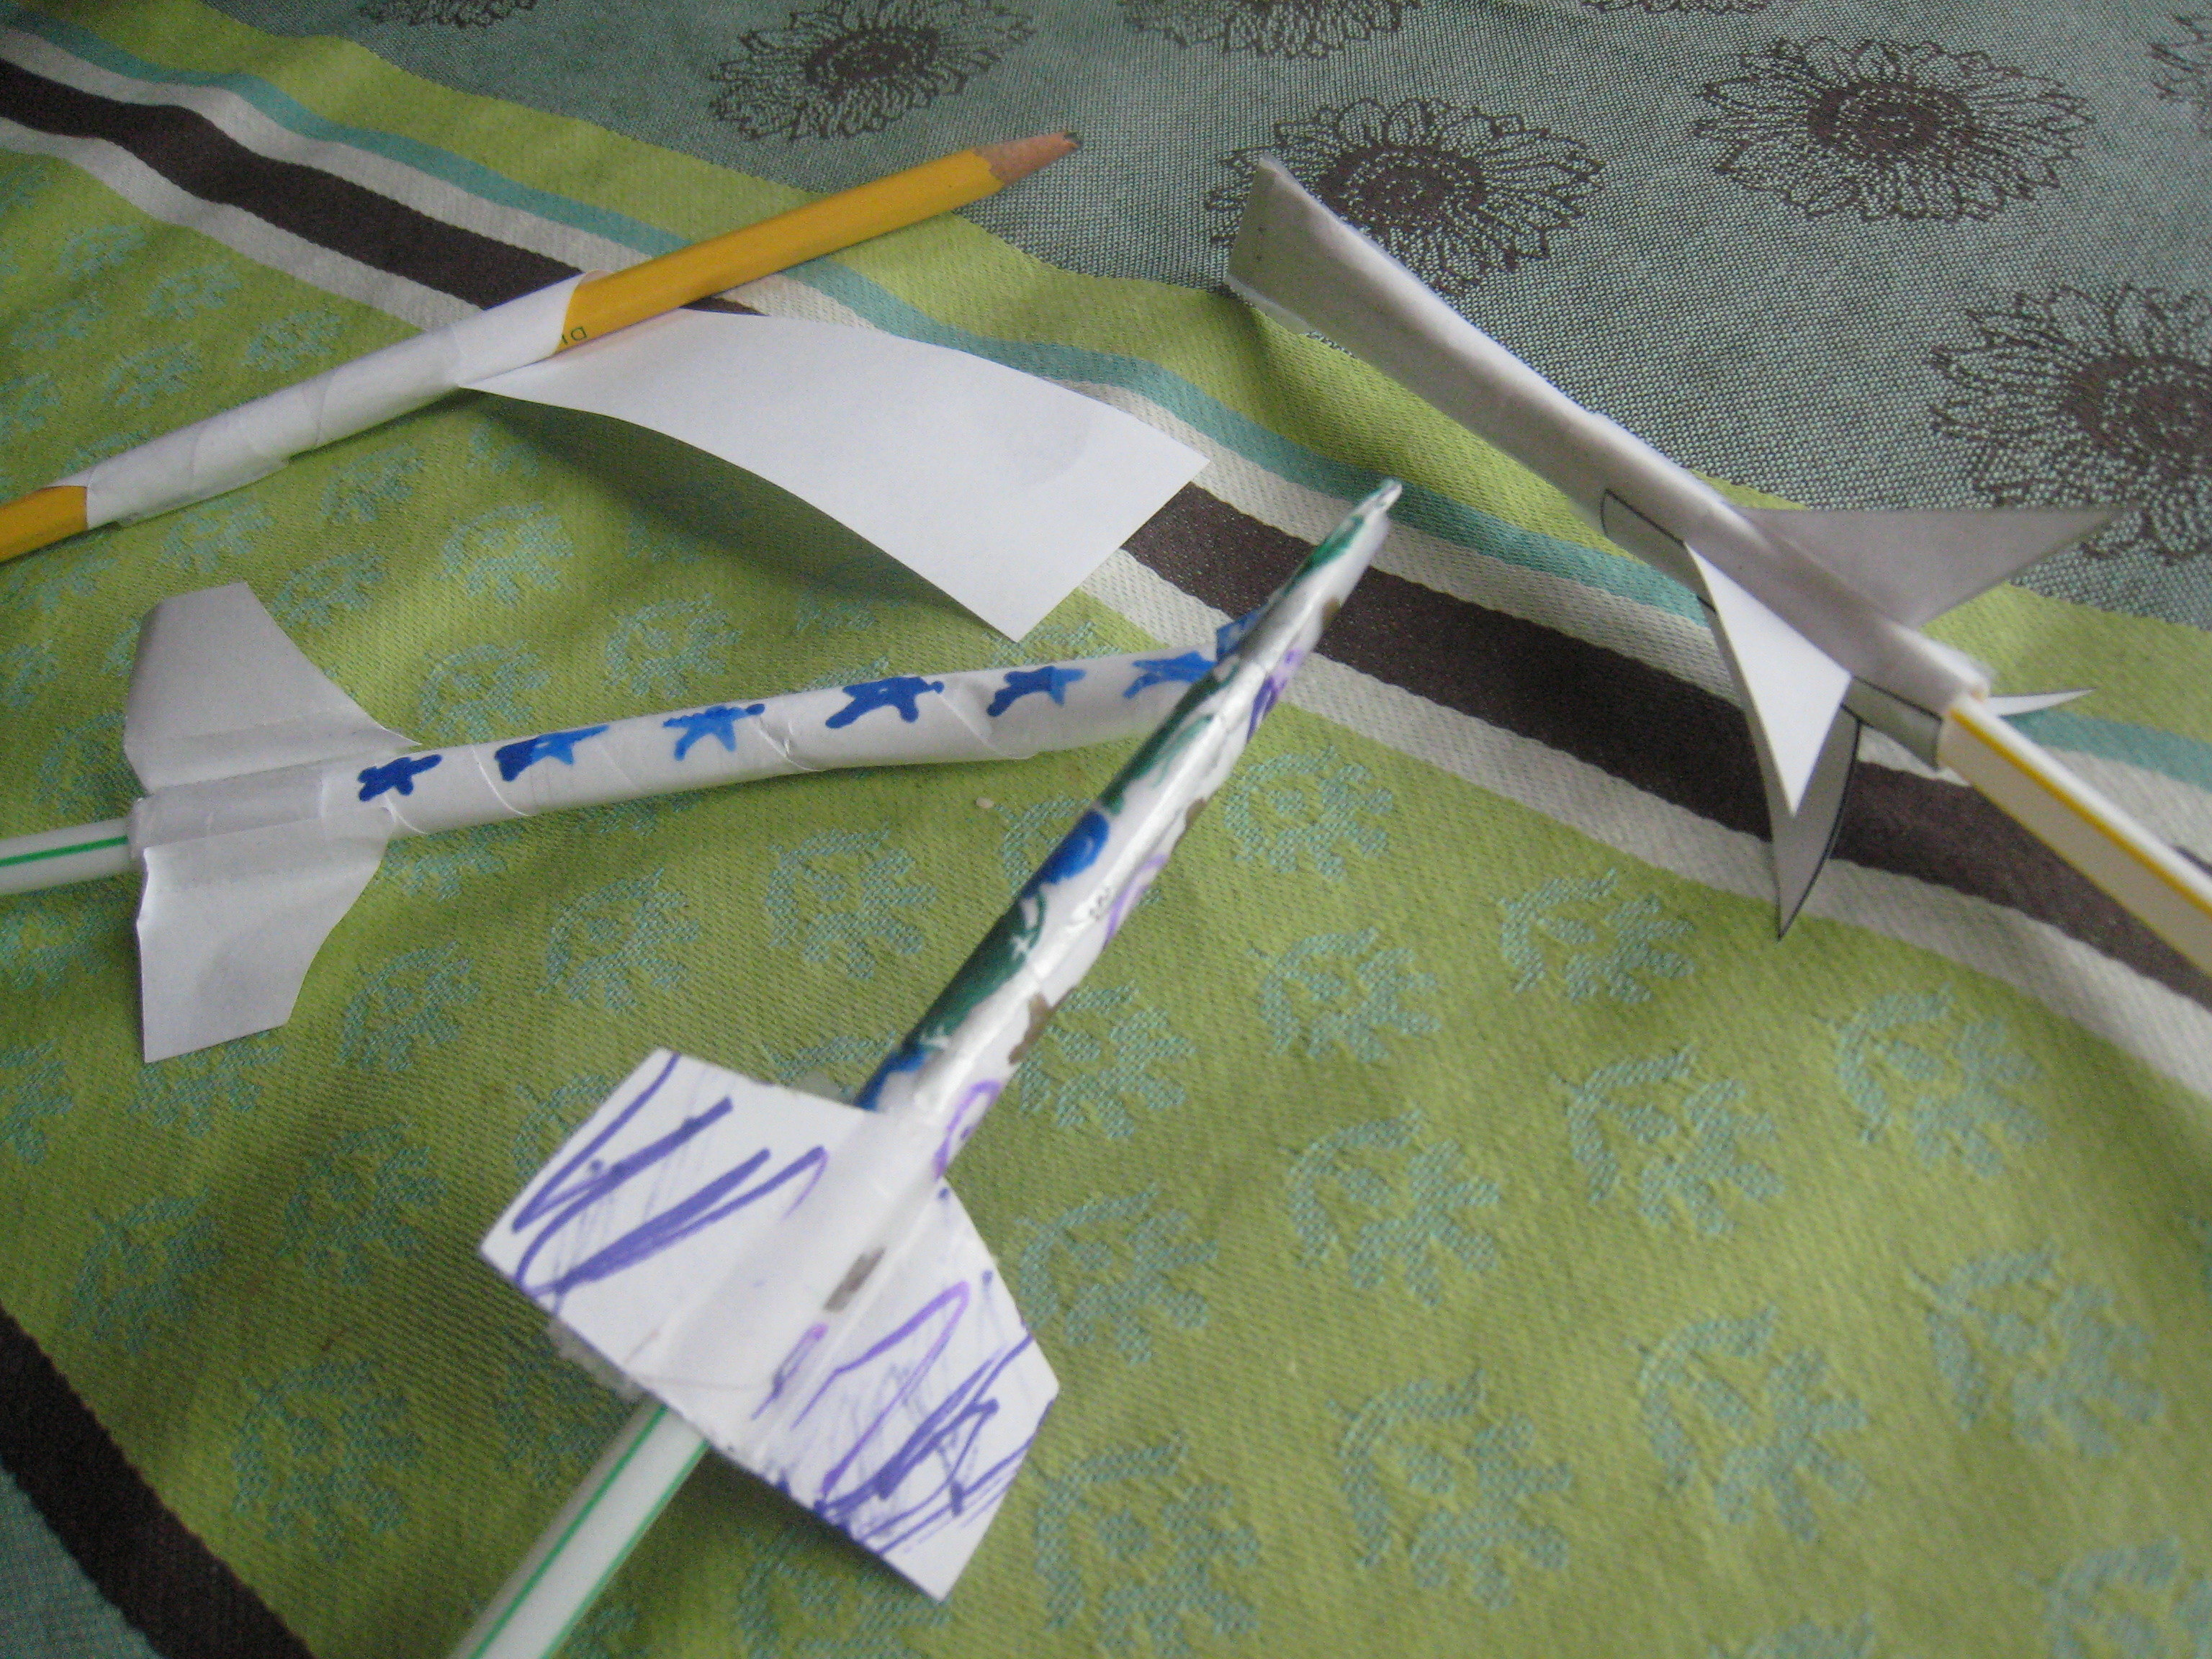
Have an engineering competition by making breath-propelled Straw Rockets and seeing whose will travel the farthest.
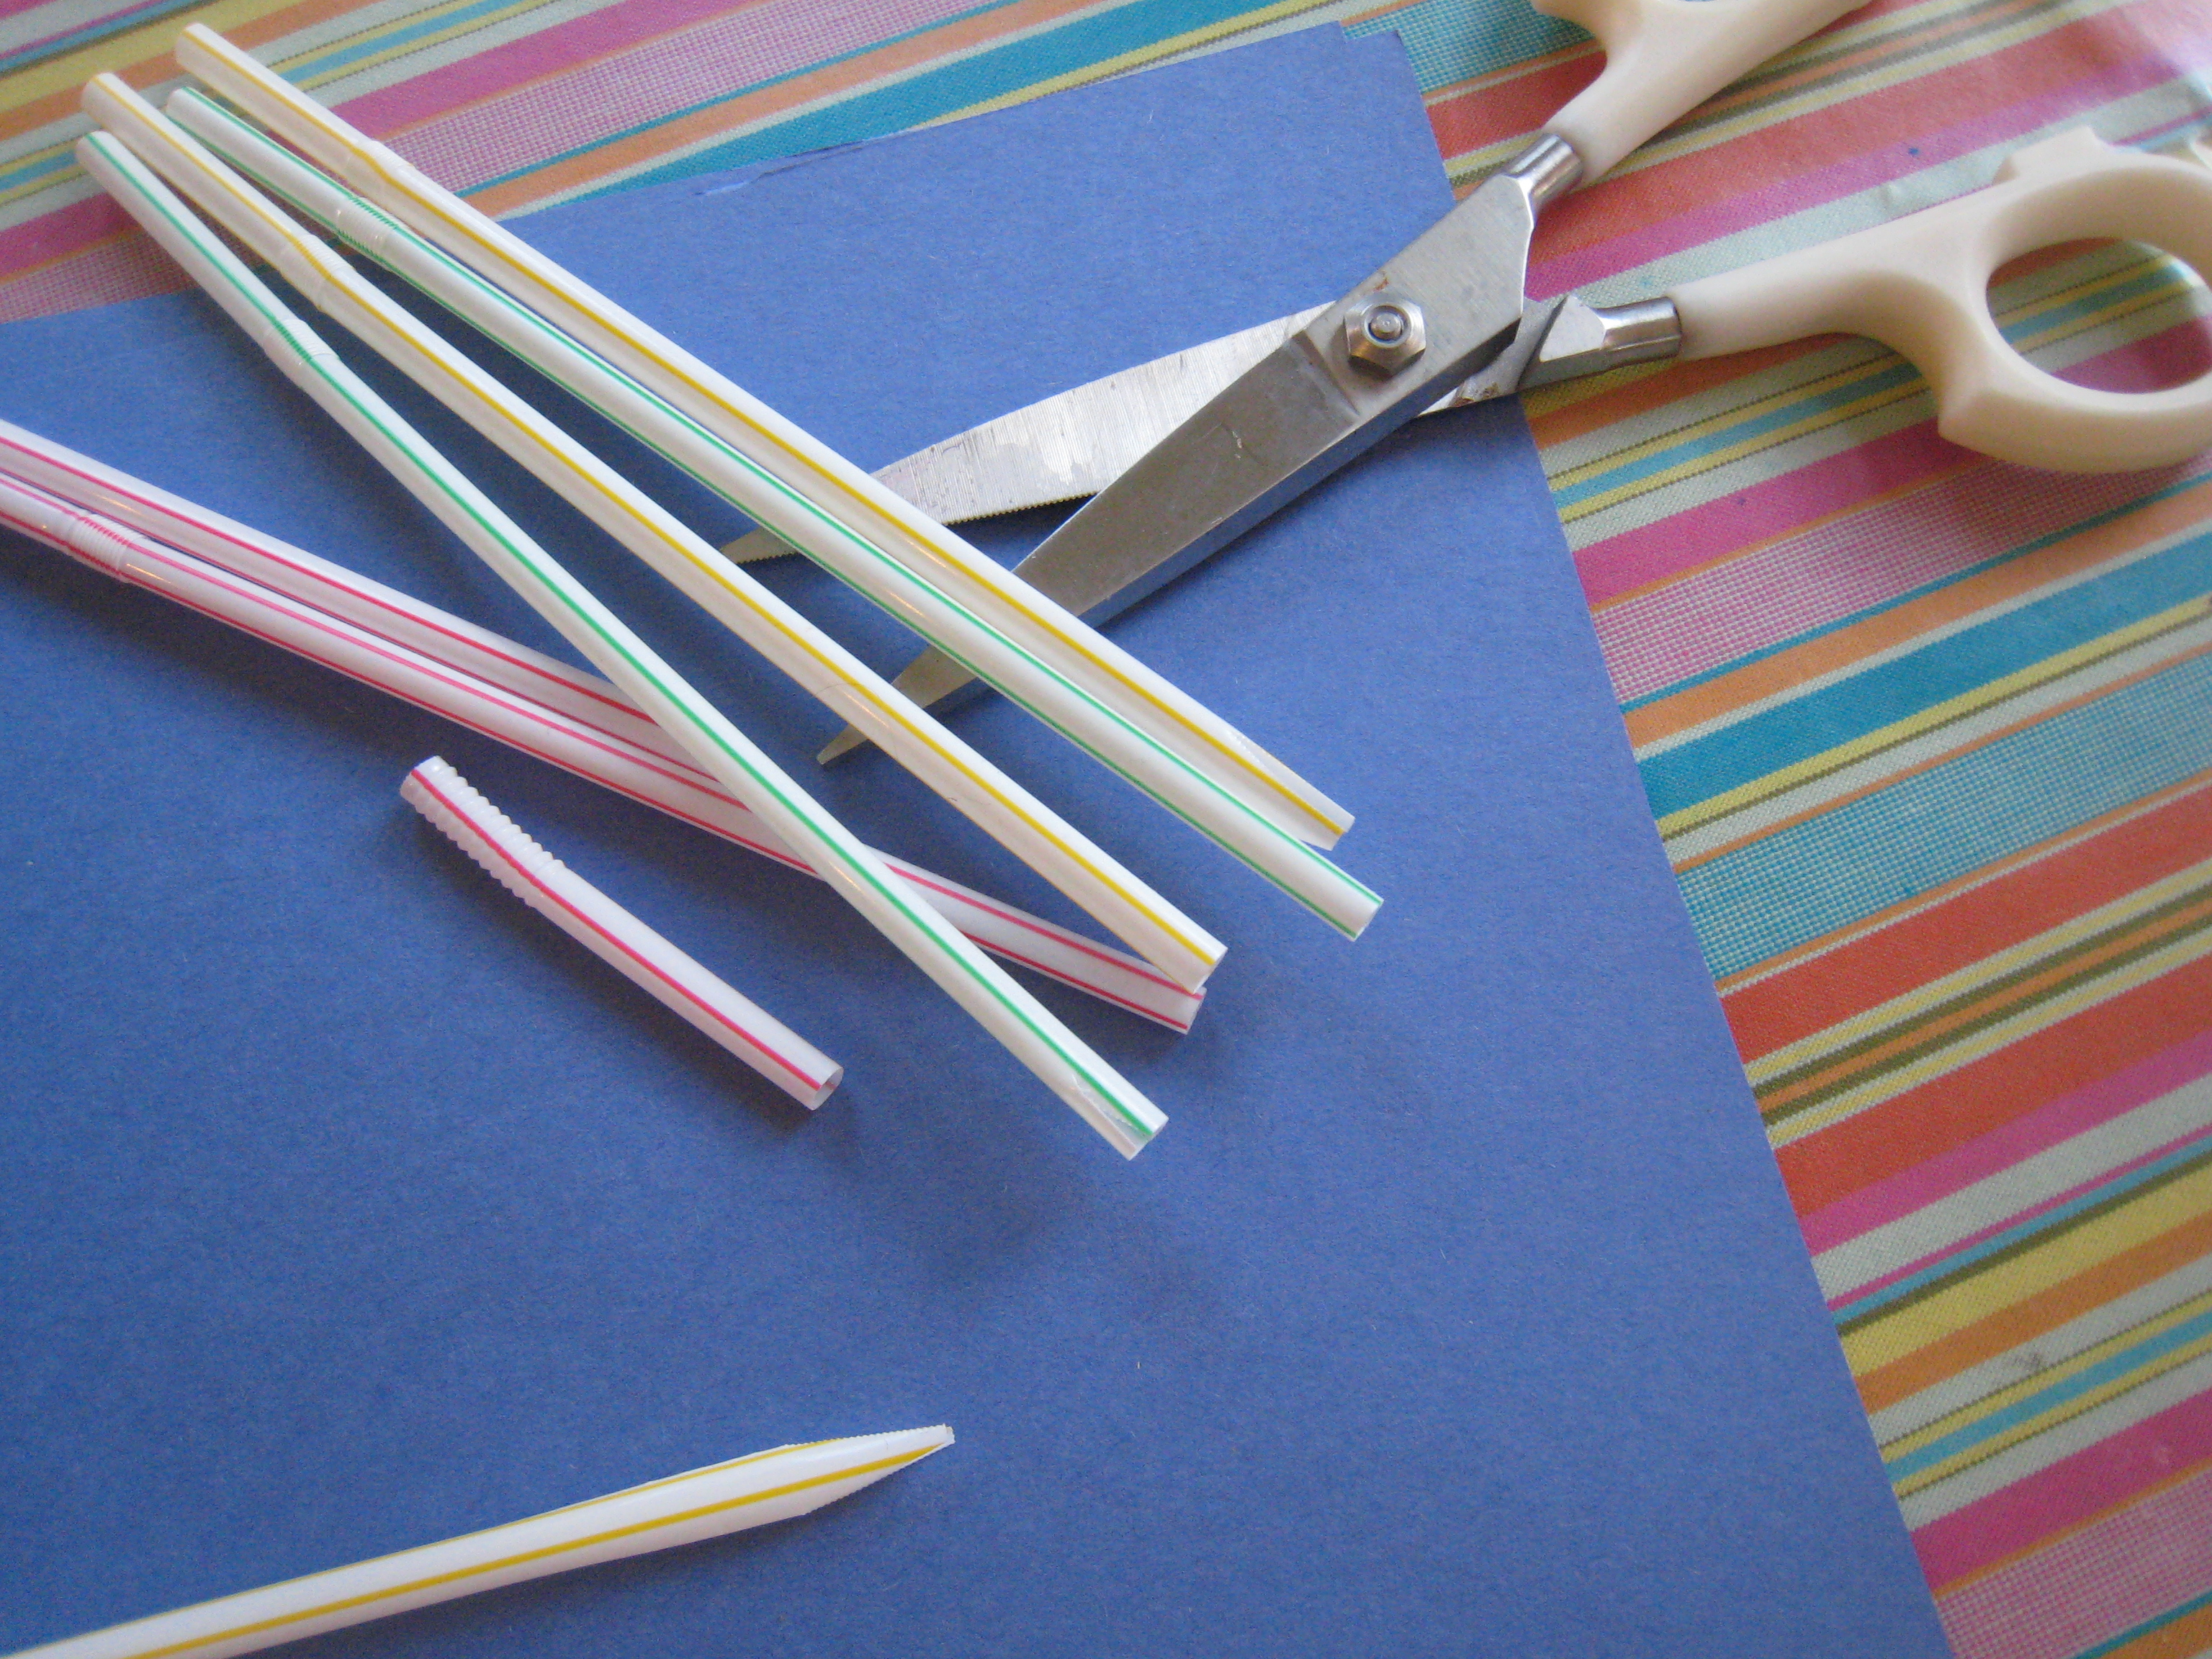
Make your own Orchestraws from plastic drinking straws. (Get out the earplugs.)
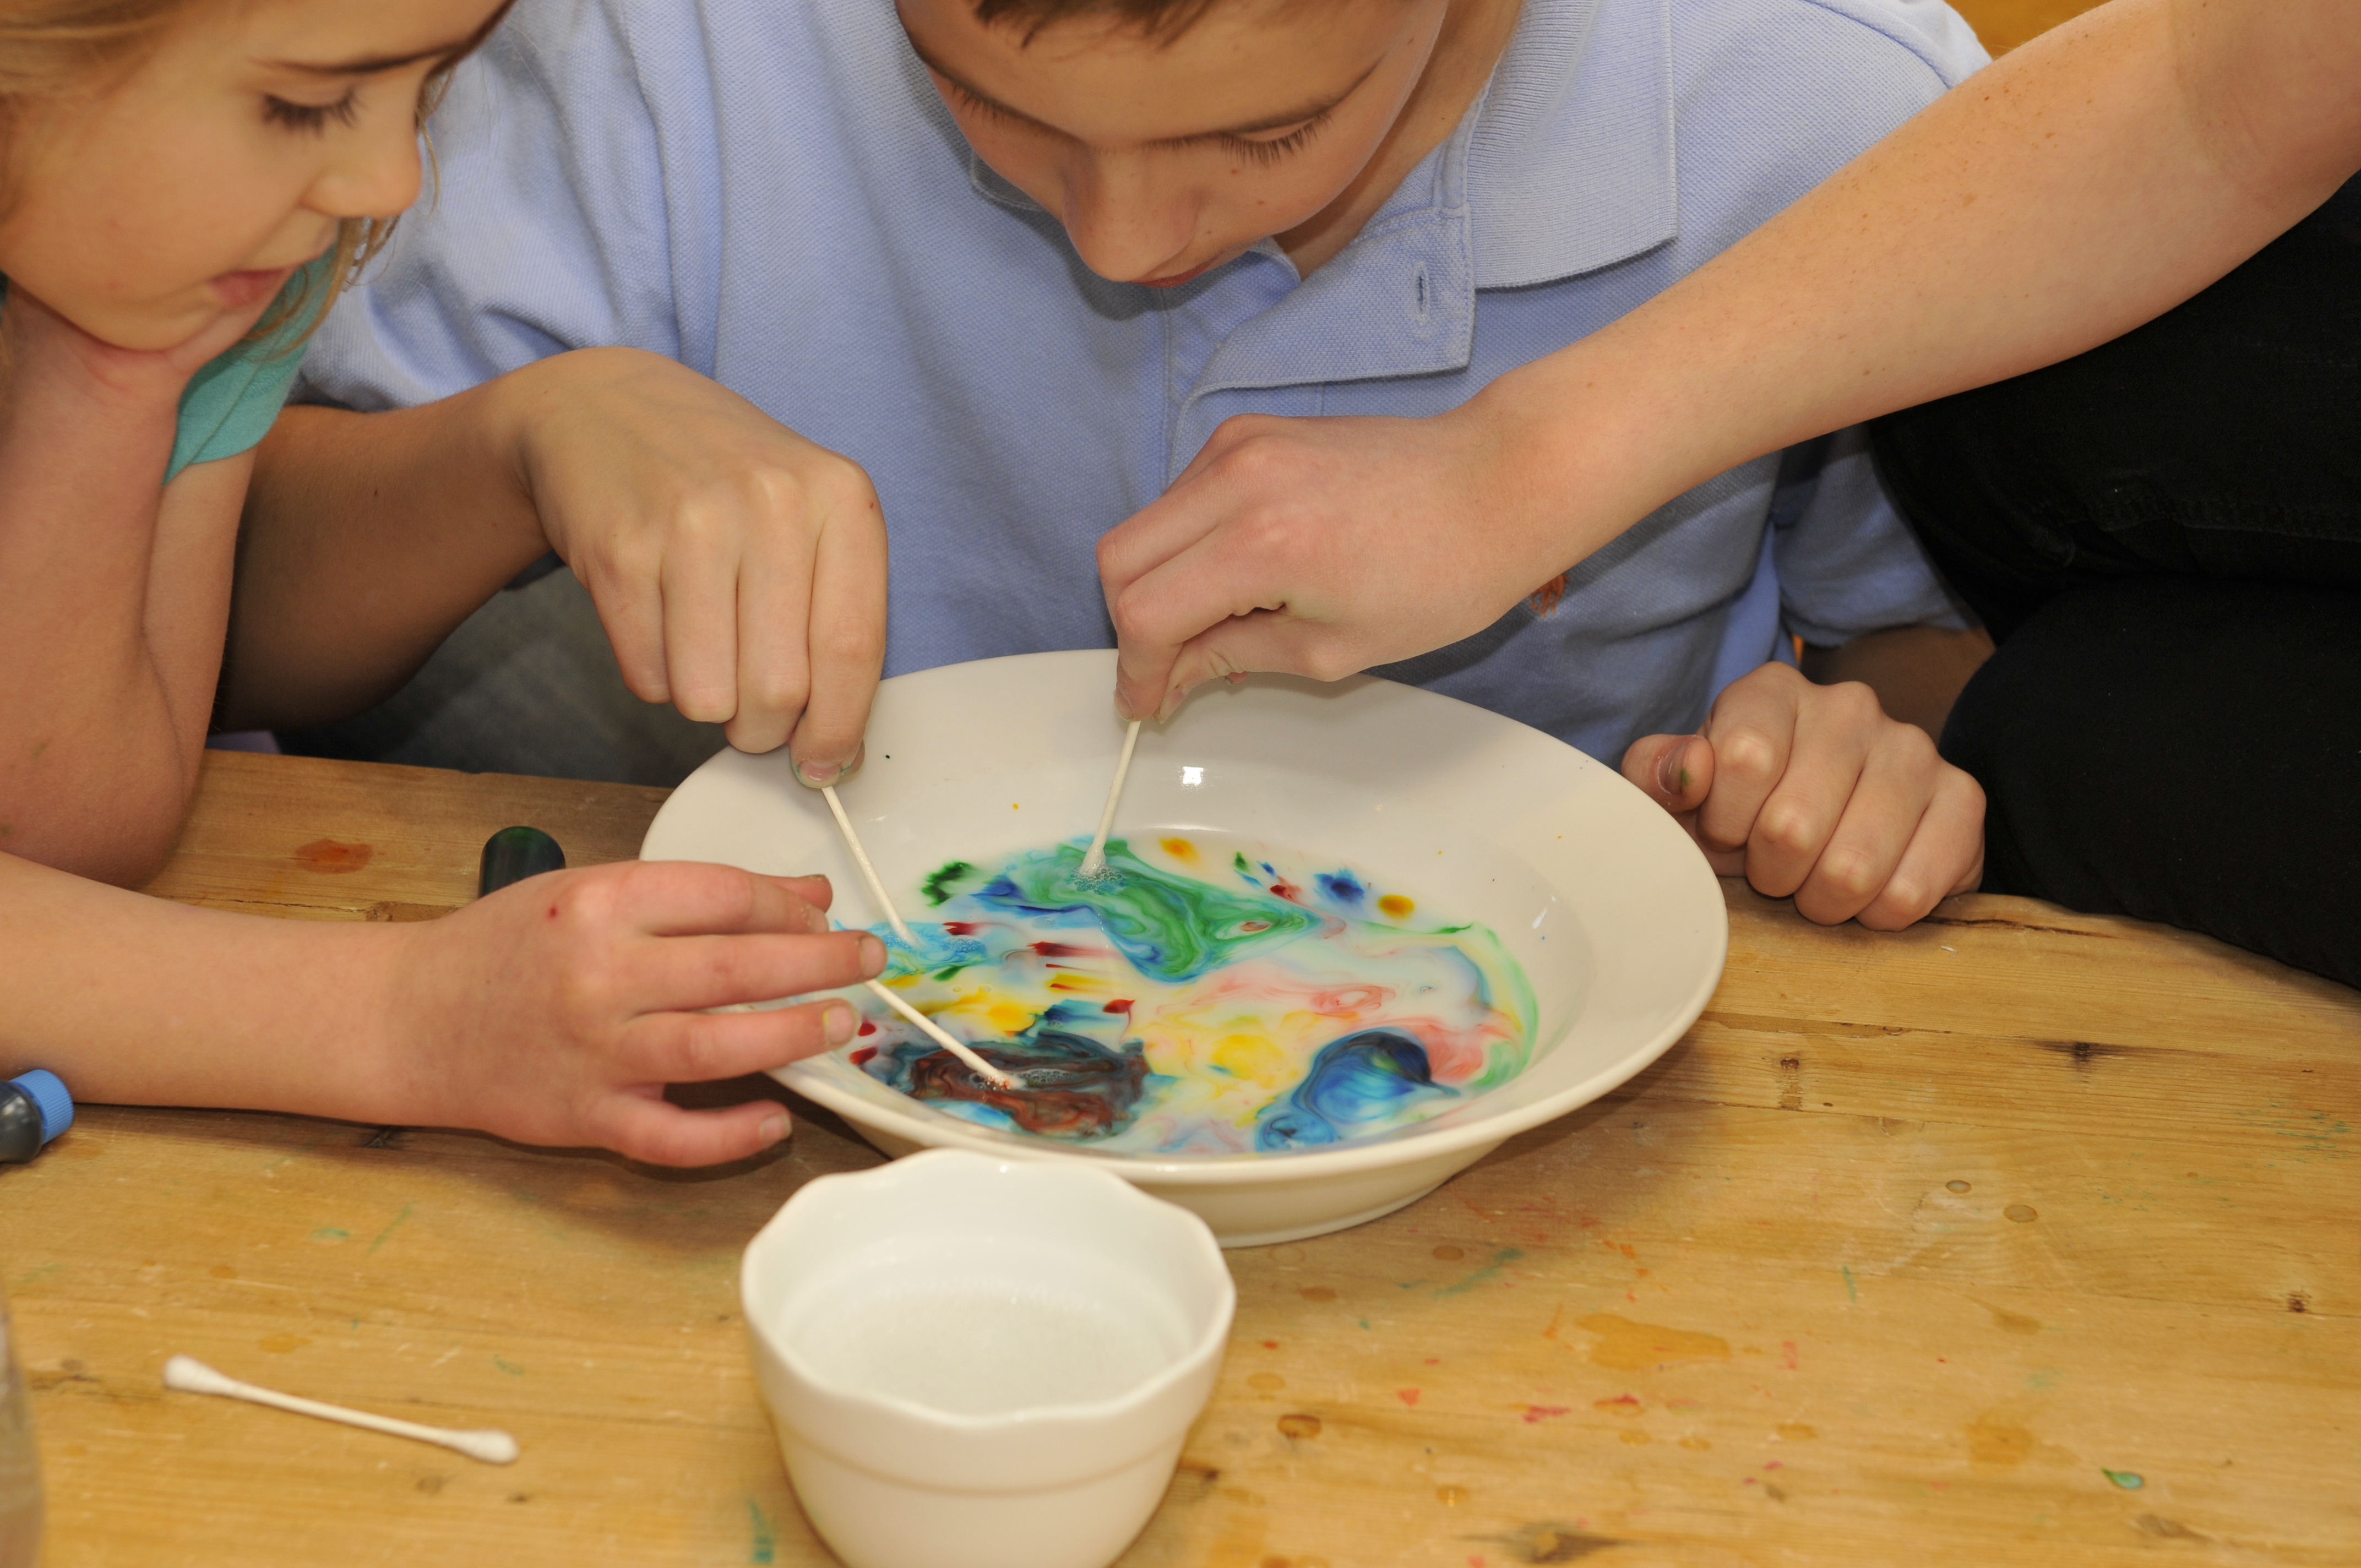
Or watch science turn psychedelic when you add food coloring and dish soap to dairy and make Tie Dye Milk.
Earth Day Science, #SpaceMicrobes and a Laser Pointer Experiment
- by KitchenPantryScientist
Earth Day is Tuesday, April 22nd. How will you celebrate the amazing planet that sustains us? Here’s a link to ten fun Earth Day science experiments. Or, step outside, take a picture of yourself and post it on social media with the hashtag #GlobalSelfie for a new mosaic image of Earth being created by NASA: a new “Blue Marble” built bit by bit with your photos.
If you live in Minnesota, join me at the Science Museum of Minnesota Tuesday morning from 10-12 to celebrate Earth Day and NASA Climate Day with some games and a hands-on experiment for kids!
#SpaceMicrobes, including our own Minnesota microbe swabbed from the Kare11 television studio, have arrived safely on the International Space Station. Over the next few days, 48 microbes swabbed from sports stadiums and other cool locations will be thawed out and start to grow! Astronauts will measure their growth using a machine called a microplate reader, over a period of three days. The experiment will be repeated three times, and scientists will average the data and compare it to the data they’ve collected doing an identical experiment with the same microbes here on Earth! I talked about it on Kare11 the other day.
Finally, here’s a fun experiment we did with a water bottle and a laser pointer this weekend. Try it!
skullsinthestars.com has a detailed explanation of this amazing phenomenon!
Growing Alum Crystals in Eggshells
- by KitchenPantryScientist
It only takes a spark to start a fire, and it only takes one atom to act as a seed for crystal formation. Under the right conditions, the atoms in alum will join together like puzzle pieces to form large crystals. I posted a few years ago about how to grow a large alum crystal, but this experiment is even more fun. It’s also easier for young kids, since it takes less small-motor coordination.

Alum is also called potassium aluminum sulfate. It’s used in pickling and in found in baking powder. You can grow beautiful alum crystals at home with a few jars of alum, water and any object you don’t mind covering with glue. We made fake geodes by breaking eggs in half and washing them out, but we also encrusted a grape stem and a plastic shark.
To do this experiment, you’ll need glue, 3/4 cup alum from the spice section of the grocery store (4 or 5 small jars should do it,) water and whatever you want to coat with crystals. It takes three days to complete.

On day one, paint glue on the objects you want to grow crystals on. If you’re making “geodes”, apply a thin layer of glue to the inside of an eggshell that’s been cut in half, washed out and dried. Then, sprinkle a little alum powder on the glue and let it dry overnight. We heavily coated our object with alum, but might have grown larger crystals if we’d used less. Each alum particle acts as a seed for crystal growth. The closer together they are, the less room your crystals will have to grow.
On day two, dissolve 3/4 cup alum in 2 cups of water by boiling. This step requires adult supervision. Make sure all the alum dissolves (it may still look a little cloudy) and let the solution cool. This is your supersaturated alum solution.
After about 30 minutes, when the solution is cool enough to be safely handled, gently immerse your object in the alum solution. For color, you can add a large squirt of food coloring. Let your project sit overnight to grow crystals.
On day three, gently remove your object from the alum solution and let it dry. How does it look? Draw it or take a picture to put in your science notebook!

Crystals are geometric networks of atoms. Imagine a three dimensional chain-link fence, and you’ll get the picture. Certain crystals will only grow in certain shapes. For example, diamonds are always cube-shaped when they form. Whether the atoms have joined to form a small diamond, or a large one, it will always be in the shape of a cube!
Some crystals, like alum, will form from supersaturated solutions, like the one you used in this experiment. A supersaturated solution is one that is forced to hold more atoms in water (or another solute) than it normally would. You can make these solutions using heat or pressure. Crystals can form when a supersaturated solutions encounters a “seed” atom or molecule, causing the other atoms to come out of the solution and attach to the seed.
What else could you try? Could you do the same experiment with salt, or sugar crystals? How do you think the color gets incorporated into the crystal? Do you think the food coloring disrupts the shape? Will larger crystals grow if you let your object sit in the solution longer?
You can read more about crystals and gems here.
Dinosaur Science
- by KitchenPantryScientist
Today on Twin Cities Live, we did some dinosaur-related science experiments in honor of the Science Museum of Minnesota’s new Ultimate Dinosaurs exhibit.
Here are directions for doing the experiments in the video. Just click on the name to go to the post.
Window Stickies diffusion experiment
Have fun!
Egg Drop
- by KitchenPantryScientist
How would you safely land a spacecraft on a planet with no atmosphere if you couldn’t use rockets? A parachute wouldn’t work, since there’s no air resistance. You’d have to design your craft with a protective shell so the impact wouldn’t destroy it.
Pretend a raw egg is your spacecraft and Voila: you have a science experiment. Besides being lots of fun, an egg drop experiment is a great way to try your hand at engineering and is a fantastic STEM (Science, Technology, Engineering and Math) project for kids and adults alike!.
The law of motion says that the faster you change the speed of an object, the greater the force applied to the object will be. We demonstrated this concept with our egg-throwing experiment by smashing eggs against a table, which stopped them fast, and watching them survive being hurled against a hanging sheet, which slowed them down. This same law explains why, if you drop an egg on the floor, it will break. When you change the speed of the egg slowly,by suspending it or surrounding it with material that helps absorb or redirect the force, less force is applied to the egg and it may remain intact. Can you design a container to protect an egg?
Why not have a holiday egg drop competition with your out-of town cousins, or other friends and family? Here are the rules we came up with. (We have a no parachute rule, but if you’d really like to design a parachute for your egg, that would be fun too!) I’m thinking an egg nogg carton might be a good place to start.
-Container made up of 100% holiday material like wrapping paper, bows, cardboard, tinsel, food, glue, toothpicks, wood, tape, plastic, Easter basket grass, candy and string. No Styrofoam, bubble wrap or packing peanuts are allowed.
-Container must contain one RAW egg.
-No Parachutes (defined as any material attached to your egg craft in such a way that it will expand outward as it falls, catching air.)
-Container should be no larger than 20 inches in any direction
-No tape or glue must touch the egg.
Drop your egg from different heights to see how well it survives. (Make sure you’re supervised by an adult when you do your egg drop!)
You can calculate the force of gravity on your egg and container by multiplying its weight in kilograms by 9.8meters/second (the acceleration due to gravity.
Science Fairs Made Simple (For Parents)
- by KitchenPantryScientist
Parents are under a ridiculous amount pressure to make sure kids finish homework, practice for music lessons and make it to sporting events, among other things. I saw the photo below on Facebook yesterday, and then again in a post on an awesome science blog called “It’s OK to Be Smart . The poster is funny, but kind of sad if you love science. It inspired me to share a few tips on making science fairs less painful for parents and to list of some of my favorite simple experiments. Most of them use ingredients you have on hand and you can also find these experiments and more, like DNA extraction from strawberries, on KidScience app and in my book Kitchen Science Lab for Kids.

Poster/photo by Susan Messina
Parents: Insist that kids take the reins on their science fair projects. Let them look through this list of experiments, and then sit down with them for five minutes and tell them to think about how you can take simple experiments like these to the next level by applying them to real life. (For example, how could you test whether soap or hand sanitizer removes more of the microbes you can grow on a homemade petri dish?) What might happen if you change the variables, like how much water you use, the temperature or even the materials used in the original experiment?
Kids: Here are a few ideas to get you started. Just click on the experiment name or the blue typeface to follow the link to instructions, photos and videos of the experiments. Choose one that you have the ingredients for and try it! You shouldn’t need help for most of these unless you have to boil something. Lots of them even have a video you can watch, if you’re not sure about one of the steps. My kids and I have tested them all and you can leave a comment here if you have any questions. Do more research into the science behind what you’re doing and think about how you could apply this experiment to something in real life.
Diffusion Experiment See how food coloring or other liquids diffuse through gelatin. You could even do this with yellow or orange jello if you don’t have plain. How can you change the rate of diffusion? Think about how the chemicals we add to water, put on our streets to melt ice, and spray on our lawns and crops can move into our soil, ground water, rivers, lakes and oceans.
Microbial Zoos Sample different surfaces with a cotton swab, or do a hand washing experiment, and grow the microbes on a homemade petri plate. (You’ll need some agar for this, so it may require a trip to the store.) Here’s a video on how to make the plates.
Vegetable Vampires See how plants take up water using the forces of physics. Does this experiment work better with some plants than others?
Shocking Machine Make an electrophorus and Leyden jar to shock your friends! Here’s how to do it. We demonstrated it on Kare11!
Frankenworms This is a fun candied chemical reaction. Gummy worms soaked in baking soda and water come to “life” when you drop them into vinegar! Click here for directions and a video.
Oil Spill Experiment: See why oil is so hard to clean up. What works best to remove it from water and feathers?
Goblin Goo (All you need is cornstarch and water. Here’s a video on how to make the goo. You can add a little food coloring to the water if you want, but it may stain your hands!)
Magic Bag (If you have ziplock baggies, water, red food coloring and skewers, you can do this experiment!) Here’s the video.
Fizzy Balloons (After we made Goblin Goo, I demonstrated how to make Fizzy Balloon Monster heads. Click here to watch.)
Magic Potion (Bubbly, stinky Halloween fun: I made a short video on how to make magic potion. Click here to watch it
Mad Scientist’s Green Slime (To see a TV segment where we made Mad Scientist’s Green Slime, click here!) Here’s another video.
Apple Mummies (Here’s a link to a TV segment where the kids and I demonstrated how to make Apple Mummies. Click here.)
Alien Monster Eggs (These make a great centerpiece for a Halloween party, when you’re done playing with them.) I demonstrated how to make them on Kare 11! Click here to watch the video.
Marshmallow Slingshots Lob Marshmallow eyeballs and spiders at a pumpkin or another target in this fun physics experiment. Do different size rubber bands make a difference?
Window Sprouts: Plant a bean in a plastic baggie with a damp paper towel to see how plants need only water and air to sprout roots and leaves. Here’s a short video demonstrating how to make a window garden.
Homemade Solar Oven: Using a pizza box, aluminum foil, plastic wrap, and newspaper, you can harness the sun’s energy to cook your own S’mores!
Carbon Dioxide and Ocean Acidity: See for yourself how the carbon dioxide in your own breath can make a water-based solution more acidic. It’s the same reason too much carbon dioxide in Earth’s atmosphere can be bad for our oceans.
Plant Transpiration: See how trees “sweat” in this survival science experiment.
Earthworm Experiment: Do you know what kind of earthworms are living in your back yard?
Composting: Be a composting detective. Bury some things in your back yard (away from power cables) and dig them up in a few months to see how they look. Composting reduces methane gas emissions (a greenhouse gas) from dumps.
Solar Water Purification: This project illustrates the greenhouse effect and is a fun “survival science” experiment. Requires hot sun and some patience!
Citizen Science: Don’t forget about all the real environmental research projects you can participate in through Citizen Science programs all around the world!
For mores activities and games, check out NASA’s Climate Kids website, to see a kid-friendly diagram of the water cycle, click here.
Sub-Zero Science
- by KitchenPantryScientist
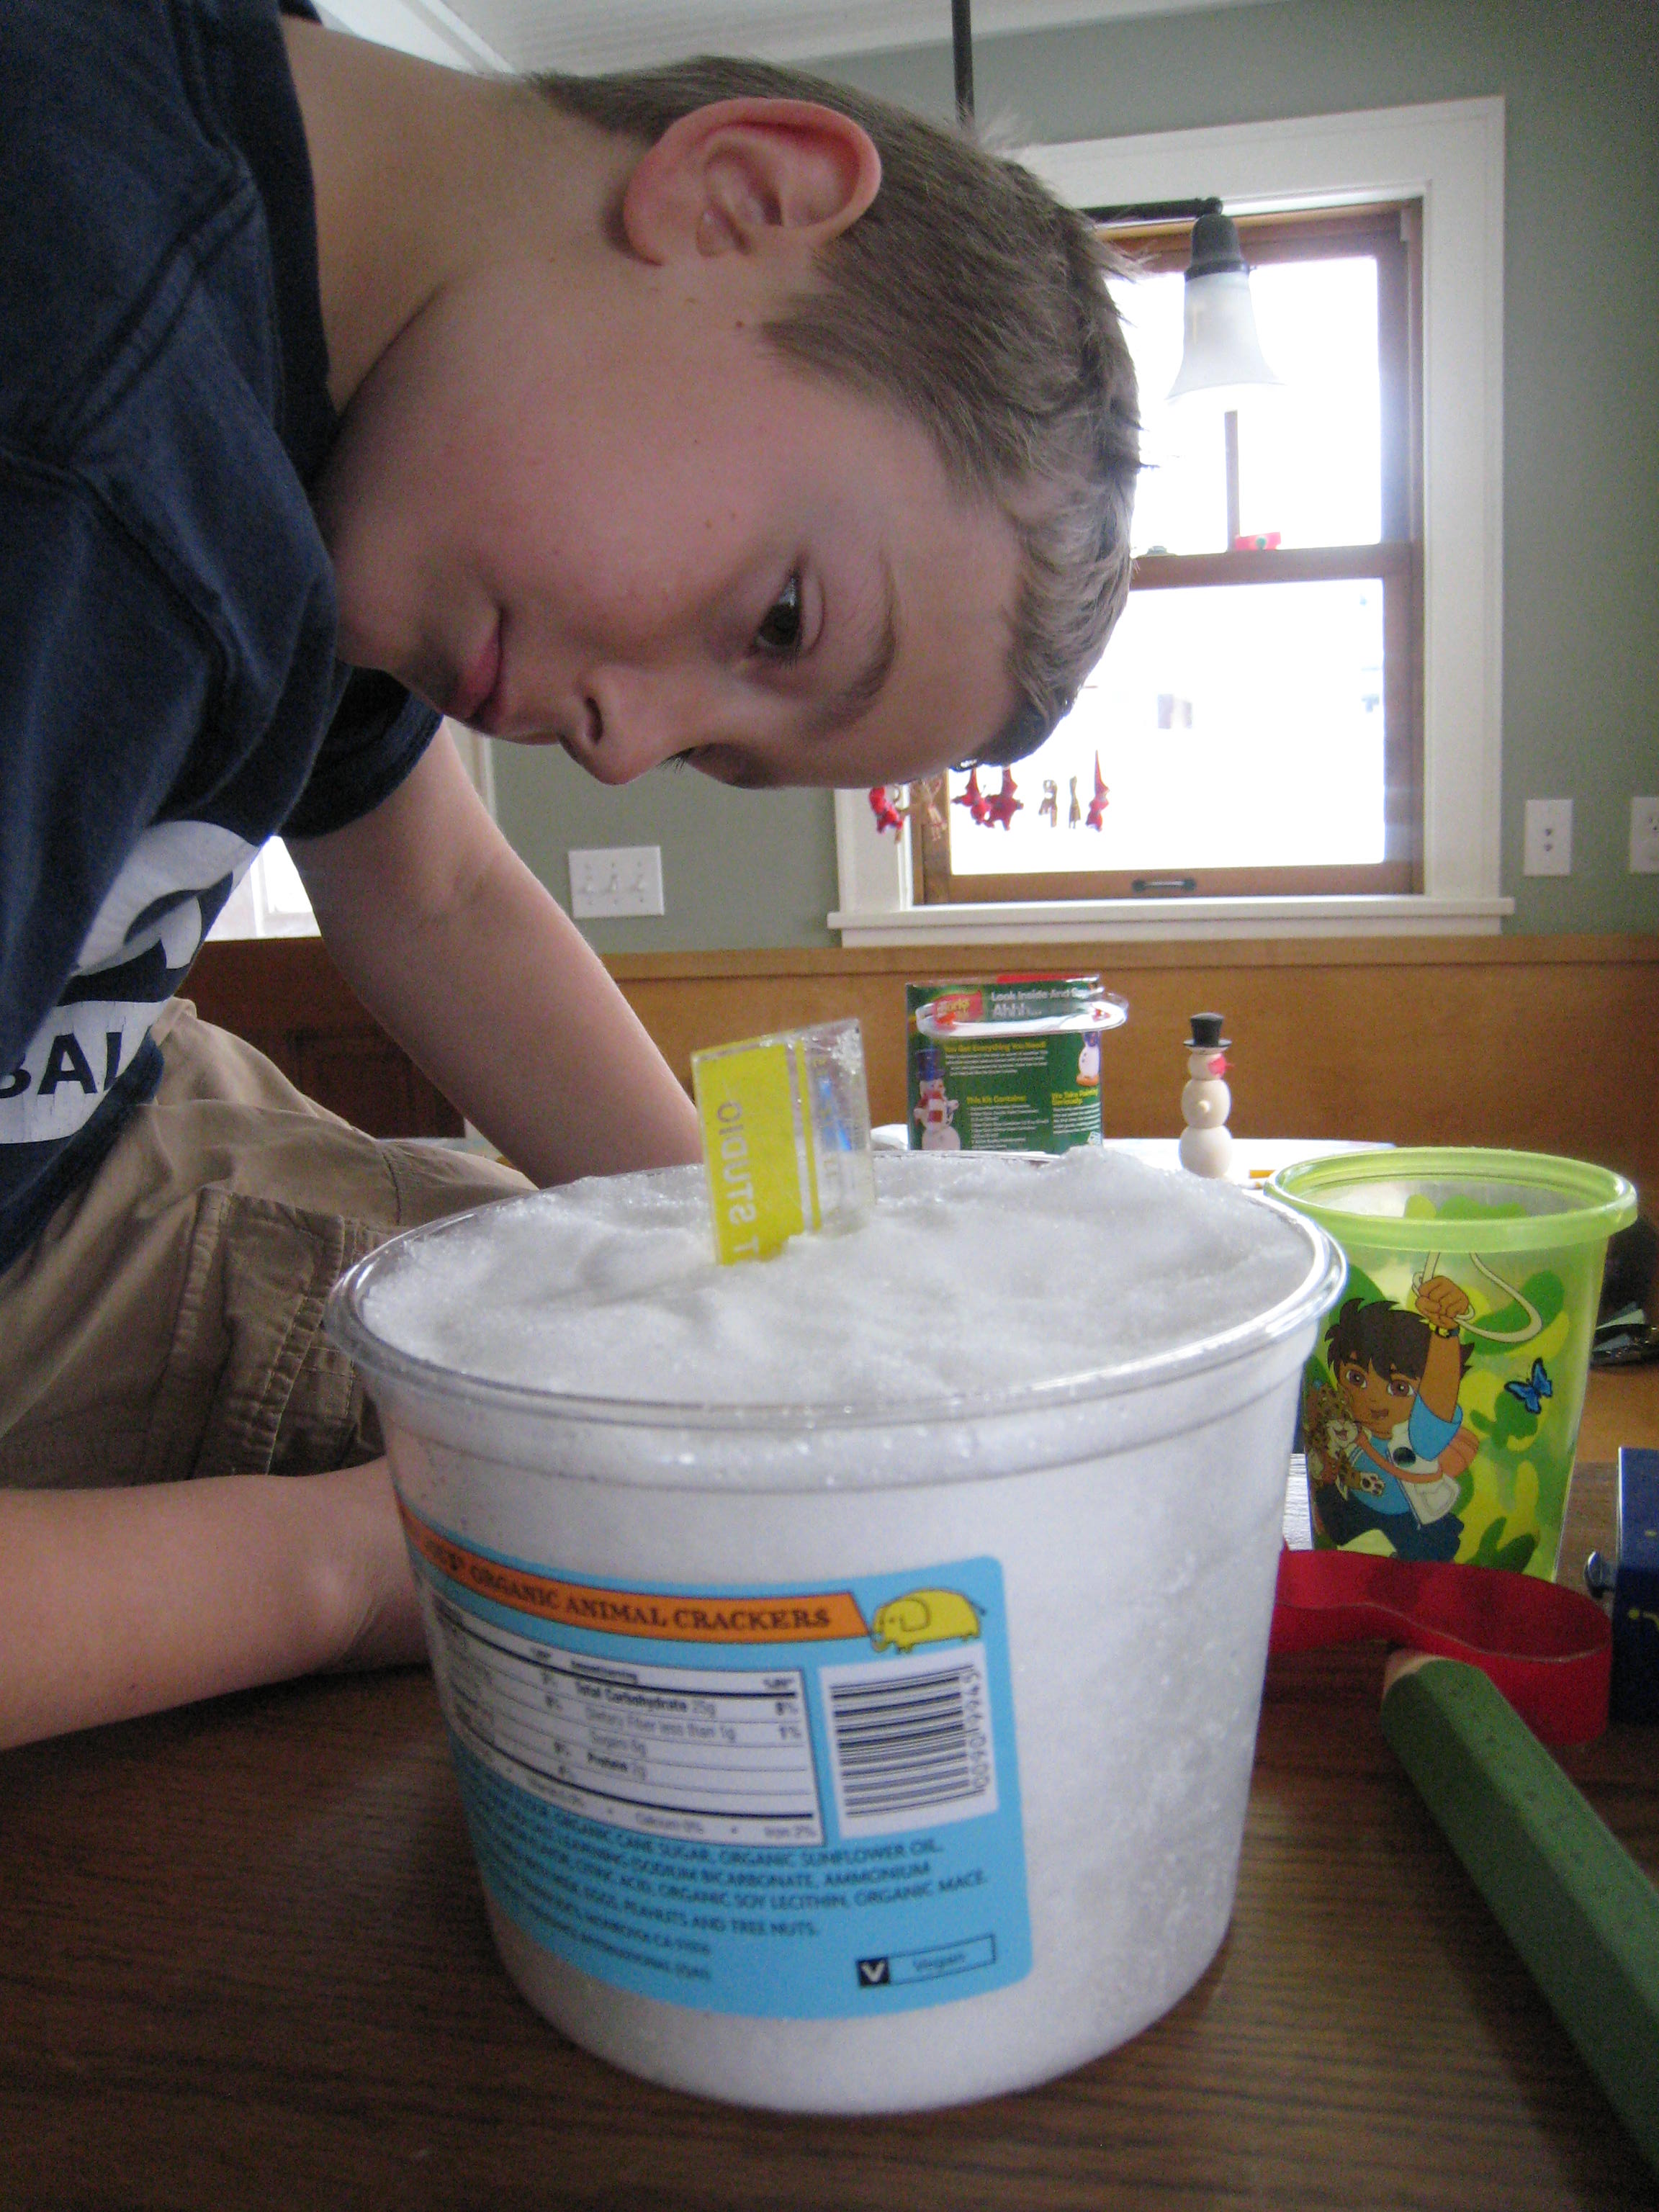
It’s been cold in Minnesota. The governor closed all the schools today in anticipation of a high temperature of around 15 below, and a low of close to 30 below in the Twin Cities. And it gets colder as you go North. This morning on Kare 11 Sunrise, we threw boiling water in the air, froze foaming soap, blew ice bubbles and experimented with bologna at 20 below to see why tongues stick to cold metal.
We did the boiling water experiment at the cabin a few weeks ago when it was a balmy 18 below. As you can see, the low viscosity of the water, and the fact that it’s about to evaporates causes most of it to instantly freeze into a snowy fog and a shower of tiny ice crystals.
Stay warm!
Holiday Break Science Experiments
- by KitchenPantryScientist
Snow, ice, wrapping paper and free time are abundant over the holidays. Here are a few fun experiments to fill the hours between celebrations. Click on the experiment name for directions.
Holiday Window Gellies: Kids of all ages love making these from gelatin and food coloring!
Snow Science: Melt snow to see how much water and dirt it contains.
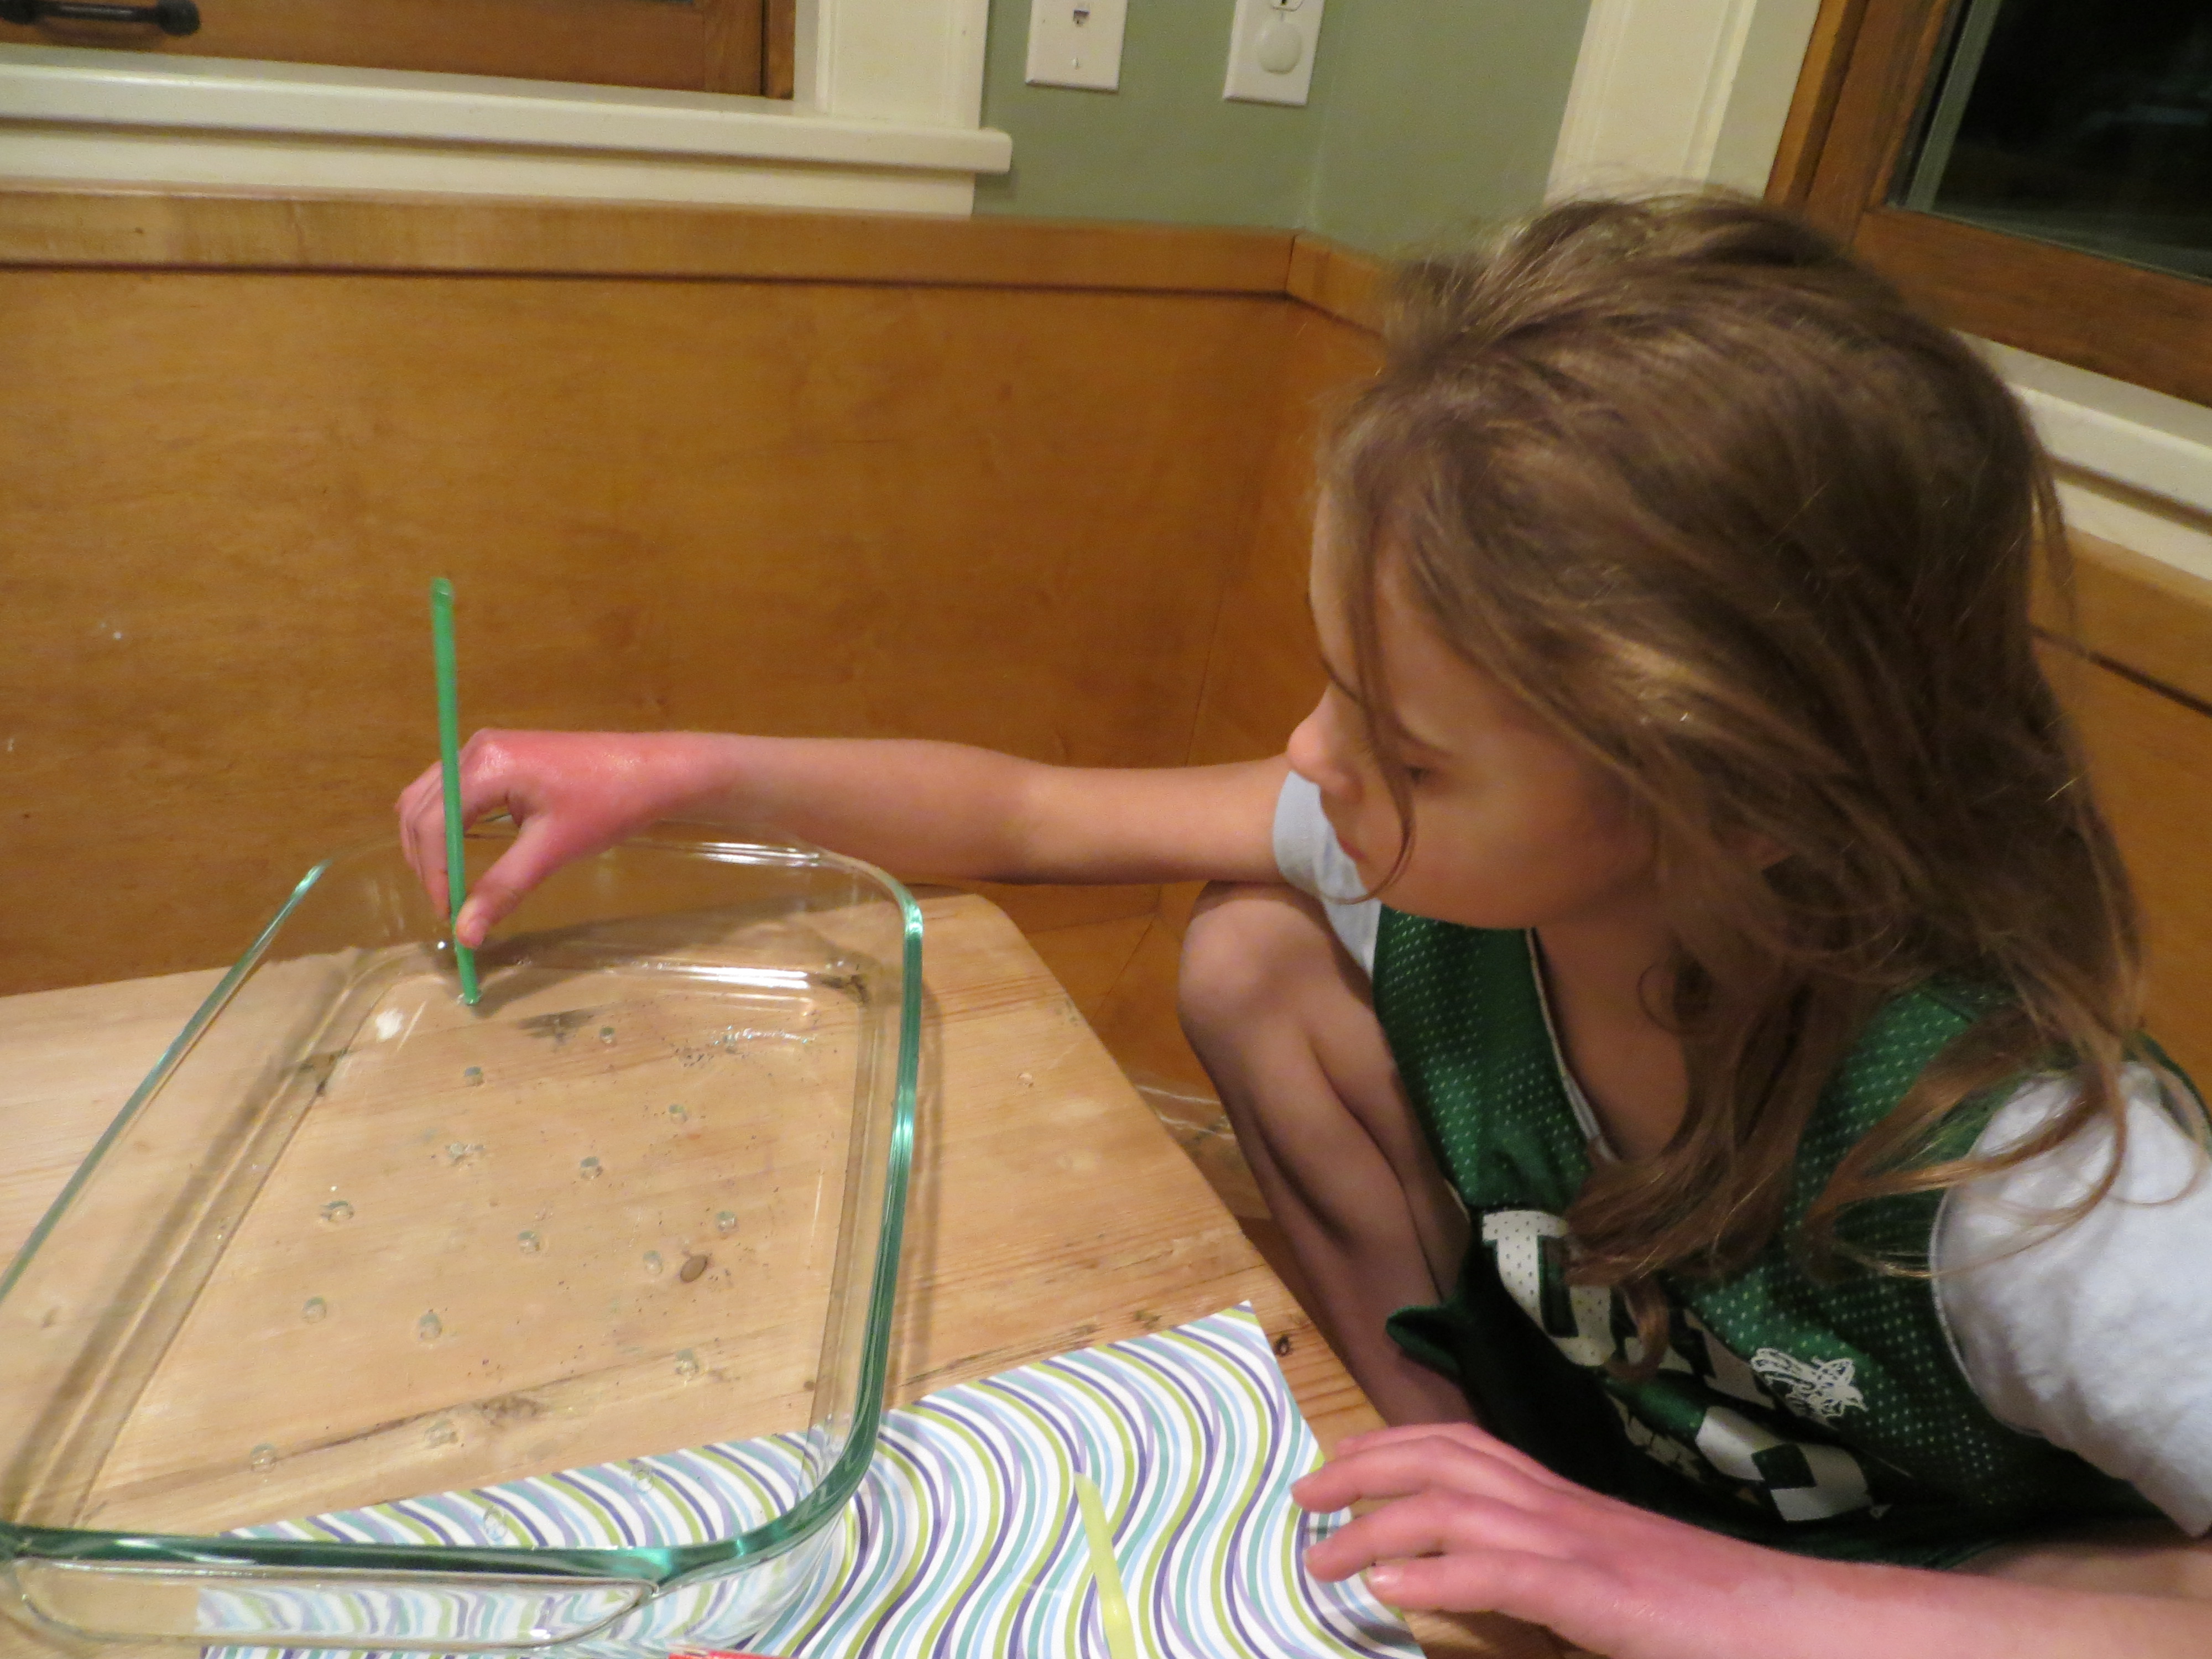
Magic Ice Experiment: Lift an ice cube from a glass of water using only a string and some salt.

Wrapping Paper Egg Drop: Have a contest to see who can engineer the best egg-protecting container from left-over boxes, wrappers and decorations.
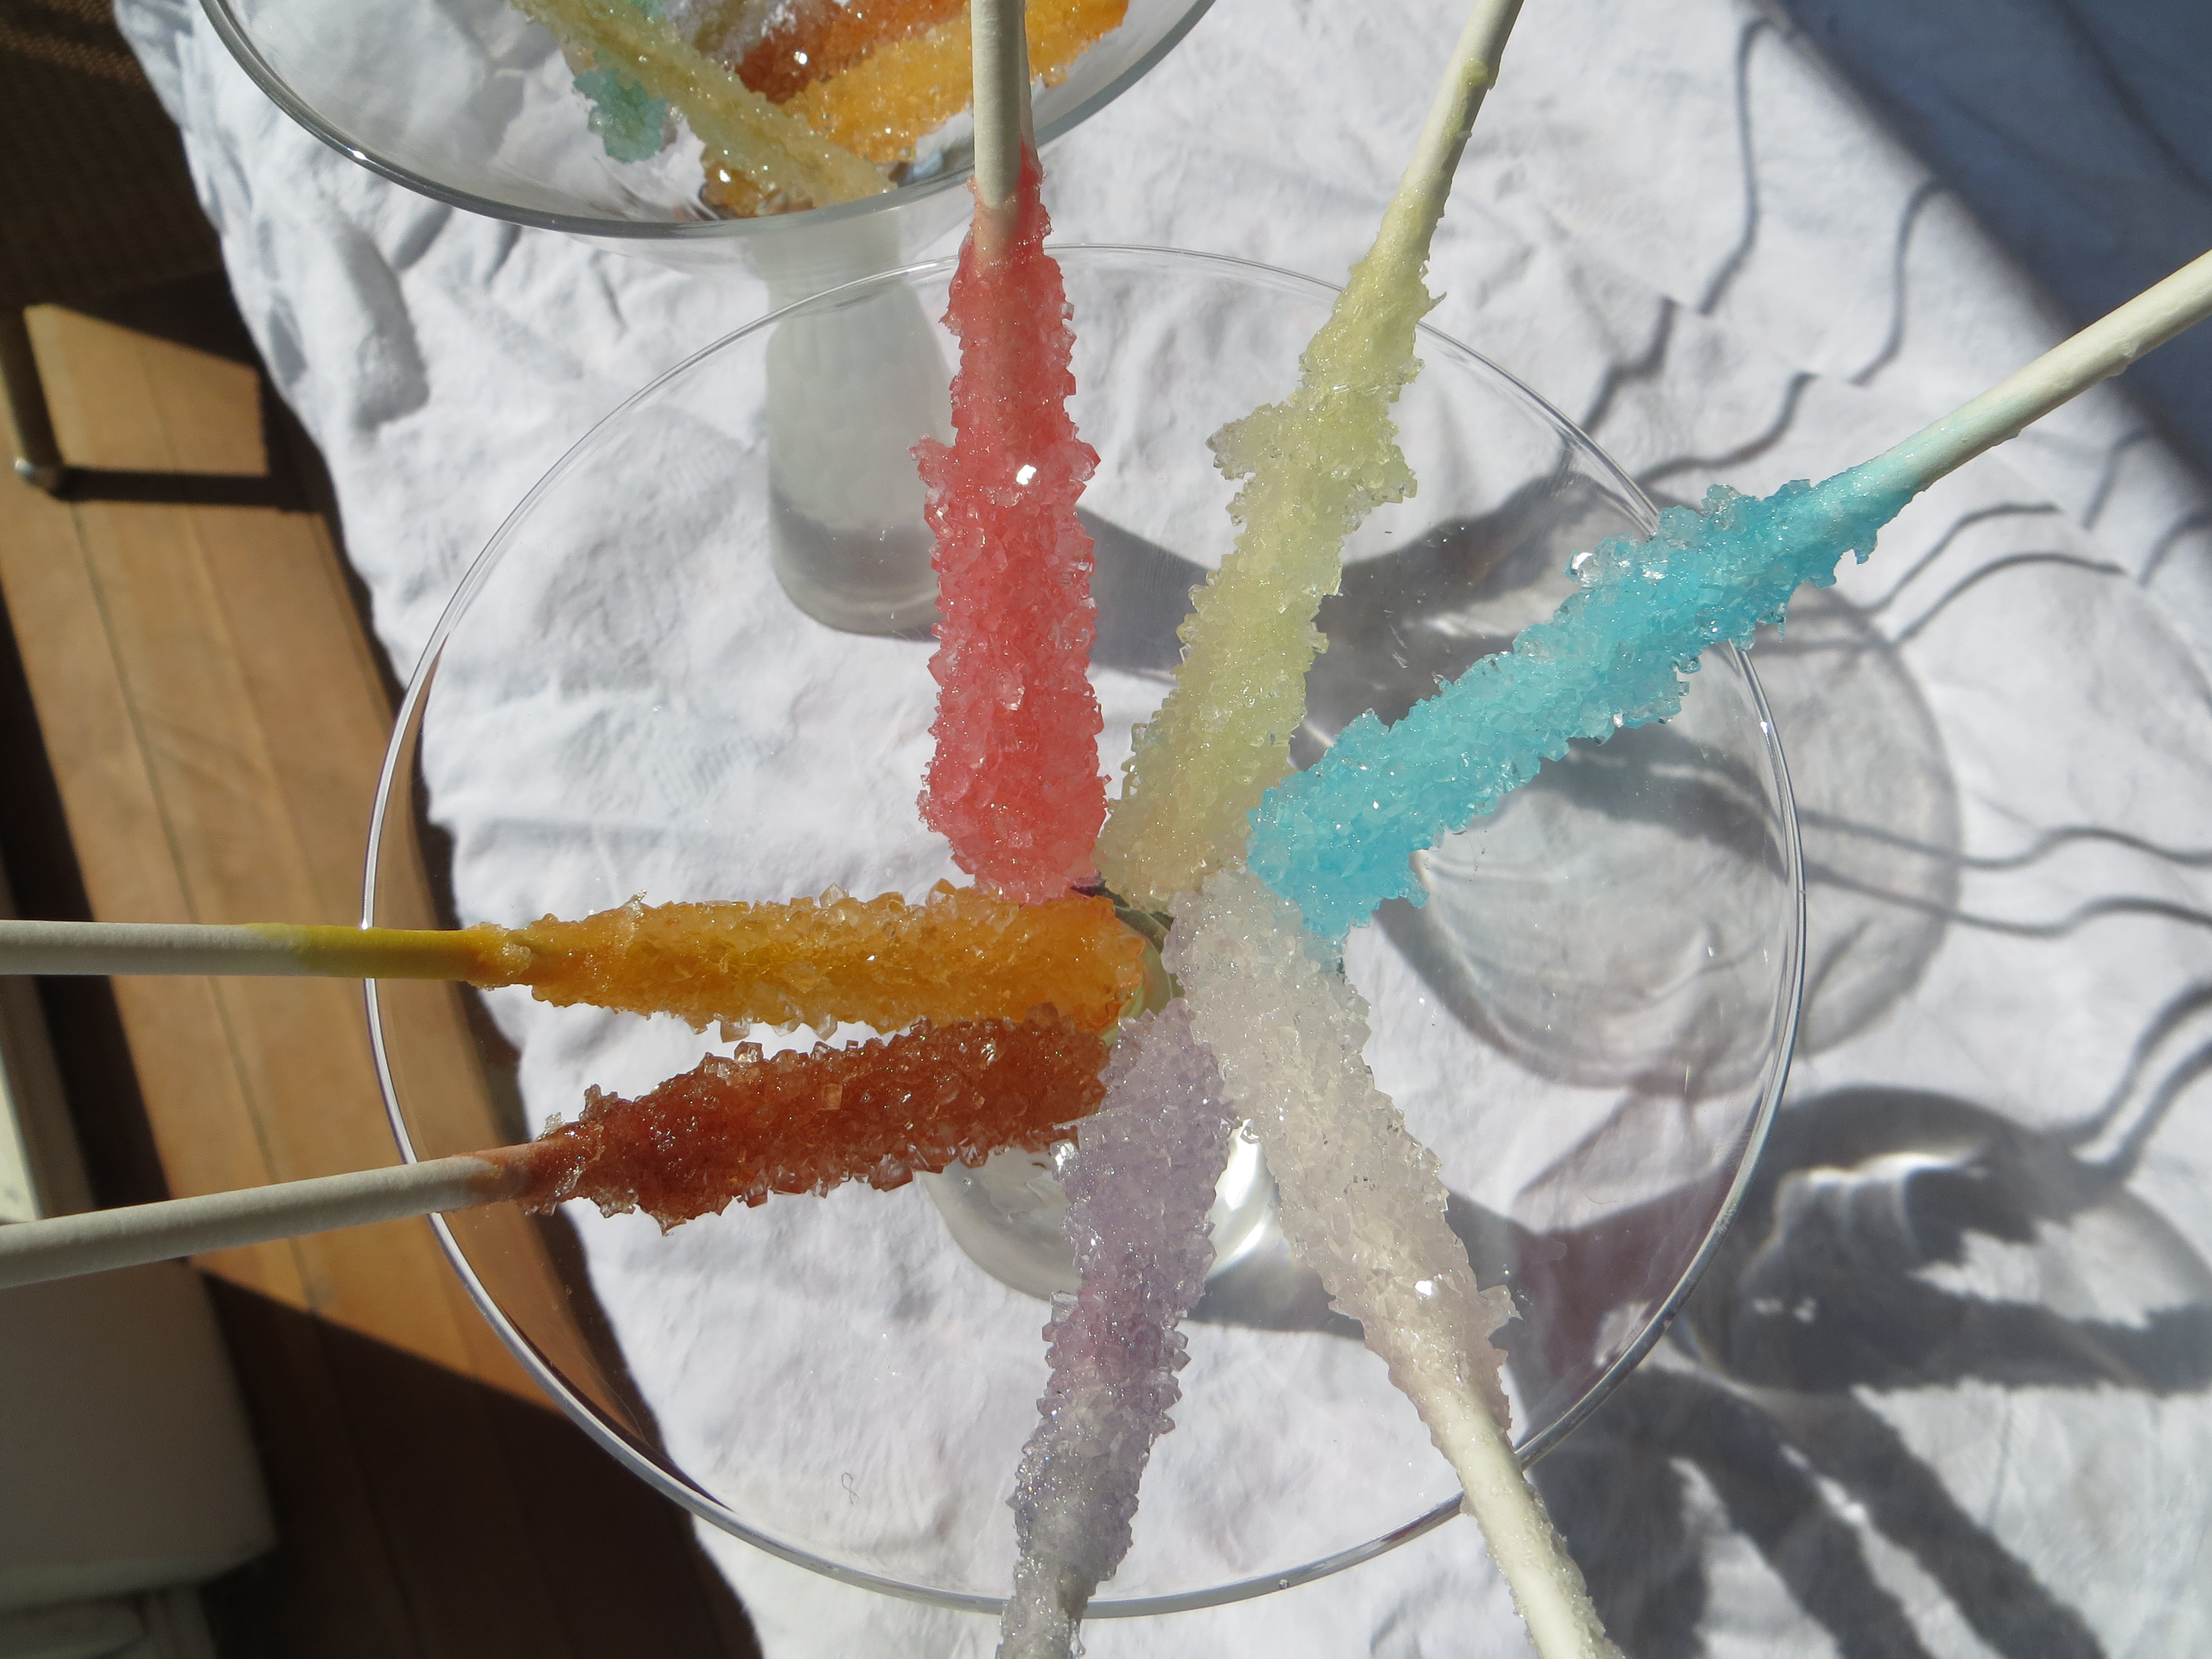
Rock Candy: Grow your own sugar crystals on a stick. What happens if you add a little peppermint oil?
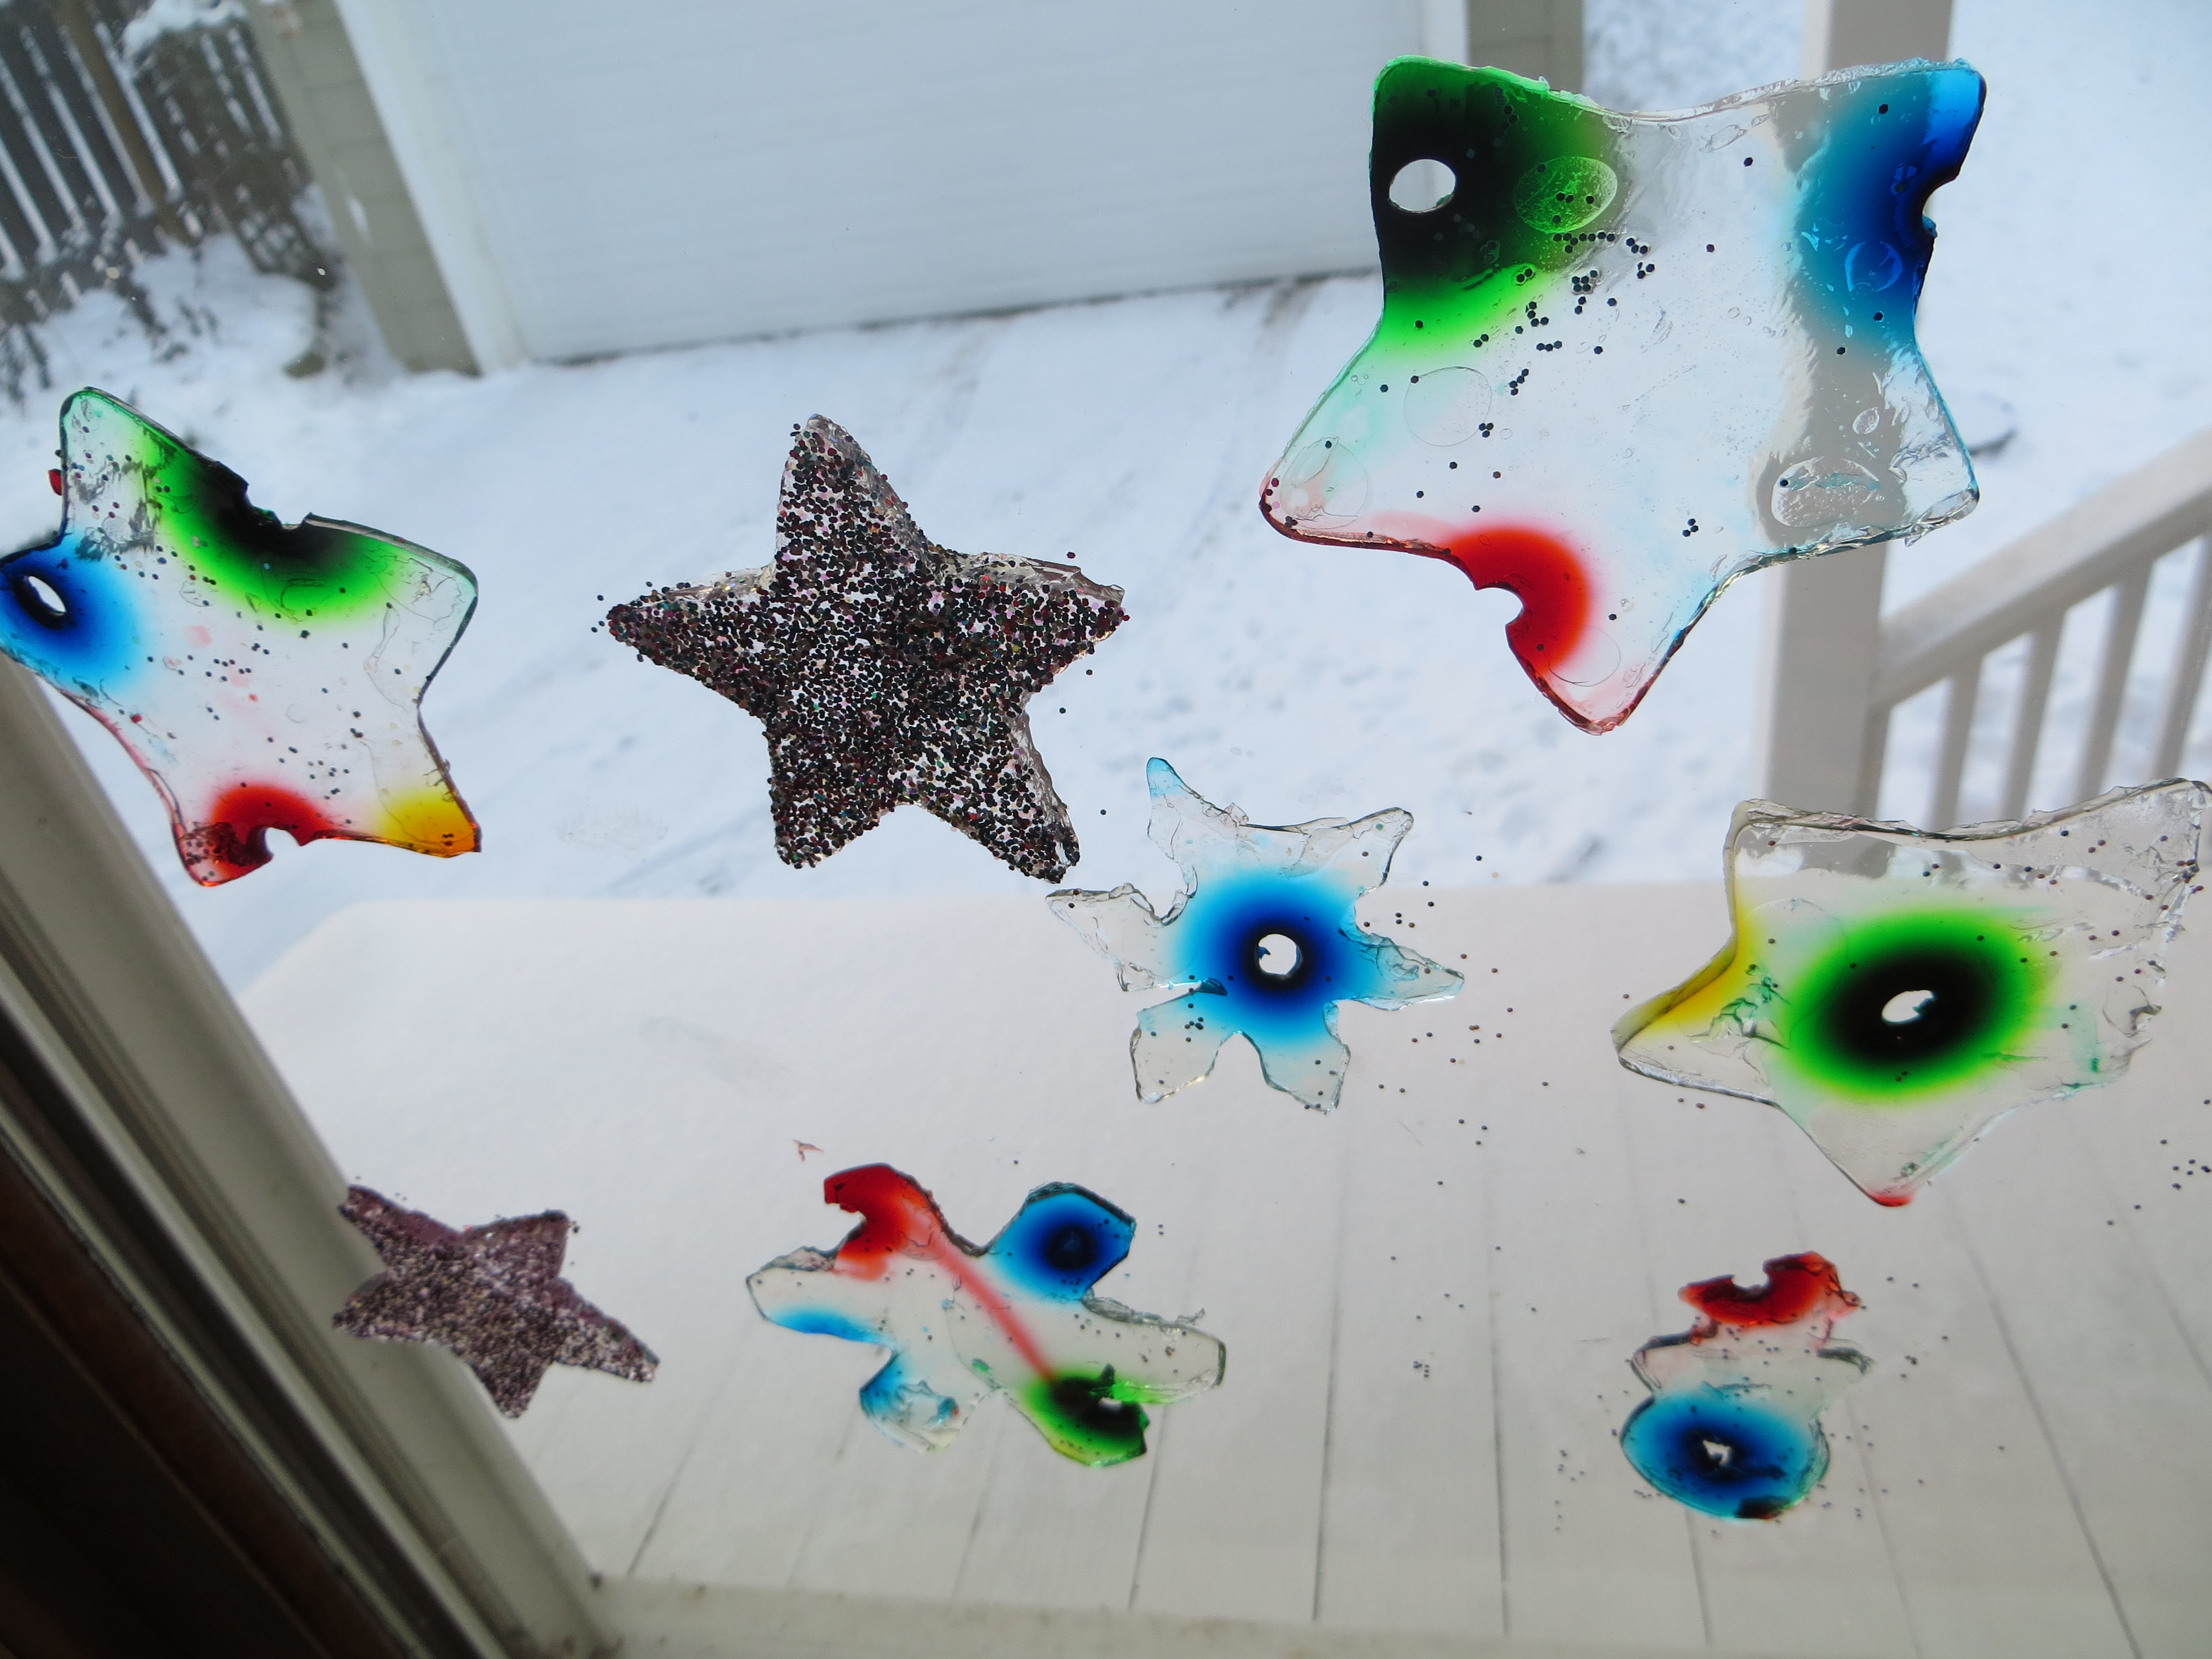
Homemade Sticky Window Gellies (Decorative Diffusion, Floatation and Evaporation Experiment)
- by KitchenPantryScientist
What happens when food coloring molecules move, or DIFFUSE through gelatin, the substance that makes jello jiggle?
This creative science experiment that my kids and I invented lets you play with floatation physics by sprinkling glitter on melted gelatin, watch colorful dyes diffuse to create patterns and then use cookie cutters to punch out sticky window decorations. Water will evaporate from the gelatin, leaving you with paper-thin “stained glass” shapes.
You can watch us making them on Kare11 Sunrise News by clicking here.
You’ll need
-plain, unflavored gelatin from the grocery store or Target
-food coloring
–a drinking straw
-water
-a ruler
-glitter
*You can use the recipe below for two pans around 8×12 inches, or use large, rimmed cookie sheets for your gelatin. For a single pan, cut the recipe in half.
Step 1. Add 6 packs of plain, unflavored gelatin (1 oz or 28 gm) to 4 cups of boiling water. Stir well until all the gelatin has dissolved and remove bubbles with a spoon.
Step 2. Allow gelatin to cool to a kid-safe temperature. Pour the liquid gelatin into two large pans so it’s around 1-1.5 cm deep. It doesn’t have to be exact.
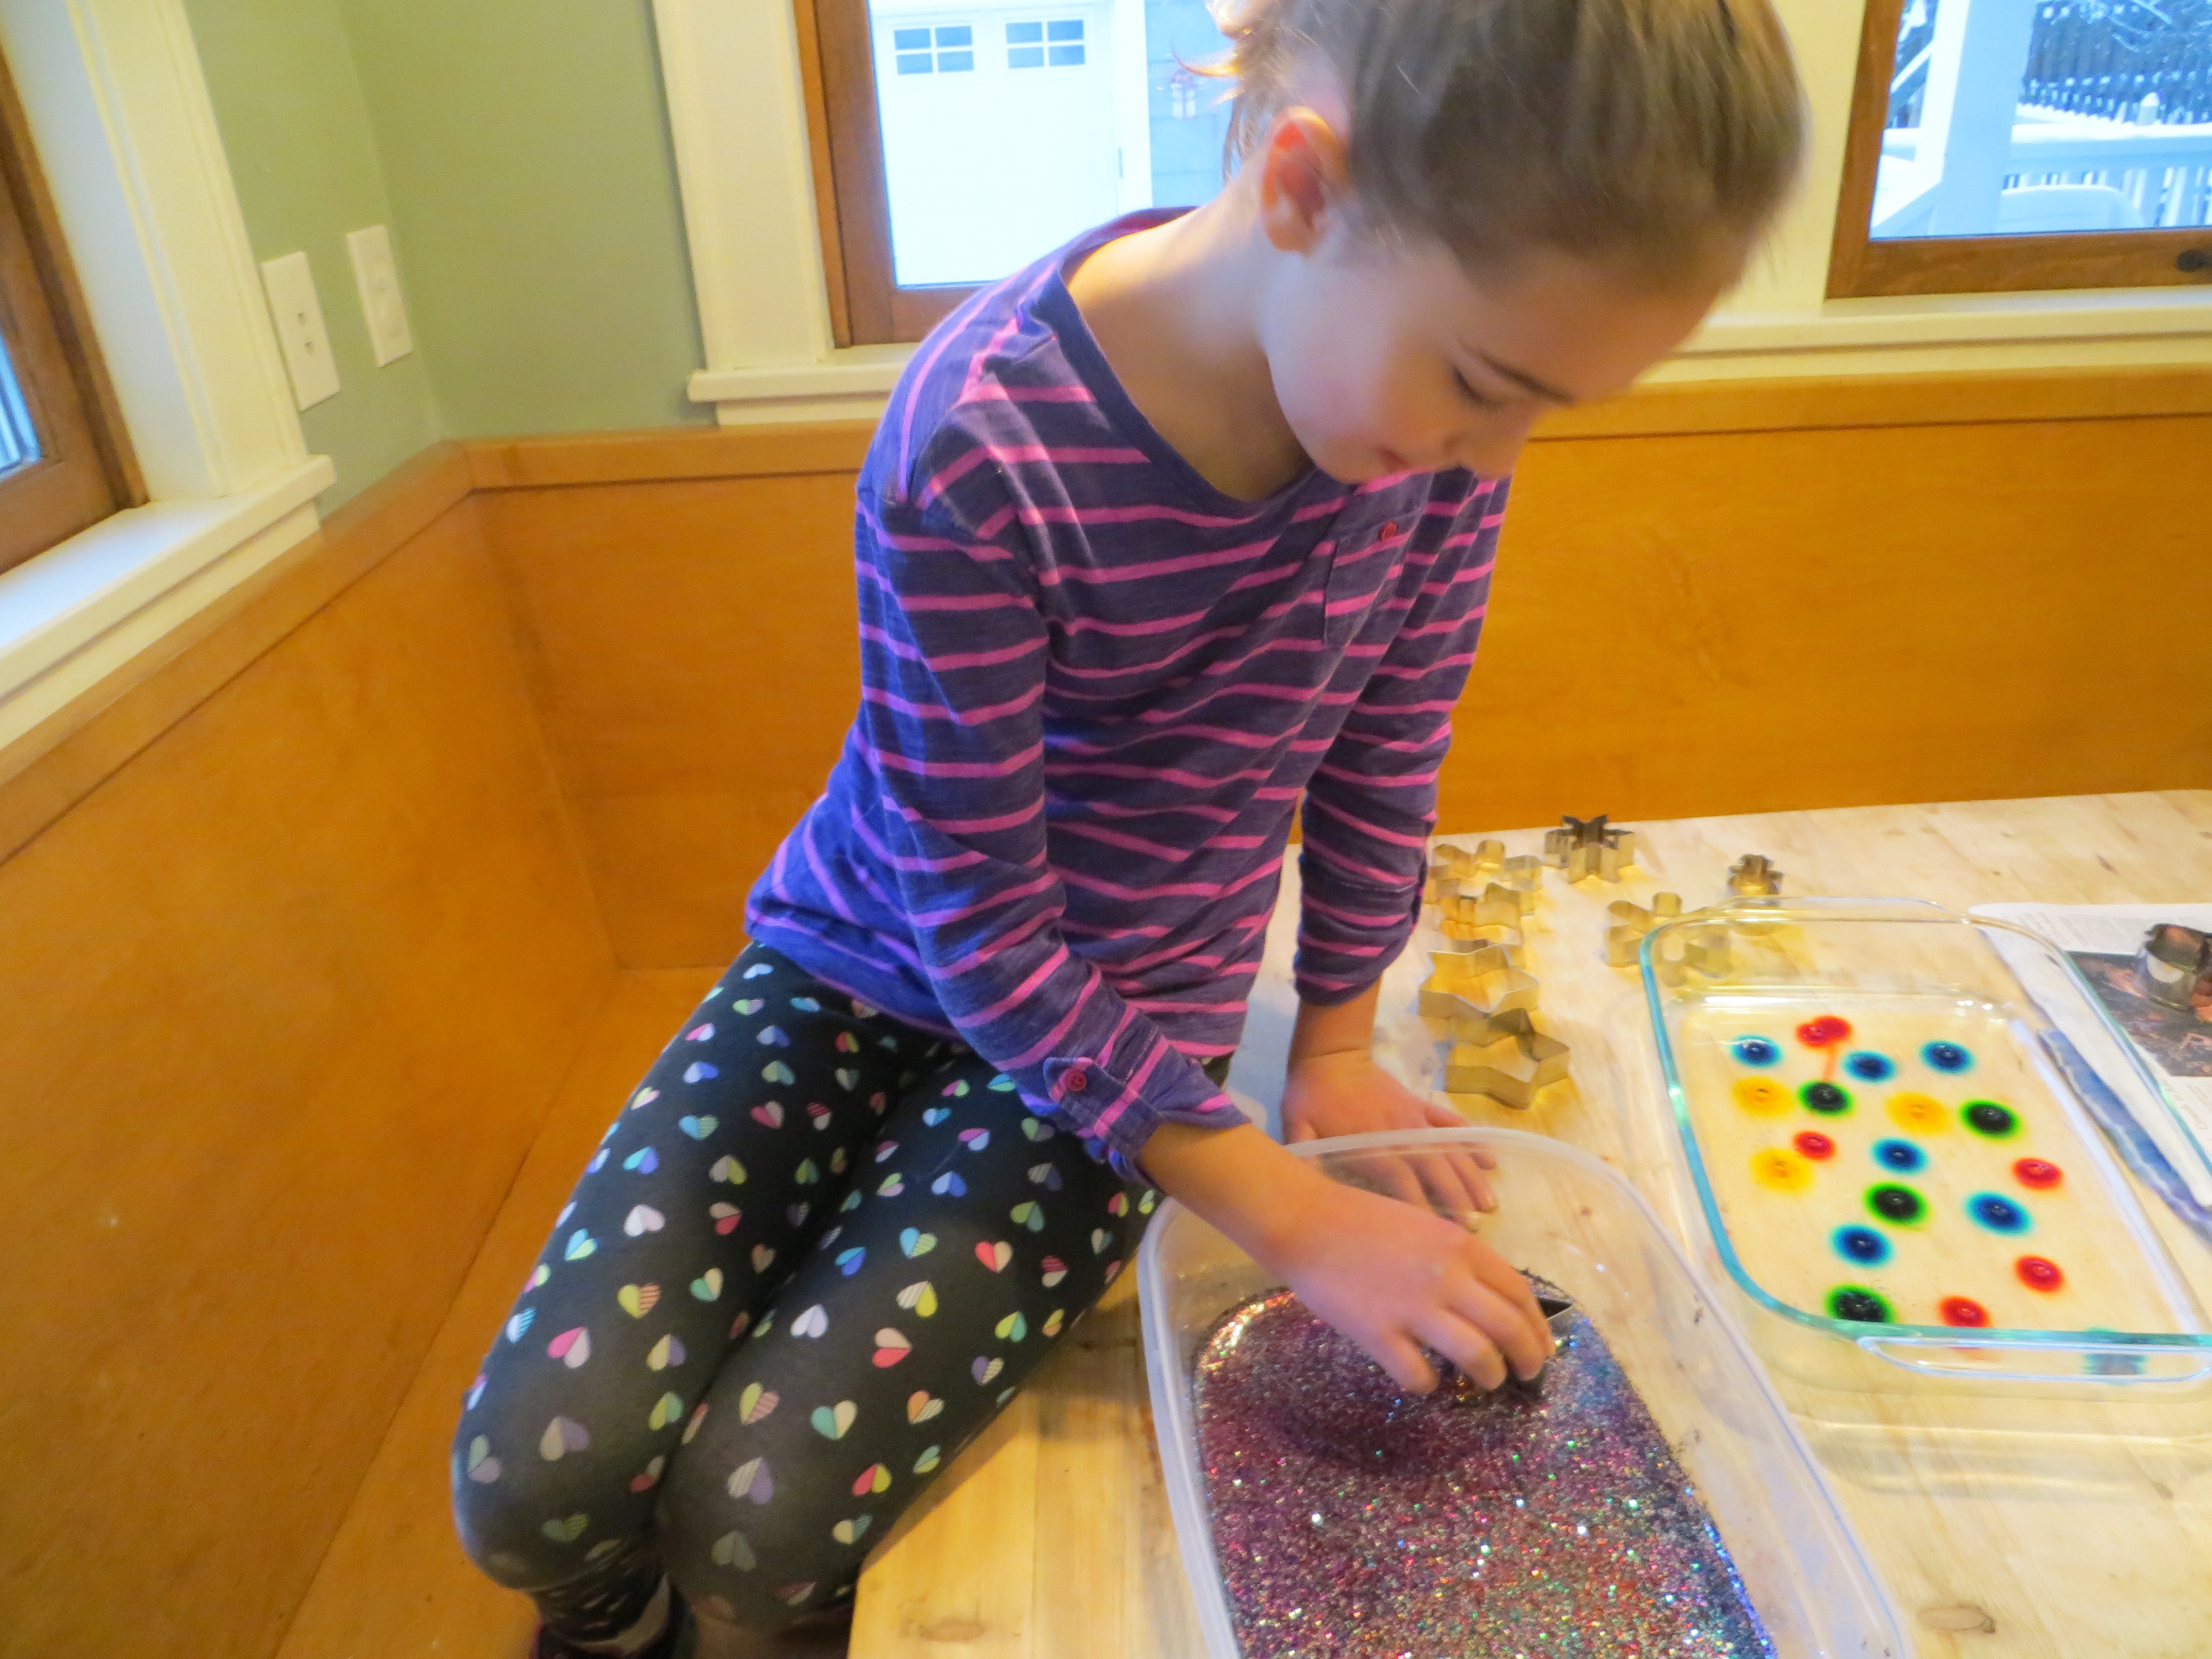
Step 3. Sprinkle glitter on the gelatin in one pan. What happens?

Step 4. Allow the gelatin to harden in both pans.
Step 5. In the pan with no glitter, use a straw to create holes in the gelatin, a few cm apart, scattered across the surface. It works best to poke a straw straight into the gelatin, but not all the way to the bottom. Spin the straw and remove it. Then, use a toothpick or skewer to pull out the gelatin plug you’ve created. This will leave a perfect hole for the food coloring. Very young children may need help.
Step 6. Add a drop of food coloring to each hole in the gelatin.
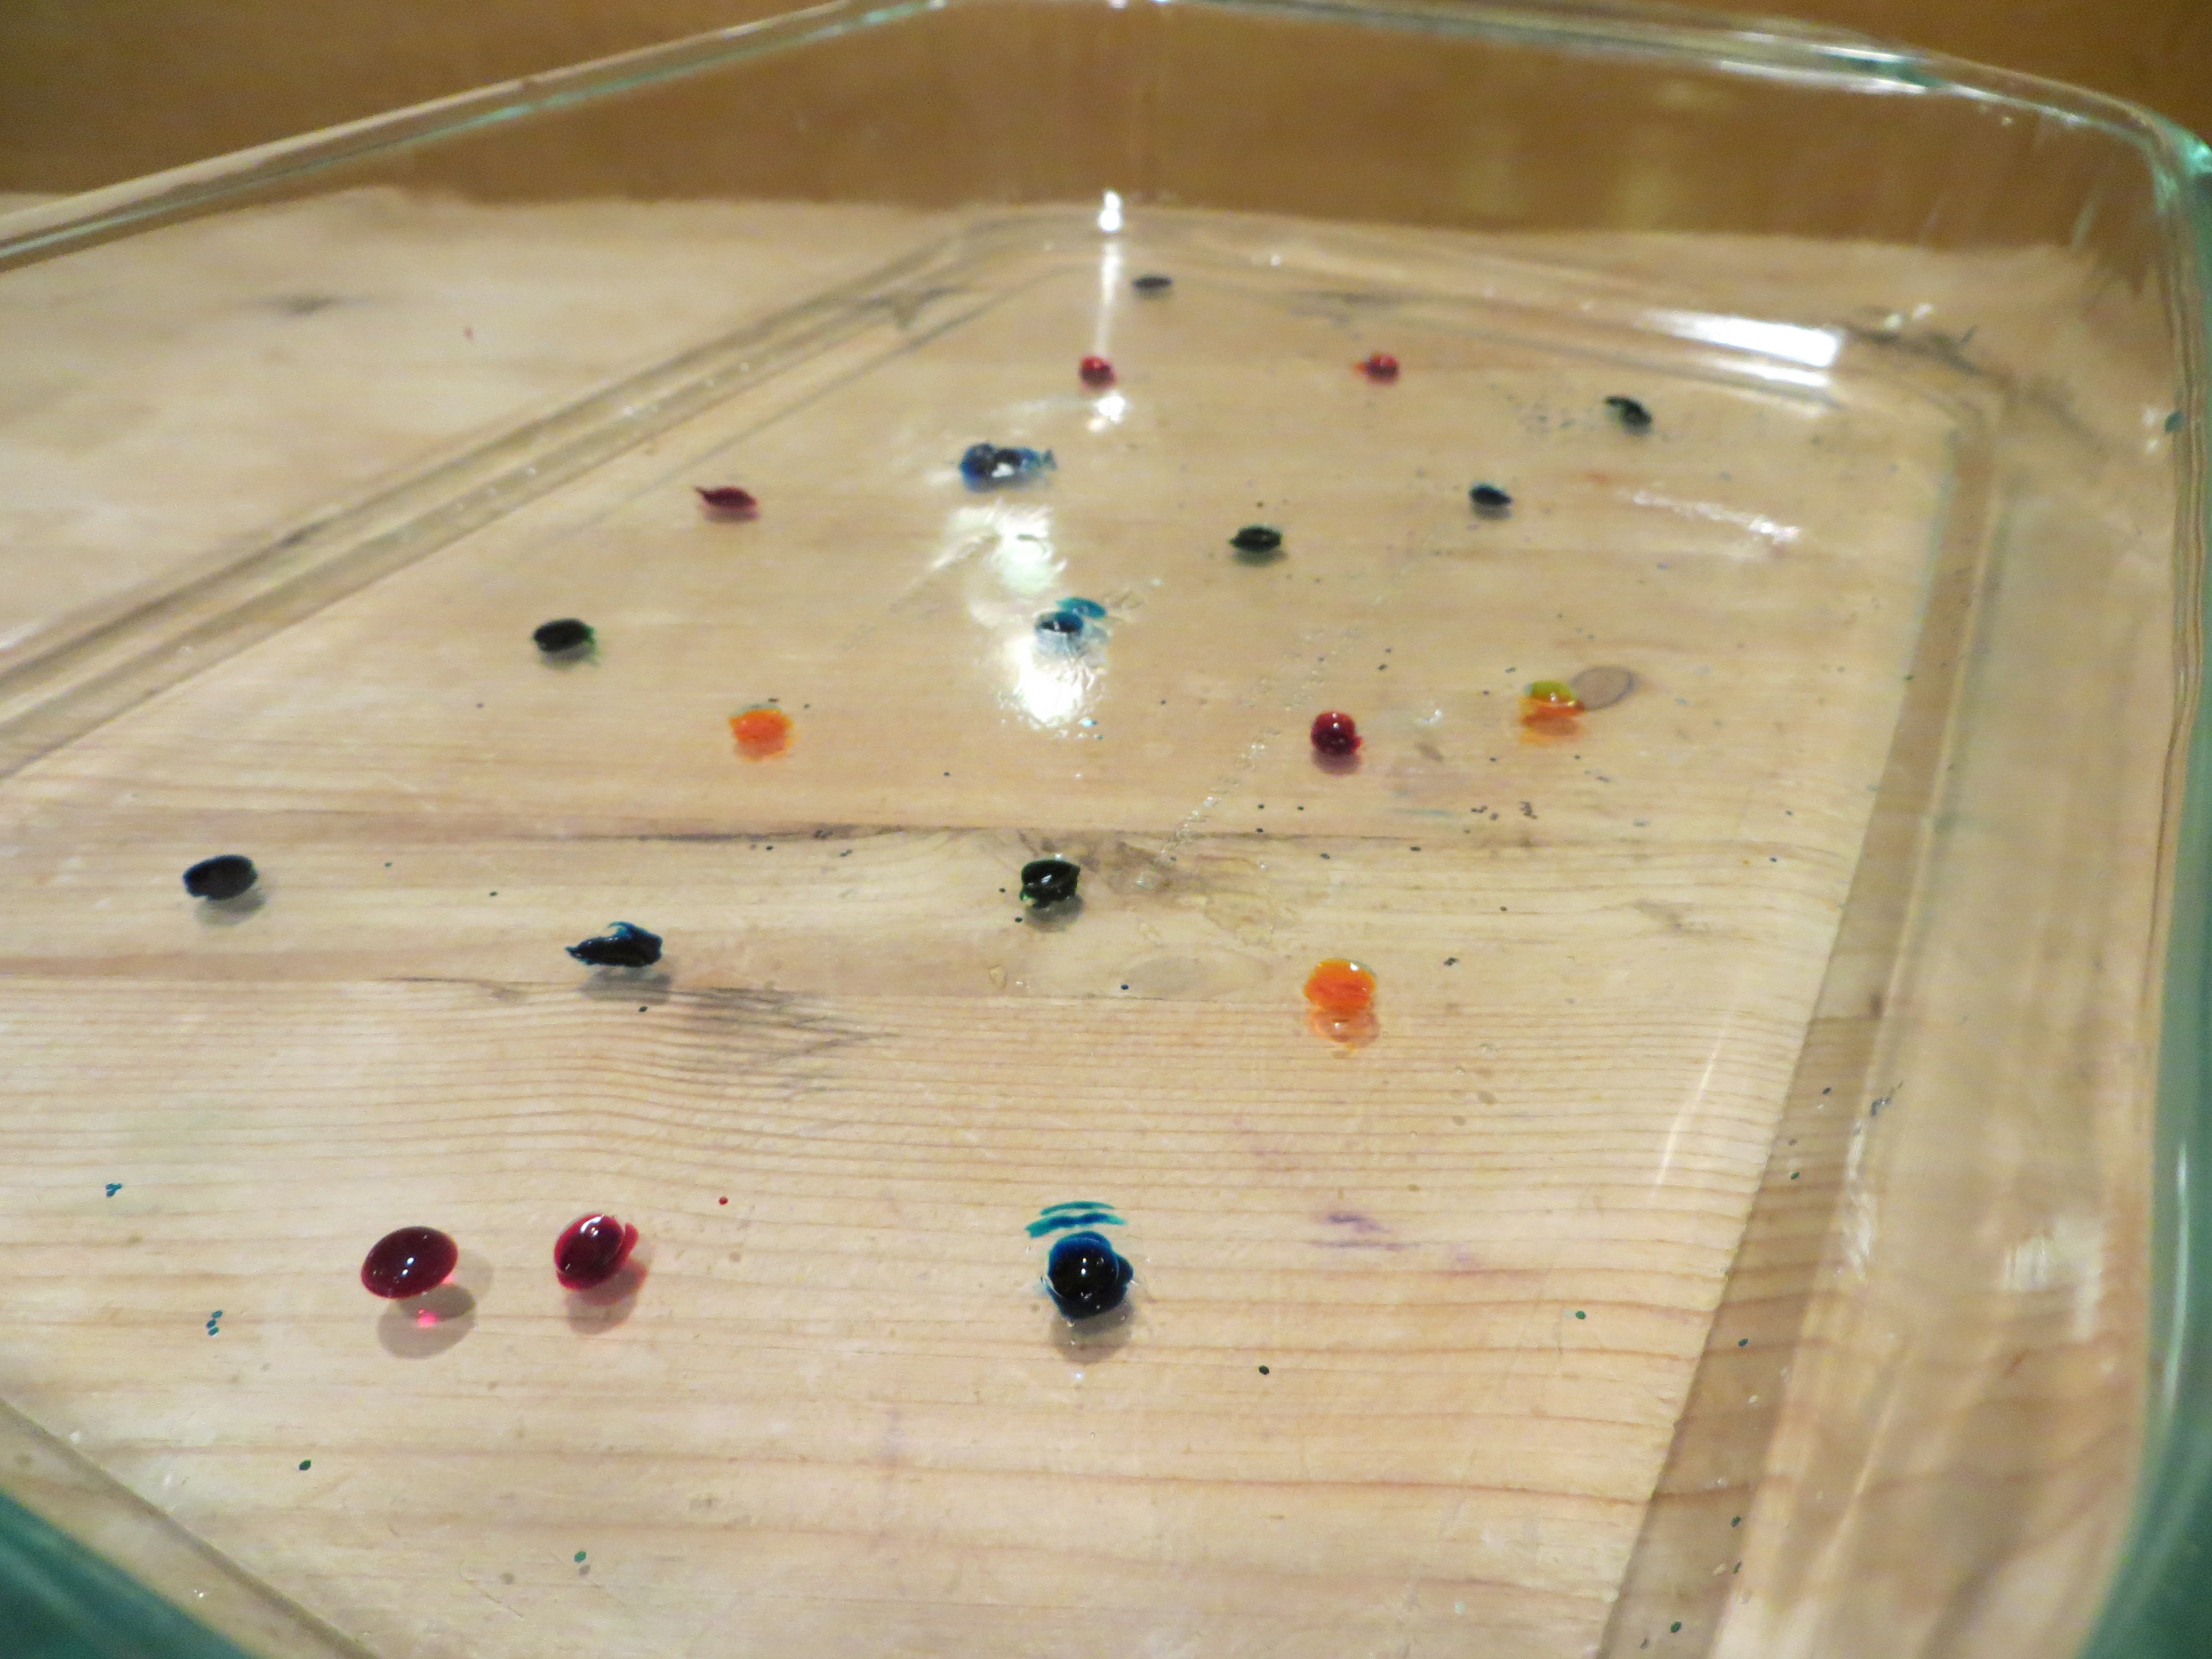
Step 7. Let the gelatin pans sit for 24 hours. Every so often, use a ruler to measure the circle of food coloring molecules as they diffuse (move) into the gelatin around them (read about diffusion at the bottom of this post.) How many cm per hour is the color diffusing? Do some colors diffuse faster than others? If you put one pan in the refrigerator and an identical one at room temperature, does the food coloring diffuse at the same rate?
Step 8. When the food coloring has made colorful circles in the gelatin, use cookie cutters to cut shapes from both pans of gelatin (glitter and food coloring), carefully remove them from the pan with a spatula or your fingers, and use them to decorate a window. (Ask a parent first, since some glitter may find its way to the floor!) Don’t get frustrated if they break, since you can stick them back together on the window.
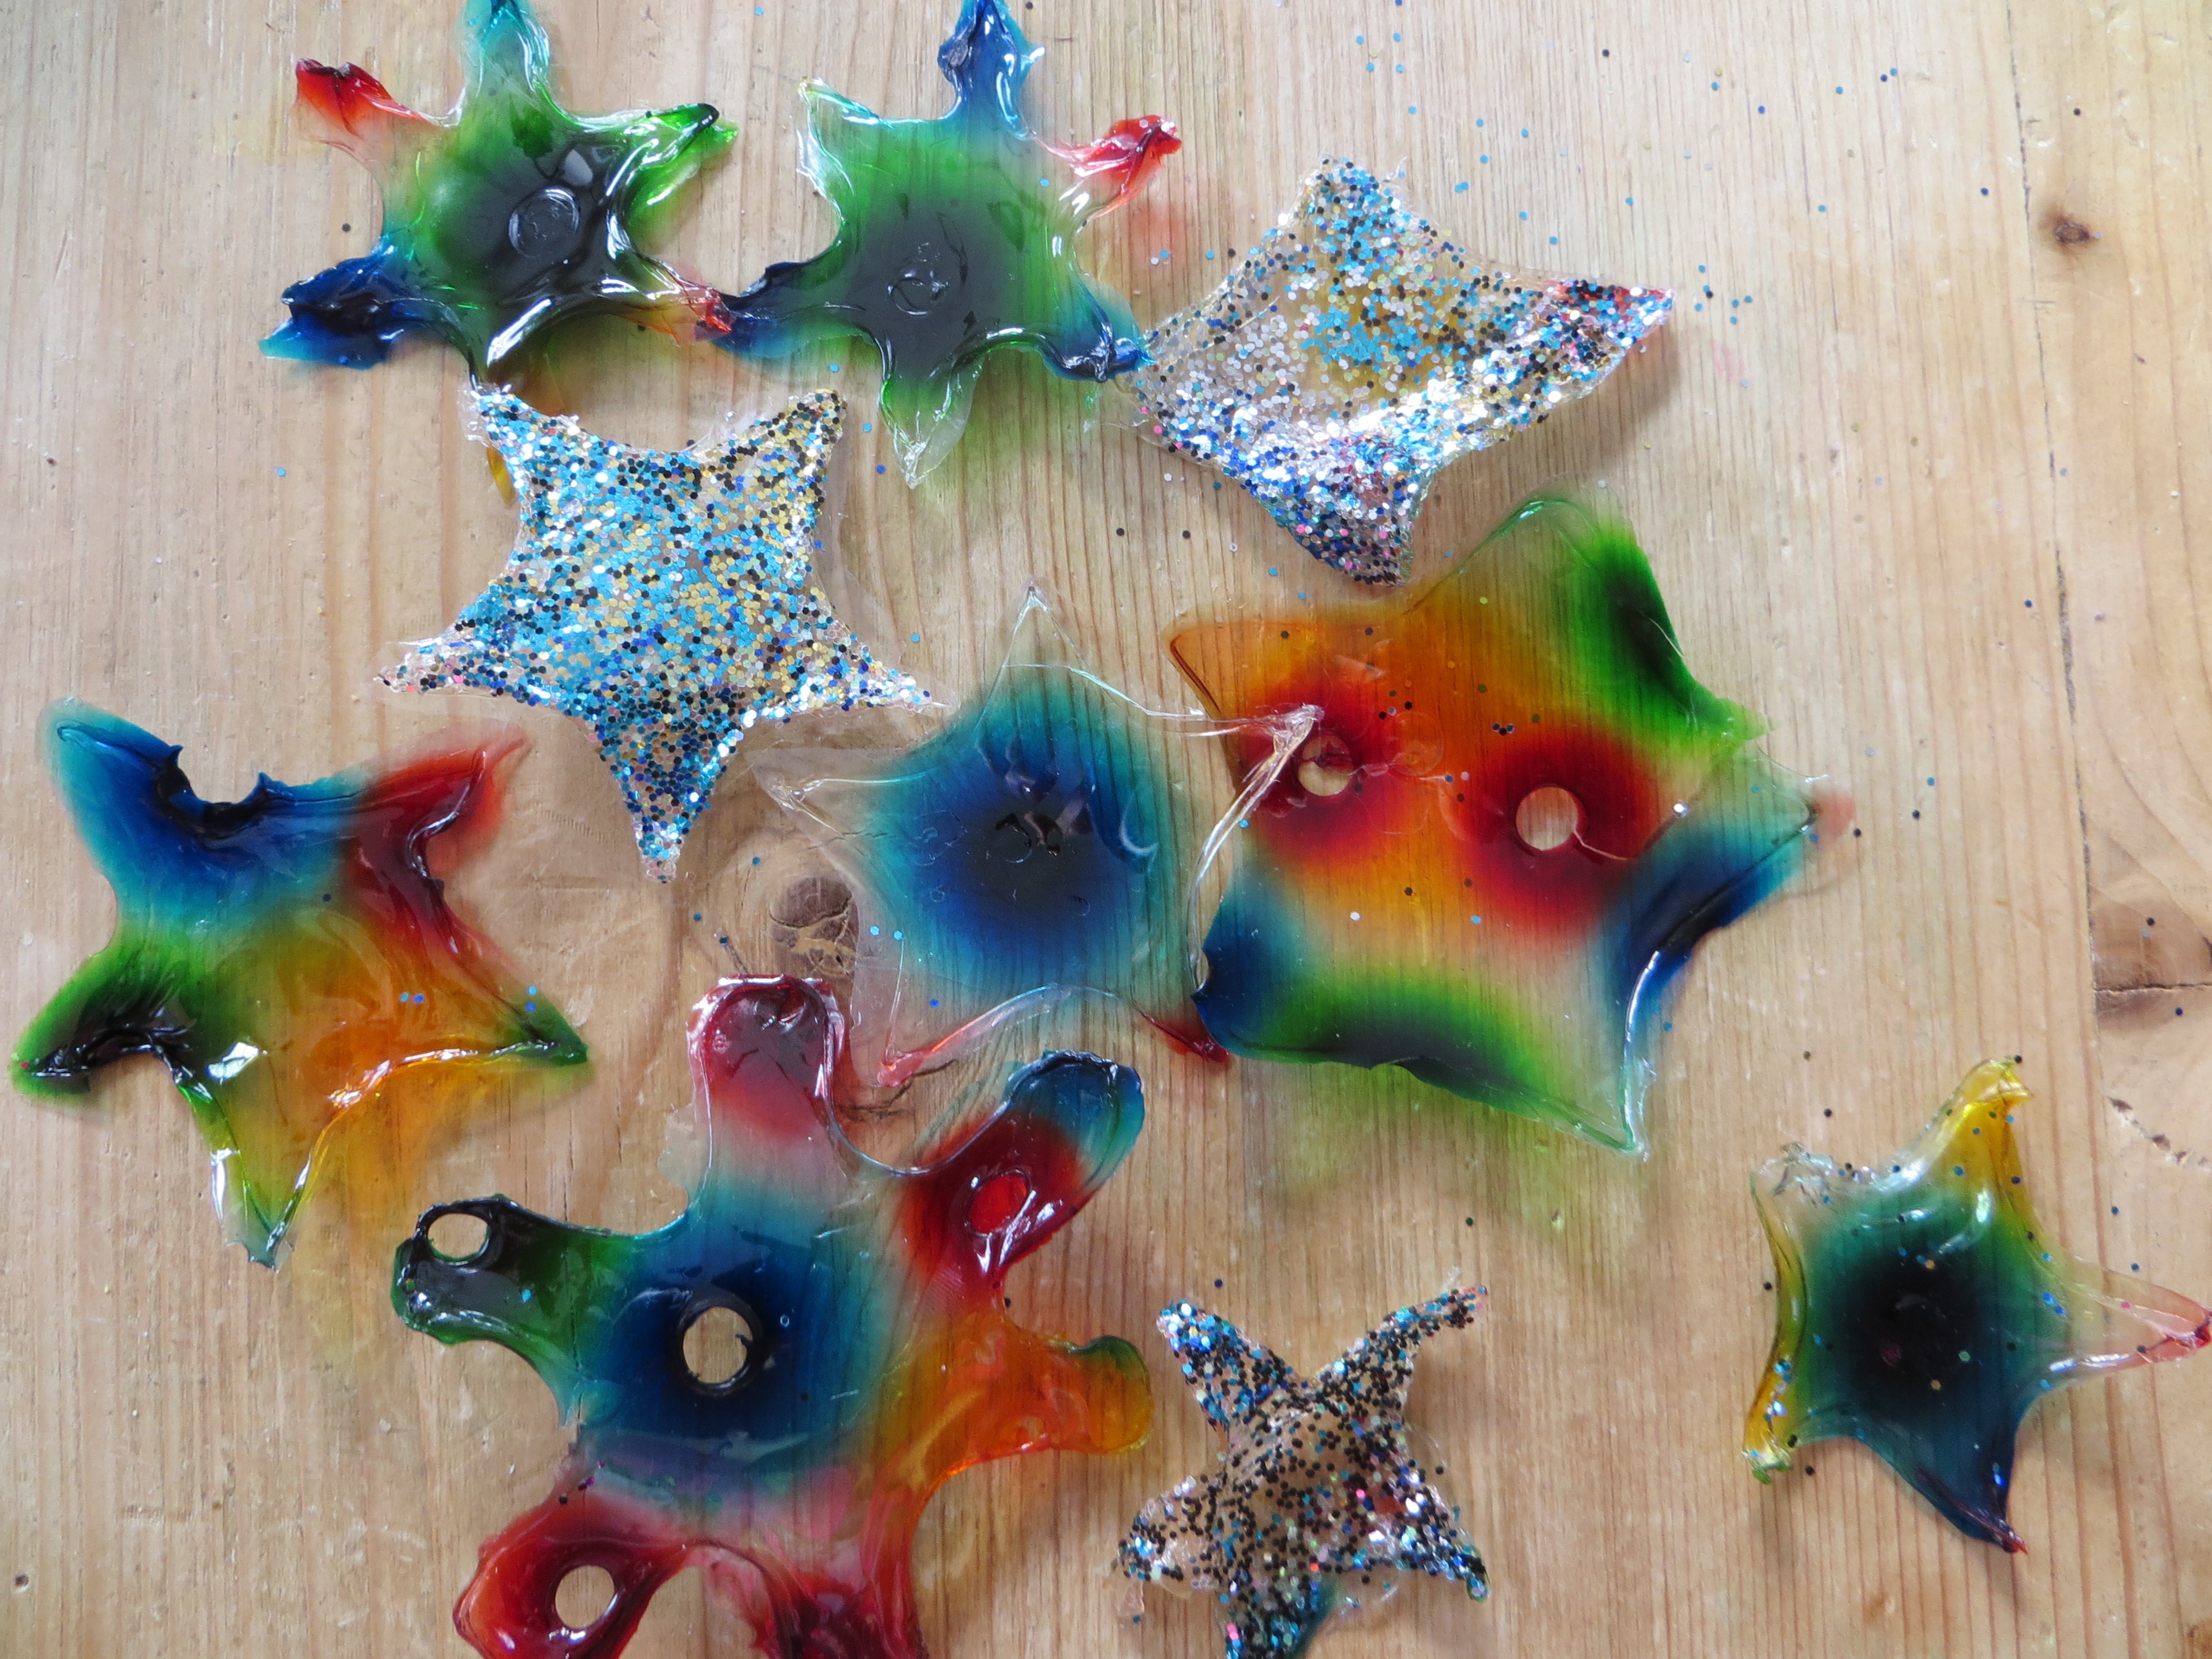
Step 9. Observe your window jellies each day to see what happens when the water evaporates from the gelatin.
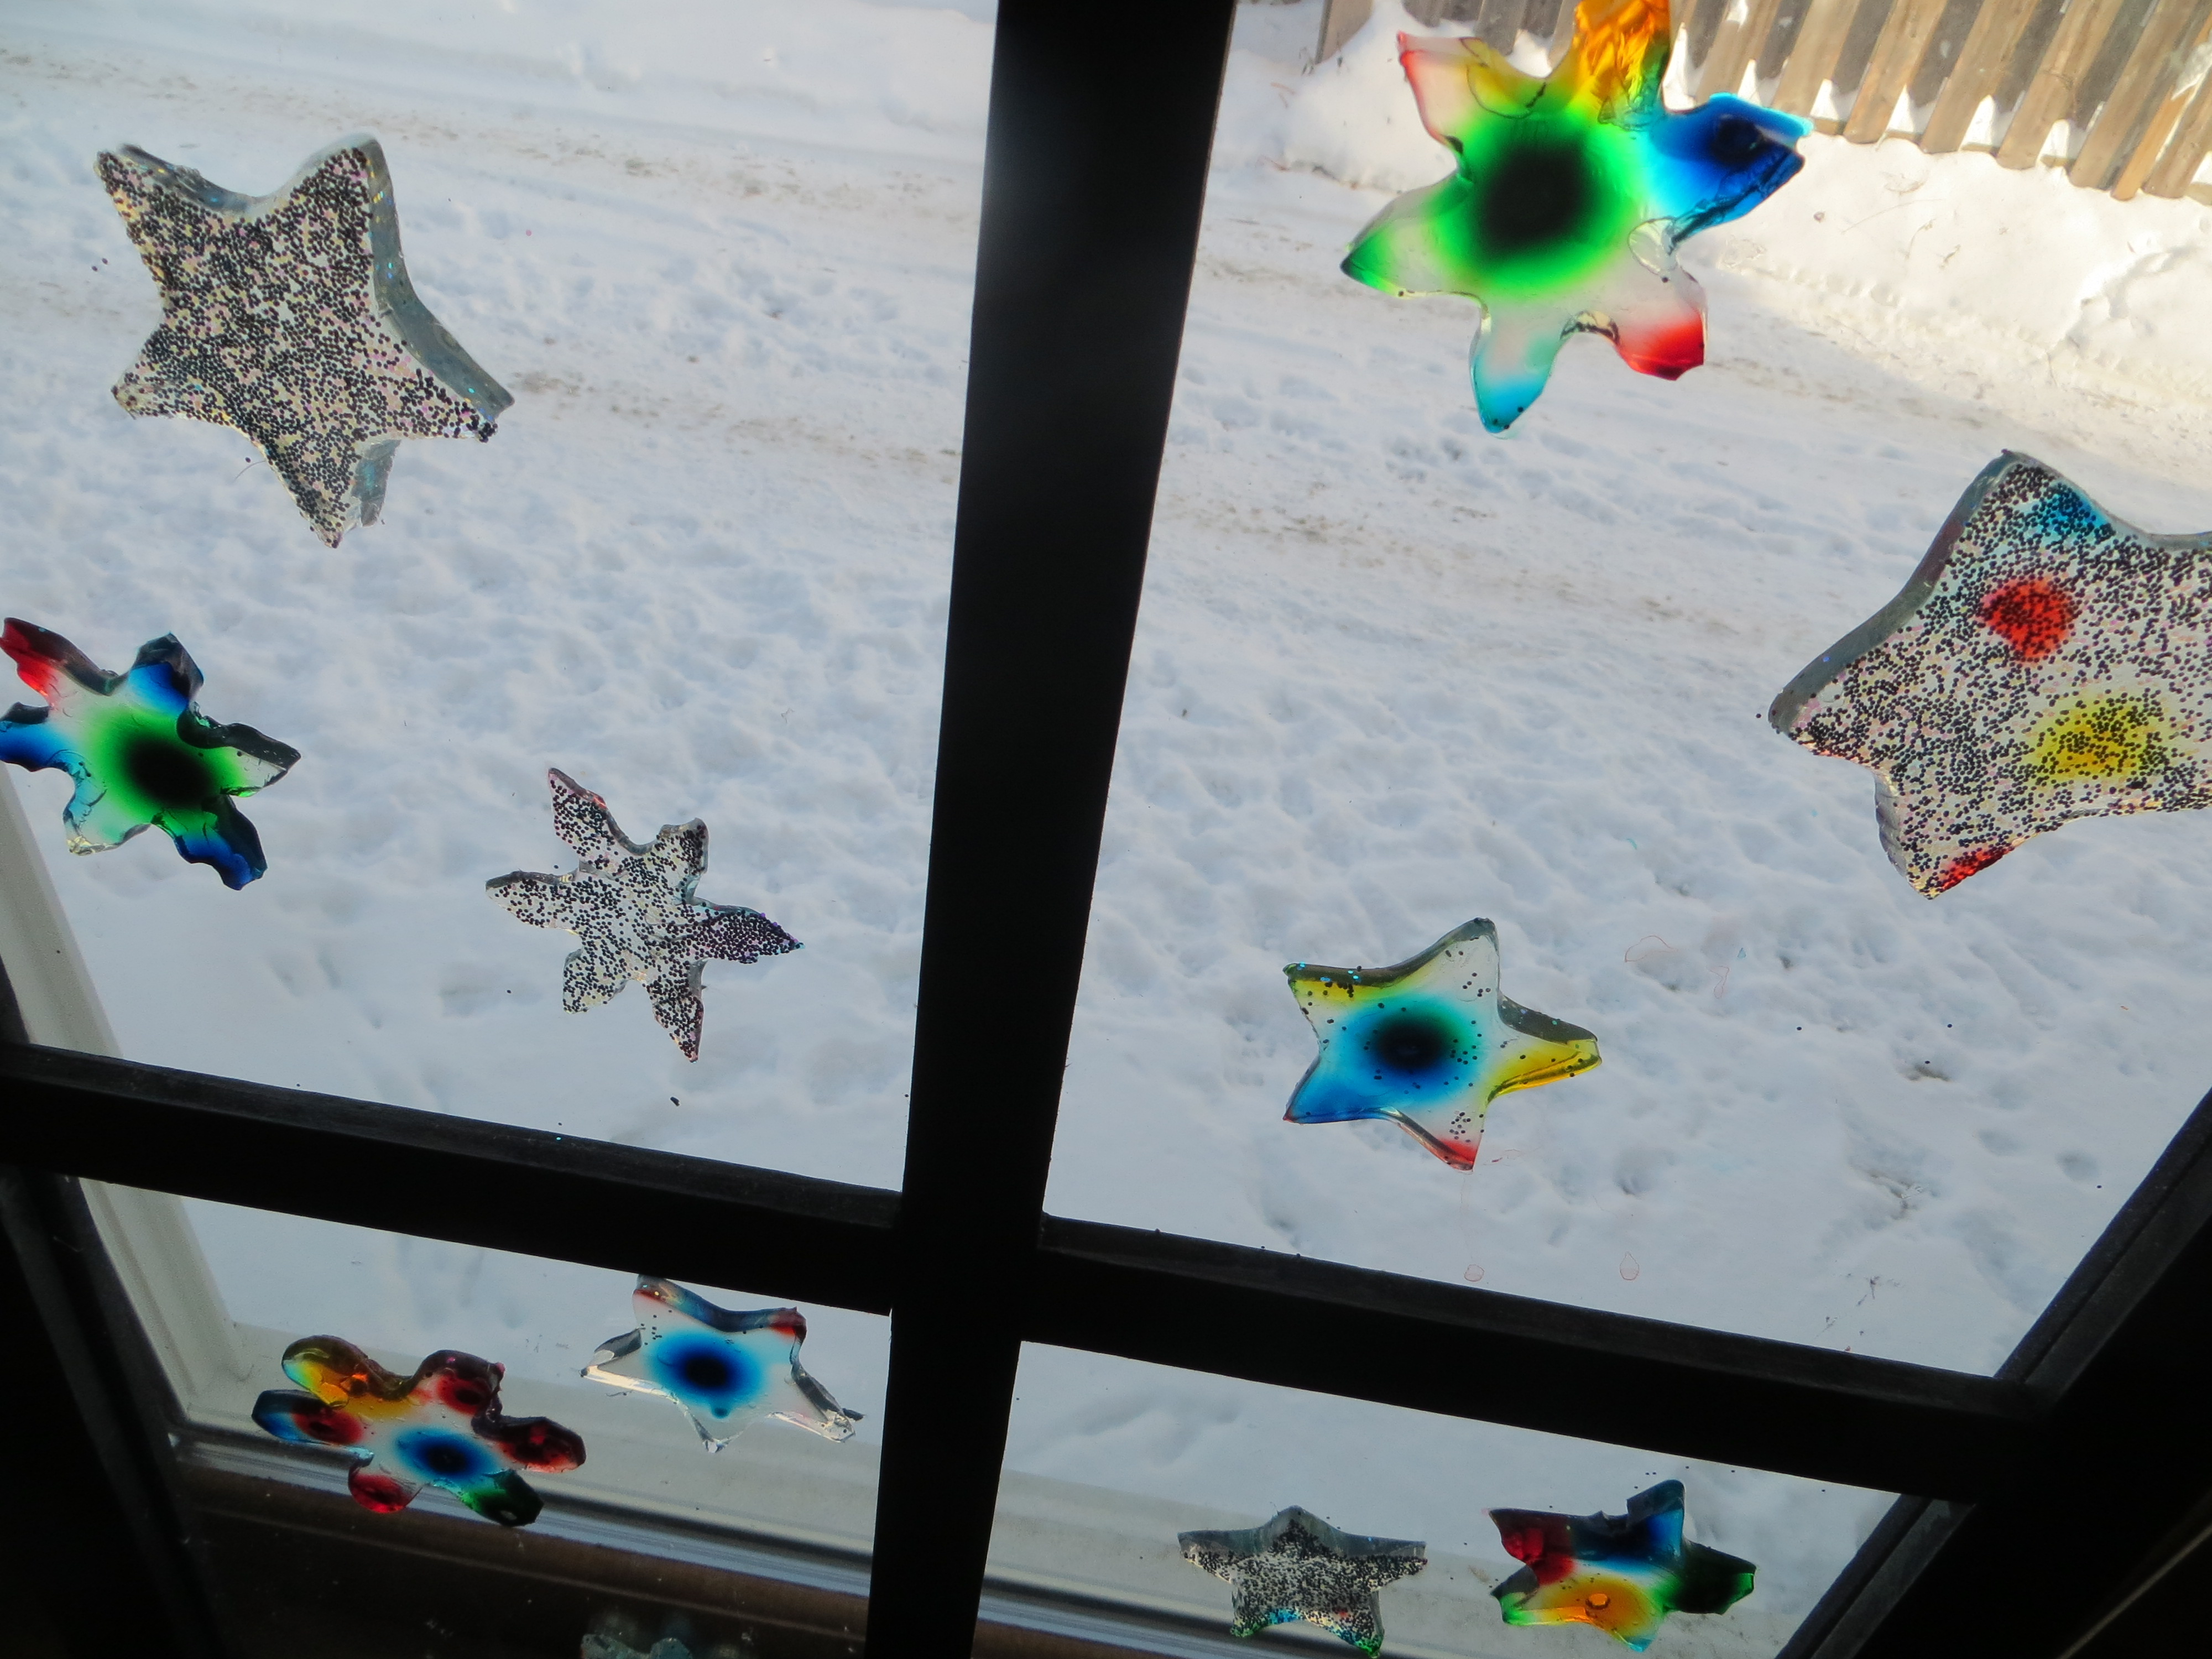 When they’re dry, peel them off the window. Are they thinner than when you started? Why? Can you re-hydrate them by soaking the dried shapes in water?
 The Science Behind the Fun:
Imagine half a box filled with red balls and the other half filled with yellow ones. If you set the box on something that vibrates, the balls will move around randomly, until the red and yellow balls are evenly mixed up.
Scientists call this process, when molecules move from areas of high concentration, where there are lots of other similar molecules, to areas of low concentration, where there are fewer similar molecules DIFFUSION. When the molecules are evenly spread throughout the space, it is called EQUILIBRIUM.
Lots of things can affect how fast molecules diffuse, including temperature. When molecules are heated up, they vibrate faster and move around faster, which helps them reach equilibrium more quickly than they would if it were cold. Diffusion takes place in gases like air, liquids like water, and even solids (semiconductors for computers are made by diffusing elements into one another.)
Think about the way pollutants move from one place to another through air, water and even soil. Or consider how bacteria are able to take up the substances they need to thrive. Your body has to transfer oxygen, carbon dioxide and water by processes involving diffusion as well.
Why does glitter float on gelatin? An object’s density and it’s shape help determine its buoyancy, or whether it will float or sink. Density is an object’s mass (loosely defined as its weight) divided by its volume (how much space it takes up.) A famous scientist named Archimedes discovered that any floating object displaces its own weight of fluid. Boats have to be designed in shapes that will displace, or push, at least as much water as they weigh in order to float.
For example, a 100 pound block of metal won’t move much water out of the way, and sinks fast since it’s denser than water. However , a 100 pound block of metal reshaped into a boat pushes more water out of the way and will float if you design it well!
What is the shape of your glitter? Does it float or sink in the gelatin?
Here’s a video I made for KidScience app that demonstrates how to make window gellies
Credit: My 11 YO daughter came up with the brilliant idea to stick this experiment on windows. I was just going to dry out the gelatin shapes to make ornaments. Kids are often way more creative than adults!
Egg-Eating Monsters
- by KitchenPantryScientist

You’ll need:
-a glass bottle, like a juice bottle, whose neck is a little smaller than a hard-boiled egg
-small or medium-sized hard-boiled eggs, peeled
-birthday candles
-a long match or lighter
1. Decorate your bottle to look like a monster, with the mouth of the bottle on the mouth-end of the monster
2. Put one or two birthday candles in the wide end of a hard-boiled egg.
3. Light the candles and hold them under the inverted bottle to warm the air inside.
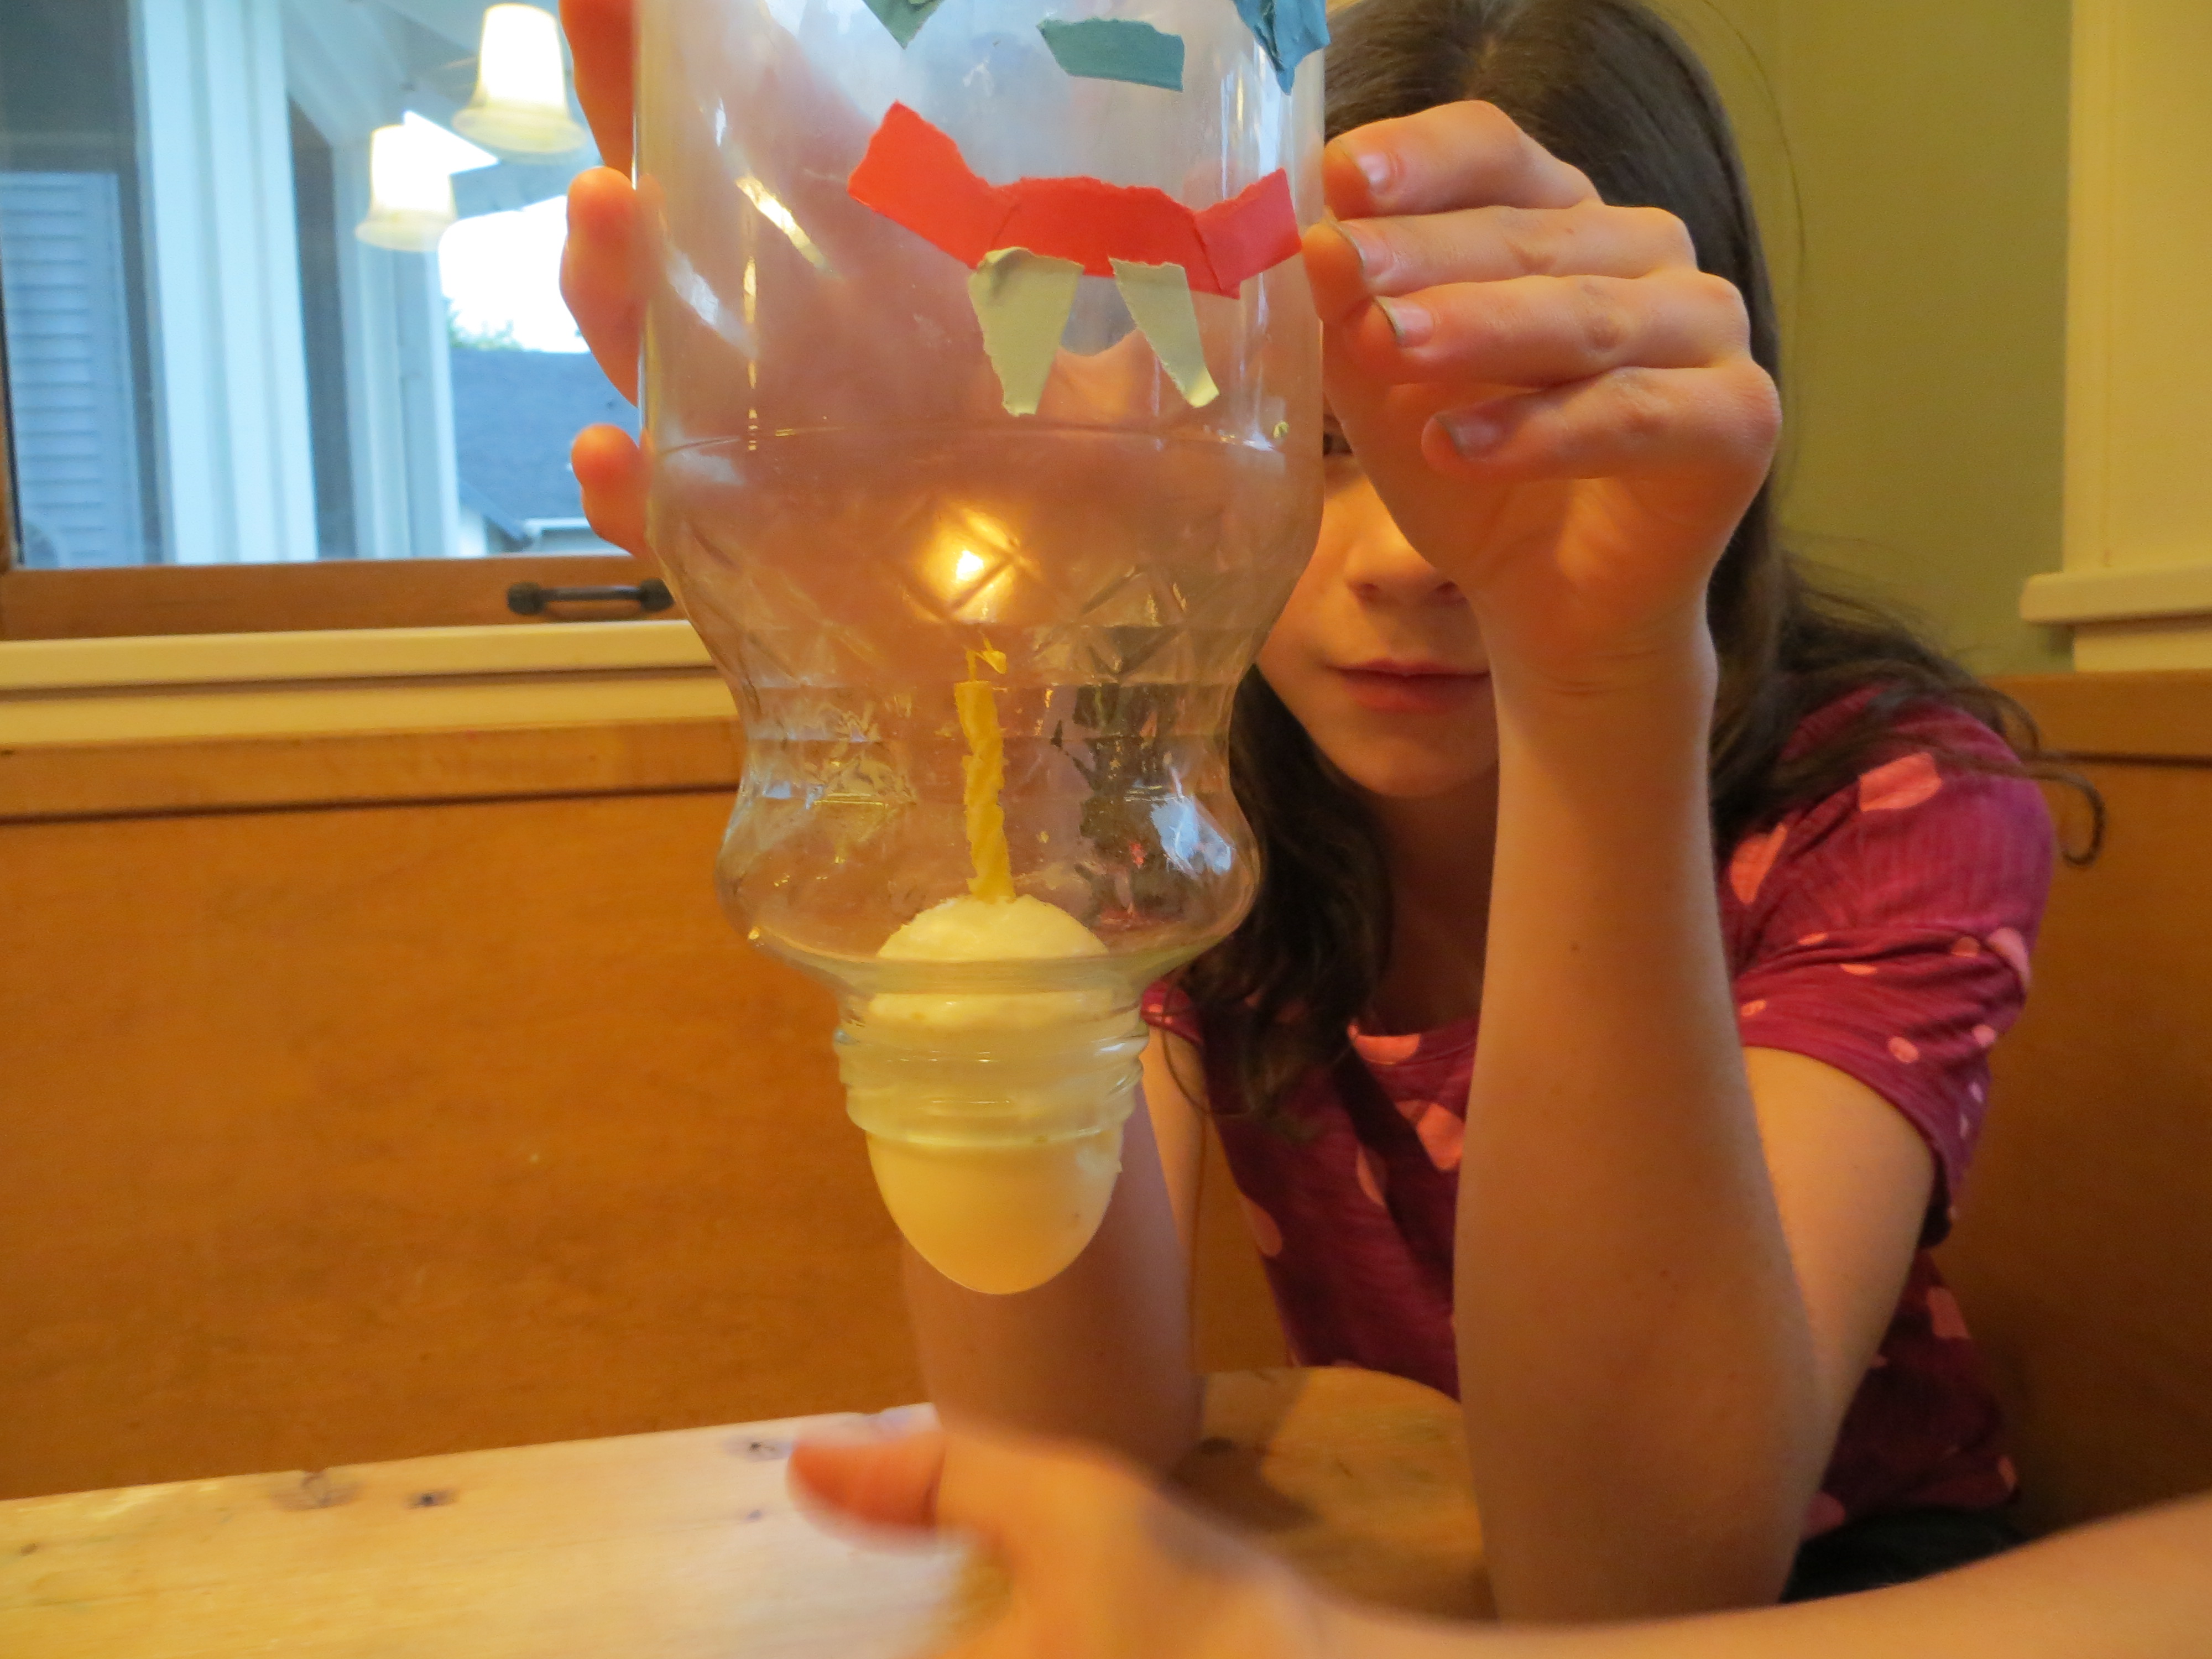
4. Hold your bottle upside down and put the candle end of the egg up into the bottle so it forms a seal. Continue to hold the egg until the candle goes out and the egg is “pushed” into the bottle by atmospheric pressure, which is the weight of the air pushing down on the egg.
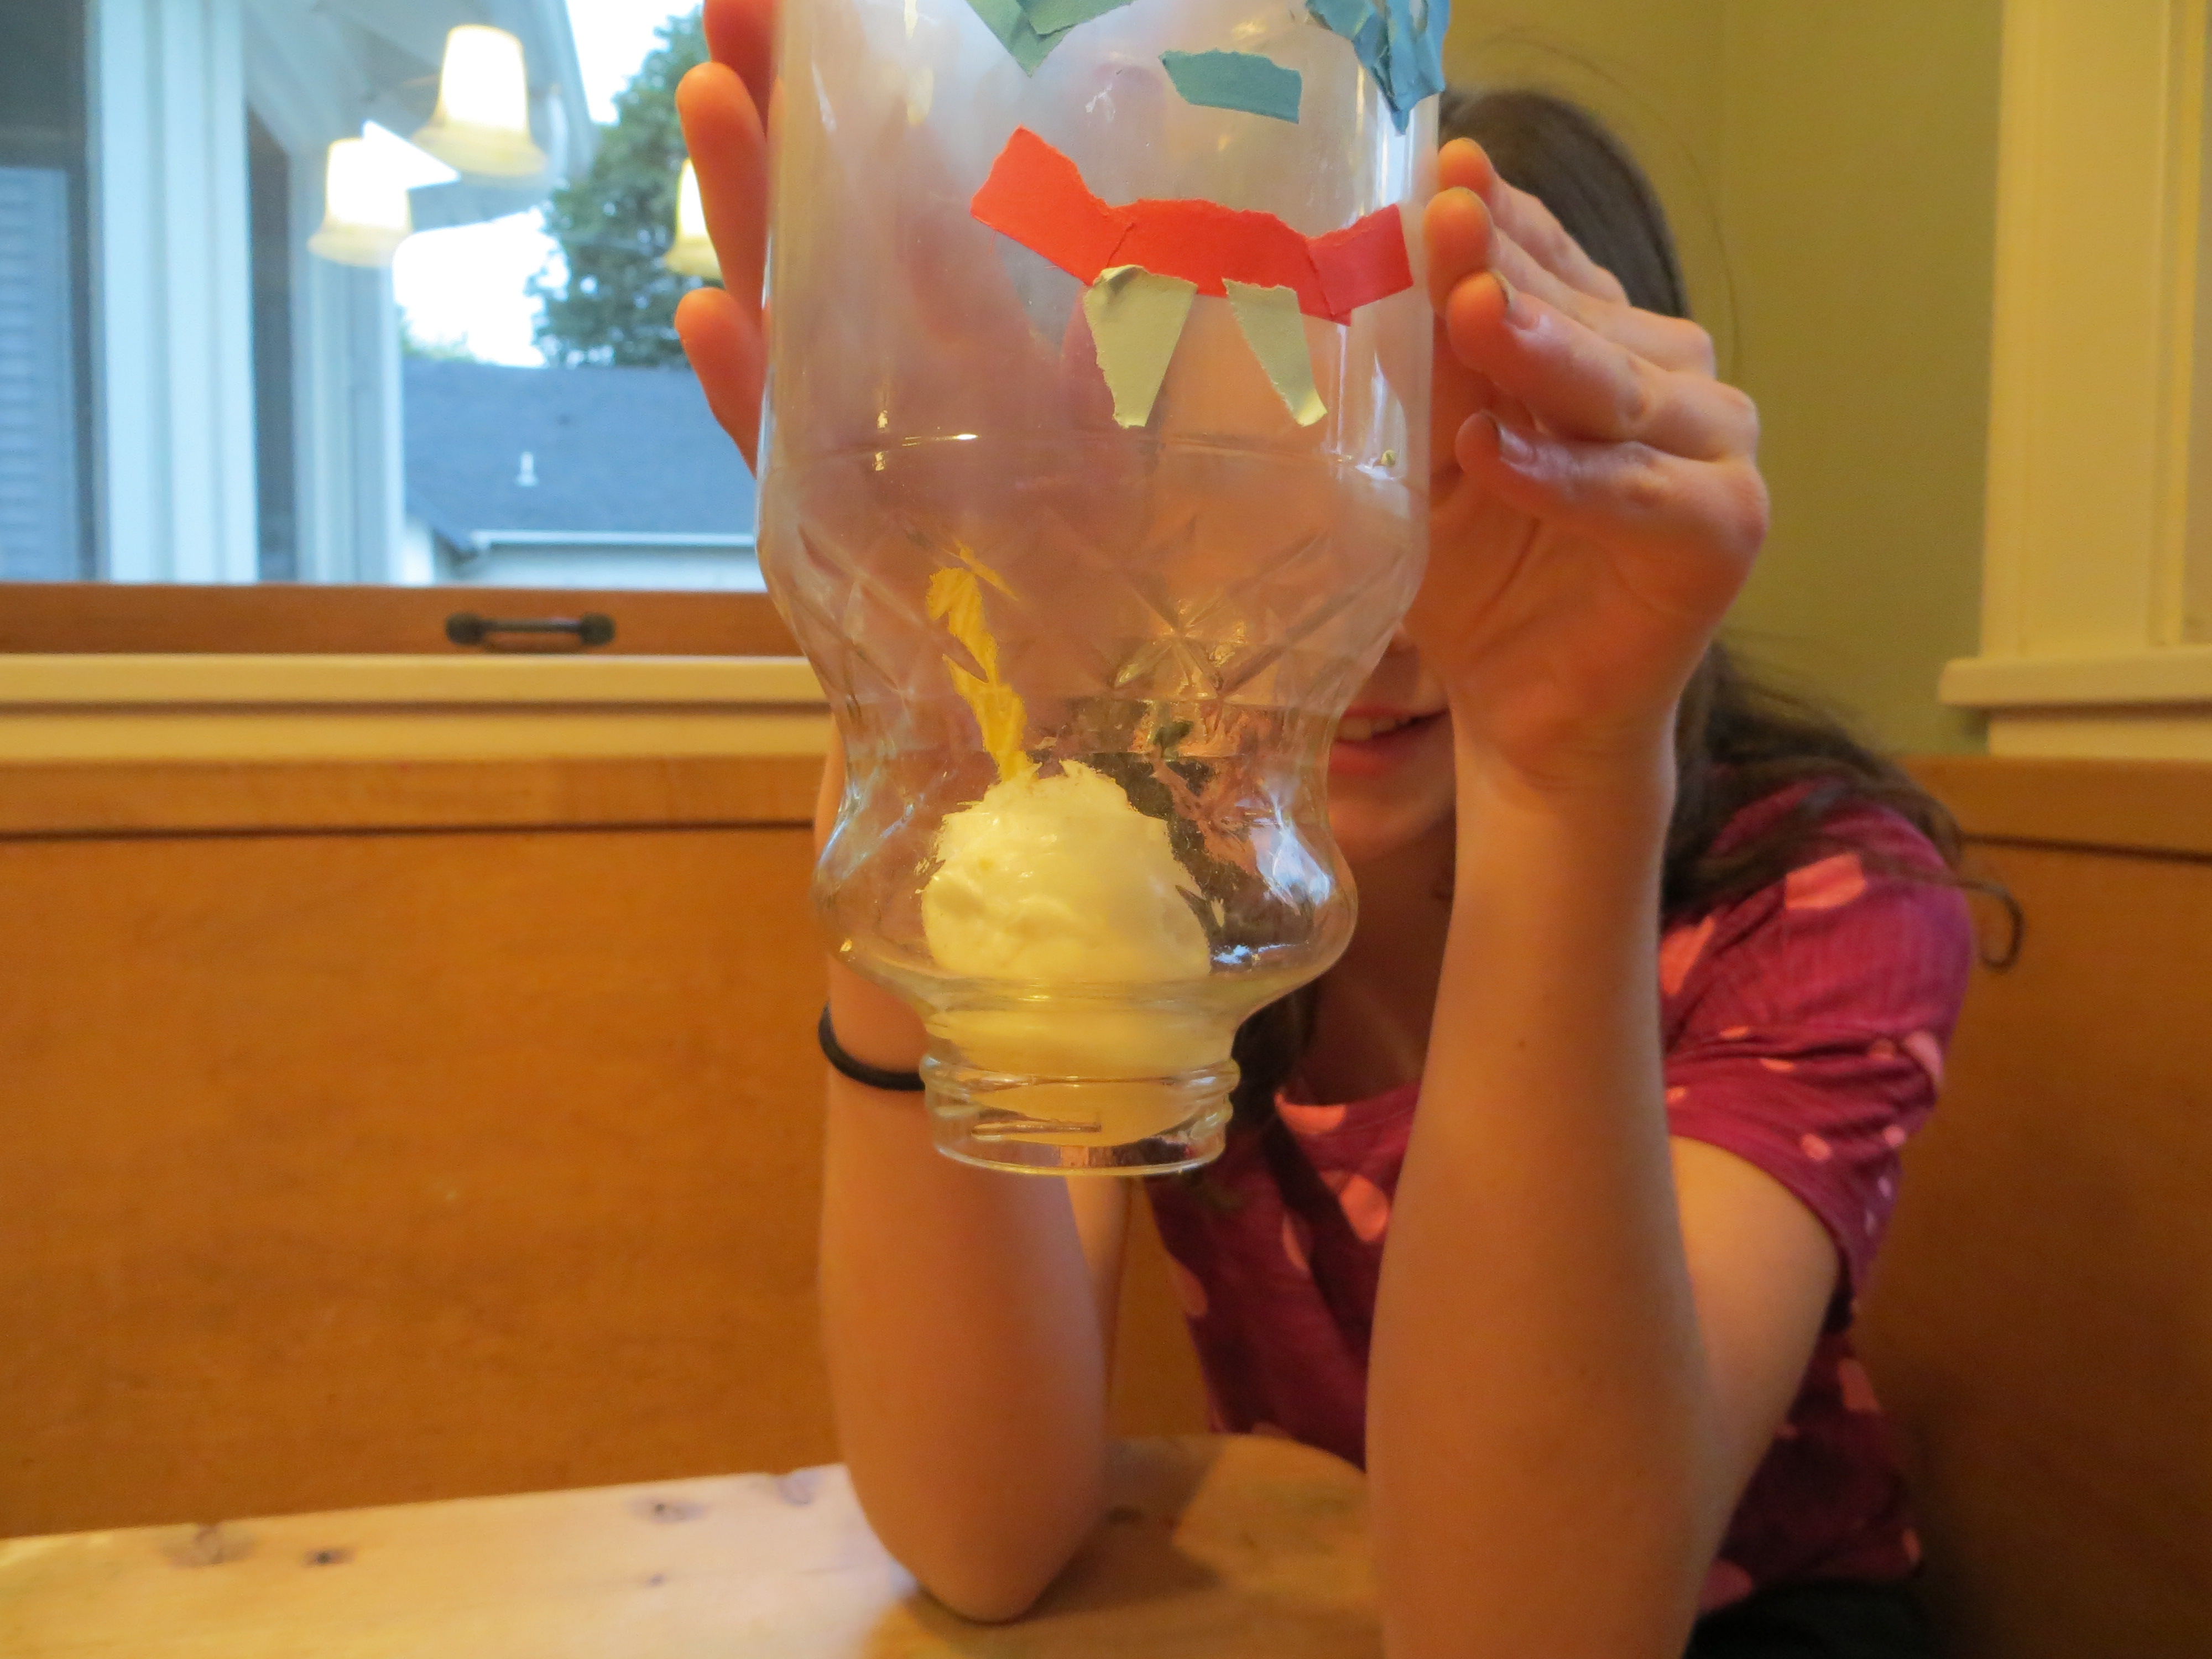
What happened?
The flame from the candle heats the air in the bottle. When the candle goes out from lack of oxygen, the remaining air in the bottle cools rapidly, decreasing the air pressure in the bottle and creating a partial vacuum. The outside air, whose atmospheric pressure is higher, pushes the egg into the bottle as it attempts to equalize the pressure inside of the bottle.