Tag: easy’
Soapy Science: Giant Bubbles
- by KitchenPantryScientist
From surface tension to evaporation, science come into play every time you blow a bubble. Here’s some bubble science, along with a recipe for making giant bubbles from my book Outdoor Science Lab for Kids!

Water molecules like to stick to each other , and scientists call this sticky, elastic tendency “surface tension.” Soap molecules, have a hydrophobic (water-hating) end and (hydrophilic) a water-loving end and can lower the surface tension of water. When you blow a bubble, you create a thin film of water molecules sandwiched between two layers of soap molecules, with their water-loving ends pointing toward the water, and their water-hating ends pointing out into the air.
As you might guess, the air pressure inside the elastic soapy sandwich layers of a bubble is slightly higher than the air pressure outside the bubble. Bubbles strive to be round, since the forces of surface tension rearrange their molecular structure to make them have the least amount of surface area possible, and of all three dimensional shapes, a sphere has the lowest surface area. Other forces, like your moving breath or a breeze can affect the shape of bubbles as well.
The thickness of the water/soap molecule is always changing slightly as the water layer evaporates, and light is hitting the soap layers from many angles, causing light waves to bounce around and interfere with each other, giving the bubble a multitude of colors.
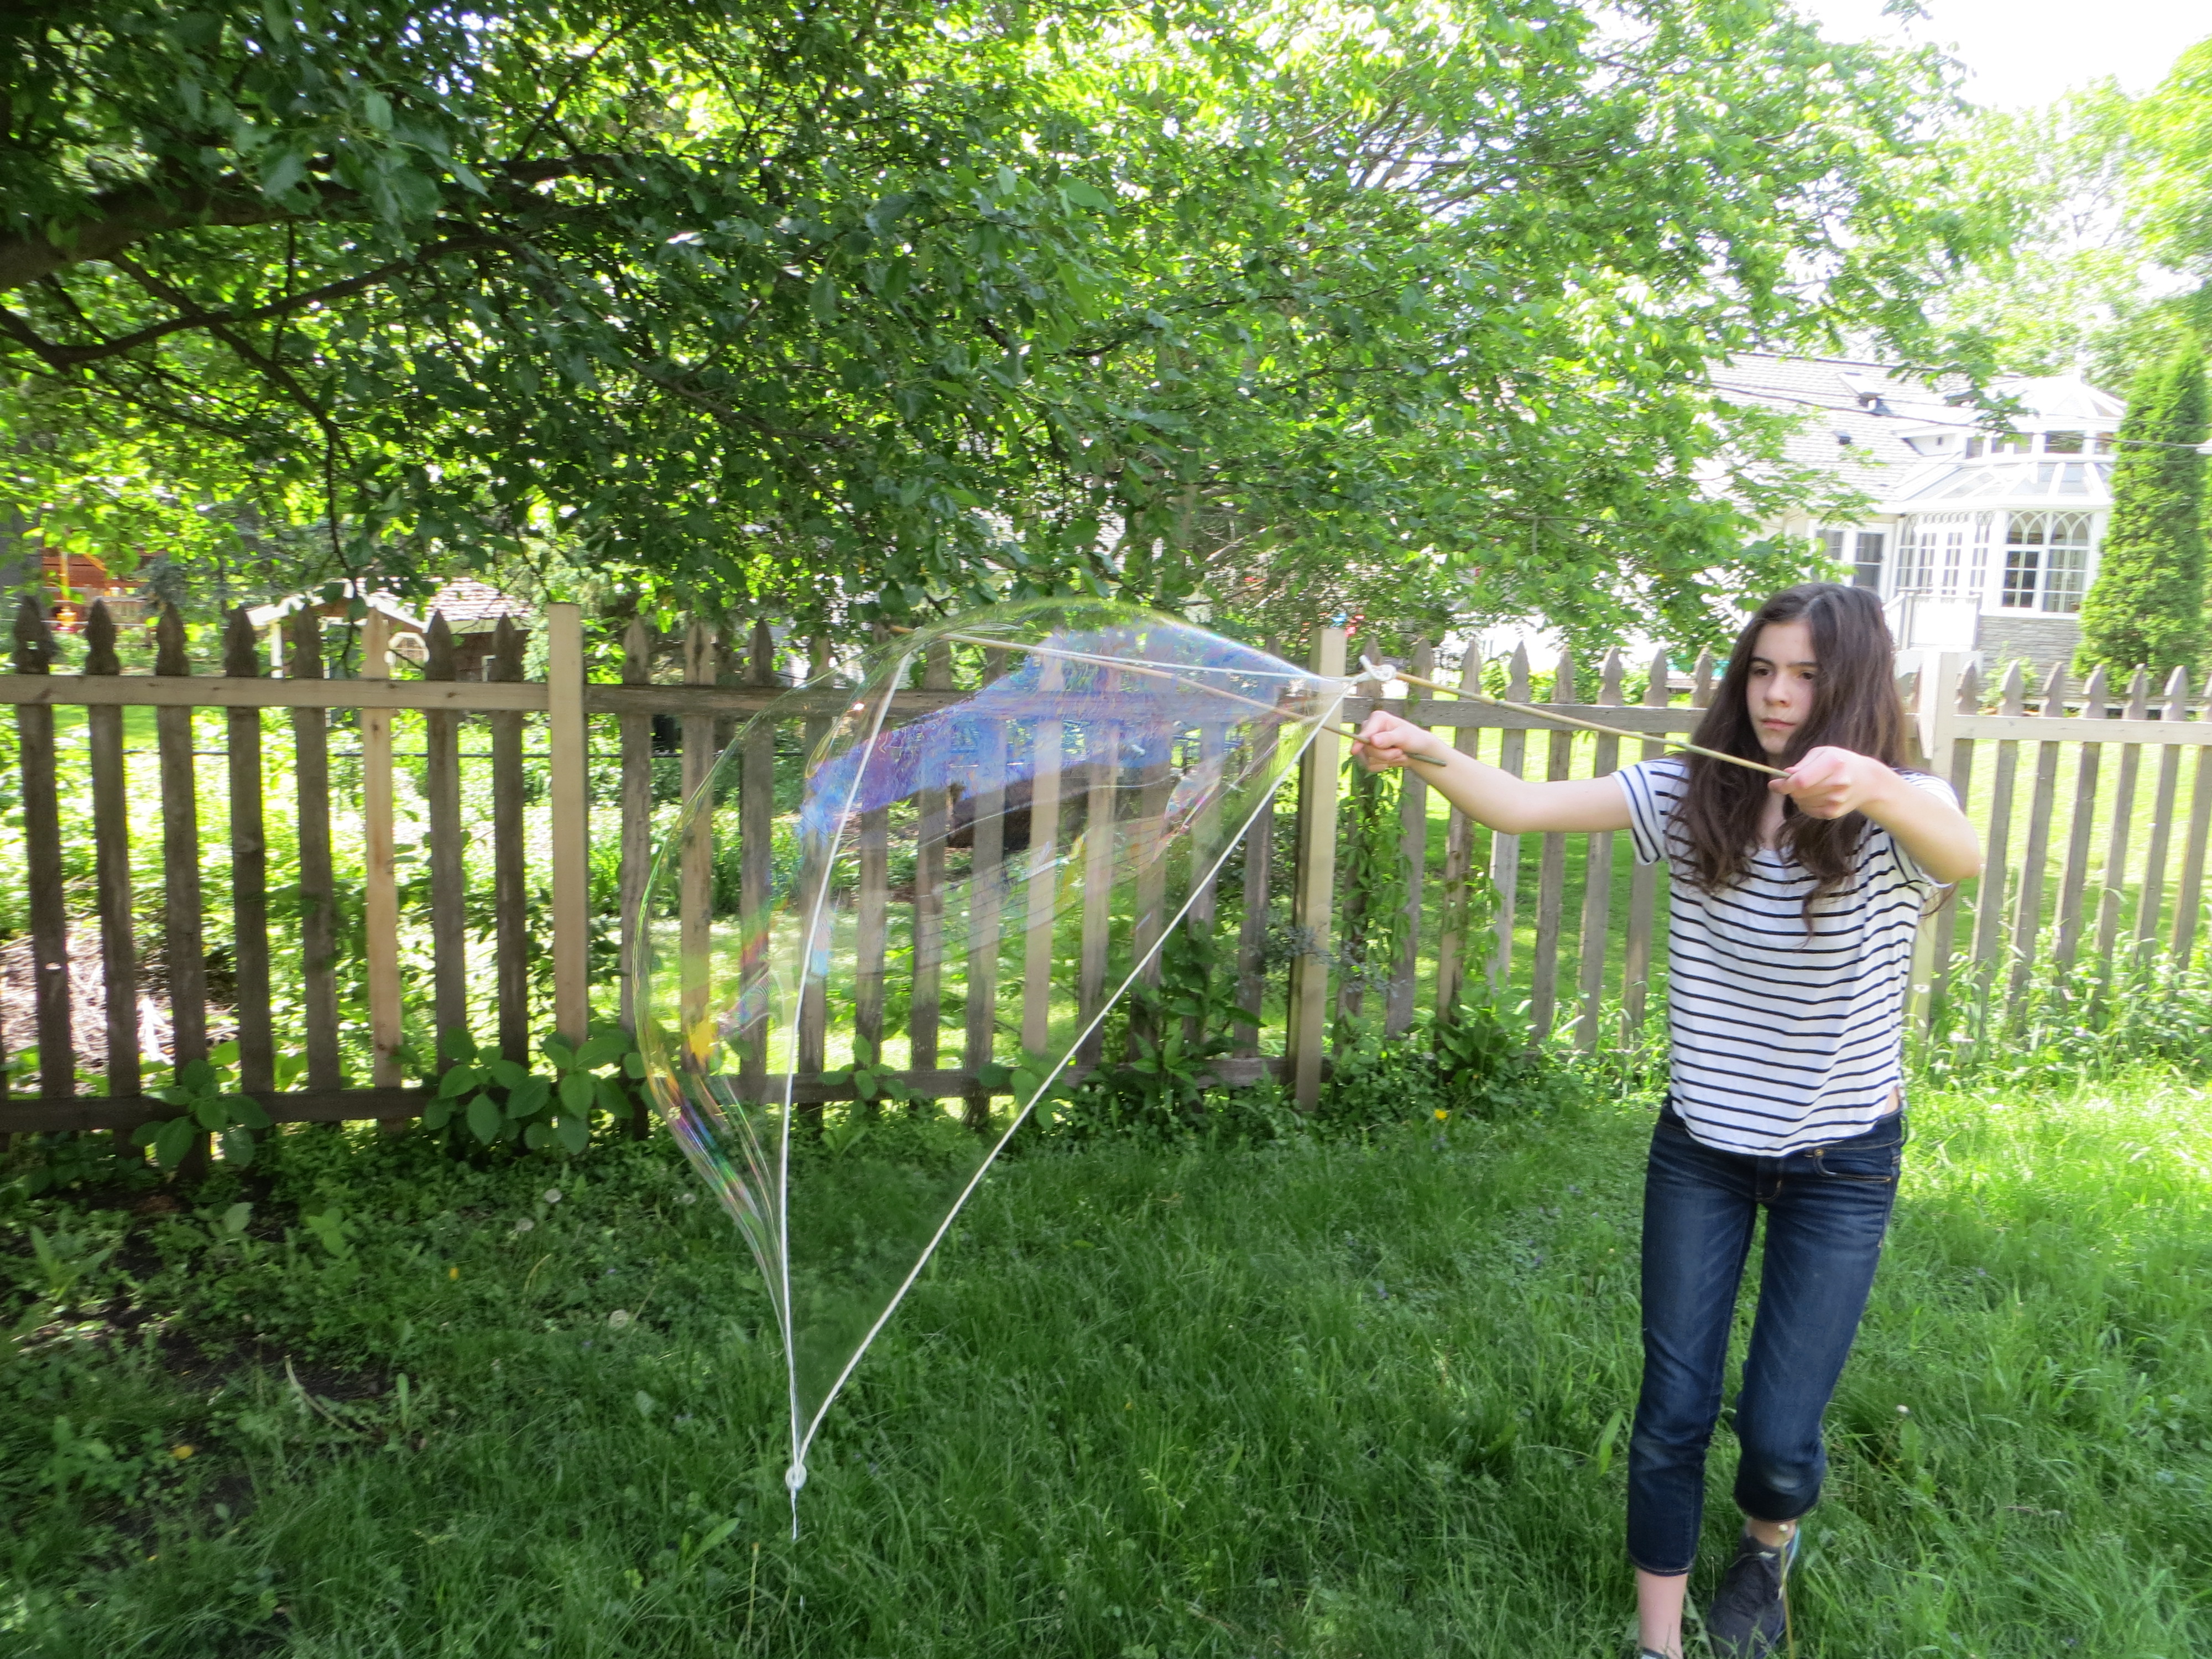
Try making these giant bubbles at home this summer! They’re a blast! (It works best a day when it’s not too windy, and bubbles love humid days!)
To make your own giant bubble wand, you’ll need:
-Around 54 inches of cotton kitchen twine
-two sticks 1-3 feet long
-a metal washer
1. Tie string to the end of one stick.
2. Put a washer on the string and tie it to the end of the other stick so the washer is hanging in-between on around 36 inches of string. (See photo.) Tie remaining 18 inches of string to the end of the first stick. See photo!
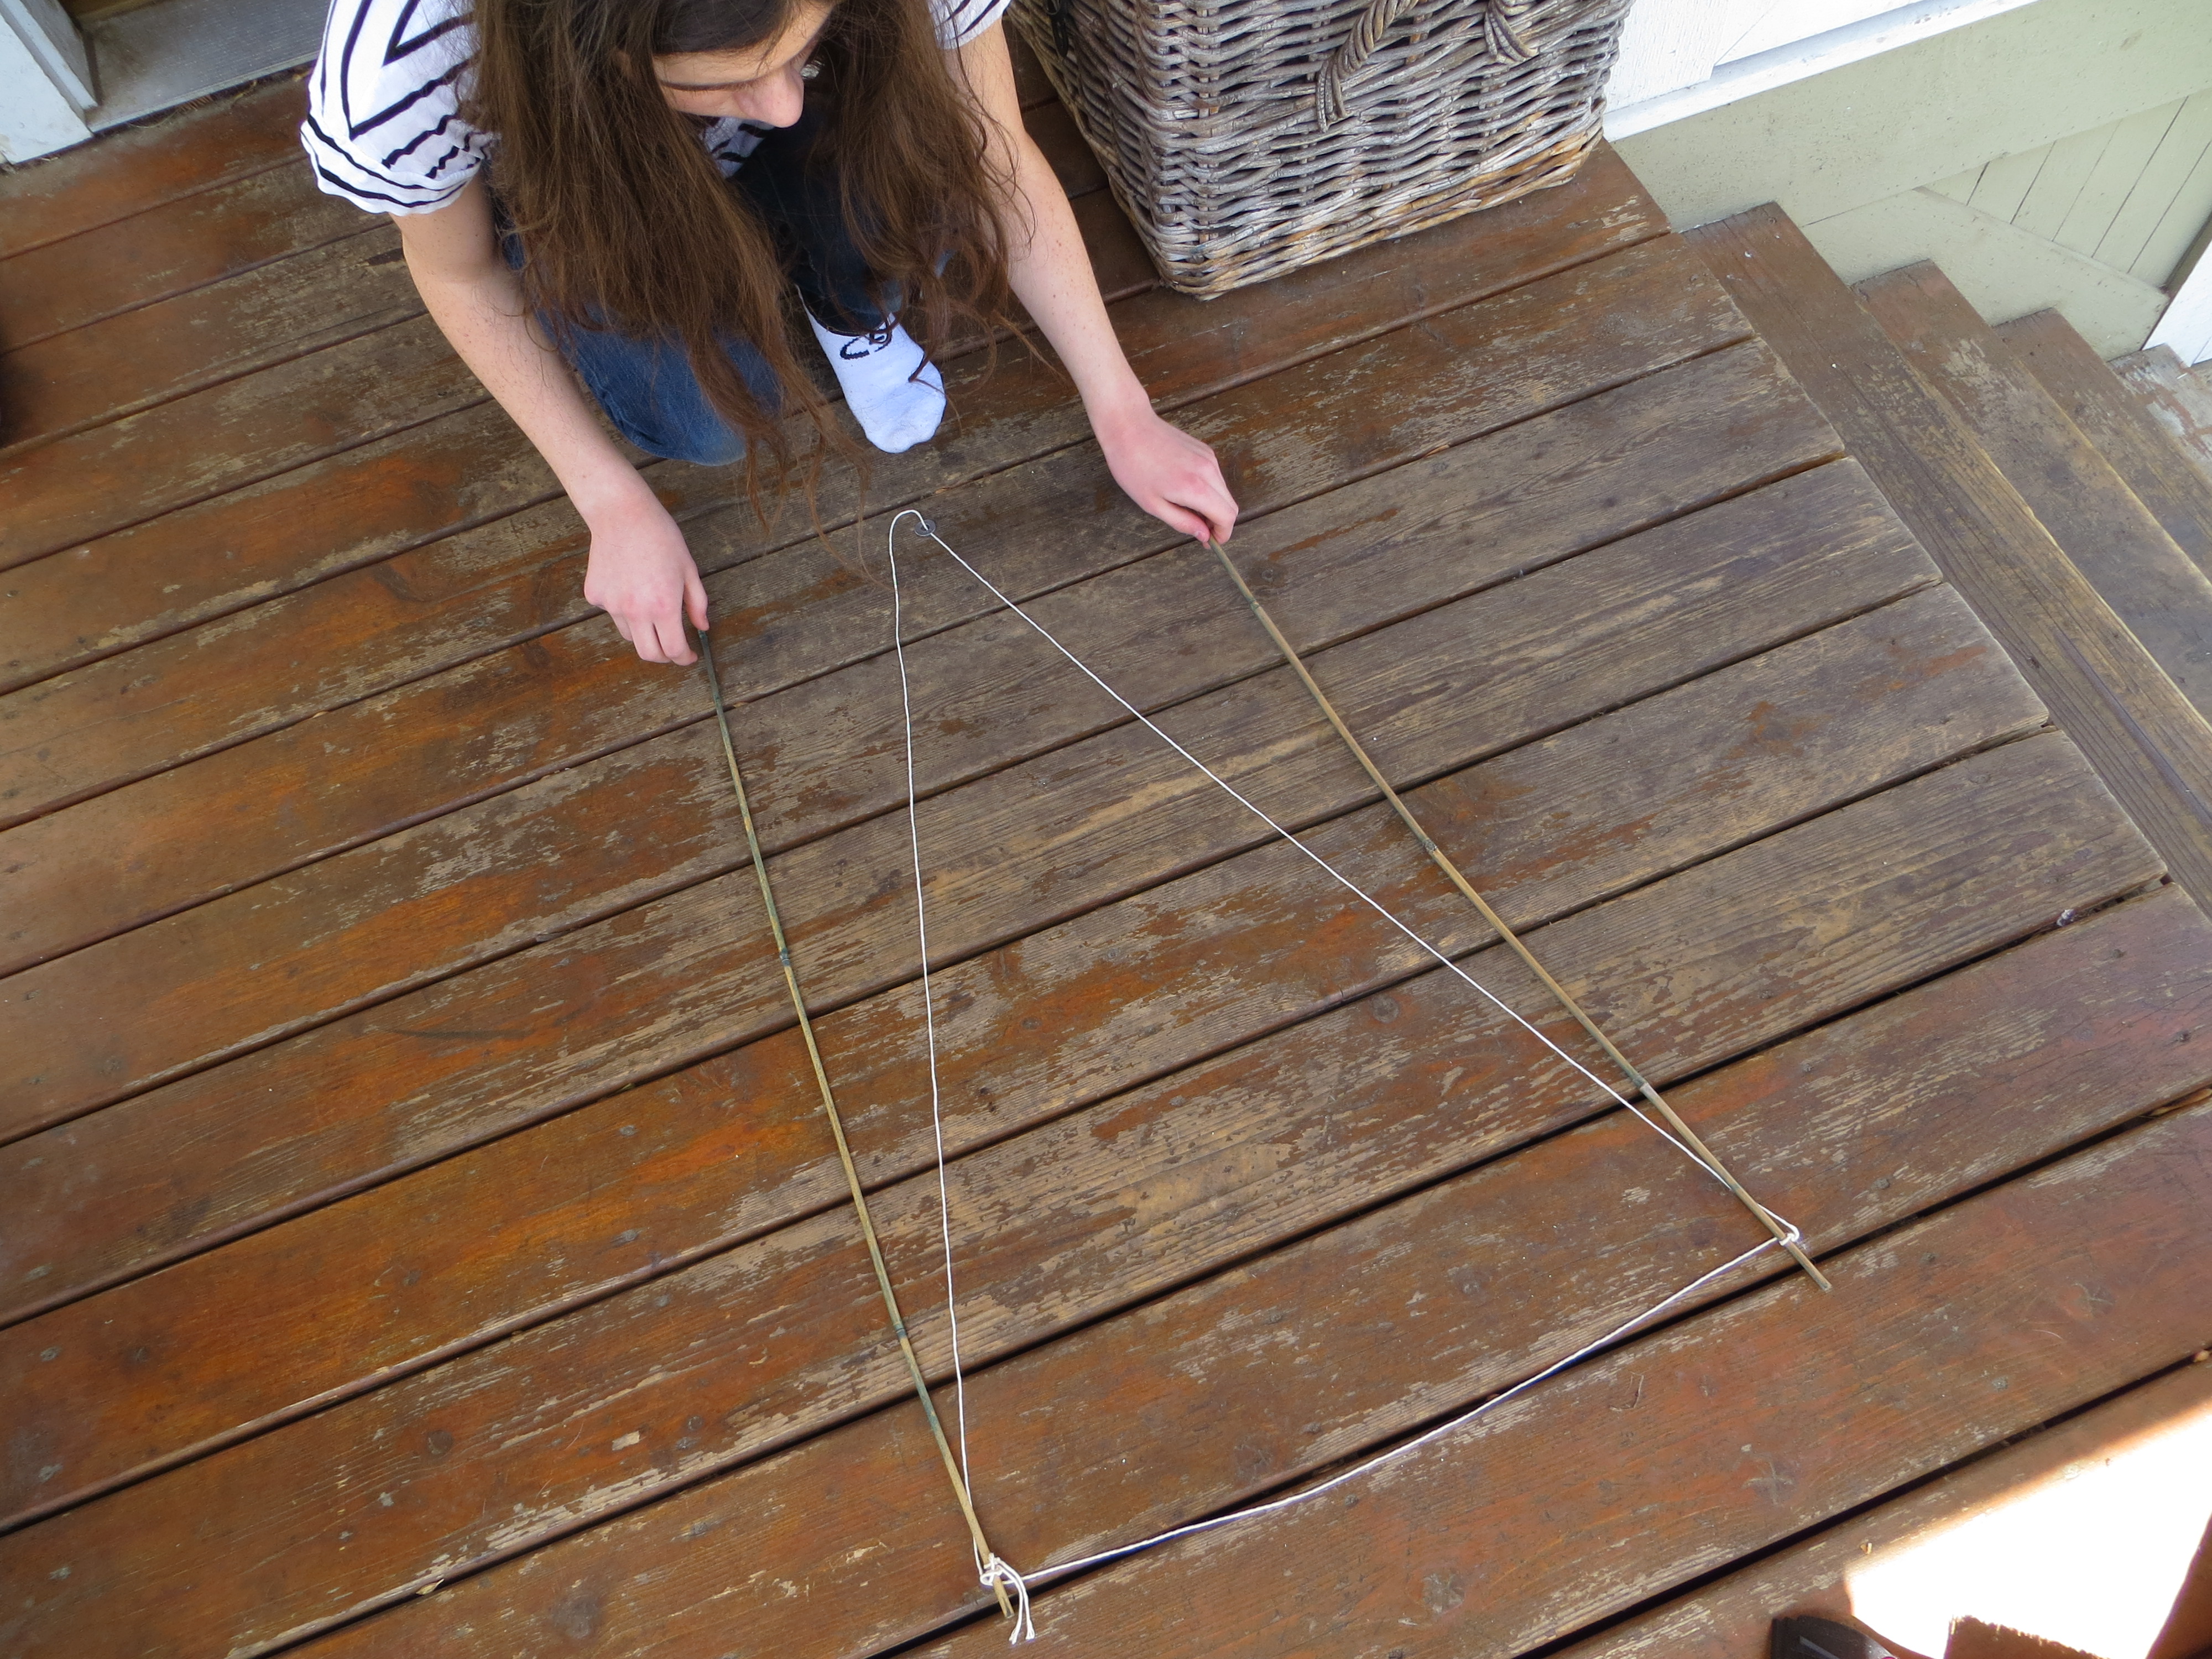
This bubble wand is a little longer than 18 inches on a side.
For the bubbles:
-6 cups distilled or purified water
-1/2 cup cornstarch
-1 Tbs. baking powder
-1 Tbs. glycerine (Optional. Available at most pharmacies.)
-1/2 cup blue Dawn. The type of detergent can literally make or break your giant bubbles. Dawn Ultra (not concentrated) or Dawn Pro are highly recommended. We used Dawn Ultra, which is available at Target.
1. Mix water and cornstarch. Add remaining ingredients and mix well without whipping up tiny bubbles. Use immediately, or stir again and use after an hour or so.
2. With the two sticks parallel and together, dip bubble wand into mixture, immersing all the string completely.

3. Pull the string up out of the bubble mix and pull them apart slowly so that you form a string triangle with bubble in the middle.

4. Move the wands or blow bubbles with your breath. You can “close” the bubbles by moving the sticks together to close the gap between strings.
What else could you try?
-Make another wand with longer or shorter string. How does it affect your bubbles?
-Try different recipes to see if you can improve the bubbles. Do other dish soaps work as well?
-Can you add scent to the bubbles, like vanilla or peppermint, or will it interfere with the surface tension?
-Can you figure out how to make a bubble inside another bubble?
Bristlebots
- by KitchenPantryScientist
With a brush, some batteries, a small motor and a few wires, it’s easy to create a robot that spins, bumps and buzzes around on any smooth surface.
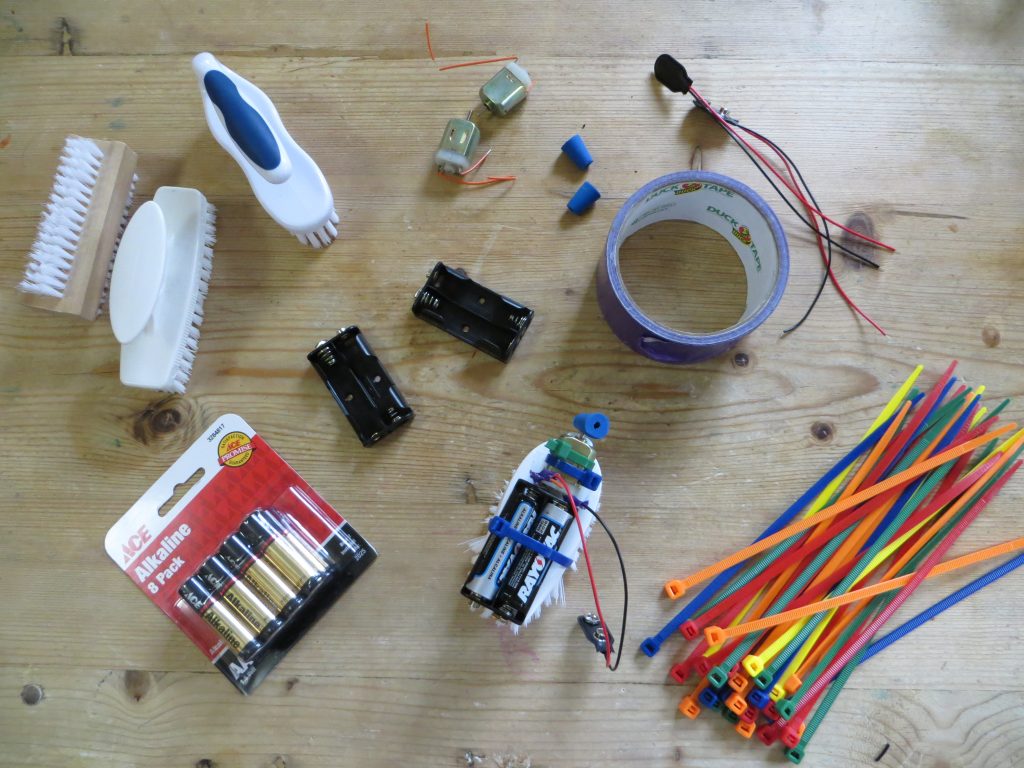
You’ll need:
-a small brush, like a vegetable brush or a cleaning brush
-two AA batteries
–battery holder for 2 AA batteries (optional)
-insulated wire
-a small toy motor with lead wires and pencil eraser or small rubber stopper (or vibrating motor)
–battery clip (optional)
-zip ties (optional)
-electrical tape or duct tape
Bristlebot-KitchenPantryScientist.com
Make your bristlebot!
- Attach the motor to one end of the top of the brush. If it’s not a vibrating motor, stick a eraser or rubber stopper onto the spinning post to make it vibrate. Use a zip tie or duct tape to secure it. Make sure the spinning parts can rotate freely.
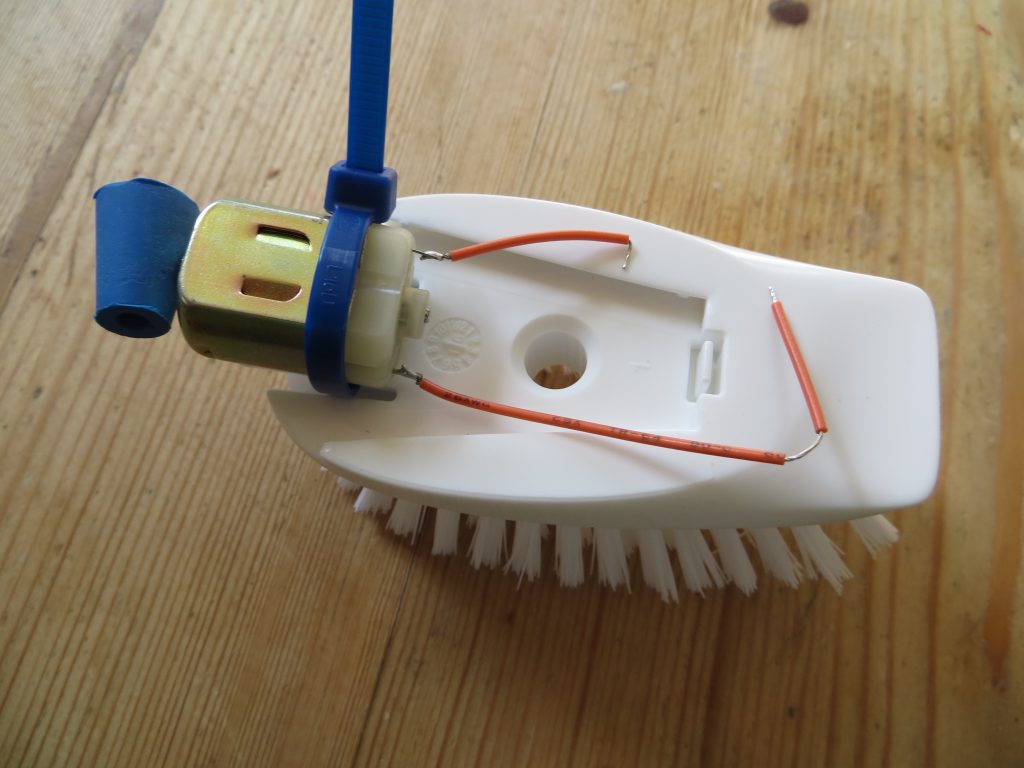
Attach motor- KitchenPantryScientist.com
- Attach the battery holder to the top of the brush near the motor.
Attach batteries- KitchenPantryScientist.com
- Insert batteries in motor.
- Twist wires around the motor terminals and secure with tape. (These may be the wires on the battery clip, if you have one.)
Connect battery clip- KitchenPantryScientist.com
- To start the motor, attach wires directly to the battery terminals, or to the battery clip and snap it onto the batteries.
Bristlebot- KitchenPantryScientist.com
- Place your robot on a smooth surface to see what happens.
Enrichment: Try different brush shapes, sizes and angles to see how they move. Does your robot spin in the same direction as the motor, or the opposite direction?
The Science Behind the Fun: In this experiment, you complete a battery-powered electrical circuit to spin a vibrating motor. The vibrations traveling through the bristles of the brush move your robot around on the floor.
Six Quick and Easy Halloween Science Experiments
- by KitchenPantryScientist
Here are some great last-minute experiments to make your Halloween more fun and spooky! Watch the TV segment I did to see how much fun they are, and look for links to directions below the video.
Click on these links for instructions on how to make Frankenworms, Cornstarch Goo, Mad Scientist’s Green Slime, Alien Monster Eggs, Magic Potion and Bags of Blood. You can find more experiments by scrolling down on my website!
Happy Halloween!
Science Fairs Made Simple (For Parents)
- by KitchenPantryScientist
Parents are under a ridiculous amount pressure to make sure kids finish homework, practice for music lessons and make it to sporting events, among other things. I saw the photo below on Facebook yesterday, and then again in a post on an awesome science blog called “It’s OK to Be Smart . The poster is funny, but kind of sad if you love science. It inspired me to share a few tips on making science fairs less painful for parents and to list of some of my favorite simple experiments. Most of them use ingredients you have on hand and you can also find these experiments and more, like DNA extraction from strawberries, on KidScience app and in my book Kitchen Science Lab for Kids.

Poster/photo by Susan Messina
Parents: Insist that kids take the reins on their science fair projects. Let them look through this list of experiments, and then sit down with them for five minutes and tell them to think about how you can take simple experiments like these to the next level by applying them to real life. (For example, how could you test whether soap or hand sanitizer removes more of the microbes you can grow on a homemade petri dish?) What might happen if you change the variables, like how much water you use, the temperature or even the materials used in the original experiment?
Kids: Here are a few ideas to get you started. Just click on the experiment name or the blue typeface to follow the link to instructions, photos and videos of the experiments. Choose one that you have the ingredients for and try it! You shouldn’t need help for most of these unless you have to boil something. Lots of them even have a video you can watch, if you’re not sure about one of the steps. My kids and I have tested them all and you can leave a comment here if you have any questions. Do more research into the science behind what you’re doing and think about how you could apply this experiment to something in real life.
Diffusion Experiment See how food coloring or other liquids diffuse through gelatin. You could even do this with yellow or orange jello if you don’t have plain. How can you change the rate of diffusion? Think about how the chemicals we add to water, put on our streets to melt ice, and spray on our lawns and crops can move into our soil, ground water, rivers, lakes and oceans.
Microbial Zoos Sample different surfaces with a cotton swab, or do a hand washing experiment, and grow the microbes on a homemade petri plate. (You’ll need some agar for this, so it may require a trip to the store.) Here’s a video on how to make the plates.
Vegetable Vampires See how plants take up water using the forces of physics. Does this experiment work better with some plants than others?
Shocking Machine Make an electrophorus and Leyden jar to shock your friends! Here’s how to do it. We demonstrated it on Kare11!
Frankenworms This is a fun candied chemical reaction. Gummy worms soaked in baking soda and water come to “life” when you drop them into vinegar! Click here for directions and a video.
Oil Spill Experiment: See why oil is so hard to clean up. What works best to remove it from water and feathers?
Goblin Goo (All you need is cornstarch and water. Here’s a video on how to make the goo. You can add a little food coloring to the water if you want, but it may stain your hands!)
Magic Bag (If you have ziplock baggies, water, red food coloring and skewers, you can do this experiment!) Here’s the video.
Fizzy Balloons (After we made Goblin Goo, I demonstrated how to make Fizzy Balloon Monster heads. Click here to watch.)
Magic Potion (Bubbly, stinky Halloween fun: I made a short video on how to make magic potion. Click here to watch it
Mad Scientist’s Green Slime (To see a TV segment where we made Mad Scientist’s Green Slime, click here!) Here’s another video.
Apple Mummies (Here’s a link to a TV segment where the kids and I demonstrated how to make Apple Mummies. Click here.)
Alien Monster Eggs (These make a great centerpiece for a Halloween party, when you’re done playing with them.) I demonstrated how to make them on Kare 11! Click here to watch the video.
Marshmallow Slingshots Lob Marshmallow eyeballs and spiders at a pumpkin or another target in this fun physics experiment. Do different size rubber bands make a difference?
Window Sprouts: Plant a bean in a plastic baggie with a damp paper towel to see how plants need only water and air to sprout roots and leaves. Here’s a short video demonstrating how to make a window garden.
Homemade Solar Oven: Using a pizza box, aluminum foil, plastic wrap, and newspaper, you can harness the sun’s energy to cook your own S’mores!
Carbon Dioxide and Ocean Acidity: See for yourself how the carbon dioxide in your own breath can make a water-based solution more acidic. It’s the same reason too much carbon dioxide in Earth’s atmosphere can be bad for our oceans.
Plant Transpiration: See how trees “sweat” in this survival science experiment.
Earthworm Experiment: Do you know what kind of earthworms are living in your back yard?
Composting: Be a composting detective. Bury some things in your back yard (away from power cables) and dig them up in a few months to see how they look. Composting reduces methane gas emissions (a greenhouse gas) from dumps.
Solar Water Purification: This project illustrates the greenhouse effect and is a fun “survival science” experiment. Requires hot sun and some patience!
Citizen Science: Don’t forget about all the real environmental research projects you can participate in through Citizen Science programs all around the world!
For mores activities and games, check out NASA’s Climate Kids website, to see a kid-friendly diagram of the water cycle, click here.
Levers and Fulcrums
- by KitchenPantryScientist
The word lever comes from the french verb “lever” which means “to raise.” A lever amplifies force, so you can lift something heavier with a lever than you would be able to lift without a lever. Scientists think the ancient Egyptians used levers to lift huge stones. 
Levers are simple machines that require only a beam (a long piece of wood, metal or steel) and a fulcrum, the support on which a lever pivots. It’s easy to make your own lever using a can, a rag, a yardstick and some sticks of butter. We cut our sticks of butter in half, but you don’t have to.
The can is your fulcrum and you can keep it from rolling by placing it on a folded rag. Balance your yardstick (your beam) on the can. It’s nice to do this experiment with a yardstick, since you can use the markings to find the halfway point.
Place a stick of butter on either side of the ruler, halfway between the fulcrum (the can) and the end of the ruler. Is it balanced?
Here’s the neat part. Slide one of the sticks of butter all the way to the end of the ruler. What happens? Put a second stick of butter on the stick of butter that you left in its original position. Now is it balanced? You can move it a little if it’s not perfect, since it’s hard to get the can exactly in the center.
See how one stick of butter further from the fulcrum (the can) can easily hold the weight of two sticks of butter that are positioned closer to the can? This demonstrates how a lever can help you lift something heavy.
What happens if you move the two sticks of butter even closer to the fulcrum? Can you add more butter and make it balance?
The mathematical expression for how a lever works is M=f times d. M is the turning force, or torque, f is the force you apply and d is the perpendicular distance between the force and the fulcrum. Basically, this “law of the lever” tells you exactly what you see: that the further you are from the fulcrom, the more weight you can lift using a lever. (So one stick of butter at the end of a ruler can lift two or more sticks of butter on the other side of the fulcrum, depending on how far they are from the fulcrum.) You can also see why a longer lever might work better than a short lever.
The famous Greek mathematician Archimedes was also a physicist, engineer, inventor and astronomer, and he is credited with first explaining how levers work. Later, in the renaissance, levers were classified as one of six simple machines, which can be combined with other simple machines and devices to form more complicated machines, like a bicycles. What levers can you think of on a bike?
I don’t have Archimedes to help me out with physics, but I’m lucky enough to have a dad who is physicist and came up with the idea for this project. Not only is he my scientific consultant, but he’s the one who got me interested in science in the first place.
Backyard Science Lab
- by KitchenPantryScientist

Now that it’s summer, move your science lab outside and try doing the Tablecloth Trick or Throwing Eggs. If you’d rather check out the power of the sun, try making a solar oven from a pizza box! You probably have everything you need for these experiments right in your kitchen, and if you don’t have a pizza box, just save one next time you order out.
What are you waiting for? Have fun!
Buttons Afloat
- by KitchenPantryScientist

Here’s a quick experiment for bored kids:
You’ll need a button, a glass, water, and a carbonated beverage.
Pour some water in the glass. Drop the button in. What happens?
If it sinks*, dump the water out and fill the glass with carbonated beverage. Drop the button in. Now what happens?
The button is more dense than the water and sinks in uncarbonated water, but in a carbonated beverage, carbon dioxide bubbles form on the button and make it buoyant, so it floats to the top.
What other sinking objects can you make float with carbonation?
If your kids like this, check out this Float or Sink experiment that even very young kids can do!
*If your button floats, the experiment won’t work, so try to find one that sinks!