Category:Chemistry Experiments’
The Science of Emulsions: Vinaigrette and Mayonnaise
- by KitchenPantryScientist
“When I wasn’t at school, I was experimenting at home, and became a bit of a Mad Scientist. I did hours of research on mayonnaise, for instance, and although no one seemed to care about it, I thought it was utterly fascinating. When the weather turned cold, the mayo suddenly became a terrible struggle, because the emulsion kept separating, and it wouldn’t behave when there was a change in the olive oil or the room temperature. I finally got the upper hand by going back to the beginning of the process, studying each step scientifically, and writing it all down. By the end of my research, I believe, I had written more on the subject of mayonnaise than anyone in history. I made so much mayonnaise that Paul and I could hardly bear to eat it anymore, and I took to dumping my test batches down the toilet. What a shame. But in this way I had finally discovered a foolproof recipe, which was a glory.” Julia Child, from My Life in France

Julia’s secret for fool-proof mayo? Beat the mixture over a bowl of hot water to get the oil and eggs to form an emulsion, which is a mixture of two thing which are normally immiscible, like water and oil. In an emulsion, a bunch of one type of molecule will actually surround individuals or small groups of the other type of molecule (think ring-around the rosy with one or two people in the middle who would rather not be there.)
When you’re trying to make an emulsion, it also helps to add a mediator called a surfactant to get between and interact with the immiscible molecules to stabilize the mixture. In a vinaigrette prepared using oil, mustard and vinegar, the proteins in the mustard act as surfactants.
To make delicious vinaigrette:
- Using a fork or wire whisk, mix together: 1 Tbsp. vinegar and 1 Tbsp. mustard.
- Add 3 Tbsp. oil (olive, vegetable or your favorite), drop-by-drop, whisking until you see an emulsion form! You can tell when an emulsion begins to form, because the mixture will start to look lighter-colored and thicker as the molecules are rearranged and reflect light differently!

Try some variations on these kitchen experiments. Does it work better to use a cold egg, room temperature egg, or warm egg? What happens if you try to make mayo by setting your mixing bowl in a bowl of ICE water? Do you get an emulsion?

Can you see the difference between batches of vinaigrette? One was whipped over a bowl of ice water and the other over warm water.
When whipping up mayonnaise, adding a little water to the eggs before adding the oil helps make some of the proteins in the eggs more available to act as surfactants. Of course, adding a little mustard helps too and tastes great!

Here’s the New York Times recipe we used to make mayonnaise:
- 1 large egg yolk, at room temperature
- 2 teaspoons lemon juice
- 1 teaspoon Dijon mustard
- 1/4 teaspoon kosher salt
- 1 teaspoon cold water
- 3/4 cup neutral oil such as safflower or canola

- In a medium bowl, whisk together the egg yolk, lemon juice, mustard, salt and 1 teaspoon cold water until frothy. Whisking constantly, slowly dribble in the oil until mayonnaise is thick and oil is incorporated. When the mayonnaise emulsifies and starts to thicken, you can add the oil in a thin stream, instead of drop by drop.
*Remember that a bacteria called Salmonella enteriditis can lurk in raw eggs and make you sick, so it’s better to use pasteurized eggs for recipes like mayonnaise, where you don’t cook the eggs.
As Julia Child would say, “Bon Appetit!”
STEAM Lab for Kids: hot glue casting, candy molecules and tesselations
- by KitchenPantryScientist
Looking for fun, creative summer projects? I showed off some projects from STEAM Lab for Kids this morning on WCCO MidMorning!
Candy Crush Stained Glass from “STEAM Lab for Kids”
- by KitchenPantryScientist
It’s hard to believe that my new book “STEAM Lab for Kids” is already in the Amazon book store! I studied both art and science in college, so this one was SO much fun to write!
Last summer, my publisher made a few videos of projects from the book for me to share with you. Here’s the first one, which features some sugar science!
Try it!
Paper Marbling Project from STEAM Lab for Kids
- by KitchenPantryScientist
More than just art-forward science, tech, engineering and math projects, my new book STEAM Lab For Kids introduces young learners to #STEAM visionaries including Louis Pasteur , Johannes Kepler, Katherine Johnson, Camille Claudel, August Rodin, Benoit Mandelbrot, Ada Lovelace and M.C. Escher. Each chapter introduction includes words on how art and STEM have influenced #STEAM role models like Sophie Shrand of Science with Sophie, neuroscientist and violinist Kaitlyn Hova, engineer and film maker Joyce Tsang, graphic artist-turned TV producer Christian Unser and musician Matt Wilson! Here’s a peek at one of the projects…
Elemental Science: Gallium
- by KitchenPantryScientist
Gallium is a soft metal related to other metals in Group 13 of the periodic table, including aluminum. It doesn’t exist as a free element in nature, but can be purified from other metallic ores, like zinc. Each gallium atom has 31 protons in its nucleus, so its atomic number is 31.
You’ll find it around you in thermometers, semiconductors, and even some LED lights, and one property that makes it so cool is that it melts from solid to liquid at low temperatures (around 85.6 degrees F or 29.8 degrees C.) This makes it easy to play with the liquid metal simply by melting it in a glass of hot water, or in the palm of your hand.
You can see the crystal structure in the side of the gallium “Lego” we created in play dough! KitchenPantryScientist.com
*Not for small children! Wearing gloves and safety goggles is recommended when observing gallium. Although is is fairly safe, gallium will coat hands with a lead-like substance. (Wash with soap and water to remove.) Gallium can also damage other metals, so keep it away from jewelry, like rings. I always recommend doing your research, as well as checking out the MSDS (Material Data Safety Sheet) of a new substance before using it to know what precautions to take.
We ordered 99.99% pure gallium on Amazon. It arrived in plastic tubes,in crystal form, but by placing the tubes in hot tap water, it melted easily. Eye droppers work well for moving the melted metal around. I’d recommend using a rimmed paper plate to contain the mess.
Try imprinting a Lego or toy car in play dough and pouring the molten gallium into the imprint. When it solidifies, you’ll have a cast of the item you imprinted! (It takes a while.) Gallium coats glass to create mirrored surfaces, so you can pour some into a small jar and use it to coat the sides. If you leave some in a puddle on the bottom of an upside-down jar, you can watch crystals form.
In other words, it’s pretty awesome!
Kid-Friendly “Elephant Toothpaste”
- by KitchenPantryScientist
I’ve been hearing about this science demonstration for years, and finally decided to try it! If you do it at home, kids should wear safety goggles or sunglasses to protect their eyes, and adults should pour the 3% hydrogen peroxide into the bottles.
You’ll need:
a tray or cookie sheet
3% hydrogen peroxide (available at most pharmacies and discount stores)
liquid dish soap
dry yeast (2 packets)
food coloring
empty 16 oz bottle
What to do:
1. Pour 1 cup hydrogen peroxide into an empty 16oz bottle. (A funnel helps!)
2. Add 2 Tbs. liquid dish soap to the bottle and mix well with the hydrogen peroxide.
3. Put 8 drops of food coloring into the bottle and swirl to mix.
4. Position the bottle on the tray.
5. Pour 2 packets of yeast into a paper cup and pinch the cup’s lip to make a pouring spout.
6. Quickly pour the yeast into the bottle, while swirling the liquid vigorously to mix well. The better you mix it, the better the experiment will work!
7. Set the bottle down on the tray before the foam emerges from the top.
8. Watch the chemical reaction between catalase in the yeast and the hydrogen peroxide create oxygen bubbles in the soap!
9. When the reactions has stopped, have an adult clean up the mess by pouring everything down the sink and rinsing the tray with water. (Normally kids should clean up, but for this one, I’d recommend an adult do it.)
The Science Behind the Fun:
Hydrogen Peroxide (H2O2) is a common household chemical that is often used to disinfect wounds and bleach hair. Certain chemicals can break it down into water (H2O) and Oxygen (O).
Dry yeast is a living fungus that produces a molecule called catalase. Catalase is very good at breaking down hydrogen peroxide quickly. When you add yeast to hydrogen peroxide that’s been mixed with liquid soap, the soap traps the oxygen and makes bubbles that push their way out of the bottle.
You may notice that the bottle feels warm. That’s because the chemical reaction produces heat and is called an exothermic reaction.
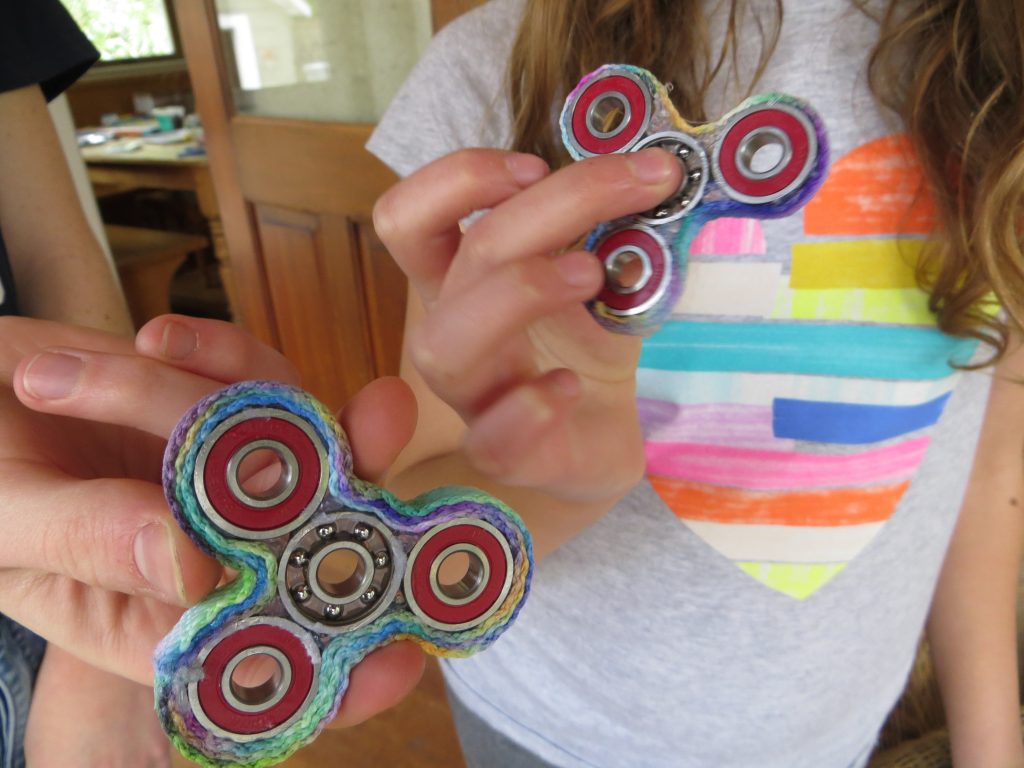
Homemade Tie-Dye Fidget Spinner
- by KitchenPantryScientist
Homemade Spinner with Tie-Dye Edges (KitchenPantryScientist.com)
Make a super-cool spinning toy using skateboard bearings, super glue and a little physics. Customize your design with a marker tie-dyed shoelace.
Warning: Not for recommended for kids under 5. Use adult supervision for super glue, sharp points, rubbing alcohol and glue gun.
You’ll need:
-4 skateboard bearings (available online or at skateboard stores)
-superglue or Krazy Glue
-a white shoelace
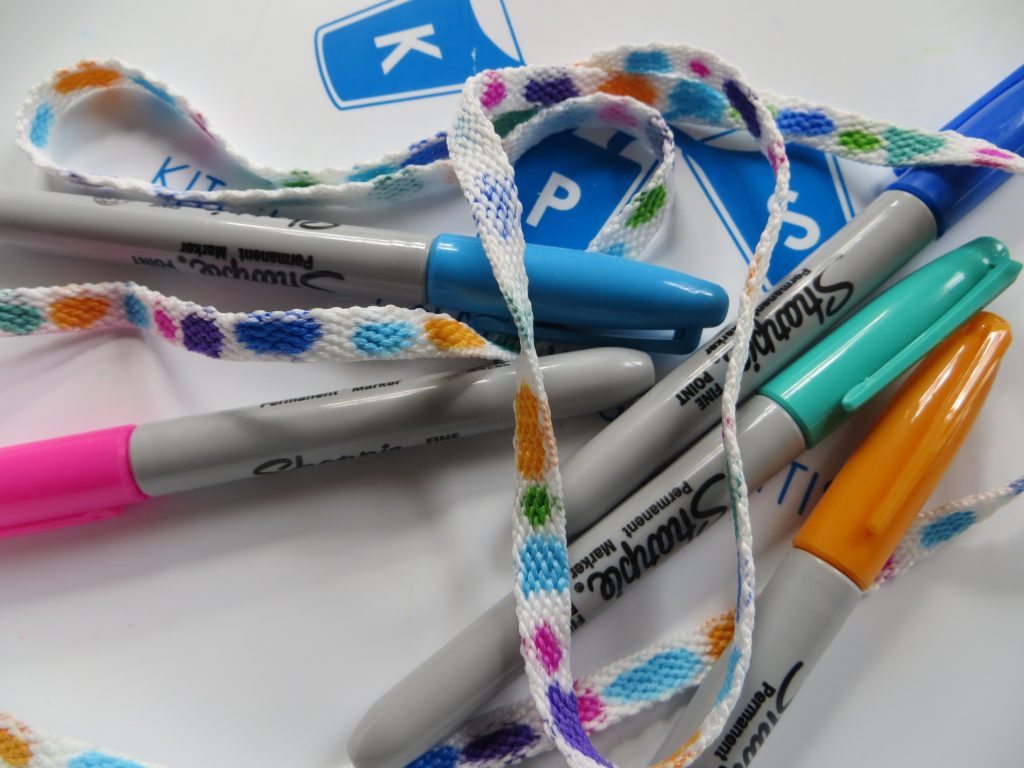
-permanent markers, like Sharpies
-rubbing alcohol (isopropanol)
-a glue gun
KitchenPantryScientist.com
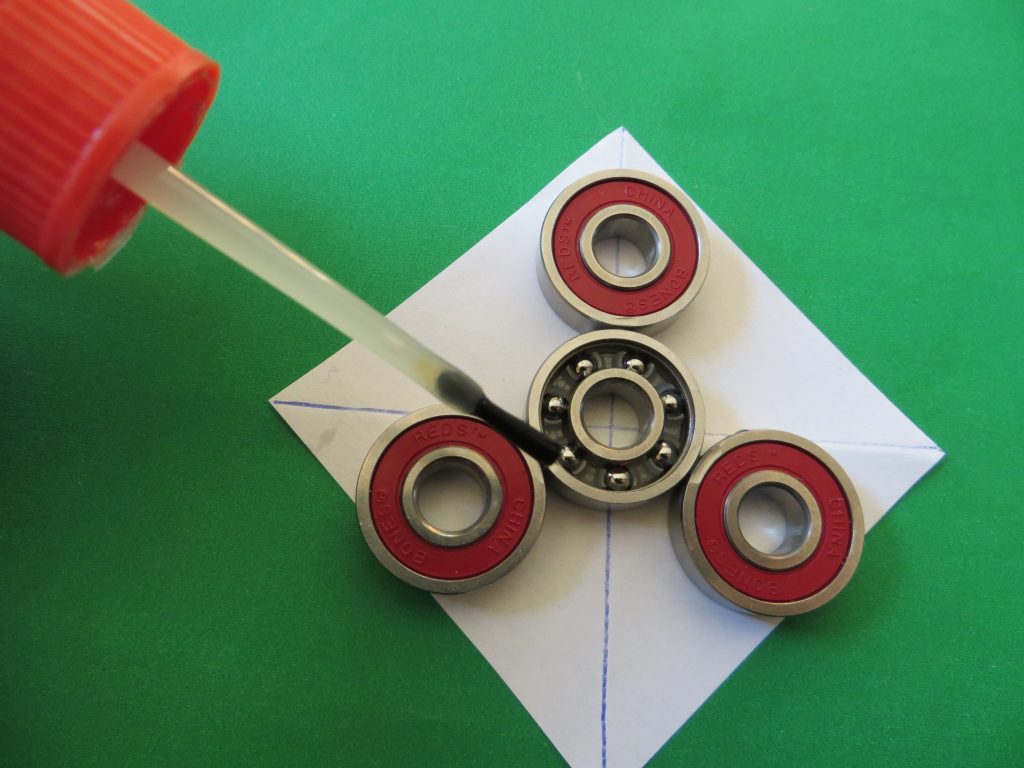
1. Use a sharp point to remove the cover from one of the bearings so that you can see the ball bearings inside. (See image above.)
2. Cut a piece of paper 6cm x 6cm and draw an X from corner to corner.
3. Center the bearing with the cover removed in the middle of the X. Then, center the other 3 bearings around the one in the middle so that they’re evenly spaced. You can use a ruler to check spacing. (See image below.)
KitchenPantryScientist.com
4. Add a single drop of super glue to the junction between each bearing to connect them. If you add too much, the spinner will stick to the paper. *Be careful not to get any glue onto the moving parts of the bearings.
KitchenPantryScientist.com
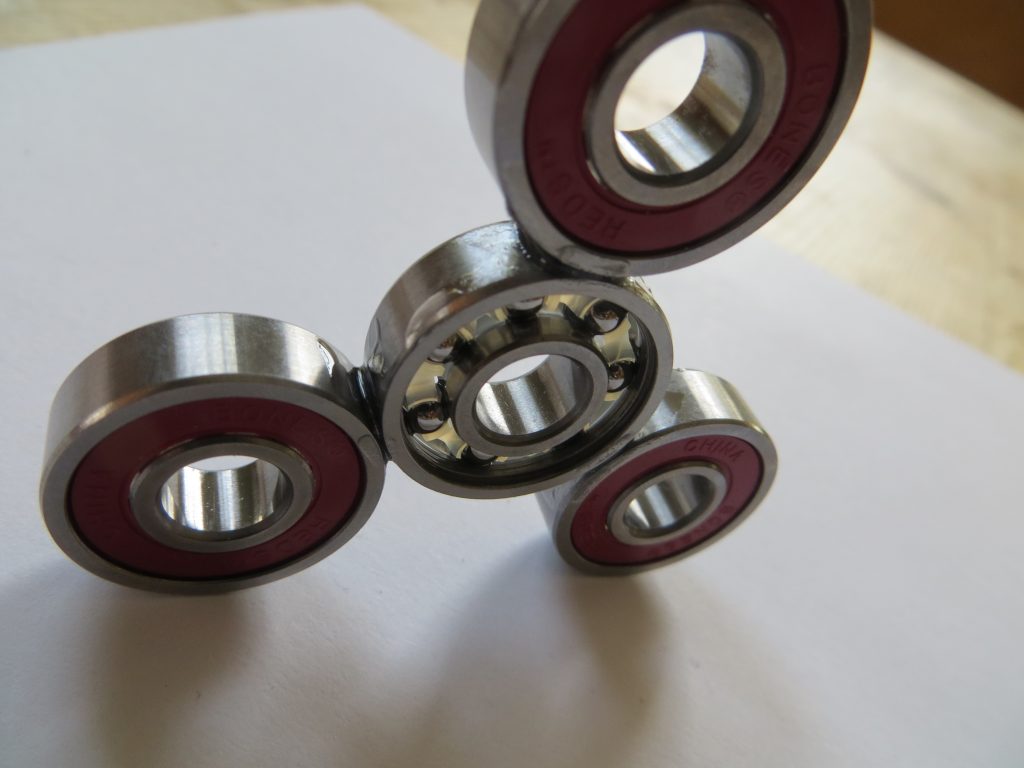
5. When the glue is dry, carefully turn the spinner over and place another drop of glue at each junction.
6. When the glue is dry, prop the spinner up on its side and add glue to the junctions on the sides. (See image below.) Repeat on each side.
KitchenPantryScientist.com
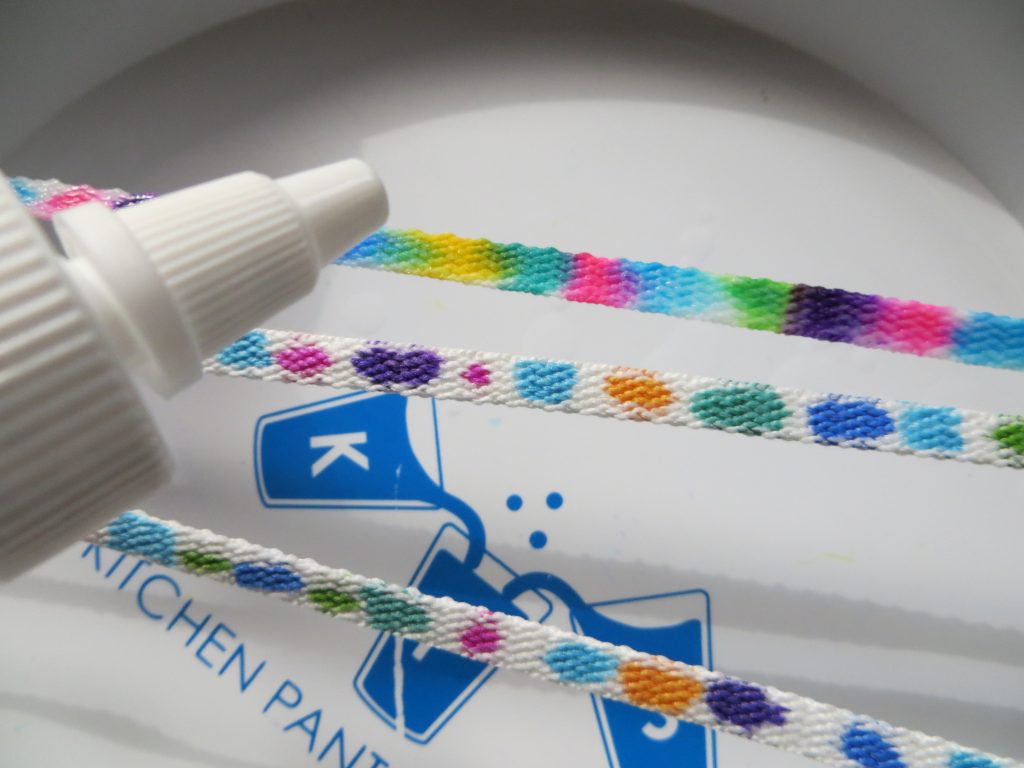
7. While the spinner glue is drying, make dots of permanent marker on the shoelace. In a well-ventilated area, suspend the shoelace over a tray or colander and drip rubbing alcohol onto it to make the colors run together. (See image.) Let it dry completely.
KitchenPantryScientist.com
8. Use the glue gun to attach the shoelace to the outside edges of the spinner. Fill in gaps between the lace and bearings with hot glue.
KitchenPantryScientist.com
9. Spin away!
The Science Behind the Fun:
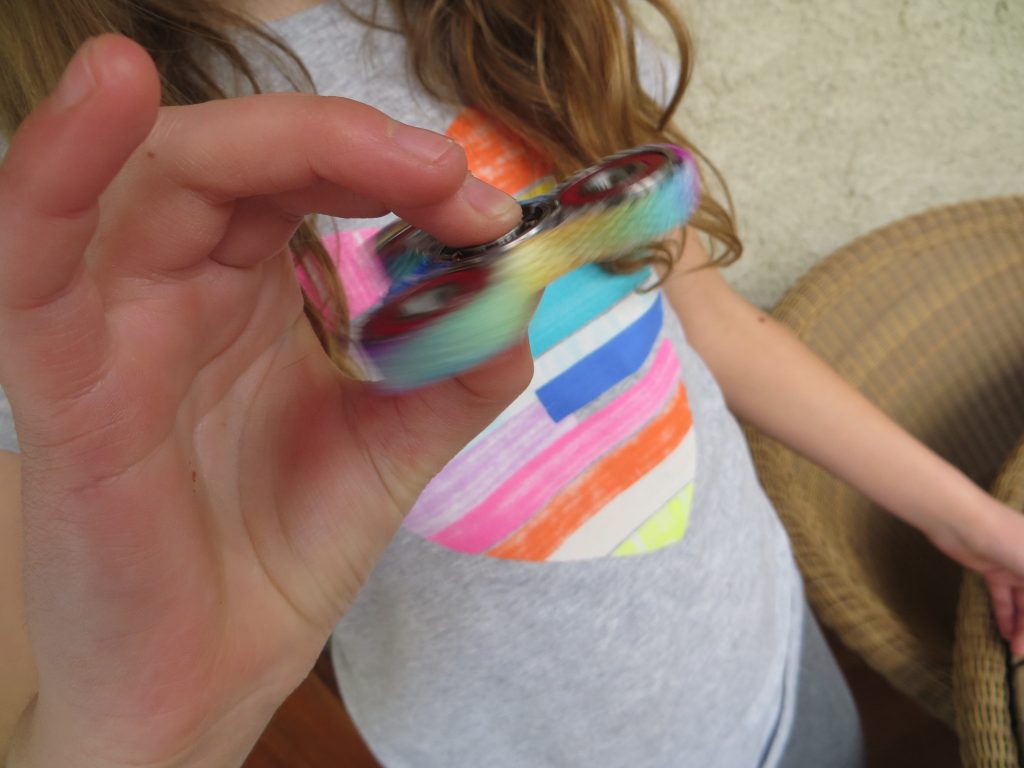
If you look closely at a skateboard bearing there are only a few ball bearings connecting the center and the outside part that spins. This means that there’s very little friction, or rubbing, between the parts. If you spin the toy around the center bearing, that bearing is called the axis of rotation.
The three bearings on the outside of the spinner provide the rotating mass that gives the toy a property called angular momentum, which keeps it spinning until the frictional force from the ball bearings in the center slows it down.
Pigments are molecules that give things color. The pigments in permanent markers are trapped in ink compounds that are insoluable in water, which means that they won’t dissolve in water. However, if you add a solvent, like rubbing alcohol, or isopropanol, to permanent markers, it dissolves the ink. As the alcohol moves through the cloth you are decorating, it carries the pigments along with it.
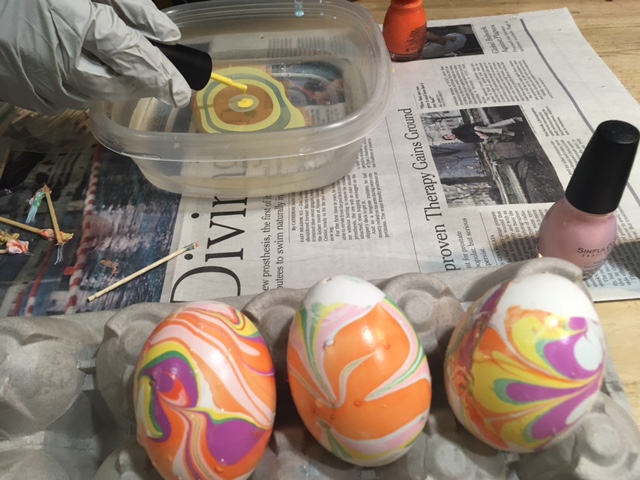
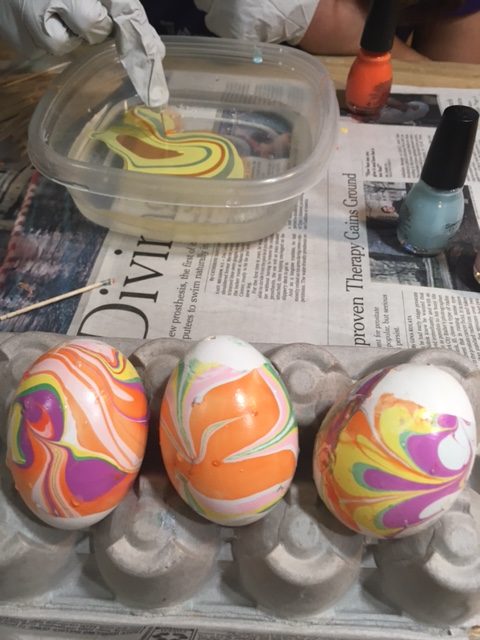
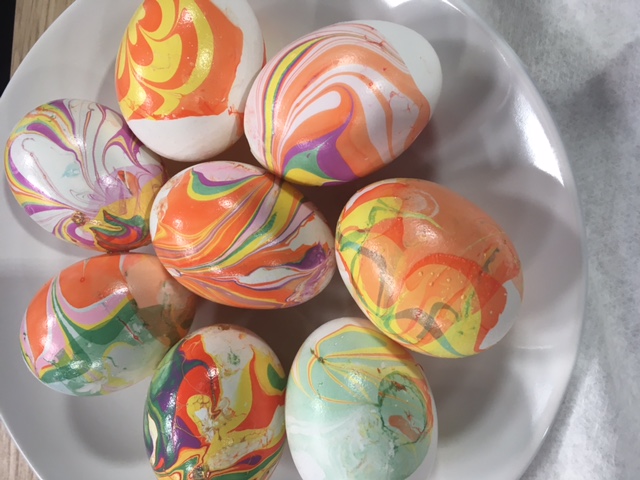
Nail Polish Marbled Eggs
- by KitchenPantryScientist
Nail polish marbling is tons of fun and yields stunning results. However, it takes some eye-hand coordination, practice and patience, so I’d recommend it for ages 10 and up. My 11 YO loved it!

KitchenPantryScientist.com
Hint: You’ll have to work reasonably fast for good results. Gloves are a must, and do this in a well-ventilated area to avoid breathing too many nail polish fumes.
You’ll need:
-eggs with the raw yolks and whites blown out (We poked generous holes in each end of our eggs using a thumb tack, scrambled the inside with a toothpick and used syringes and balloon pumps to blow out the raw whites and yolks. It takes patience, and you’ll lose a few eggs to cracks.)
-a container that can be thrown away
-nail polish in two or more colors
-a toothpick
-water
1. Fill your container 3/4 full of water.
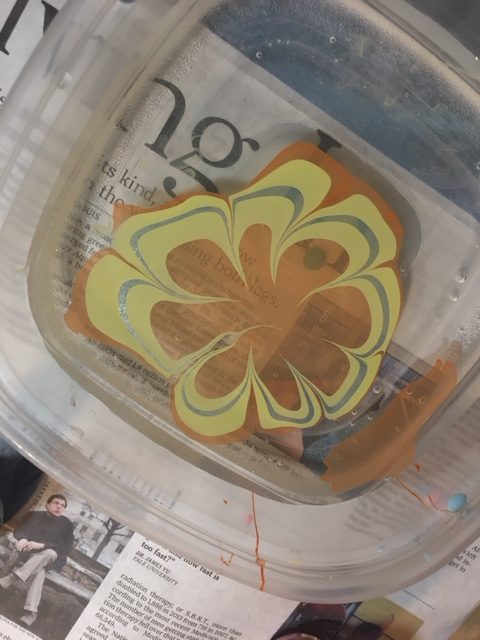
2. Drip nail polish, a drop at a time into the center of the water. Each drop should be in the center of the one before. Don’t worry if they spread out, just keep adding more. You’ll have to work fast, or the polish will dry on top of the water. It may take practice.
Kitchen Pantry Scientist.com
3. Use tip of the toothpick to draw designs in the polish. Start by pulling it out from the center or pushing it into the center.
KitchenPantryScientist.com
KitchenPantryScientist.com
4. When the design is ready, roll it onto your egg like you’re rolling a bandage around an ankle. Try to keep in smooth and in a single layer. If it looks bad, try another one. You’ll get the hang of it!
KitchenPantryScientist.com
5. Put the marbled egg on an egg carton to dry.
The science behind the fun: Nail polish is less dense than water and floats on top of it. It contains a solvent called acetate that evaporates very quickly into the air, drying out the polish.
Edible Egg Marbling (with Food Coloring and Whipped Cream)
- by KitchenPantryScientist
Want to take egg-dying up a notch the easy way? Marbling eggs using whipped cream and food coloring is a great project for little ones and the results are downright gorgeous!

KitchenPantryScientist.com
Hint: Wear disposable glove to prevent your fingers from getting stained.
You’ll need:
-hard boiled eggs
-vinegar
-a shallow container
-cool whip or whipped cream
-food coloring (neon, if you can get it)
-a chopstick or toothpick
1. Soak eggs in vinegar for 5 minutes.
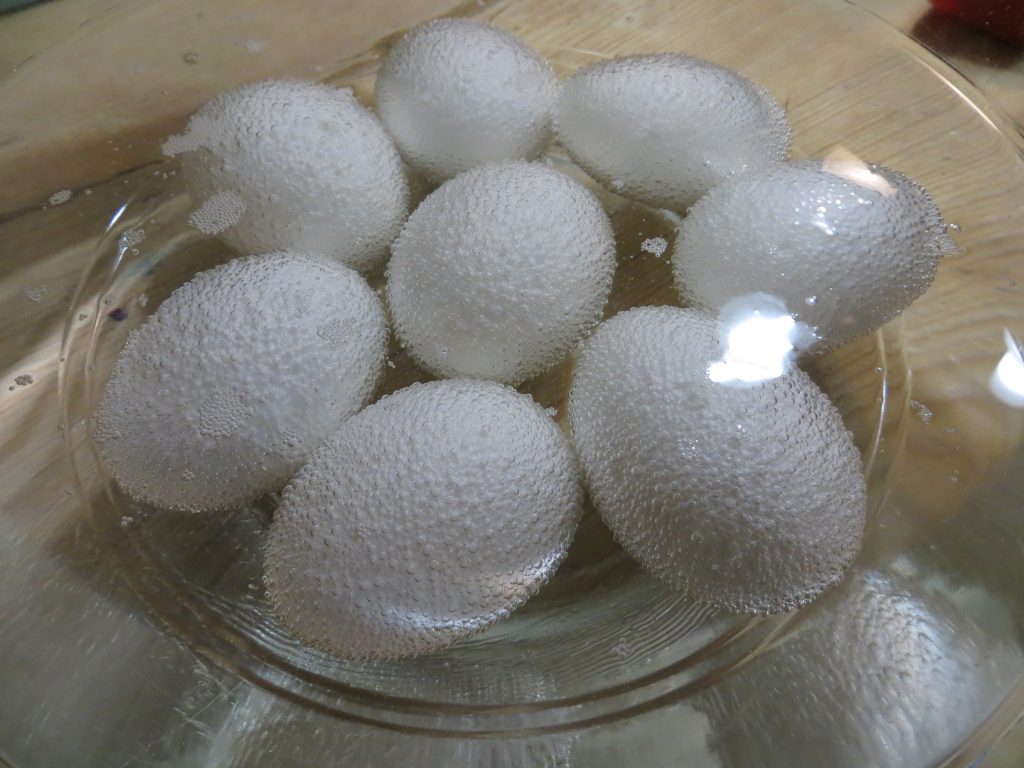
You’ll see carbon dioxide bubbles forming on the eggs as the vinegar reacts with the calcium carbonate in the egg shells.
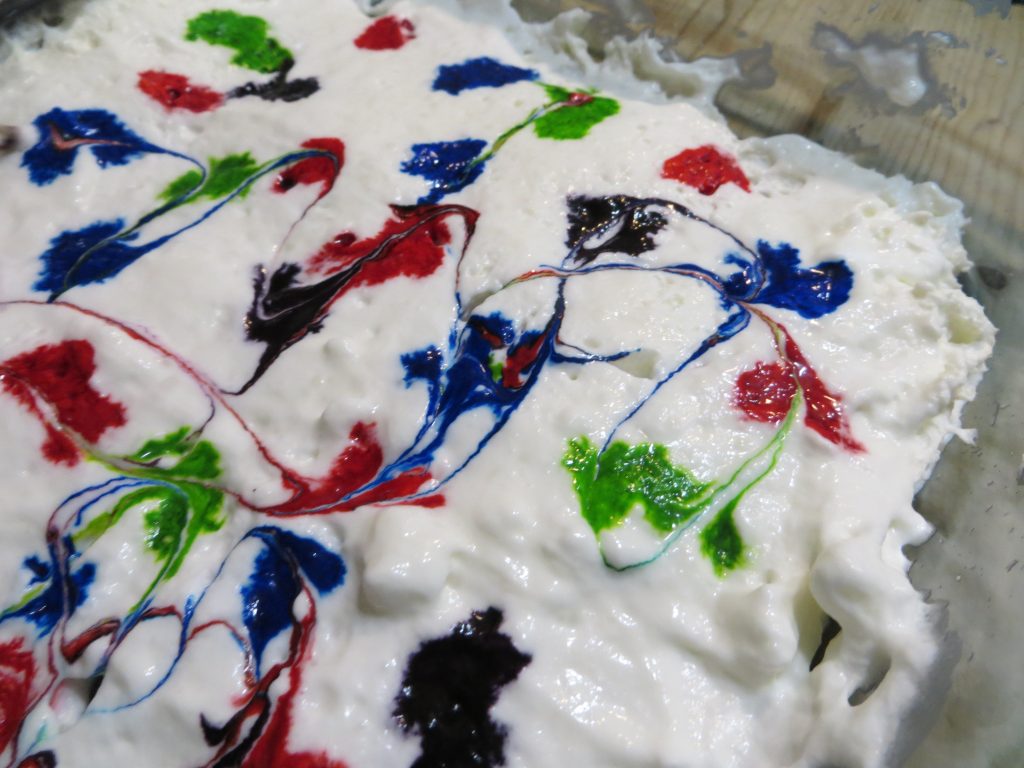
2. Spread and smooth a layer of whipped cream across the bottom of the container and drip food coloring all over the whipped cream.
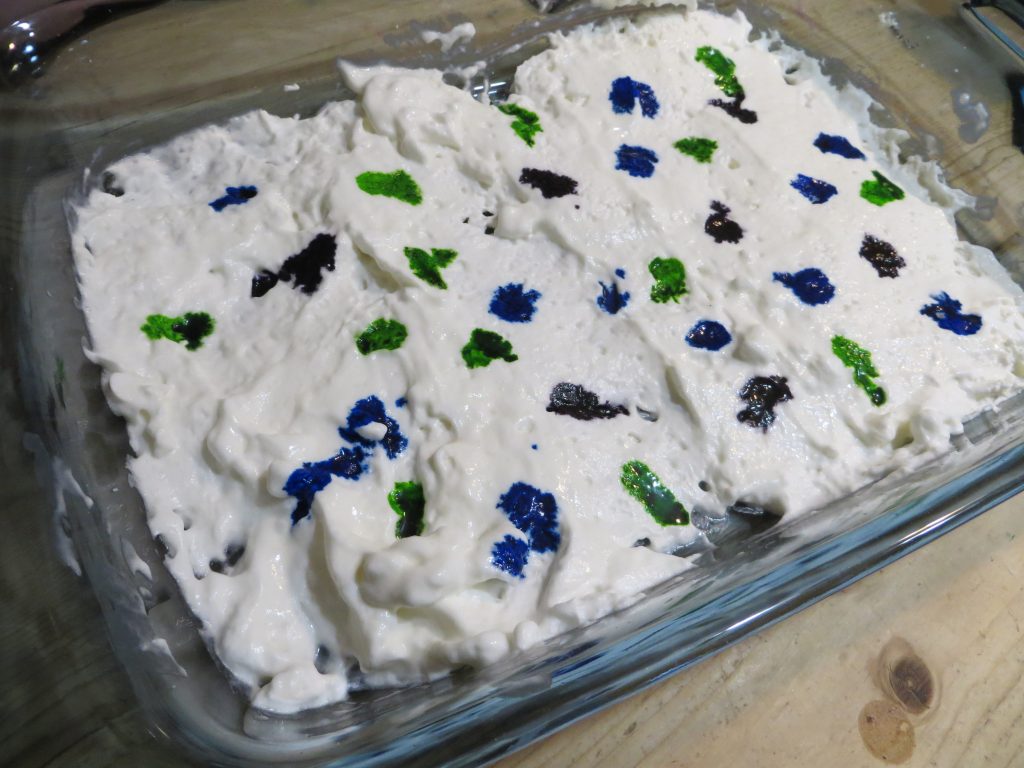
3. Swirl the drips into patterns using a toothpick or chopstick.
KitchenPantryScientist.com
4. Remove eggs from vinegar, blot them with a paper towel and roll them through the food coloring. Put them on a plate to dry.
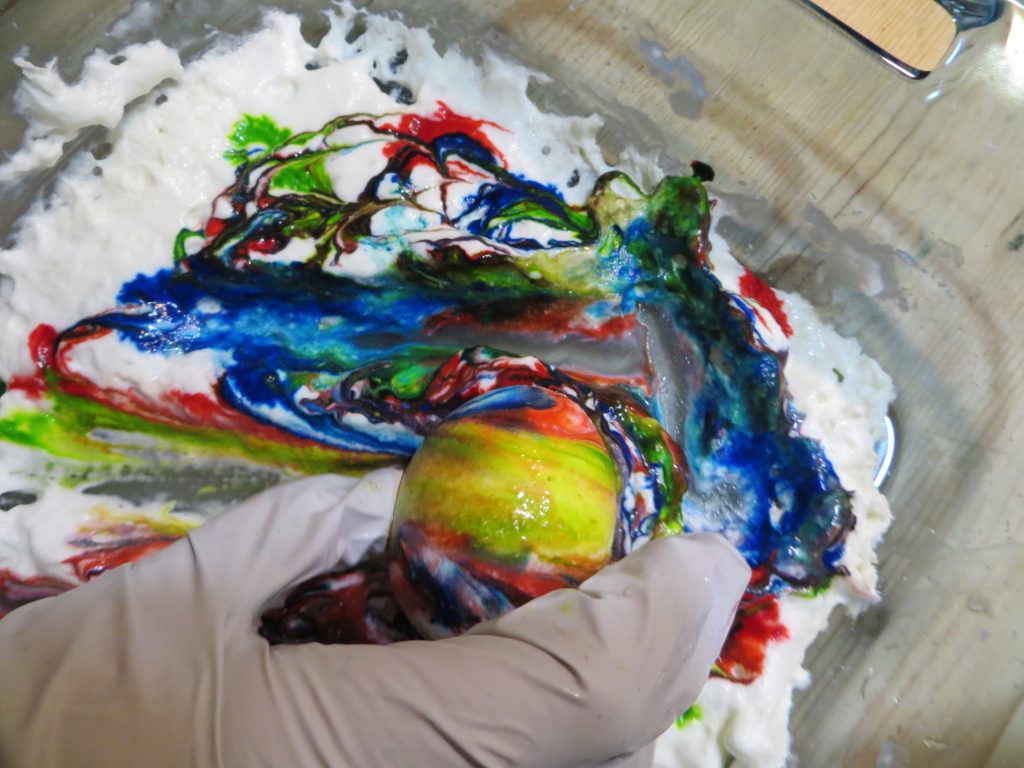
KitchenPantryScientist.com
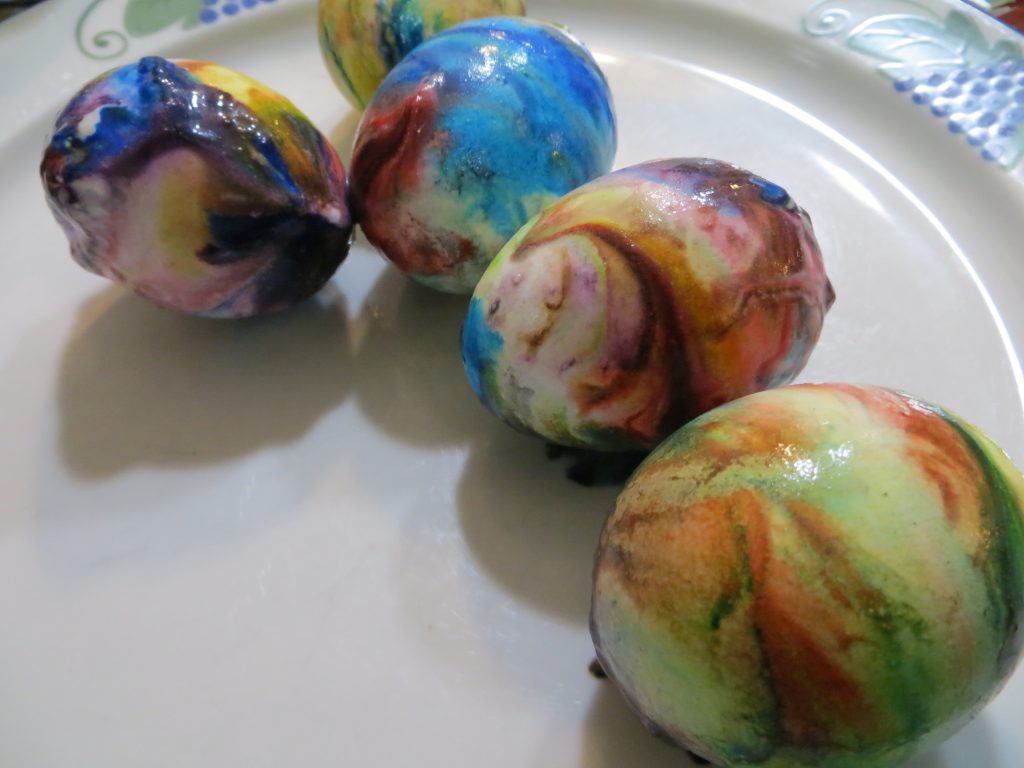
5. When the eggs are dry, wipe the excess whipped cream and color from the shells.
KitchenPantryScientist.com
The science behind the fun: Food coloring is an acid dye, so the vinegar (acetic acid) helps it form chemical bonds with the egg shell, dying the egg.
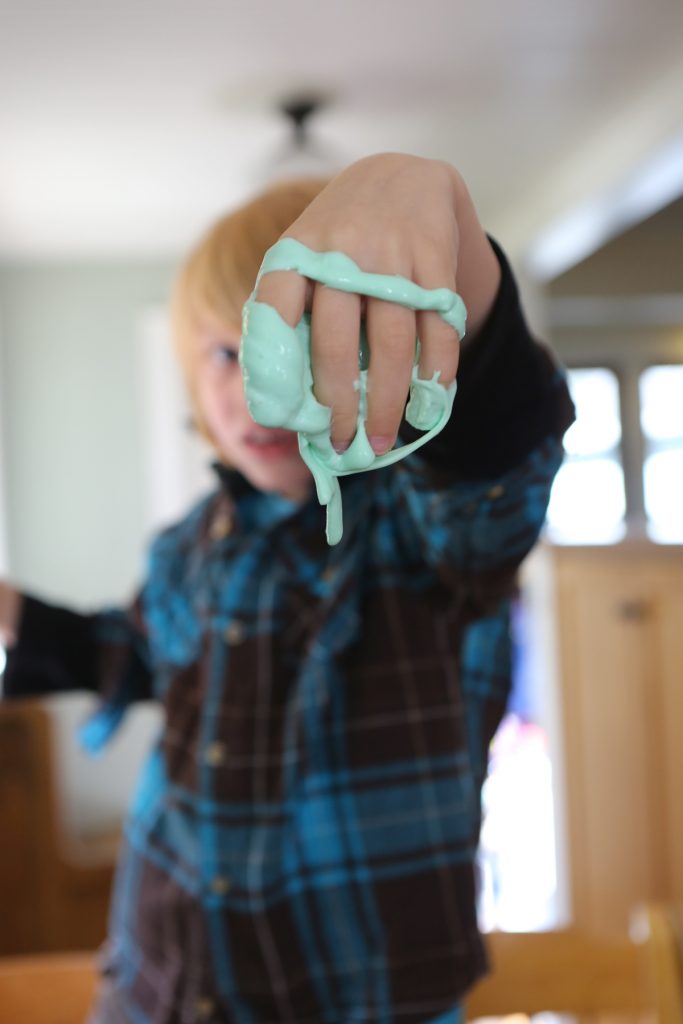
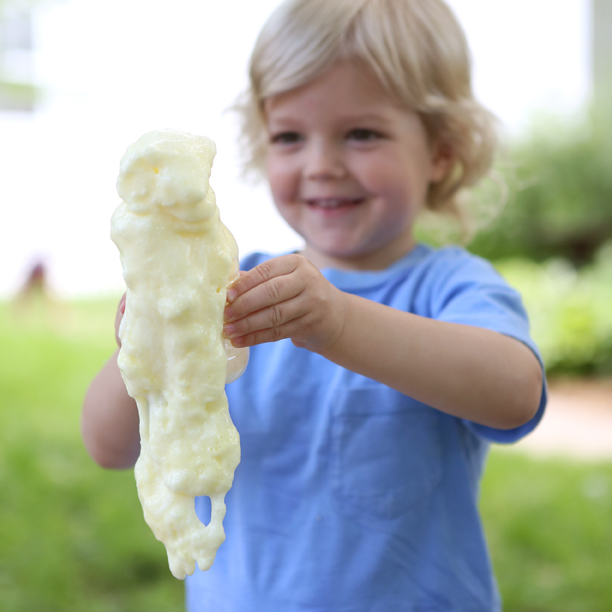
Slime versus Slime
- by KitchenPantryScientist
A homemade slime craze is sweeping the nation, and glue is becoming a limited resource as stores are swarmed by school kids on a quest to make the perfect goo.
from Kitchen Science Lab for Kids (Quarry Books 2014)
I’ve posted recipes and videos for slime-making on this website and included one in “Kitchen Science Lab for Kids.” For my most recent book, “Outdoor Science Lab for Kids,” I invented a recipe for making slime that oozes from a bottle like a living thing.
From “Outdoor Science Lab for Kids” (Quarry Books 2016)
But the other day, my 11-YO brought home a slime recipe featuring clear glue, baking soda, shaving cream and contact lens solution, and I was baffled. Which ingredient was the cross-linking chemical that would bind all of the glue molecules together into slime? I hadn’t had much luck using any cross-linker besides Borax laundry detergent.
Curiosity got the best of me, and a trip to Walgreens confirmed my suspicion that most contact lens solution contains boric acid, a cross-linking chemical related to Borax. In the glue aisle, I discovered a “Borax-free slime” recipe for slime made with Tide Free and Gentle. (Tide detergent does, in fact, contain the same chemical in Borax, so it’s not really Borax-free.)
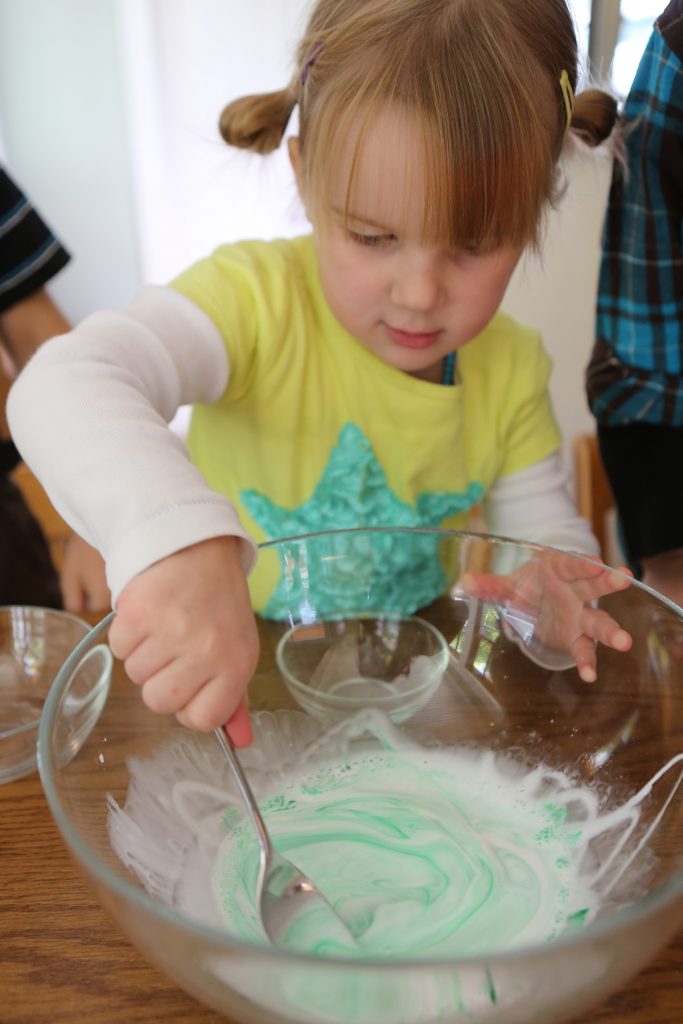
A few days later, a friend called saying that the slime her kids were making with Borax and clear glue wasn’t turning out. That’s when I decided it was time for us to do some scientific sleuthing.
From Kitchen Science Lab for Kids (Quarry Books 2014)
We tested two glues (clear glue and white school glue) with three cross-linking solutions (Borax laundry detergent, contact lens solution, and Tide Free and Gentle (which contains some Borax) to see how the end-products would differ.
Helpful hints: A bottle of glue contains 4 or 5 oz, which is a little more than half a cup. Mix glue with other ingredients BEFORE adding the cross-linker. Keep slime away from toddlers, as ingredients may be harmful if consumed. Always wash your hands after playing with slime.
Here’s what we found:
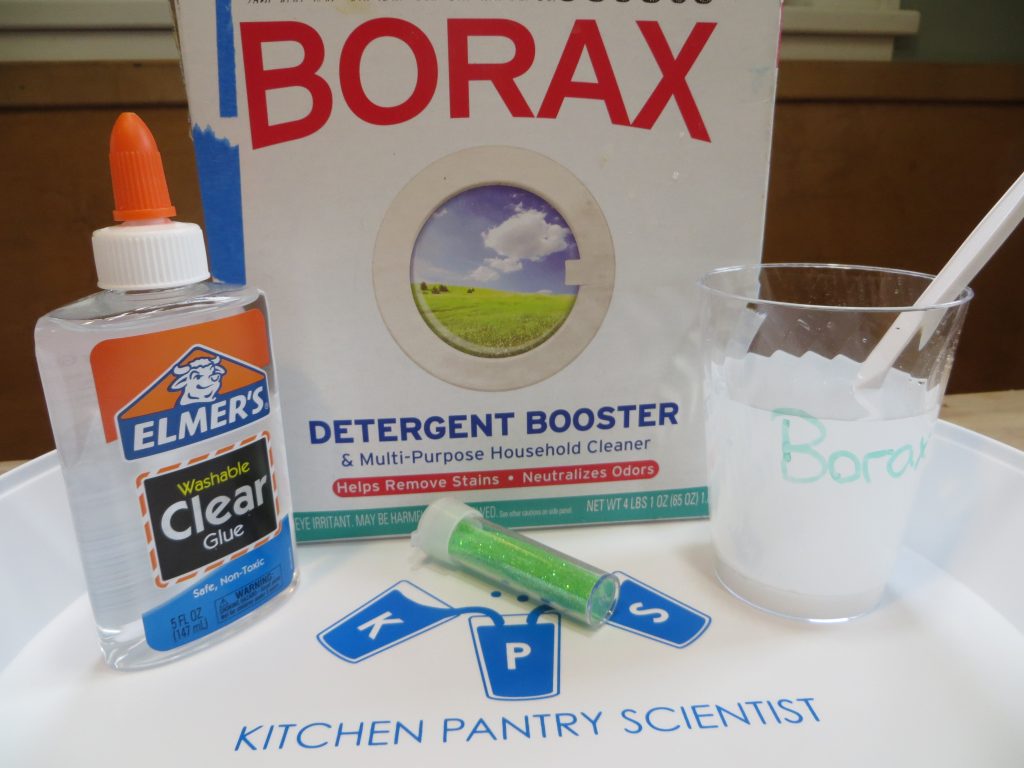
Traditional Borax Slime: Add equal parts glue and water (for example, one 5 oz bottle of glue+5 oz water.) Add glitter or food coloring. Dissolve a few spoonfuls of Borax in a cup of water to make a Borax solution. Add Borax solution to glue, a little at a time, until it no longer feels sticky.
-White school glue works best for this recipe and the result is smooth slime that can be rolled into long snakes.
-Clear glue doesn’t work well with this recipe and produces brittle slime. Save clear glue for the two recipes below.
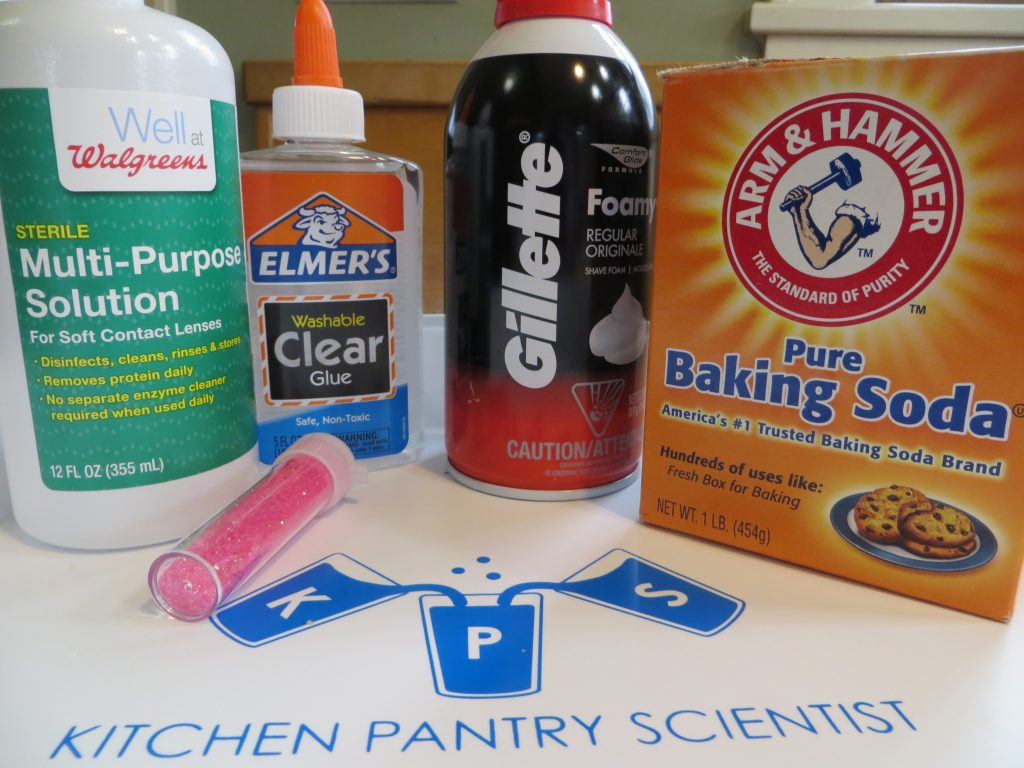
Puffy Slime: Add 5 oz glue to a large bowl. Stir in 1/2 tsp baking soda, 1/4 cup shaving cream and glitter or food coloring. Mix well. Add contact lens solution as a crosslinker and stir. Keep adding contact lens solution until your slime is no longer sticky and knead slime until it has the desired consistency.
-White school glue works well with this recipe and results in a puffier, firmer product than clear glue. The slime has a strong shaving cream smell.
-Clear glue works well for this project and produces nice, smooth puffy slime that smells like shaving cream.
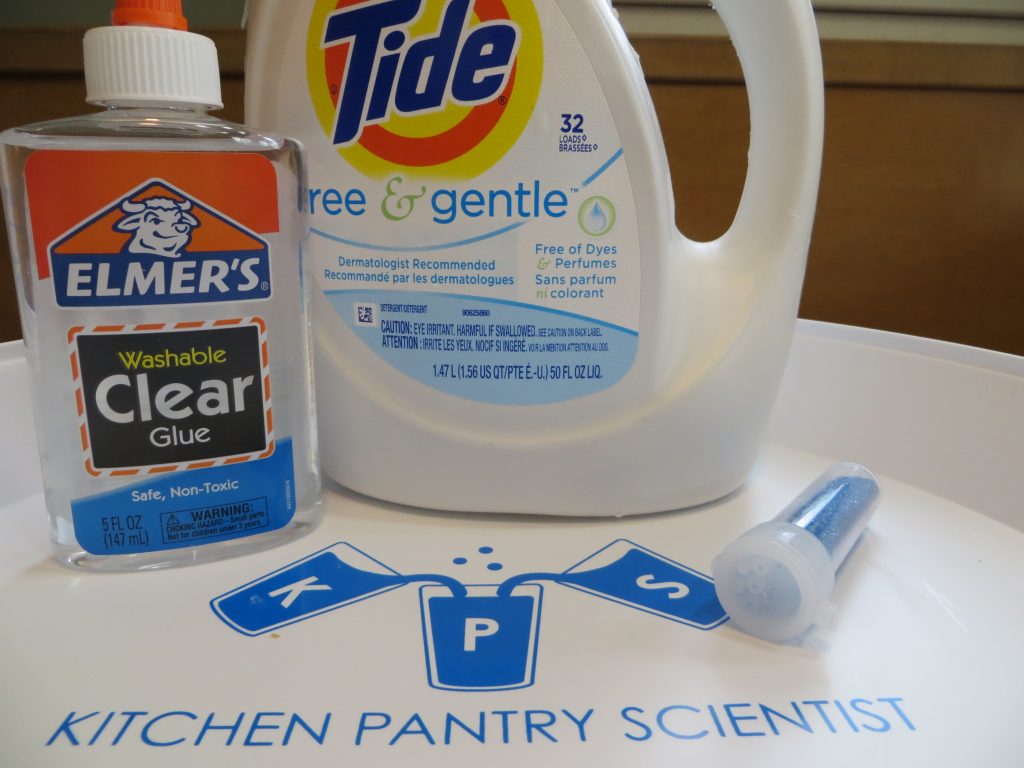
Tide Detergent Slime: Add 5 oz glue to a large bowl. Stir in 5 oz water and some glitter or food coloring. Add 1/4 cup of Tide Free and Clear laundry detergent. Mix well with a spoon and then hands to the desired consistency.
-White school glue works well with this recipe and the soap in the detergent makes tiny bubbles in the slime.
-Clear glue works well for this project and makes great , smooth slime that’s puffy from the soap in the detergent.

Try adding cornstarch, lotion, or anything else you can think of to perfect your recipe.
What are you waiting for? Go make some slime!
The Science Behind the Fun: A polymer is a long chain of repeating molecules, kind of like a string of pearls. The polymer in school glue is called polyvinyl acetate. Borax solution (sodium tetraborate) and boric acid (combined with baking soda to make borate), are cross-linking substances that make the polymer chains in glue stick together. As more and more chains stick together, they can’t move around and the solution gets thicker and thicker. Eventually, all the chains are bound together and no more Borax or boric acid solution can be incorporated into the slime.