Tag: homemade’
Homemade Gelatin Printing Plates for Leaf Prints
- by KitchenPantryScientist
When dissolved in hot water and allowed to cool, gelatin molecules trap water to create what scientists call a colloid, or a gel. When glycerin is added to a gel, it becomes slippery, so paper won’t stick to it and can be used to make beautiful prints that capture the character and anatomy of a leaf. I’m obsessed with this fun, easy science/art project. Parental supervision is recommended when adding the boiling water to the gelatin.

You’ll need:
1.5 cups vegetable glycerin ( around 375 ml) (I’d recommend ordering this online, since it’s cheaper.
1/2 cup cold water
112 grams powdered plain gelatin (four 1oz boxes of plain Knox gelatine, near Jell-O in the grocery aisle
1 and 1/2 cups boiling water
heat-resistant mixing bowl
kitchen strainer/sieve (optional)
liquid measuring cup
large, flat container, such as a casserole dish or rimmed baking sheet
paper towels
paper
a small paint roller or brayer
liquid acrylic paint
leaves

Directions”
- Place 1/2 cup cold water in a bowl.
- Pour half of the glycerin liquid into the water and mix slowly to avoid bubbles.
- Sprinkle the gelatin powder into the water/glycerin and stir/mash together.
- Add boiling water and stir carefully, mashing up the lumps until the gelatin dissolves.
- Put the mixture through the sieve to remove any lumps of undissolved gelatin.
- Add the remaining glycerin to the strained gelatin mixture.
- Slowly stir to thoroughly blend all ingredients, being careful not to introduce bubbles.
- Pour the mixed liquid into the large, flat container.
- Use a paper towel to skim any bubbles off the surface of your gelatin mix
- Let the gelatin sit undisturbed for an hour or two, and then put it in the refrigerator for 2 hours.
- While the plate solidifies, find some fresh leaves. Use a book or app to try to identify the leaves you picked.
- When the gelatin plate is ready, you can leave it in the container or remove it. (I left it in the casserole dish.) Use the roller to apply paint to the gelatin
- Lay some leaves on the paint and use a finger to smooth each part of the leaf down into the paint. To highlight the veins on the leaf, lightly roll paint over the leaf.
- Carefully put a piece of paper down on top of the leaves and paint. Use your fingers to smooth the top sheet of paper and transfer the paint. Lift the paper to reveal the leaf prints.
- Peel the leaves off the painted gel and place them between two sheets of paper to make a positive print. Smooth the paper to transfer the paint and separate the paper to see the images.
- The gelatin plate can be reused with different paint colors. Just wash the gel plate with a wet paper towel between uses, and store it between pieces of saran wrap. It should keep for a few weeks.

Homemade herb garden and flower seed paper
- by KitchenPantryScientist

This fun project teaches kids about paper science and lets you keep a little bit of summer growing all year long. You can find instructions on the video below, from my Kitchen Pantry Scientist YouTube channel. (Follow me there for loads of fun science projects!)
Homemade Hand Sanitizer
- by KitchenPantryScientist
Handwashing is the best way to kill influenza and corona viruses, but it’s easy to make your own hand sanitzer for those times when you can’t get to a sink.
To make sanitizer, you’ll need 91% or 99% rubbing alcohol (isopropanol) and the kind of aloe vera gel used for sunburn treatment, which may have a little bit of water and alcohol mixed in already. Both are available over the counter at most stores.
Mix 3/4 cup 91% alcohol with 1/4 cup aloe vera gel, or mix 2/3 cup 99% alcohol with 1/3 cup aloe vera gel. (You need at least 60% alcohol in the final product.) Add to a dispenser or bottle and keep out of the reach of children, unless applying it to their hands!
Leprechaun Pop Rocks (Carbon Dioxide Candy)
- by KitchenPantryScientist
Homemade pop rocks aren’t as fizzy as the ones you buy at the store, but they’re mighty tasty! Citric acid combines with baking soda to make carbon dioxide gas bubbles that get trapped in the candy. Adding extra citric acid and baking soda to the surface of the candy gives some extra fizz when you put them in your mouth. Trick your friends by adding a flavor that doesn’t match the color!
Leprechaun Pop Rocks (KitchenPantryScientist.com)
Warning: Ages 8 and up only. Extremely hot candy syrup. Adult supervision required.
You’ll need:
2 cups sugar
1/4 cup water
1/2 cup corn syrup
candy thermometer
baking sheet
corn starch
a few drops of food coloring
1 tsp flavoring, like orange or cherry
1/4 cup citric acid + 1 tsp to sprinkle on in final step
1 tsp baking soda plus some to sprinkle on the candy
Step 1. Coat a the bottom of an inverted baking sheet with cornstarch.
Step 2. Boil sugar, corn syrup, and water, stirring until it reaches 300 degrees F.
Step 3. Remove the hot, melted candy from heat. Stir in food coloring, flavoring, 1/4 cup citric acid and 1 tsp baking soda.
Step 4. Very carefully, pour the mixture onto the baking sheet. Do not touch!!! Sprinkle 1 tsp. citric acid evenly over the surface of the candy.
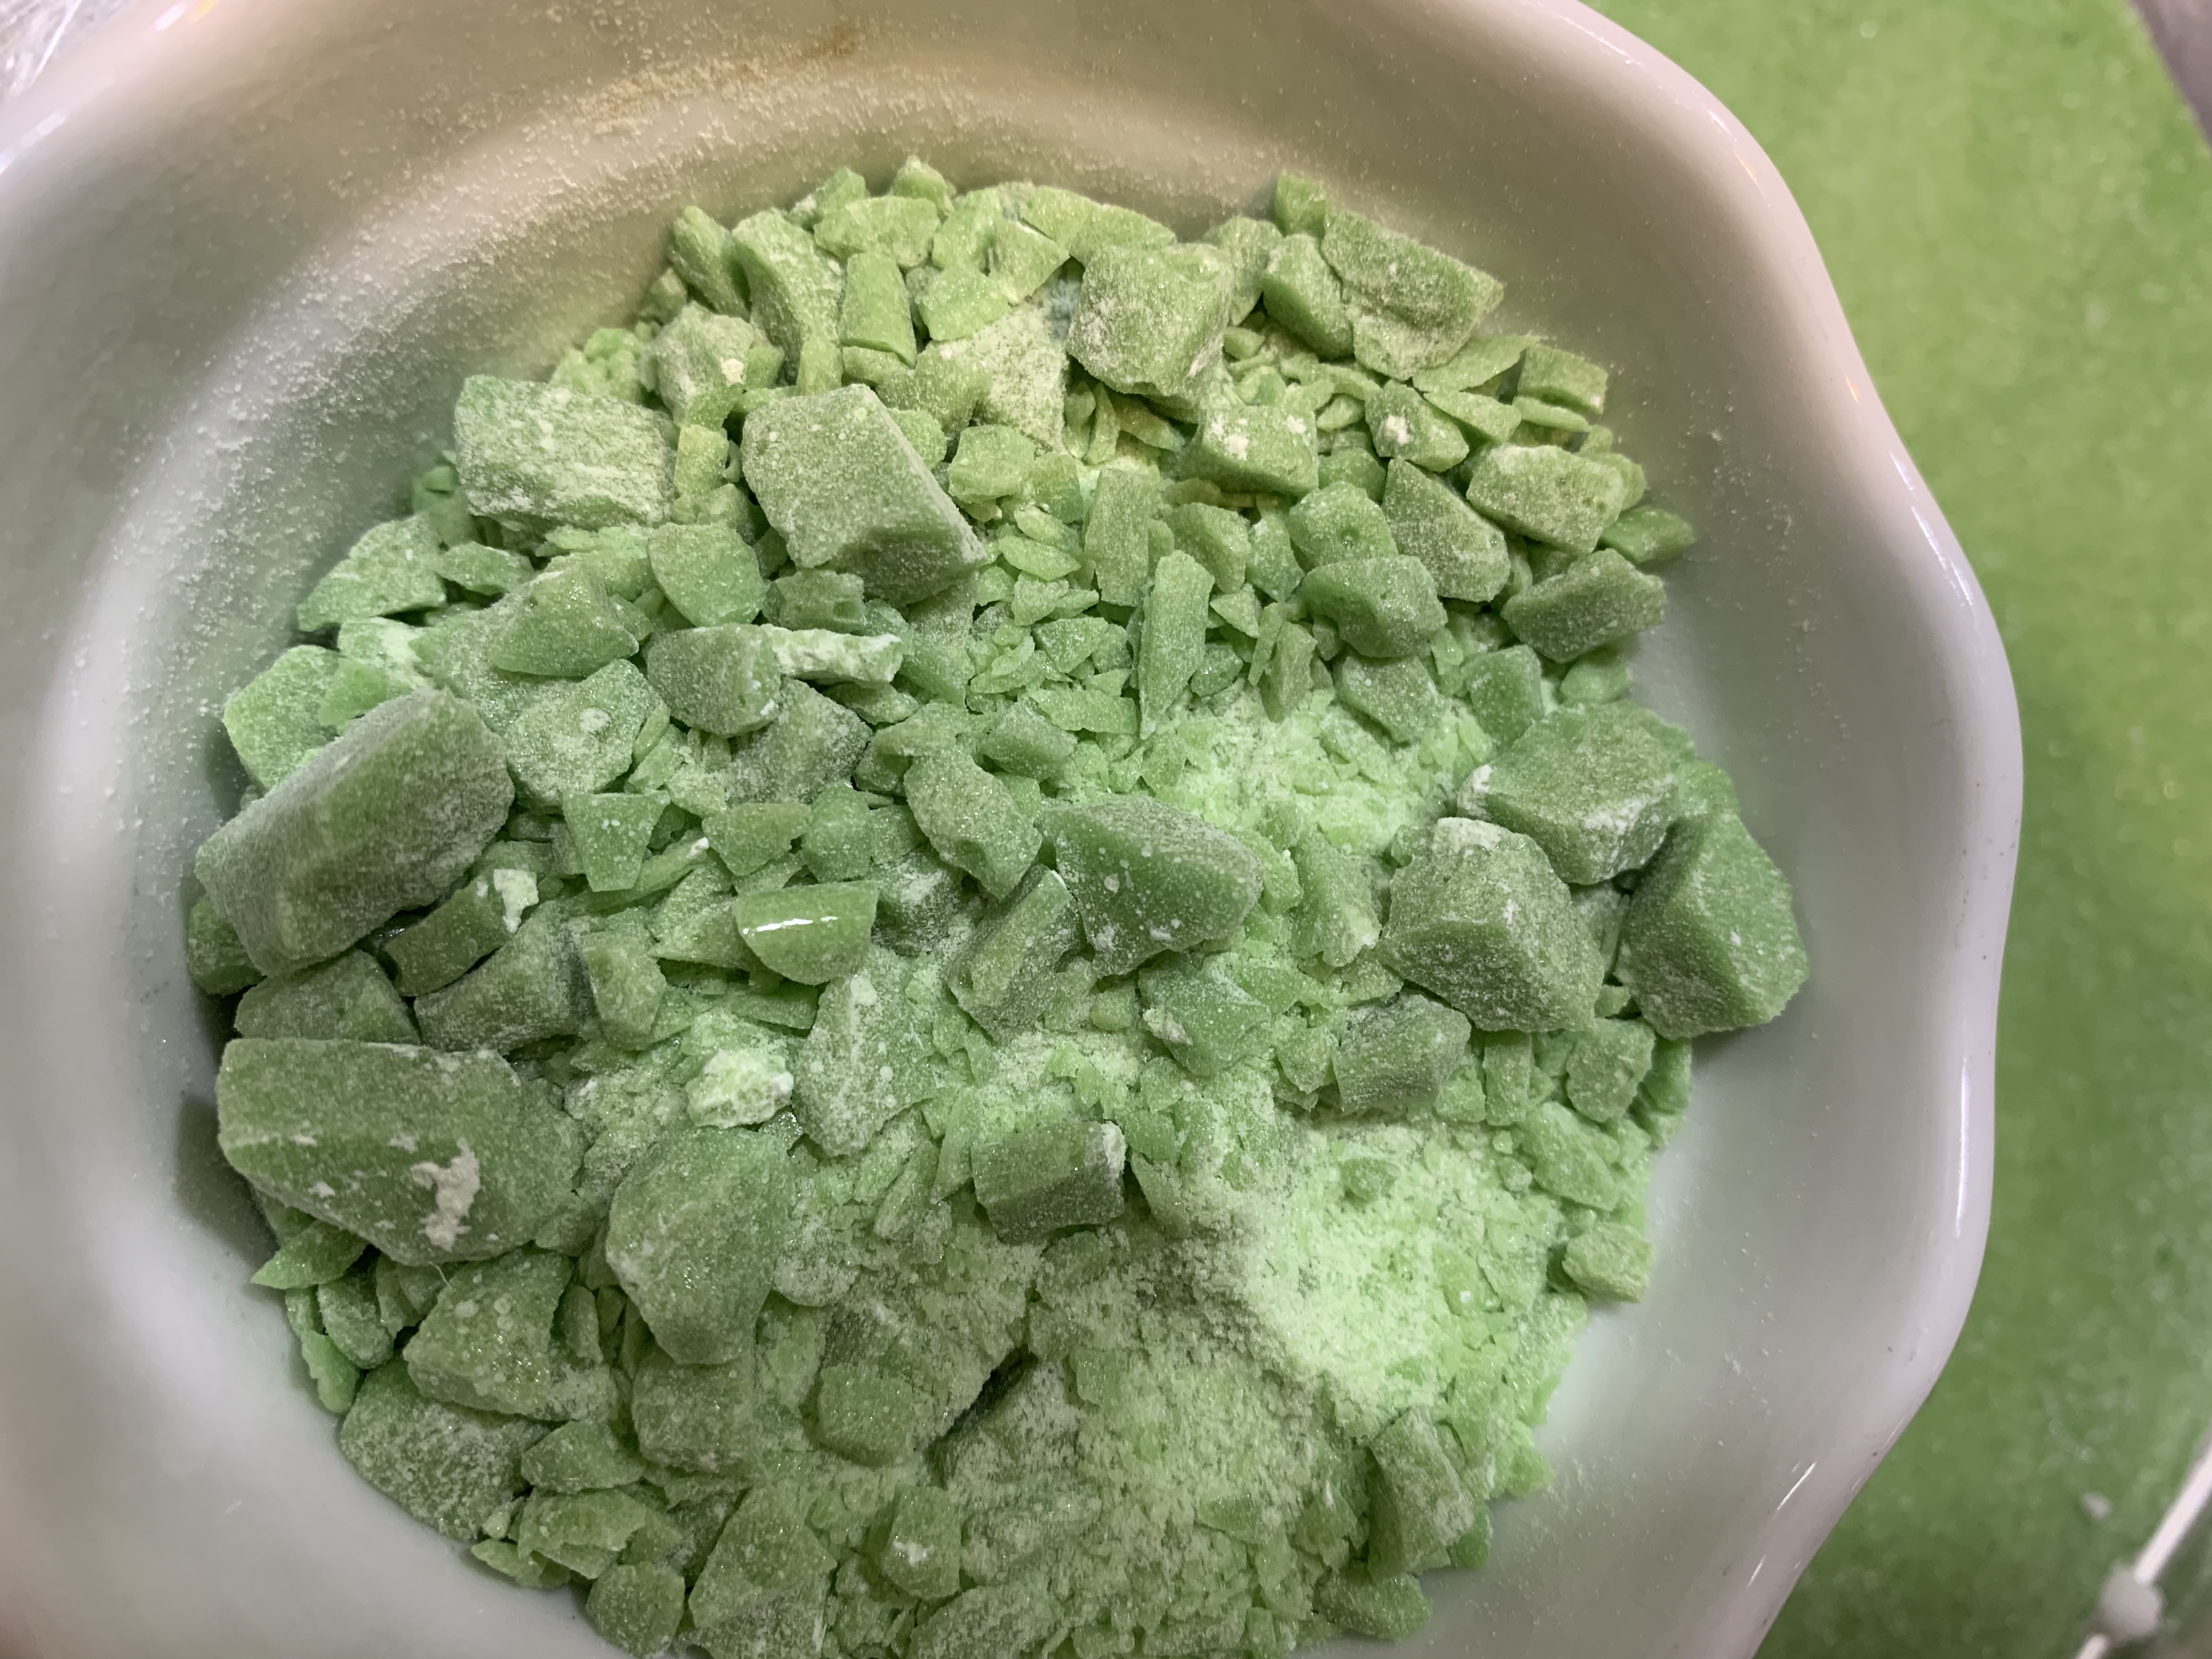
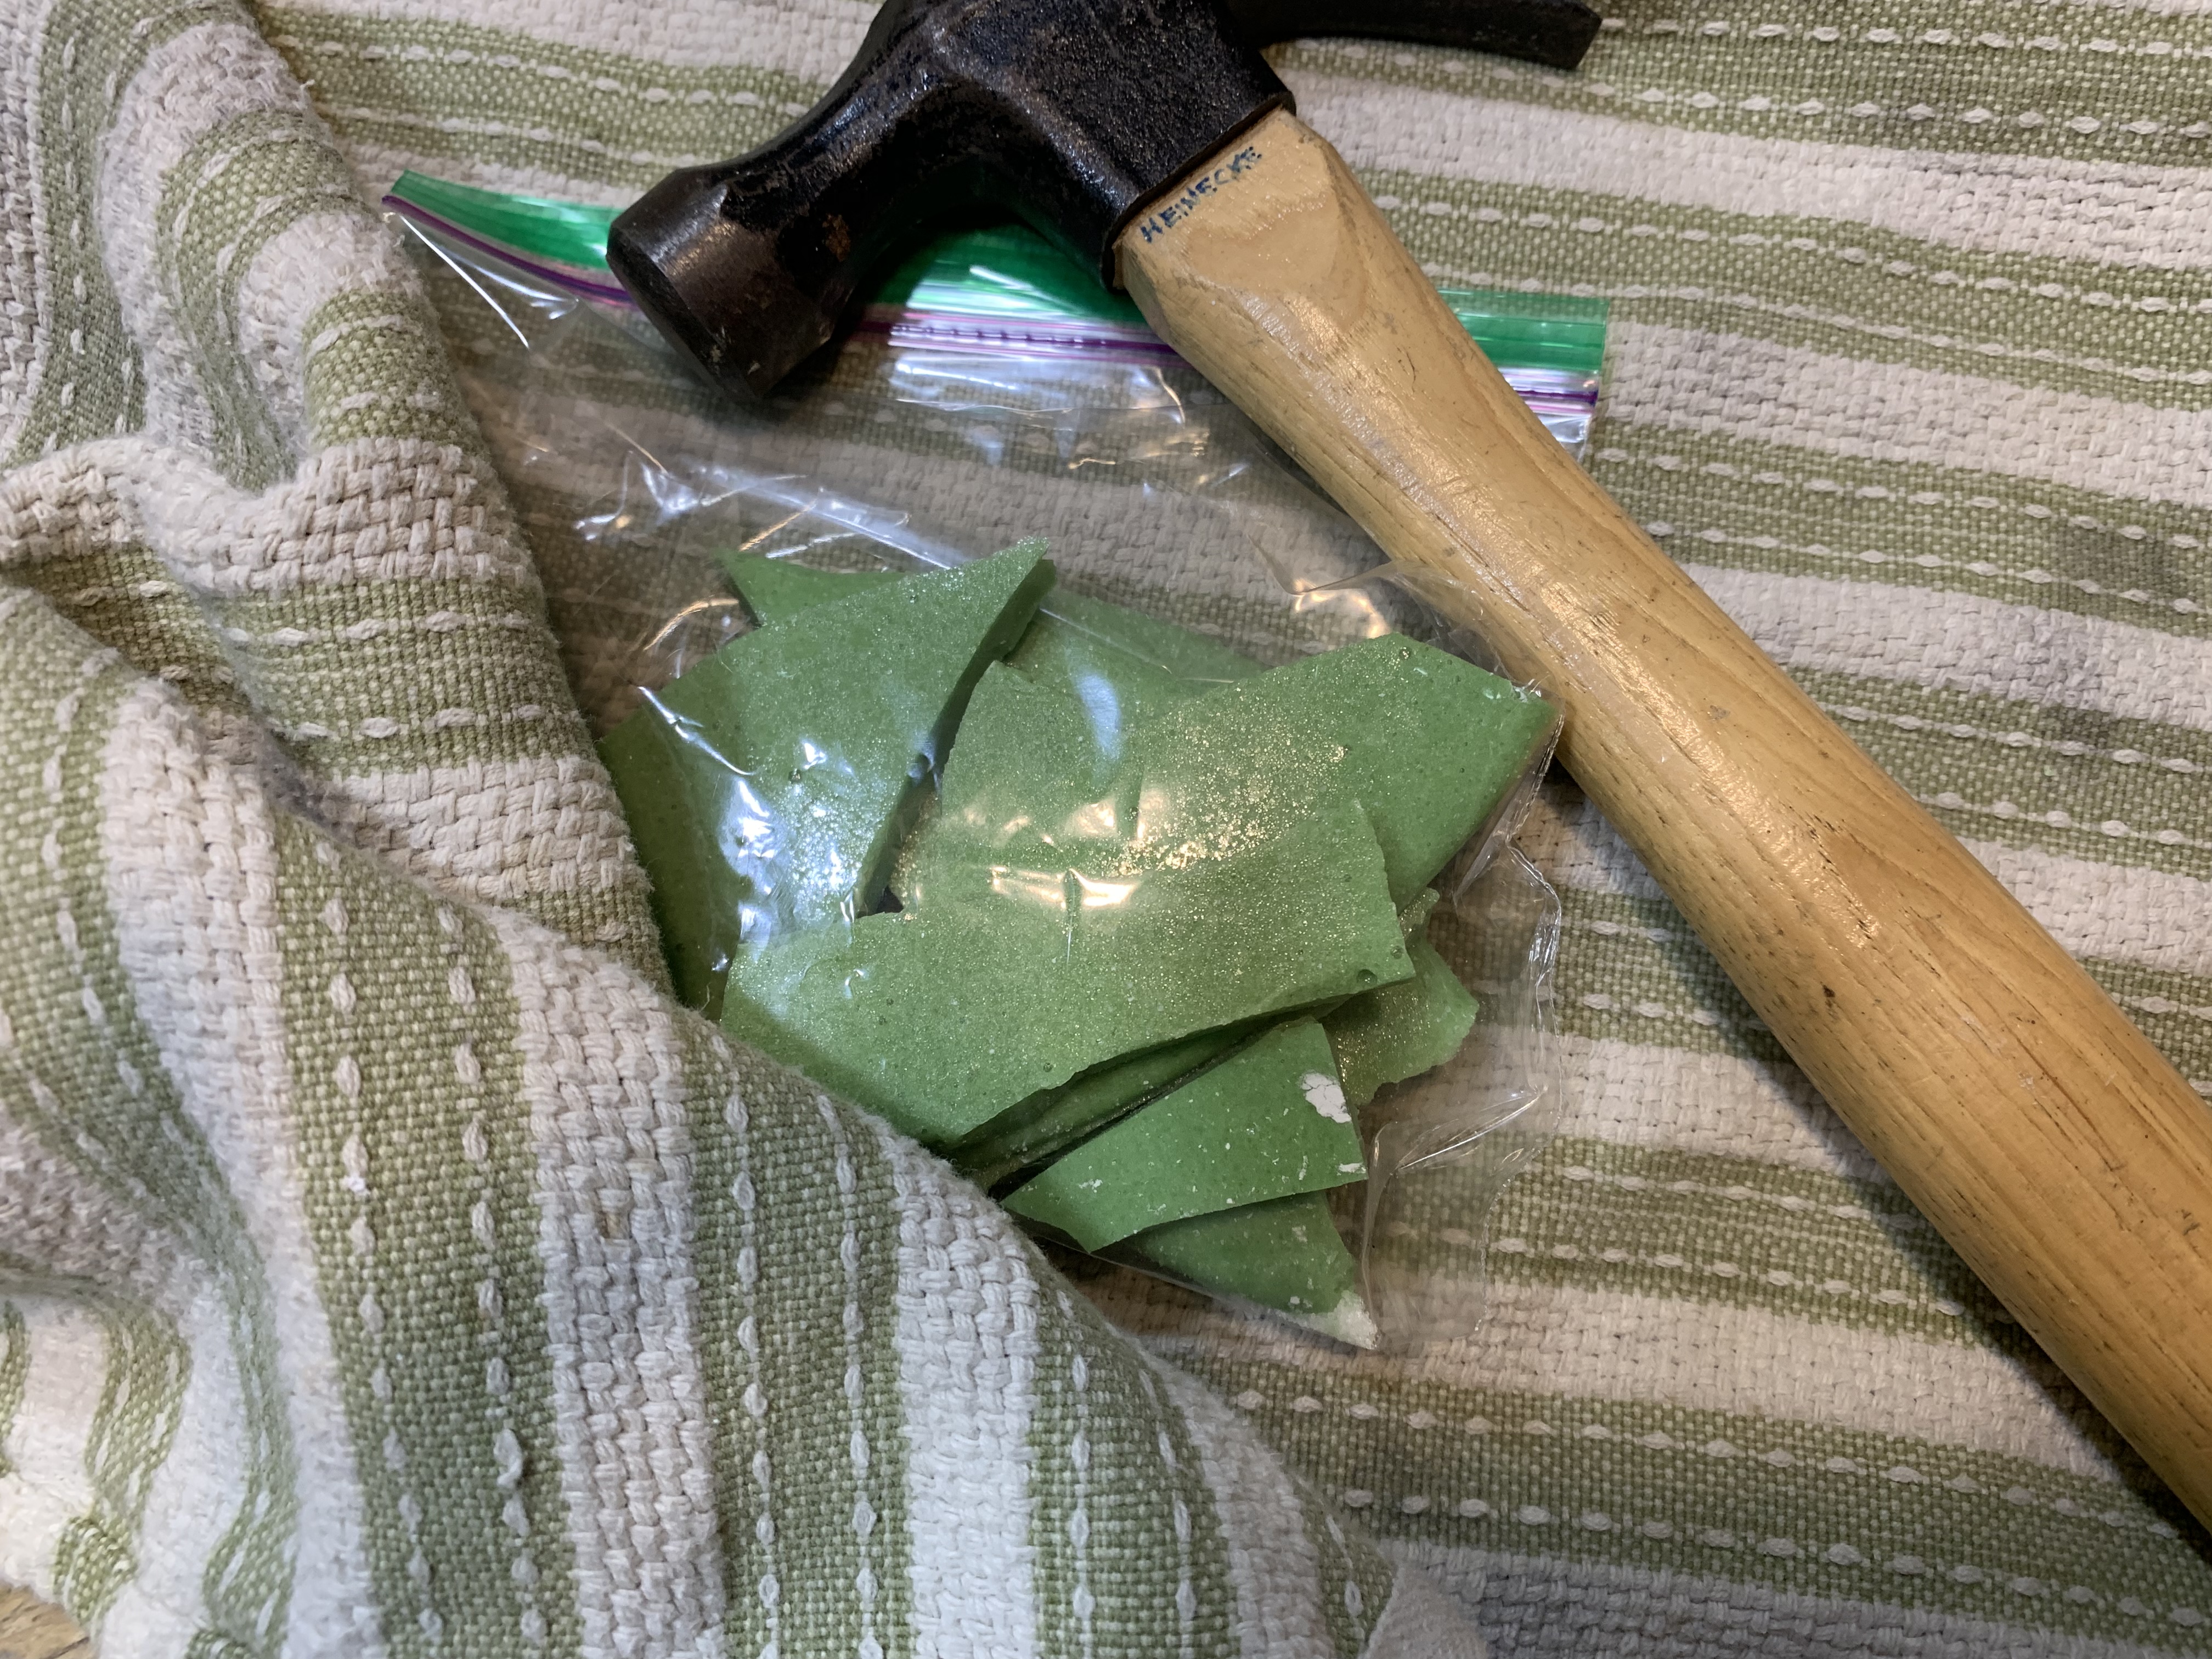
Step 5. Let the mixture cool for at least 30 minutes and the break it into small pieces. Put some of the fragments in a plastic zip lock bag and use a hammer or rolling pin to crush them into tiny pieces or powder.
Step 6. Sprinkle on a little more baking soda and shake up in the bag.
Step 7. Enjoy the leprechaun pop rocks!
Homemade Petri Plates
- by KitchenPantryScientist
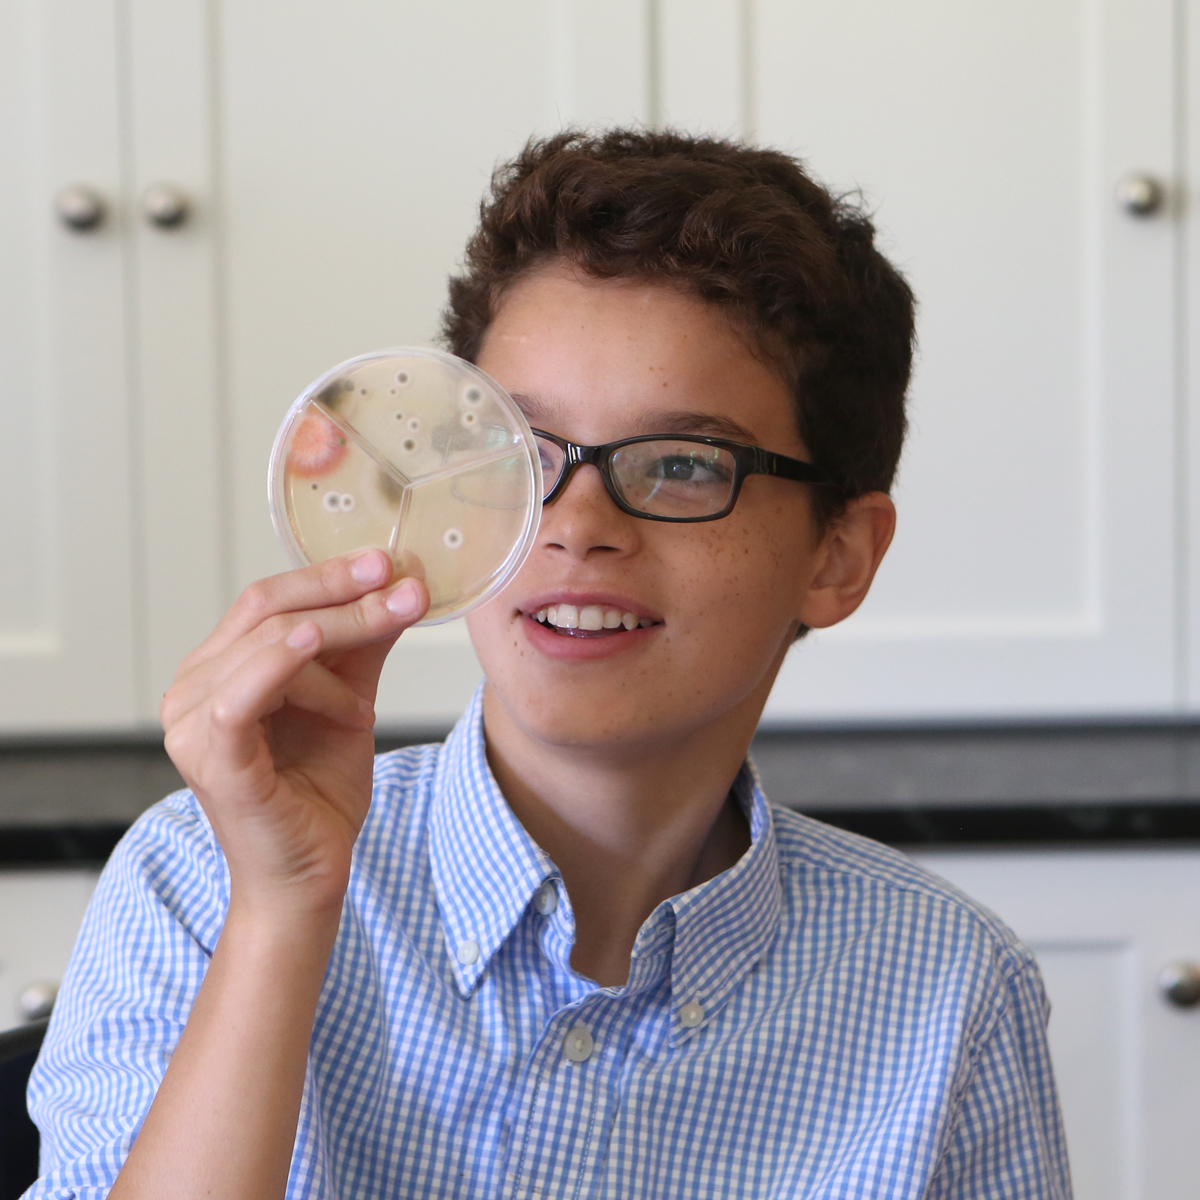
Does hand-washing really get rid of germs? Yes! Scrubbing your hands with soap and water for the length of time it takes you to recite the ABC’s will get rid of the majority of harmful microbes on your hands.
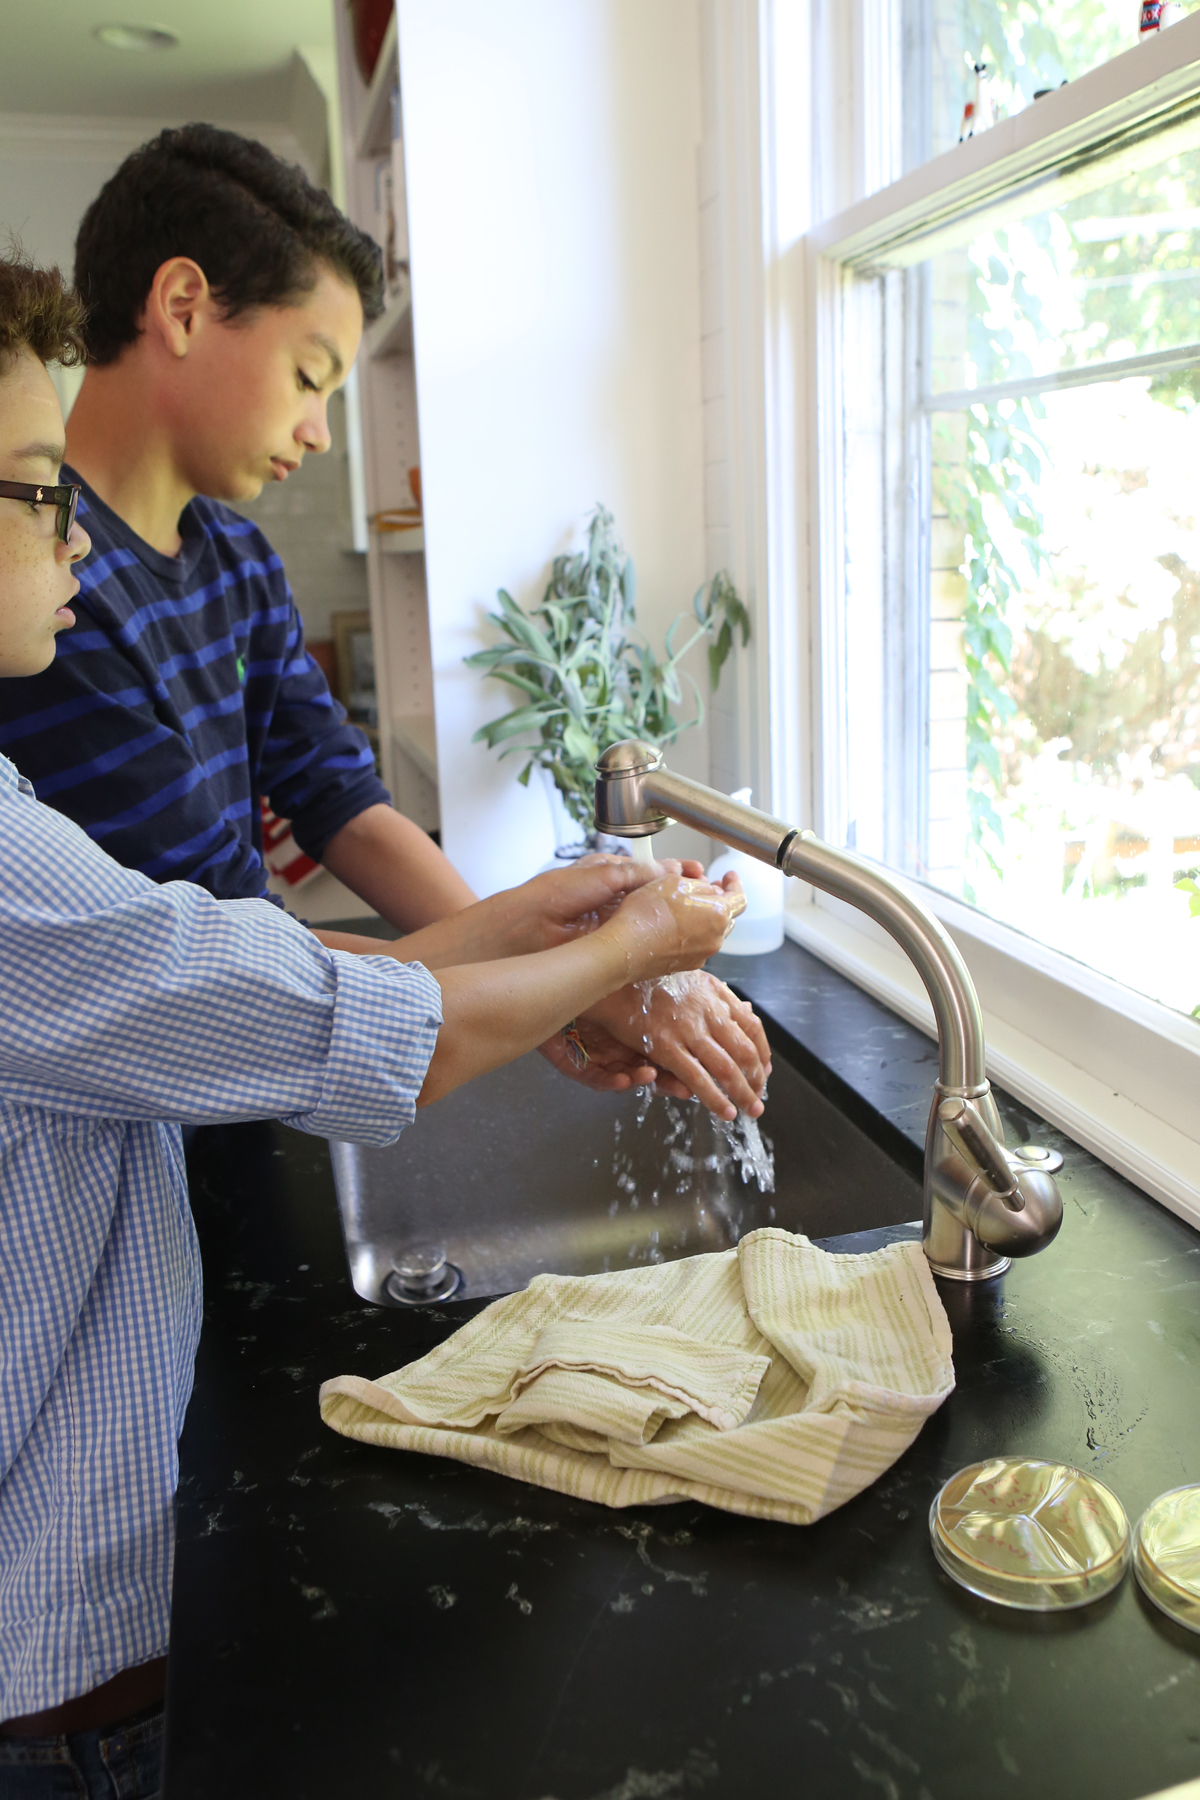
Image from “Kitchen Science Lab for Kids” (Quarto Books 2016)
Here’s a video on how to make Petri plates for a hand-washing experiment, where you touch labeled sections of the plates with your fingertips before washing, after washing with water alone, and after scrubbing with soap or hand sanitizer. You can also use the plates to swab and grow microbes from around your house or school!
Find the recipe for Petri Plates in my book Kitchen Science Lab for Kids, or click here for a link to the recipe on my original blog post, where you can also read more about the science!
Homemade Petri Plates from “Kitchen Science Lab for Kids” (Quarto Books 2016)
Homemade Robotics Kit (Holiday Gift Idea)
- by KitchenPantryScientist
With a few simple technology and art supplies, you can put together a simple kit that lets kids design and build bristle bots, art bots and light-up creatures.
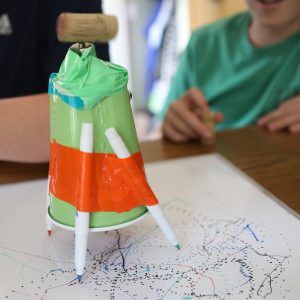
The Science Behind the Fun: Hooking an unbalanced spinning toy motor to a brush sends vibrations through the bristles. The vibrating bristles move the brush, and anything attached to it, around on a flat surface. Make a disc robot by attaching toothbrushes to a CD and attaching a motor, or make a drawing robot with legs made of pens.
Art Bot from “STEAM Lab for Kids” (Quarry Books 2018)
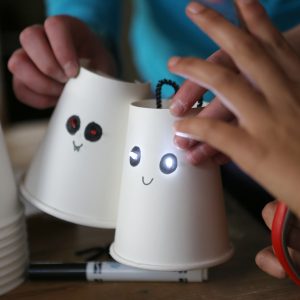
Light Up Creatures from “STEAM Lab for Kids” (Quarry Books 2018)
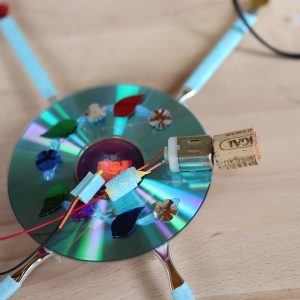
CD Bot from “STEAM Lab for Kids” (Quarry Books 2018)
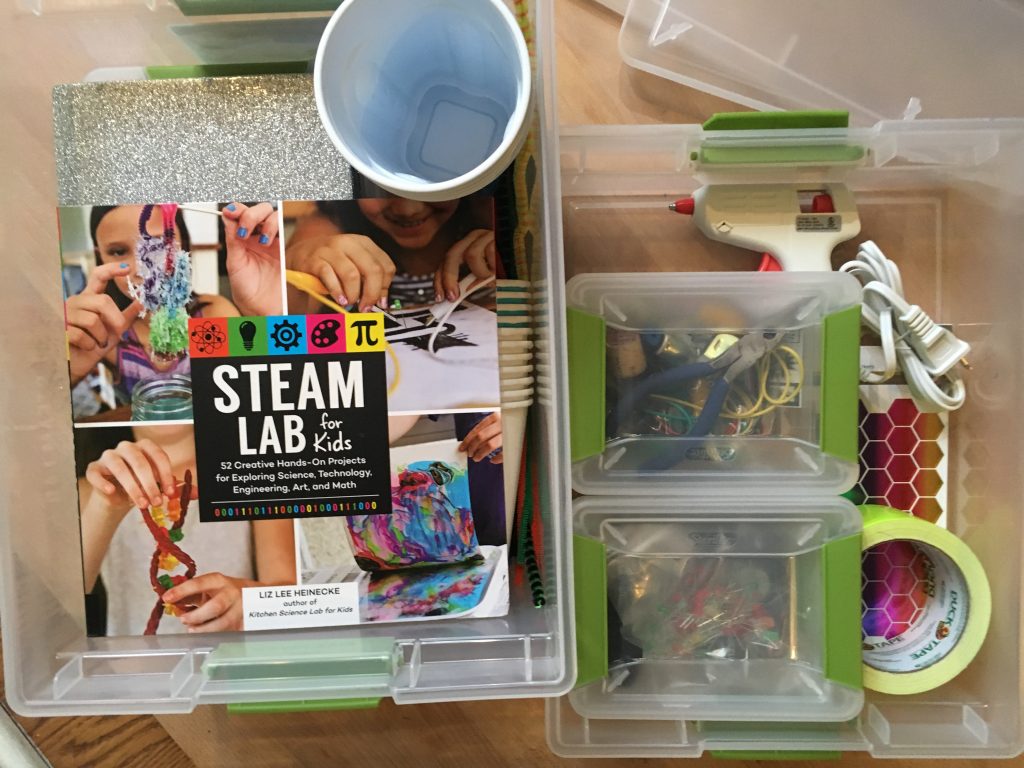
I’ve included ideas for items to put in a kit, along with a tech supply list and photos of the robots from STEAM Lab for Kids. Use your imagination for art supplies! Pair the kit with a book, like STEAM Lab for Kids (Amazon.com), which has instructions for making bristle bots, art bots and light-up creatures, or let tech-savvy kids take the reigns and start building!
Homemade robotics kit- kitchenpantryscientist.com
LEDs, alligator clip test leads, toy motors and batteries let kids assemble simple circuits. (Supply list below photo)
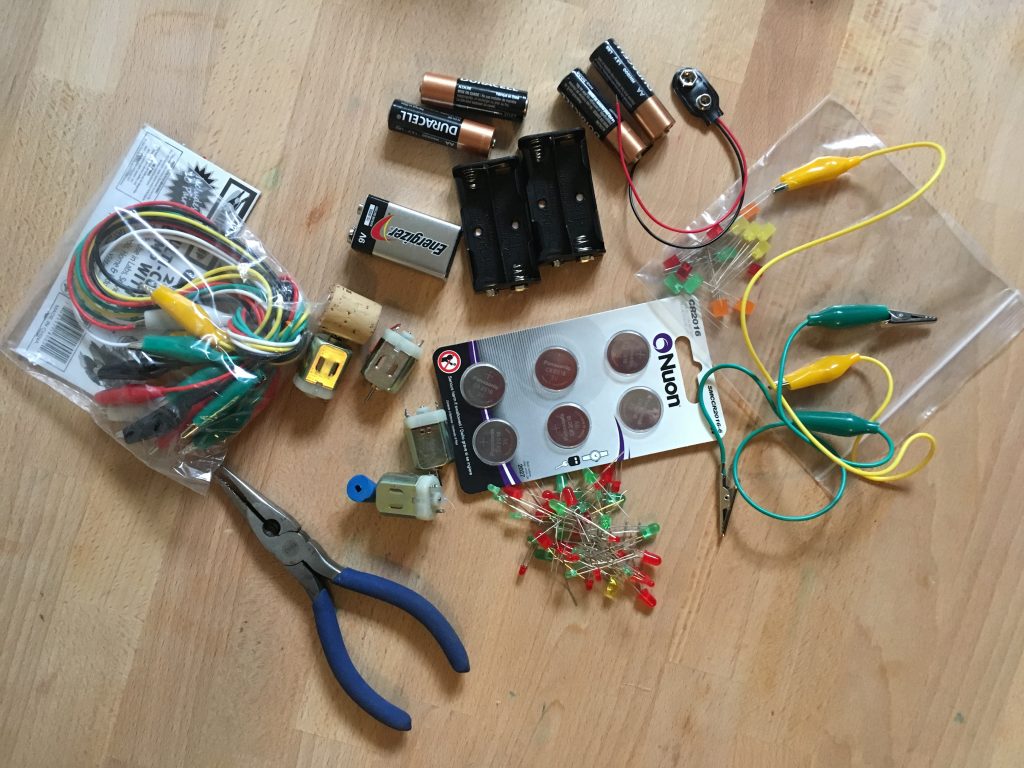
tech components for robot kit- kitchenpantryscientist.com
Basic 3mm and 5mm through-hole LEDs (Art Bot, CD Bot, Light-Up Creature)
Small alligator clip test leads (Art Bot, CD Bot, Light-Up Creature)
AA battery holders (Art Bot, CD Bot )
AA batteries and 9V batteries (Art Bot, CD Bot )
9V battery clip snap-on connectors (battery snaps)
3V coin cell batteries (Light-Up Creature)
Mini electric motor for DIY toys (1500 rpm) for Art Bot, CD Bot
(Find these supplies at your favorite bricks and mortar location, like Axman Surplus stores, or get them online at Amazon.com or another tech retailer.)
USA https://www.amazon.com Canada https://www.amazon.ca
Paper and plastic cups, brushes, toothbrushes, duct tape, zip-ties, and CDs all make great building supplies, and a glue gun always comes in handy.
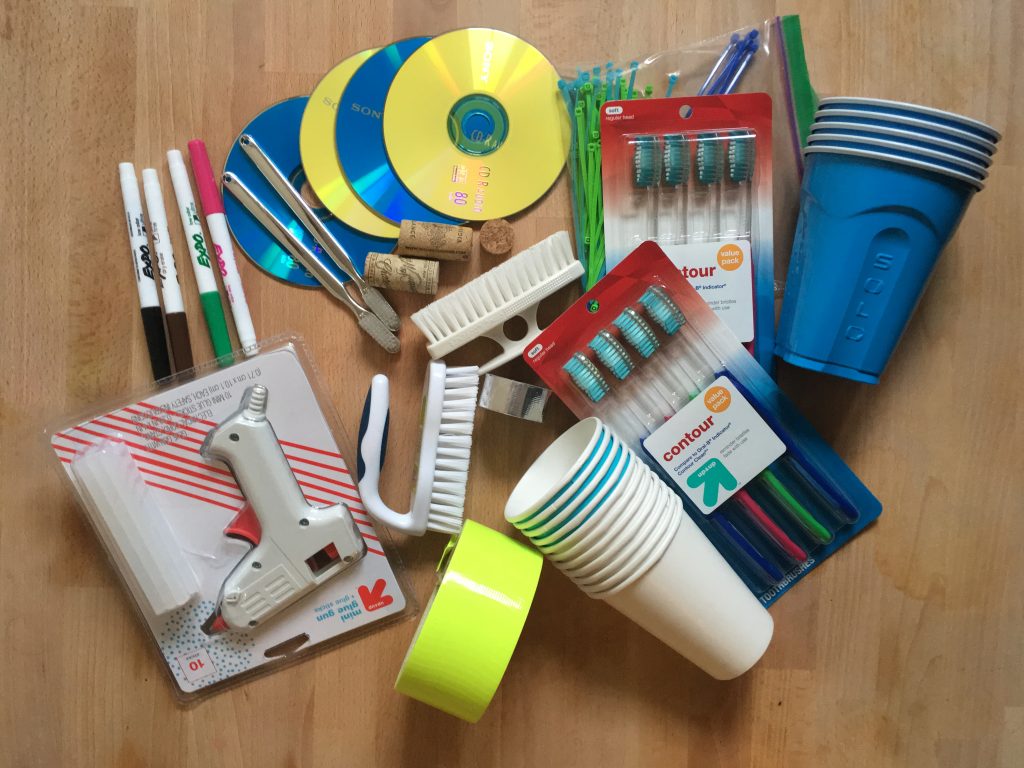
building components for robotics kit- kitchenpantryscientist.com
Use your imagination for the art supplies.
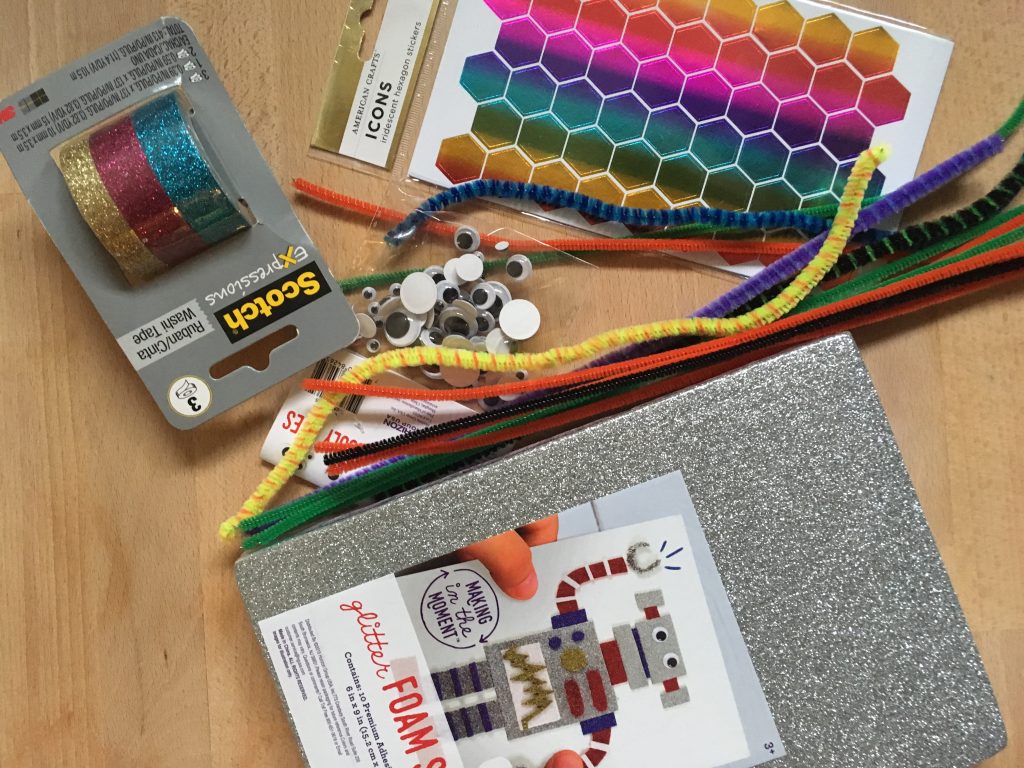
art supplies for homemade robotics kit- kitchenpantryscientist.com
And if you’ve got a kid who likes to sew, it’s fun to add supplies to make sewable circuits!
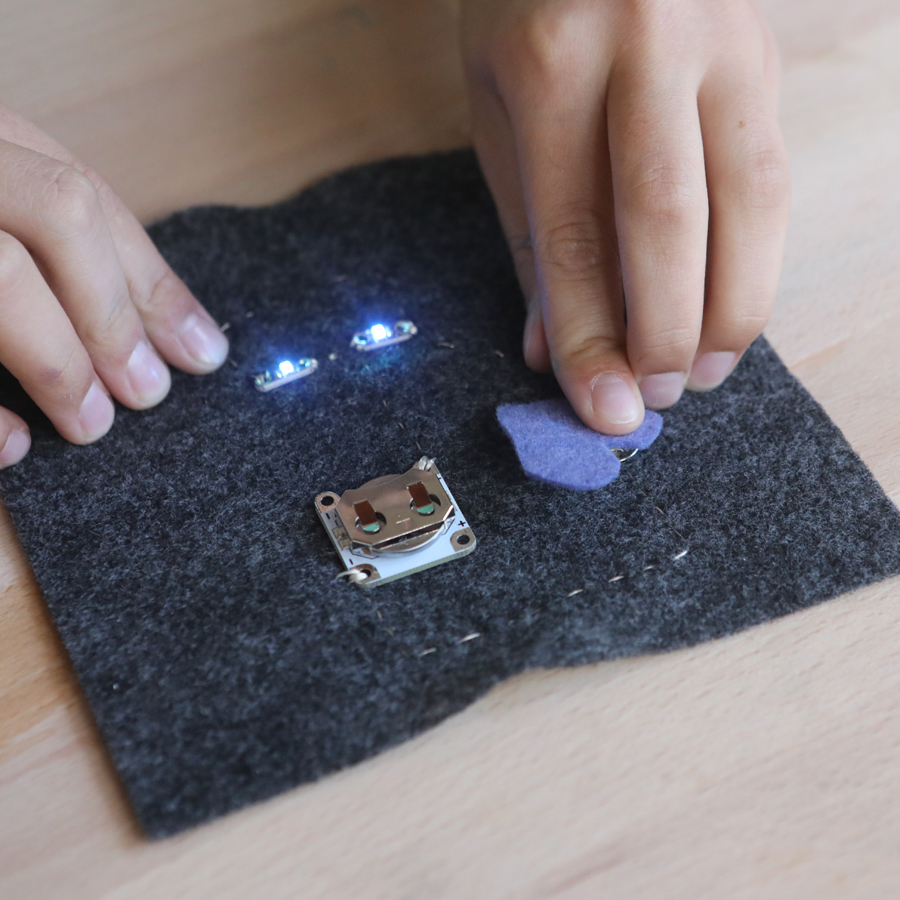
Sewable electronics: coin cell battery holders, sewable LEDs, snaps and conductive thread
USA https://www.sparkfun.com/lilypad_sewable_electronics and https://www.adafruit.com
Canada https://www.amazon.ca
Europe https://www.amazon.co.uk
Here are instructions for building a simple bristle bot.
Have fun!
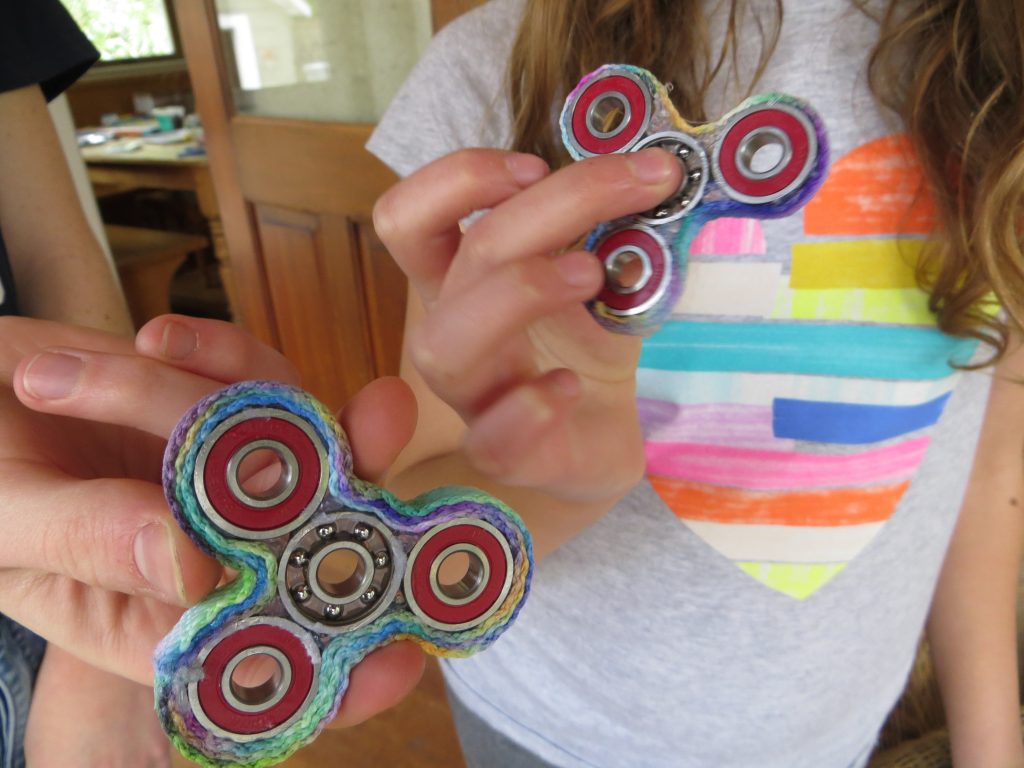
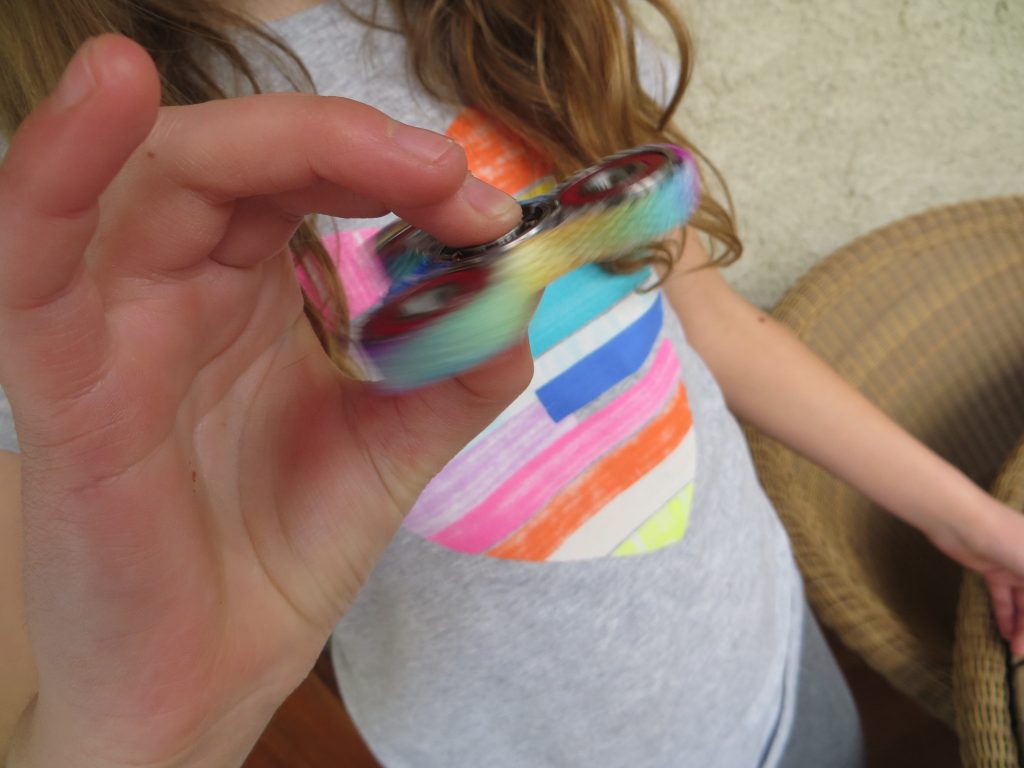
Homemade Tie-Dye Fidget Spinner
- by KitchenPantryScientist
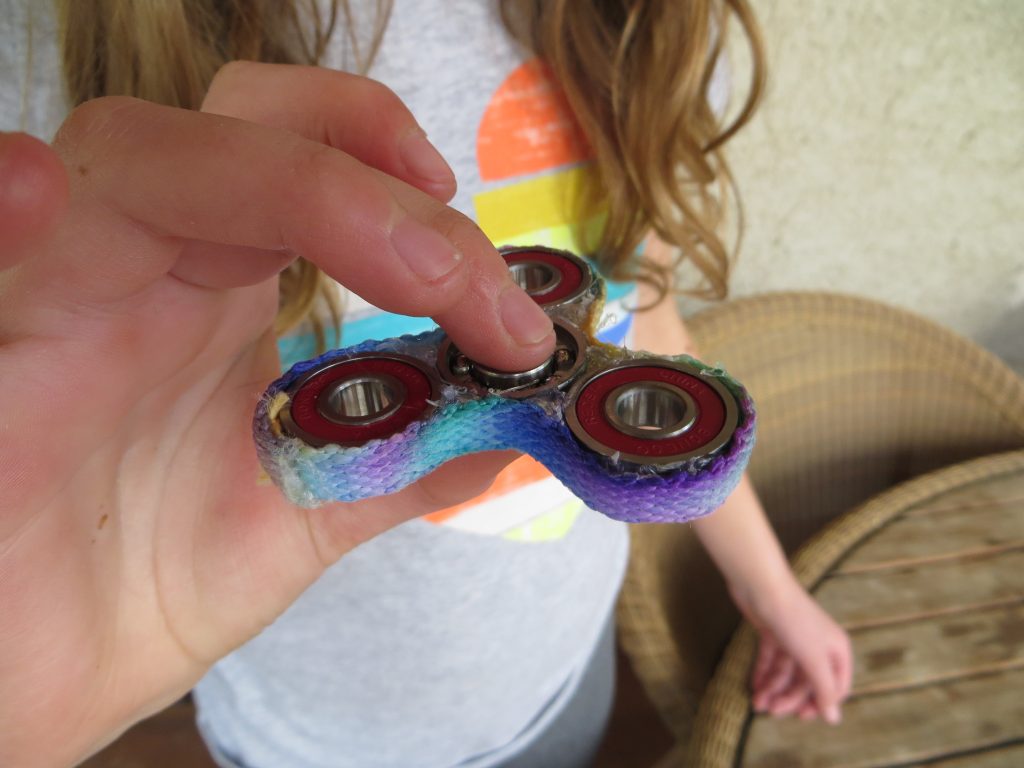
Homemade Spinner with Tie-Dye Edges (KitchenPantryScientist.com)
Make a super-cool spinning toy using skateboard bearings, super glue and a little physics. Customize your design with a marker tie-dyed shoelace.
Warning: Not for recommended for kids under 5. Use adult supervision for super glue, sharp points, rubbing alcohol and glue gun.
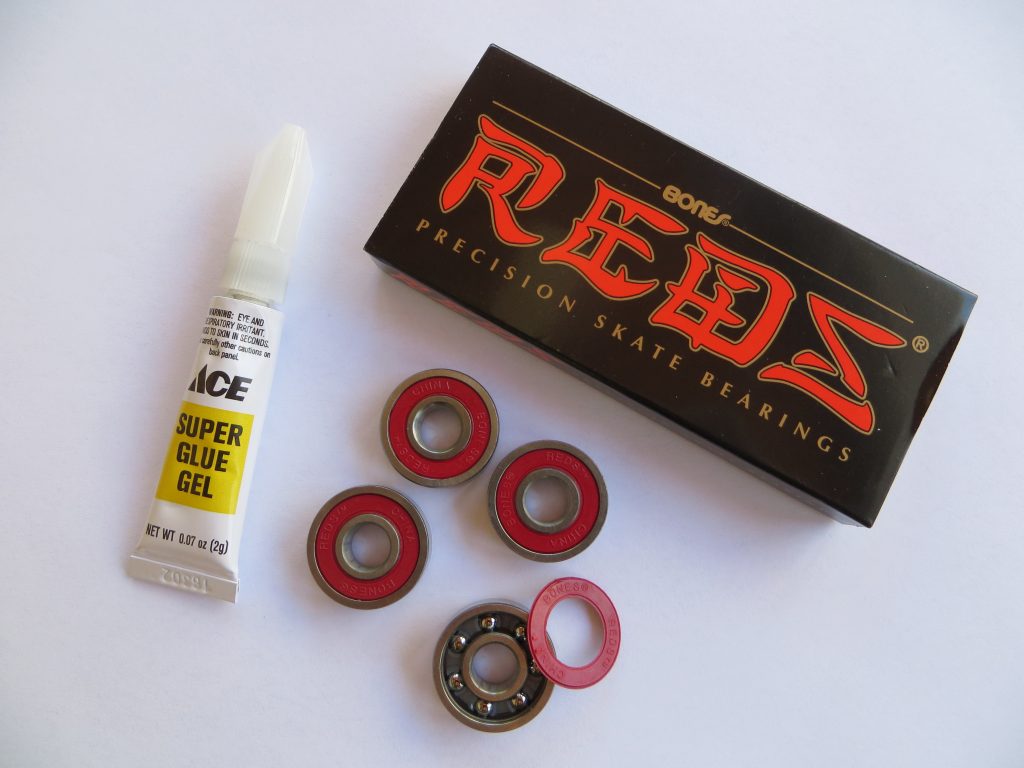
You’ll need:
-4 skateboard bearings (available online or at skateboard stores)
-superglue or Krazy Glue
-a white shoelace
-permanent markers, like Sharpies
-rubbing alcohol (isopropanol)
-a glue gun
KitchenPantryScientist.com
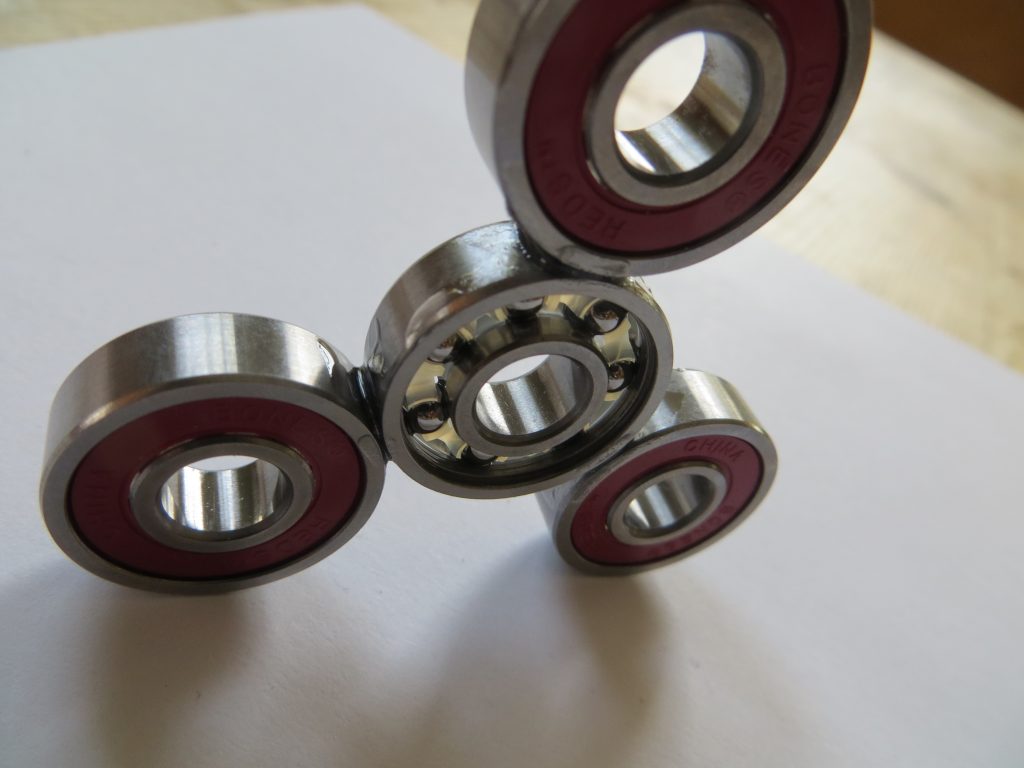
1. Use a sharp point to remove the cover from one of the bearings so that you can see the ball bearings inside. (See image above.)
2. Cut a piece of paper 6cm x 6cm and draw an X from corner to corner.
3. Center the bearing with the cover removed in the middle of the X. Then, center the other 3 bearings around the one in the middle so that they’re evenly spaced. You can use a ruler to check spacing. (See image below.)
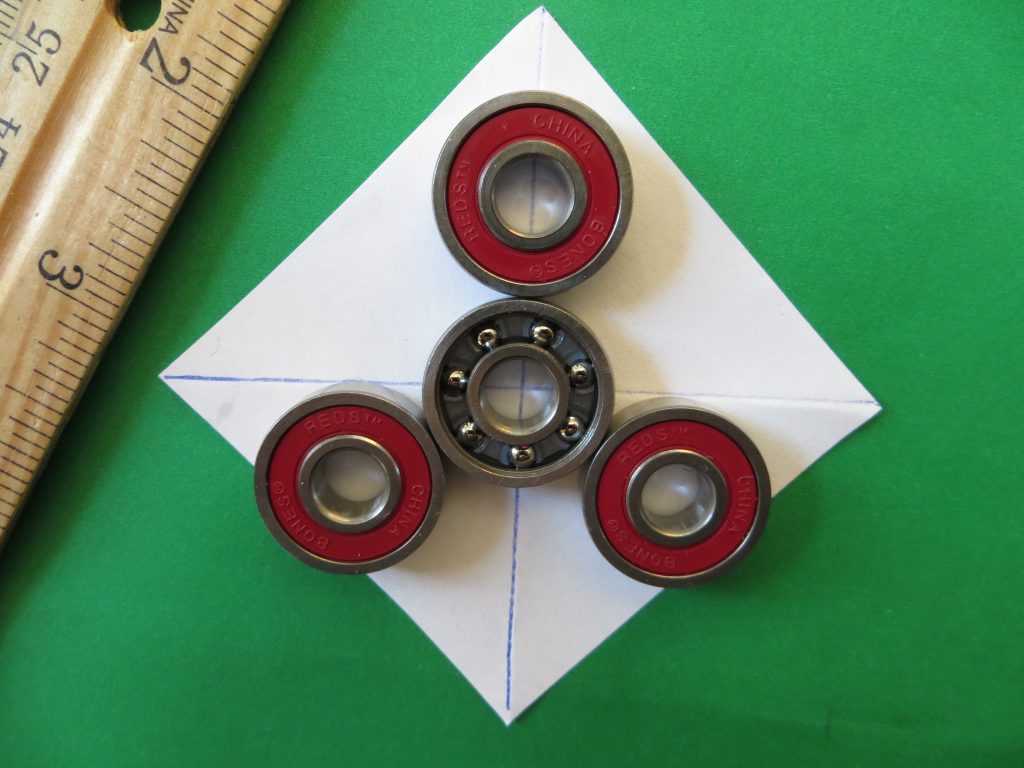
KitchenPantryScientist.com
4. Add a single drop of super glue to the junction between each bearing to connect them. If you add too much, the spinner will stick to the paper. *Be careful not to get any glue onto the moving parts of the bearings.
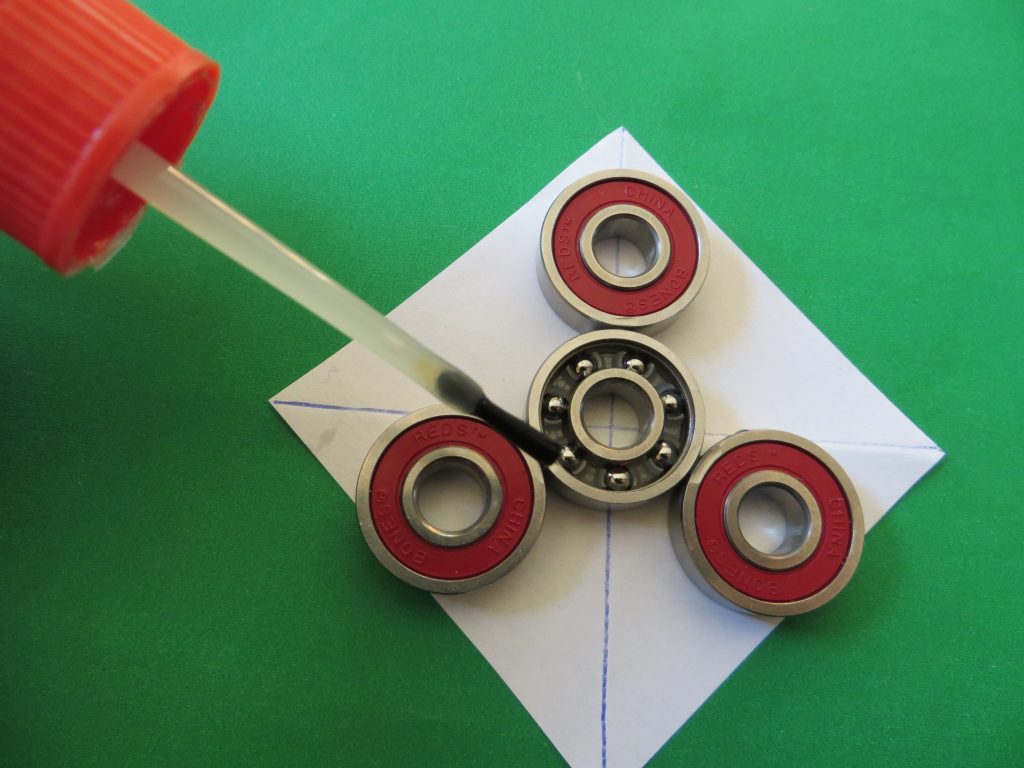
KitchenPantryScientist.com
5. When the glue is dry, carefully turn the spinner over and place another drop of glue at each junction.
6. When the glue is dry, prop the spinner up on its side and add glue to the junctions on the sides. (See image below.) Repeat on each side.
KitchenPantryScientist.com
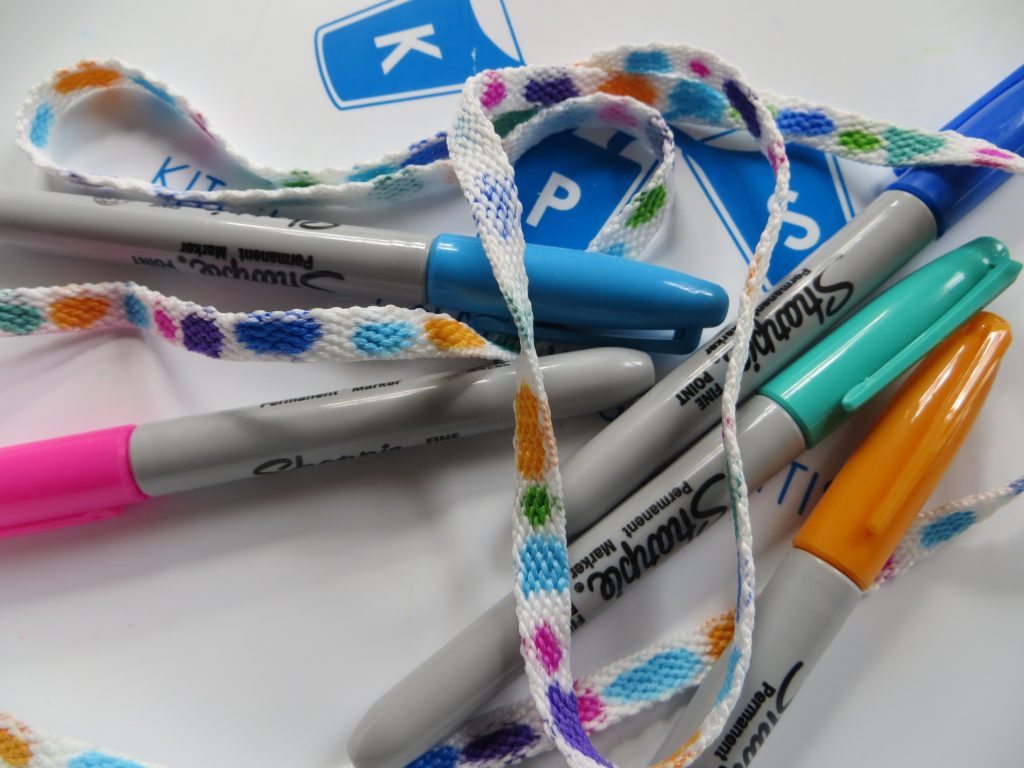
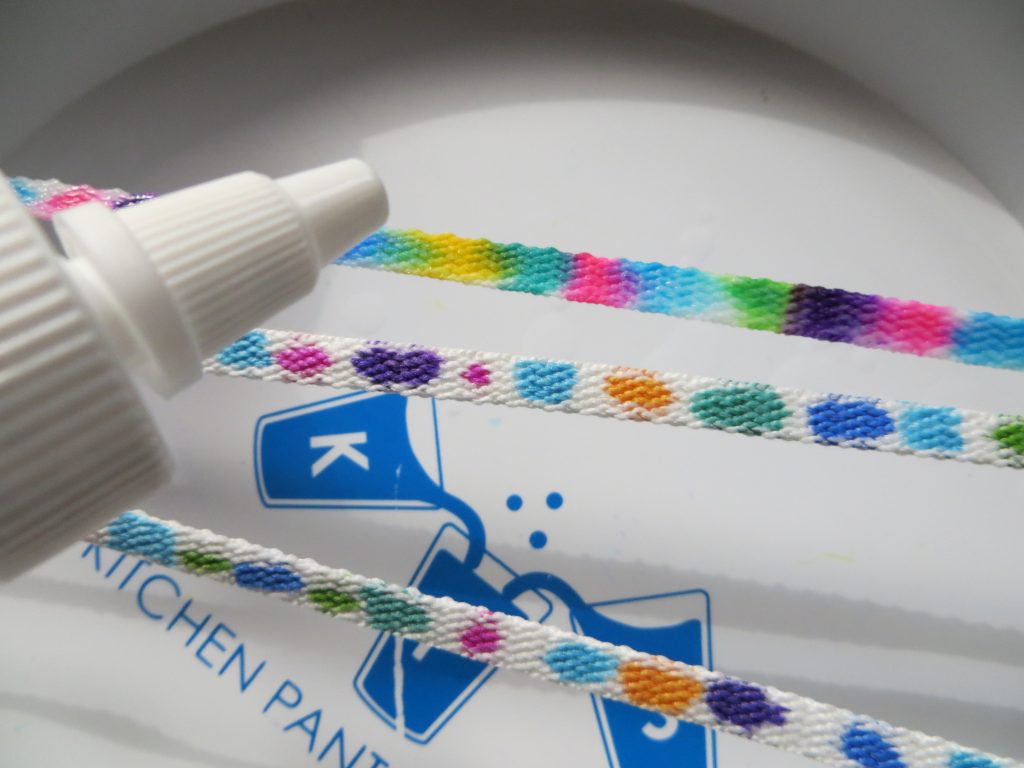
7. While the spinner glue is drying, make dots of permanent marker on the shoelace. In a well-ventilated area, suspend the shoelace over a tray or colander and drip rubbing alcohol onto it to make the colors run together. (See image.) Let it dry completely.
KitchenPantryScientist.com
8. Use the glue gun to attach the shoelace to the outside edges of the spinner. Fill in gaps between the lace and bearings with hot glue.
KitchenPantryScientist.com
9. Spin away!
The Science Behind the Fun:
If you look closely at a skateboard bearing there are only a few ball bearings connecting the center and the outside part that spins. This means that there’s very little friction, or rubbing, between the parts. If you spin the toy around the center bearing, that bearing is called the axis of rotation.
The three bearings on the outside of the spinner provide the rotating mass that gives the toy a property called angular momentum, which keeps it spinning until the frictional force from the ball bearings in the center slows it down.
Pigments are molecules that give things color. The pigments in permanent markers are trapped in ink compounds that are insoluable in water, which means that they won’t dissolve in water. However, if you add a solvent, like rubbing alcohol, or isopropanol, to permanent markers, it dissolves the ink. As the alcohol moves through the cloth you are decorating, it carries the pigments along with it.
Homemade Sweep Nets (from Outdoor Science Lab for Kids)
- by KitchenPantryScientist
This fun project from my book Outdoor Science Lab for Kids shows you how to collect and identify amazing arthropods using a net you make yourself. For more engaging outdoor experiments, you can order the book here, or anywhere else books are sold.
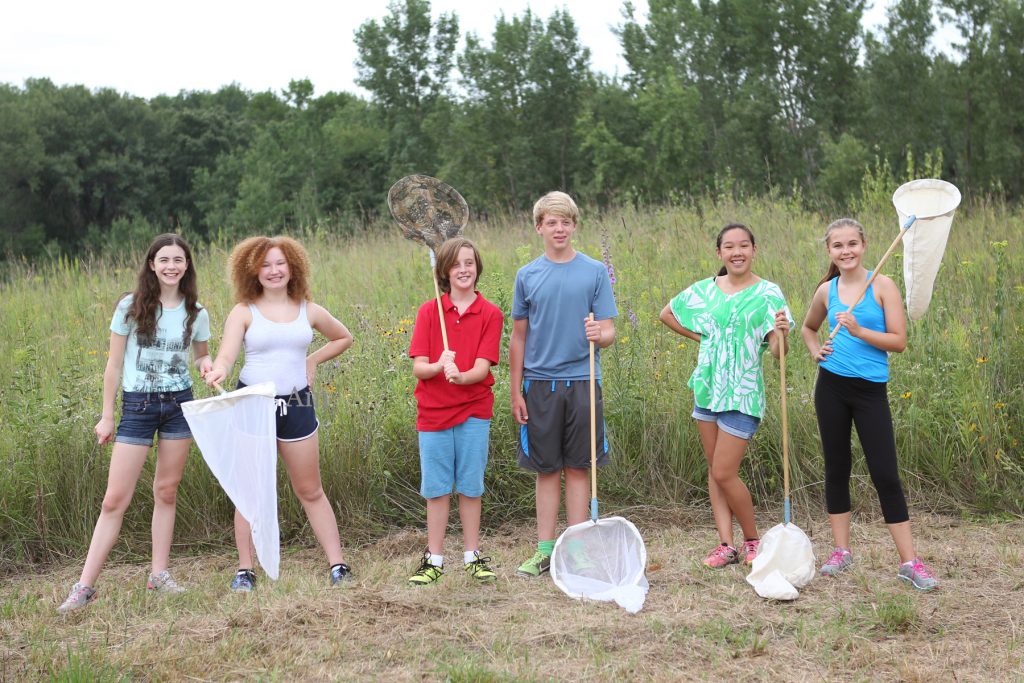
Image from Outdoor Science Lab for Kids (Quarry Books 2016)
Materials
– sweep net or: two wire hangers, an old, light-colored pillowcase, scissors, pliers, long wooden broomstick or sturdy yardstick, and duct tape
– area with long grass
– jars
-large white piece of fabric, like an old sheet
– insect identification books (optional)
Safety Tips and Hints
- Don’t pick insects up with your bare hands, unless you know they don’t bite or sting.
- Ticks love tall grass. If there are ticks in your area, take precautions and do a tick check after your insects hunt.
Protocol
Step 1: If you don’t have a sweep net, make one by straightening and twisting two wire hangers together. Form them into a loop, leaving about 3 inches (8cm) straight on either end. Cut about one third off of the open end of a pillow case and pull the mouth of the pillowcase over the wire loop. Tape it securely around the perimenter.

Image from Outdoor Science Lab for Kids (Quarry Books 2016)
Step 2. Find an area with long grass and plants. Sweep with your net the same way you’d sweep a floor, but flip the open side of the net back and forth to capture insects in the grass.
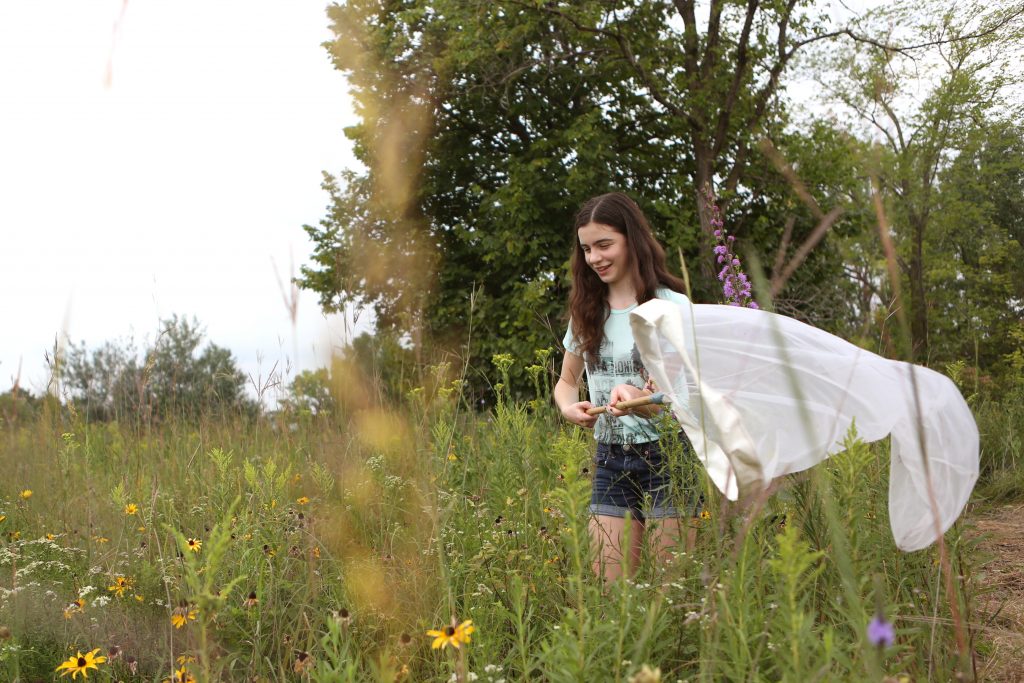
From Outdoor Science Lab for Kids (Quarry Books 2016)
Step 3. Close your net by flipping the bottom over the top and take it over to your large piece of fabric.
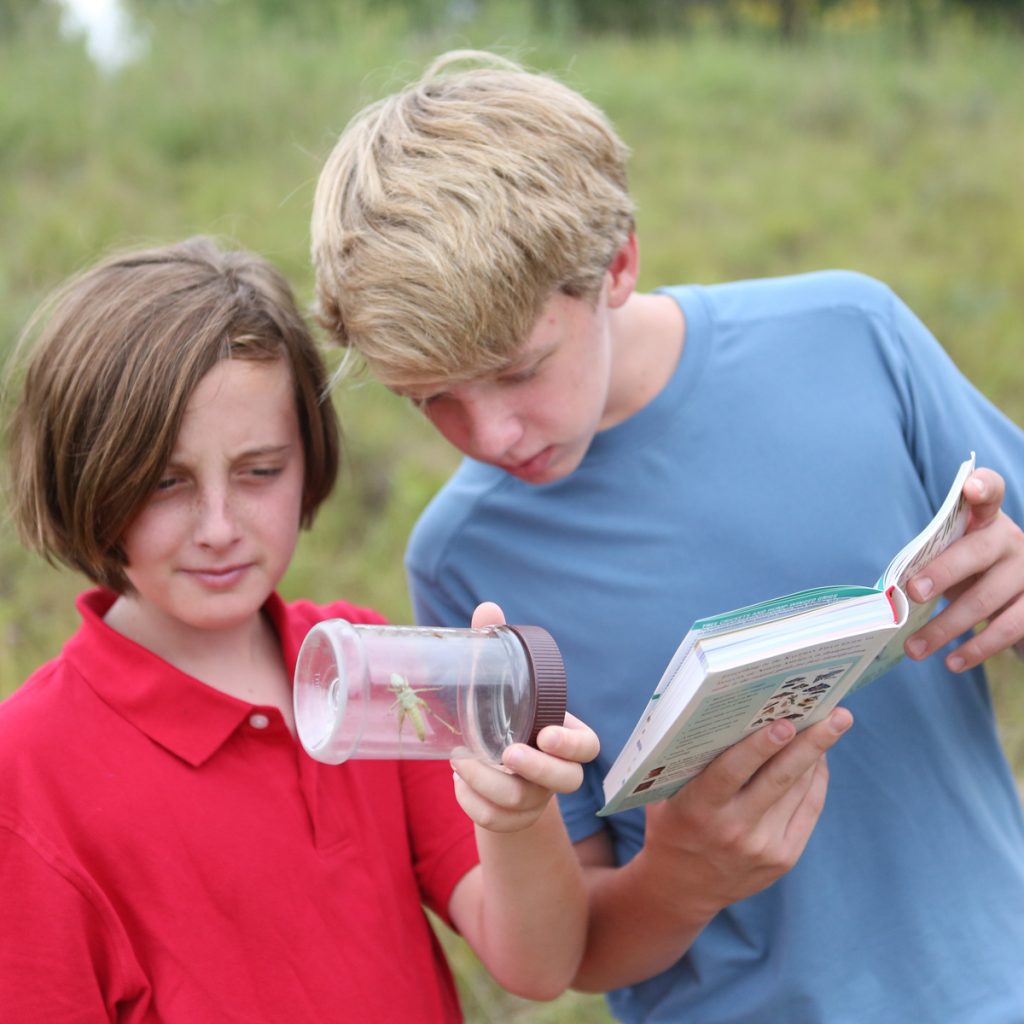
Step 4. Carefully dump the creatures you’ve collected onto the white fabric to inspect them. If you want a closer look, put an insect inside a jar with a loose lid.

Image from Outdoor Science Lab for Kids (Quarry Books 2016)
Step 5. Count how many legs they have, how many body segments, look for antennae, wings and unique color. Record your observations in a notebook.
Step 6. Use insect identification books, or other means to identify what you’ve found.
Step 7. Keep a journal of the insects and arachnids you capture, the time of day, and where you found them.
The Science Behind the Fun:
Arthropods are amazing animals with skeletons outside their body, called exoskeletons, segmented bodies, and jointed legs.
When you sweep, chances are you’ll find lots of insects, which are arthropods with six legs. They often have wings, and their life cycle goes from egg to larva, to adult. Some insects, like butterflies, also go through a pupal stage, in which their bodies are significantly transformed. The antennae on their heads are sensory organs.
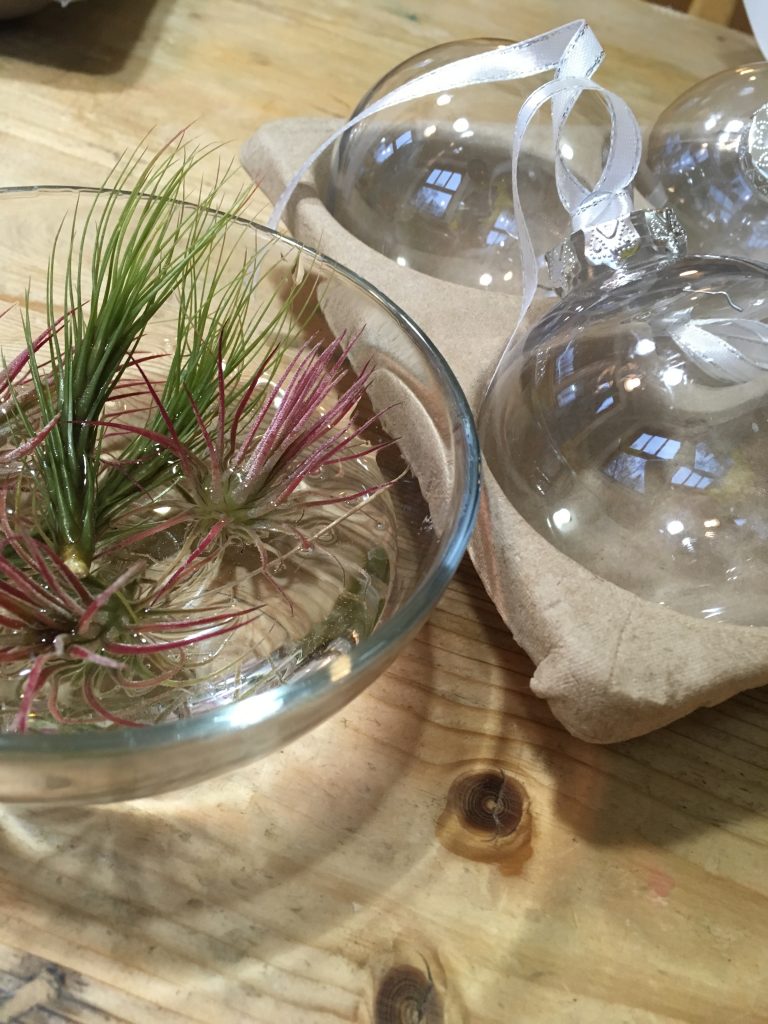
Air Plant (Tillandsia) Holiday Ornaments
- by KitchenPantryScientist
Tillandsia, also known as Air Plants, come in many shapes, sizes and colors. In nature, you’ll find them living in trees in warm places like South America. They collect moisture from the air and rain, rather than pulling it up via roots like most plants, so you can care for them with a weekly misting.
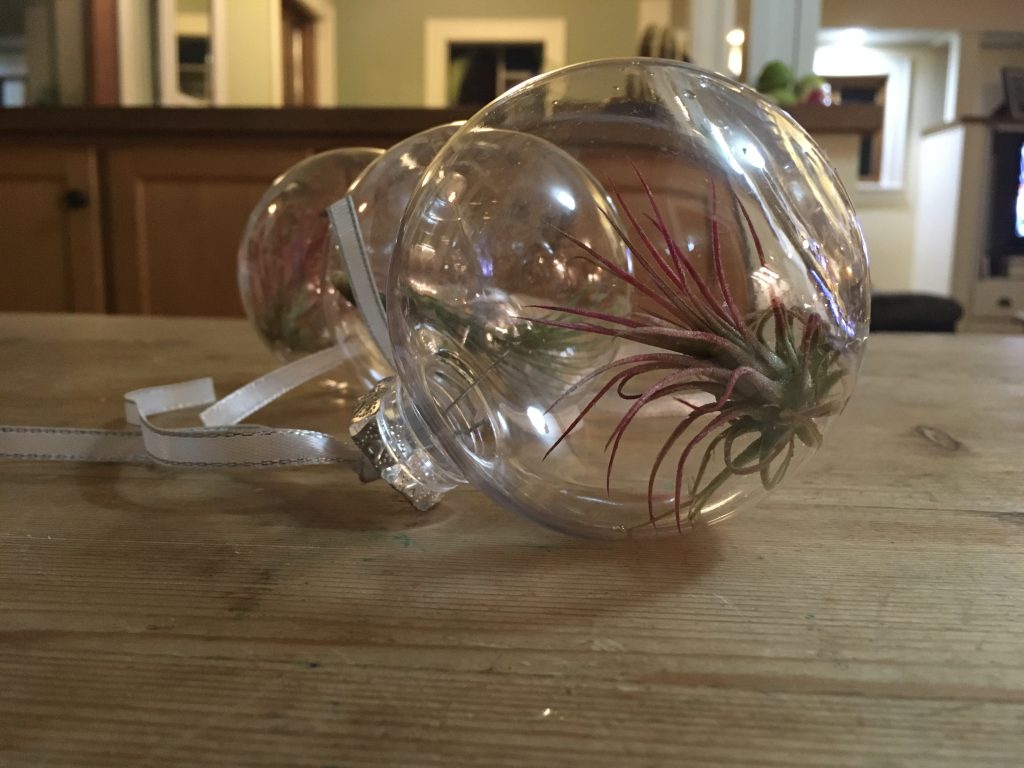
Tillandsia ornament (KitchenPantryScientist.com)
Pick up a few clear, hollow “decorate your own” ornaments, and you can use these living wonders to make unique homemade decorations. We’re giving them as gifts this year.
You’ll need:
-clear ornaments with removable tops
-small Tillandsia that will fit through ornament tops (Air Plants are available at most nurseries. Ask for care instructions, if they have them.)
-needle nose pliars, or tweezers
Note: Choose plants that are small enough to fit through the openings of your ornament!
Tillandsia ornaments (Kitchen Pantry Scientist.com)
Mist your plants, or soak them in a bowl of clean water for 15 minutes or so, gently shake off the excess water, and carefully push them into the ornaments, bottom first so you don’t harm the plant. Put the top back on the ornament, leaving it loose enough for air to circulate.
Once a week or so, remove the top of the ornament and add some water. Coat the entire plant with water, pour out the excess and put the top back on. After the holidays, you can remove the plants with tweezers and move them to a new home in a vase, bowl or other clear container.
Slime Kit: Homemade Science-y Holiday Gifts for Kids
- by KitchenPantryScientist
Buying gifts is fine, but it’s more fun to make them. This year, we decided to make botanical gifts for the adults on our list, and slime kits for the kids.
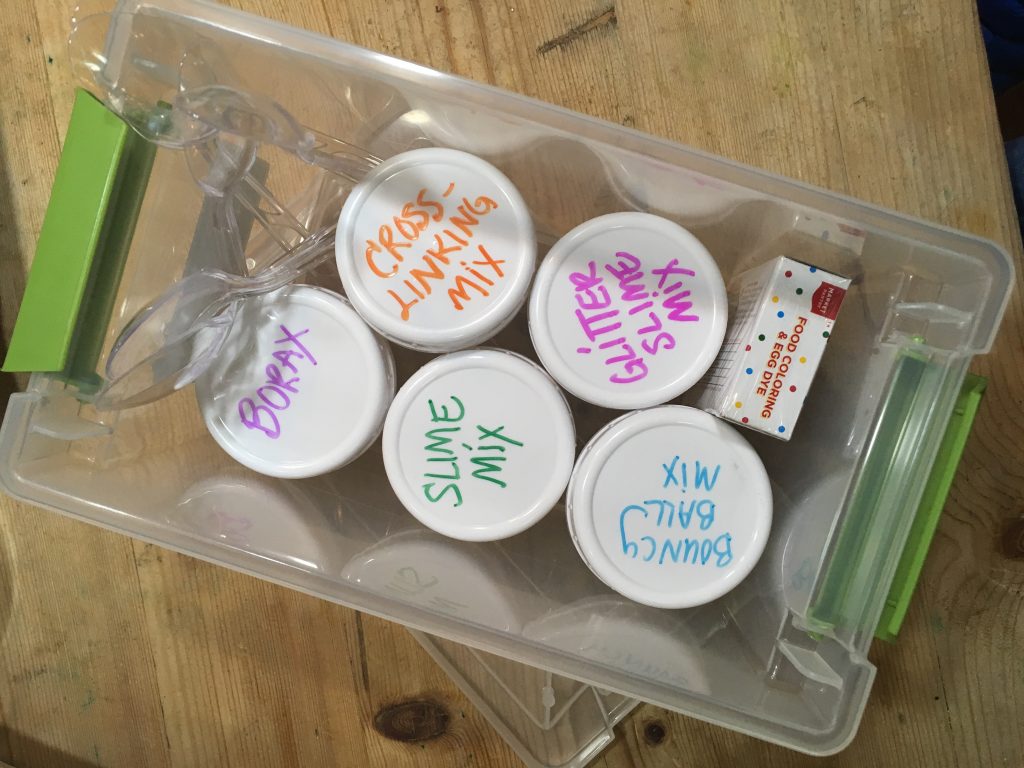
To make a slime kit, you’ll need:
-glue
-glitter glue (optional)
-Borax laundry detergent
-small plastic sample cups or paper cups (optional)
-food coloring
-jars with lids
-a small plastic bin or shoe box
-plastic spoons
-extra glitter (optional)
Label the jars and fill as follows:
- Bouncy Ball Mix (fill with glue)
- Slime Mix (fill with equal parts glue and water, mixed well)
- Borax detergent (fill with powdered detergent)
- Cross-Linking Solution (leave empty)
- optional-Sparkly Bouncy Ball mix (fill with glitter glue)
- optional-Sparkly Slime Mix (fill with equal parts water and glitter glue, mixed well)
Make an instruction sheet for the kit. (Print out the info below, or copy it onto a card.)
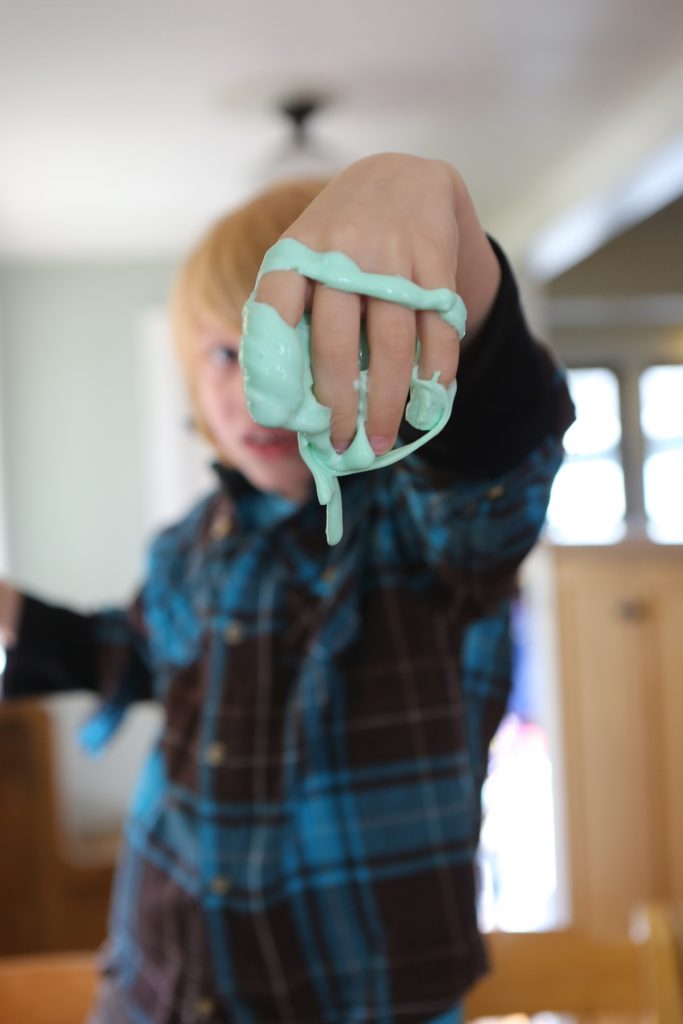
To make slime:
- Fill Cross-Linking Solution container with warm water. Add about 2 tsp Borax per 1/2 cup water to the container. Mix well. (Don’t worry if all the Borax doesn’t dissolve!)
- Add a few spoonfuls of Ball Mix or Slime Mix to a small plastic cup or paper cup.
- Add a drop or two of food coloring to the cup. Stir.
- Add 3 spoonfuls of the Cross-Linking Solution to your ball mix or slime mix and stir well.
- If the slime still feels too sticky, add a little more Cross-Linking Solution.
- Remove your completed slime from the cup.
The Science Behind the Fun:
Glue is a polymer, which is a long chain of molecules linked together, like a chemical chain. The polymer formed by water and glue is called polyvinyl acetate.
The Borax solution is called a cross-linking substance, and it makes the glue polymer chains stick to each other. Eventually, all the chains are bound together and no more cross-linking solution can be taken up.
To finish the slime kit, fill the plastic bin with the ingredients you put together, including jars of ingredients, instructions, plastic spoons, and mixing cups (optional.)
Slime from Kitchen Science Lab for Kids (Quarry Books)