Tag: homemade’
Culture
- by KitchenPantryScientist
Today on WCCO MidMorning, I’ll be talking microbiology! According to the CDC, hand washing is the best way to remove microbes from your hands.
You can see what bacteria and fungi are hanging out on your fingertips by touching homemade petri plates to grow colonies. Test your fingers before and after washing with water alone, soap and water, and finally hand sanitizer. You can find the experiment in my book, Kitchen Science Lab for Kids, and here on my website. The video below shows you how to make plates.
Kitchen Pantry Scientist’s Homemade Bath Fizzies
- by KitchenPantryScientist
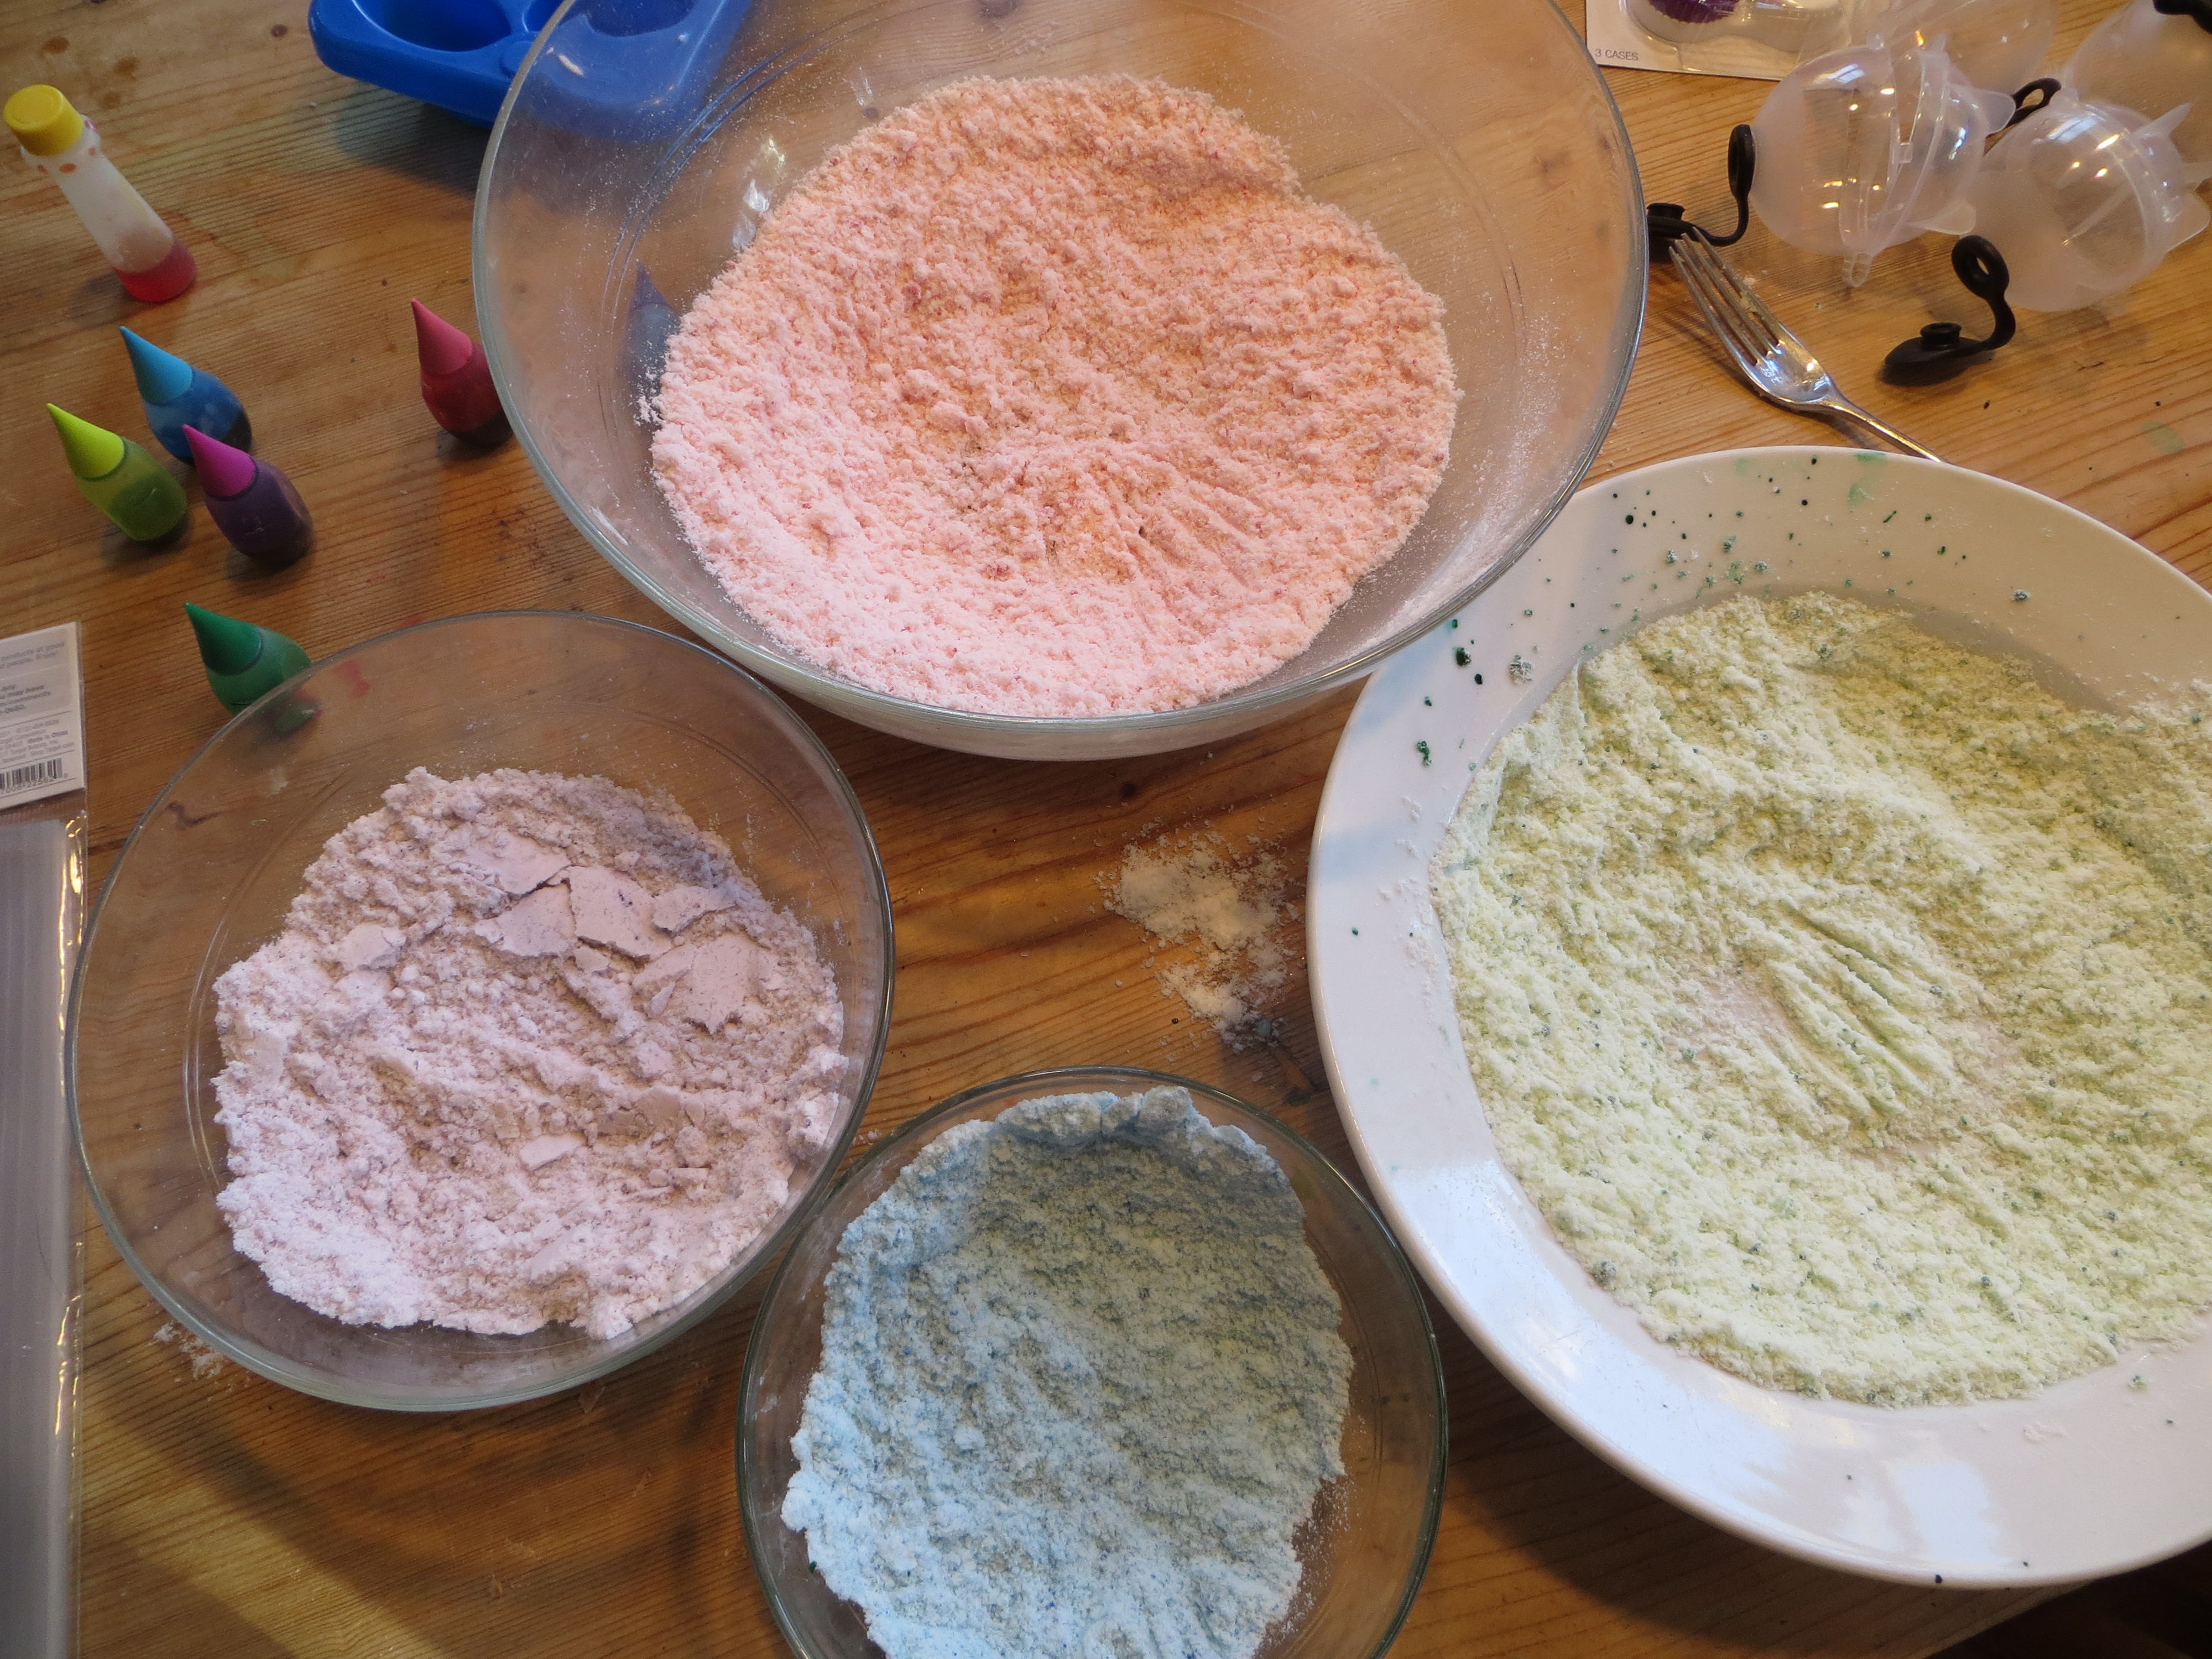
My 9 YO and I did some fun experimenting yesterday to figure out the best way to make bath bombs. As a starting point, we tried a few recipes off of the internet. The first was was crumbly and smelled too strongly of olive oil, and the next one was equally tricky to work with. After our first two failures, we looked at our results and decided to omit the water in the recipes, using just coconut oil to hold the mix together. It worked well! Here’s the recipe we came up with. You may have to tweak it a little by adding a tiny bit more oil to make the perfect bath bomb mixture!
1 cup baking soda
¼ cup cream of tartar
2 Tbs. coconut oil, melted to liquid
food coloring
empty contact lens case
metal spoon
-Whisk together baking soda and cream of tartar. Slowly drizzle in coconut oil, mixing immediately. Stir for several minutes until you get a nice even mixture that holds together when you press it between your fingers.
-Separate the mix into 3 or 4 bowls, and add a few drops of food coloring to each bowl. Mix again until color is incorporated.
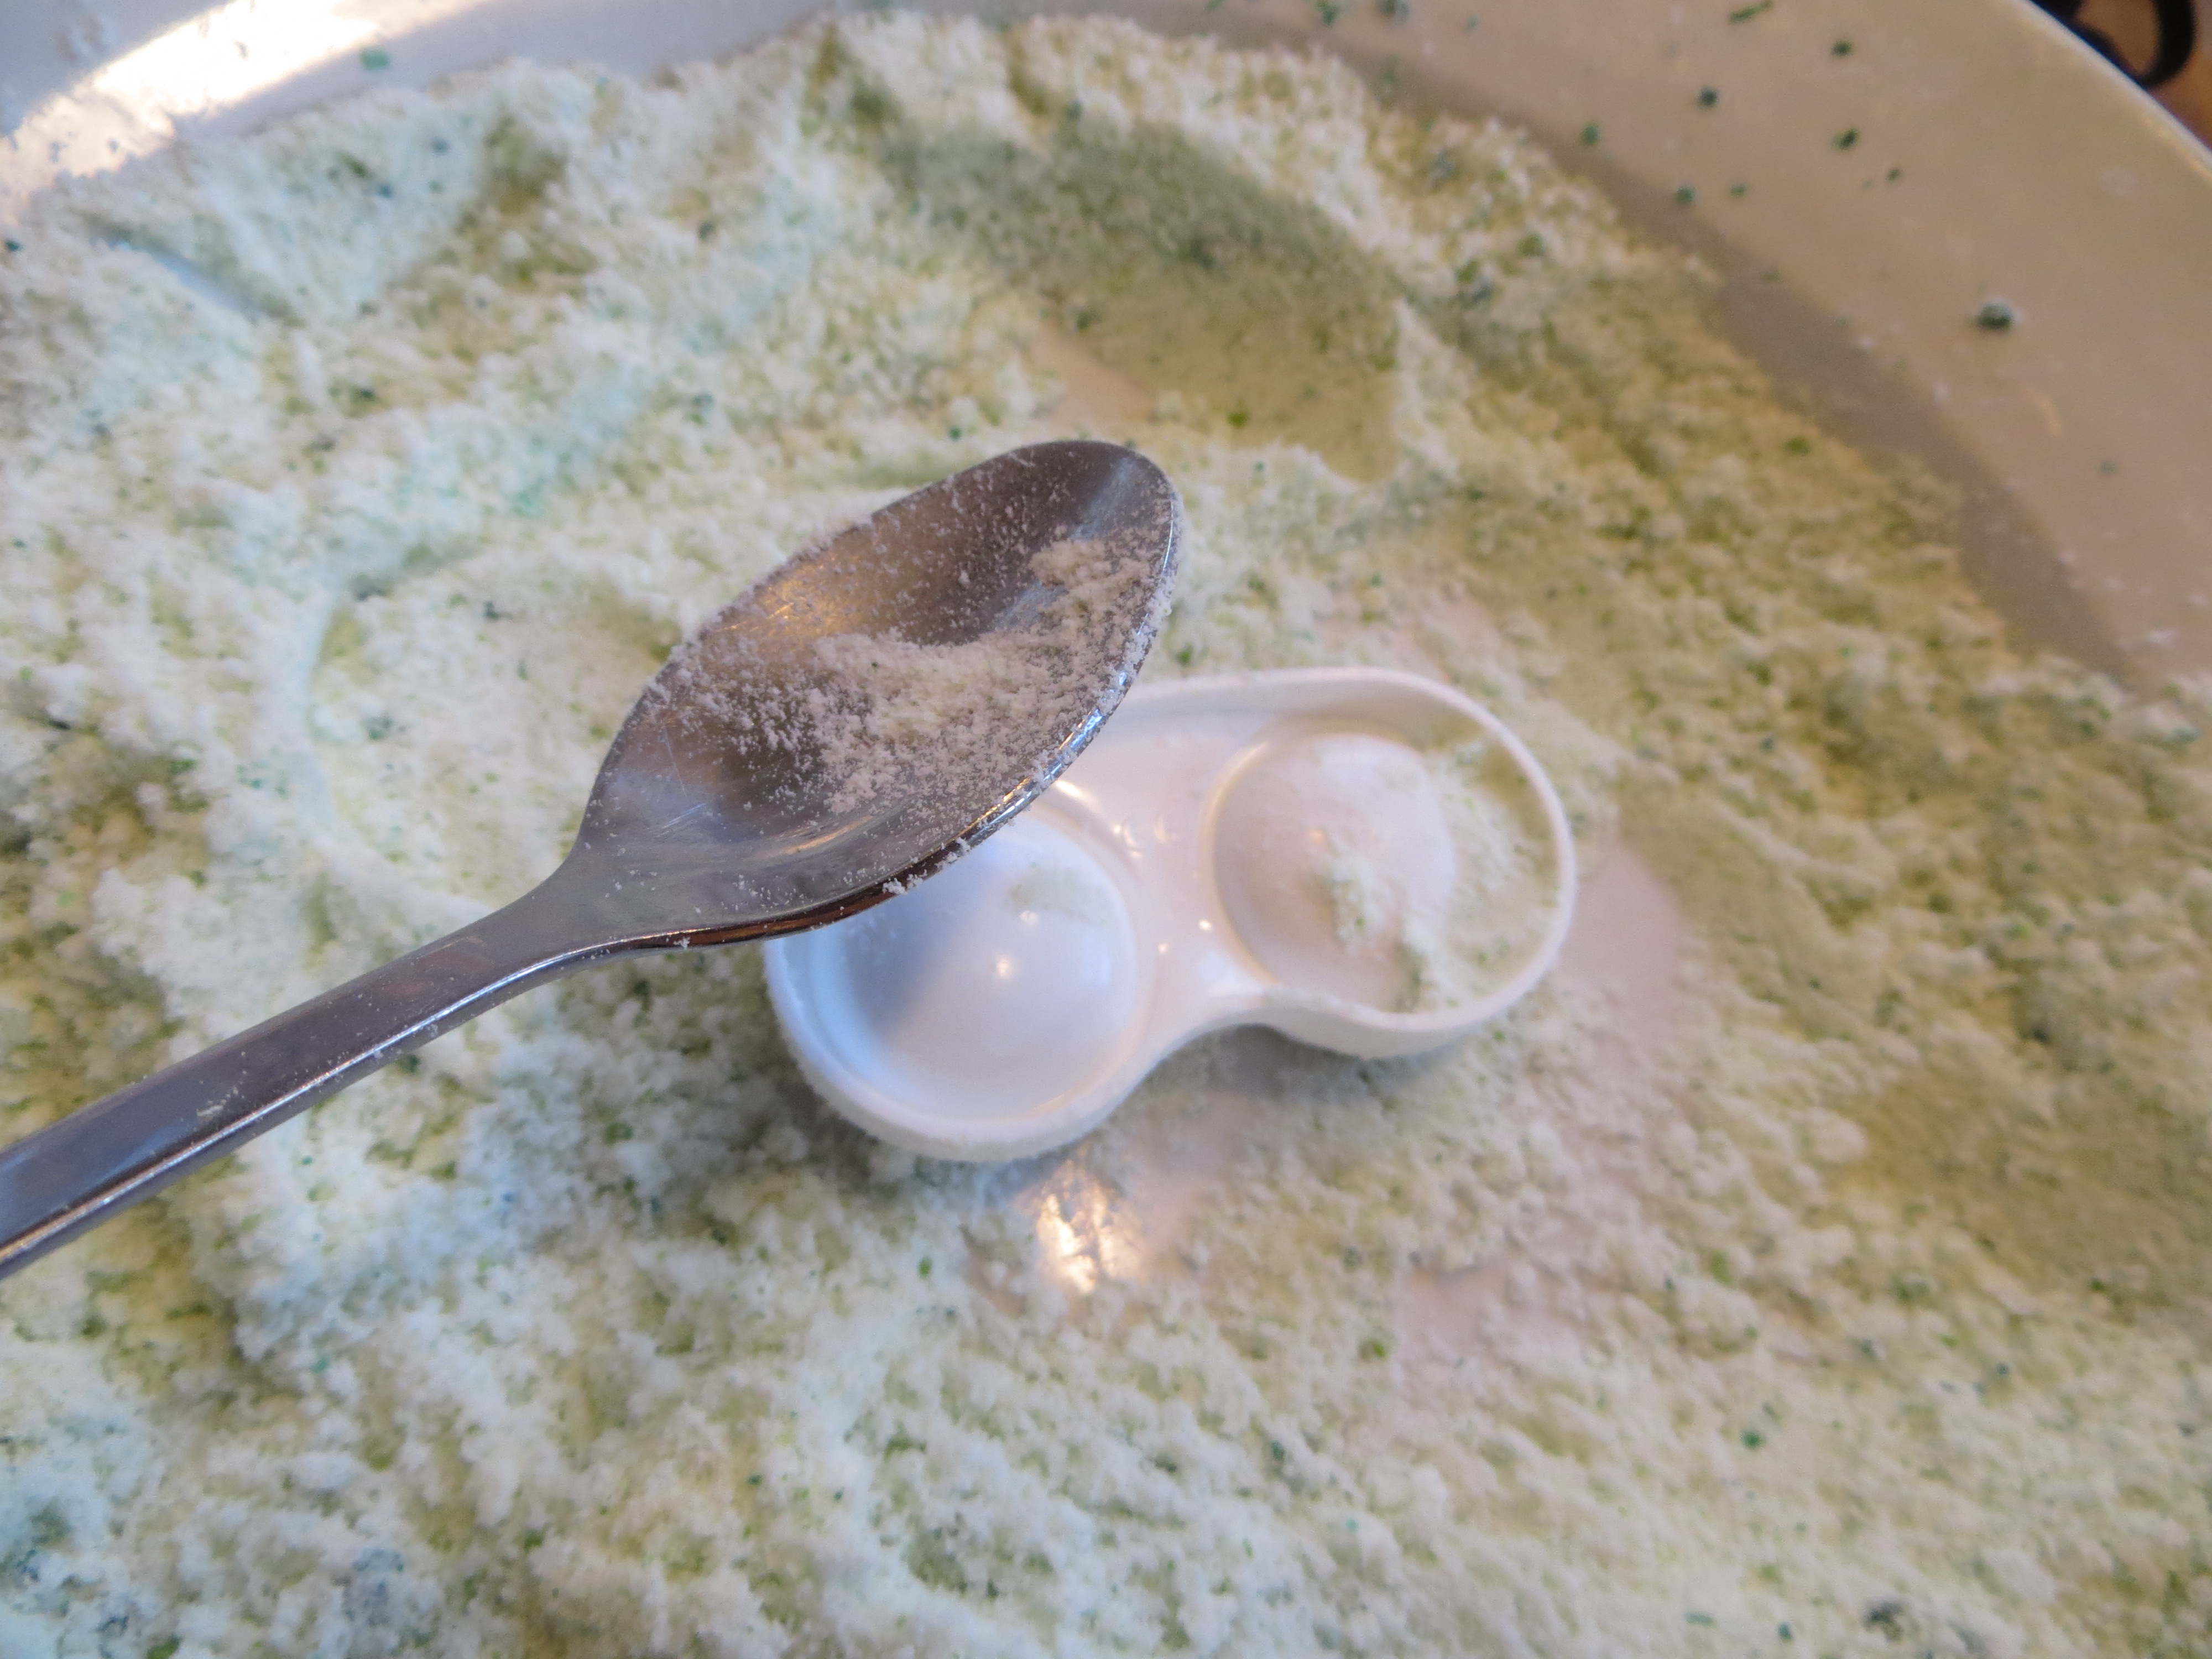
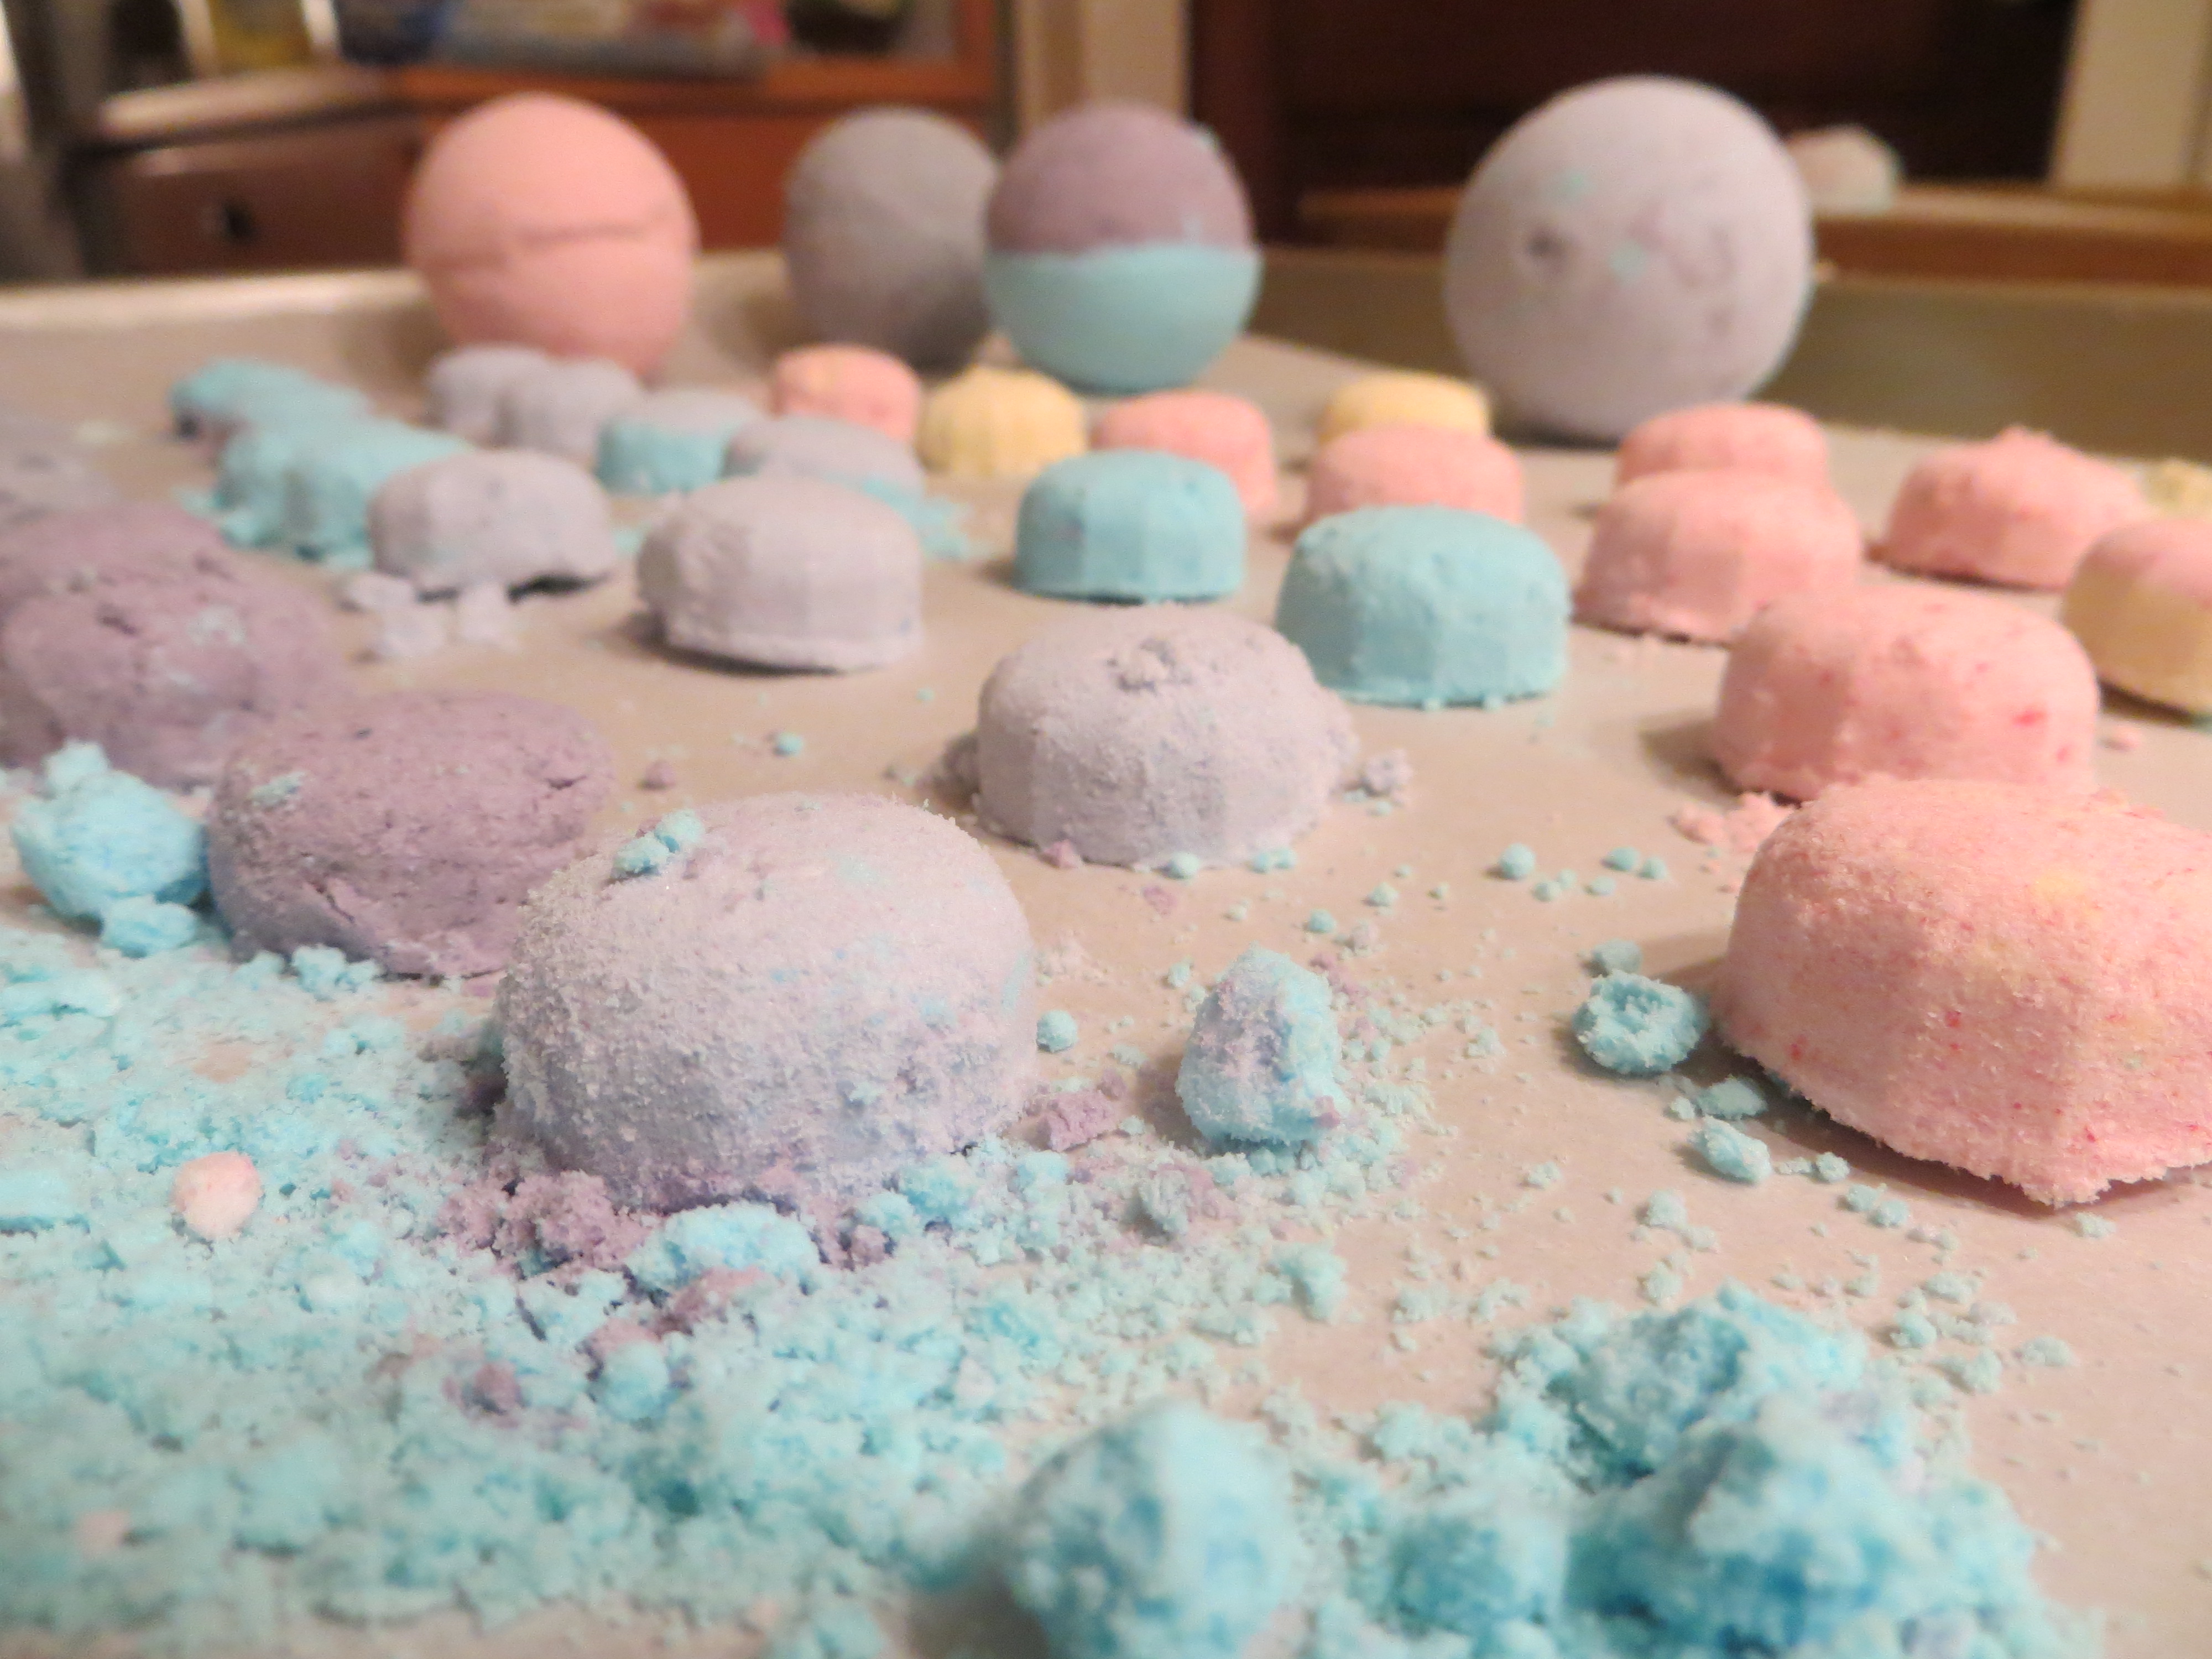
-Press the bath bomb mixture into empty contact lens cases and gently tap the backs with a spoon to remove fizz tablets. It may take a few tries to get the hang of it! If they don’t stick together, try adding a little more oil and mixing again. Dry the bath fizzies on a plate or cooking sheet and package in cellophane bags or pretty baking cups for friends and family. Use your fizz bombs within a few weeks for maximum fizziness!
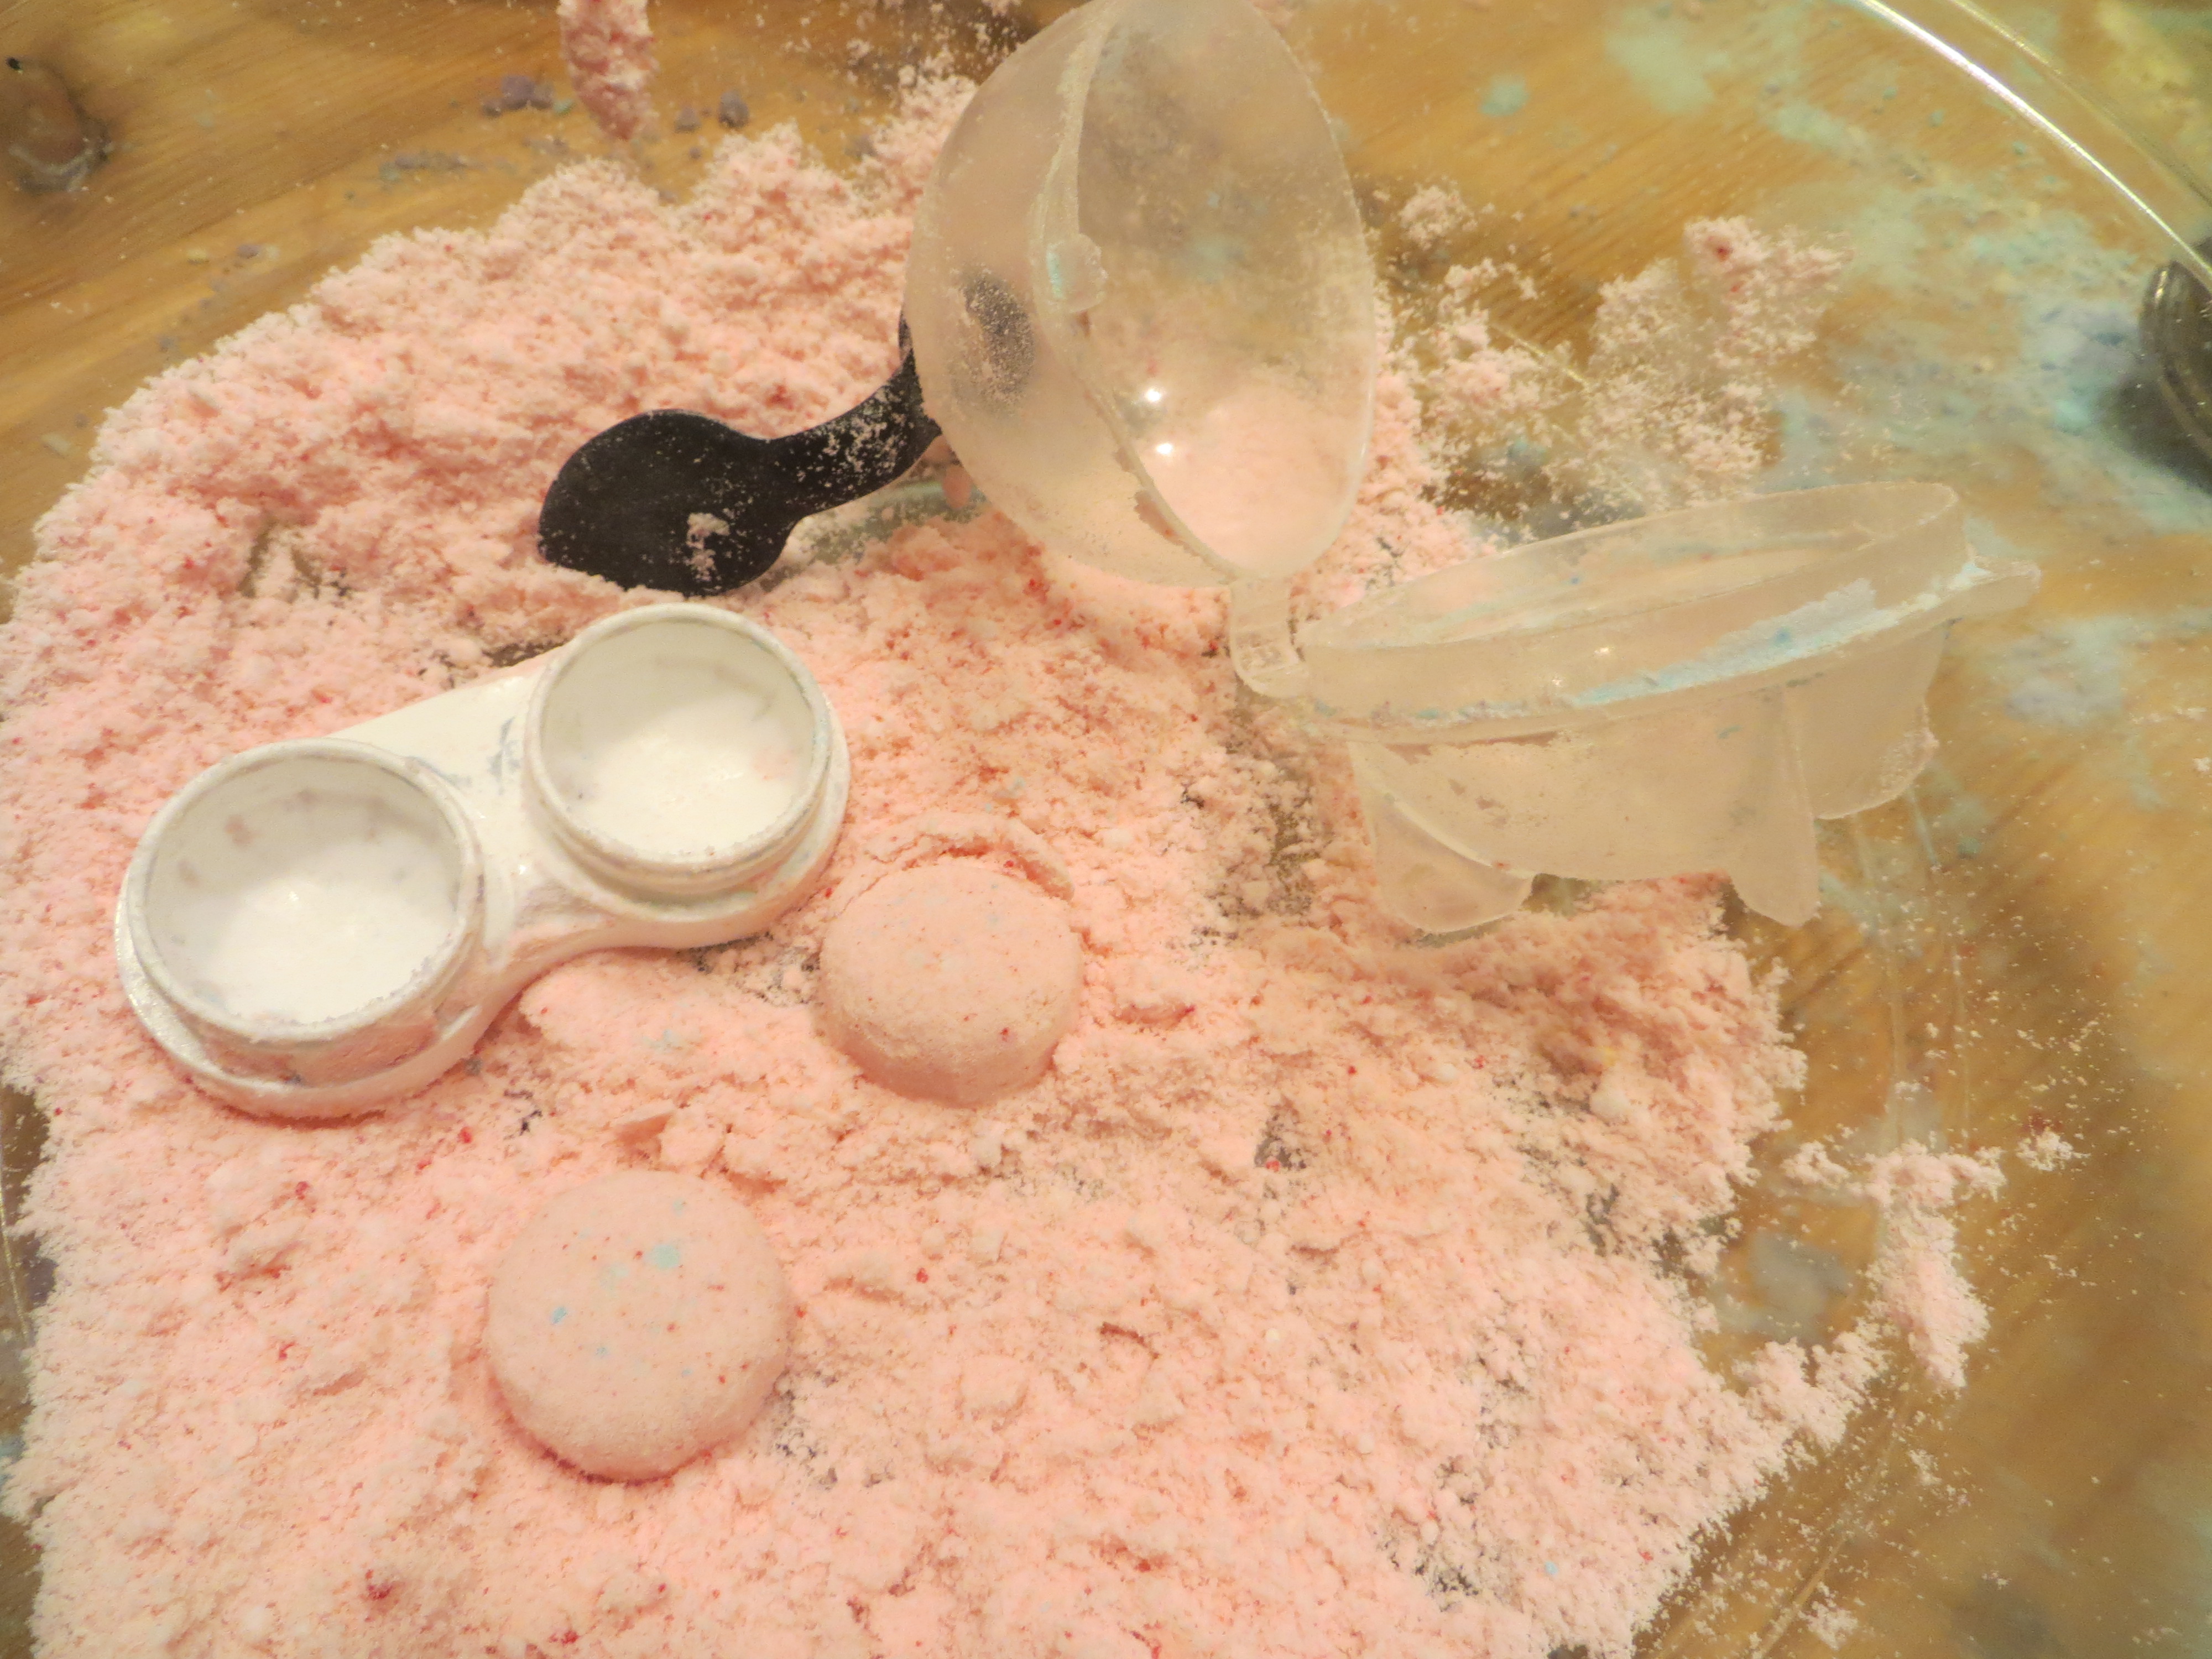
–Older kids can make larger “bath bombs” using molds for round ice cubes (which we found at Target.) Double or triple the recipes, gently press some mixture into each side of the mold, and mound a little extra on each side. Press the mold together to compress the bath bomb mixture into a single ball. Tap one side gently with the back of a spoon and gently open the mold to release that side of the sphere. Hold it in your palm and repeat with the other side to release the entire bath bomb from the mold.
The science behind the fun: The chemical name for baking soda is sodium bicarbonate, and cream of tartar is potassium bitartrate, or potassium hydrogen tartrate. When you mix them together in water, you create a chemical reaction that forms carbon dioxide gas bubbles! It’s interesting to note that at temperatures below 76 degrees F (25 C), coconut oil is a solid, but that at temperatures above this, it melts into a clear liquid. How does this affect your bath fizzies? Will they work in cold water as well as they do in warm water? Try it!
Homemade Root Beer
- by KitchenPantryScientist
I’ve been having fun with fermentation the last few weeks and my kids loved making root beer. In a week or two, I’ll post instructions, but here’s a general how-to demo I did on WCCO MidMorning.
Homemade Magic Orbs
- by KitchenPantryScientist
My 8-YO loves Orbeez, those water-thirsty polymer balls that go from the size of cookie sprinkles to the size of marbles after a quick soak.
I wondered whether we could make something similar from gelatin or agar.
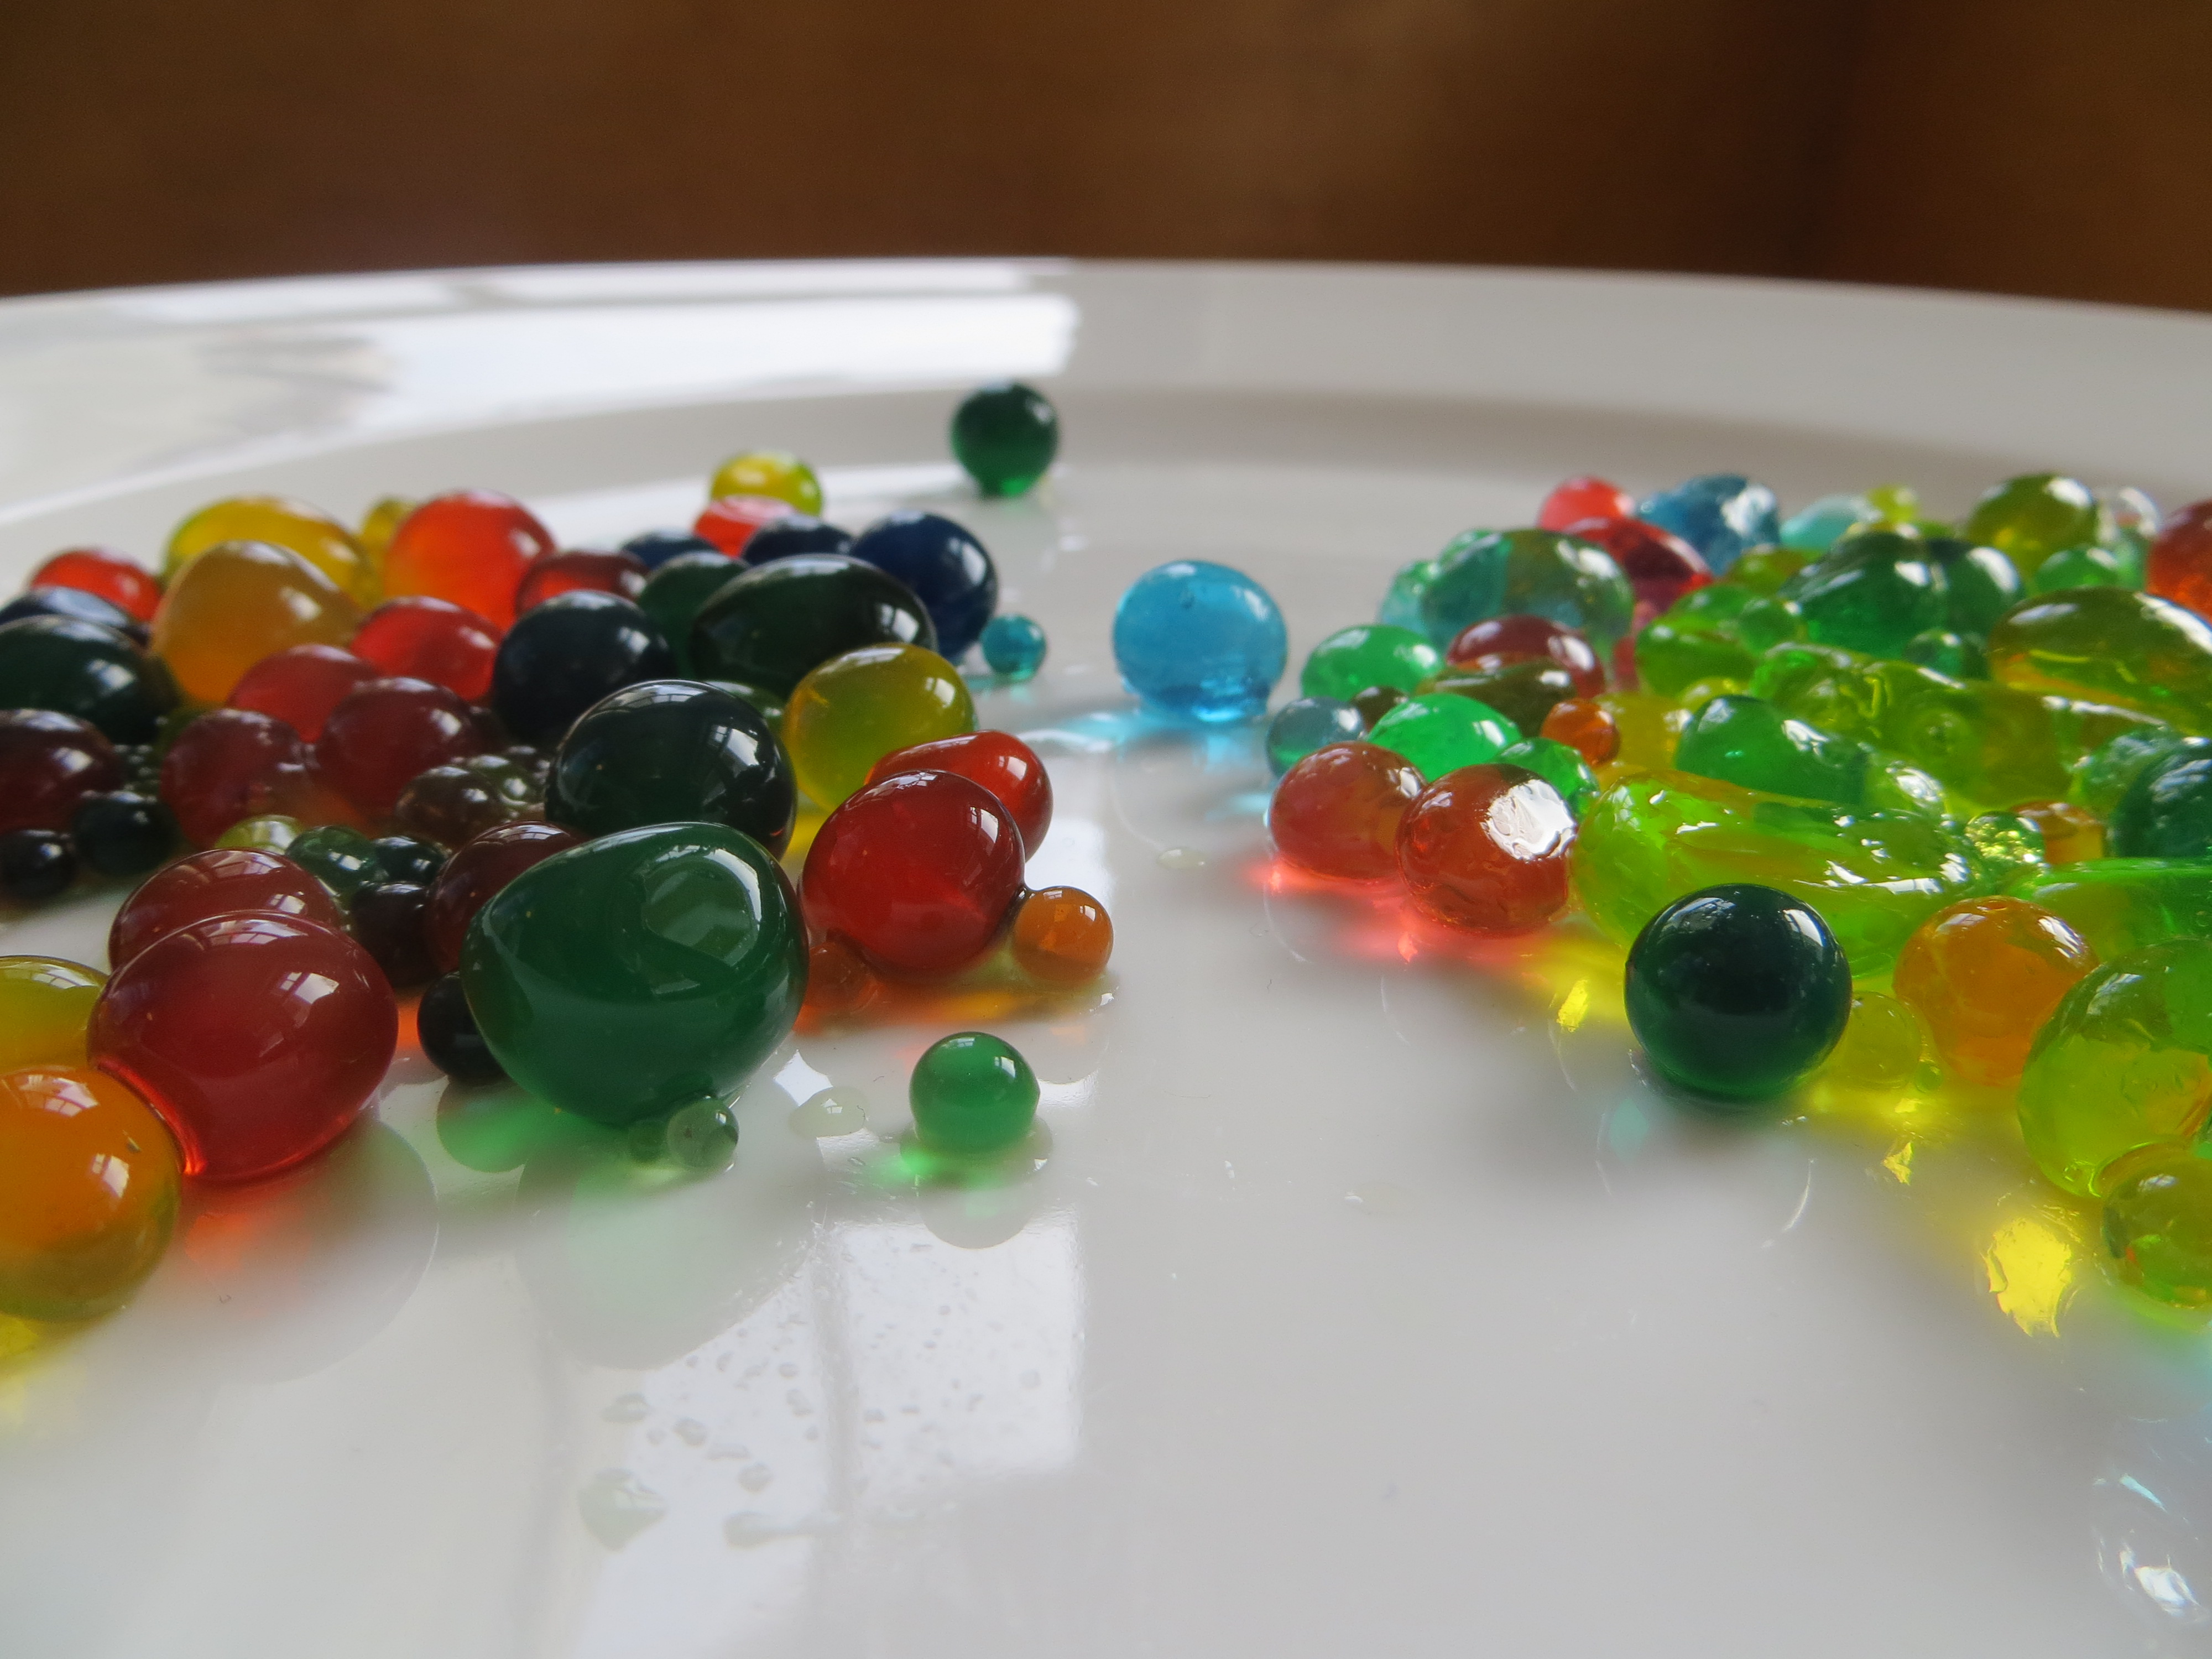
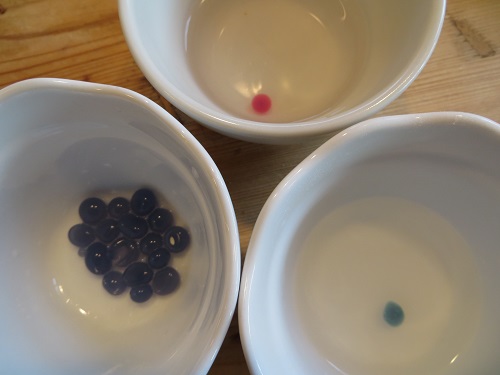
Homemade Magic Orbs- KitchenPantryScientist.com (agar orbs on left, gelatin orbs on right)
A quick search online showed me that some chefs use a technique called oil spherification to make tiny round morsels using everything from balsamic vinegar to fruit juice, mixed with gelatin and agar. It’s known to cooks as a “molecular gastronomy” technique, and takes advantage of the fact that water and oil don’t mix. Water-based droplets falling through chilled oil form into perfect spheres due to surface tension, and gelatin and agar added to the mix are colloids that solidify as they cool.
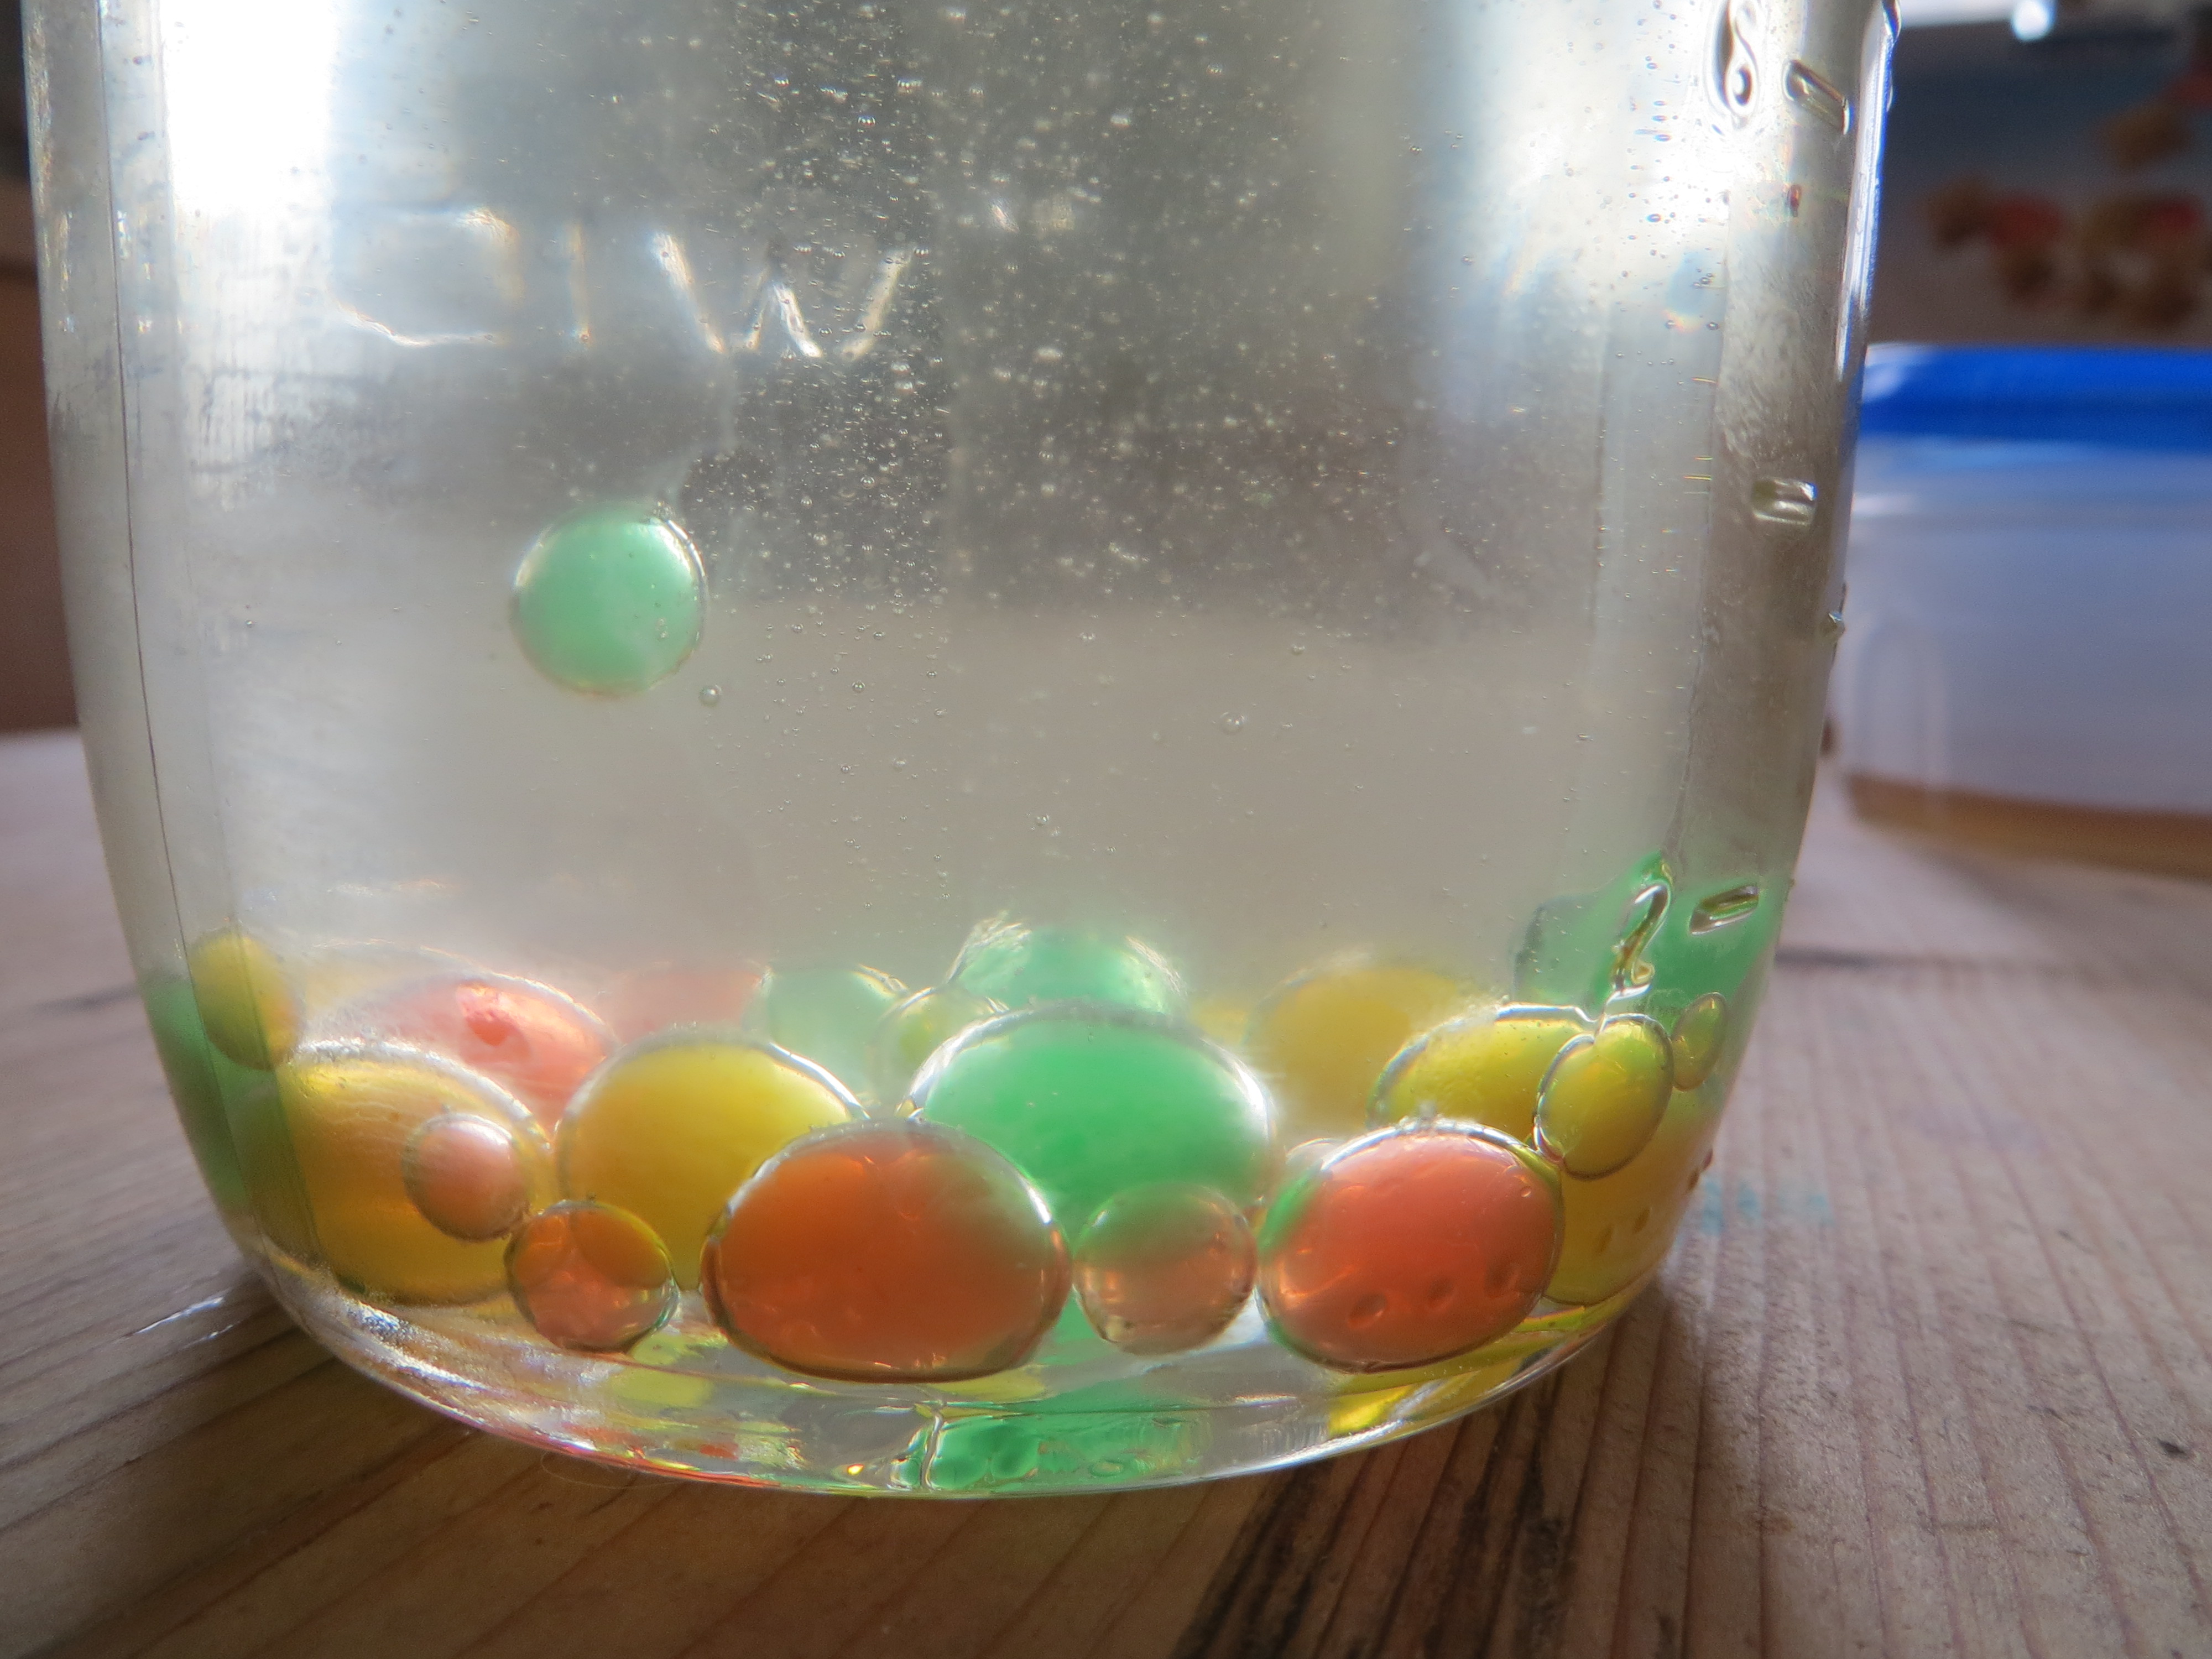
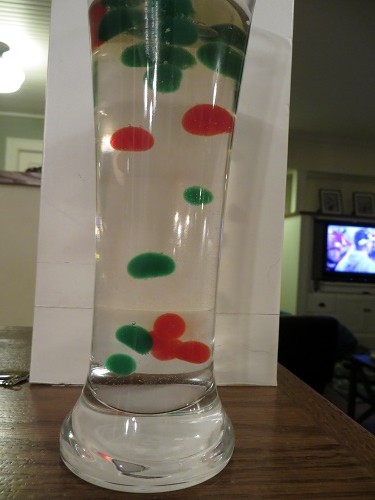
Magic Orbs forming in cold oil (KitchenPantryScientist.com)
We made some fun (inedible) orbs of our own, using the technique: standard orbs (from gelatin or agar and water), floating orbs (with agar and vinegar) and color-changing acid/base indicator orbs (from red cabbage juice and gelatin or agar.) Adult supervision is required for this project, since it involves hot liquids. The orbs may also be a choking hazard, so keep them away from toddlers. I demonstrated how to make them on Kare11 Sunrise News.
To make magic orbs, you’ll need
-unflavored gelatin or agar*
-water
-vinegar
-food coloring
-cold vegetable oil in a tall container. Chill oil in freezer or on ice for at least an hour, or until it is cloudy, but still liquid.
HINT: Orbs made with vinegar and agar shrink better than those made with gelatin (see floating orb recipe below!)
Standard colored orbs:
1. With adult supervision, dissolve 5 packets unflavored gelatin or 2 Tbs. agar in 1 cup hot water. Add 2 tsp. vinegar. Microwave and stir until completely dissolved.
2. Pour into smaller containers and add food coloring. When cooler, but not solid, add the melted, colored gelatin or agar to an empty glue container or squeeze bottle.
3. Drip gelatin or agar solution into the cold oil, a few drops at a time so it forms into marble-sized orbs and sinks. Drip two colors together to make multi-colored orbs! Allow to cool for 30 seconds or so and retrieve with a slotted spoon or strainer. Rinse with water and repeat, re-chilling the oil as needed until you have as many orbs as you want.
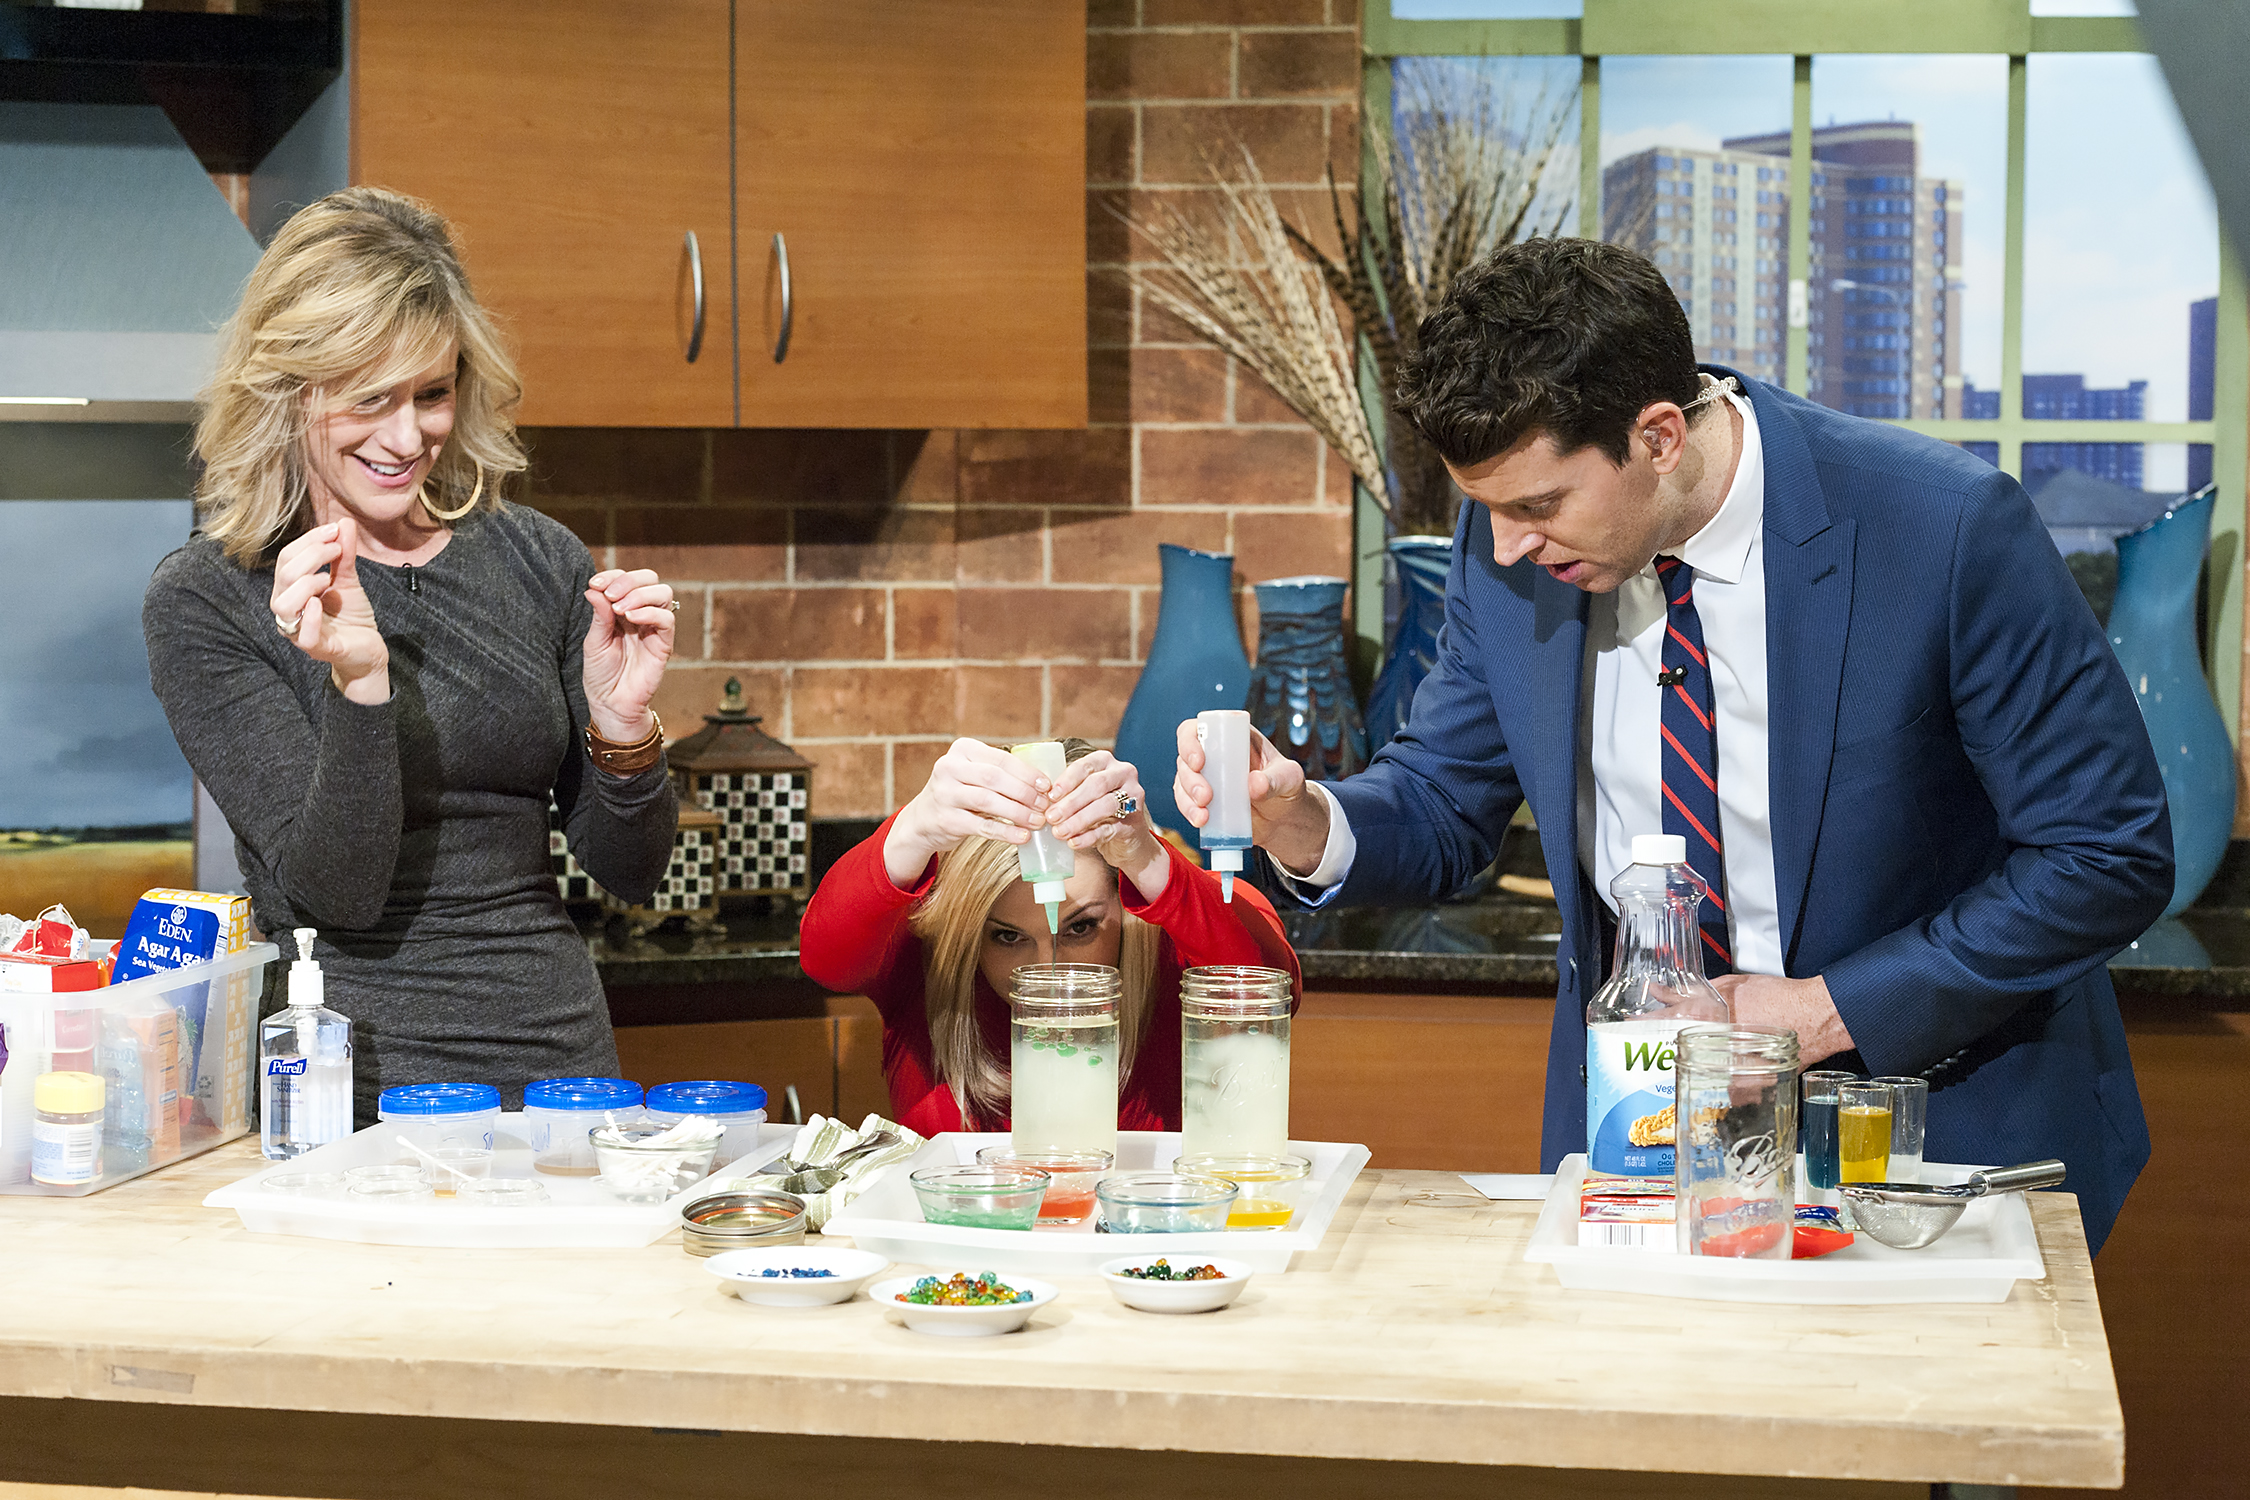
Making magic orbs on Twin Cities Live with Lindsey Brown and Steve Patterson (photo by Glenn Griffin)
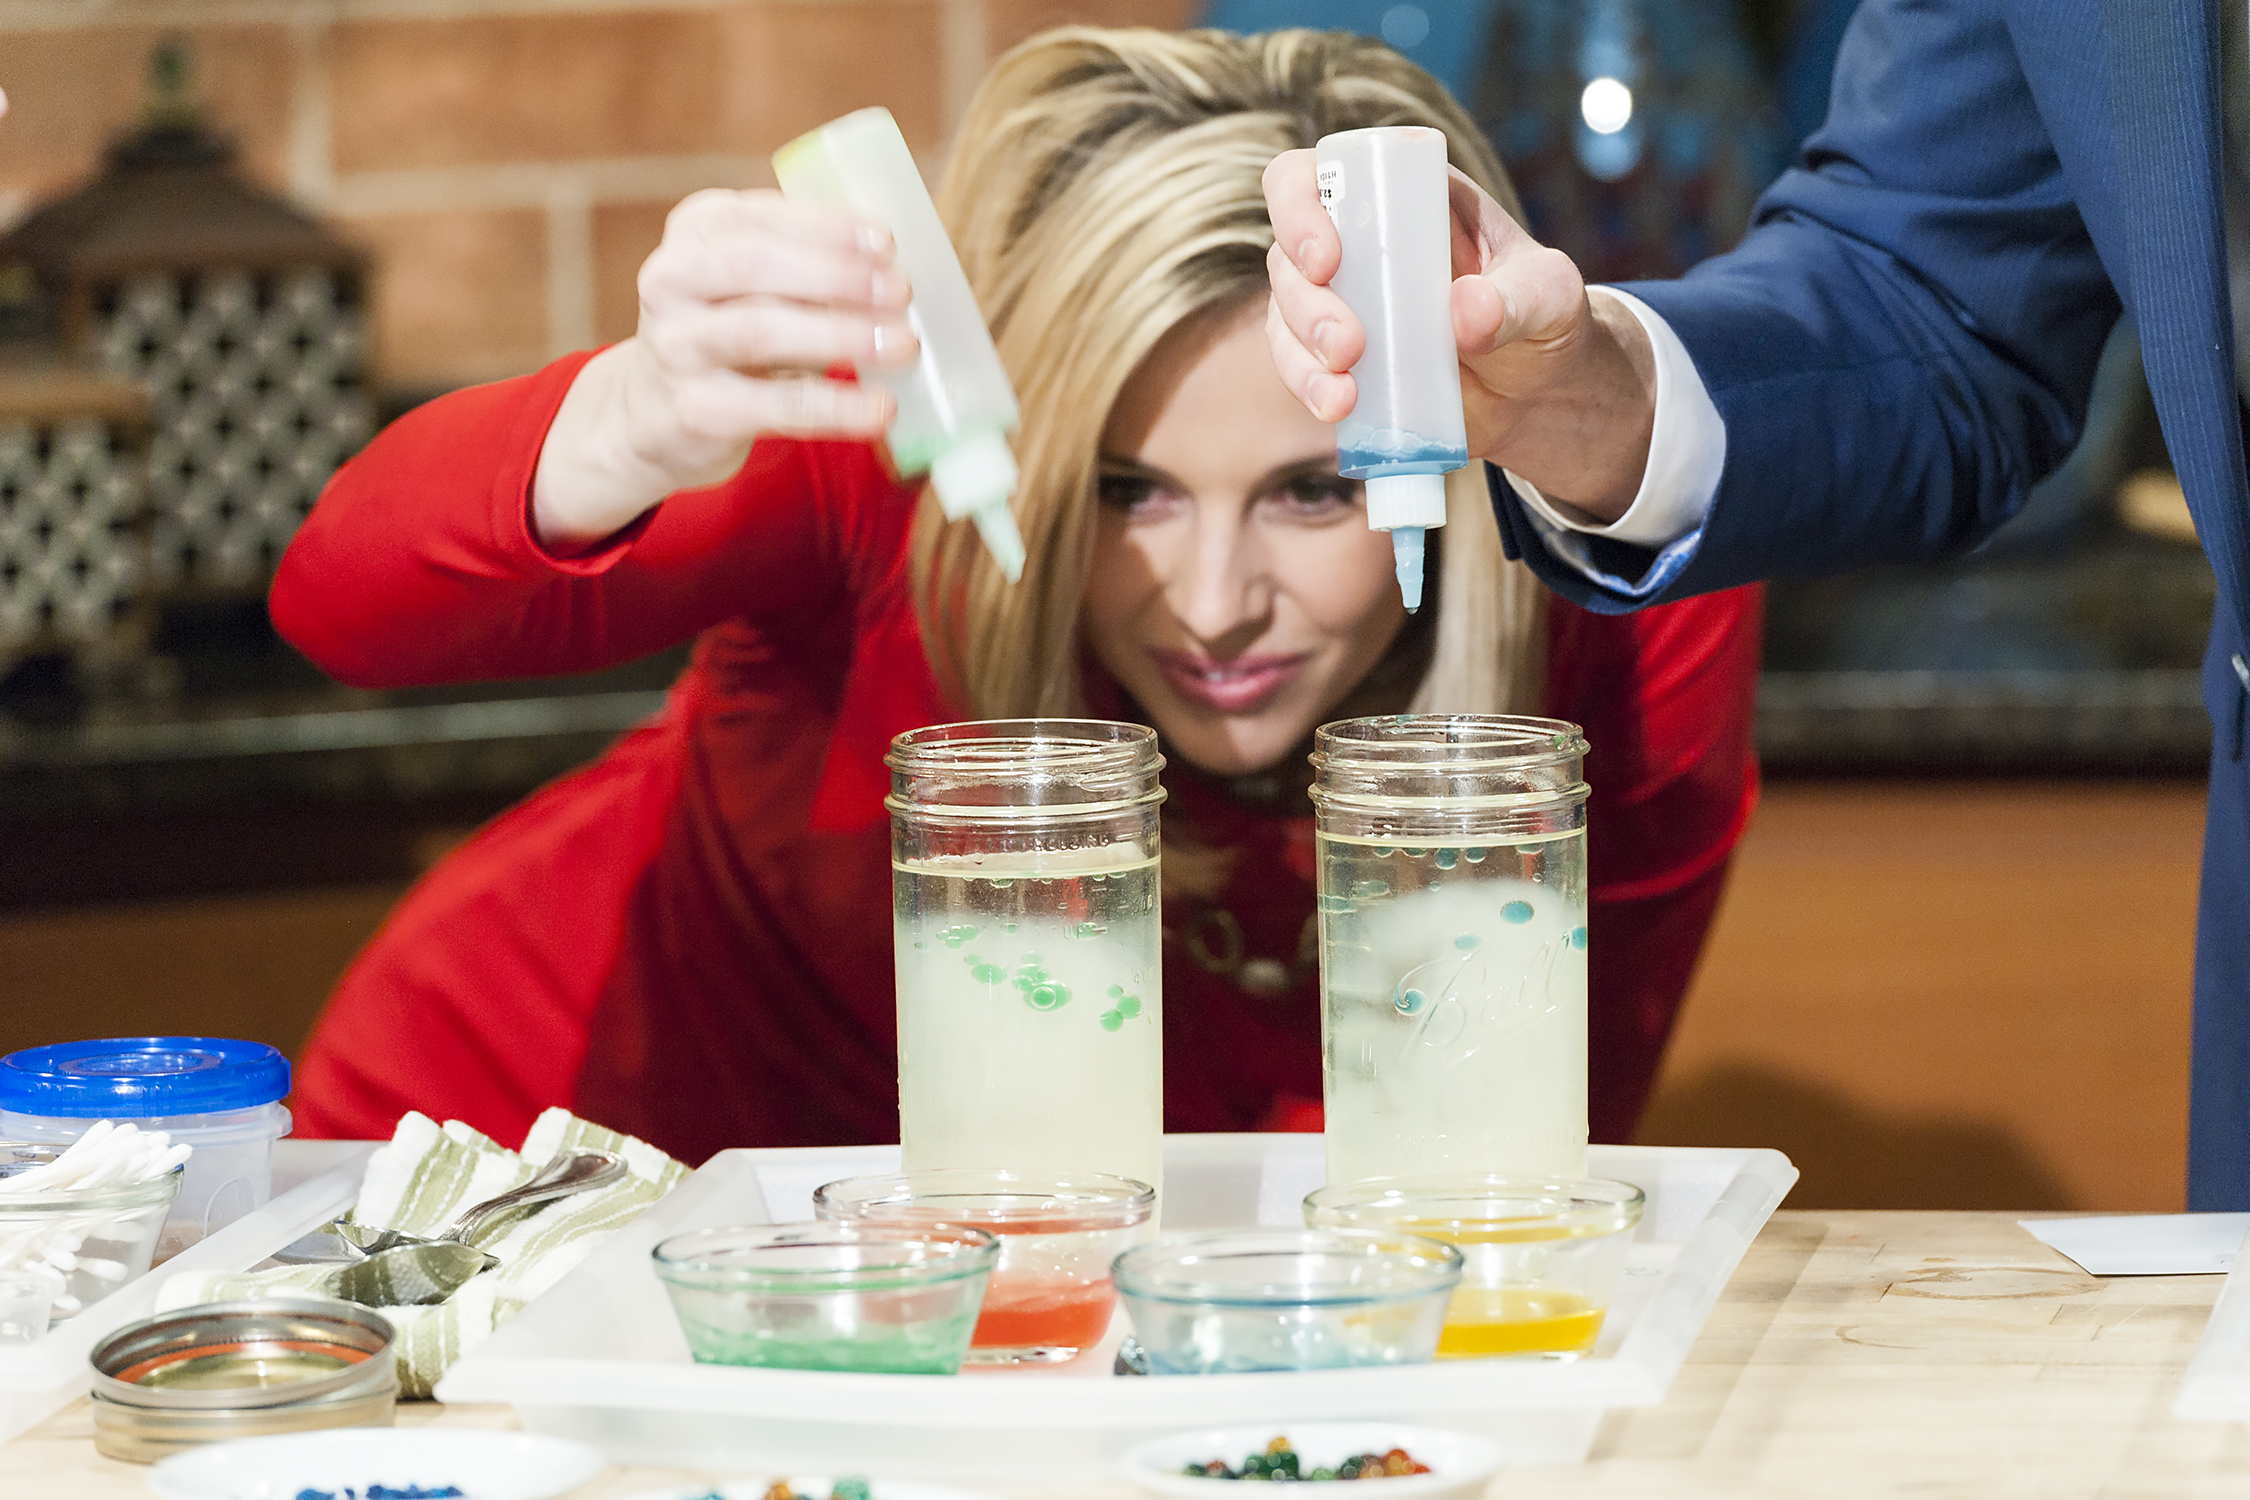
Lindsey Brown and Steve Patterson making orbs on Twin Cities Live (photo by Glenn Griffin)
4. Rinse orbs with water. Dry them out by setting them on a plate overnight if you want to see them shrink and then re-hydrate them with water. Orbs can be kept in a plastic bag in the refrigerator. (Keep away from small children, since they may be a choking hazard.)
To make floating orbs, follow directions above, but make with 1 cup white vinegar and 2 Tbs. agar. They will sink and float when added to water with a few tsp. of baking soda mixed in as the vinegar and baking soda react to form carbon dioxide gas.
To make color-changing orbs, dissolve 2 Tbs. agar or 5 packs unflavored gelatin in 1 cup red cabbage juice (magic potion) and follow directions for making orbs. Then drop them in vinegar to watch them turn pink or in water containing baking soda to watch them turn blue!
Could you make homemade jelly beans using flavored gelatin using this same method? Try it!
*Agar, or agar agar flakes can be found in the Asian food section of many grocery stores!
Crock Pot Microbiology: Yogurt
- by KitchenPantryScientist
Microbes are always fighting for space.
Bacteria and fungi try to outnumber other tiny competitors using chemical warfare, among other things. That’s why many antibiotics (which kill certain bacteria) are actually produced by other bacteria. One reason foods like yogurt and cheese, which are made by beneficial bacteria like Lactobacillus acidopholis, don’t easily spoil is that these bacteria can turn milk sugars into lactic acid. This makes their environment toxic to some of their competitors, like pathogenic bacteria. Luckily, we humans aren’t harmed by lactic acid and can enjoy its tangy flavor.

To grow bacteria in labs, scientists have to take care of them the way you’d take care of a pet. You have to give them the type of food they like, the right amount of oxygen and moisture, and keep them at their optimal temperature.
The same principles apply to growing the bacteria that make yogurt. You prepare the bacteria’s food by heating some milk and letting it cool to a temperature that the bacteria can tolerate. Then, you add the bacteria and let them grow for about eight hours. During that time, the bacteria will happily divide, multiply and eat milk sugar. In the process, they’ll produce lots of lactic acid which changes the way the proteins and fats in the milk interact, forming a more solid food product.

We made yogurt in our crock pot, which turned out to be a lovely bacterial incubator. The end product was a little runny, but putting it through cheese cloth (or a coffee filter in a plastic bag with the tip cut off) gives you thicker yogurt. It is delicious! Here’s how we made it, thanks to directions from Stephanie O’Dea:
Ingredients: 8 cups (half-gallon) of whole milk , 1/2 cup grocery store yogurt (must contain live/active culture), thick bath towel, slow cooker

Turn crock pot on to low. Add an entire half gallon of milk. Cover and cook for 2 hours and 30 minute. Unplug your crock pot, but leave the cover on. Let it sit for 3 hours so your bacteria will not be overheated when you add them.
After 3 hours, put 2 cups of your warm milk in a bowl. Whisk in 1/2 cup of the live/active culture yogurt. Dump the bowl contents back into the crock pot and stir well. Wrap a heavy bath towel all the way around the unplugged crock pot as insulation and let your bacteria grow for 4-8 hours or until thickened. Refrigerate and enjoy with fruit, honey, or granola. As I mentioned, you can strain the yogurt if you prefer a thicker consistency, and your homemade yogurt will make a great starter culture for the next batch!

If you don’t have cheesecloth, you can strain your yogurt through a coffee filter in a plastic bag with a corner cut off.
Happy kitchen microbiology!
Homemade Petri Plates- Microbial Zoos
- by KitchenPantryScientist
 I’m re-posting this project we did two years ago, since I’m making plates today for a hand-washing experiment that the kids and I will do after school. Stay tuned!
Did you know that every surface in your home is teeming with microorganisms? Culturing microbes from your home on petri dishes lets you grow some of them as colonies that you can see with your naked eye. You might already have what you need in your kitchen cupboard. If not, the ingredients are readily available at most grocery stores. I demonstrated this experiment on Kare11 and you can watch it here, following the yeast experiment.
 To make petri plates, you’ll need disposable containers (see below), beef bouillon cubes or granules, plain gelatin or agar agar*, water, sugar and Q-tips. (*Agar-agar can be found with Asian groceries in some grocery stores.) **Gelatin will melt if it gets too warm, and some strains of bacteria can liquify it, which is why scientists in labs use agar to make their plates. The idea to use agar for plates originally came from Angelina Hess, who used agar for canning food.
For containers, you can use foil muffin tins, clear plastic cups covered with plastic baggies, clear Tupperware with lids, or real petri dishes. We’re going to use clear deli containers, so that we can recycle while we learn. (Containers must be heat-resistant enough to pour warm agar into.)
Start by making microbial growth medium (or microbe food, as we like to call it.) Mix together:
–1 cup water
-1 Tbs. agar-agar (OR one and one half packages gelatin, which is about one and a half oz or 12g)
–1 bouillon cube (or 1 tsp. granules)
–2 tsp. sugar
The next step requires adult assistance, since it involves very hot liquid. Bring the mixture to a boil on the stove or in the microwave, stirring at one minute intervals and watching carefully until the gelatin or agar is dissolved. Remove the boiling liquid from heat and cover. Let cool for about fifteen minutes.

Pour the medium carefully into clean containers, until 1/3 to 1/2 full. Loosely place lids, foil or plastic baggies over containers and allow dishes to cool completely. The geltin or agar should make the growth media hard like jello. When your plates have hardened, store them in a cool place, like a refrigerator, before using. Plates should be used in 2-3 days. When you are working with the plates, try to keep the lids on loosely whenever possible, so that they are not contaminated by microorganisms floating around in the air. If you’re planning to use muffin tins, simply place them in a muffin pan, fill them with agar, and when they’re cool, put them in individual zip-lock baggies. With other containers, put the lids on tightly once the plates harden.


When the plates are ready, shake the condensation (water droplets) off the lids of the containers and put them back on. If you have a clear container, you can draw a grid of four sections on the bottom of the plate with permanent marker. (If using muffin tins, label each bag with the surface you are checking.) Decide which surfaces you’d like to test.
Label your plates with the names of the surfaces you want to test. Be sure to label the bottom of the plate since the lid will move. You should be able to see through the agar to see your lines and your writing. If you want to, you can label a separate plate for each surface, but we had three kids and three plates, so we made sections. TV remotes, kitchen sinks, computer keyboard, doorknobs and piano keys are great surfaces to check. You can even touch your finger to the plate, cough on a plate, or leave one open to the air for half an hour to see what’s floating around! (See the photo at the top of this post for a better picture of how your plate might look.)
Rub a clean Q-tip around on the surface you want to test. Then, remove the lid from the plate and gently rub the Q-tip across the section of the plate labeled for that surface. If you’re careful, the agar shouldn’t break. If it does, it’s no big deal. When you’re done, set the plates on a flat surface with their lids loosened and taped on (do not invert them.)

Here’s what grew on one of our plates (pictured above): The large, fuzzy colonies are fungi and the small, whitish ones are probably bacteria.
See what grows! You will mostly see fungi (molds), but you may also see some tiny clear or white spots that are colonies formed by millions of bacteria. Record and draw how your plates look in your science notebook. Keep track of how long it takes things to grow and the shapes, sizes and colors of the microbial colonies that grow on their plates. Sciencebuddies.org has this great page on interpreting what you find growing on your plates! If you want to learn more about microbes, search for the words fungi and bacteria on the website cybersleuthkids.com and it will give you some great links to microbiology websites. Microbes are everywhere, but that very few of them are harmful, and many of them are essential for good health.
Wash your hands after handling the plates, and throw the plates away when you are done. Remember, if you washyour hands with regular hand soap for the length of time that it takes to say the ABCs, you’ll remove most of the harmful bacteria and viruses on them. (One side effect of this experiment is the sudden urge to disinfect computer keyboards and remote controls.)
Science Kit for Kids
- by KitchenPantryScientist
I just put together a homemade science kit (for a silent auction at a fundraiser) and it was so cute I had to post a picture.

homemade science kit
Click here to see a post with links to homemade science kit experiments. Love giving these as birthday and holiday gifts too! To take it up a notch, pair your science kit with KidScience app for iPhones/iPods!
Over the next few weeks, I’ll be posting some fun biology experiments, so be sure to check back in!
Flammable Science: Homemade Black Snake Fireworks
- by KitchenPantryScientist
***Always wear goggles and fireproof aprons, if you have them, when working with flammable substances like ethyl alcohol, which burns very hot with no color! Be sure to pull long hair back as well!
Fireworks are really just explosive chemical reactions, and they’ve been around for thousands of years. Most of them are far too dangerous to make at home, but with some parental supervision, it’s fun to make homemade “black snake” fireworks, which are basically just flambeed powdered sugar and baking soda! Thanks again to Pat Mullin of Labconco who sent me a video of this experiment, which I posted about a year ago.

I had to mess around with the recipe to get it to work consistently, and each time we do it we get different-looking snakes, but it’s pretty neat. The key is to use enough fuel (alcohol) to keep your sugar burning.
BE SAFE! Set this experiment up on a heat-proof surface like a concrete driveway and have a hose ready, just in case. Make sure long hair is pulled back, and don’t try this on a windy day.
You’ll need:
1/3 cup sand, mounded in a pie plate with an indentation in the middle to hold the sugar/baking soda mix.

3 tsp. high-percentage alcohol (ethanol) like Everclear. I chose this as fuel rather than denatured alcohol or lighter fluid since there are no toxic fumes when you burn it.
4 tsp. powdered sugar mixed with 1 tsp. baking soda.
To make your snakes:
-Add the alcohol to the indentation in the sand.
-scoop 1 tsp. of the sugar/baking soda mix into a teaspoon and carefully drop it into the indentation in the sand. It’s fine if it holds the shape of the spoon, but try not to pack it down!

-Have an adult use a grill lighter or a long match to light the alcohol around the sugar on fire. It may be hard to see the flame, so stand back. You’ll see the sugar start to bubble when it’s lit. It will burn until the alcohol is gone, so wait until you’re sure it’s out before you try to touch the snakes!

What happens? When the baking soda gets hot, it makes carbon dioxide gas. The pressure from this gas pushes the carbonate from the burning sugar out of the sand, producing the “black snakes” you see.
Did you know there’s carbon in plants, like sugar cane? It’s called new carbon and is constantly recycled between the environment and living things. There’s also old carbon, like the kind you find in fossil fuels, including coal and oil. Here’s a cool NASA video that talks about the carbon cycle:
Homemade Science Lab
- by KitchenPantryScientist

Homemade science kits are fantastic, inexpensive holiday or birthday gifts. In addition, they’re great places to store loose science items you might already have around the house, like magnets or magnifying glasses. I’ll list how much some of the ingredients/stuff cost me at Target. In a single shopping trip, it’s easy to fill a plastic bin with enough supplies to do a number of science experiments (with a few last-minute additions from around the kitchen, like dish soap and milk.) The other morning, I talked about making your own science kit on Kare11 Sunrise. Pair your kit up with KidScience app for iPhones and iPods, and watch your kid turn your kitchen table into a science lab!
I’ll list some “ingredients” for science kits and link directly to the experiments in blue (just click on the experiment name.) You can print out directions from my website for older kids, or let younger kids watch the how-to videos on my website (see sidebar), so they can do them on their own. Better yet, just put down some newspaper and let them start mixing things together.
Safety goggles, petri dishes,magnets, plastic test tubes, eyedroppers, magnifying glasses, plastic beakers and graduated cylinders are great additions to any kit! Many of these are reasonably priced at Creative Kidstuff stores, if you live in the Twin Cities.
Here’s what we put in our kit:
composition book: really cheap at Target and makes a great science notebook to draw, record, and tape photos of experiments into.
baking soda: $.52 at Target can be used for a number of experiments like fizzy balloons and magic potion. Mix with vinegar to make carbon dioxide bubbles.
vinegar $1.12 at Target can be used for fizzy balloons , alien monster eggs and magic potion.
balloons for fizzy balloons are $1.75 at Target.
dry yeast for yeast experiment is around $1. 32 at Target
white coffee filters: can be used for magic marker chromatography or making red cabbage litmus paper.
cornstarch: $1.27 at Target can keeps kids busy playing with Cornstarch Goo, a non-newtonian fluid. Here’s the video.
marshmallows around $1.50 at Target with rubber bands and prescription bottle rings you have around the house can be used to make marshmallow catapults. My kids used theirs to make their own Angry Birds game.
Knox gelatine and beef bouillon cubes can be used to make petri plates for culturing microbes from around the house. You can also use the gelatine for cool osmosis experiments!
Food coloring $2.39 at Target can be used to learn about surface tension by making Tie Dye Milk. Here’s the video. You can also easily make colorful sugar-water gradients that illustrate liquid density!
Mentos mints will make a Mentos geyser when combined with a 2L bottle of Diet Coke.
drinking straws$1.09 at Target are great for NASA soda straw rockets and a carbon dioxide experiment.
film canisters with pop-in lids make amazing rockets. I wouldn’t include the Alka-Seltzer tablets you need to make them work in kits for younger children, since they’re technically medicine. These rockets would be amazing gifts for kids to make each other. They’re fun to make and decorate.
Decorating the bin with sharpies(or paint) and stickers is a great way to personalize it and fun for whoever is putting it together. Have fun!
Homemade Petri Plates
- by KitchenPantryScientist
Culturing microbes (bacteria and fungi) on petri dishes lets you test different surfaces for microbes and grow your own germs. It’s also a great reminder of why it’s important to wash your hands. Even very young children will have fun helping with the Q-tips and seeing what grows in their microbial zoo. It’s fun, easy, and you might even already have what you need in your kitchen cupboard. If not, the ingredients are readily available at any grocery store.
You will need disposable containers to grow cultures in (see below), beef bouillon cubes or granules, plain gelatin or agar agar* (seaweed gelatin), water, sugar and Q-tips. (*Agar-agar can be found with Asian ingredients in some grocery stores.)
Note: Gelatin will melt if it gets too warm,and some bacteria make enzymes which can liquefy it, which is why scientists in labs use agar to make their plates. The idea to use agar for plates originally came from the wife of a famous microbiologist who used agar for canning food. Try to keep petri plates away from hot lights, etc. so they won’t melt.
For containers, you can use foil muffin tins, clear plastic cups covered with plastic baggies, clear plasticware with lids, or real petri dishes to grow fungi and some bacteria. We’re going to use clear deli containers, so that we can recycle while we learn. (They look like they will be heat-resistant enough to pour warm agar into.)
You’ll start by making microbial growth medium (or germ food, as we like to call it.)
Mix together a little less than 1 cup water, one and one half packages gelatin (Or 1 and 1/2 Tbs. agar-agar), one bouillon cube (or 1 tsp. granules), and 2 tsp. sugar. The next step is for an adult to help with, since it involves very hot liquid. Bring the mixture to a boil on the stove, stirring constantly, or boil in the microwave, stirring at one minute intervals and watching carefully until the gelatin or agar is dissolved. Remove the boiling liquid from heat and cover it with aluminum foil. Let the growth medium cool for about fifteen minutes.
Pour the medium carefully into clean containers, until 1/3 to 1/2 full. Loosely place lids, foil or plastic baggies over containers and allow dishes to cool completely. The geltin or agar should make the growth media hard like jello. When your plates have hardened, store them in a cool place, like a refrigerator, before using. Plates should be used in 2-3 days. When you are working with the plates, try to keep the lids on loosely whenever possible, so that they are not contaminated by the air. If you’re planning to use muffin tins, simply place them in a muffin pan, fill them with agar, and when they’re cool, put them in individual zip-lock baggies. With other containers, put the lids on tightly once the plates harden.
When the plates have hardened and you’re ready swab, shake the condensation off the lids of the containers and put them back on. Then, draw a grid of four sections on the bottom of the plate with permanent marker. (If you are using muffin tins, you’ll just label each bag with the surface you are checking.) Decide which surfaces you’d like to test. It’s always fun to label one section of the grid “fingerprint” to see what grows when you touch your finger to the plate.
Label each section with the surface you want to test. Be sure to label the bottom of the plate since the lid will move. You should be able to see through the agar to see your lines and your writing. If you want to, you can label a separate plate for each surface, but we had three kids and three plates, so we made sections. TV remotes, kitchen sinks, computer keyboard, doorknobs and piano keys are great surfaces to check. You can even cough on a plate or leave one open to the air for half an hour to see what’s floating around! (See the photo at the top of this post for a better picture of how your plate might look.)
Now comes the fun part. Rub a clean Q-tip around on the surface you want to test. Then, remove the lid from the plate and gently rub the Q-tip across the section of the plate labeled for that surface. If you are careful, the agar shouldn’t break. If it does, it’s no big deal. When you have finished, set the plates on a flat surface with their lids loosened and taped on (do not invert them.) I set our plates on a countertop where they wouldn’t be in the way. Check your plates every day, and soon you will observes colonies of different shapes, sizes and colors starting to grow.
You will mostly see fungi (molds), but you may also see some tiny clear or white spots that are colonies formed by millions of bacteria. Record and draw how your plates look in your science notebook. Older kids can keep track of how long it takes things to grow and the shapes, sizes and colors of the microbial colonies that grow on their plates. If you want to learn more about microbes, search for the words fungi and bacteria on the website cybersleuthkids.com and it will give you some great links to microbiology websites. Microbes are everywhere, but that very few of them are harmful, and many of them are essential for good health.

Be sure to wash your hands after handling the plates, and throw the plates away when you are done. Remind your kids that if they wash their hands with regular hand soap for the length of time that it takes to say the ABCs, they’ll remove most of the harmful bacteria and viruses on them. (For adults, a severe side effect of this experiment is the sudden urge to disinfect computer keyboards and remote controls.)
Here’s what grew on one of our plates: The large, fuzzy colonies are fungi and the small, whitish ones are probably bacteria. The grid with the most fungi was cultured from our piano keys. The one with both fungi and bacterial colonies visible was cultured from our bathroom sink. One grid has mostly small, white bacterial colonies and was cultured from a water-glass my son drank from. The fingerprint grid has only a single fungal spot. My daughter must have washed her hands before touching it! Our other two plates were pushed too close to the under-counter lights in our kitchen and the gelatin melted, so we threw them away.