Tag: science’
Rainbow Icicles -Winter Science for Kids
- by KitchenPantryScientist
Grab your coat and head outside to try this fun winter science project!
Rainbow Ice (kitchenpantryscientist.com)
You’ll need:
A large plastic zipper bag
Cotton kitchen twine
a toothpick or wooden skewer
ice-cold water
food coloring
a spray bottle
a squeeze bottle or syringe (optional, but helpful)
a very cold day (below 10 degrees F works best, but you can try it on any day when it’s below freezing)
Note: This experiment takes lots of playing around and results will vary depending on how cold it is outside. Remind your kids (and yourself) to be patient and try it on a colder day if it doesn’t work the first time around! If the bag leaks too quickly, try making one with smaller holes around the string.
Rainbow Ice (kitchenpantryscientist.com)
What to do:
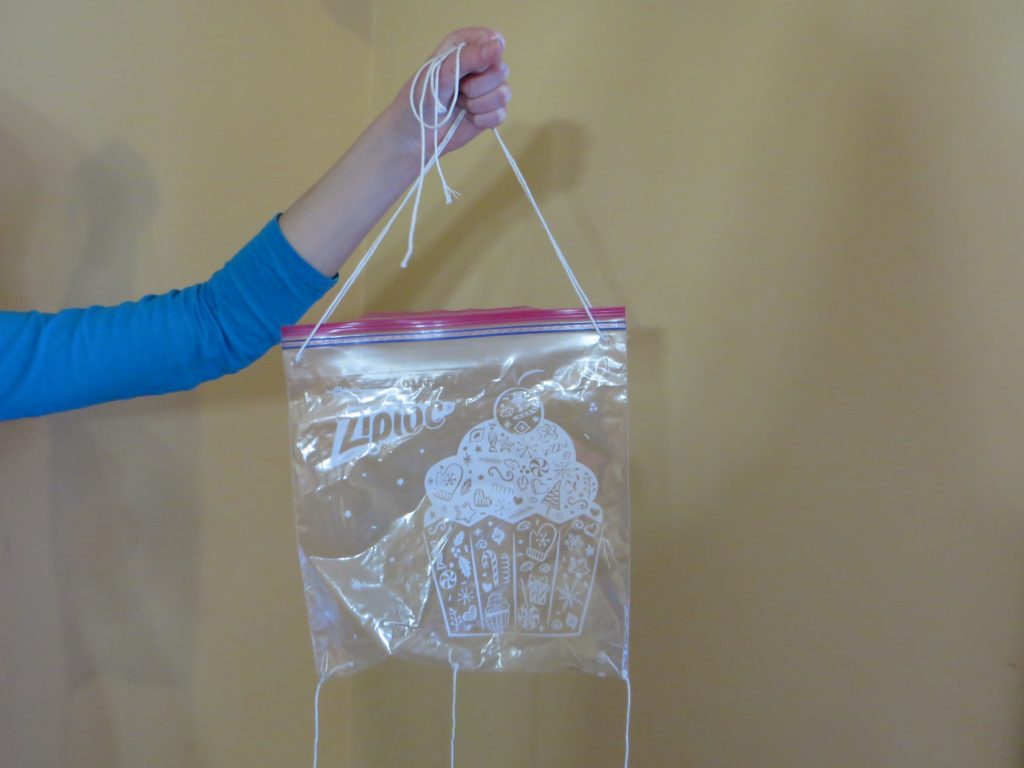
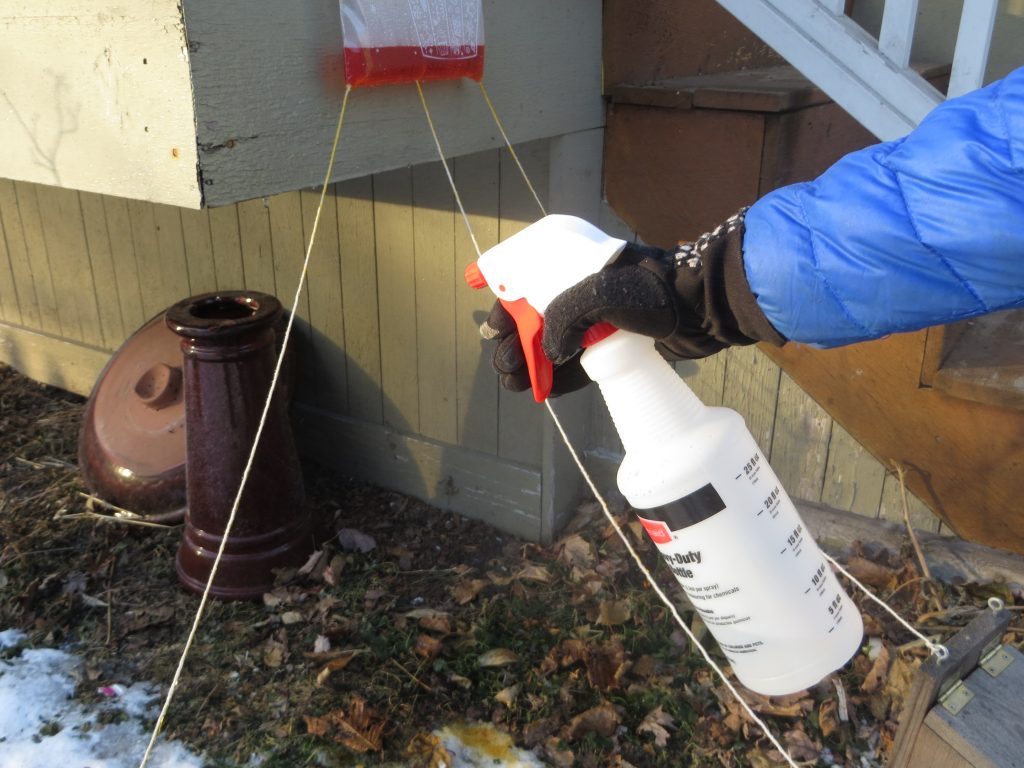
- Use a toothpick or skewer to poke 3 small holes in the bottom of a zipper plastic bag. Make one in the middle and one on each end.
- Cut three long (3 feet or so) pieces of kitchen twine and knot them at one end.
- Carefully thread the twine through the holes in the bag so that the knots are inside the bag to keep the strings from falling through. Try to keep the holes from getting too big, since the bag will be filled with water and you’ll want it to drip out very slowly around the string.
Rainbow Ice (kitchenpantryscientist.com)
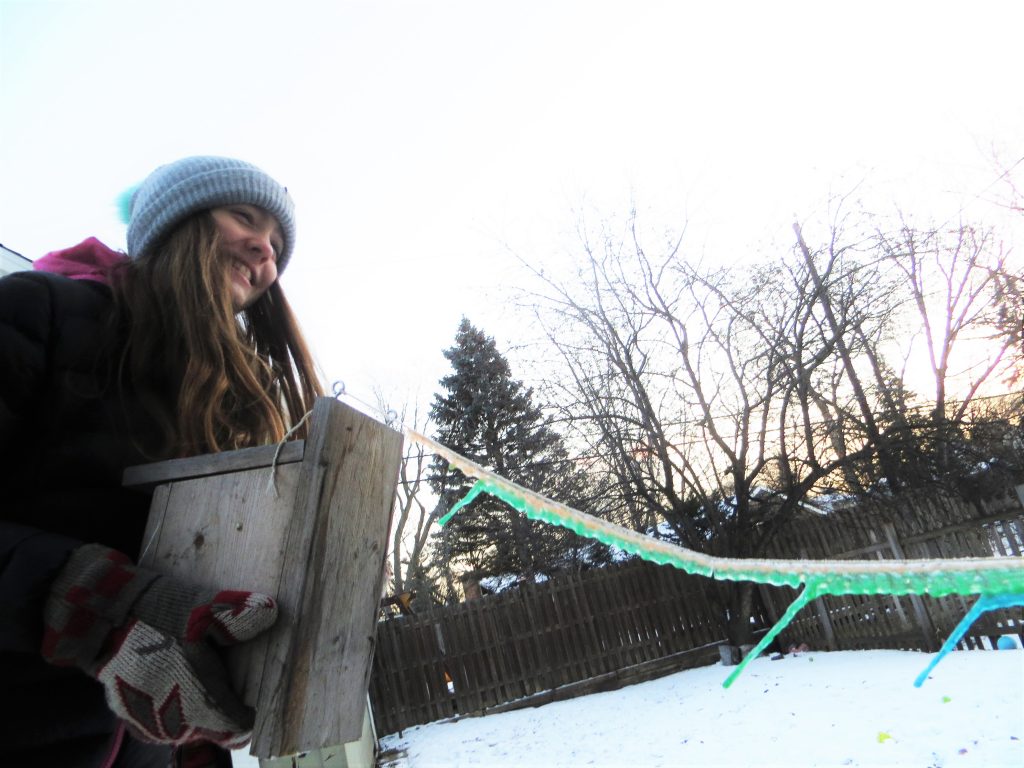
4. Attach two more pieces of twine to each top corner of the bag (above the zipper) to use for hanging the bag
5. Go outside and hang the bag from a low tree branch or railing.
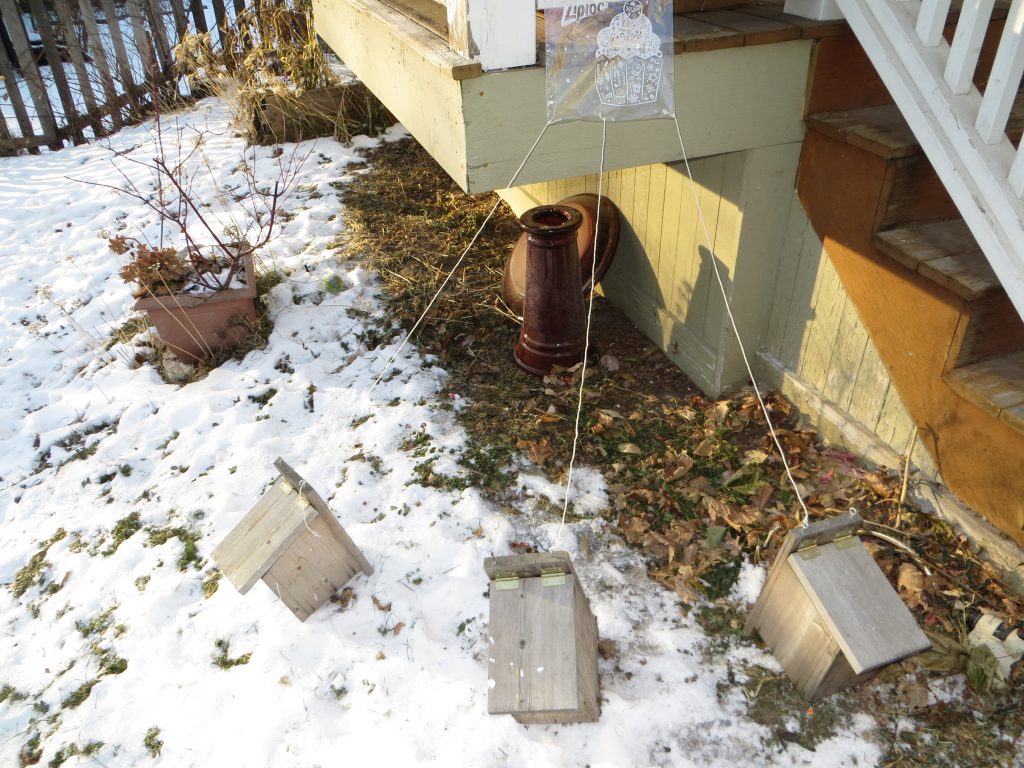
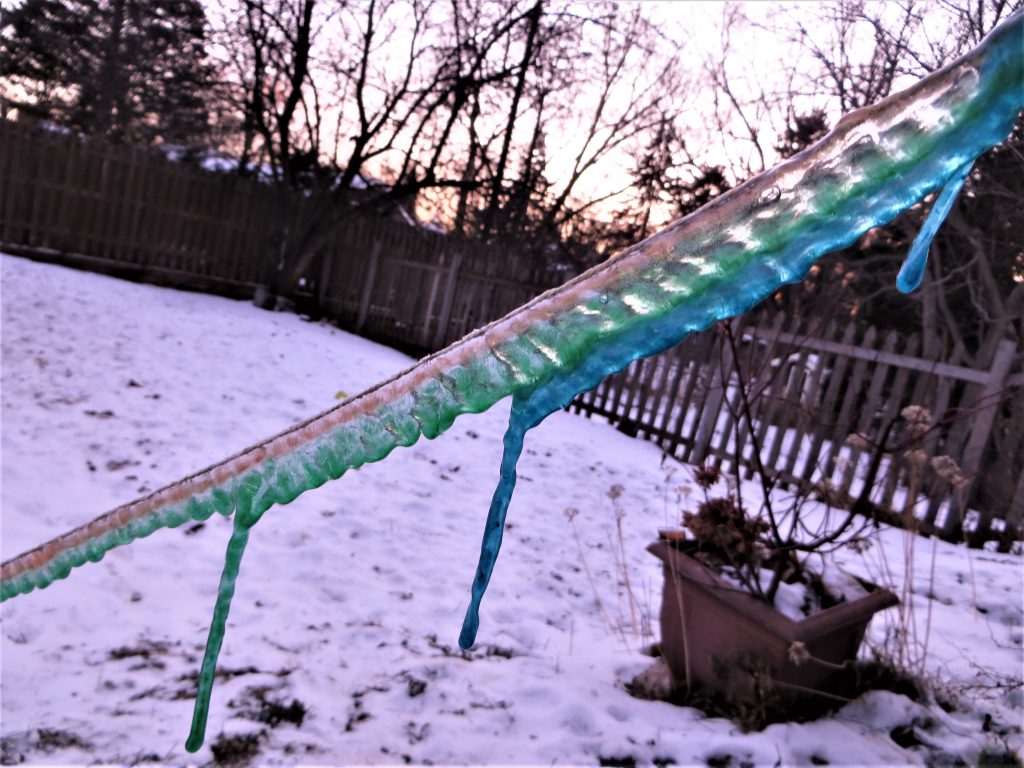
6. Tie each of the three strings to something on the ground, like a rock, piece of wood, or the handle of an empty milk carton filled with water to weight it down. Arrange the objects so that the strings loosely radiate out at around a 45 degree angle. (See photo)
7. Add food coloring to some ice-cold water in a pitcher.
8. Fill the spray bottle with ice-cold water.
9. Add the cold colorful water to the zipper bag hanging outside. Zip the top of the back to slow the rate of leaking.
10. Immediately spray the strings with water to guide the leaking water down the strings.
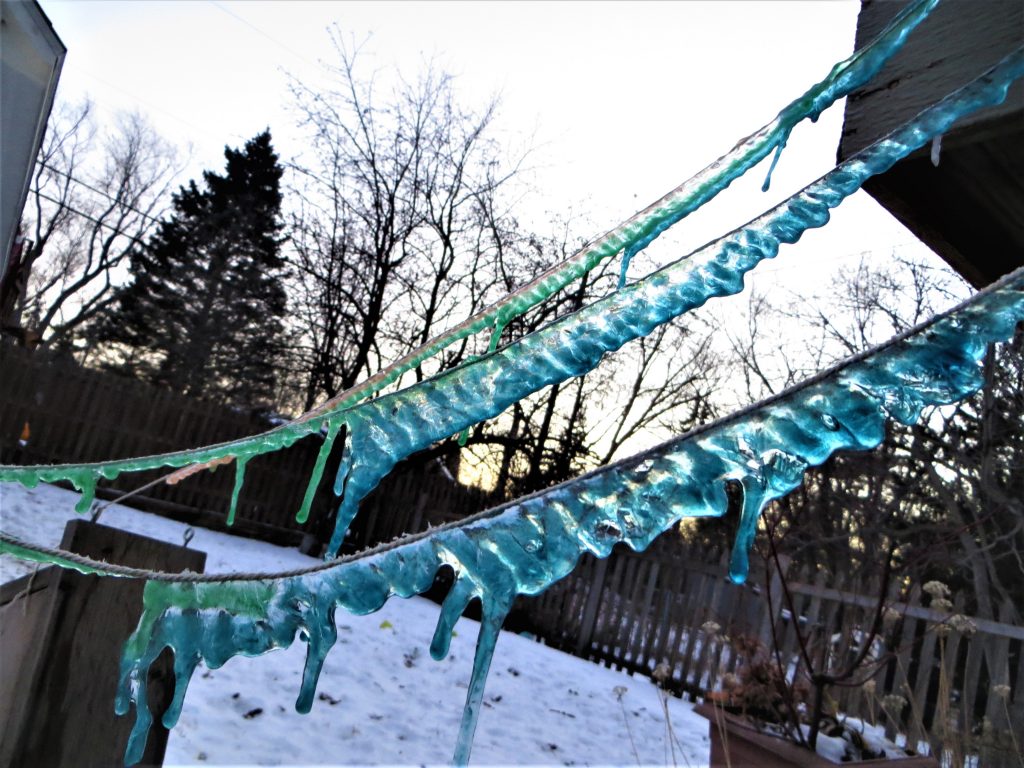
10. Wait for the water on the strings to freeze. Use your syringe to add a little bit more water to the strings (same color) and wait for them to freeze again. Repeat until you have a nice layer of ice/icicles.
11. Refill the bag, using a different color of ice-cold water. Spray the strings lightly again. Repeat step 11.
12. Add layers of color to the icicles until you’re happy with the way they look!
Rainbow Ice (kitchenpantryscientist.com)
The science behind the fun:
Icicles form when dripping water starts to freeze. Scientists have discovered that the tips of icicles are the coldest part, so that water moving down icicles freezes onto the ends, forming the long spikes you’ve seen if you live in a cold climate. When you add different colors of water to icicles in sequence, the color you add last will freeze onto the tip of the ice.
Here’s a cool article on icicle science by an expert, and another great article on “Why Icicles Look the Way They Do.”
You’ll find more fun ice science experiments in my book “Outdoor Science Lab for Kids” and in my upcoming books “STEAM Lab for Kids” (Quarry Books April 2018) and “Star Wars Maker Lab” (DK- July 2018)
Mirror Image Plant Prints
- by KitchenPantryScientist
Yesterday on Twin Cities Live, I demonstrated some fun botanical science projects for learners of all ages, including Vegetable Vampires and Leaf Chromatography.
This fun art/science project lets you transfer plant pigments to cloth, creating beautiful prints of your favorite leaves and flowers. It’s especially great for fall, when there are so many colorful leaves around.
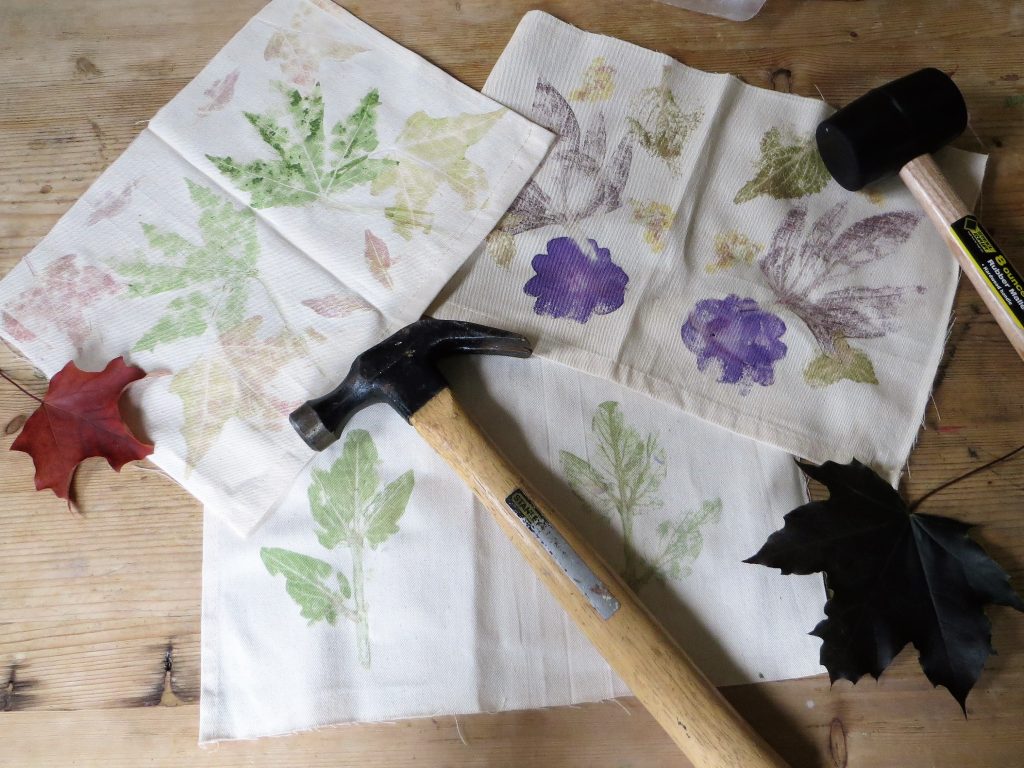
Mirror Image Plant Prints- kitchenpantryscientist.com
You’ll need:
-Fresh leaves and flowers (Dry leaves won’t work.)
-A hard, smooth pounding surface, like a wooden cutting board or carving board
-Wax paper or plastic wrap
-Mallets or hammers
-Untextured cotton cloth, like a dishtowel. Heavy cloth works better than very thin cloth.
-*Alum and baking soda to treat cloth (This is optional. I don’t pre-treat my fabric, but the treatment step will help bond and preserve color, if you want to frame your prints. You can also buy fabric that’s pre-treated for dyeing.)
Mirror Image Plant Prints- kitchenpantryscientist.com
Safety tips: Protective eye wear is recommended. Young children should be supervised when using mallets and hammers.
What to do:
*If treating cloth: The day before you do the project, add 2 quarts water to a large pot. Add 1 Tb alum and 1 tsp baking soda to the water. Add the cotton and bring to a boil. Simmer for 2 hours, turn off heat and soak for at least two hours. Let fabric dry.
The next steps are the same, whether you’re using an untreated piece of cotton or treated cloth.
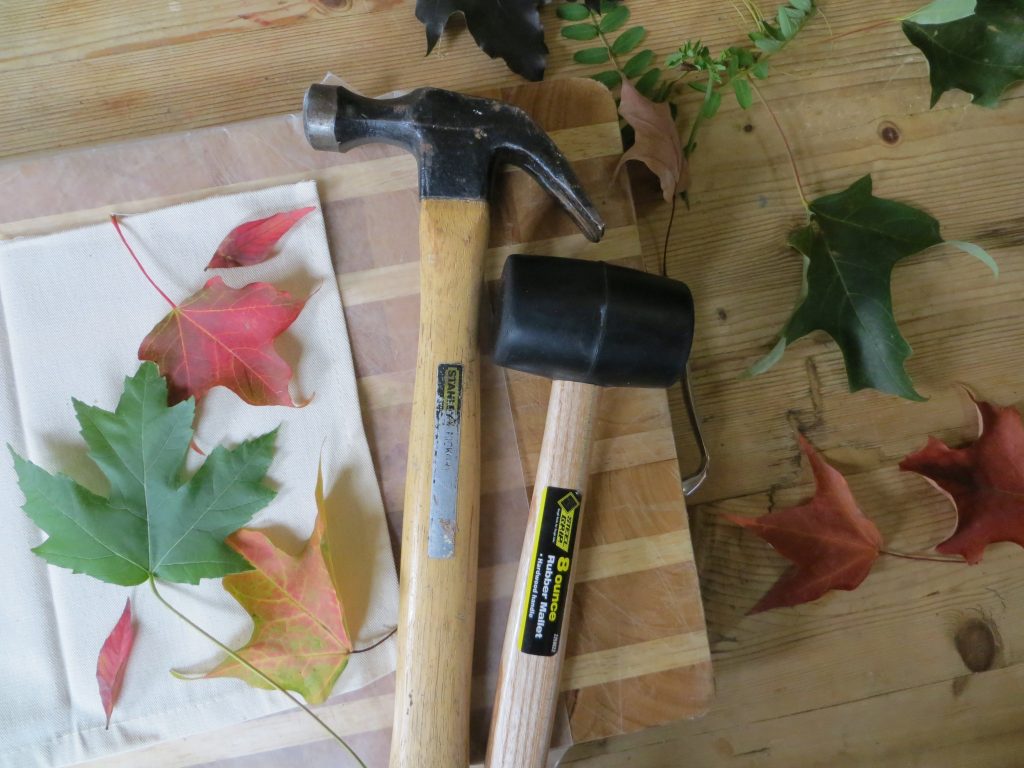
- Take a walk to collect colorful leaves and flowers. Choose plants that can be flattened. Flowers with huge centers, like coneflowers don’t work as well, but petals may be removed and pounded.
- Cover the pounding surface with waxed paper or plastic wrap.
- Cut a piece of cloth that will fit on the pounding surface when folded in half. Iron the fold.
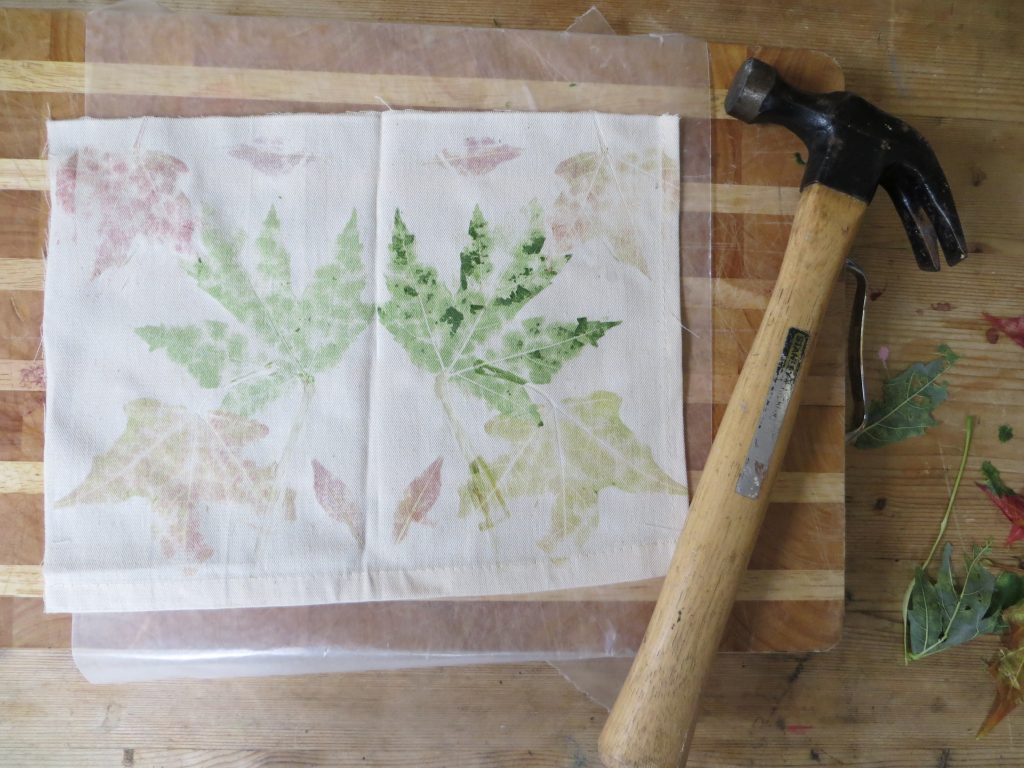
- Open the cloth and lay it on the pounding surface. (See image above)
- Arrange leaves and flowers on the cloth.
Mirror Image Plant Prints- kitchenpantryscientist.com
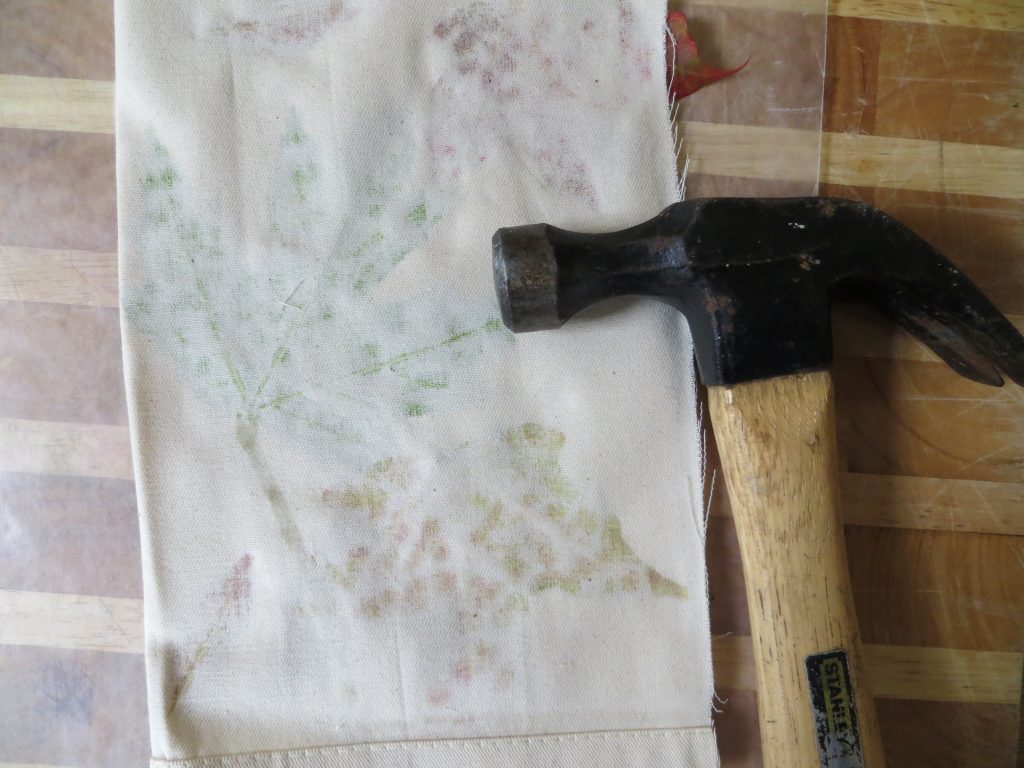
- Fold the cloth over the plants and pound it with the hammer or mallet. If you’re using a hammer, pound more gently.
- Pound until you can see the forms of the leaves through the fabric. As the pigment leaks through, you’ll see the outlines of what you’re smashing. Hint: Hammers work better than mallets for fall leaves. For juicy leaves and flowers, use a mallet or hammer gently.
Mirror Image Plant Prints- kitchenpantryscientist.com
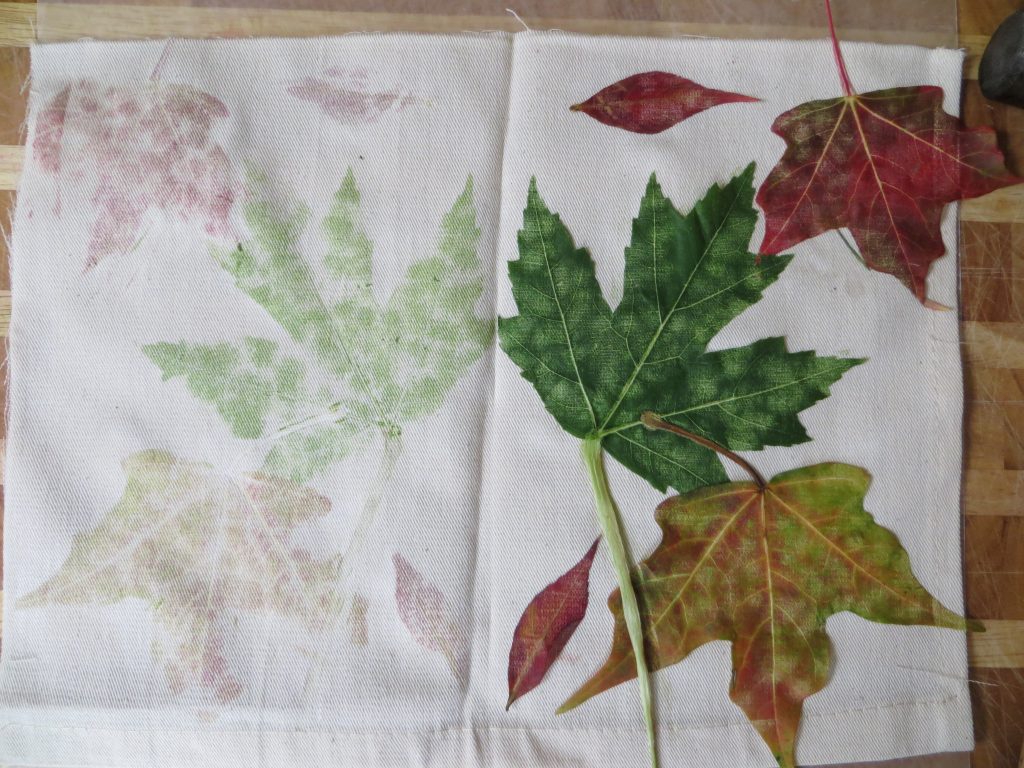
- When you’re finished pounding, unfold the fabric to reveal the print you created. Remove the leaves and petals.
Mirror Image Plant Prints- kitchenpantryscientist.com
- Label the image with plant names, enhance it with paint or markers, or leave nature’s design to speak for itself.
The Science Behind the Fun:
Pigments are compounds that give things color, and many of them are found in nature. Flowers, leave, fruits and vegetables are full of brilliant pigments. In this experiment, we transfer plant pigments to cloth by bursting plant cells using pressure from a hammer or mallet.
The green pigment found in leaves is called chlorophyll. In the fall, many trees stop making chlorophyll, and the red, yellow and orange pigments inside the leaves become visible.
Although you create a mirror image of leaves and flowers, you’ll notice that the color may be more intense on one side of the print. A waxy covering called a cuticle covers leaves, and is sometimes thicker on the top than on the underside of the leaf. It may affect the transfer of pigment to the cloth, making it easy to see structures like veins on the leaf print.
Enrichment:
What parts of the leaf can you identify in the print you created?
Kid-Friendly “Elephant Toothpaste”
- by KitchenPantryScientist
I’ve been hearing about this science demonstration for years, and finally decided to try it! If you do it at home, kids should wear safety goggles or sunglasses to protect their eyes, and adults should pour the 3% hydrogen peroxide into the bottles.
You’ll need:
a tray or cookie sheet
3% hydrogen peroxide (available at most pharmacies and discount stores)
liquid dish soap
dry yeast (2 packets)
food coloring
empty 16 oz bottle
What to do:
1. Pour 1 cup hydrogen peroxide into an empty 16oz bottle. (A funnel helps!)
2. Add 2 Tbs. liquid dish soap to the bottle and mix well with the hydrogen peroxide.
3. Put 8 drops of food coloring into the bottle and swirl to mix.
4. Position the bottle on the tray.
5. Pour 2 packets of yeast into a paper cup and pinch the cup’s lip to make a pouring spout.
6. Quickly pour the yeast into the bottle, while swirling the liquid vigorously to mix well. The better you mix it, the better the experiment will work!
7. Set the bottle down on the tray before the foam emerges from the top.
8. Watch the chemical reaction between catalase in the yeast and the hydrogen peroxide create oxygen bubbles in the soap!
9. When the reactions has stopped, have an adult clean up the mess by pouring everything down the sink and rinsing the tray with water. (Normally kids should clean up, but for this one, I’d recommend an adult do it.)
The Science Behind the Fun:
Hydrogen Peroxide (H2O2) is a common household chemical that is often used to disinfect wounds and bleach hair. Certain chemicals can break it down into water (H2O) and Oxygen (O).
Dry yeast is a living fungus that produces a molecule called catalase. Catalase is very good at breaking down hydrogen peroxide quickly. When you add yeast to hydrogen peroxide that’s been mixed with liquid soap, the soap traps the oxygen and makes bubbles that push their way out of the bottle.
You may notice that the bottle feels warm. That’s because the chemical reaction produces heat and is called an exothermic reaction.
Weather Science
- by KitchenPantryScientist
It’s fun to track the weather, and you can create some cool meteorology instruments using stuff you have around the house. Here’s a great post by NOAA (The National Oceanic and Atmospheric Association) on how to make your own weather station.
It’s also fun and easy to do this cool convection current experiment, using warm and cold water to explore how air moves in Earth’s atmosphere.
Convection Experiment (kitchenpantryscientist.com)
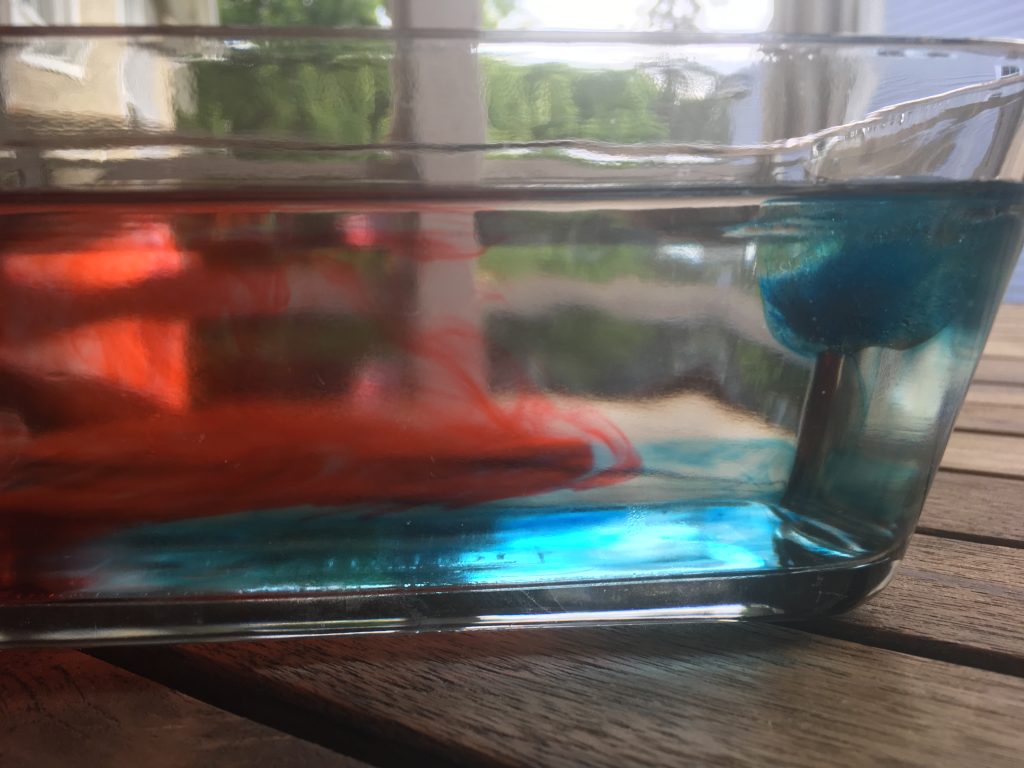
To see how cold fronts move under warm fronts, you’ll need ice cube trays, water, blue and red food coloring and a clear container.
- Add water to an ice cube tray and add a few drops of blue food coloring to the water in each cube space. Freeze.
- Fill a clear container with room temperature water.
- Place one or two blue ice cube or two at one end of the container, and a few drops of red food coloring at the other end.
- Observe what happens.
The Science Behind the Fun:
Cold water(blue) is more dense than warm water and forces warmer water (red) to move up and over it.
This is similar to the way warm air is forced up when it collides with masses of cold air in the atmosphere. Warm air carries energy, and when there’s lots of moisture in the air, these collisions often result in thunderstorms.
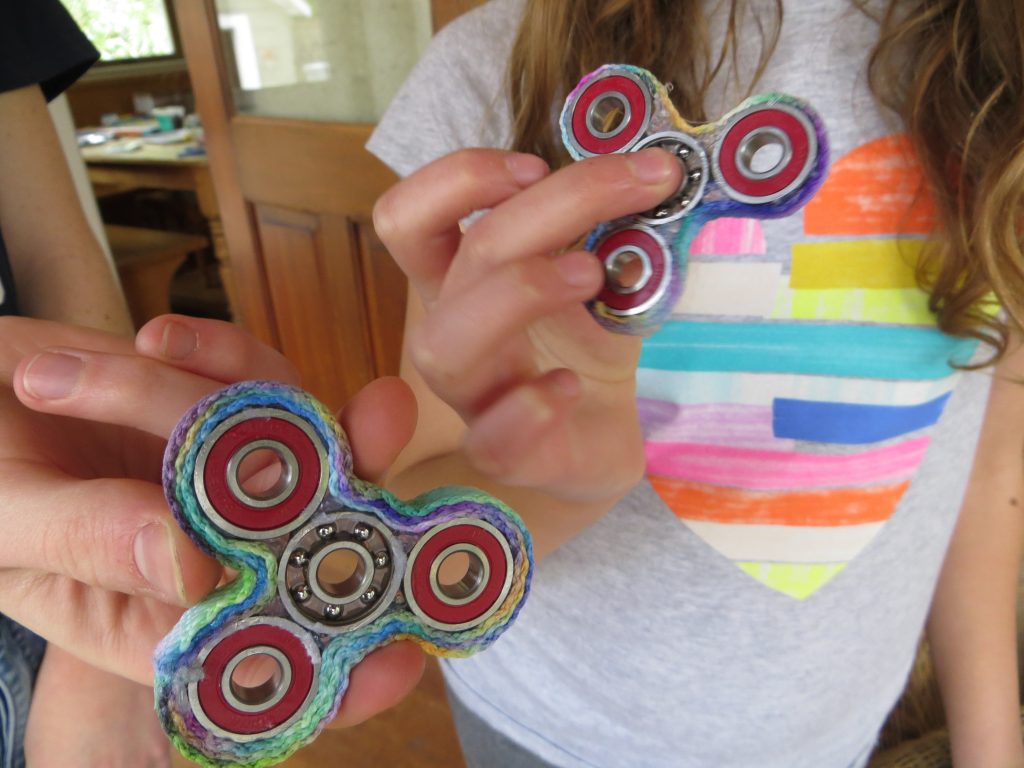
Homemade Tie-Dye Fidget Spinner
- by KitchenPantryScientist
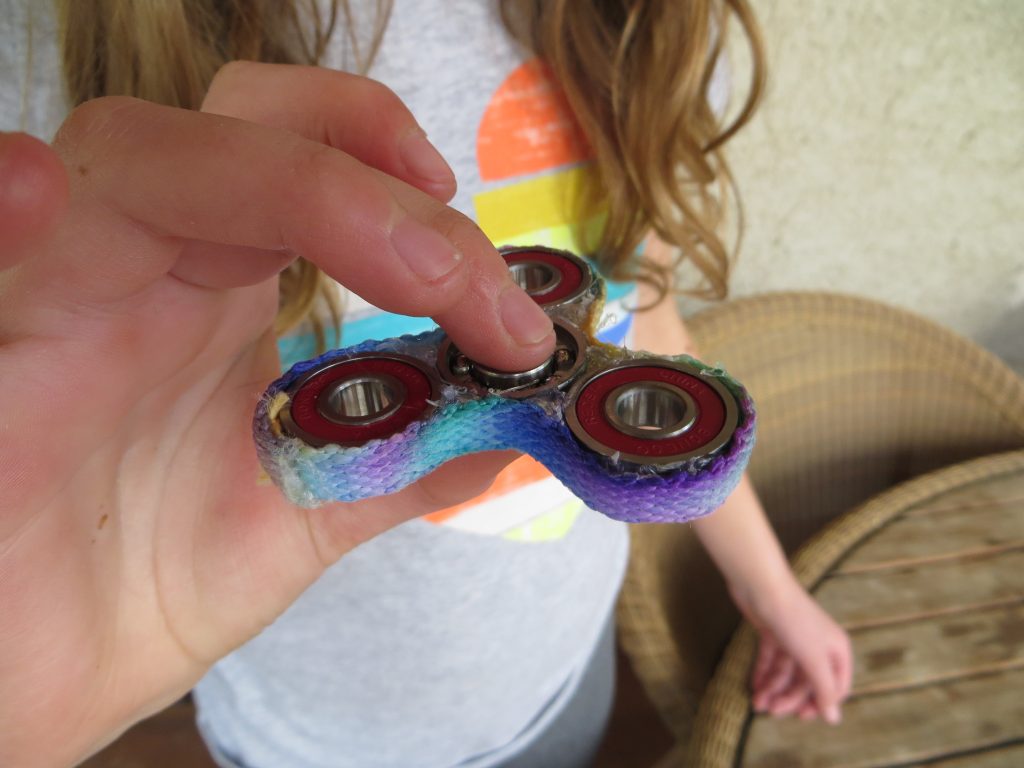
Homemade Spinner with Tie-Dye Edges (KitchenPantryScientist.com)
Make a super-cool spinning toy using skateboard bearings, super glue and a little physics. Customize your design with a marker tie-dyed shoelace.
Warning: Not for recommended for kids under 5. Use adult supervision for super glue, sharp points, rubbing alcohol and glue gun.
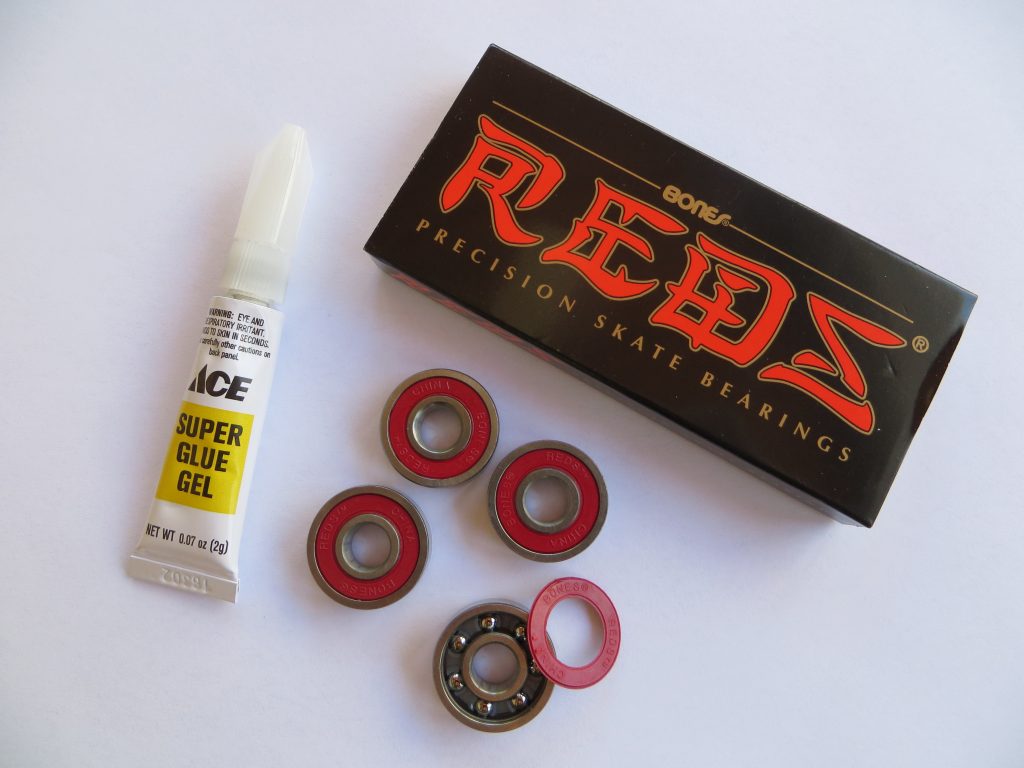
You’ll need:
-4 skateboard bearings (available online or at skateboard stores)
-superglue or Krazy Glue
-a white shoelace
-permanent markers, like Sharpies
-rubbing alcohol (isopropanol)
-a glue gun
KitchenPantryScientist.com
1. Use a sharp point to remove the cover from one of the bearings so that you can see the ball bearings inside. (See image above.)
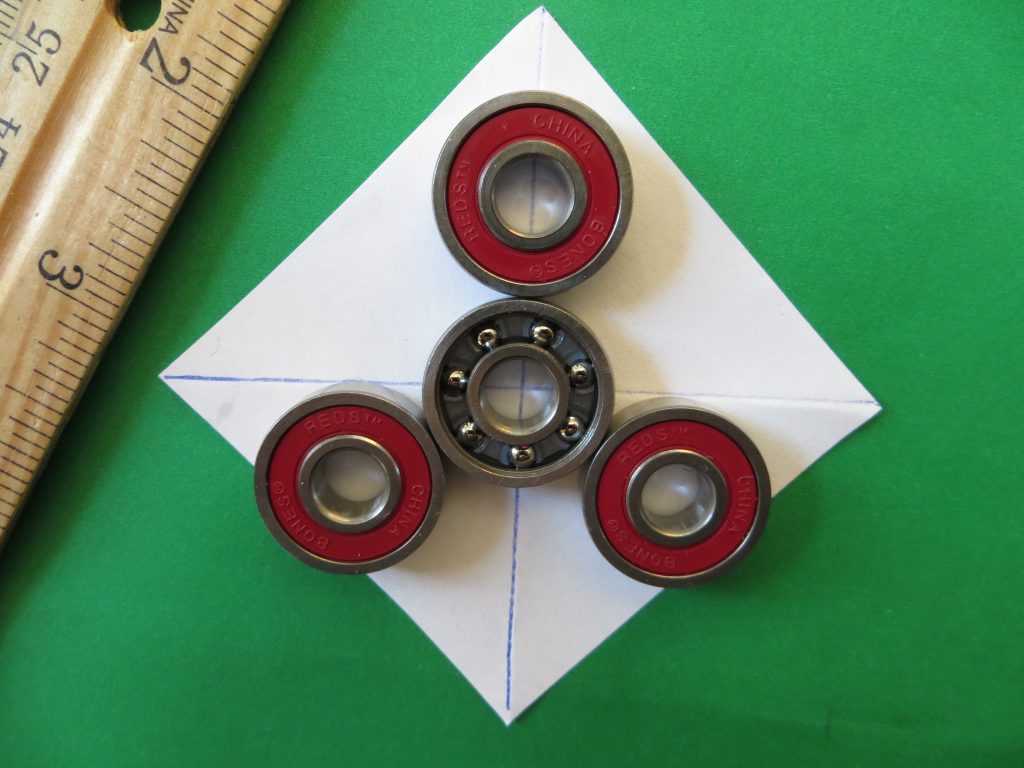
2. Cut a piece of paper 6cm x 6cm and draw an X from corner to corner.
3. Center the bearing with the cover removed in the middle of the X. Then, center the other 3 bearings around the one in the middle so that they’re evenly spaced. You can use a ruler to check spacing. (See image below.)
KitchenPantryScientist.com
4. Add a single drop of super glue to the junction between each bearing to connect them. If you add too much, the spinner will stick to the paper. *Be careful not to get any glue onto the moving parts of the bearings.
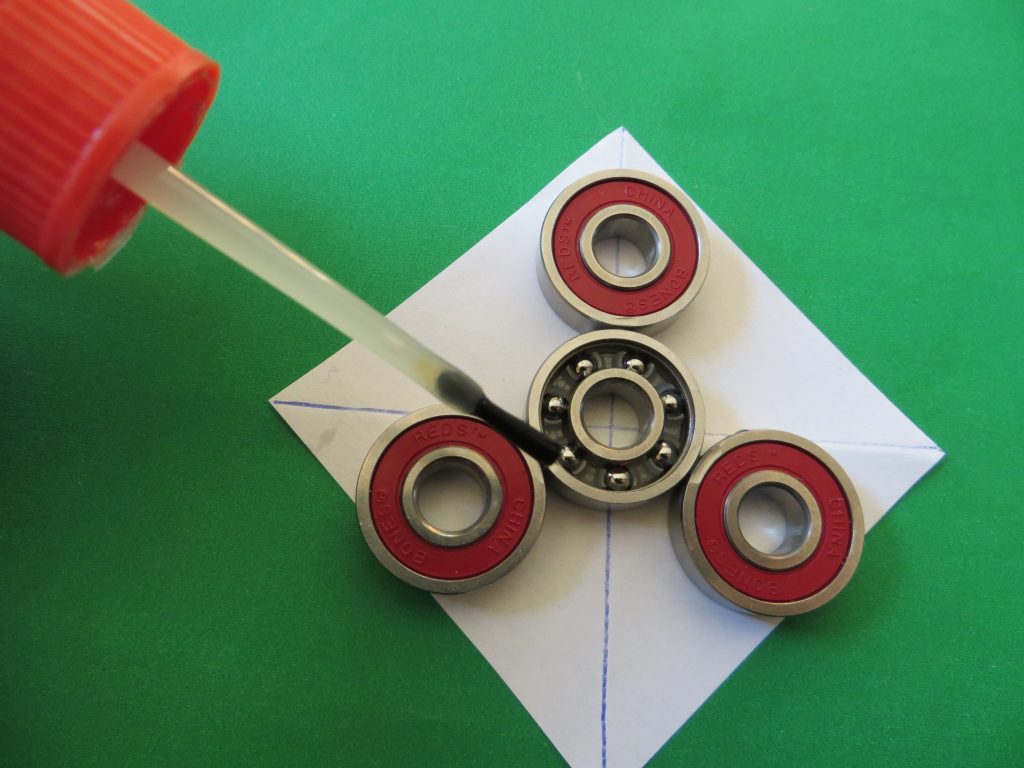
KitchenPantryScientist.com
5. When the glue is dry, carefully turn the spinner over and place another drop of glue at each junction.
6. When the glue is dry, prop the spinner up on its side and add glue to the junctions on the sides. (See image below.) Repeat on each side.
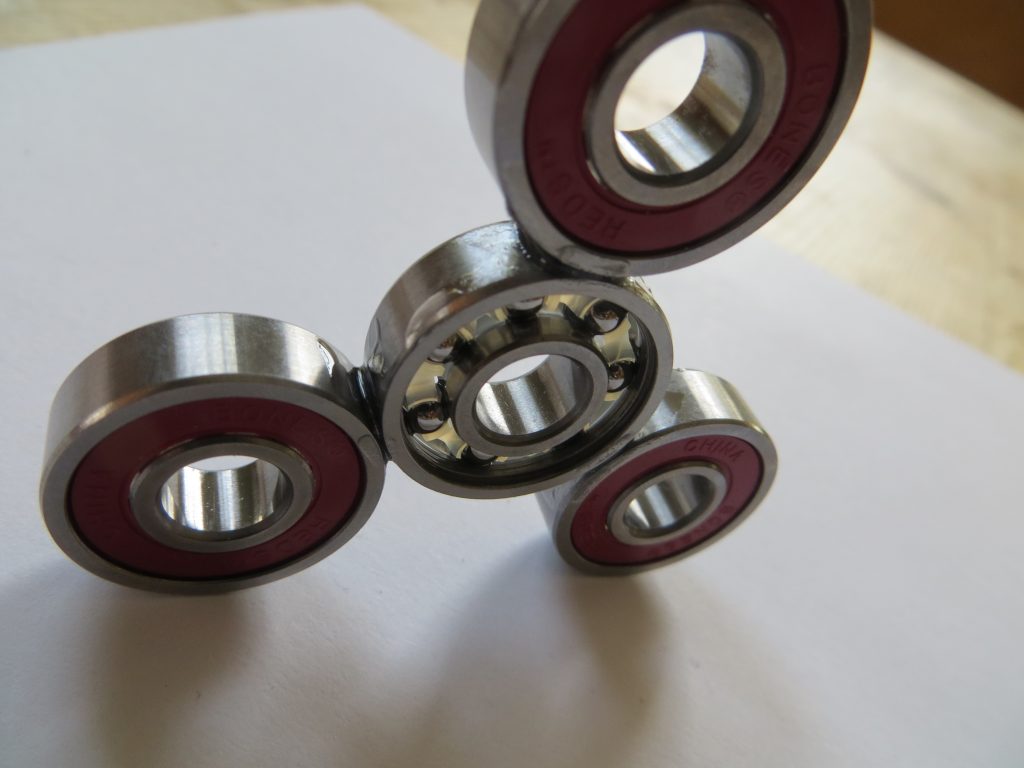
KitchenPantryScientist.com
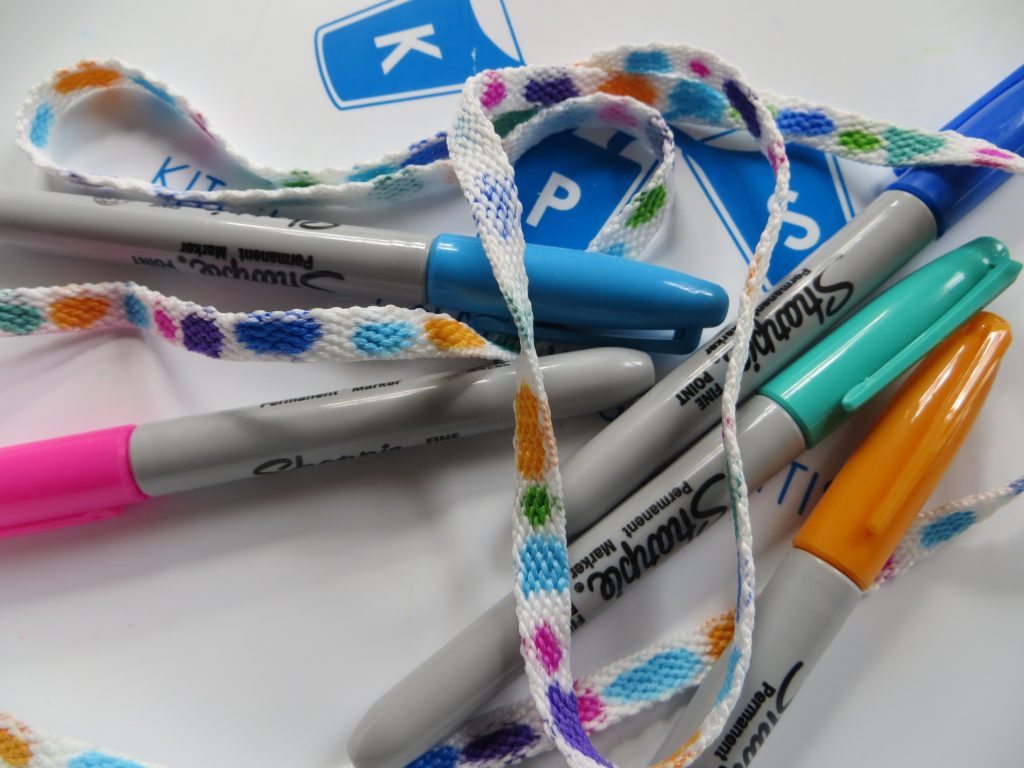
7. While the spinner glue is drying, make dots of permanent marker on the shoelace. In a well-ventilated area, suspend the shoelace over a tray or colander and drip rubbing alcohol onto it to make the colors run together. (See image.) Let it dry completely.
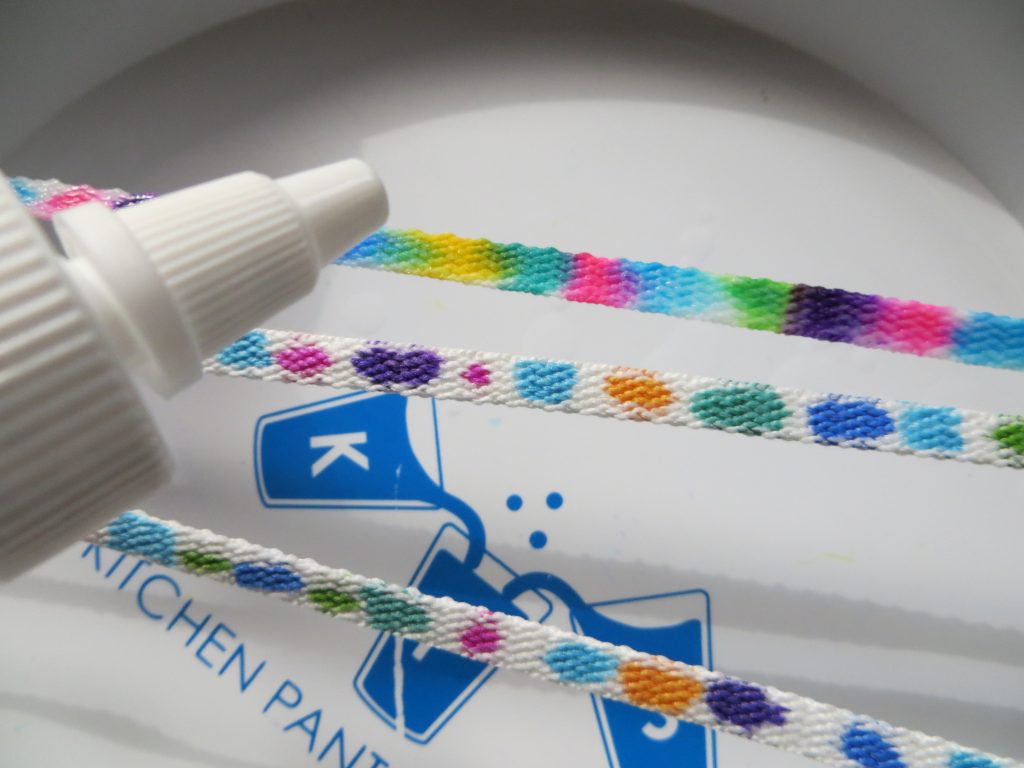
KitchenPantryScientist.com
8. Use the glue gun to attach the shoelace to the outside edges of the spinner. Fill in gaps between the lace and bearings with hot glue.
KitchenPantryScientist.com
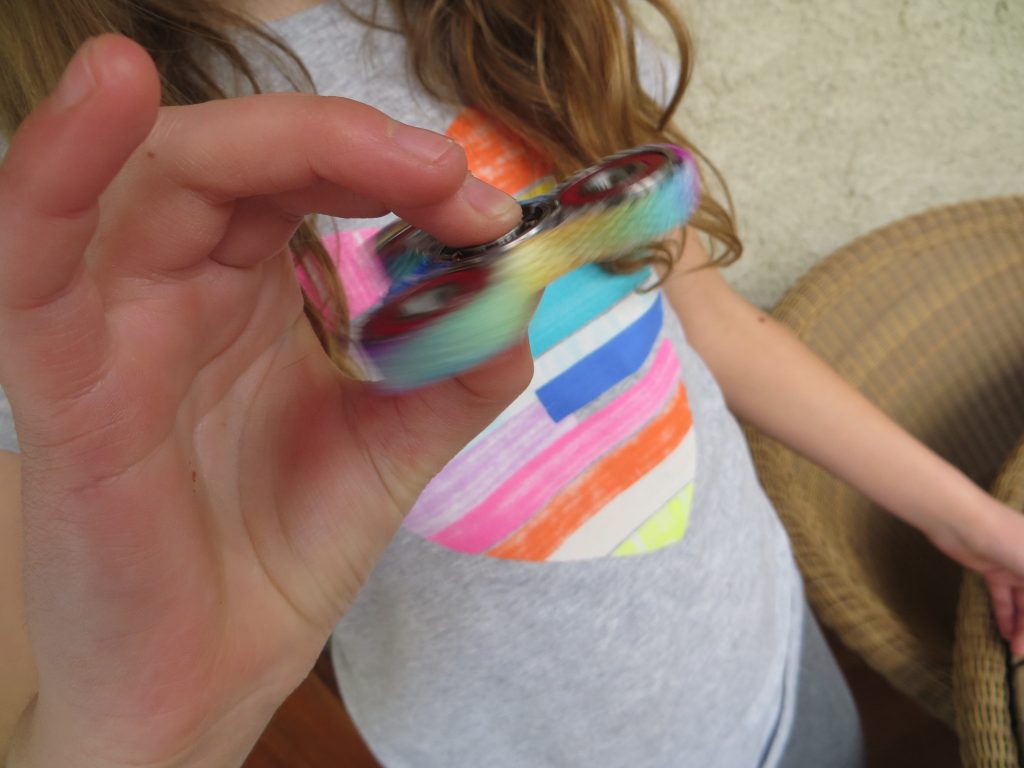
9. Spin away!
The Science Behind the Fun:
If you look closely at a skateboard bearing there are only a few ball bearings connecting the center and the outside part that spins. This means that there’s very little friction, or rubbing, between the parts. If you spin the toy around the center bearing, that bearing is called the axis of rotation.
The three bearings on the outside of the spinner provide the rotating mass that gives the toy a property called angular momentum, which keeps it spinning until the frictional force from the ball bearings in the center slows it down.
Pigments are molecules that give things color. The pigments in permanent markers are trapped in ink compounds that are insoluable in water, which means that they won’t dissolve in water. However, if you add a solvent, like rubbing alcohol, or isopropanol, to permanent markers, it dissolves the ink. As the alcohol moves through the cloth you are decorating, it carries the pigments along with it.
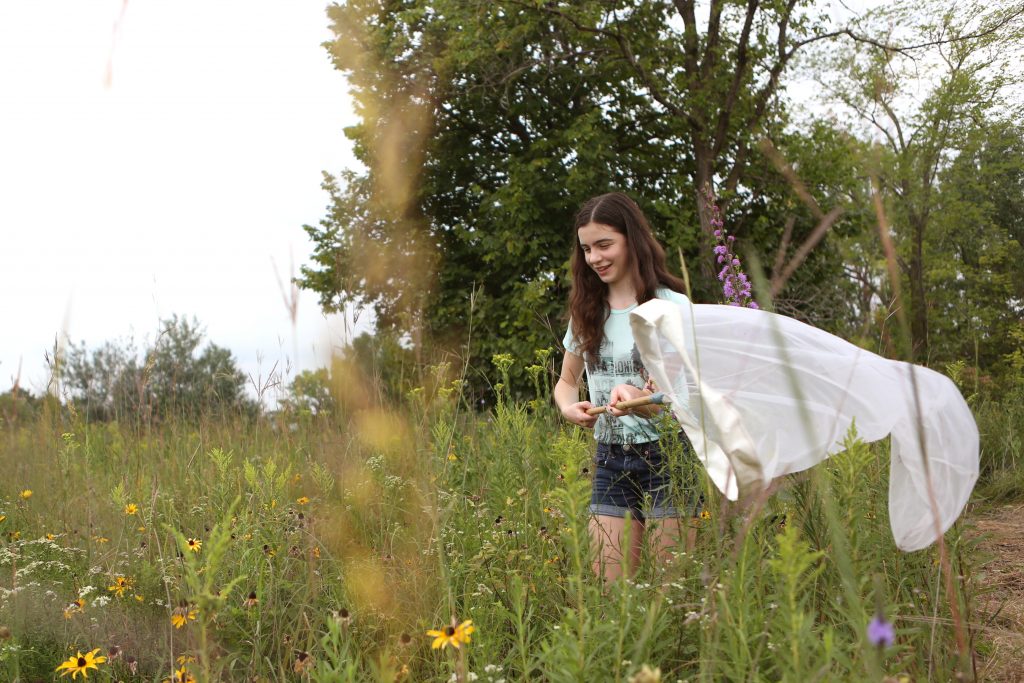
Homemade Sweep Nets (from Outdoor Science Lab for Kids)
- by KitchenPantryScientist
This fun project from my book Outdoor Science Lab for Kids shows you how to collect and identify amazing arthropods using a net you make yourself. For more engaging outdoor experiments, you can order the book here, or anywhere else books are sold.
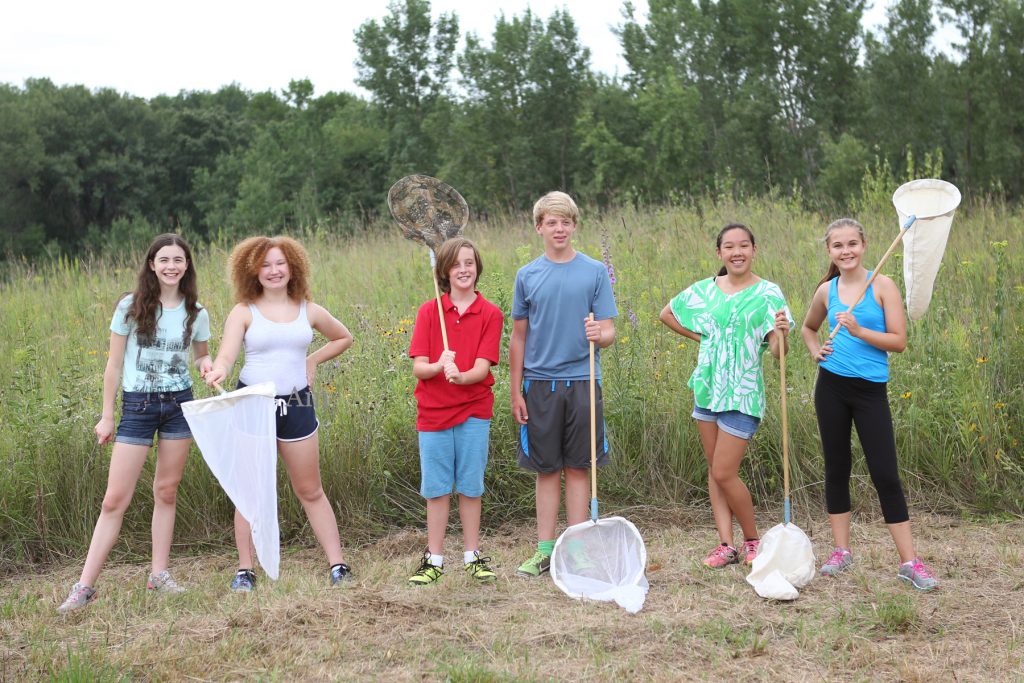
Image from Outdoor Science Lab for Kids (Quarry Books 2016)
Materials
– sweep net or: two wire hangers, an old, light-colored pillowcase, scissors, pliers, long wooden broomstick or sturdy yardstick, and duct tape
– area with long grass
– jars
-large white piece of fabric, like an old sheet
– insect identification books (optional)
Safety Tips and Hints
- Don’t pick insects up with your bare hands, unless you know they don’t bite or sting.
- Ticks love tall grass. If there are ticks in your area, take precautions and do a tick check after your insects hunt.
Protocol
Step 1: If you don’t have a sweep net, make one by straightening and twisting two wire hangers together. Form them into a loop, leaving about 3 inches (8cm) straight on either end. Cut about one third off of the open end of a pillow case and pull the mouth of the pillowcase over the wire loop. Tape it securely around the perimenter.

Image from Outdoor Science Lab for Kids (Quarry Books 2016)
Step 2. Find an area with long grass and plants. Sweep with your net the same way you’d sweep a floor, but flip the open side of the net back and forth to capture insects in the grass.
From Outdoor Science Lab for Kids (Quarry Books 2016)
Step 3. Close your net by flipping the bottom over the top and take it over to your large piece of fabric.
Step 4. Carefully dump the creatures you’ve collected onto the white fabric to inspect them. If you want a closer look, put an insect inside a jar with a loose lid.

Image from Outdoor Science Lab for Kids (Quarry Books 2016)
Step 5. Count how many legs they have, how many body segments, look for antennae, wings and unique color. Record your observations in a notebook.
Step 6. Use insect identification books, or other means to identify what you’ve found.
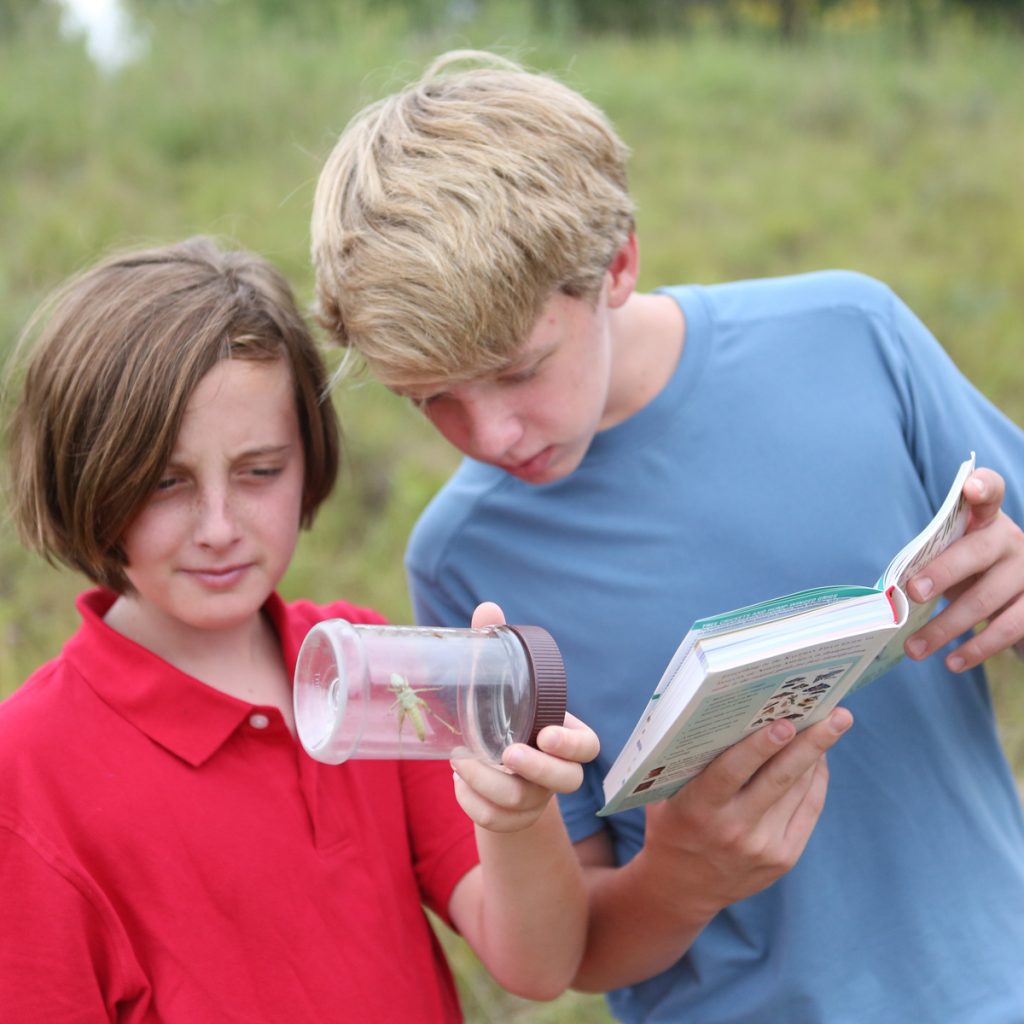
Step 7. Keep a journal of the insects and arachnids you capture, the time of day, and where you found them.
The Science Behind the Fun:
Arthropods are amazing animals with skeletons outside their body, called exoskeletons, segmented bodies, and jointed legs.
When you sweep, chances are you’ll find lots of insects, which are arthropods with six legs. They often have wings, and their life cycle goes from egg to larva, to adult. Some insects, like butterflies, also go through a pupal stage, in which their bodies are significantly transformed. The antennae on their heads are sensory organs.
Graphite Circuits
- by KitchenPantryScientist
Electrons (negatively charged particles) can flow through substances called conductors.
Graphite, used to make pencil lead, among other things, is a conductor and can be used to make a simple circuit on paper. A circuit is just a path for electrical current.
You have to do this experiment with a graphite pencil, rather than the kind you use at school, but you can pick them up at most art supply stores. You’ll also need a few small LED bulbs, 2 wires with alligator clips on either end, and a 9 volt battery.
Adult supervision recommended.
- Make a thick, black rectangle using a graphite pencil. We used a #9 graphite crayon.
- Hook the two wires up to the battery terminals.
- Clip the wire attached to the positive battery terminal to one wire of an LED bulb. (Don’t test it on the battery, or you may blow it out.)
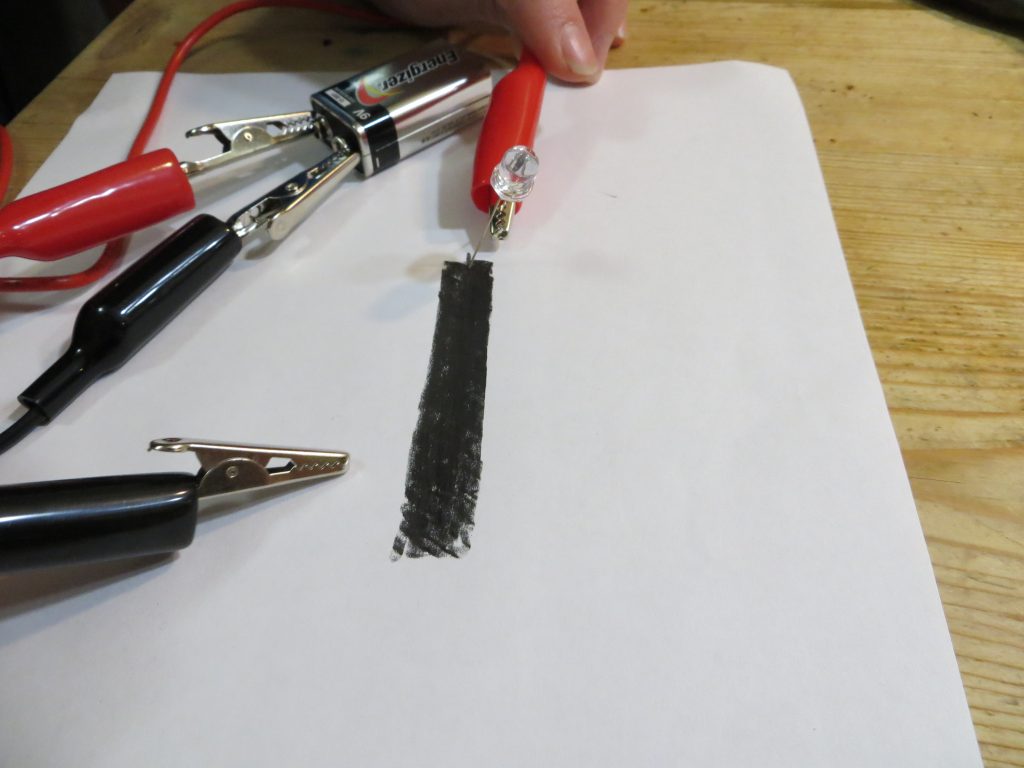 4. Touch the un-attached LED wire to the other (left) side of the graphite bar.
 5.Touch the alligator clip attached to the negative battery terminal to the right side of the graphite bar you drew.
6.If it doesn’t light, switch the positive alligator clip to the other wire of the LED bulb and try it again.
7. Move negative clip closer to the bulb. It should get brighter as you decrease the distance.
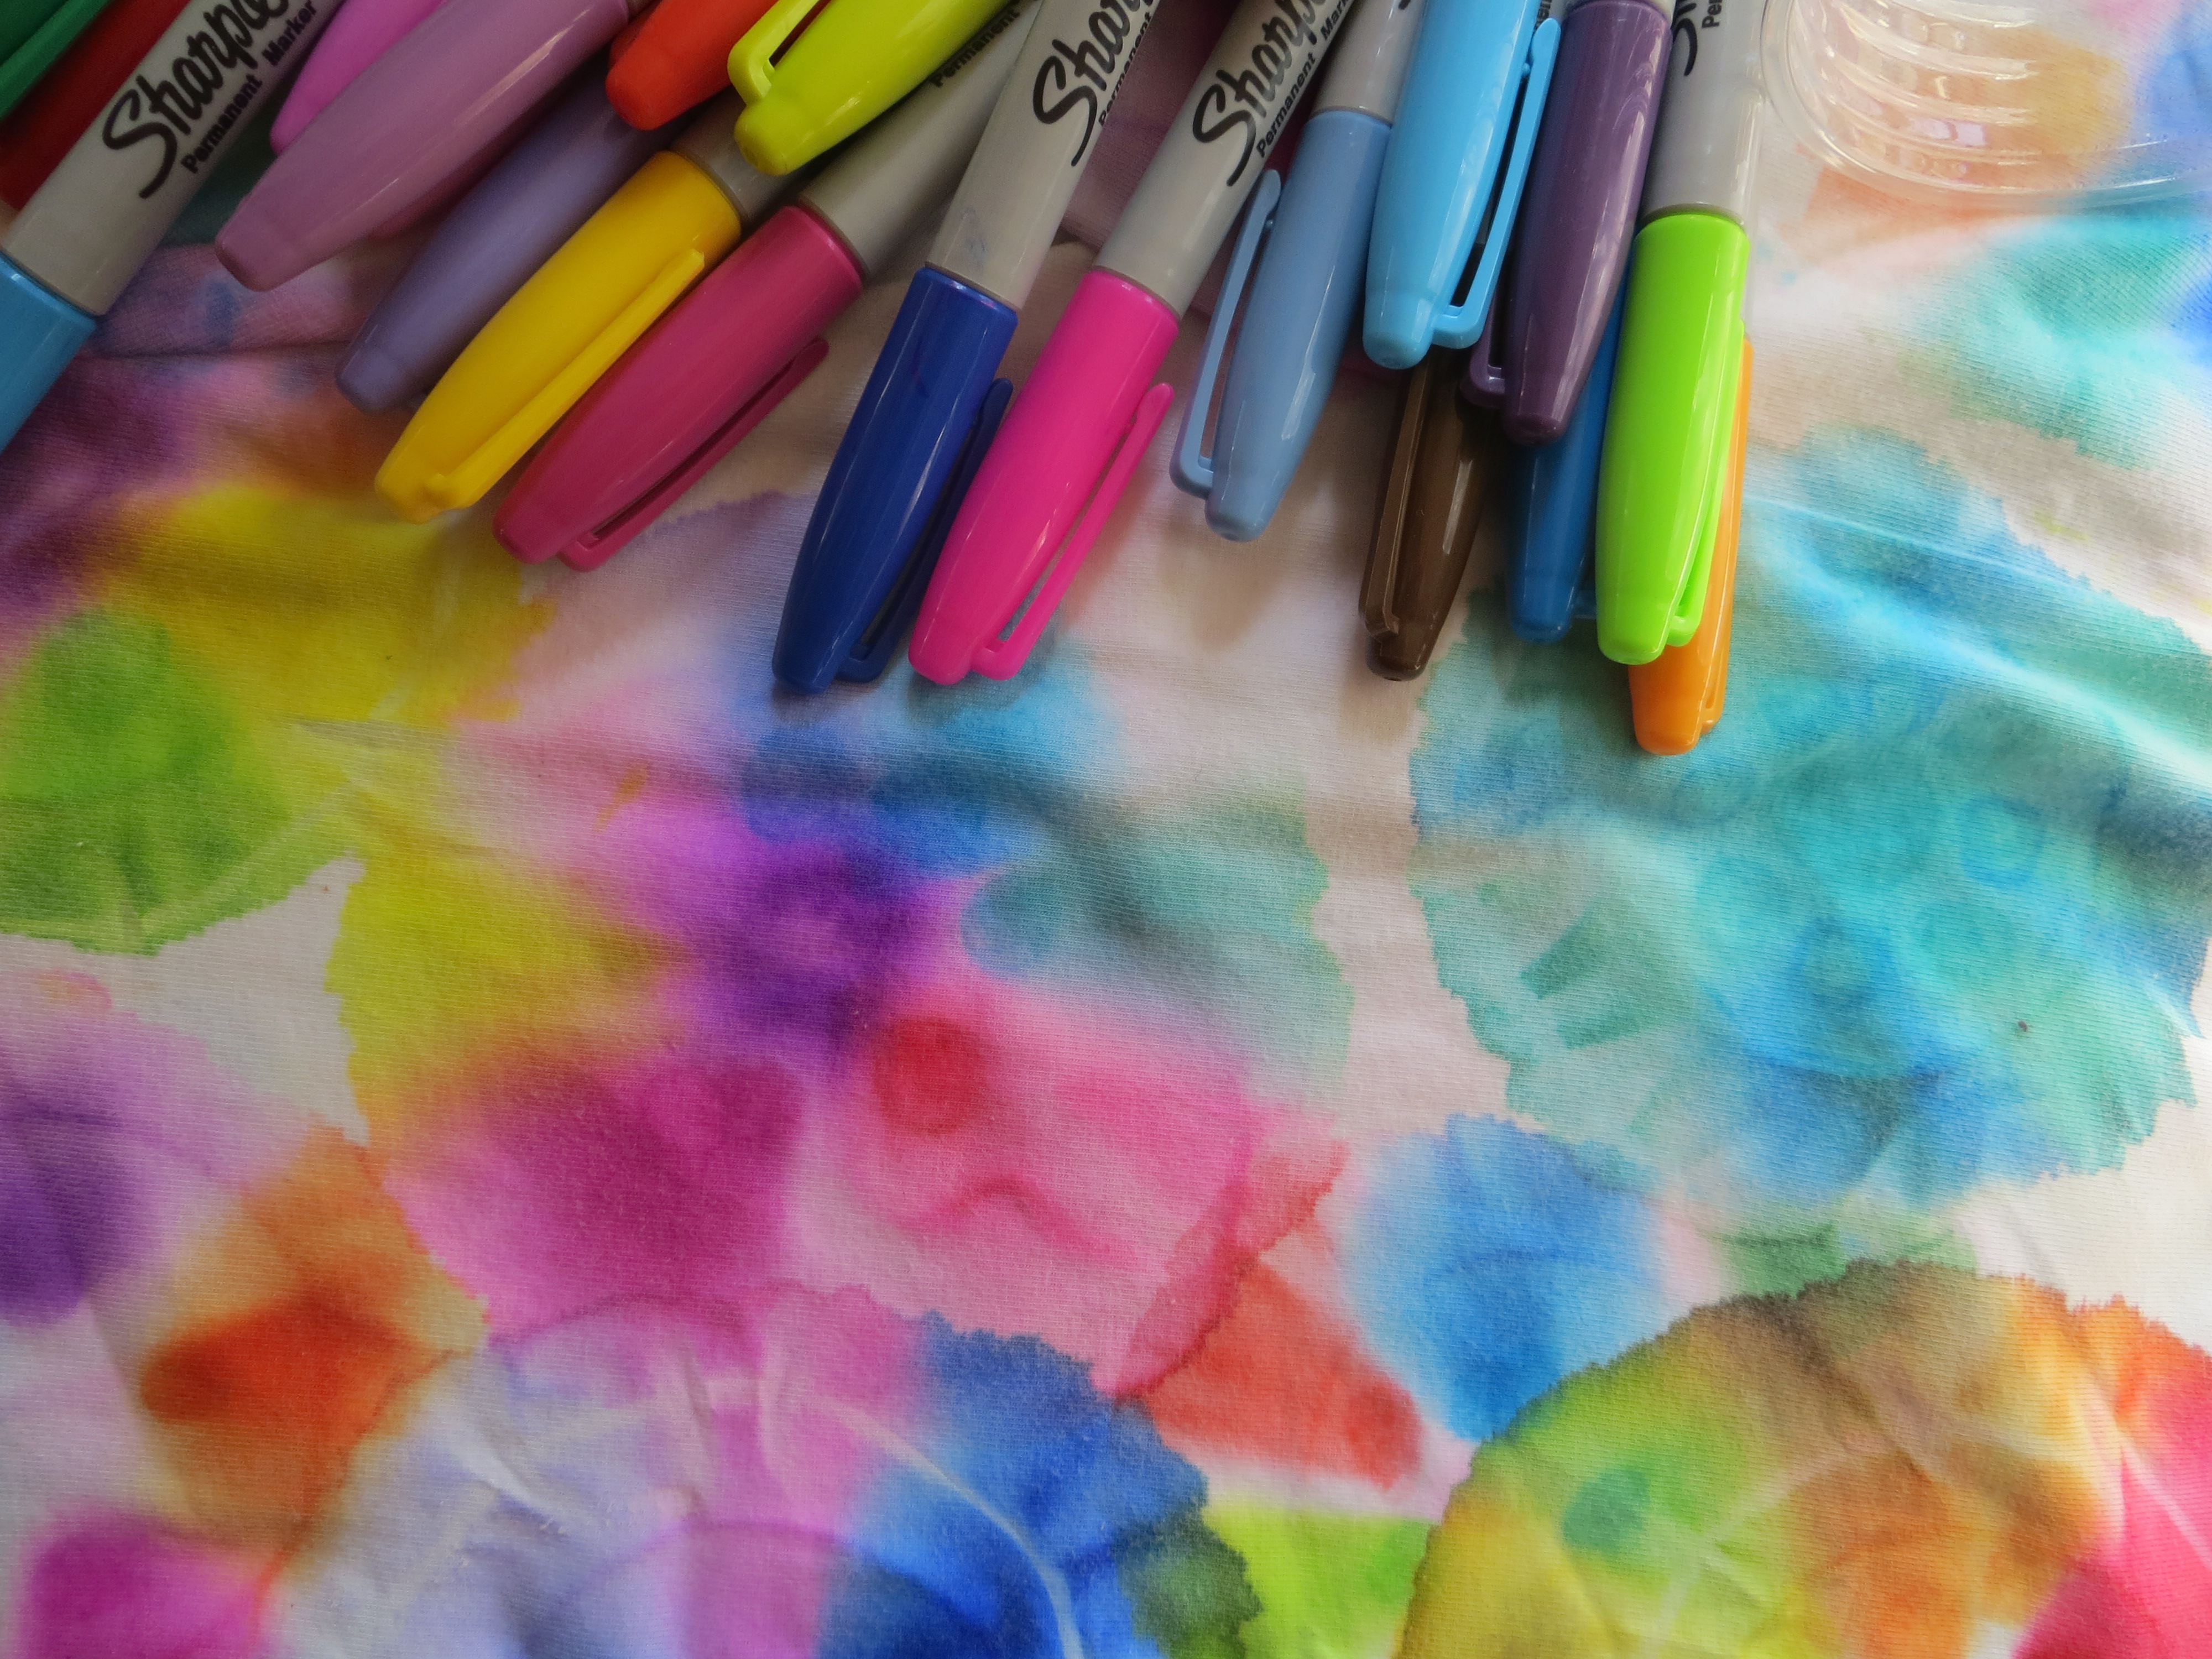
Permanent Marker Tie Dye (Color and Chemistry)
- by KitchenPantryScientist
(Re-post from April 14, 2016)
I love traditional tie-dye, but it’s fun to do this experiment that uses permanent markers and rubbing alcohol to make bright, gorgeous designs that mimic tie-dye, more easily, and with less mess.
This experiment was created by Bob Becker, a chemistry and AP chemistry teacher at Kirkwood High School in Kirkwood, MO. (To find a few of the original experiments I invented, check out Frankenworms, Sugar Cube Fizz Bombs, Homemade Window Stickies, Foaming Slime, and Cornstarch Frescos.)
Here’s a video from my YouTube channel on how to do this experiment, so kids can “watch and do.”
To play with permanent marker tie dye, you’ll need:
-permanent markers (like Sharpies)
-cotton items to decorate, like tee-shirts, socks, or dish towels
-rubbing alcohol (isopropanol)*Read warning labels. Parental supervision is required, since rubbing alcohol is poisonous if swallowed. Do this experiment in a well-ventilated area, and do not expose your artwork to heat until is is COMPLETELY dry, since rubbing alcohol and its fumes are flammable.
-rubber bands
-eye droppers
-containers like plastic cups or jars
To make your designs, stretch the cotton over the mouth of a jar or cup and secure it with rubber bands. (See video above.)
Use permanent markers to make several dime-sized dots of different colors on the stretched cotton.
Slowly drip rubbing alcohol onto the spots of color until the alcohol starts to soak outward, carrying the ink with it.
Allow your design to dry overnight. When completely dry, hang your shirt in the sun, or put it in the dryer for 15 minutes to set the color. Wash separately from other clothes, just in case!
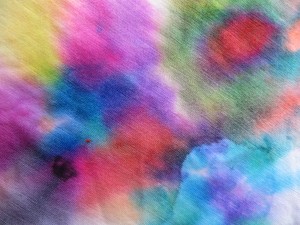
The Science Behind the Fun: Pigments are molecules that give things color. The pigments in permanent markers are trapped in ink compounds that are insoluable in water, which means that they won’t dissolve in water. However, if you add a solvent, like rubbing alcohol, or isopropanol, to permanent markers, it dissolves the ink. As the alcohol moves through the cloth you are decorating, it carries the pigments along with it. Small pigment molecules move faster than big ones, so the colors sometimes separate into their different color components as they move through the cloth. The alcohol evaporates into the air, leaving the ink in the fabric, and since it is still insoluable in water, it won’t come out when you wash it.
Enrichment: What happens if you draw lines, concentric circles or different shapes on your designs? Can you layer colors and watch them separate? What if you add rubbing alcohol next to the color, instead of directly on it? How many drops of alcohol do you have to add to a dime-sized color spot before it starts to expand?
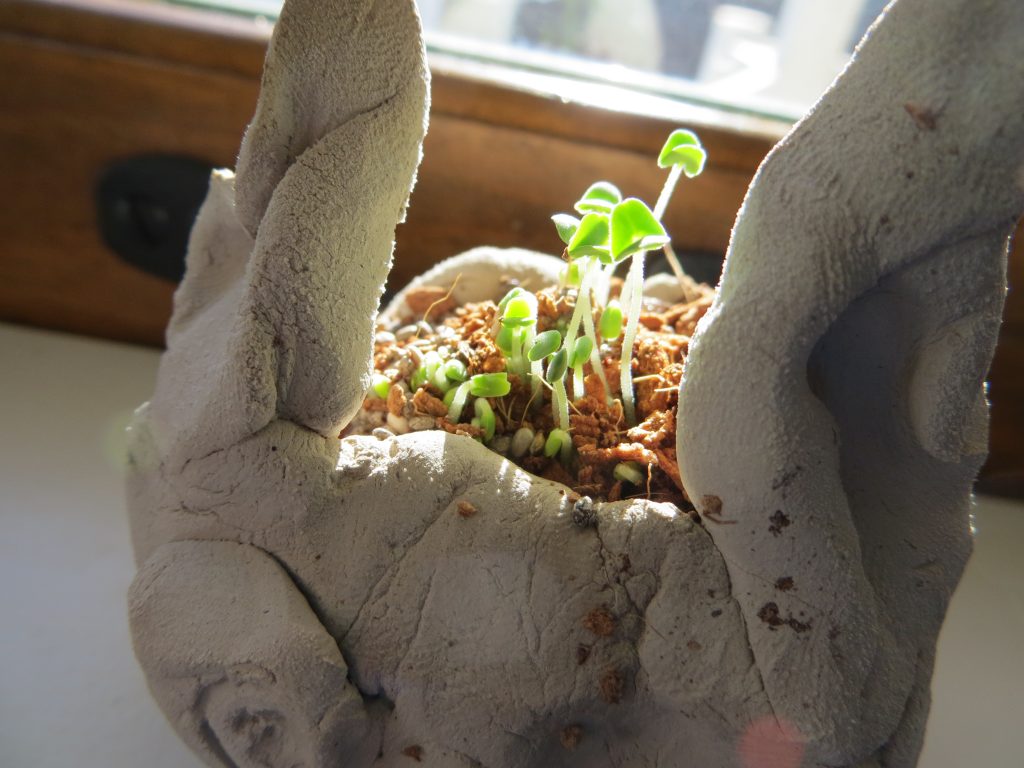
Seed Science: Homemade Chi Pets
- by KitchenPantryScientist
I grew up hearing the Chi Chi Chi Chi song on TV, but our family never actually purchased a Chi Pet, so I never realized the dream of sprouting green hair from a clay animal. Until now.
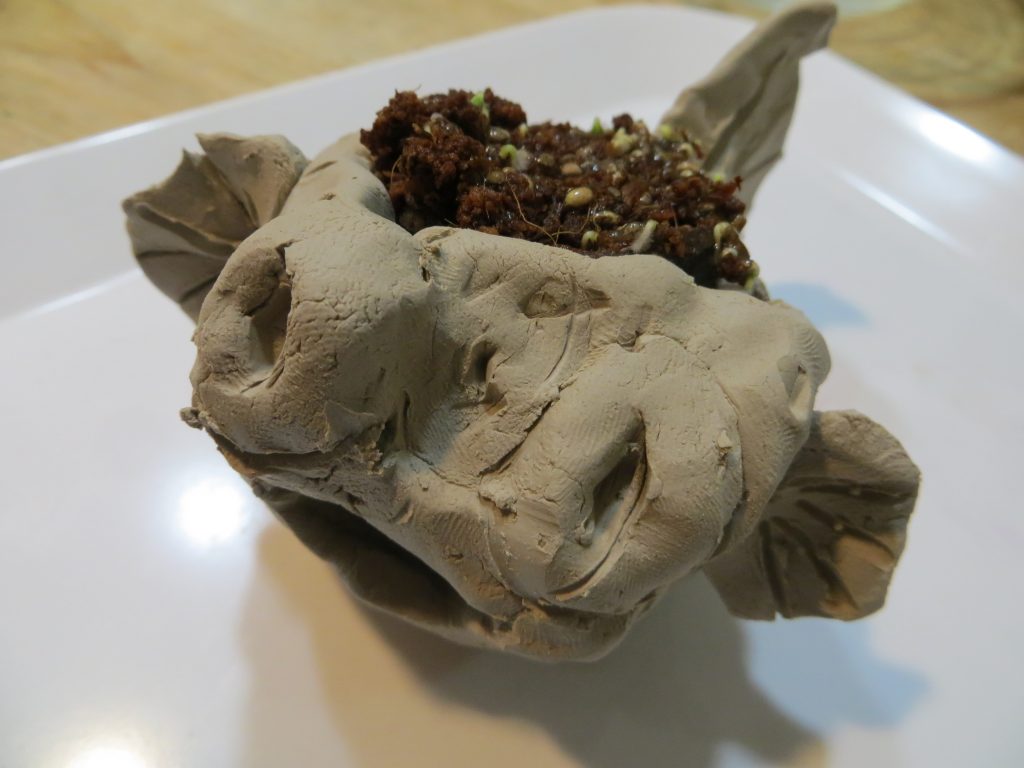
Chia Creature (KitchenPantryScientist.com)
With the emergence of chi seeds as a new health fad, it’s easy to get your hands on some chi seeds (of the sprouting variety) with a click of the mouse, or a trip to the Co-op. Chia seeds are quick-growing members of the mint family called Salivia hispanica, hailing from Central and South America where they have served as a food source for humans for well over a thousand years. And although studies have shown that they probably won’t help you lose weight, they are chock full of protein, fiber, fatty acids and anti-oxidants.
When you give these tiny seeds the signals they need to sprout: water, light, warmth and air, they grow very fast, so you should see tiny white roots poking out in a few days, soon to be followed by a shoot and leaves.
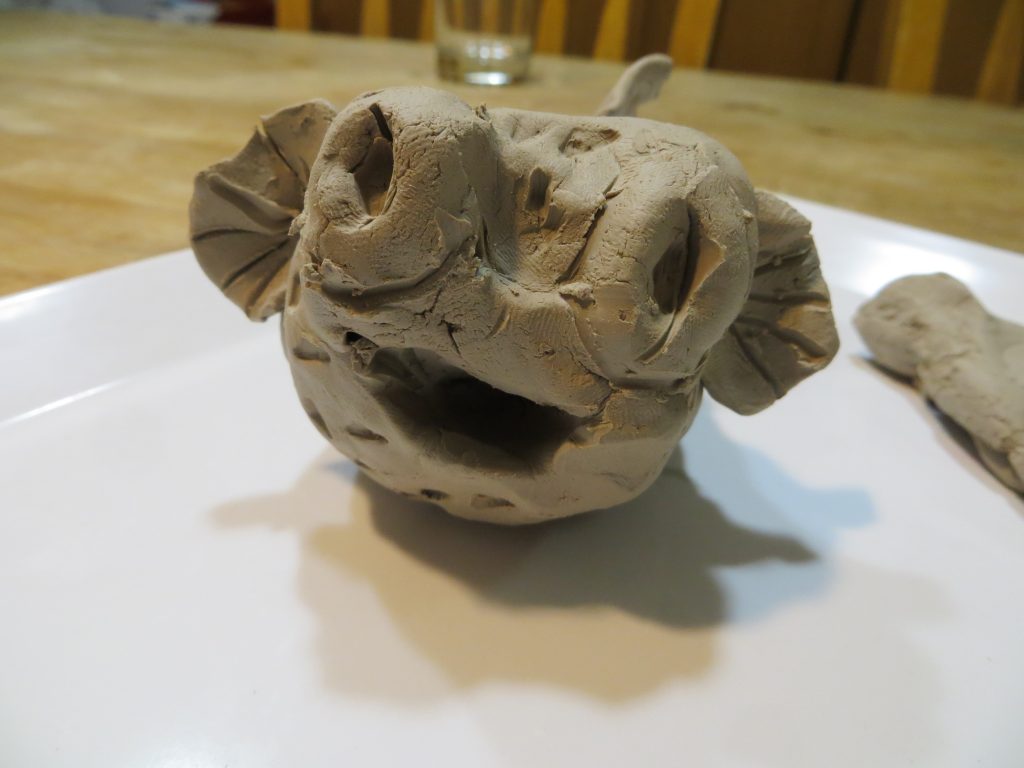
Since most people don’t have any way to fire clay in their homes, I decided to keep it simple. These homemade chia pets are basically clay (or Play-Dough) animals formed around seed starter pellets (also available online.) Add a few pre-soaked chia seeds, wait a few days and Voila! Your homemade animal will be sprouting living green hair.
You’ll need:
-2 Tbs chia (sprouting) seeds
-dirt or seed starter pellets
-clay or playdough
-a fork or toothpick
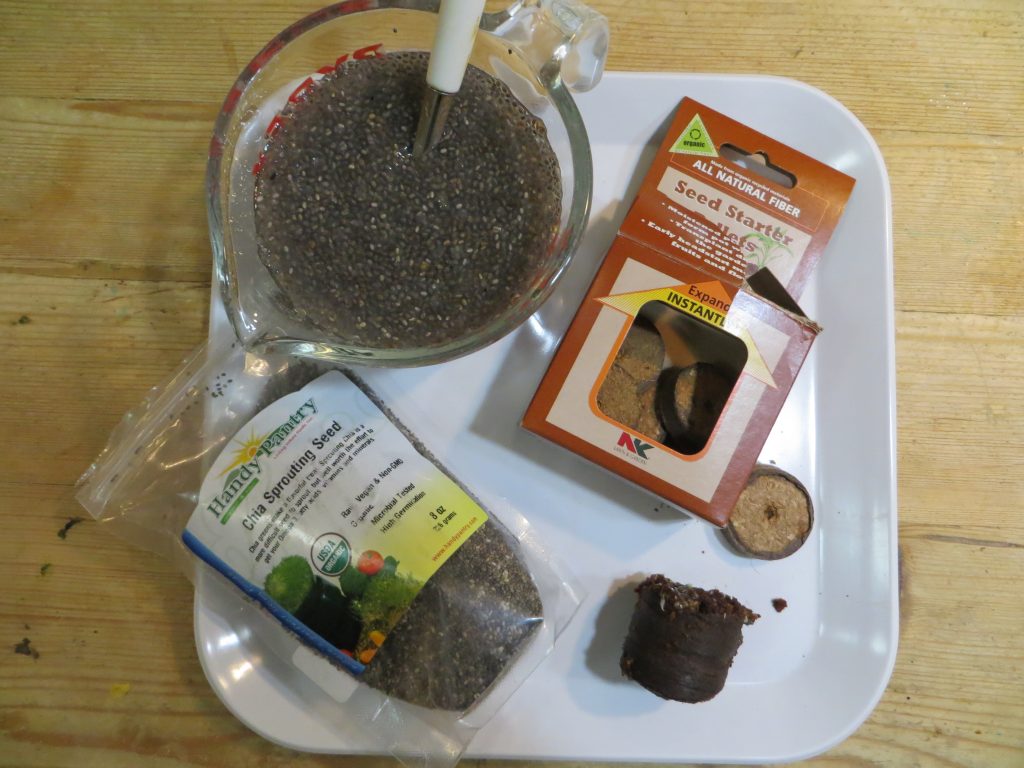
1. Soak 2 Tbs. chia seeds in 1/2 cup water overnight. The mixture will get slimy as it sits and water is trapped by tiny fibers on the seeds to form a gel-like substance.
2. The next day, soak your seed starter pellets per the instructions on the package.
3. Create a clay or Play-Dough animal big enough to hold the expanded pellet or some dirt inside, wherever you want the green sprouts to appear.
4. Put the dirt/seed starter pellet into to space you created and scratch the surface with a fork or toothpick.
5. Add 1/2 tsp or so of seeds to the dirt and use the fork or toothpick to mix them into the soil.
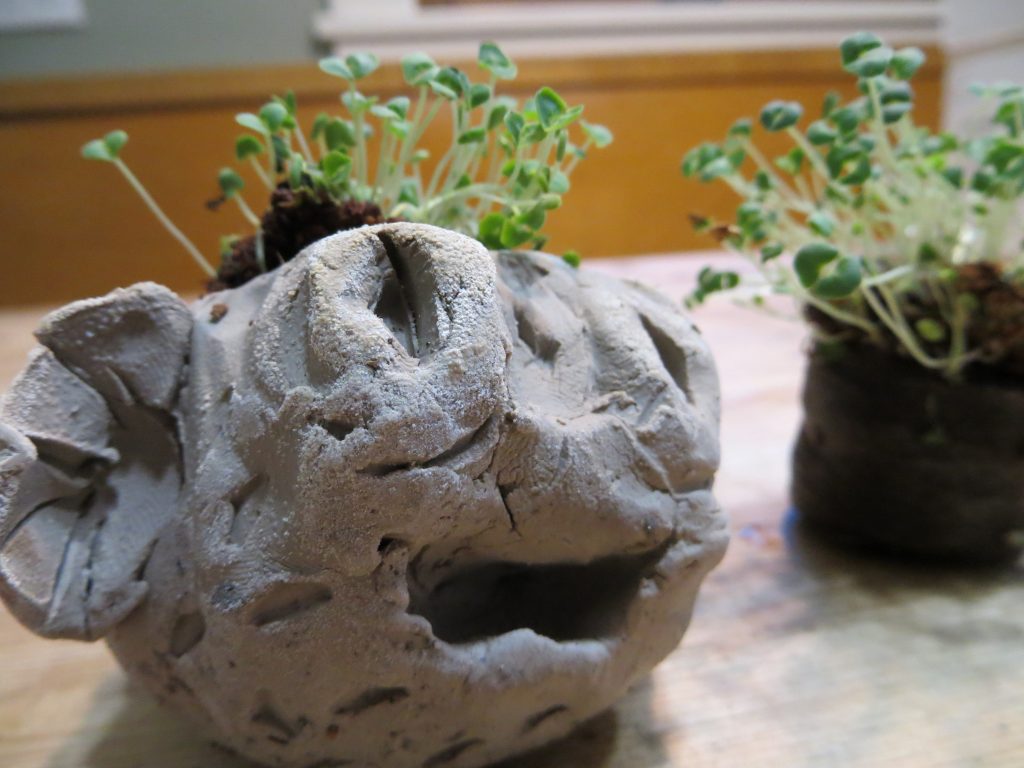
Chia seeds sprouting in our Chia Puffer Fish! (KitchenPantryScientist.com)
6. Wait for the seeds to grow, keeping the soil damp at all times. (You can speed growth by covering your chia pet with a plastic bag to hold in heat and moisture.) Watch for roots and leaves to emerge and draw or photograph them.
Homemade Chia Pet -KitchenPantryScientist.com
“No risk is more terrifying than that taken by the first root. A lucky root will eventually find water, but its first job is to anchor an embryo and forever end its mobile phase, however passive that motility was….it assesses the light and humidity of the moment, refers to its programming and quite literally takes the plunge.” -Hope Jahren “Lab Girl” (My favorite new book. Read it!)
Winter Science: Mouthwatering Maple Syrup Snow Candy
- by KitchenPantryScientist
Maple Snow Candy from Outdoor Science Lab for Kids (Quarry Books 2016)
Remember this homemade snow candy from Laura Ingalls Wilder’s classic “Little House in the Big Woods?” You can make the same amazing maple treats using heat evaporation and quick cooling in the snow, or on crushed ice cubes.
Here’s how to make the candy, along with some candy-making science, straight from the pages of my new book, “Outdoor Science Lab for Kids,” which you can order from your favorite book retailer by clicking here.
You’ll need:
-1 cup pure maple syrup
-sauce pan
-candy thermometer
-fresh, clean snow
Safety Tips and Hints:
-Hot sugar syrup can cause burns. This experiment must be done with adult supervision.
-Allow candy to cool completely before tasting.
-Only use pure maple syrup for the best results.
Directions:
Step 1: Go outside and scout out a spot with some clean snow several inches deep for making your candy. Alternately, collect and pack down a few inches of fresh snow in a large, flat container, like a casserole dish. (You can use crushed ice cubes if you don’t have snow.)
Step 2. Boil the maple syrup in saucepan, stirring constantly until it reaches around 235-240 degrees F (soft ball stage.)
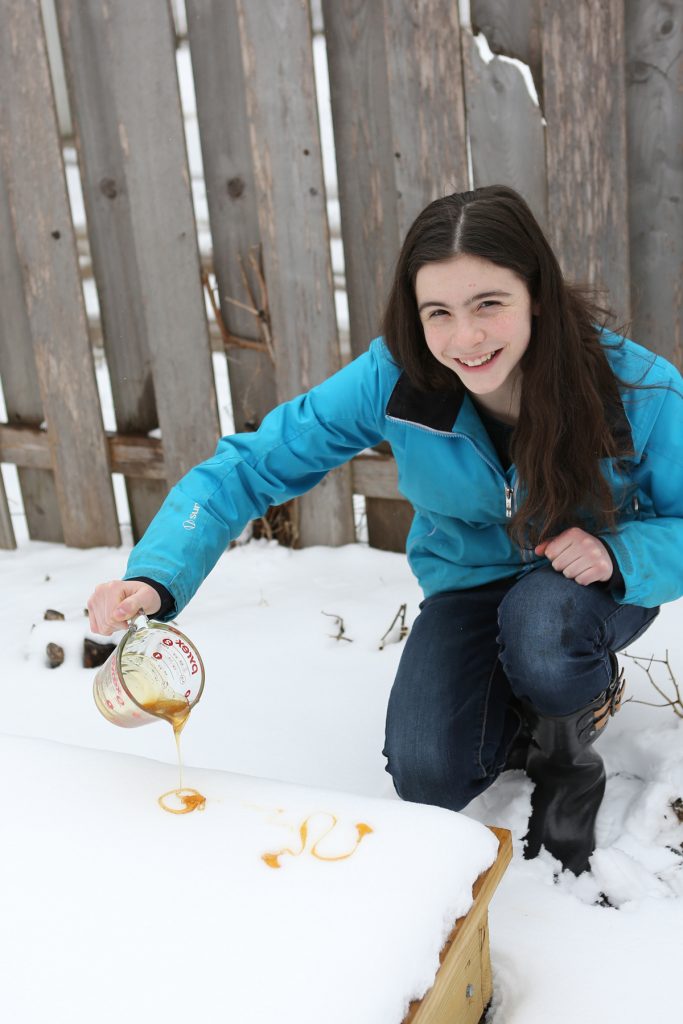
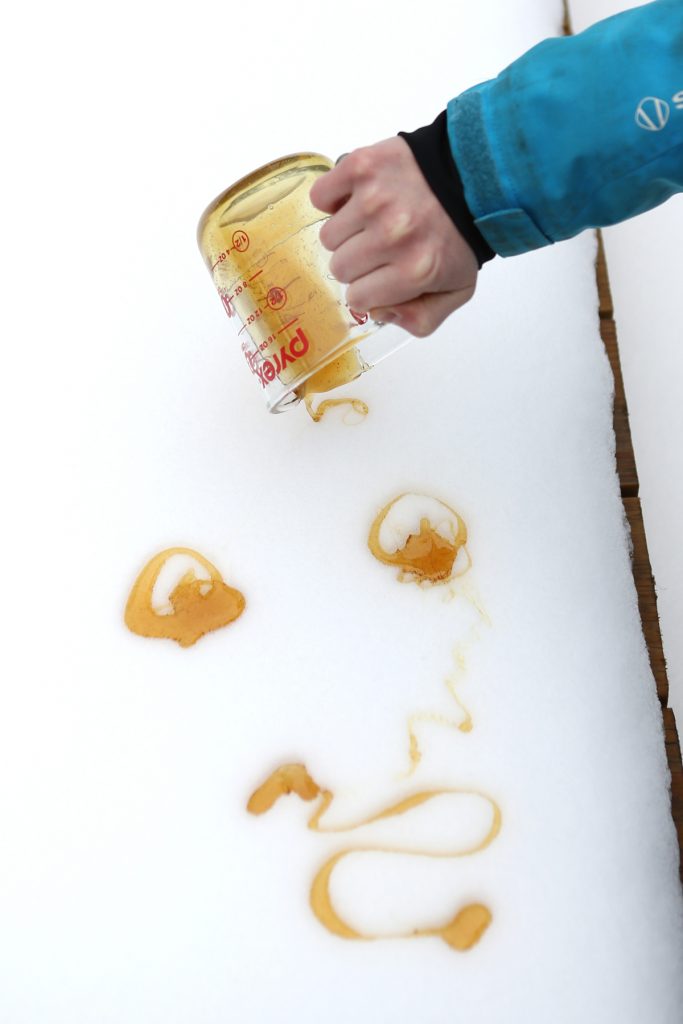
Step 3. Remove the maple syrup from the heat and carefully pour it into a heat-resistant container with a spout, like a Pyrex measuring cup.
Step 4. Pour wiggly candy lines into the snow to freeze them into shape.
Maple Snow Candy from Outdoor Science Lab for Kids (Quarry Books 2016)
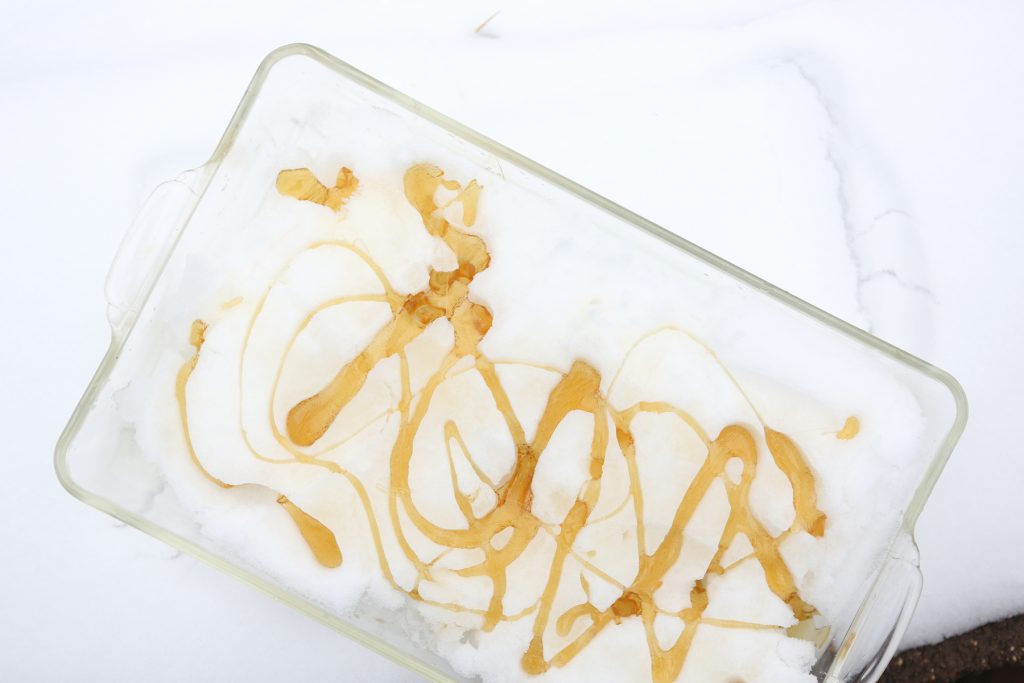
Alternately, make snow candy in a casserole dish filled with fresh snow or crushed ice.
Step 5. When you’re done, remove the candy from the snow with a fork.
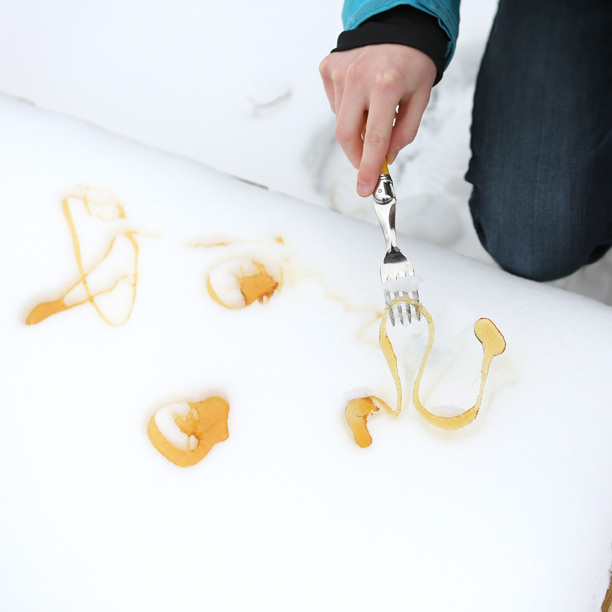
Maple Syrup Snow Candy from “Outdoor Science Lab for Kids” (Quarry Books 2016)
Step 6. Eat your candy right away, or let it warm up and wind it around sticks or skewers to make maple lollipops. Enjoy!
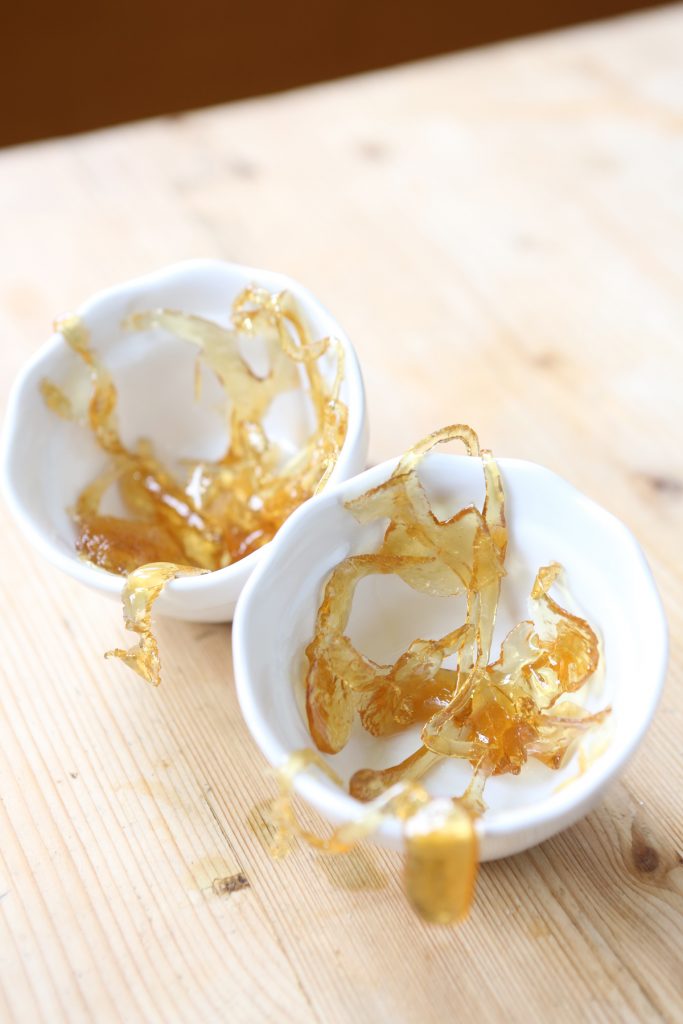
Maple Snow Candy from Outdoor Science Lab for Kids (Quarry Books 2016)
The Science Behind the Fun:
Maple syrup is made from watery tree sap boiled to evaporate most of the moisture it contains when it’s first tapped from a tree. Following evaporation, the syrup that remains is mostly made up of a sugar called sucrose, but it also contains smaller amounts of glucose and fructose.
Naturally, other organic compounds are also present in tree sap, giving syrup from different areas unique flavors. Syrup collected earlier in spring when it is cold tend to be light in color and have a mild flavor. As the days get warmer, microbes ferment some of the sugar in the syrup, making it darker and giving it a more robust taste.
In this experiment, you heat maple syrup, evaporating even more water. A super saturated solution forms, which holds more sugar molecules in the liquid than would be possible if you evaporated the water at room temperature.
When you pour the supersaturated sugar into the snow, it cools quickly, forming some sugar crystals to give the maple candy a soft, semi-solid consistency. Heating the syrup to a higher temperature will evaporate more water, resulting in even more crystal formation in the cooled syrup, making it harder to bite. If you carefully evaporate all of the water from maple syrup, you’ll be left with pure maple sugar crystals.
Creative Enrichment:
-Try collecting some syrup from your pan at several different temperatures and compare the resulting snow candy for texture, color and consistency.
-Can you do the same experiment with other sugar syrups, like molasses or corn syrup?
-Try to make maple sugar.