Category:Physics Experiments’
Elemental Science: Gallium
- by KitchenPantryScientist
Gallium is a soft metal related to other metals in Group 13 of the periodic table, including aluminum. It doesn’t exist as a free element in nature, but can be purified from other metallic ores, like zinc. Each gallium atom has 31 protons in its nucleus, so its atomic number is 31.
You’ll find it around you in thermometers, semiconductors, and even some LED lights, and one property that makes it so cool is that it melts from solid to liquid at low temperatures (around 85.6 degrees F or 29.8 degrees C.) This makes it easy to play with the liquid metal simply by melting it in a glass of hot water, or in the palm of your hand.
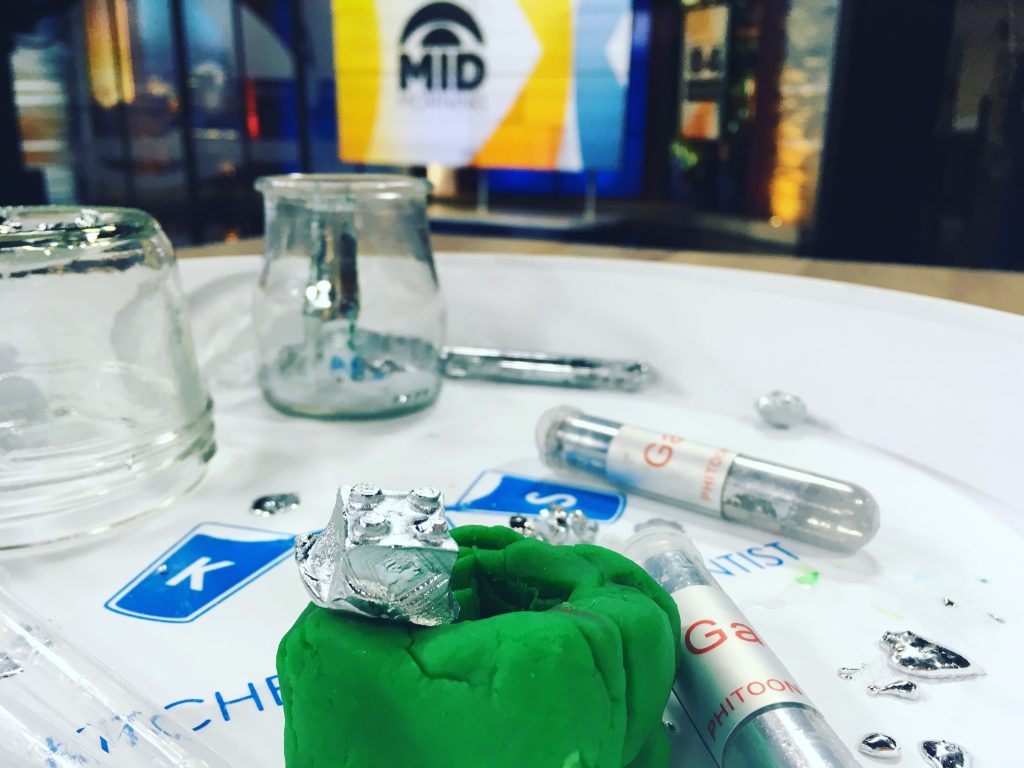
You can see the crystal structure in the side of the gallium “Lego” we created in play dough! KitchenPantryScientist.com
*Not for small children! Wearing gloves and safety goggles is recommended when observing gallium. Although is is fairly safe, gallium will coat hands with a lead-like substance. (Wash with soap and water to remove.) Gallium can also damage other metals, so keep it away from jewelry, like rings. I always recommend doing your research, as well as checking out the MSDS (Material Data Safety Sheet) of a new substance before using it to know what precautions to take.
We ordered 99.99% pure gallium on Amazon. It arrived in plastic tubes,in crystal form, but by placing the tubes in hot tap water, it melted easily. Eye droppers work well for moving the melted metal around. I’d recommend using a rimmed paper plate to contain the mess.
Try imprinting a Lego or toy car in play dough and pouring the molten gallium into the imprint. When it solidifies, you’ll have a cast of the item you imprinted! (It takes a while.) Gallium coats glass to create mirrored surfaces, so you can pour some into a small jar and use it to coat the sides. If you leave some in a puddle on the bottom of an upside-down jar, you can watch crystals form.
In other words, it’s pretty awesome!
Science Light
- by KitchenPantryScientist
Here’s a fun optics experiment, based on one created in 1842 by Jean-Daniel Colladon, that you can do at home using a laser pointer and a bottle of water.
Parental supervision required. (Eye protection recommended for kids.) Never shine a laser pointer at or near eyes, as it can cause blindness.
Skullsinthestars.com has a well-written, detailed explanation of how light can be reflected in a transparent medium, like water.
Floating Ping Pong Balls
- by KitchenPantryScientist
This experiment is so awesome that our balloon-popping dog Heidi had to get in on the action! Try it, and you’ll see how much fun it is to play with the forces of physics using a blow drier and a ping pong ball or balloon.
Newton’s third law tells us that for every action, there is an equal and opposite reaction. As the air pushes up on the ball, the ball pushes back down on the air. Other forces are at work too, as pressure differences in the air column help the ball stay in the middle of the air flow.
Weather Science
- by KitchenPantryScientist
It’s fun to track the weather, and you can create some cool meteorology instruments using stuff you have around the house. Here’s a great post by NOAA (The National Oceanic and Atmospheric Association) on how to make your own weather station.
It’s also fun and easy to do this cool convection current experiment, using warm and cold water to explore how air moves in Earth’s atmosphere.
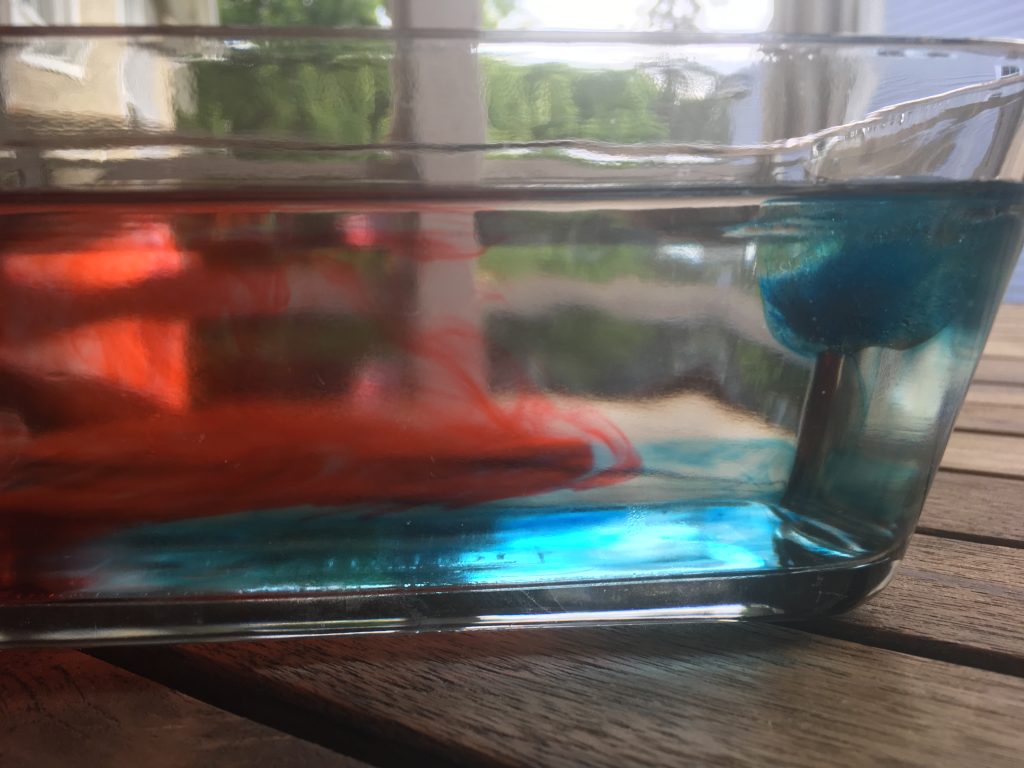
Convection Experiment (kitchenpantryscientist.com)
To see how cold fronts move under warm fronts, you’ll need ice cube trays, water, blue and red food coloring and a clear container.
- Add water to an ice cube tray and add a few drops of blue food coloring to the water in each cube space. Freeze.
- Fill a clear container with room temperature water.
- Place one or two blue ice cube or two at one end of the container, and a few drops of red food coloring at the other end.
- Observe what happens.
The Science Behind the Fun:
Cold water(blue) is more dense than warm water and forces warmer water (red) to move up and over it.
This is similar to the way warm air is forced up when it collides with masses of cold air in the atmosphere. Warm air carries energy, and when there’s lots of moisture in the air, these collisions often result in thunderstorms.
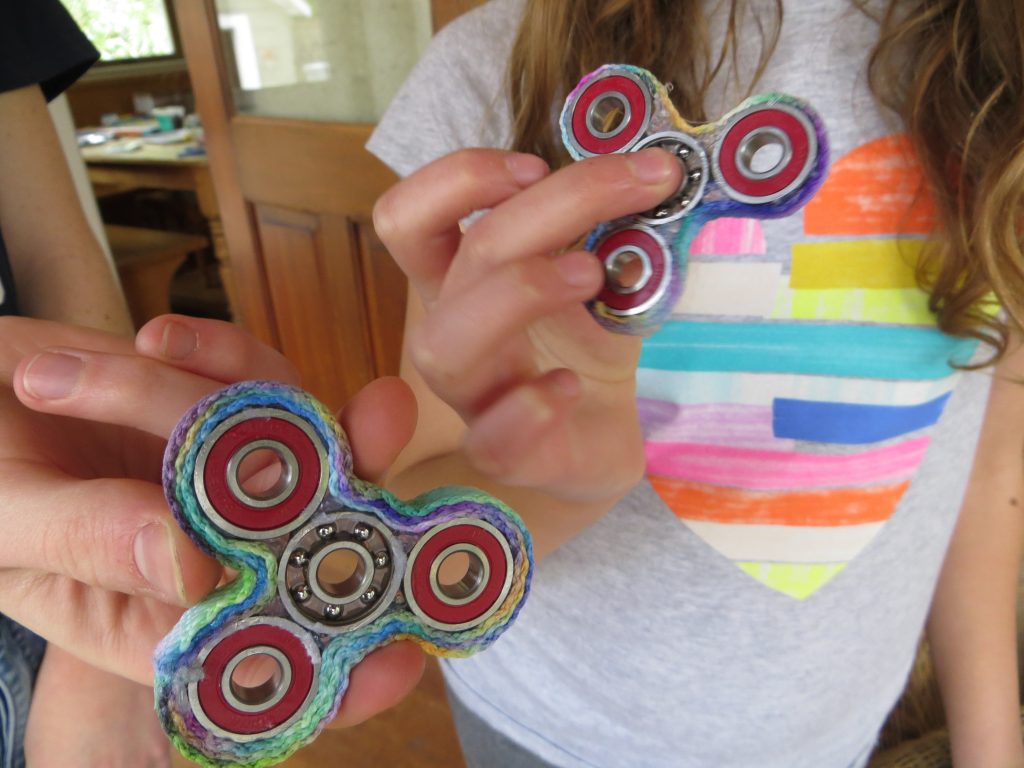
Homemade Tie-Dye Fidget Spinner
- by KitchenPantryScientist
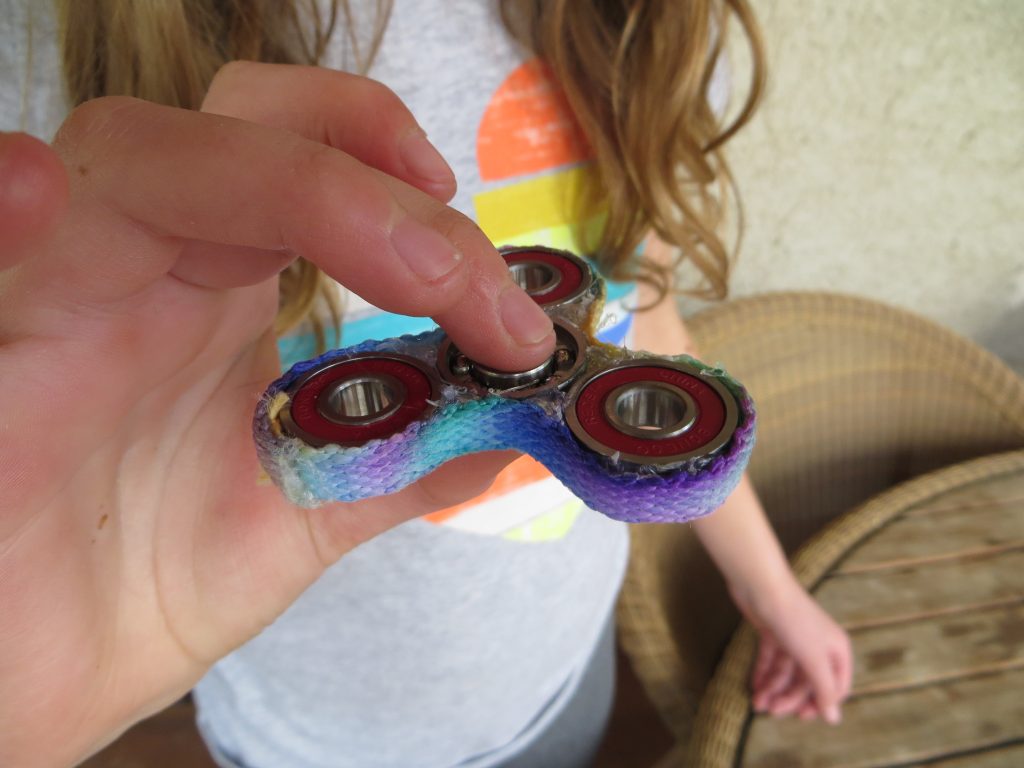
Homemade Spinner with Tie-Dye Edges (KitchenPantryScientist.com)
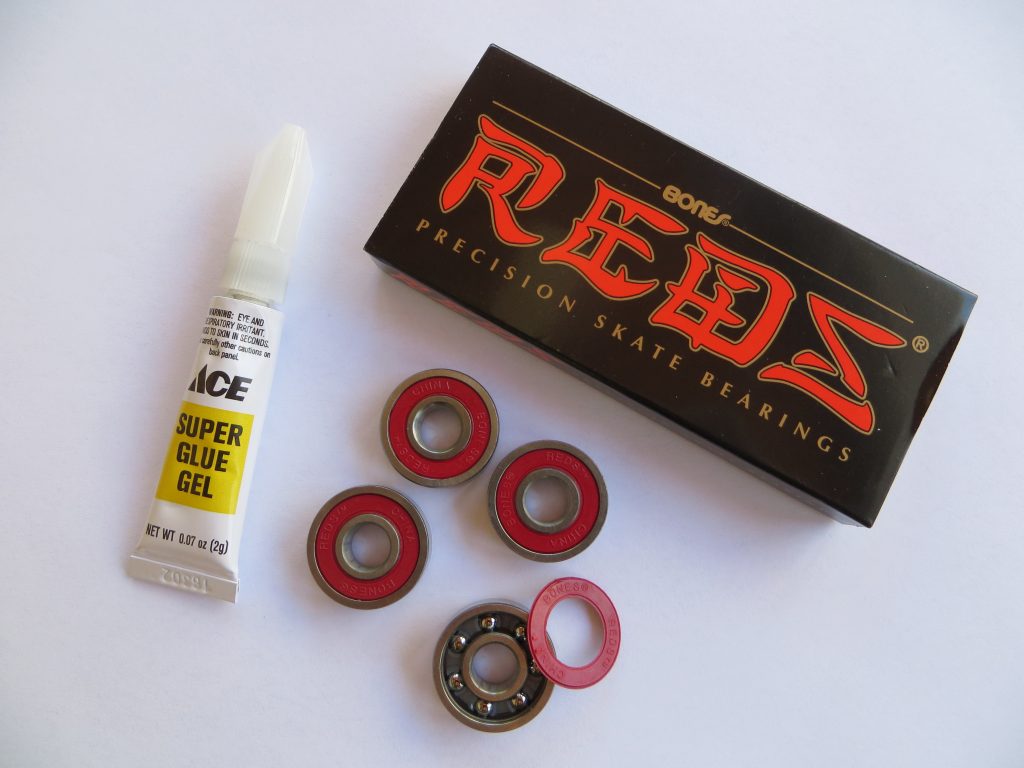
Make a super-cool spinning toy using skateboard bearings, super glue and a little physics. Customize your design with a marker tie-dyed shoelace.
Warning: Not for recommended for kids under 5. Use adult supervision for super glue, sharp points, rubbing alcohol and glue gun.
You’ll need:
-4 skateboard bearings (available online or at skateboard stores)
-superglue or Krazy Glue
-a white shoelace
-permanent markers, like Sharpies
-rubbing alcohol (isopropanol)
-a glue gun
KitchenPantryScientist.com
1. Use a sharp point to remove the cover from one of the bearings so that you can see the ball bearings inside. (See image above.)
2. Cut a piece of paper 6cm x 6cm and draw an X from corner to corner.
3. Center the bearing with the cover removed in the middle of the X. Then, center the other 3 bearings around the one in the middle so that they’re evenly spaced. You can use a ruler to check spacing. (See image below.)
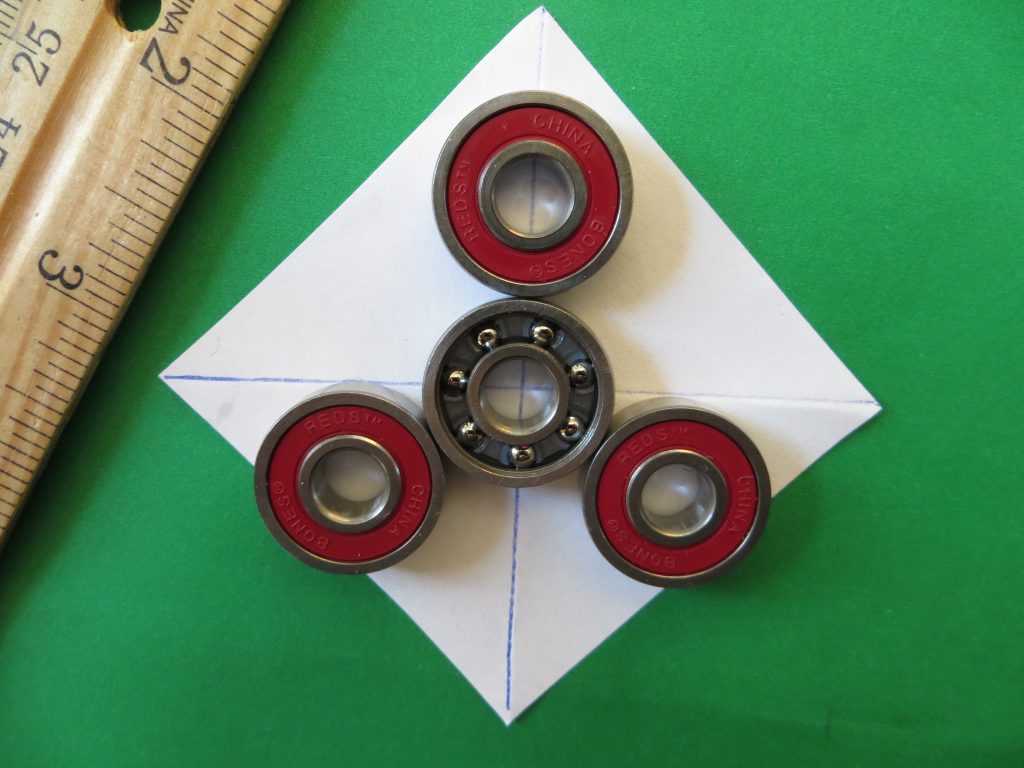
KitchenPantryScientist.com
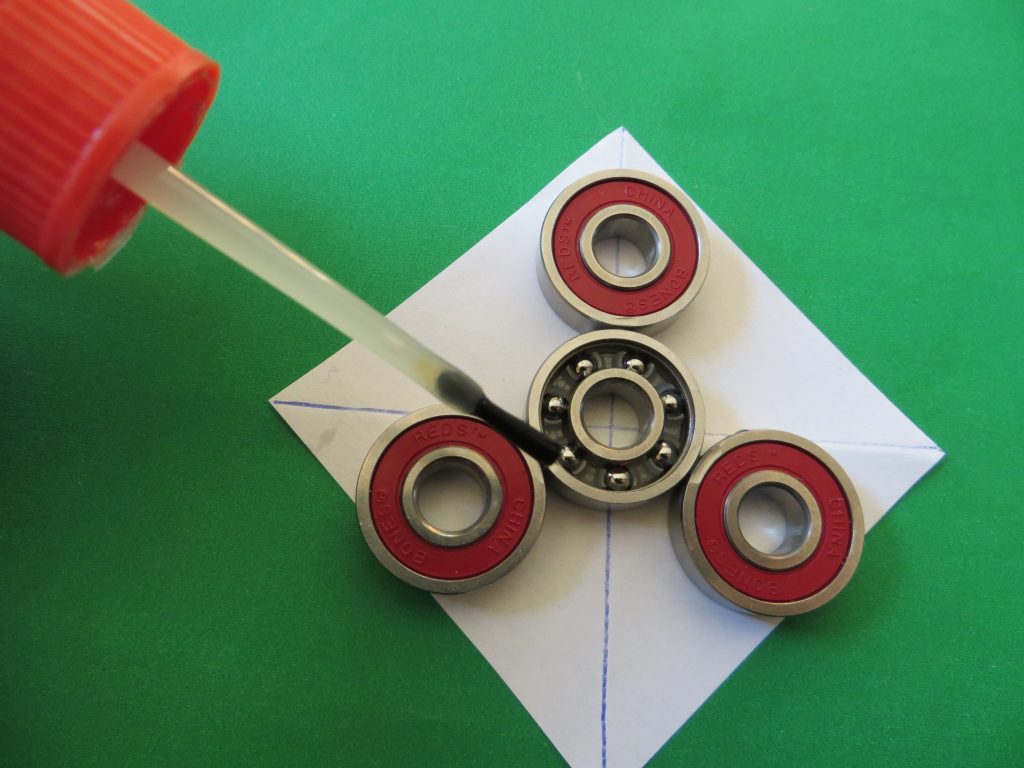
4. Add a single drop of super glue to the junction between each bearing to connect them. If you add too much, the spinner will stick to the paper. *Be careful not to get any glue onto the moving parts of the bearings.
KitchenPantryScientist.com
5. When the glue is dry, carefully turn the spinner over and place another drop of glue at each junction.
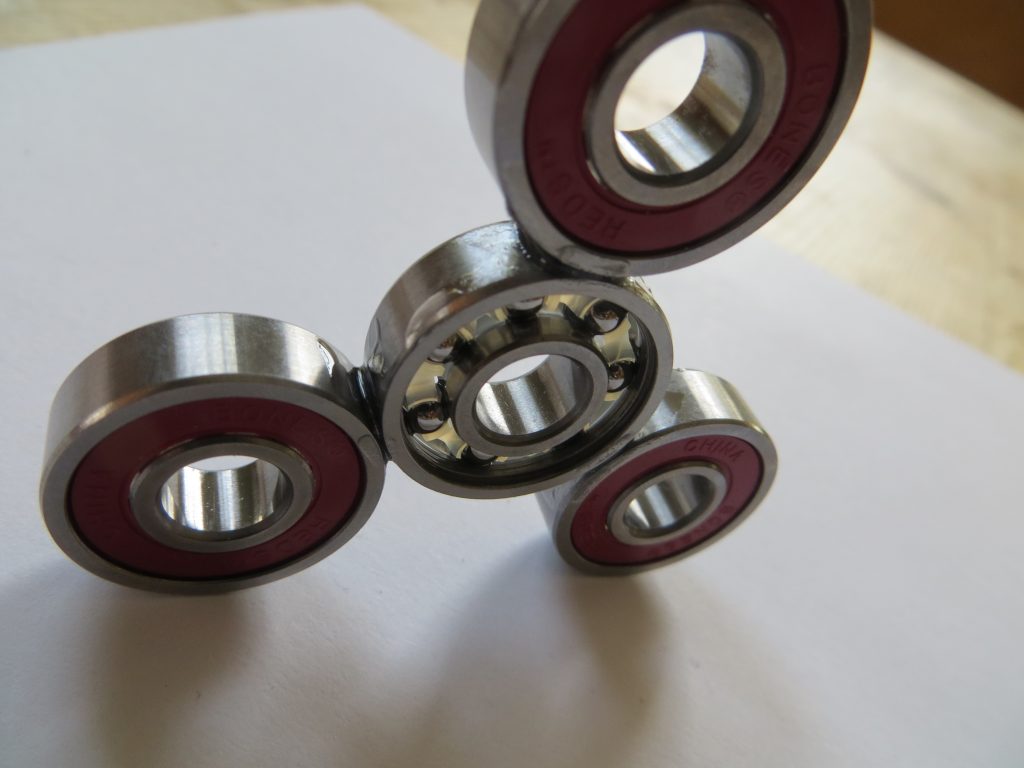
6. When the glue is dry, prop the spinner up on its side and add glue to the junctions on the sides. (See image below.) Repeat on each side.
KitchenPantryScientist.com
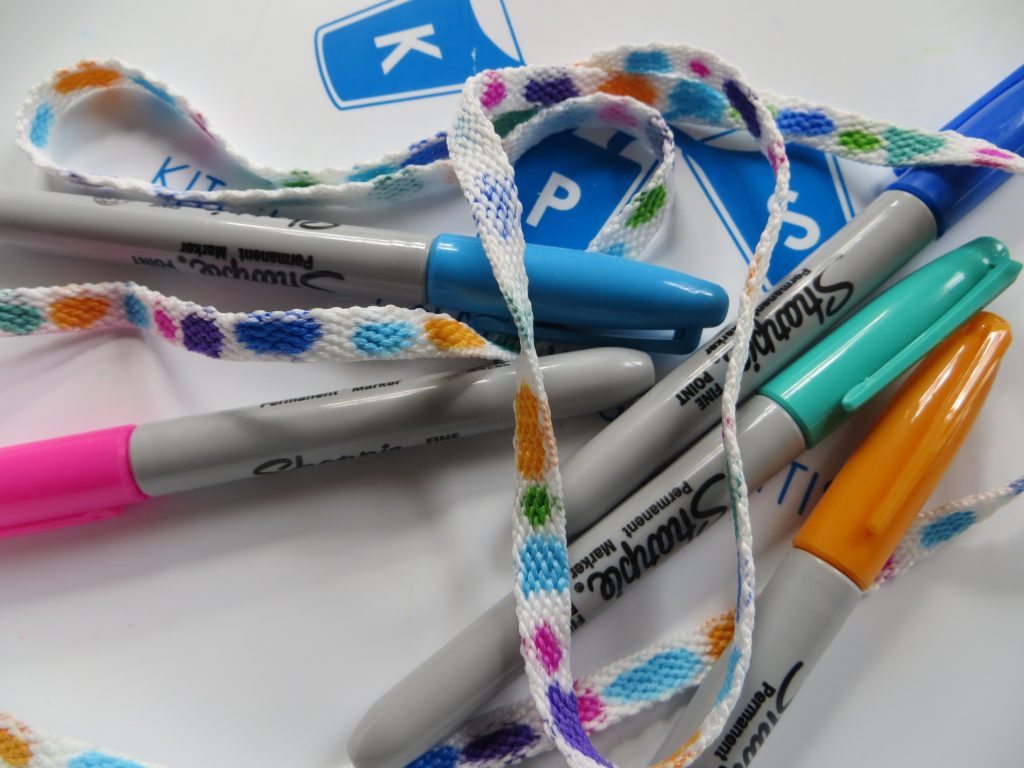
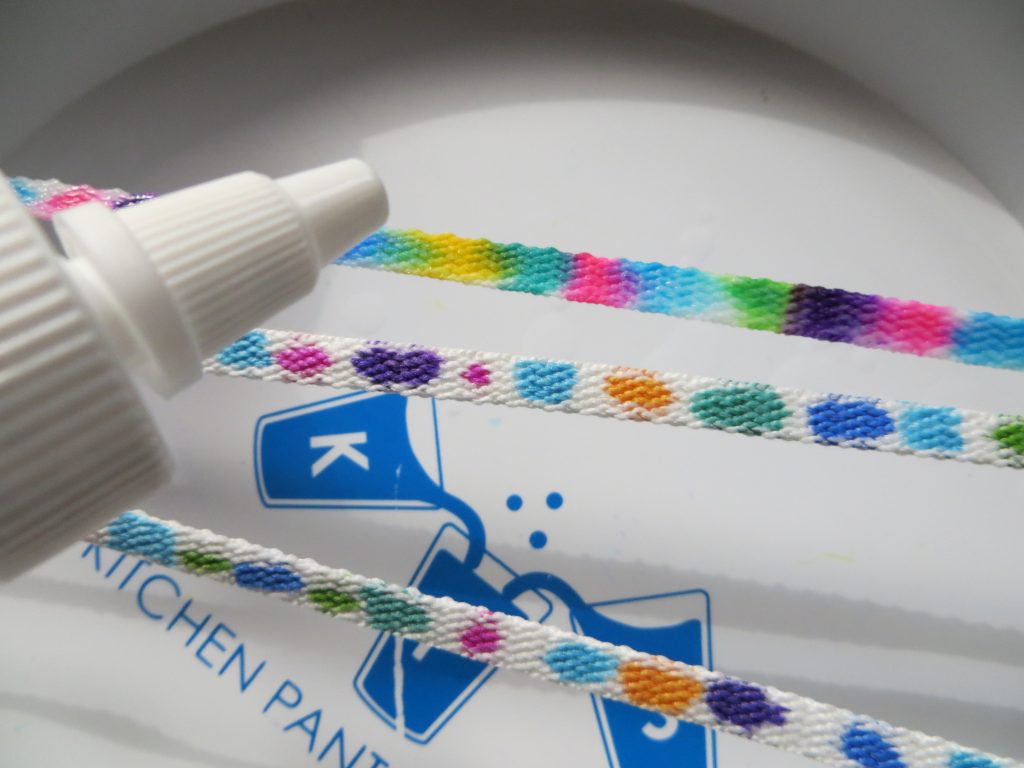
7. While the spinner glue is drying, make dots of permanent marker on the shoelace. In a well-ventilated area, suspend the shoelace over a tray or colander and drip rubbing alcohol onto it to make the colors run together. (See image.) Let it dry completely.
KitchenPantryScientist.com
8. Use the glue gun to attach the shoelace to the outside edges of the spinner. Fill in gaps between the lace and bearings with hot glue.
KitchenPantryScientist.com
9. Spin away!
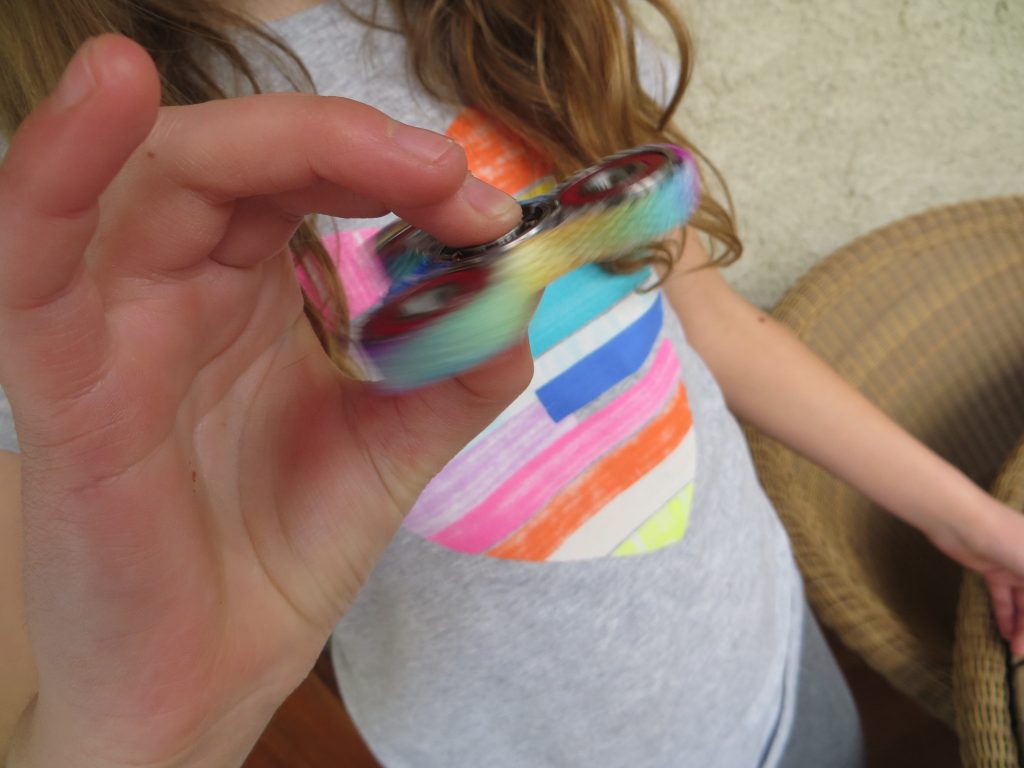
The Science Behind the Fun:
If you look closely at a skateboard bearing there are only a few ball bearings connecting the center and the outside part that spins. This means that there’s very little friction, or rubbing, between the parts. If you spin the toy around the center bearing, that bearing is called the axis of rotation.
The three bearings on the outside of the spinner provide the rotating mass that gives the toy a property called angular momentum, which keeps it spinning until the frictional force from the ball bearings in the center slows it down.
Pigments are molecules that give things color. The pigments in permanent markers are trapped in ink compounds that are insoluable in water, which means that they won’t dissolve in water. However, if you add a solvent, like rubbing alcohol, or isopropanol, to permanent markers, it dissolves the ink. As the alcohol moves through the cloth you are decorating, it carries the pigments along with it.
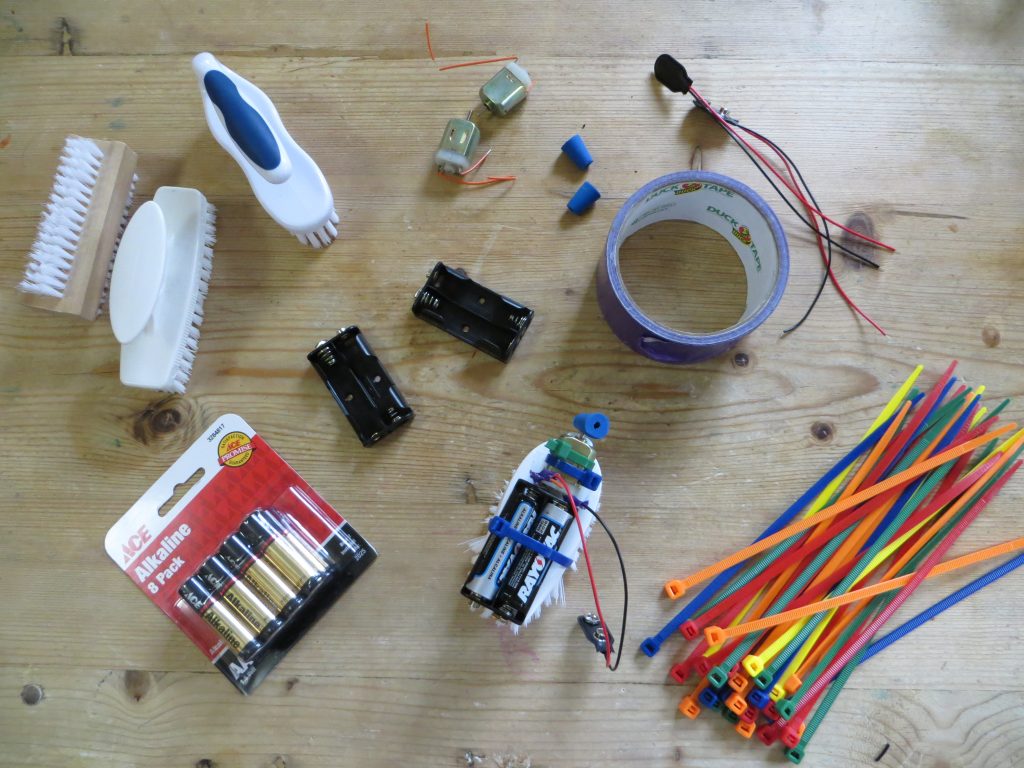
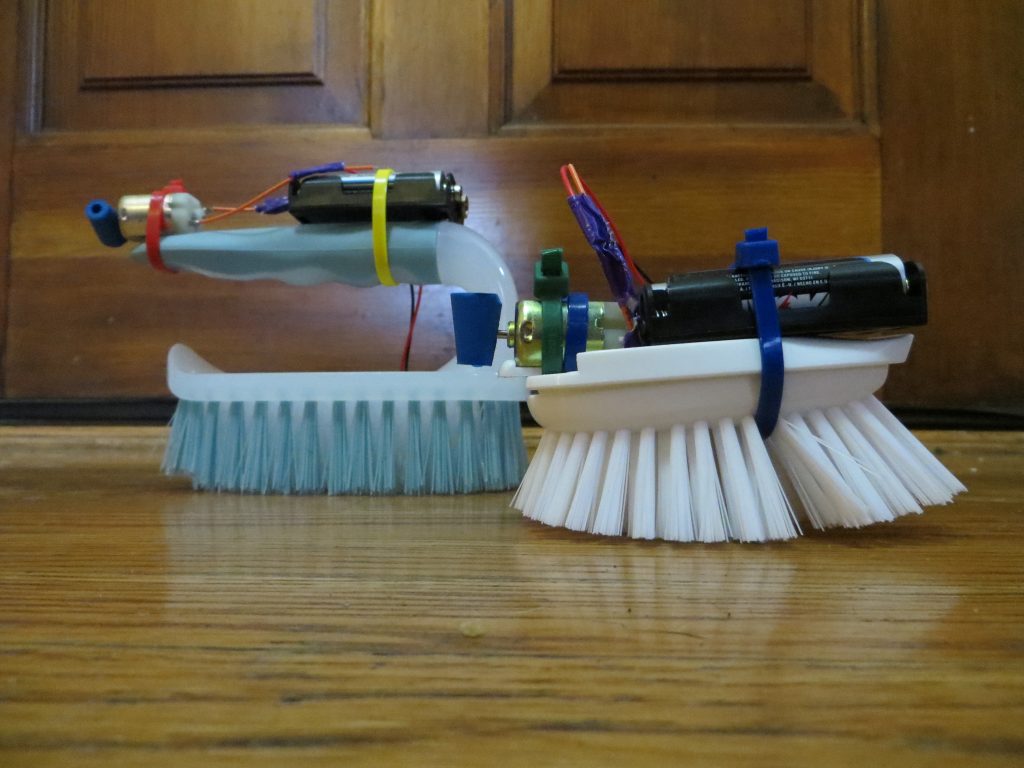
Bristlebots
- by KitchenPantryScientist
With a brush, some batteries, a small motor and a few wires, it’s easy to create a robot that spins, bumps and buzzes around on any smooth surface.
You’ll need:
-a small brush, like a vegetable brush or a cleaning brush
-two AA batteries
–battery holder for 2 AA batteries (optional)
-insulated wire
-a small toy motor with lead wires and pencil eraser or small rubber stopper (or vibrating motor)
–battery clip (optional)
-zip ties (optional)
-electrical tape or duct tape
Bristlebot-KitchenPantryScientist.com
Make your bristlebot!
- Attach the motor to one end of the top of the brush. If it’s not a vibrating motor, stick a eraser or rubber stopper onto the spinning post to make it vibrate. Use a zip tie or duct tape to secure it. Make sure the spinning parts can rotate freely.
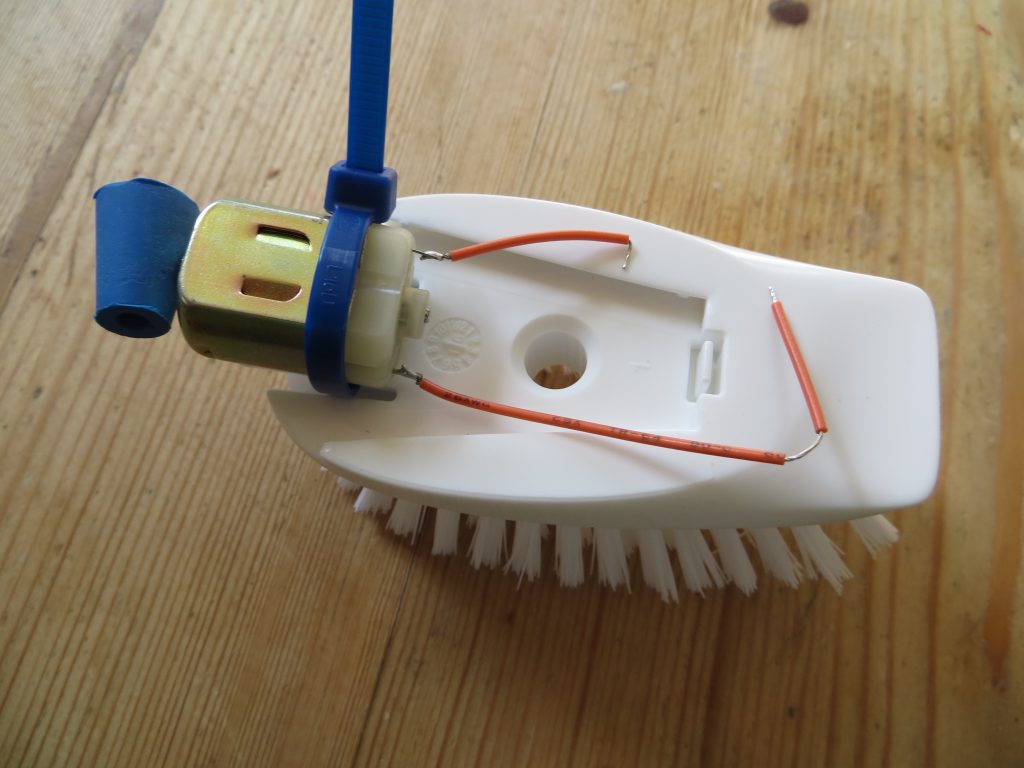
Attach motor- KitchenPantryScientist.com
- Attach the battery holder to the top of the brush near the motor.
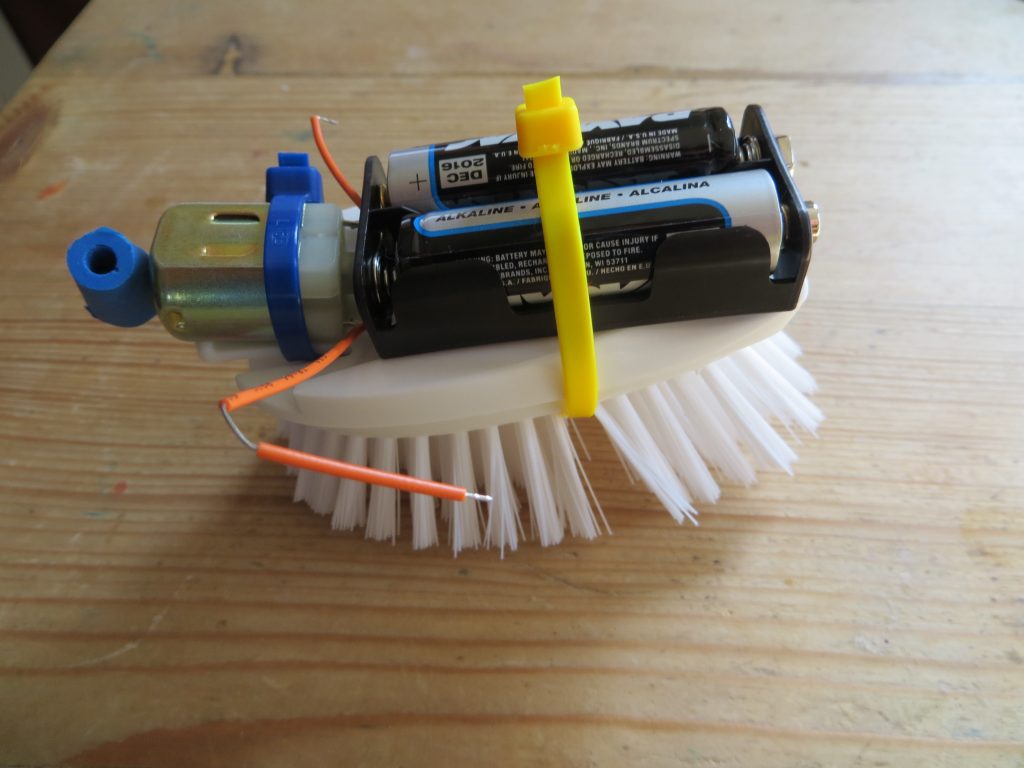
Attach batteries- KitchenPantryScientist.com
- Insert batteries in motor.
- Twist wires around the motor terminals and secure with tape. (These may be the wires on the battery clip, if you have one.)
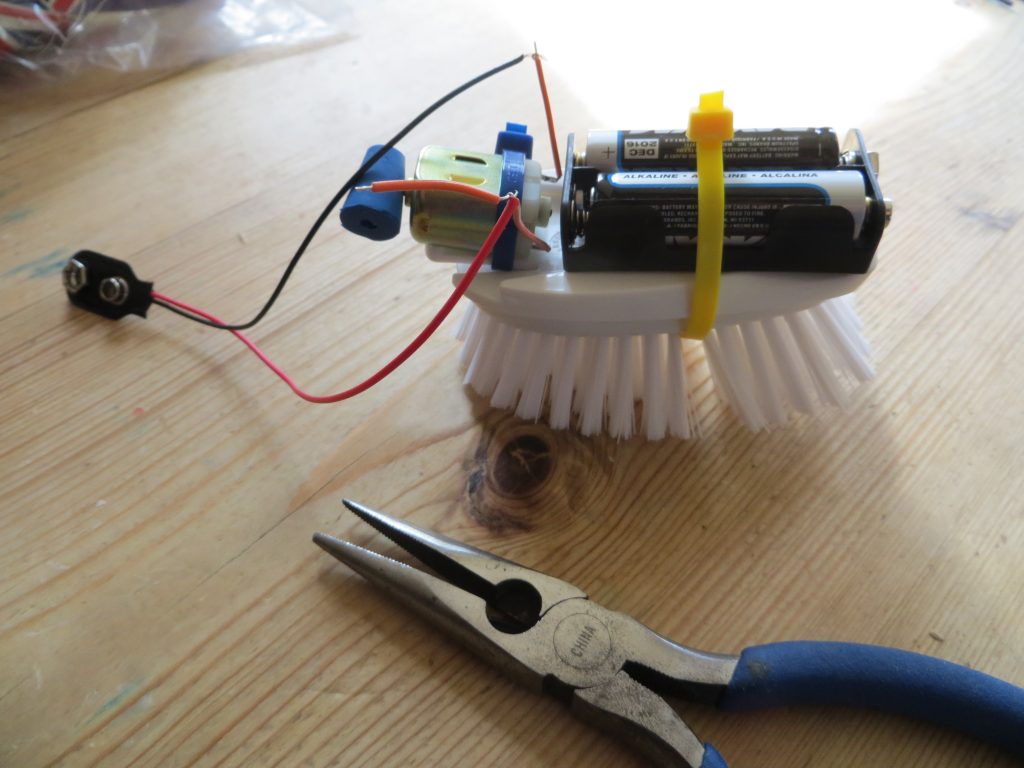
Connect battery clip- KitchenPantryScientist.com
- To start the motor, attach wires directly to the battery terminals, or to the battery clip and snap it onto the batteries.
Bristlebot- KitchenPantryScientist.com
- Place your robot on a smooth surface to see what happens.
Enrichment: Try different brush shapes, sizes and angles to see how they move. Does your robot spin in the same direction as the motor, or the opposite direction?
The Science Behind the Fun: In this experiment, you complete a battery-powered electrical circuit to spin a vibrating motor. The vibrations traveling through the bristles of the brush move your robot around on the floor.
Graphite Circuits
- by KitchenPantryScientist
Electrons (negatively charged particles) can flow through substances called conductors.
Graphite, used to make pencil lead, among other things, is a conductor and can be used to make a simple circuit on paper. A circuit is just a path for electrical current.
You have to do this experiment with a graphite pencil, rather than the kind you use at school, but you can pick them up at most art supply stores. You’ll also need a few small LED bulbs, 2 wires with alligator clips on either end, and a 9 volt battery.
Adult supervision recommended.
- Make a thick, black rectangle using a graphite pencil. We used a #9 graphite crayon.
- Hook the two wires up to the battery terminals.
- Clip the wire attached to the positive battery terminal to one wire of an LED bulb. (Don’t test it on the battery, or you may blow it out.)
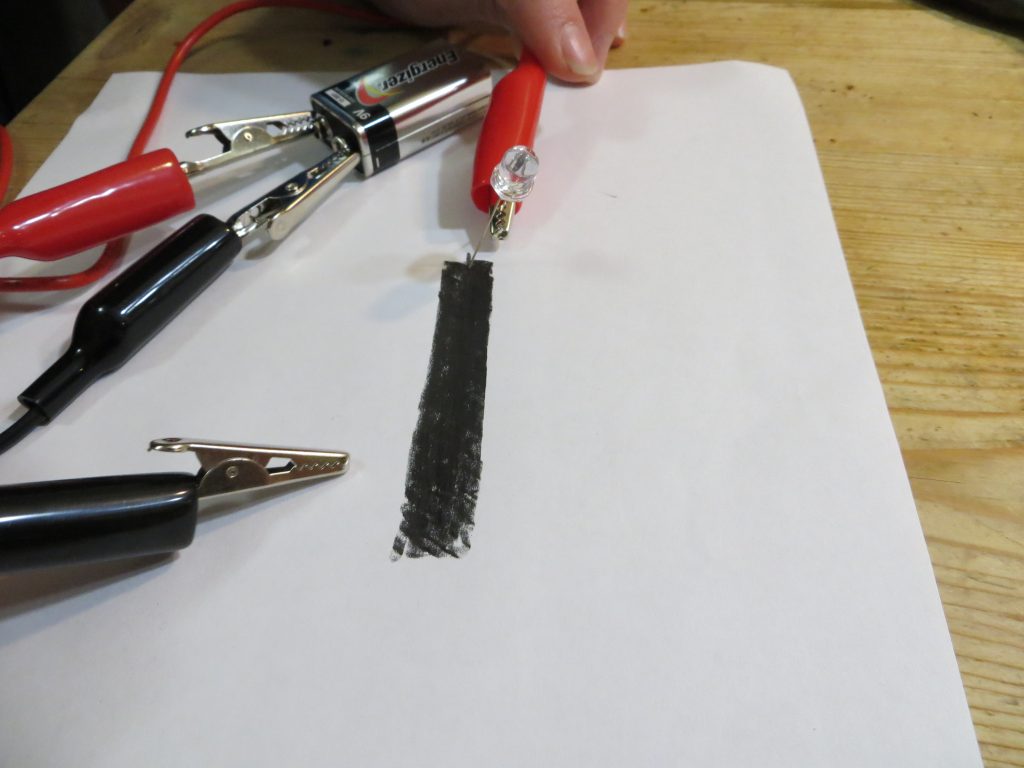 4. Touch the un-attached LED wire to the other (left) side of the graphite bar.
 5.Touch the alligator clip attached to the negative battery terminal to the right side of the graphite bar you drew.
6.If it doesn’t light, switch the positive alligator clip to the other wire of the LED bulb and try it again.
7. Move negative clip closer to the bulb. It should get brighter as you decrease the distance.
Lemon Batteries
- by KitchenPantryScientist
To make a battery, you need two oppositely charged electrodes (materials that pass electrical current from one thing to another) and an electrolyte (a liquid that allows charged atoms to travel through it.)
If you stick a zinc (galvanized) nail and a copper wire side by side into a lemon, but not touching each other, they act as electrodes. The lemon juice acts as the electrolyte.
A chemical reactions occurs between the zinc electrode and the acidic lemon juice, resulting in a second chemical reaction at the copper electrode. If you attach the two electrodes to a metal wire, electrons from the chemical reaction will flow through the wire from the zinc to the copper, creating an electric current. We used a tool called a mutimeter to connect the two electrodes and measure the current flowing through the wire.
To make a lemon battery, push a zinc nail and a piece of copper into a lemon, side by side, but not touching. You can use a copper wire or a penny.
Touch the two ends of a multimeter to each of the electrodes to see how much current you’re generating. (See image below.)
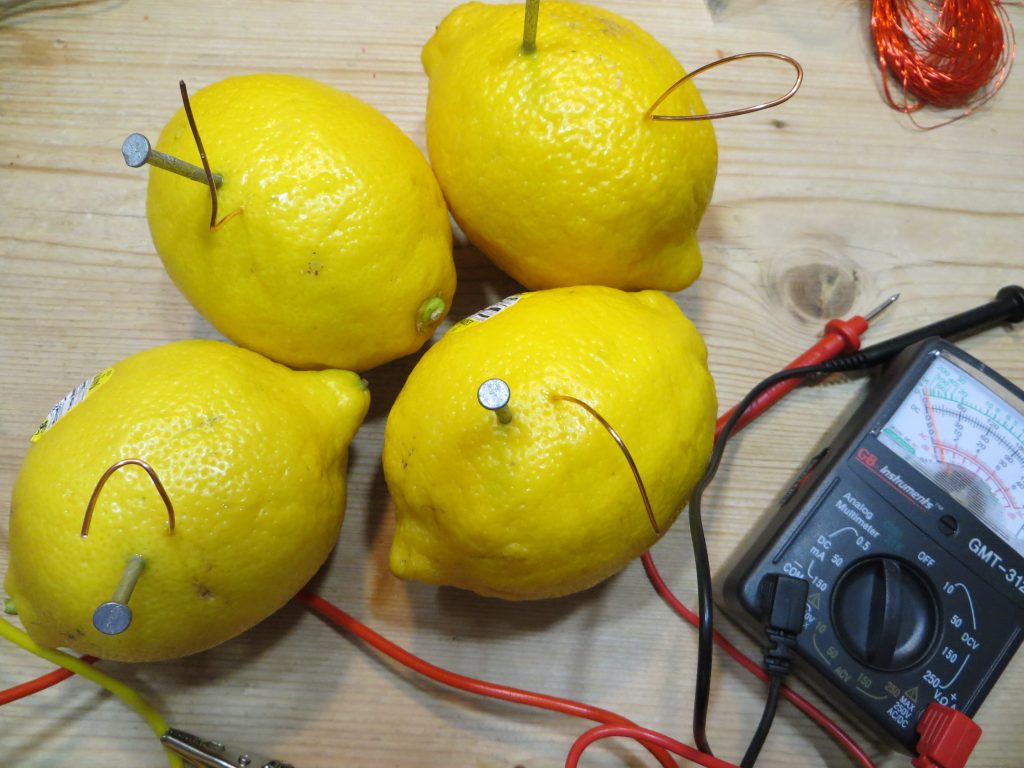
Lemons with zinc and copper electrodes.
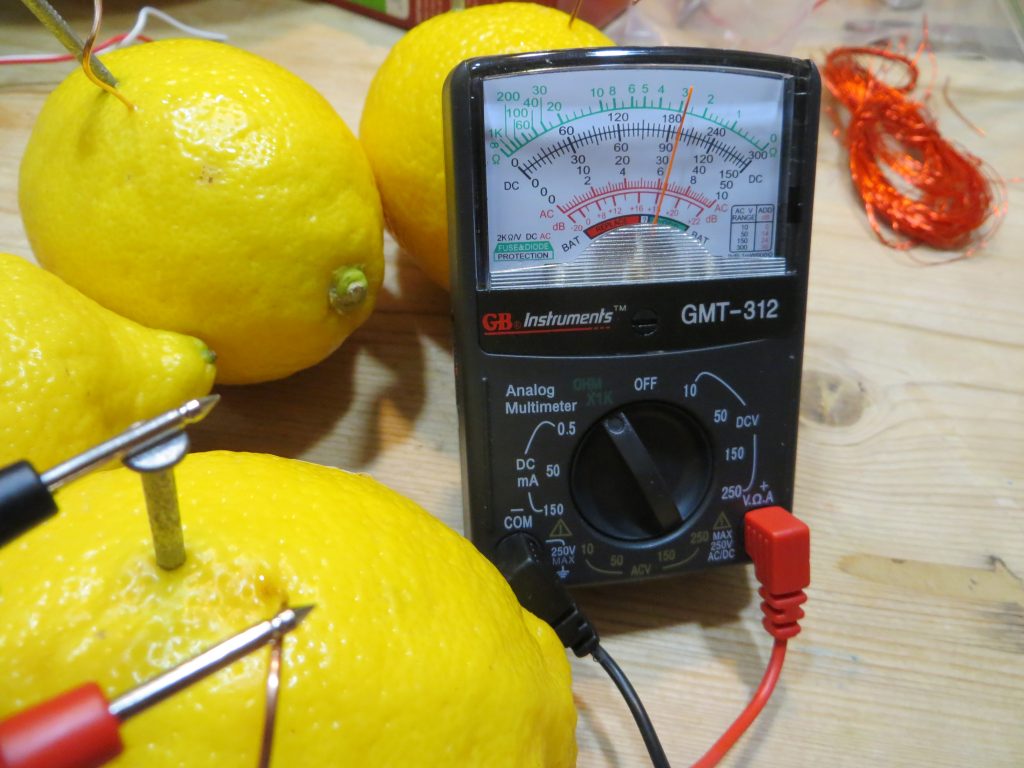
Testing current produced by a single lemon using a multimeter.
Test how changing the distance between the two electrodes changes the current. What else could you try?
Permanent Marker Tie Dye (Color and Chemistry)
- by KitchenPantryScientist
(Re-post from April 14, 2016)
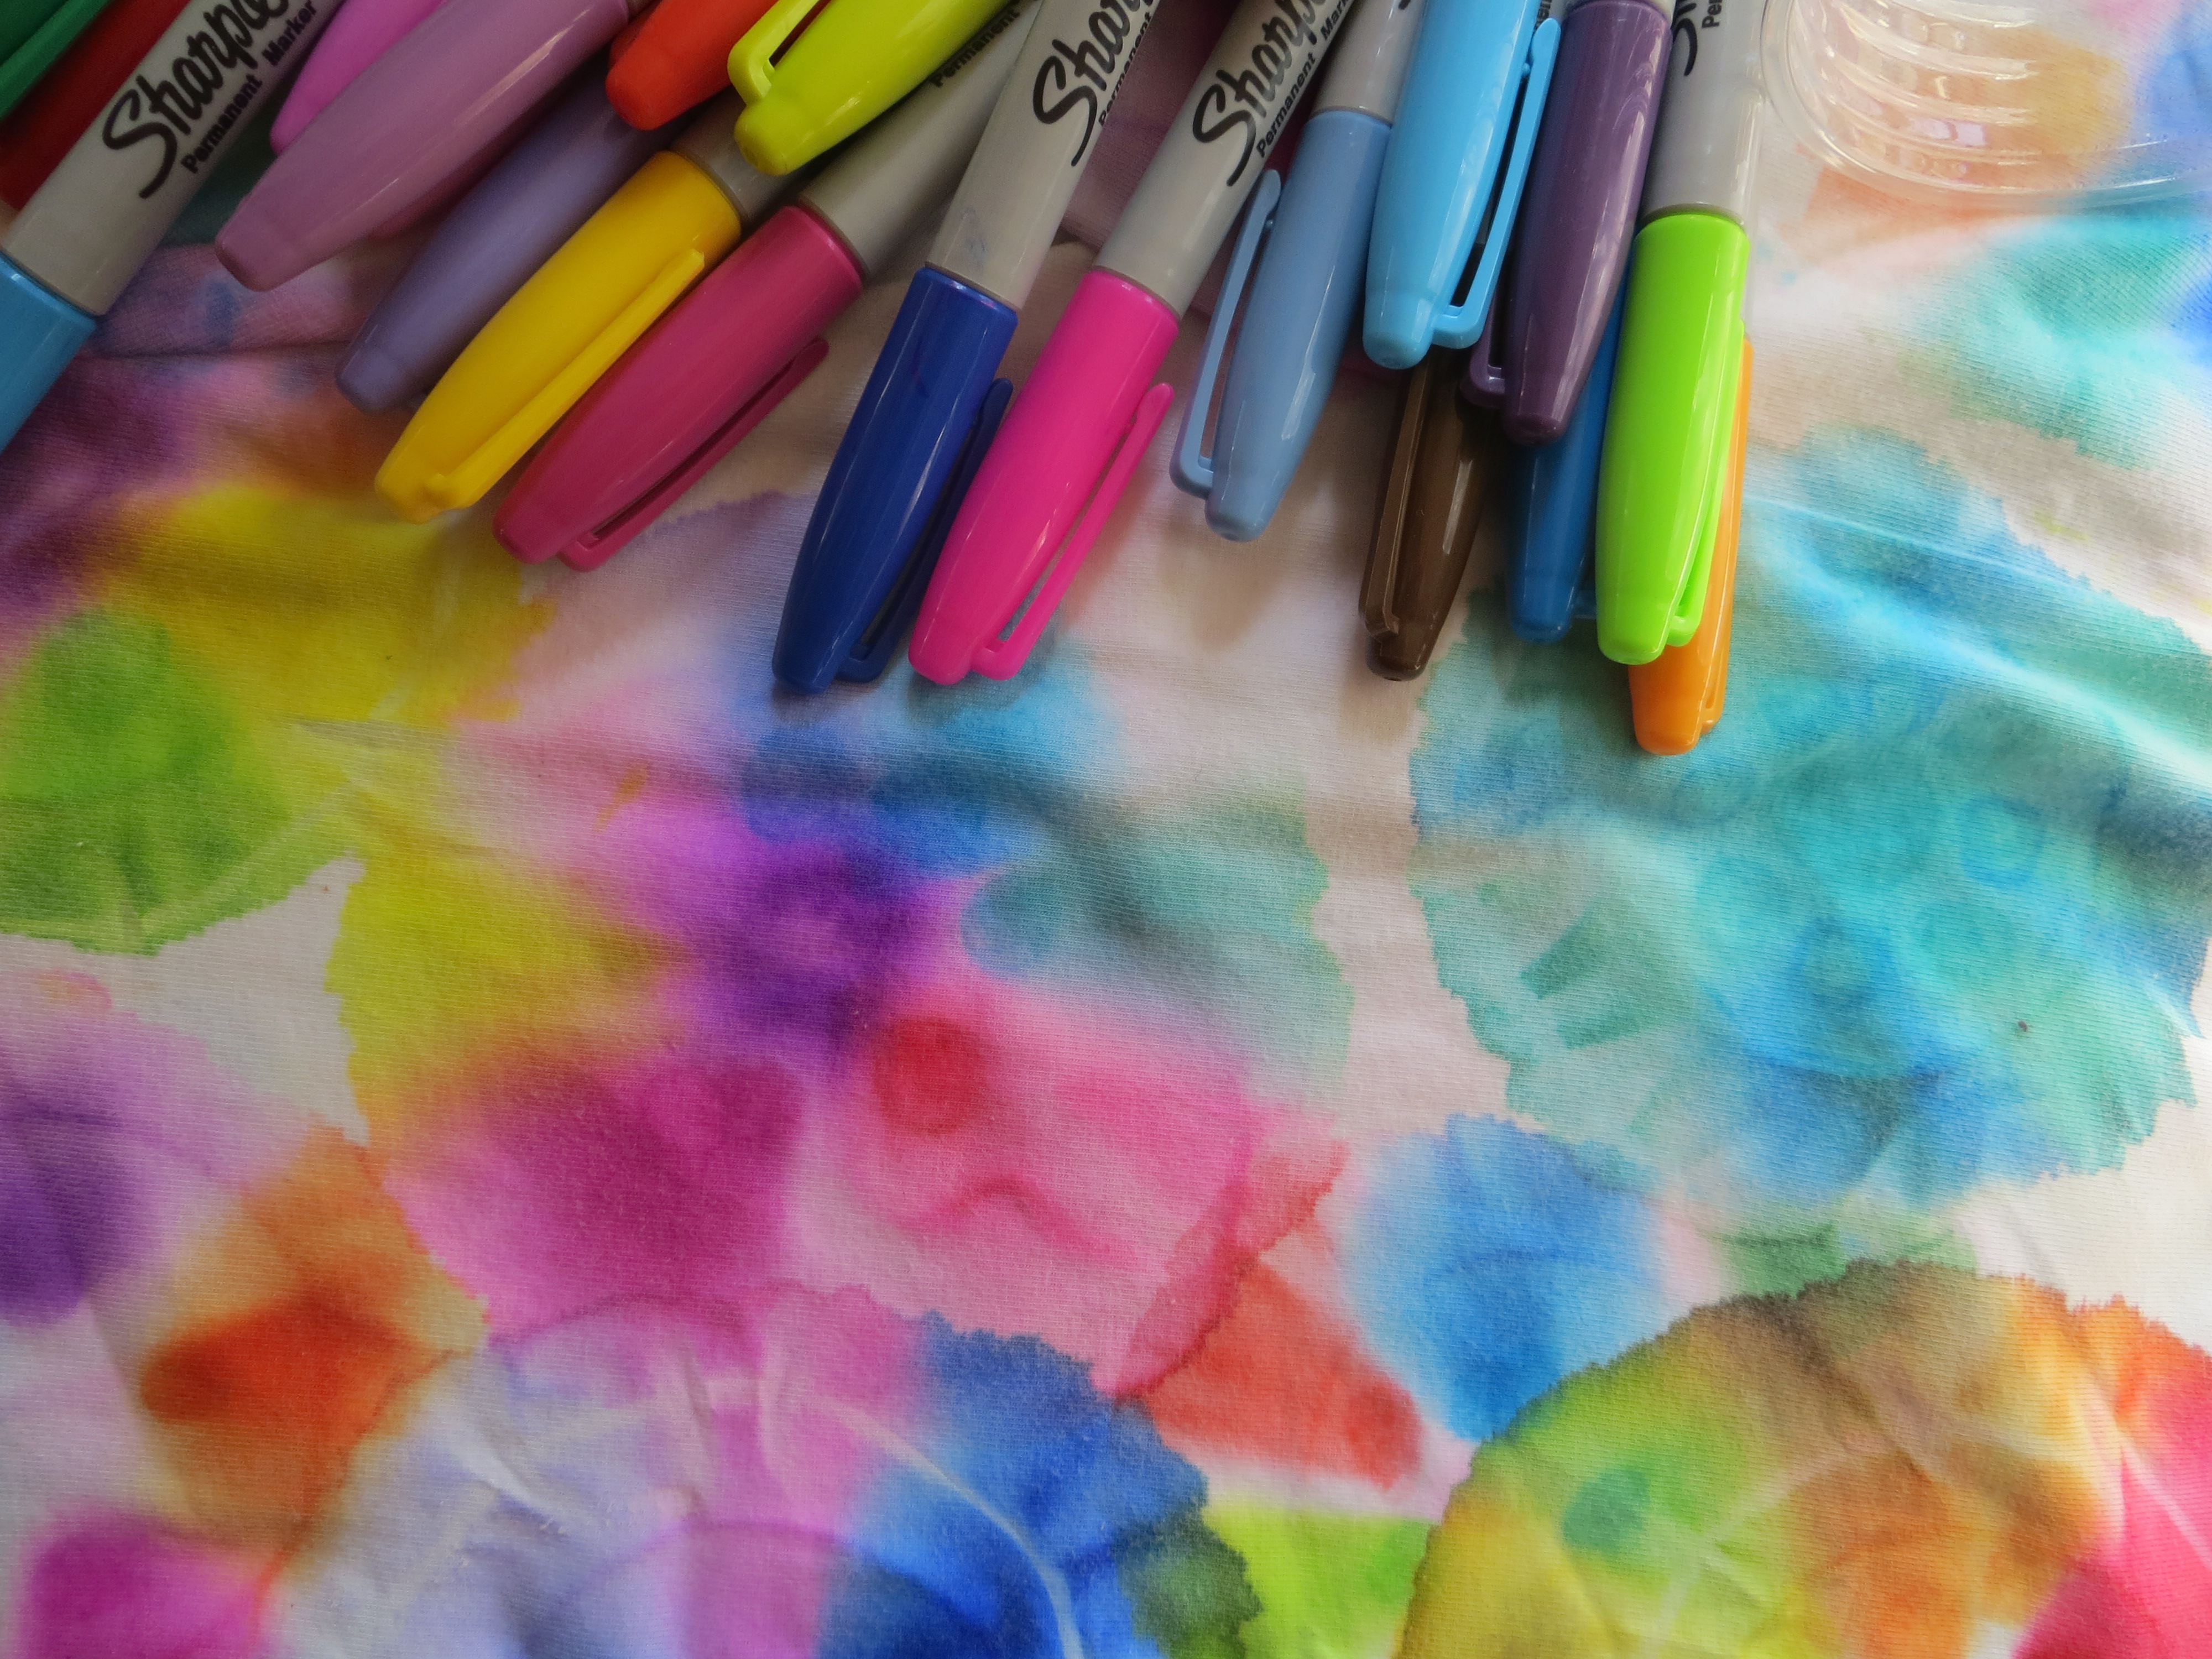
I love traditional tie-dye, but it’s fun to do this experiment that uses permanent markers and rubbing alcohol to make bright, gorgeous designs that mimic tie-dye, more easily, and with less mess.
This experiment was created by Bob Becker, a chemistry and AP chemistry teacher at Kirkwood High School in Kirkwood, MO. (To find a few of the original experiments I invented, check out Frankenworms, Sugar Cube Fizz Bombs, Homemade Window Stickies, Foaming Slime, and Cornstarch Frescos.)
Here’s a video from my YouTube channel on how to do this experiment, so kids can “watch and do.”
To play with permanent marker tie dye, you’ll need:
-permanent markers (like Sharpies)
-cotton items to decorate, like tee-shirts, socks, or dish towels
-rubbing alcohol (isopropanol)*Read warning labels. Parental supervision is required, since rubbing alcohol is poisonous if swallowed. Do this experiment in a well-ventilated area, and do not expose your artwork to heat until is is COMPLETELY dry, since rubbing alcohol and its fumes are flammable.
-rubber bands
-eye droppers
-containers like plastic cups or jars
To make your designs, stretch the cotton over the mouth of a jar or cup and secure it with rubber bands. (See video above.)
Use permanent markers to make several dime-sized dots of different colors on the stretched cotton.
Slowly drip rubbing alcohol onto the spots of color until the alcohol starts to soak outward, carrying the ink with it.
Allow your design to dry overnight. When completely dry, hang your shirt in the sun, or put it in the dryer for 15 minutes to set the color. Wash separately from other clothes, just in case!
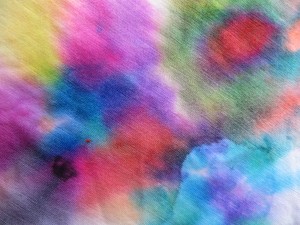
The Science Behind the Fun: Pigments are molecules that give things color. The pigments in permanent markers are trapped in ink compounds that are insoluable in water, which means that they won’t dissolve in water. However, if you add a solvent, like rubbing alcohol, or isopropanol, to permanent markers, it dissolves the ink. As the alcohol moves through the cloth you are decorating, it carries the pigments along with it. Small pigment molecules move faster than big ones, so the colors sometimes separate into their different color components as they move through the cloth. The alcohol evaporates into the air, leaving the ink in the fabric, and since it is still insoluable in water, it won’t come out when you wash it.
Enrichment: What happens if you draw lines, concentric circles or different shapes on your designs? Can you layer colors and watch them separate? What if you add rubbing alcohol next to the color, instead of directly on it? How many drops of alcohol do you have to add to a dime-sized color spot before it starts to expand?
Winter Science: Mouthwatering Maple Syrup Snow Candy
- by KitchenPantryScientist
Maple Snow Candy from Outdoor Science Lab for Kids (Quarry Books 2016)
Remember this homemade snow candy from Laura Ingalls Wilder’s classic “Little House in the Big Woods?” You can make the same amazing maple treats using heat evaporation and quick cooling in the snow, or on crushed ice cubes.
Here’s how to make the candy, along with some candy-making science, straight from the pages of my new book, “Outdoor Science Lab for Kids,” which you can order from your favorite book retailer by clicking here.
You’ll need:
-1 cup pure maple syrup
-sauce pan
-candy thermometer
-fresh, clean snow
Safety Tips and Hints:
-Hot sugar syrup can cause burns. This experiment must be done with adult supervision.
-Allow candy to cool completely before tasting.
-Only use pure maple syrup for the best results.
Directions:
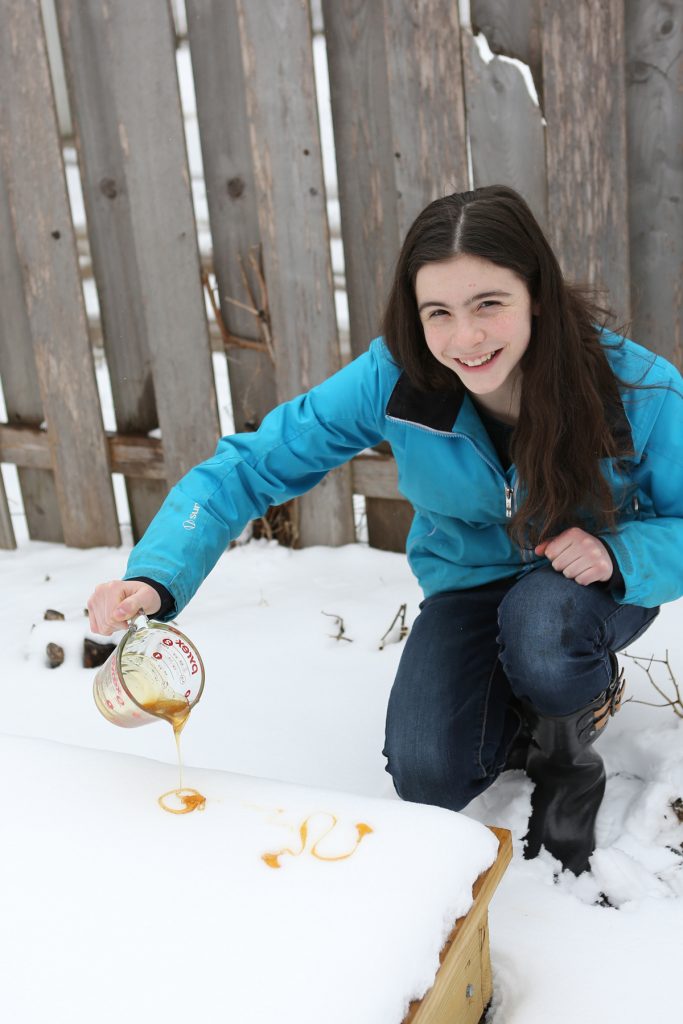
Step 1: Go outside and scout out a spot with some clean snow several inches deep for making your candy. Alternately, collect and pack down a few inches of fresh snow in a large, flat container, like a casserole dish. (You can use crushed ice cubes if you don’t have snow.)
Step 2. Boil the maple syrup in saucepan, stirring constantly until it reaches around 235-240 degrees F (soft ball stage.)
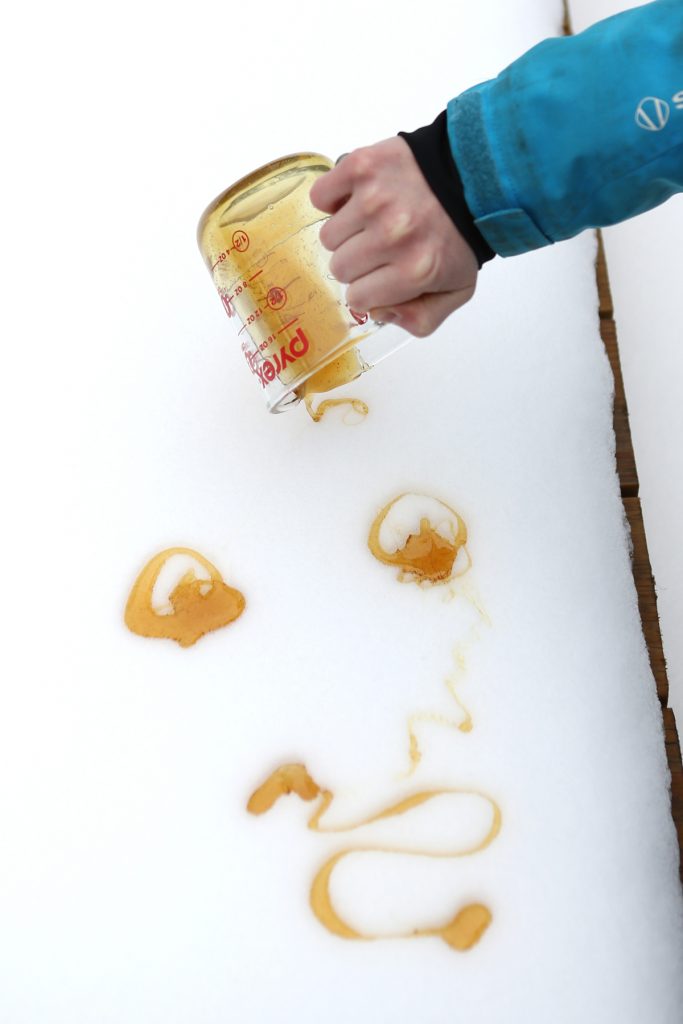
Step 3. Remove the maple syrup from the heat and carefully pour it into a heat-resistant container with a spout, like a Pyrex measuring cup.
Step 4. Pour wiggly candy lines into the snow to freeze them into shape.
Maple Snow Candy from Outdoor Science Lab for Kids (Quarry Books 2016)
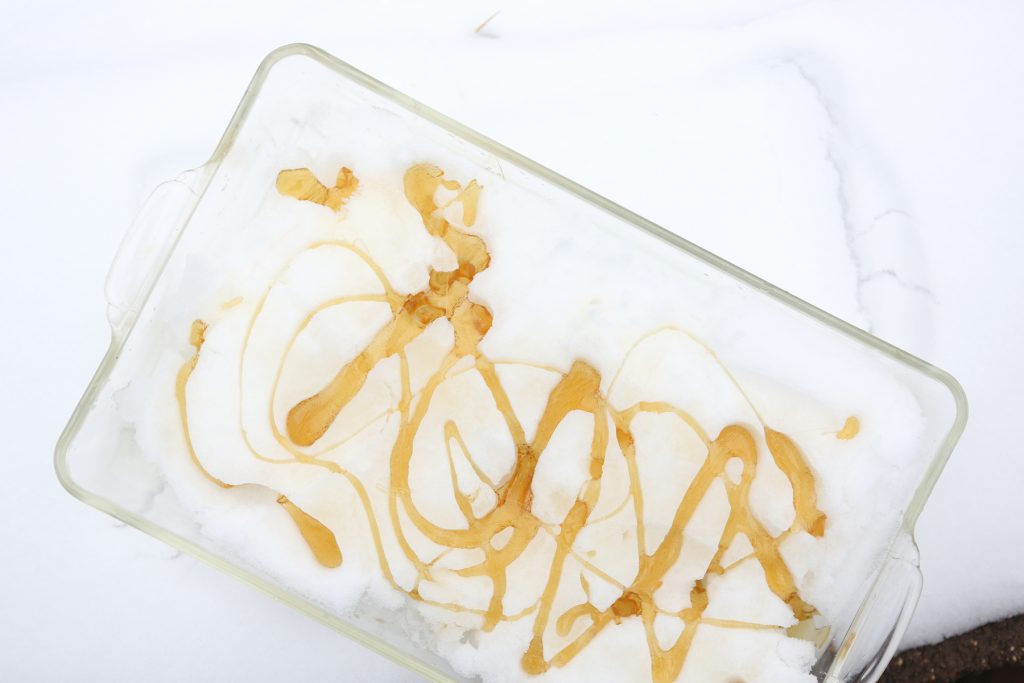
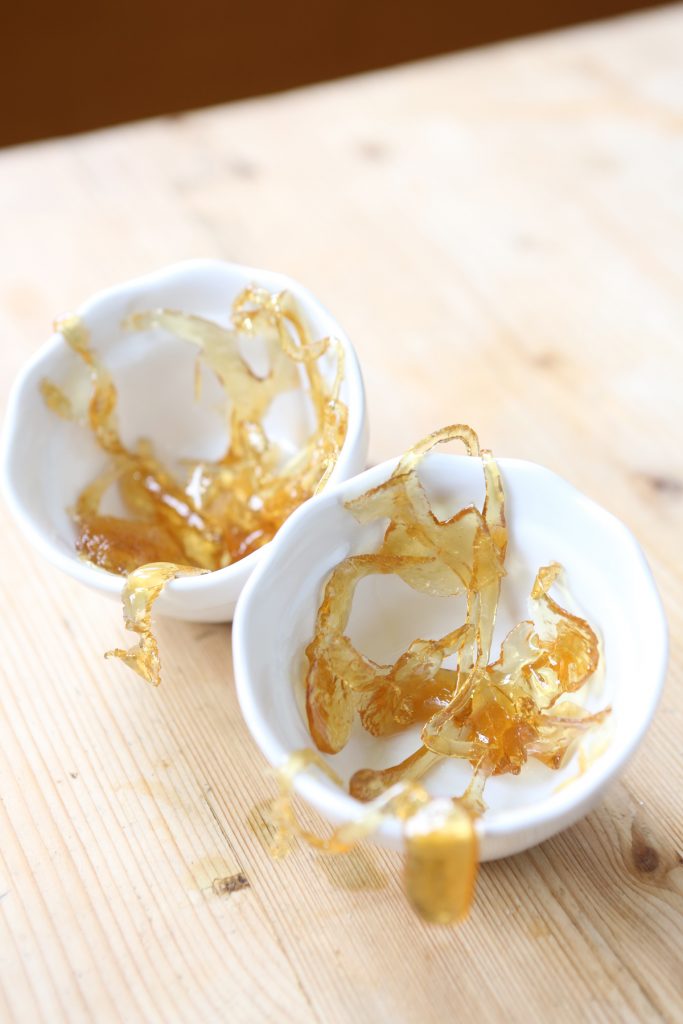
Alternately, make snow candy in a casserole dish filled with fresh snow or crushed ice.
Step 5. When you’re done, remove the candy from the snow with a fork.
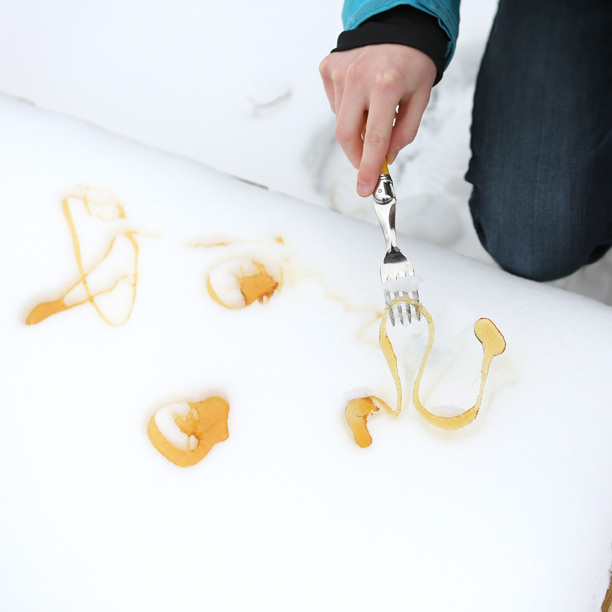
Maple Syrup Snow Candy from “Outdoor Science Lab for Kids” (Quarry Books 2016)
Step 6. Eat your candy right away, or let it warm up and wind it around sticks or skewers to make maple lollipops. Enjoy!
Maple Snow Candy from Outdoor Science Lab for Kids (Quarry Books 2016)
The Science Behind the Fun:
Maple syrup is made from watery tree sap boiled to evaporate most of the moisture it contains when it’s first tapped from a tree. Following evaporation, the syrup that remains is mostly made up of a sugar called sucrose, but it also contains smaller amounts of glucose and fructose.
Naturally, other organic compounds are also present in tree sap, giving syrup from different areas unique flavors. Syrup collected earlier in spring when it is cold tend to be light in color and have a mild flavor. As the days get warmer, microbes ferment some of the sugar in the syrup, making it darker and giving it a more robust taste.
In this experiment, you heat maple syrup, evaporating even more water. A super saturated solution forms, which holds more sugar molecules in the liquid than would be possible if you evaporated the water at room temperature.
When you pour the supersaturated sugar into the snow, it cools quickly, forming some sugar crystals to give the maple candy a soft, semi-solid consistency. Heating the syrup to a higher temperature will evaporate more water, resulting in even more crystal formation in the cooled syrup, making it harder to bite. If you carefully evaporate all of the water from maple syrup, you’ll be left with pure maple sugar crystals.
Creative Enrichment:
-Try collecting some syrup from your pan at several different temperatures and compare the resulting snow candy for texture, color and consistency.
-Can you do the same experiment with other sugar syrups, like molasses or corn syrup?
-Try to make maple sugar.