Category:Chemistry Experiments’
Earth Day Science Experiments
- by KitchenPantryScientist
Here are some of our favorite environmental science experiments. Click on the experiment name for directions and photos. I’ll post a new photosynthesis experiment on Monday!

Window Sprouts: Plant a bean in a plastic baggie with a damp paper towel to see how plants need only water and air to sprout roots and leaves. Here’s a short video demonstrating how to make a window garden.
Homemade Solar Oven: Using a pizza box, aluminum foil, plastic wrap, and newspaper, you can harness the sun’s energy to cook your own S’mores!
Nature Walk Bracelets: Wrap some duct tape around your wrist (inside out) and take a walk, sticking interesting natural objects like leaves and flowers to your bracelet. It’s a great way to get outdoors and engage with nature!
Carbon Dioxide and Ocean Acidity: See for yourself how the carbon dioxide in your own breath can make a water-based solution more acidic. It’s the same reason too much carbon dioxide in Earth’s atmosphere can be bad for our oceans.
Plant Transpiration: See how trees “sweat” in this survival science experiment.
Earthworm Experiment: Do you know what kind of earthworms are living in your back yard?
Composting: Be a composting detective. Bury some things in your back yard (away from power cables) and dig them up in a few months to see how they look. Composting reduces methane gas emissions (a greenhouse gas) from dumps.
Diffusion and Osmosis: See for yourself how the chemicals we add to water, put on our streets to melt ice, and spray on our lawns and crops can move into our soil, ground water, rivers, lakes and oceans.
Solar Water Purification: This project illustrates the greenhouse effect and is a fun “survival science” experiment. Requires hot sun and some patience!
Citizen Science: Don’t forget about all the real environmental research projects you can participate in through Citizen Science programs all around the world!
For mores activities and games, check out NASA’s Climate Kids website, to see a kid-friendly diagram of the water cycle, click here, or just get outside and enjoy the beautiful planet that sustains and nurtures us.
The Science of Hard-Boiled Eggs
- by KitchenPantryScientist
You can’t judge an egg by its shell, but you can use science to figure out whether or not it’s fresh.

Imagine an egg. It can be white or brown, since they’re identical except for shell color. There are two membranes inside an eggshell, separating it from the inside of the egg and helping to keep it safe from microbial invaders.
Under the membranes is the egg white, made up of proteins and water, and the yolk, which also contains fat and is enclosed in a sac. Tiny rope-like structures anchor the yolk between either end of the egg. The egg white contains a substance called lysosyme, which is a potent antibacterial. Eleven percent of an egg’s weight is made up by shell, 58% by white and 31% by yolk.
When a hen first lays an egg, the raw egg white contains carbon dioxide, making it look cloudy, and the proteins in the egg white are freshly folded into their correct protein shapes, so it will hold a nice shape in a pan. However, egg shells contain thousands of tiny pores, some big enough to see with the naked eye, and as an egg sits, it changes.
The contents begin to slowly shrink, and a small air pocket forms between the two membranes, usually at the large end. The egg’s pH, about 7.6 when first laid, rises as the egg ages and loses carbon dioxide. In just a few days, the pH may reach 9.7, causing the egg white to look clear and spread out more in a pan when the egg is broken.

The nicer shape and centered yolk of fresh eggs is why they’re recommended for frying. But why are older eggs better for boiling, and why does the yolk turn green sometimes?
Fresh eggs are harder to peel. When you boil an egg, it cooks from the outside to the inside, and its proteins become unfolded, or denatured. The denatured proteins are more likely to stick to the membranes on the eggshell of a fresh egg because the pH is lower. According to “FOODS, A Scientific Approach” by Charley and Weaver, eggs are easier to peel if their pH is greater than 8.7. In other words, old eggs that have lost carbon dioxide have a higher pH (are less acidic) and are easier to peel.
Sometimes, when you boil eggs, you see a greenish/gray/blue layer on the outside of the yolk. It’s the harmless product of a chemical reaction between the iron in the egg yolk and sulfer-containing proteins in the white. You can try to avoid it by using fresh eggs, using hot (not boiling water) to cook the eggs, by plunging eggs into ice water immediately after cooking, and by promptly removing the shells.

If you’ve heard of candling eggs, it involves shining a strong light through a raw egg to look at yolk position, air sac size and white clarity. You can also tell that an egg is older if it floats in water, due to the enlarged air sac.
Ideally, to cook perfect hard boiled (large) eggs, you put them in cold water, bring the water to a boil, remove the heat and let the pan stand with the lid on for 17 minutes before removing the eggs and plunging them into cold water. Alternately, boil large eggs for eleven minutes and put them in ice water to stop the cooking. For perfect eggs, prick the large end of your eggs with a pin to release the air in the air sac.
March Eggs
- by KitchenPantryScientist
Between basketball games and homework this weekend, we stood barefoot on cartons of raw eggs and painted hard boiled ones with lemon juice and baking soda.
Why the eggfest? We’re making videos for some April KidScience app experiments!
Here are a few still shots of our lovely creations:

We soaked hard-boiled eggs in cabbage juice overnight. Then, we painted them with citric acid (lemon juice) and sodium bicarbonate (baking soda.) Click here for detailed directions and more about the science.
Spring Break Boredom-Busters on KidScience App
- by KitchenPantryScientist
Whether you’re home or away, science can make any vacation more fun. You can collect data for real citizen science research projects by searching SciStarter.com or do your own experiments. KidScience app, based on the science projects on this website, puts fun science experiments at your fingertips on your iPhone, iPod Touch or iPad, no matter where you are.
I showed Kare11 viewers three of our favorite KidScience experiments: Red Cabbage Litmus Paper, Fizzy Balloons and Marshmallow Slingshots (using stuffed animals like Angry Birds to learn a little about the conservation of energy. Click here to watch the TV segment.
How will you mix a little science into your spring break?
Kitchen Science
- by KitchenPantryScientist
“Are you a good cook?” was the first thing Dr. Tsneo Suzuki asked when I sat down in the office next to his cancer research lab at the University of Kansas. I stared at the picture of his wife, who I later learned had passed away from breast cancer, and wondered whether I should be offended.
After all, I was in my twenties and had five years of molecular biology experience under my belt. But I understood why he asked the question. Once you figure out how to test a hypothesis, most science experiments involve following recipes, which scientists call protocols. Generally, if you can read directions and mix things together in the correct order, in the right proportions, you can do things like amplify DNA and clone genes into bacteria.
So I truthfully answered “Yes, I’m a pretty good cook,” and got the job.

Food preparation is like a science experiment. If you can follow a recipe, you should get something close to what you set out to make, because often the ingredients will interact with each other to make something new. This is the very definition of a chemical reaction. Everything you cook with, from water to baking soda, is just a collection of molecules.
Here’s a collection of some food science experiments on my website. Since I love to cook, I hope to add more in the future! Leave a comment if you have other favorite kitchen science experiments, and I’ll try to add them to the list.
Testing Foods for Starch– Add a drop of iodine and watch for color change to detect starch.
Crock Pot Microbiology: Making yogurt from scratch is a delicious experiment
Yeast Experiment: Pyramids, Pasteur and Plastic Baggies– Grow yeast in a plastic bag to see how they make bread rise.
Emulsions: Mayonnaise and Vinaigrette– Mix the un-mixable using surfactants.
Curds and Whey: Make glue and plastic from milk and vinegar.
Gluten Ball– Explore the protein that makes bread chewy.
Red Cabbage Juice CO2 experiment– Use the pH-sensitive pigment in red cabbage to illustrate how CO2 can acidify liquids (and why soda is bad for your teeth.)
Homemade Petri Plates: test surfaces around your kitchen and house for microbes. Use to test fingers before washing, after washing with water alone, after washing with soap, and after using hand sanitizer.
So remember, cooking can make you a better scientist, and doing science can make you a better cook.
Ice Science Video
- by KitchenPantryScientist
Salt lowers the melting/freezing temperature of ice, which is the solid form of water. Here’s a fun experiment you can do to see for yourself how Sodium Chloride (table salt) makes ice melt and water refreeze on a string, allowing you to “magically” lift an ice cube from a glass of water.
Click here for detailed instructions and more about the science.
This video will soon appear on KidScience app‘s Premium version, which allows you to easily search for experiments and videos based on kids’ ages, type of science, what you have on hand, or how much time you have.
Thanksgiving Science Experiment: testing foods for starch
- by KitchenPantryScientist
Ever wonder how much starch is in your Thanksgiving dinner? Click here for a fun experiment that lets you test your favorite foods for starch using iodine from the medicine cabinet.

Remember to supervise small children if you do this experiment, since iodine should not be ingested! Happy Thanksgiving!
Cranberry Science for Thanksgiving
- by KitchenPantryScientist
Grab an extra bag or two of cranberries and you can stir up a Thanksgiving science project: Spy Juice and invisible ink!

Click here for detailed directions.
Halloween Science on abullseyeview.com
- by KitchenPantryScientist
Today, Target shared three of our favorite Halloween science experiments on abullseyeview.com.

Halloween Science: Magic Bag of Blood
- by KitchenPantryScientist
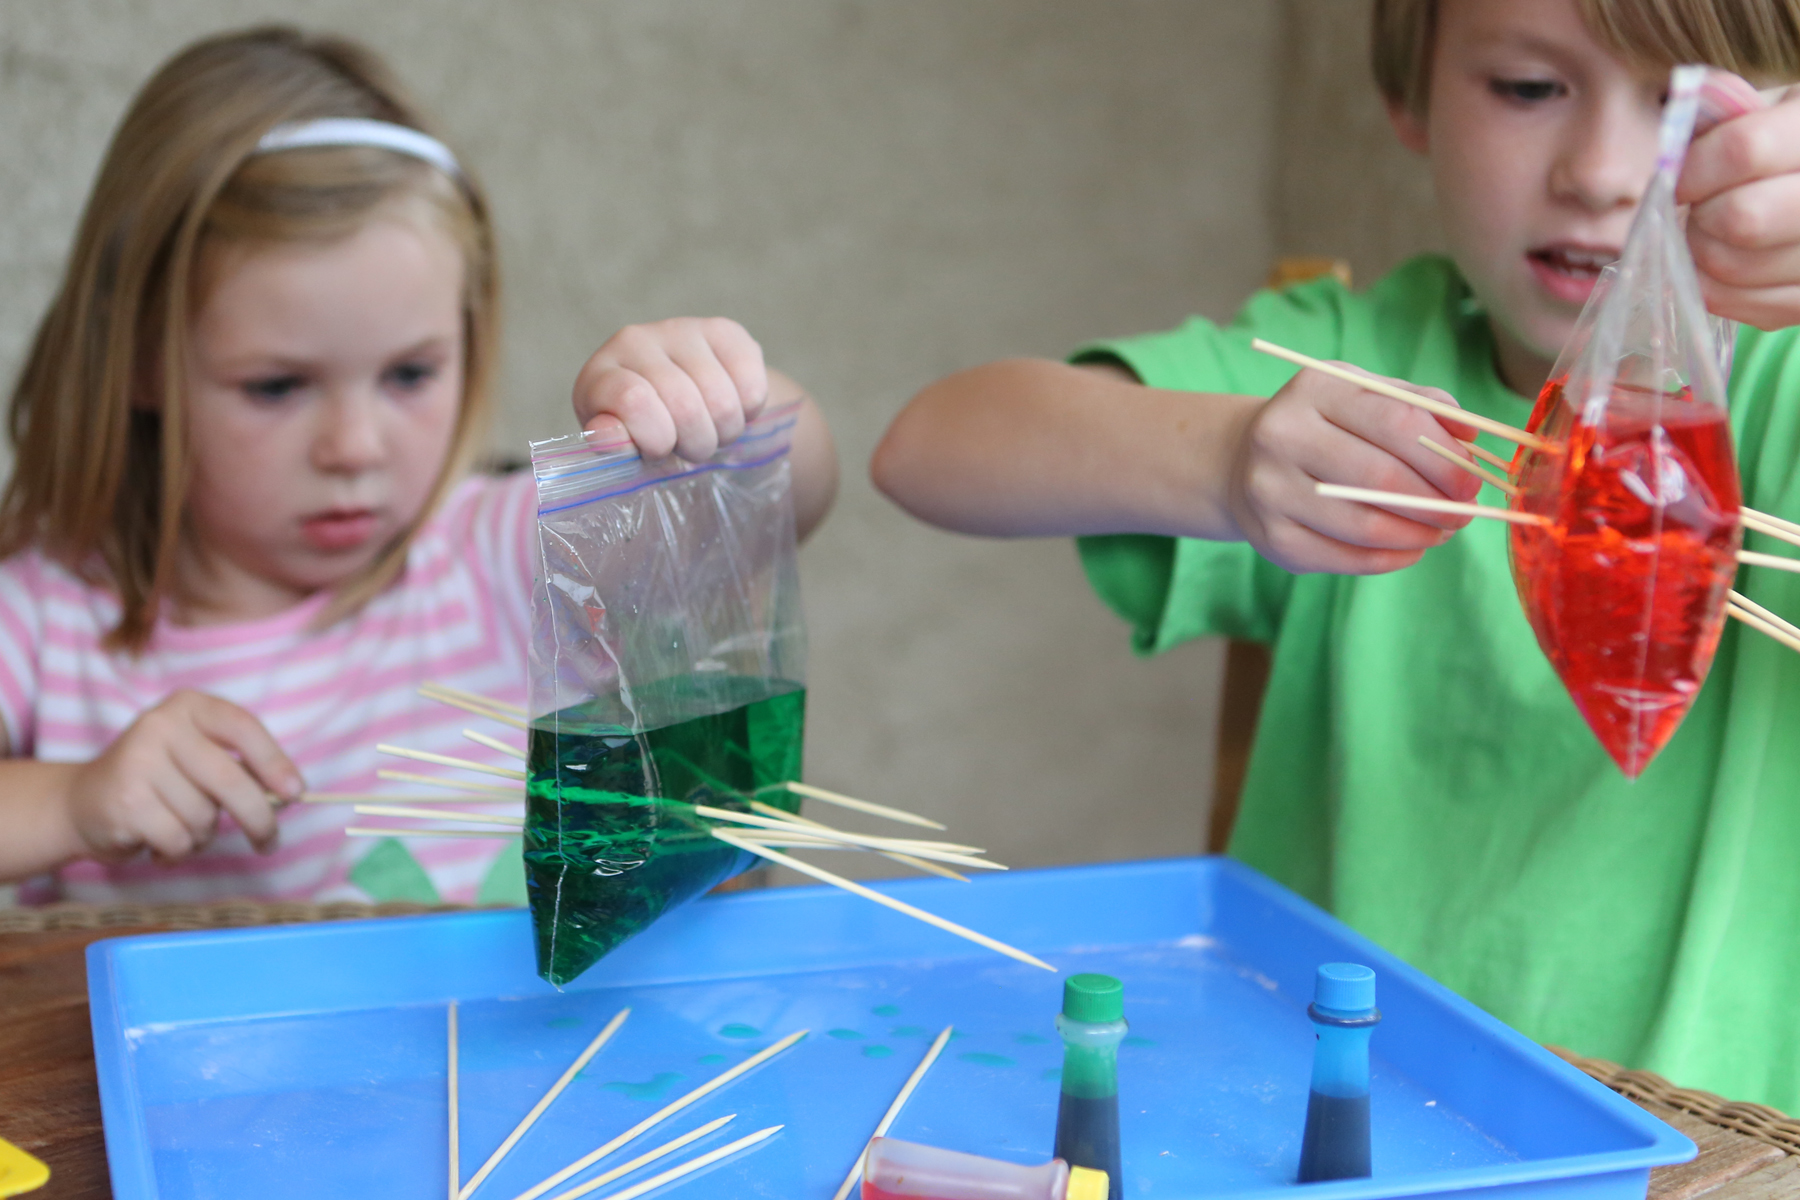
Image from Kitchen Science Lab for Kids (Quarry Books 2014)
You’ll be amazed when you fill a plastic zip-lock bag with “blood” and poke sharp skewers through, only to find that the bag doesn’t leak! All you need is a ziplock bag, water, food coloring and wooden skewers. Heavy-duty ziplocks work best! Fill a quart-sized ziplock bag with water, add a few drops of red food-coloring, and seal it. Slowly poke several wooden skewers completely through the bag, from one side to the other, avoiding the part with air in it. See how many you can push through! (Remember to be careful with the sharp points and I’d recommend putting a bowl underneath to collect drops.)
Why doesn’t the bag leak? Plastic is a polymer, made up of long, elastic molecules that form a seal around the spot where the skewer is poking through. In addition, the bag is sealed and contains very little air, so there isn’t much air pressure pushing on the water. If you make a hole in the part of the bag with air in it, surrounding air pressure (atmospheric pressure) can push on the liquid and make the bag leakier!