Tag: experiment’
Invisible Ink
- by KitchenPantryScientist
Write secret messages using baking soda and water and make the big reveal using a bright yellow spice called turmeric!

(safety note: small children should be supervised around rubbing alcohol. It is poisonous.)
You’ll need:
1 Tbsp. baking soda
1 tsp. turmeric
rubbing alcohol
cotton swabs
paper
Instructions:
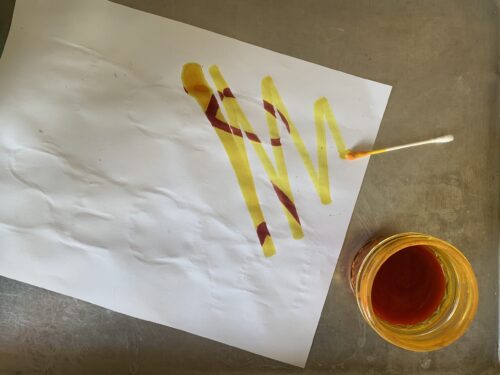
For invisible ink, mix 1 Tbsp. baking soda into 1/2 cup water
For revealing paint, mix 1 tsp. turmeric into 1/2 cup rubbing alcohol (isopropanol)
- Use a cotton swab dipped in invisible ink to write a message or draw a picture on a piece of paper.
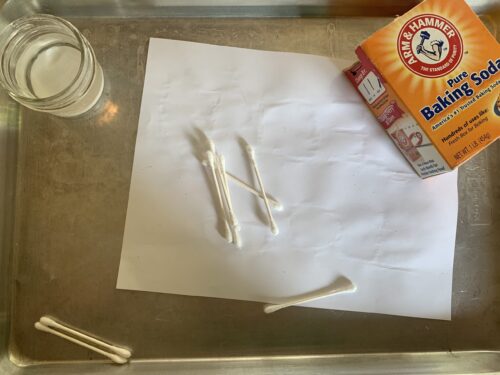
- Let the ink dry
- Use a second cotton swab dipped in revealing paint to make the message appear, as if by magic.
The Science Behind the Fun:
Baking soda is white, and when it dries, you can’t see it against the white paper because it is camouflaged and blends into the paper. Turmeric is a kind of chemical called an acid-base indicator that changes color depending on whether it’s in a solution with a high pH, called a base, or a solution with a low pH, called an acid. Baking soda is a base, and turns the turmeric bright red where you wrote the message. Paper has a neutral pH (isn’t an acid or a base), and the turmeric on the paper stays yellow.
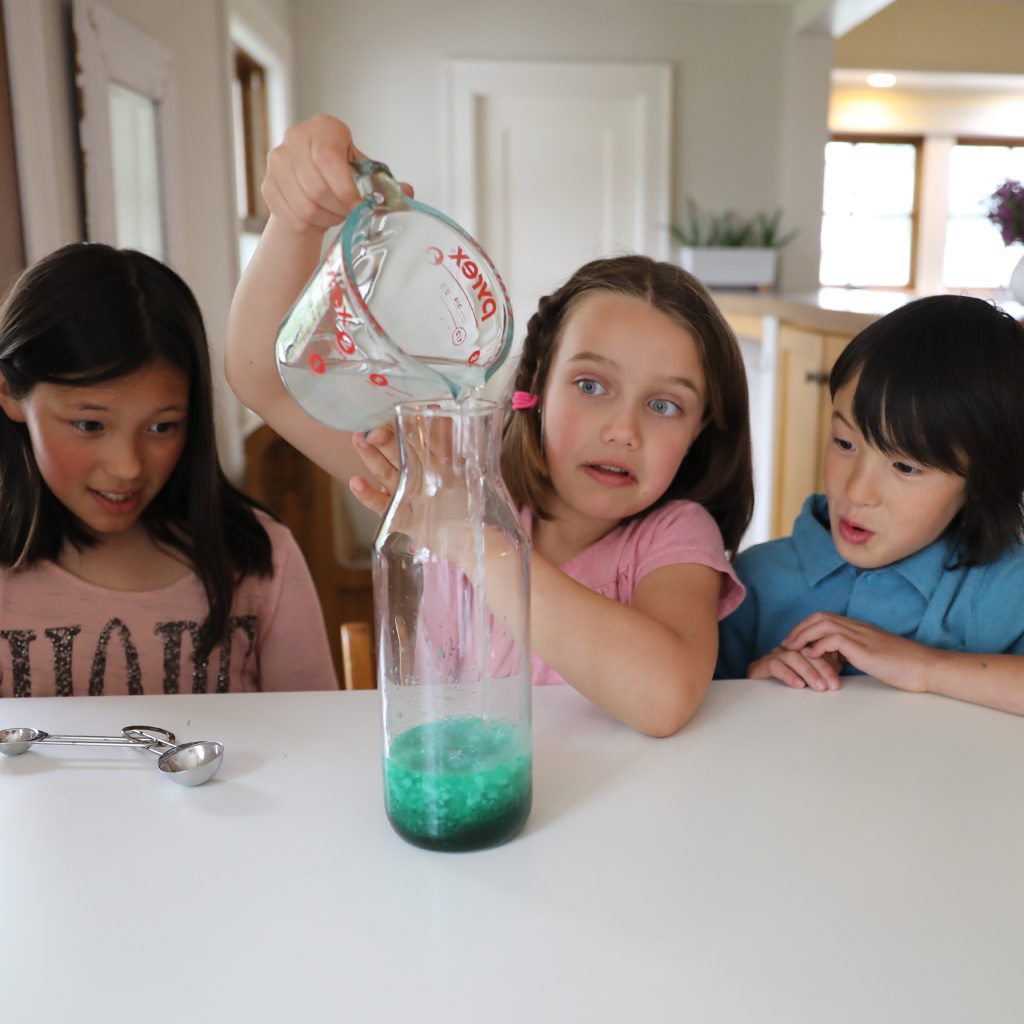
Thanksgiving Food Science: Cranberry Spy Juice
- by KitchenPantryScientist
(Adapted from Kitchen Science Lab for Kids)
Grab an extra bag of cranberries this Thankgiving! Kids can use it to reveal invisible messages they write with baking soda and water.
You’ll need:
-around 2 cups of cranberries
-water
-baking soda
-printer paper
-small paintbrush, Q-tip, or lollipop stick
Safety tips and Hints:
Boiling the berries should be done by an adult. Keep the lid on the pan, since the air pockets that make cranberries float can also make them explode. Kids can take over once the juice is cool.
When playing with cranberry juice, aprons or old clothes are a good idea, since it stains!
Directions:
Step 1. Cut a cranberry in half and observe the air pockets that make it float.
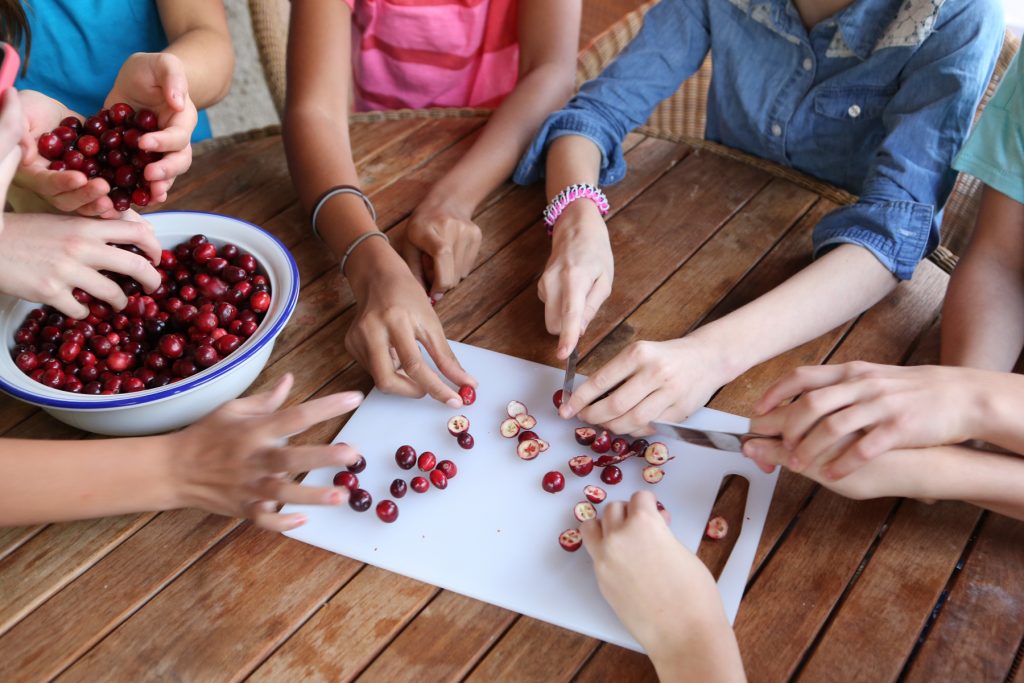
Step 2. Boil the cranberries in about three cups of water for 15 to 20 minutes, covered. Listen for popping sounds as the air in the cranberries heats up and they explode.
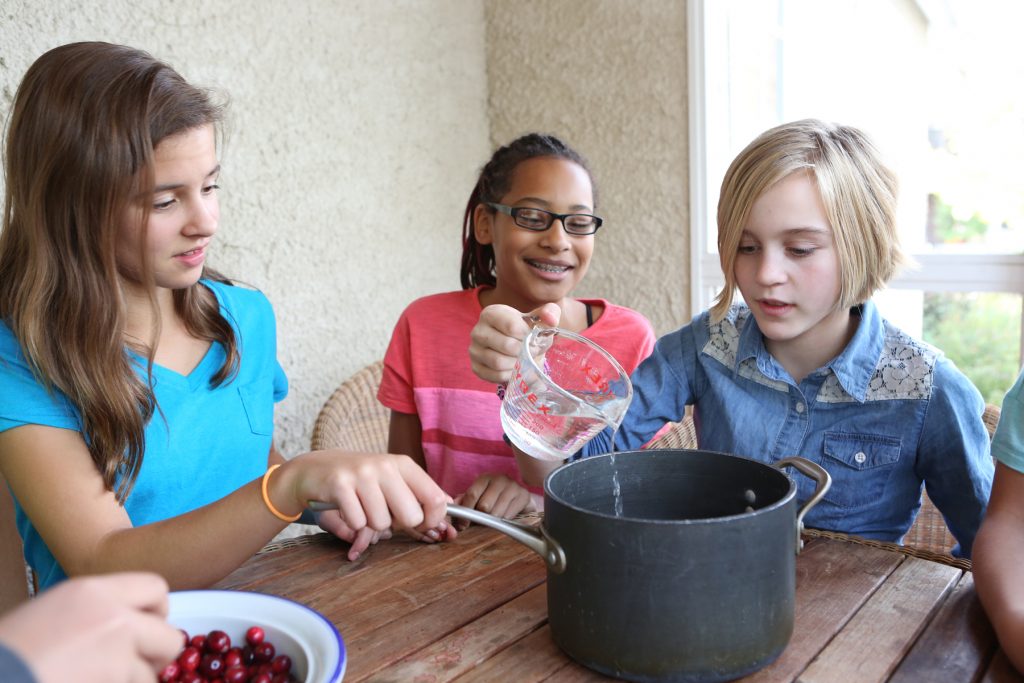
Step 3. Crush the cooked berries and push the liquid through a sieve or colander to collect the concentrated cranberry juice.
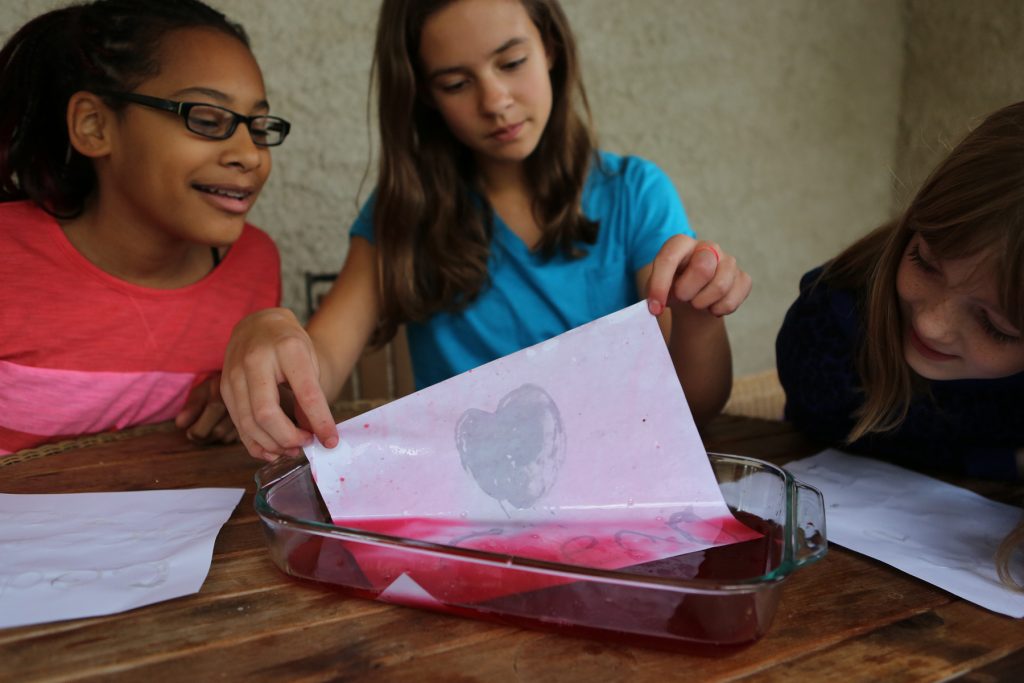
Step 4. Allow the juice to cool and pour it into a casserole dish or cake pan big enough to hold a piece of paper. If your cranberry juice seems thick and syrupy, add a little water, so that it’s thin enough to soak into paper!
Step 5. Test the paper you want to use by cutting a small piece and soaking it in the cranberry juice. If it stays pink, it will work, but if it turns blue or gray, try some other paper.
Step 6. Add a few teaspoons of baking soda to 1/3 cup of warm water and stir well. Don’t worry if you can still see some baking soda.
Step 7. Using a Q-tip, paintbrush, or a homemade writing tool, use the baking soda solution as ink to write a message on your paper. It may take a little practice, so don’t get frustrated.
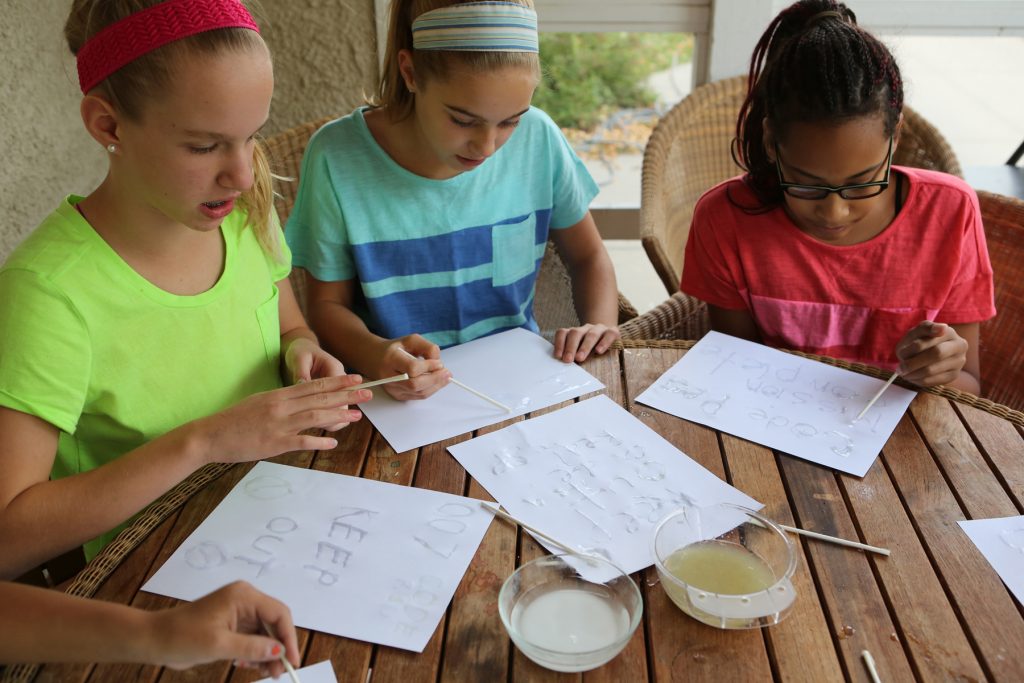
Step 8. Let your message air dry, or speed things up with a blow dryer.
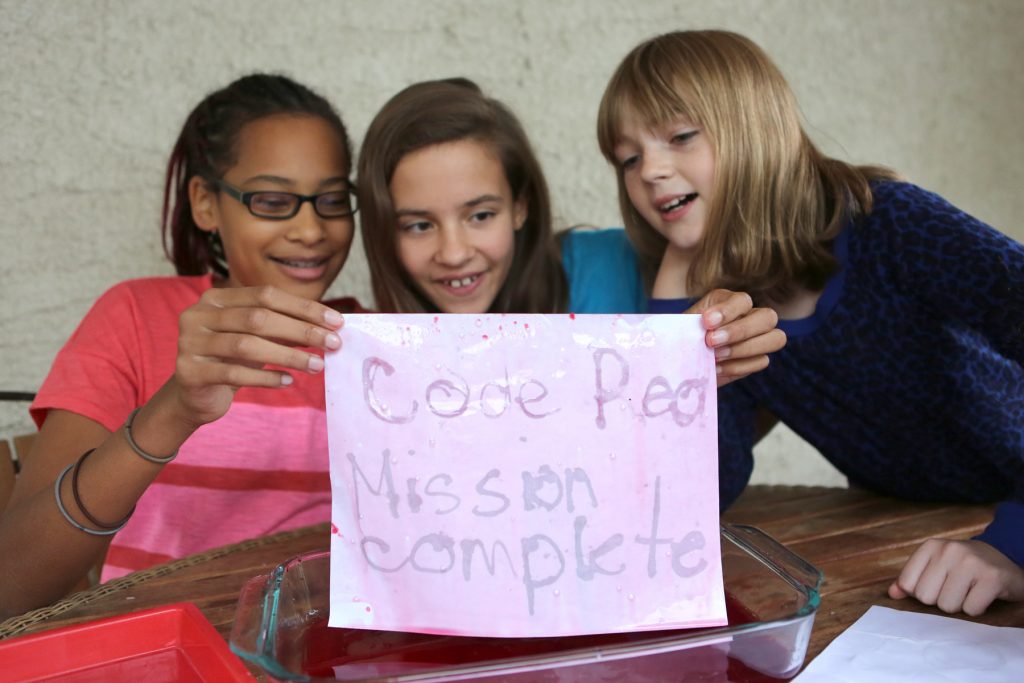
Step 9. To reveal your message, place your paper in the cranberry juice and see what happens!
*What other natural acid/base indicators could you use to do this experiment? What else could you use as ink.
The Science Behind the Fun:
Cranberries contain pigments called anthocyanins (an-tho-SY-a-nins,) which give them their bright color. In nature, these pigments attract birds and other animals to fruit. This is important because animals eat the berries and spread plants seeds from one place to another.
These pigments, called flavanoids, change color when they come in contact with acids and bases. Cranberry juice is very acidic, and the pigment is pink in acids, but when you add it to a base, it turns purple or blue.
Baking soda is a base, so your baking soda message will turn blue when it comes into contact with the pigments in the cranberry juice. Eventually, when enough cranberry juice soaks into the paper, it will dilute the baking soda, turning the pigment back to red and your message will disappear!
There are over 300 kinds of anthocyanins which are found in many fruits and vegetables including blueberries, red cabbage, grapes and blueberries. Scientists believe they may have many health benefits.
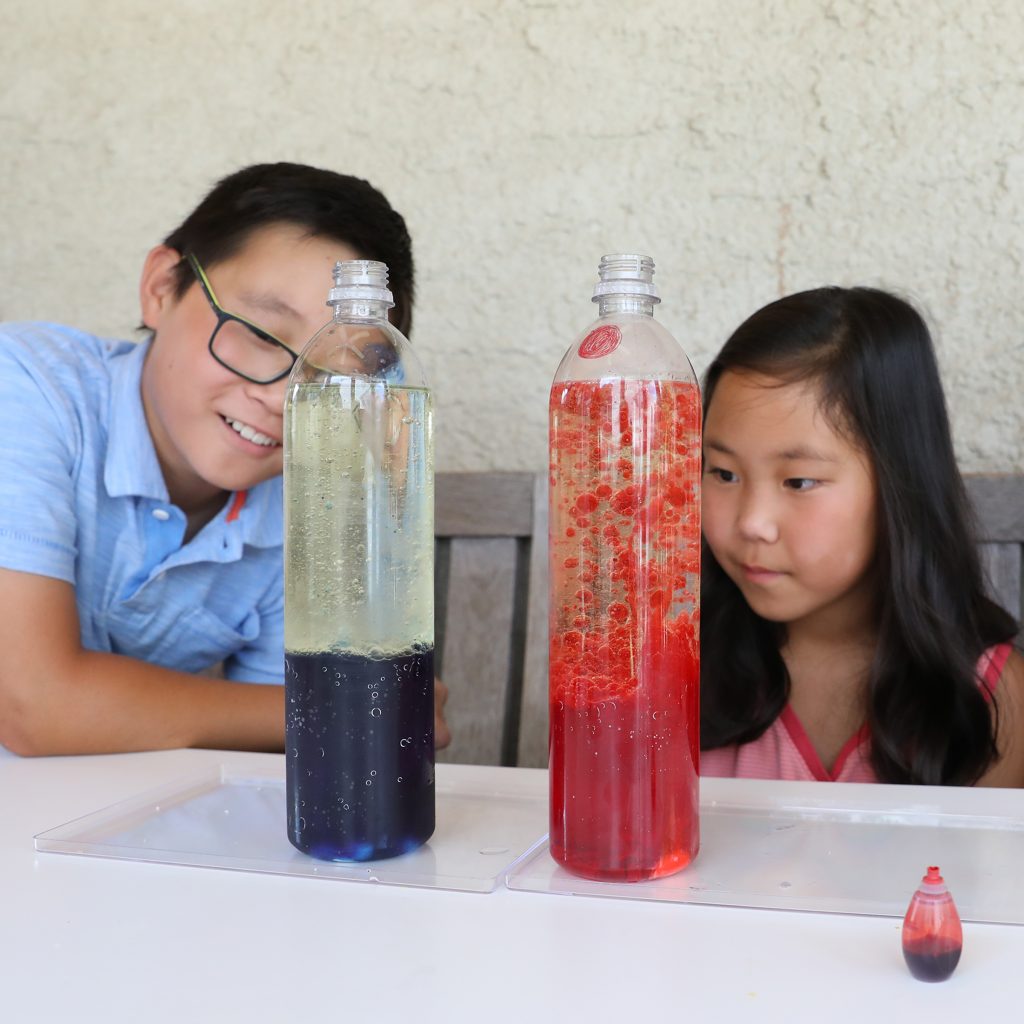
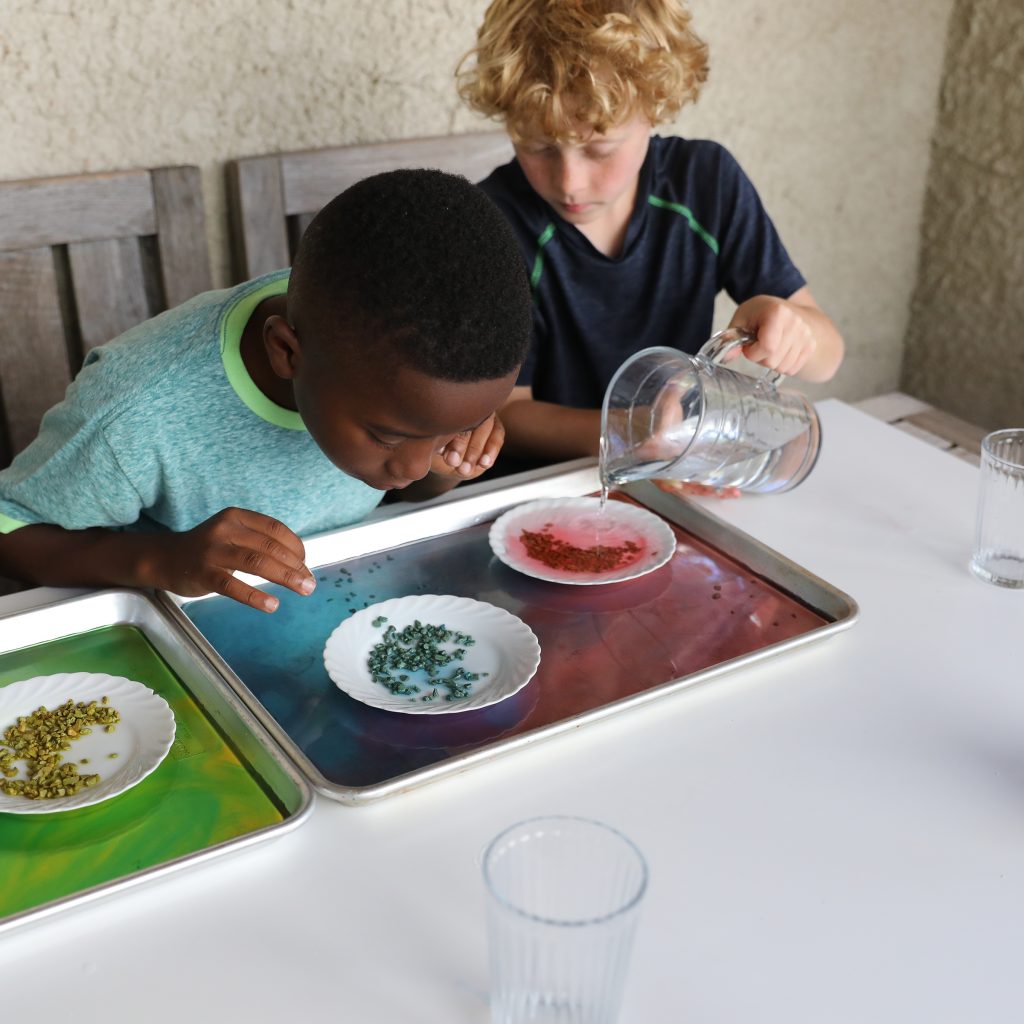
Halloween Candy Lava Lamps (Use chemistry to test whether candy contains citric acid.)
- by KitchenPantryScientist
Make mini “lava lamps” from water, baking soda and oil to test whether candy contains citric acid!
The science behind the fun: Oil floats on water because it is less dense. When citric acid in candy combines with baking soda, a chemical reaction occurs which produces carbon dioxide gas bubbles. As the bubbles move up through the oil, they carry water and food coloring with them. Once the gas escapes into the air, gravity pulls the water and food coloring back down through the oil.to the bottom of the container.
Chemistry for Kids: Scientist Stories and Hand-On Projects Related to Their Work
- by KitchenPantryScientist
I’m thrilled that my newest kids’ science book will be out this Spring and is available for pre-order wherever books are sold, including your favorite neighborhood bookstore, Barnes and Noble and Amazon!
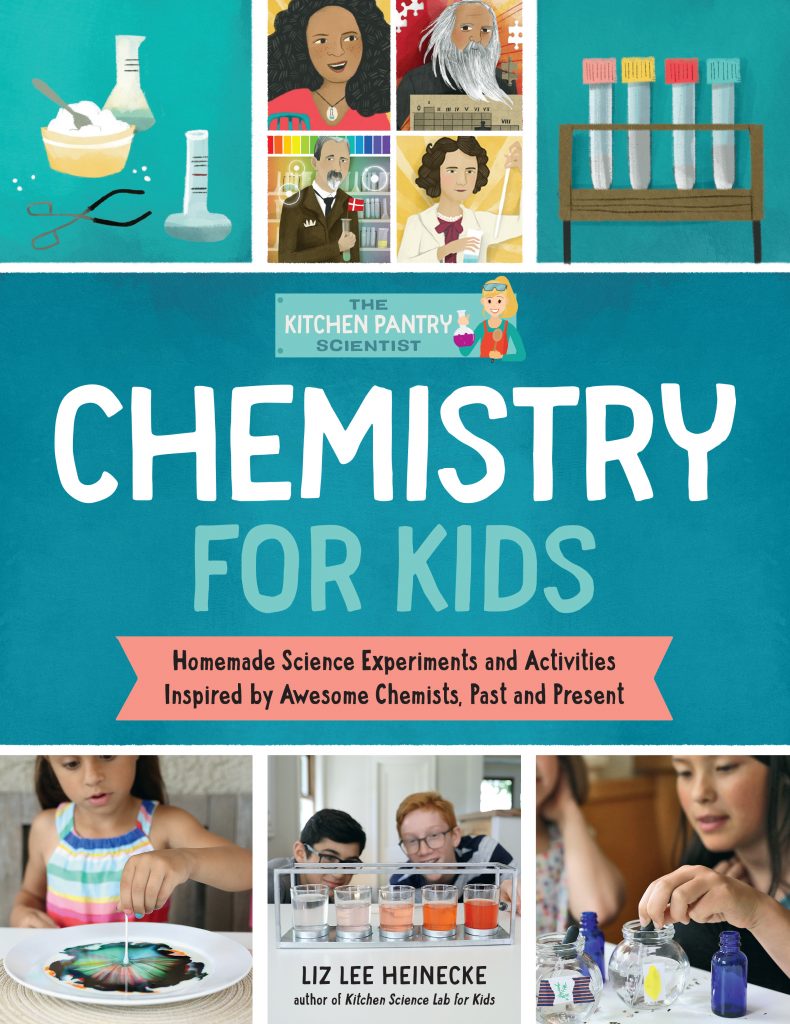
Here’s the cover, and sneak peek of a photos from a few of the projects! The book features gorgeous illustrations by Kelly Anne Dalton and beautiful photographs by Amber Procaccini.
Chemistry for Kids- Quarry Books
Chemistry for Kids- Quarry Books
Chemistry for Kids- Quarry Books
Chemistry for Kids- Quarry Books
Chemistry for Kids- Quarry Books
I’ll be demonstrating several of the projects on television over the next few months and will post the clips here for you to check out!
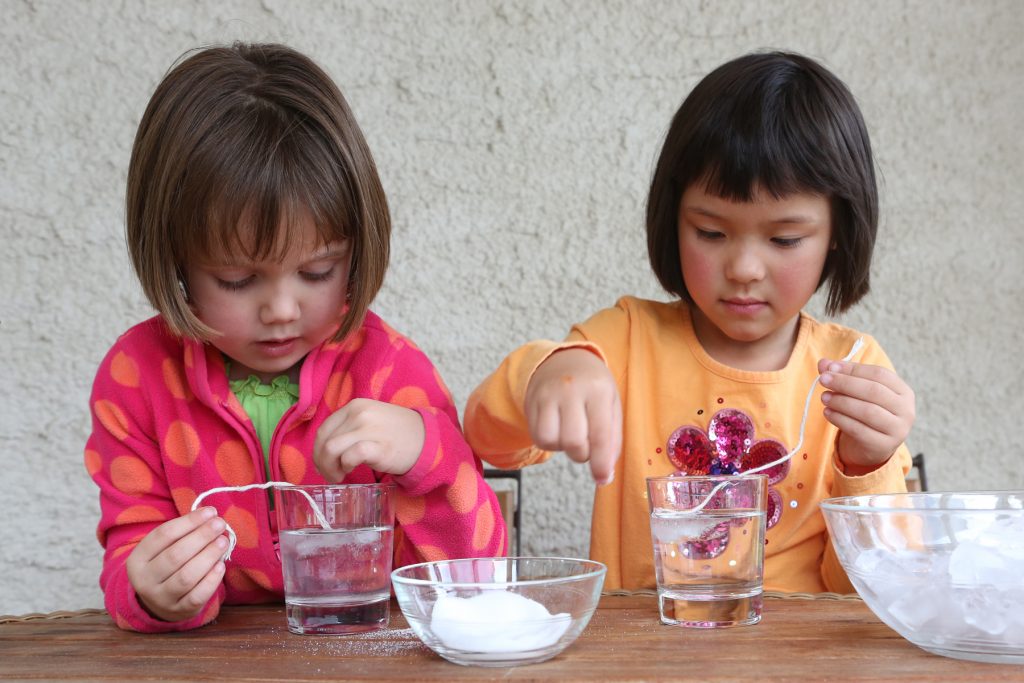
Ice Science: Lifting an Ice Cube Using Salt and a String
- by KitchenPantryScientist
Have you ever wondered why putting chemicals like salt on a road makes the ice melt?
To see how NaCl (table salt) melts ice by lowers the melting temperature of water, you’ll need an ice cube, a glass of water, and a piece of kitchen twine or string about 6 inches long and salt.
What to do:
Drop an ice cube in a glass of ice water. Try to pick the ice cube up without your fingers by simply placing the string on it and pulling up. Impossible, right?
From Kitchen Science Lab for Kids (Quarry Books 2014)
Now, dip the string in water, lay it across the ice cube and sprinkle a generous amount of salt over the string/ice cube. Wait about a minute and try again to lift the cube using only the string. What happens?
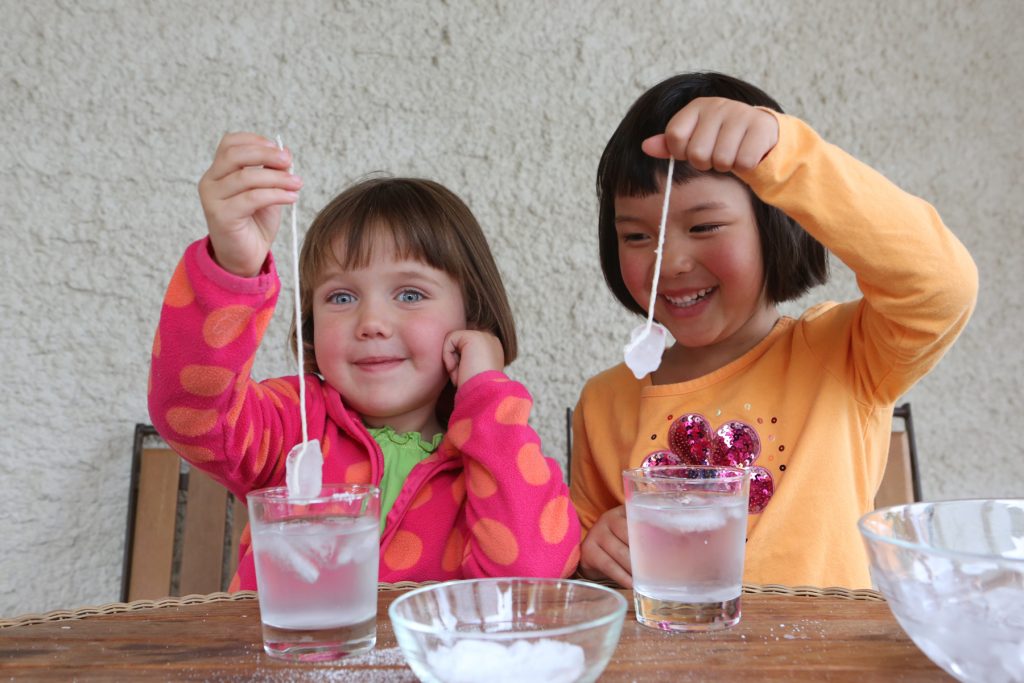
From Kitchen Science Lab for Kids (Quarry Books 2014)
It may seem like magic, but it’s only science. Watch me demonstrate the experiment by clicking here.
Salt lowers the temperature at which ice can melt and water can freeze. Usually, ice melts and water freezes at 32 degrees Farenheit, but if you add salt to it, ice will melt at a lower (colder) temperature.
The salt helps the ice surrounding the string start to melt, and it takes heat from the surrounding water, which then re-freezes around the string.
Different chemicals change the freezing point of water differently. Salt can thaw ice at 15 degrees F, but at 0 degrees F, it won’t do anything. Other de-icing chemicals they add to roads can work at much colder temperatures (down to 20 degrees below zero.) If it’s cold enough, even chemicals won’t melt the ice.
Brrr.
Pressure can also make ice melt at colder temperatures. This is why ice skates glide on rinks. The pressure is constantly melting the ice a where the blade presses down on it so the blade glides on a thin layer of water!
Supercool! Ice Science for Kids
- by KitchenPantryScientist
Under the right conditions, purified water can get much colder than 32 degrees before it freezes into a solid. This “supercooled” water will instantly freeze when it touches an ice crystal.
You don’t need a special lab to make supercooled water. In fact, you can make it in your own freezer!
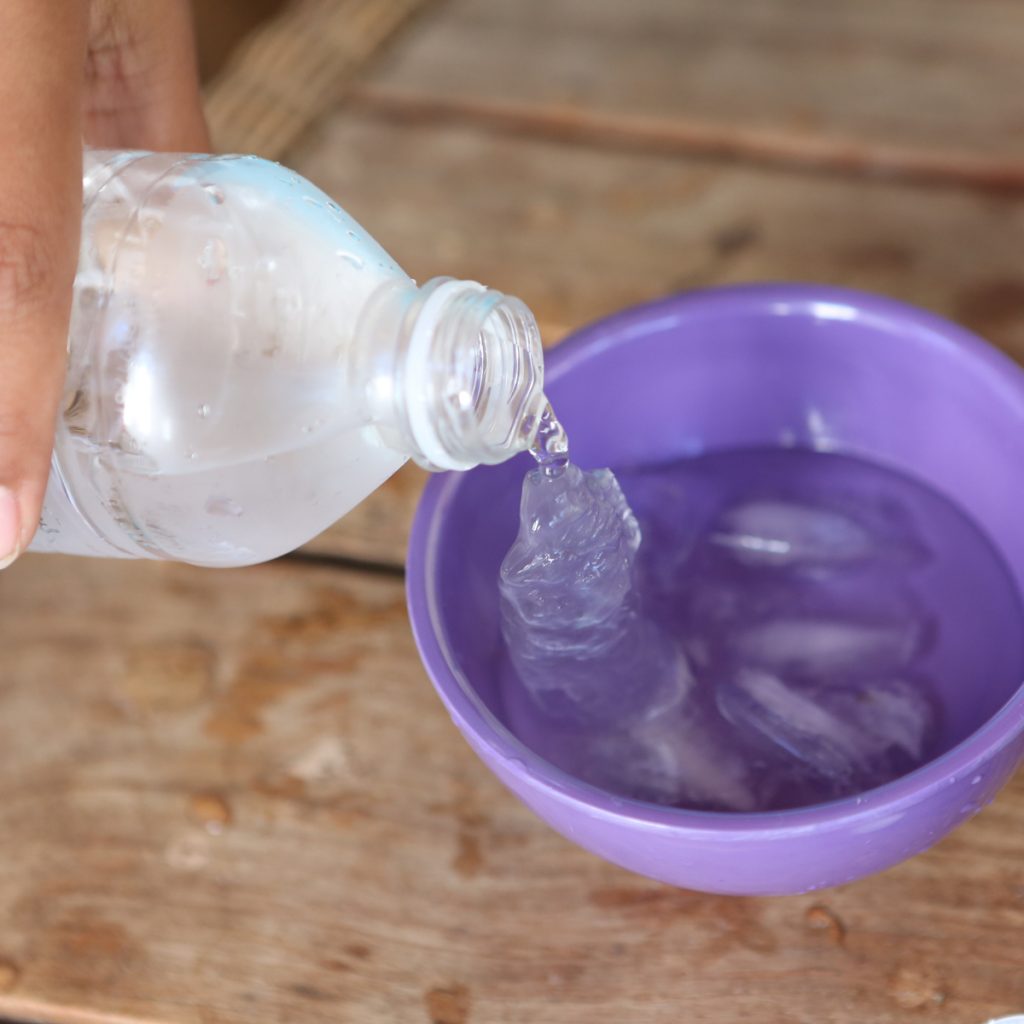
Image from Outdoor Science Lab for Kids (Quarry Books 2016)
1. Place three 12 oz bottles of water (caps loosened and re-tightened) in the freezer. Two should be filled with purified water and one with tap water.
2. Wait 2 hours and then check them every 5 minutes. When the tap water is frozen, gently remove the other two bottles from the freezer. (Tap water freezes first, because it contains some impurities that help ice crystals form more easily.)
3. Carefully open one bottle of purified water and pour it onto a few ice cubes on a plate. The supercooled water from the bottle will instantly crystallize into ice when it hits the cubes, making slush. Try it with the second bottle. There may be some freezing time variation between freezers, so you may have to experiment to find the perfect amount of time it takes your freezer to supercool water!
You can do the same thing by putting bottled water in a cooler full of ice, salt, and water. Salt lowers the melting temperature of ice, which makes the salty ice water cold enough to freeze bottles of liquid. Try the same experiment using soda to make a slushy! (From Outdoor Science Lab for Kids-Quarry Books 2014)
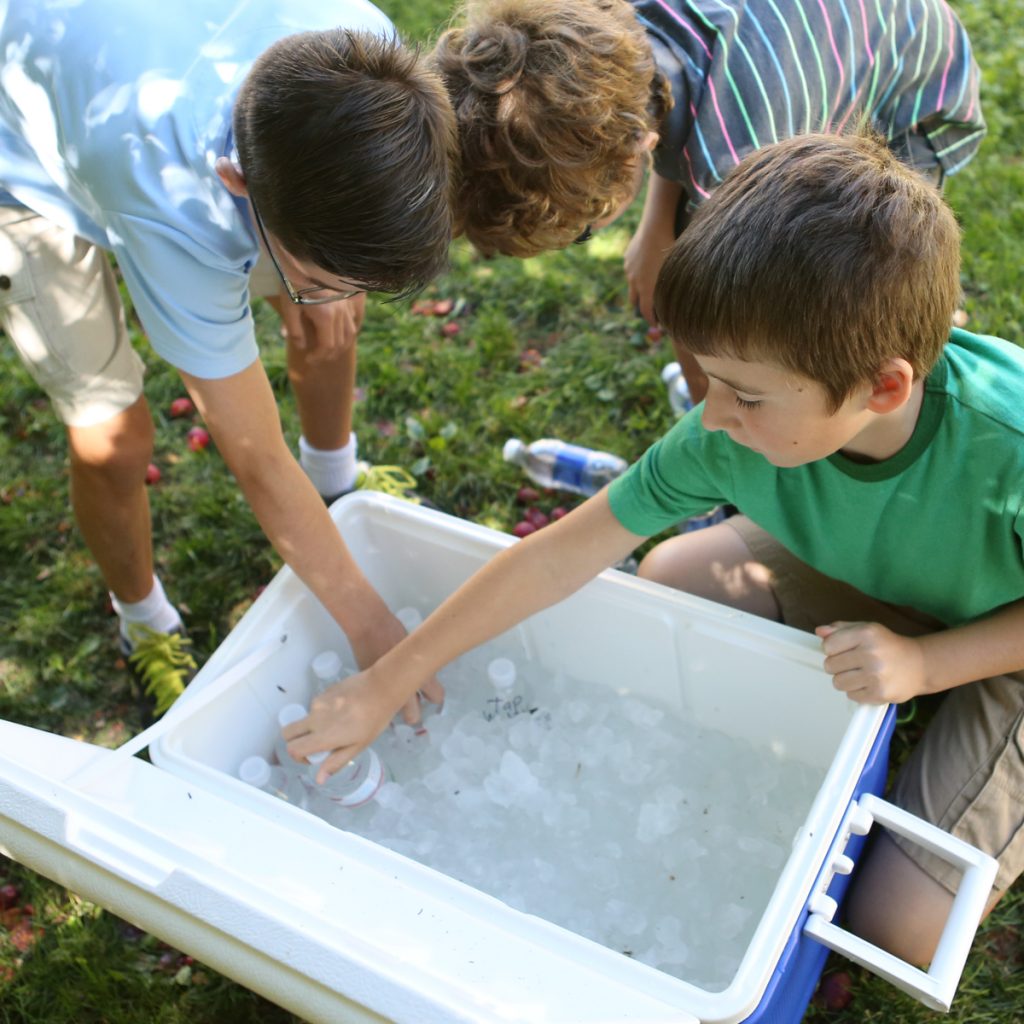
Image from Outdoor Science Lab for Kids (Quarry Books 2016)
Homemade Petri Plates
- by KitchenPantryScientist
Does hand-washing really get rid of germs? Yes! Scrubbing your hands with soap and water for the length of time it takes you to recite the ABC’s will get rid of the majority of harmful microbes on your hands.
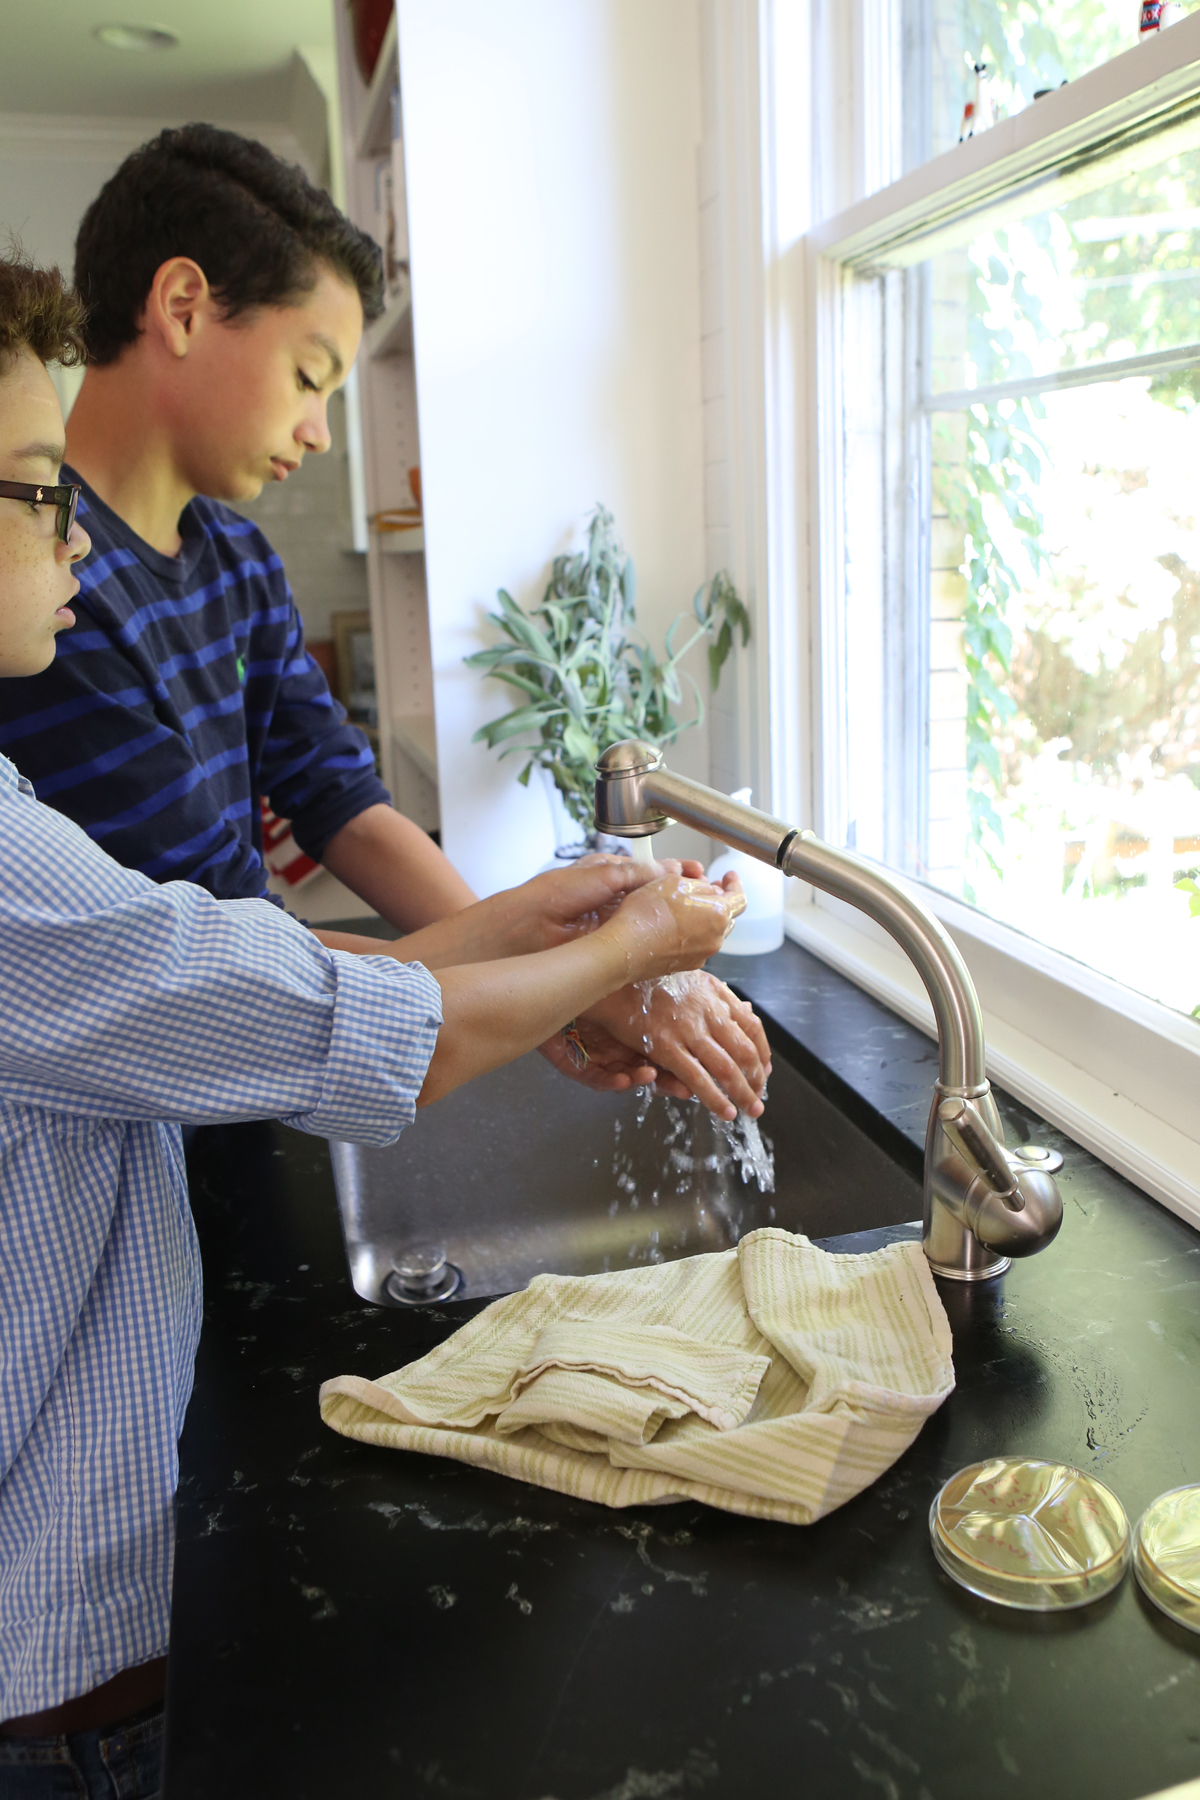
Image from “Kitchen Science Lab for Kids” (Quarto Books 2016)
Here’s a video on how to make Petri plates for a hand-washing experiment, where you touch labeled sections of the plates with your fingertips before washing, after washing with water alone, and after scrubbing with soap or hand sanitizer. You can also use the plates to swab and grow microbes from around your house or school!
Find the recipe for Petri Plates in my book Kitchen Science Lab for Kids, or click here for a link to the recipe on my original blog post, where you can also read more about the science!
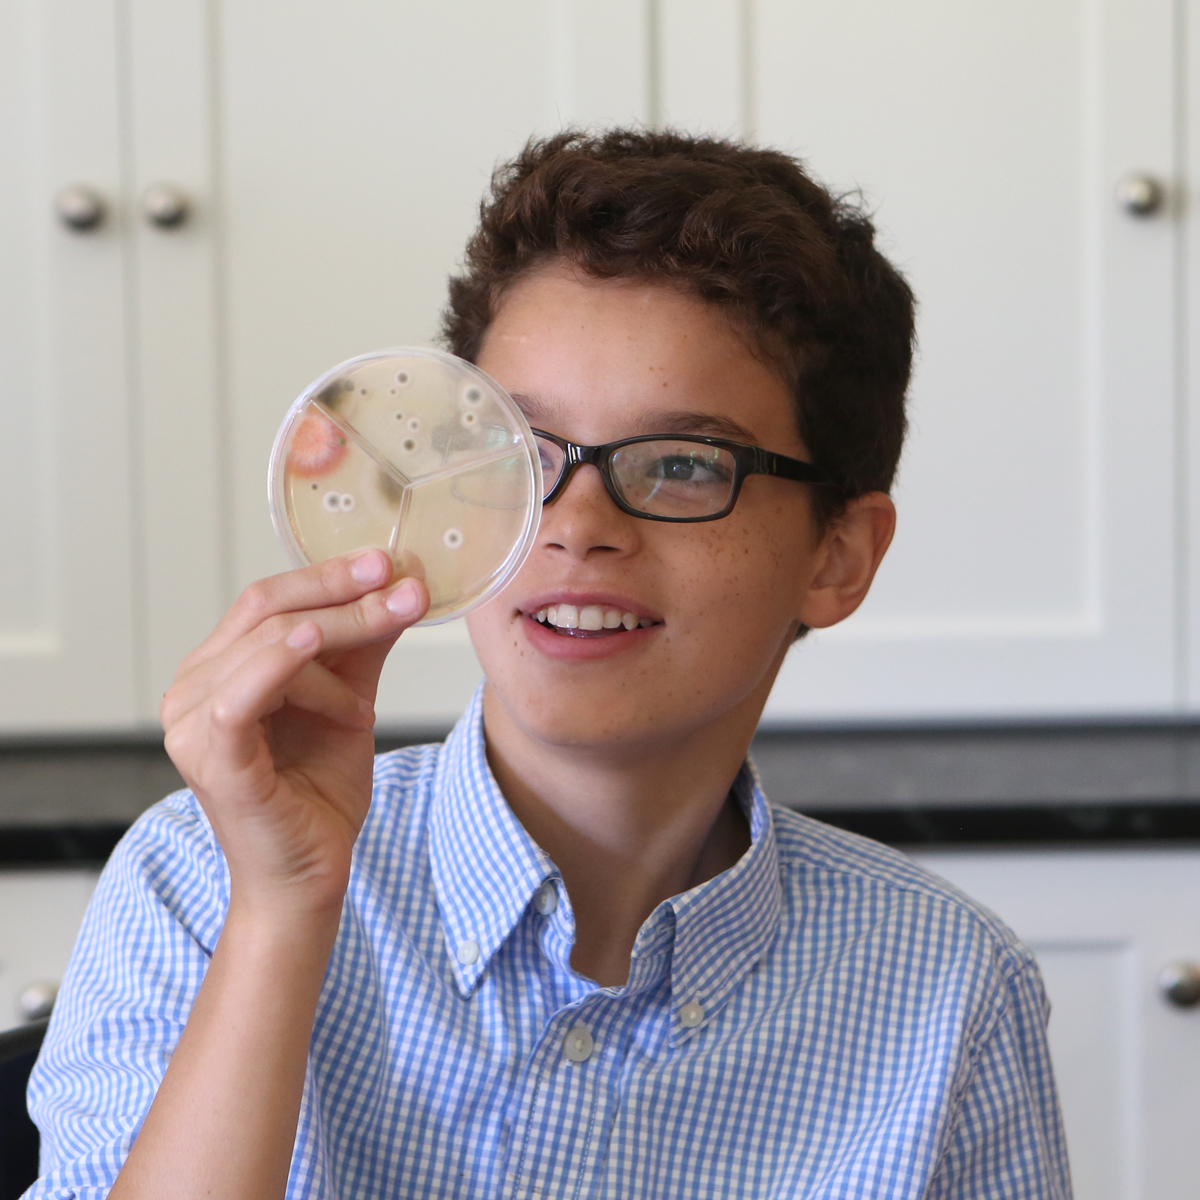
Homemade Petri Plates from “Kitchen Science Lab for Kids” (Quarto Books 2016)
Weather Science
- by KitchenPantryScientist
It’s fun to track the weather, and you can create some cool meteorology instruments using stuff you have around the house. Here’s a great post by NOAA (The National Oceanic and Atmospheric Association) on how to make your own weather station.
It’s also fun and easy to do this cool convection current experiment, using warm and cold water to explore how air moves in Earth’s atmosphere.
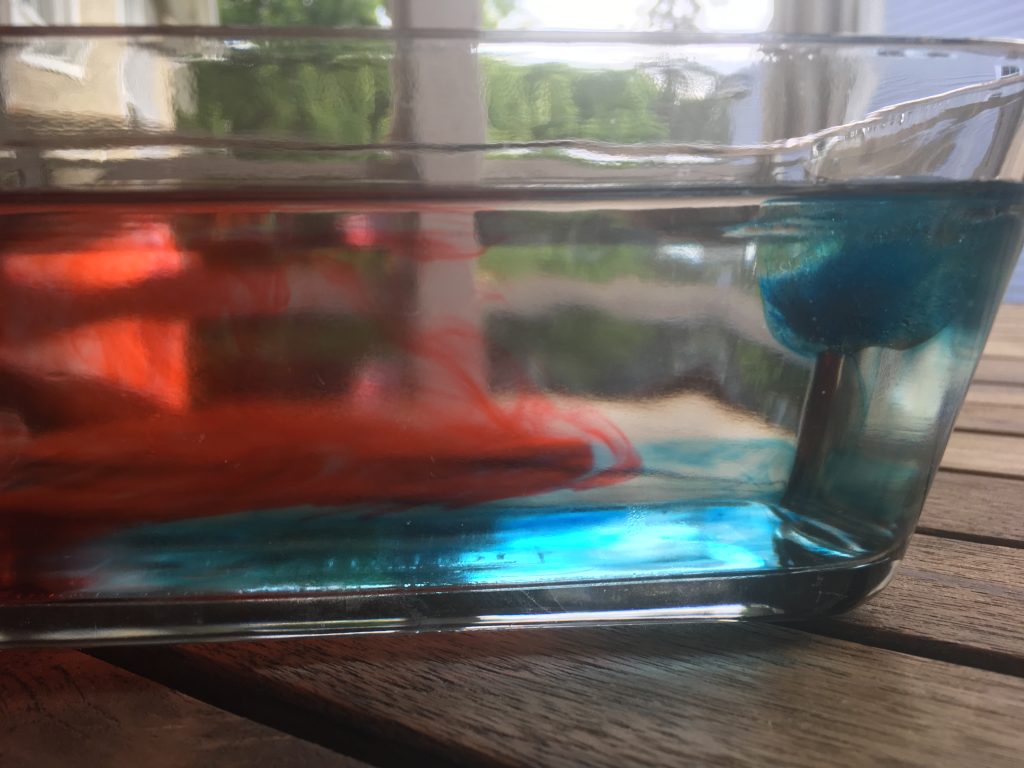
Convection Experiment (kitchenpantryscientist.com)
To see how cold fronts move under warm fronts, you’ll need ice cube trays, water, blue and red food coloring and a clear container.
- Add water to an ice cube tray and add a few drops of blue food coloring to the water in each cube space. Freeze.
- Fill a clear container with room temperature water.
- Place one or two blue ice cube or two at one end of the container, and a few drops of red food coloring at the other end.
- Observe what happens.
The Science Behind the Fun:
Cold water(blue) is more dense than warm water and forces warmer water (red) to move up and over it.
This is similar to the way warm air is forced up when it collides with masses of cold air in the atmosphere. Warm air carries energy, and when there’s lots of moisture in the air, these collisions often result in thunderstorms.
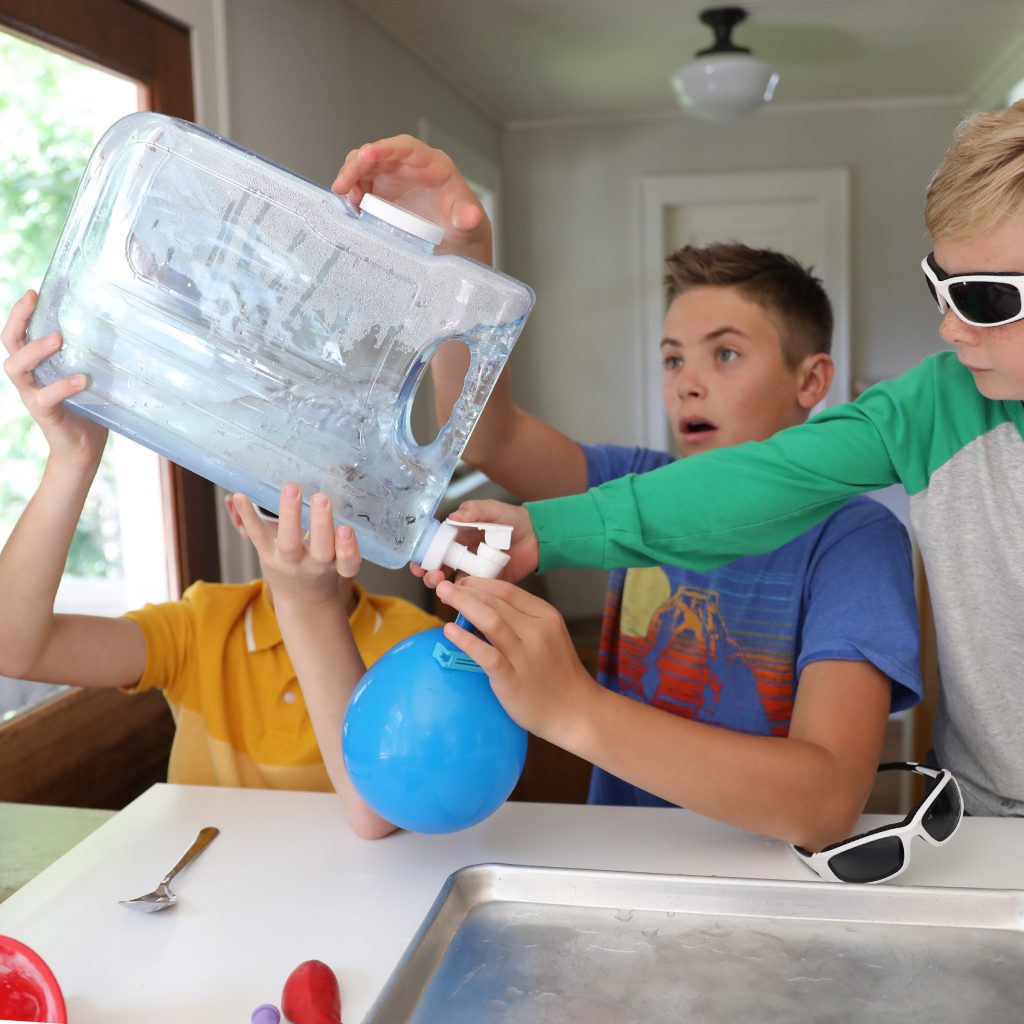
Foaming Slime Volcano
- by KitchenPantryScientist
We supersized the foaming slime experiment from Outdoor Science Lab for Kids to make a giant foaming slime volcano. And it was awesome!
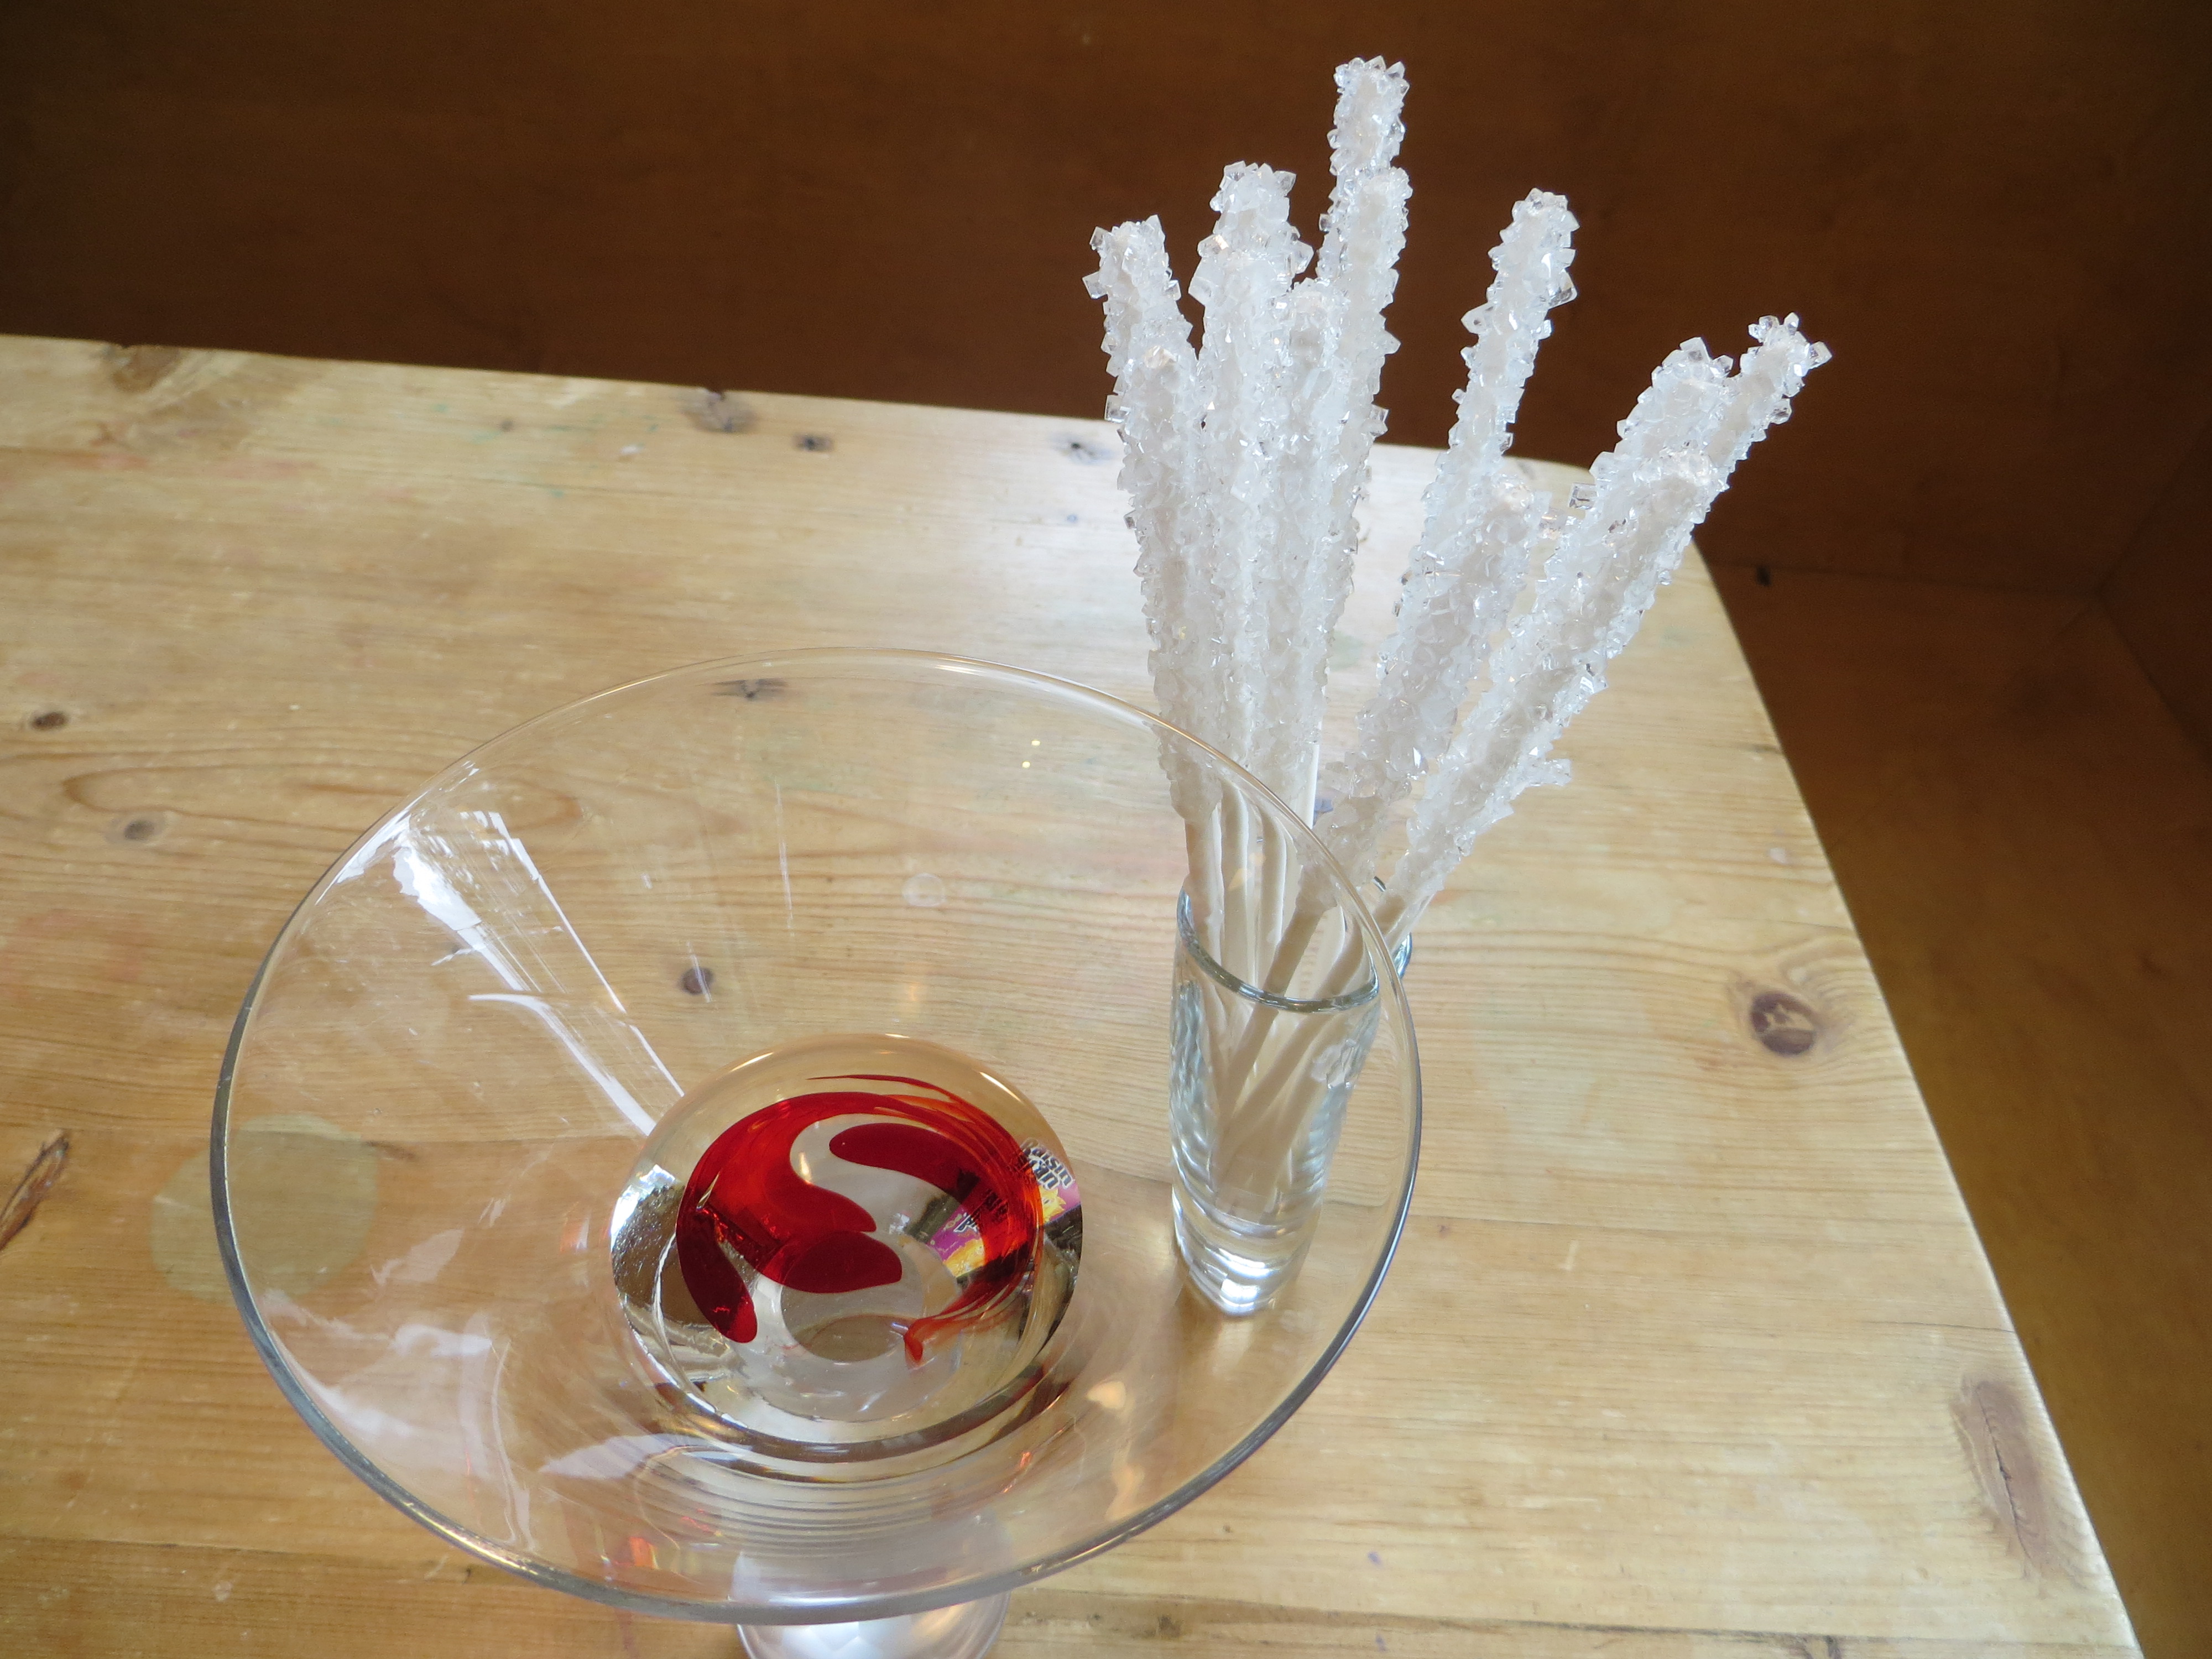
Halloween Vampire Snacks
- by KitchenPantryScientist
This bloody candy experiment takes a few weeks , but is worth the wait! If you start today, you’ll have gorgeously gruesome rock candy, dripping with sugary fake blood, in time for Halloween.

This experiment requires adult supervision for boiling and handling the hot sugar syrup. Once it’s cooled down, kids can take over.
To make 12-15 sticks, you’ll need the following:
-2 and 1/2 cups white granulated sugar
– 1 cup water
-cake pop sticks or wooden skewers
-red food coloring
- Dip one end of cake-pop sticks or wooden skewers in water and then roll them in granulated white sugar.
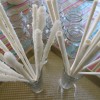 The sugar should cover 2-3 inches of the stick. Let them dry completely. These are the seeds for the sugar crystal growth.
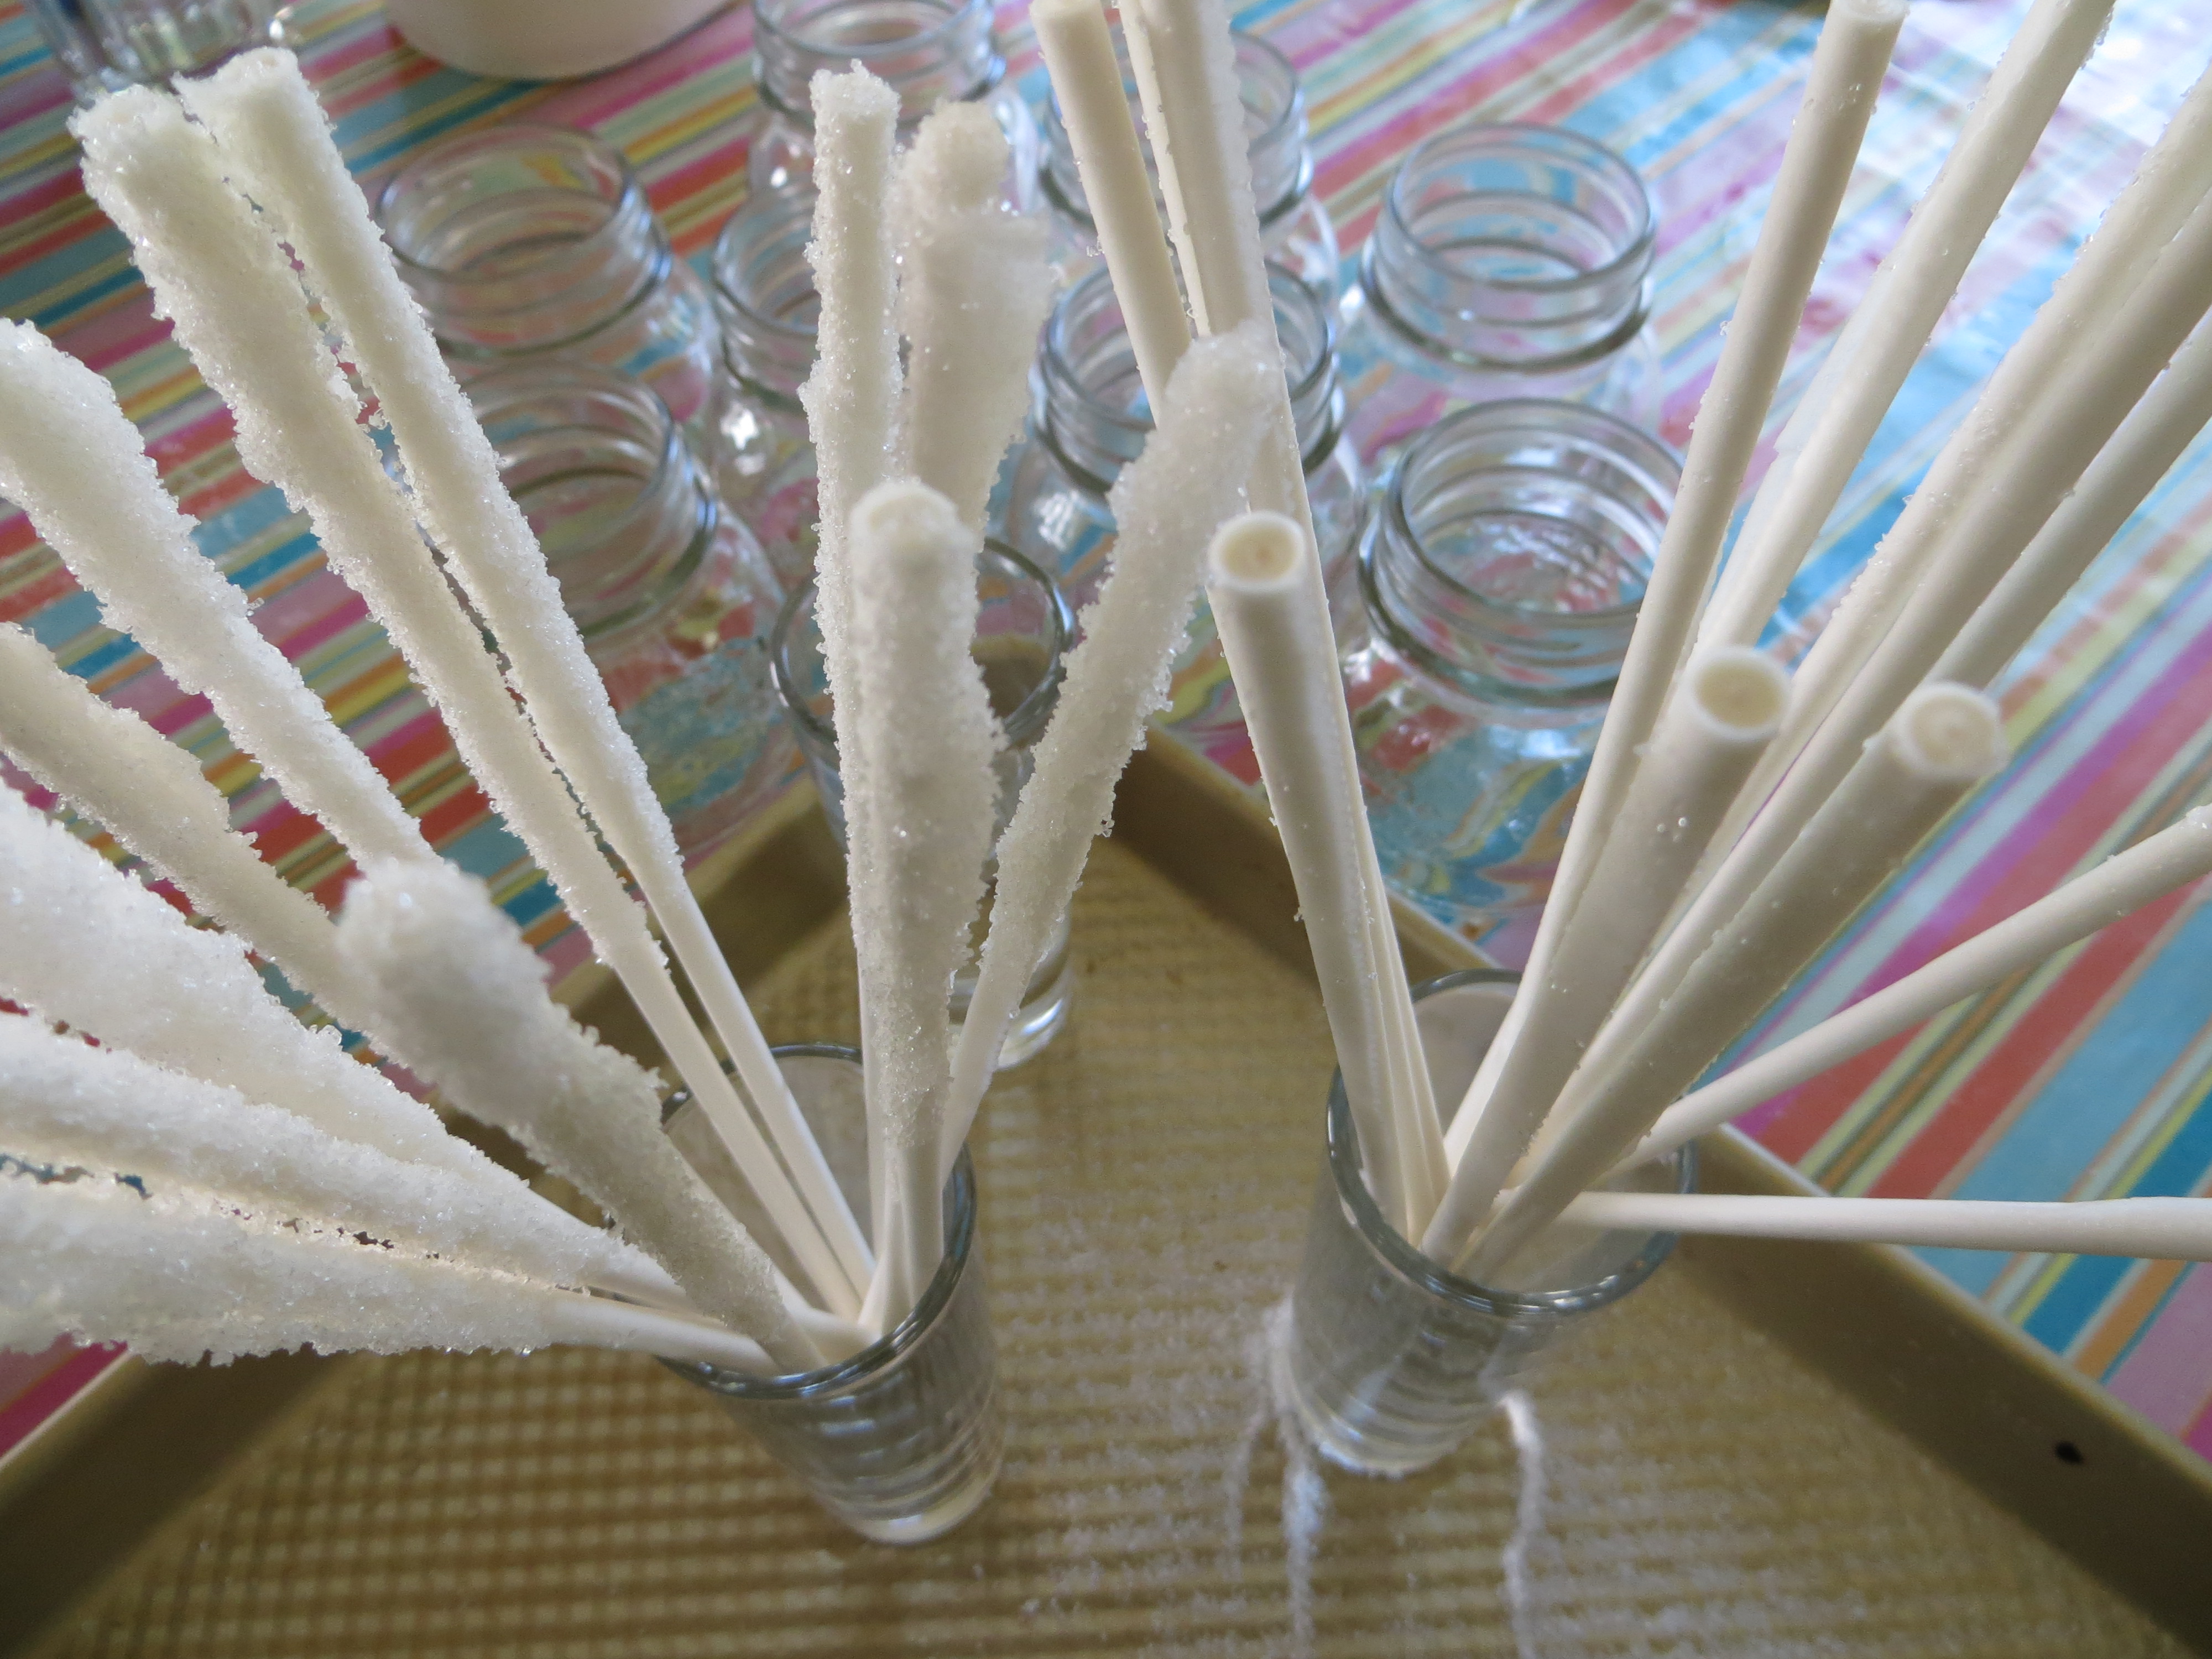
- Boil 2 cups water and 5 cups sugar until sugar is dissolved as much as possible. It should look like syrup. Once it cools, this syrup is your supersaturated sugar solution.
- Let syrup sit until it is no longer hot and pour into a large glass jar or deep bowl.
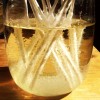
- When syrup is completely cool, set the sugary end of the sugar-seeded cake pops or skewers into the syrup, evenly spaced in the jar. Cover loosely with plastic wrap and let them sit for about a week. Gently move the sticks around occasionally, so they don’t stick to each other and the crystals in the bottom of the glass. If the glass container gets too full of crystals, pour the syrup into a new container and move your stick into the cleaner syrup to grow more crystals.
- When the rock candy is done, pull them from the syrup and let them dry. Save the syrup.
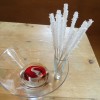
- To serve, pour a few cm of your sugar syrup into the bottom of a pretty glass and add a few drops of red food coloring. You can even add a little flavoring to the syrup (like cherry extract.) Stir.
- Put your rock candy, handle side up, into the glass. Be sure to give your guests napkins, so they don’t drip “blood” all over the house!

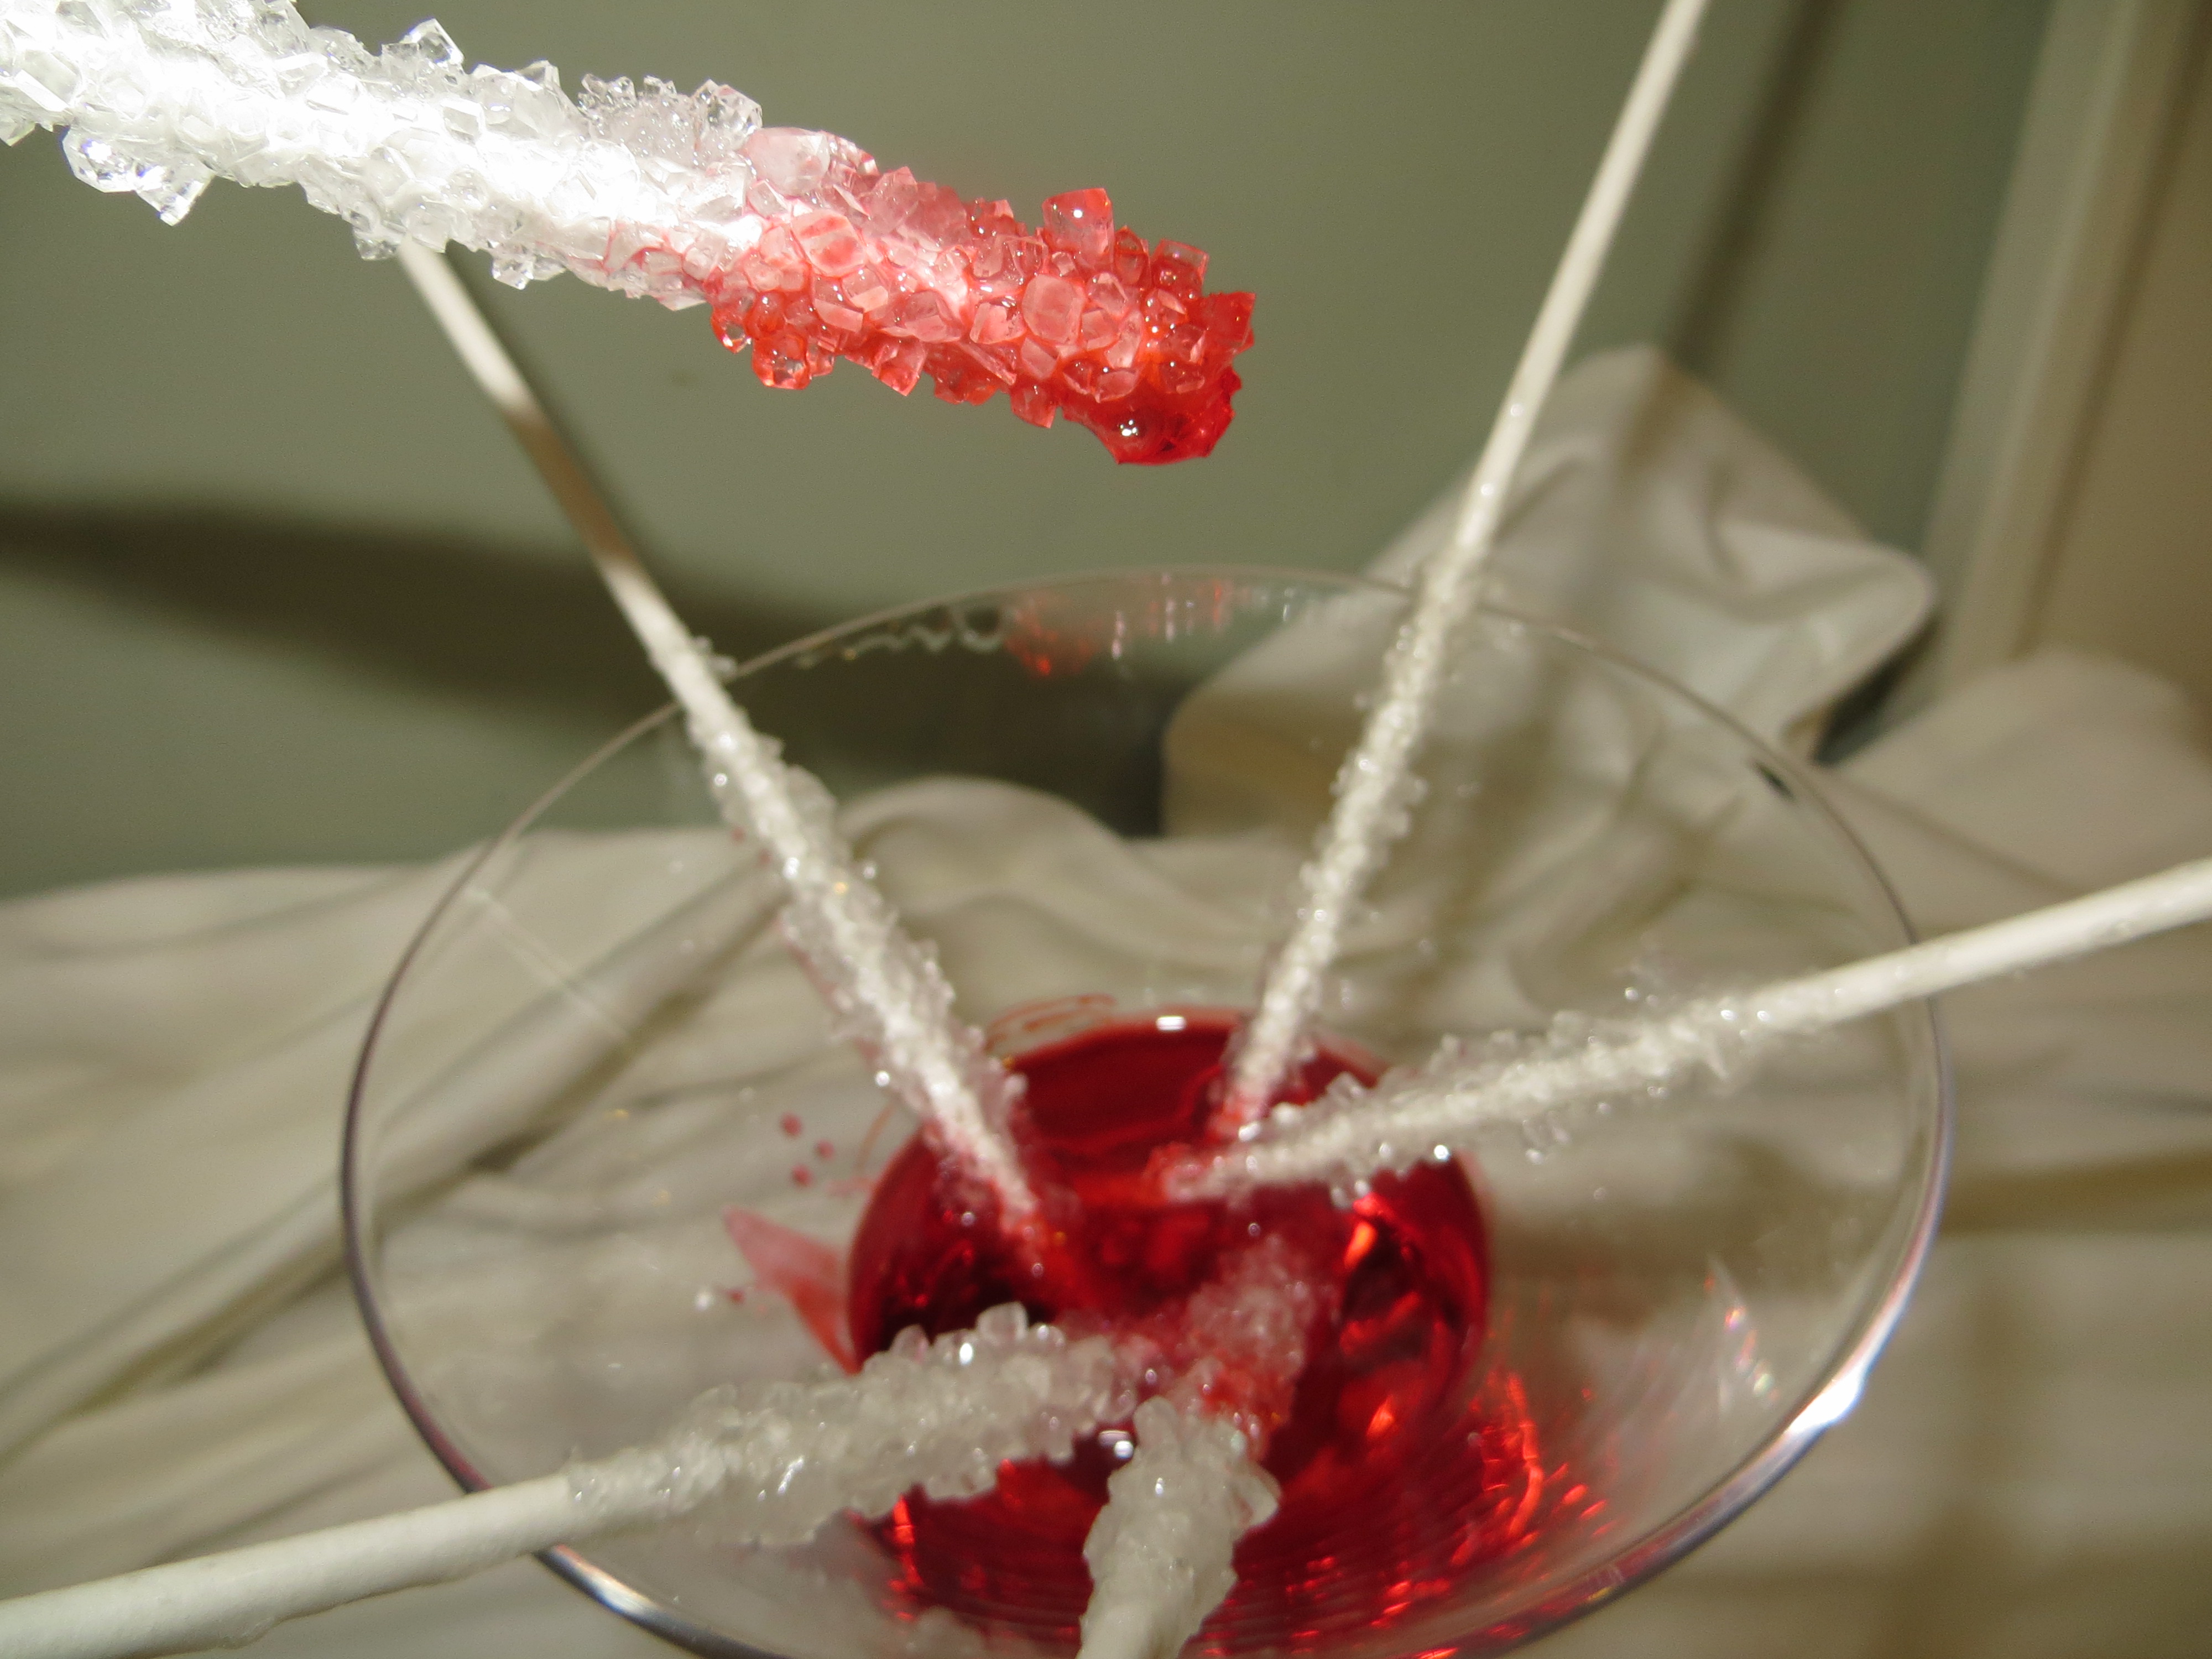
How do Crystal Grow?
Like bricks in a wall, crystals are solids formed by a network of repeating patterns of molecules. Instead of the mortar that holds brick together, the atoms and molecules are connected by atomic bonds.
Crystals that share the same chemical composition can be big or small, but the molecules always come together to form the same shape. Table sugar, or sucrose, is made up of a molecule composed of two sugars, glucose and fructose. Crystals formed by sucrose are hexagonal (six-sided) prisms, slanted at the ends.
The crystals on your rock candy sticks grow from the “seeds” of the sugar you rolled on the stick before you put them in the syrup.