Tag: kids’
Vegetable Vampires
- by KitchenPantryScientist
Plants love water as much as vampires love blood. Although they don’t have long thin fangs, they’ve developed a great system for pulling water up through their trunks and stems to their highest leaves using capillary action.
The kids and I demonstrated how to make them on WCCO MidMorning. Click here to watch.

after 24 hours of “drinking”
Make a vegetable vampire and watch capillary action move colored water through the cabbage creature you created.
To make a leafy vampire, you’ll need:
-head of fresh napa cabbage
-2 large cups, jars or plasticware containers large enough to hold the base of ½ of your cabbage
-food coloring
-fruits and veggies to use as eyes and eyebrows on your monster
-toothpicks
-rubber bands or string
First, fill your two containers ¾ of the way to the top with warm (not hot) water.
Add 10 or more drops of blue food coloring to one container and 10 or more drops of red food coloring to the other .
With a sharp knife, cut the cabbage in half vertically, from the bottom up, leaving the top 10cm or so intact, so the two pieces are still attached at the crown. If possible, try to cut down the middle of one of the big leaves.
Use rubber bands to secure the bottoms of each side of the cabbage and make a fresh cut at the bottom, a few cm up from the old cut.
Put one half of the base of your cabbage in the red water, and the other half in the blue water.
Decorate your two “vampires” with eyes and spooky eyebrows made from olives and peppers (or whatever you have in the refrigerator.) Secure the decorations with toothpick.

Keep an eye on your cabbage to see how much colored water it’s drinking. Your vegetable vampire will have to drink for 24-48 hours for the best results.
Plants survive by drawing nutrients dissolved in water up into their stems, stalks, trunks, branches and leaves.
Capillary action is the main force that allows the movement of water up into plants. In a narrow tube, on a surface that attracts water, the attraction between the surface and water, coupled with the attraction of the water molecules to each other, pulls water up. Plants are composed of huge numbers of tube-shaped cells that take advantage of these physical forces.
In this experiment, you can see colored water being taken up, via capillary action, into your cabbage.
Imagine how high the water in giant redwoods has to travel to reach the leaves at the top. In very tall trees, a process called transpiration helps the water overcome the forces of gravity. Here’s a transpiration experiment you can try at home.
Halloween Science Roundup
- by KitchenPantryScientist
Halloween Halloween brings out the kid in all of us, and there’s no better way to celebrate than with some ghoulish science experiments. Next week, I’ll be adding Vegetable Vampires and Zombie Candy to the lineup!

Here’s a list of our favorites. Just click on the name of the experiment to go to the instructions, see photos of what to do, and learn a little science. Most have links to videos or TV segments where I demonstrate how to do the experiments.
Shocking Machine Make an electrophorus and Leyden jar to shock your friends! Here’s how to do it. We demonstrated it on Kare11 last week!
Frankenworms Gummy worms soaked in baking soda and water come to “life” when you drop them into vinegar! Click here for directions and a video.
Goblin Goo (All you need is cornstarch and water. Here’s a video on how to make the goo. You can add a little food coloring to the water if you want, but it may stain your hands!)
Bag of Blood (If you have ziplock baggies, water, red food coloring and skewers, you can do this experiment!) Here’s the video.
Fizzy Balloon Monster Heads (After we made Goblin Goo, I demonstrated how to make Fizzy Balloon Monster heads. Click here to watch.)
Magic Potion (Bubbly, stinky Halloween fun: I made a short video on how to make magic potion. Click here to watch it.
Mad Scientist’s Green Slime (To see a TV segment where we made Mad Scientist’s Green Slime, click here!) Here’s another video.
Apple Mummies (Here’s a link to a TV segment where the kids and I demonstrated how to make Apple Mummies. Click here.)
Alien Monster Eggs (These make a great centerpiece for a Halloween party, when you’re done playing with them.) I demonstrated how to make them on Kare 11! Click here to watch the video.
Creepy Critter Slingshots Lob Marshmallow eyeballs and spiders at a pumpkin or another target in this fun physics experiment.
Science on a Stick: Rock Candy
- by KitchenPantryScientist
Got sugar? You can grow big, edible sugar crystals, commonly called “rock candy,” in your own kitchen. We thought they’d make a great science experiment to demonstrate at the Minnesota State Fair, where foods on a stick hold sway.
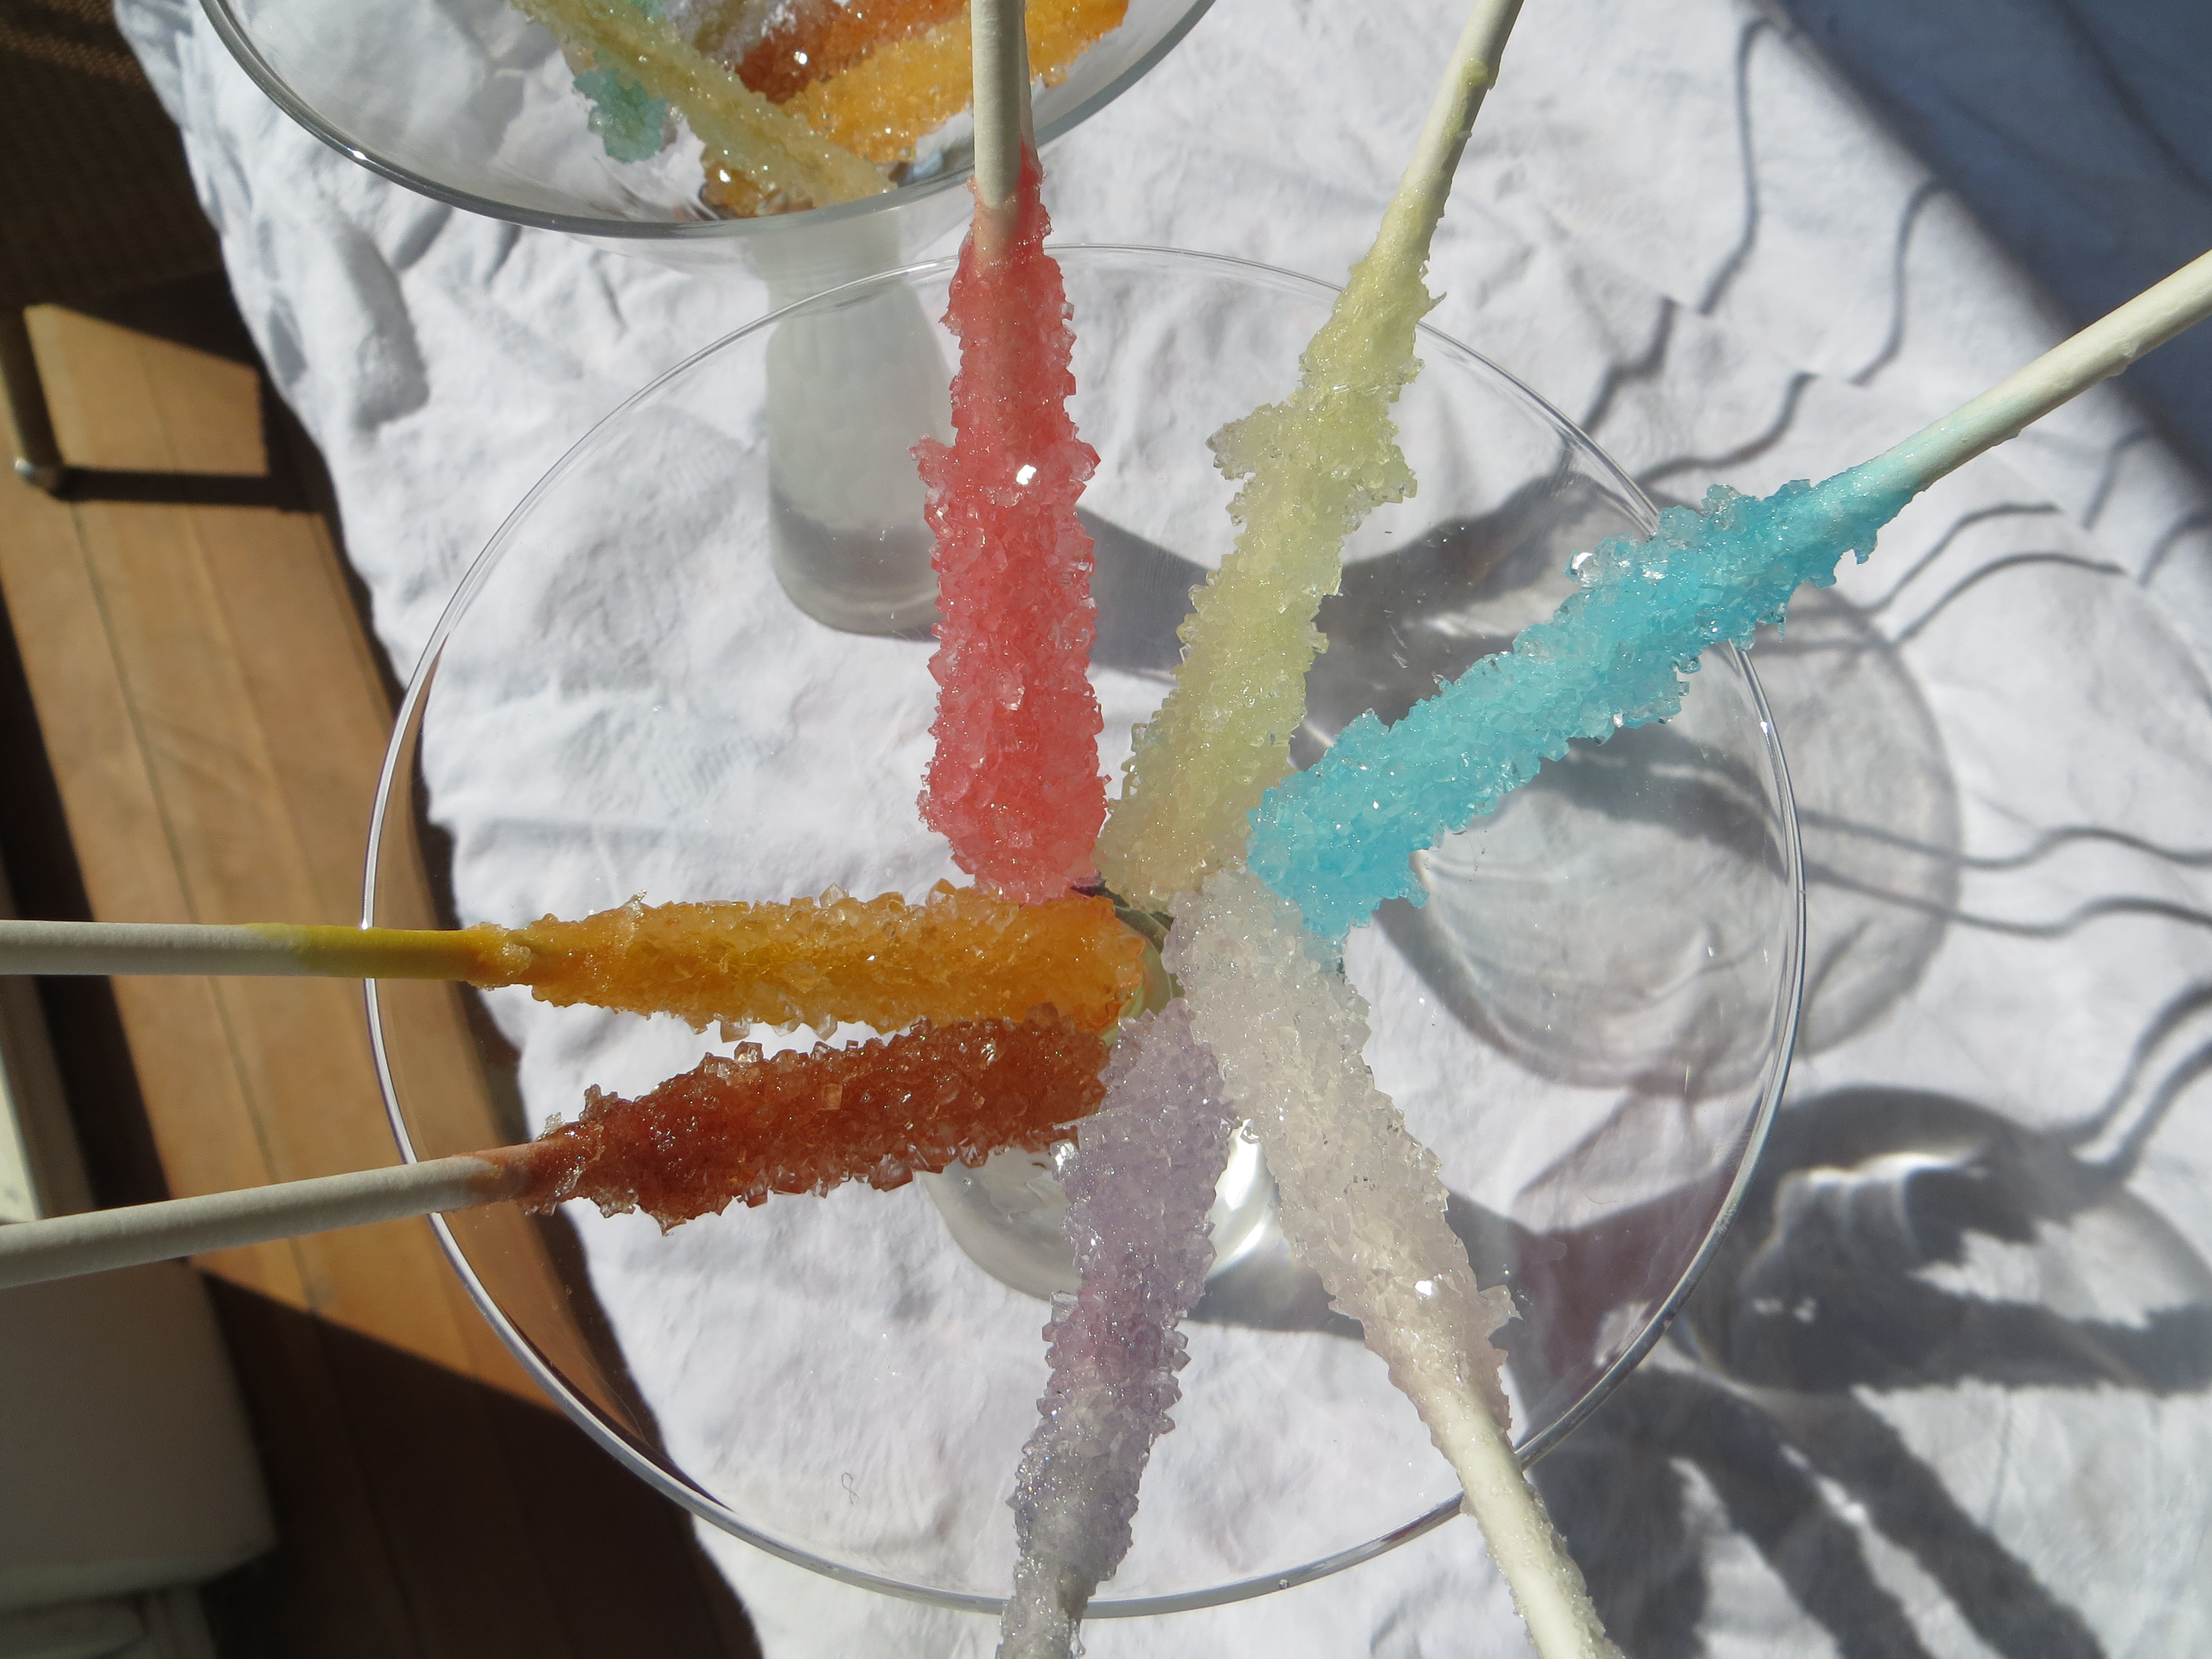
Like bricks in a wall, crystals are solids formed by repeating patterns of molecules. Instead of mortar, the atoms and molecules are connected by atomic bonds.
They can be big or small, but crystals made from the same atoms or molecules always form the same shape. Table sugar, or sucrose, is made up of a molecule composed of two sugars, glucose and fructose. The crystals formed by sucrose are hexagonal (six-sided) prisms, slanted at the ends.
To make rock candy on a stick, you’ll need: 5 cups white granulated sugar, 2 cups water, cake pop sticks or wooden skewers, and food coloring
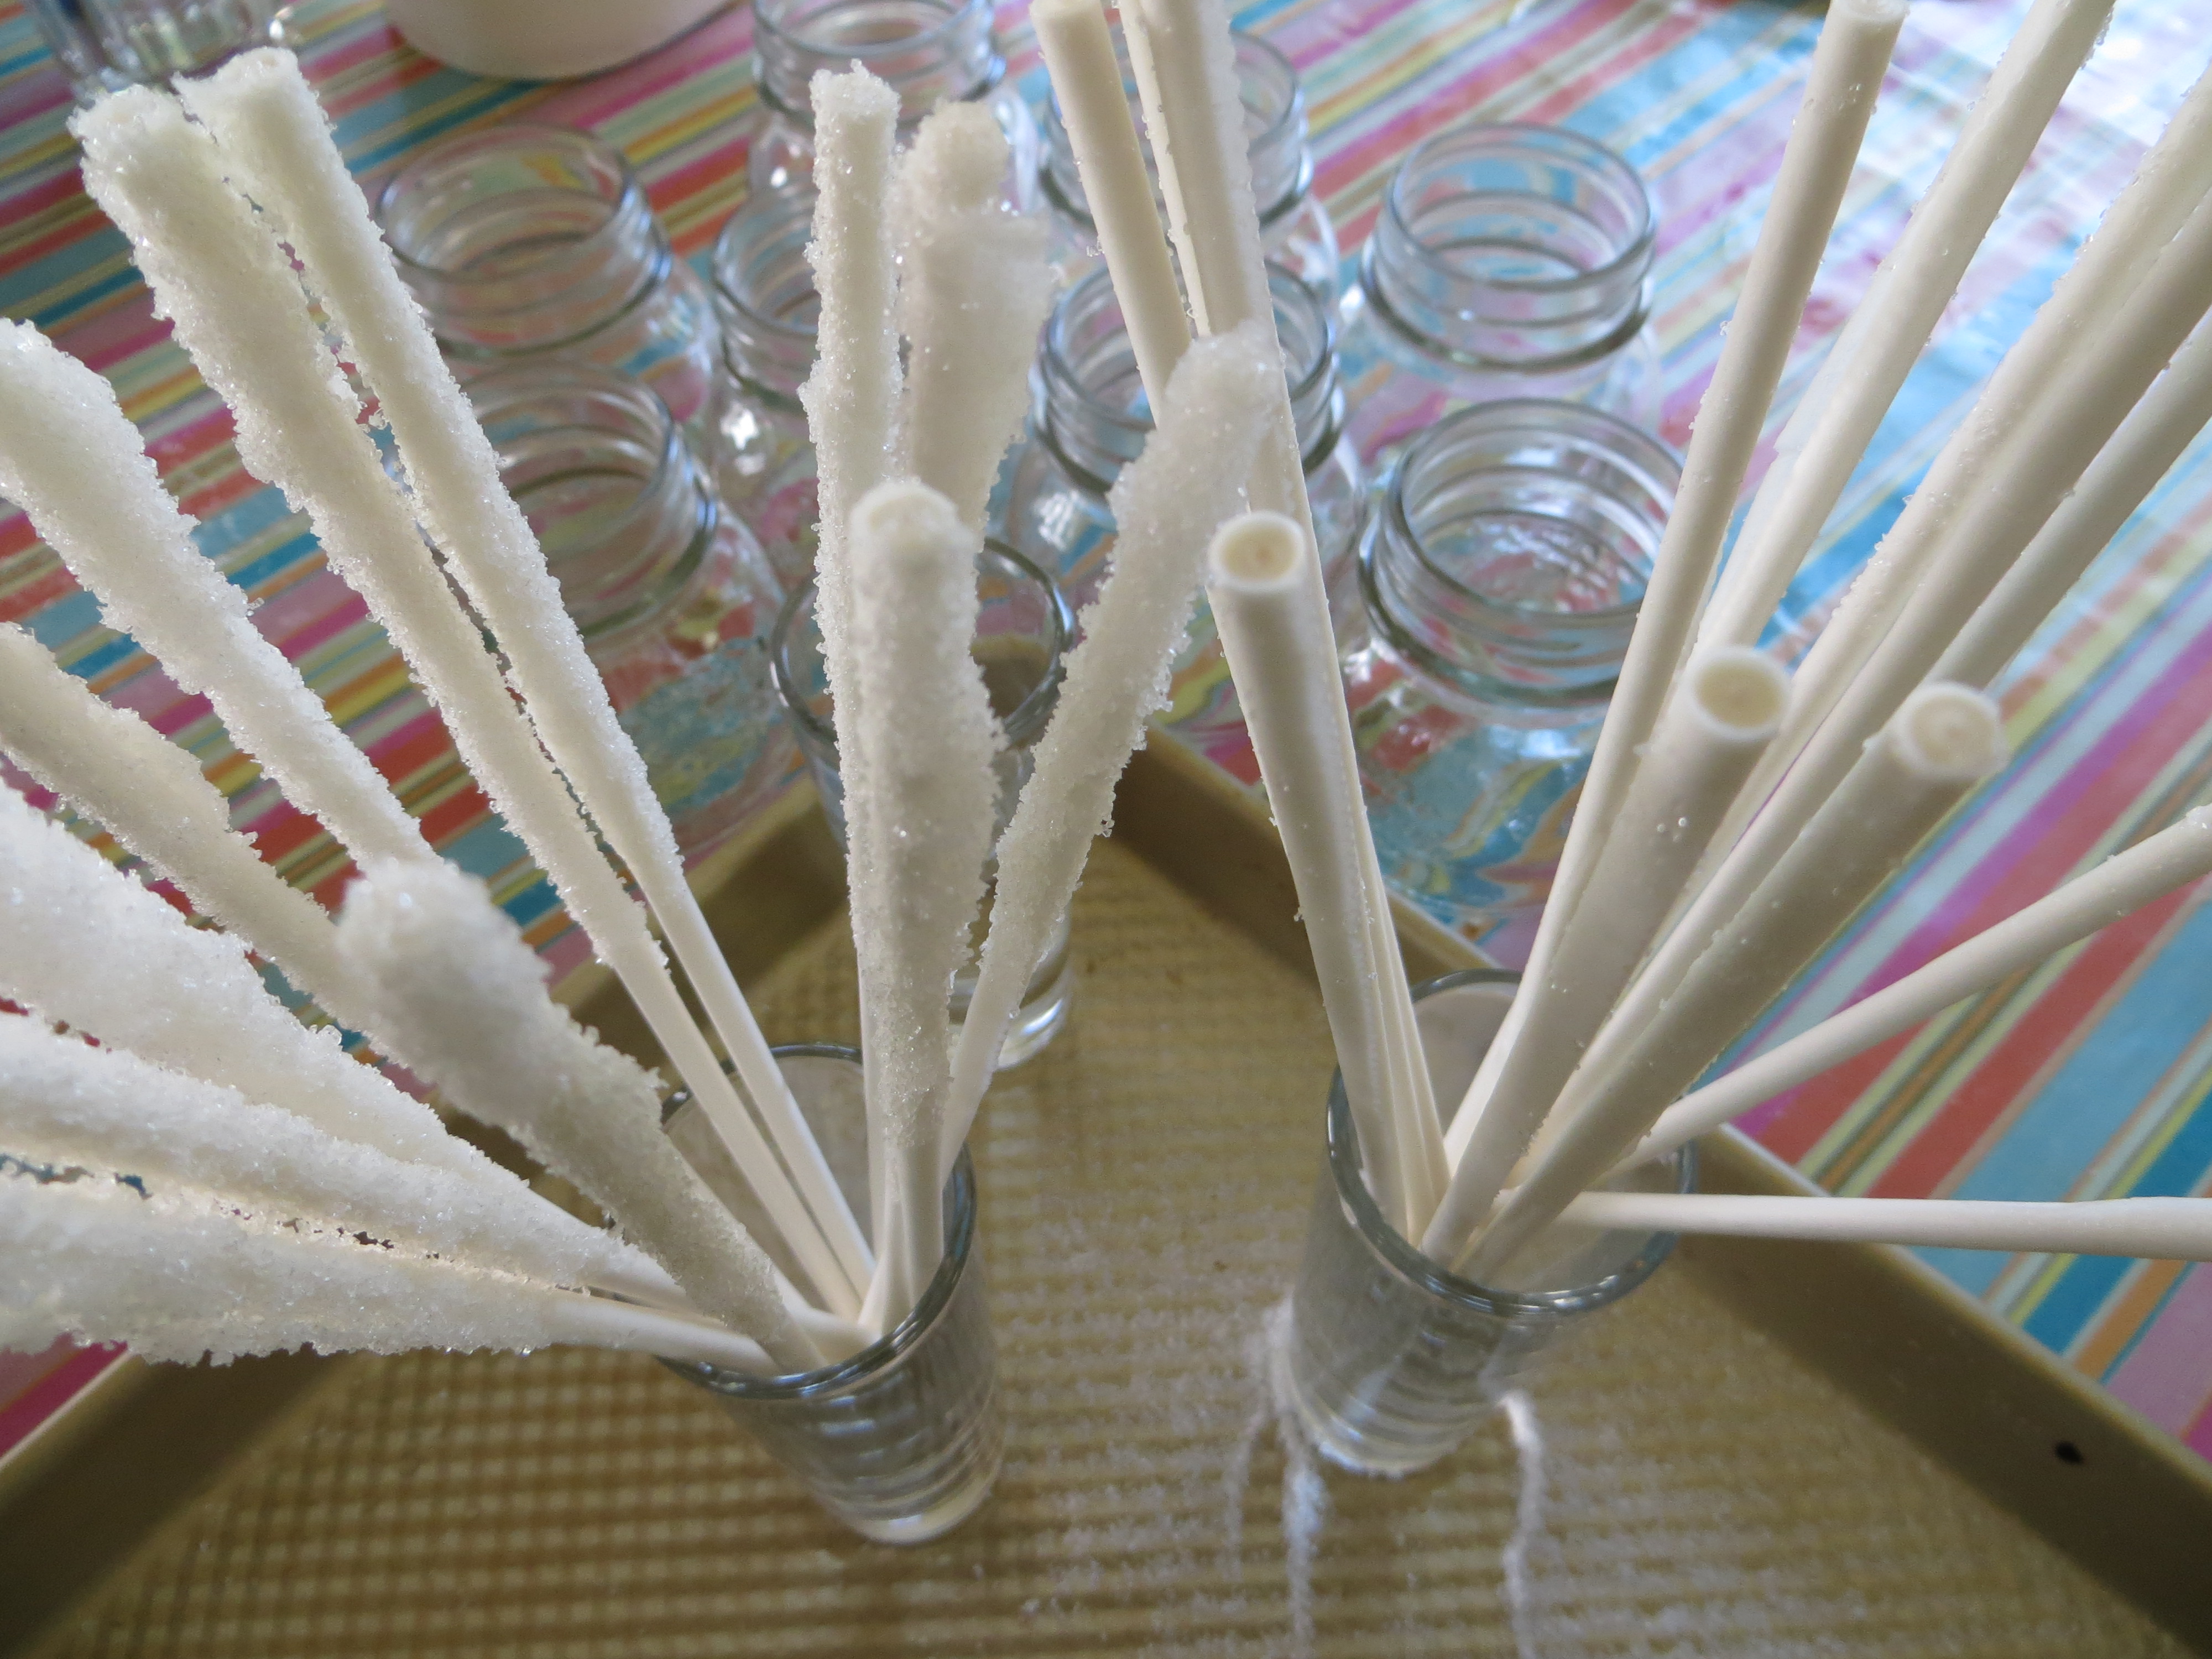
- Dip one end of cake-pop sticks or wooden skewers in water and then roll them in granulated white sugar. The sugar should cover 2-3 inches of the stick. Let them dry completely. These are the seeds for the sugar crystal growth.
- Boil 2 cups water and 5 cups sugar until sugar is dissolved as much as possible. It should look like syrup. This is your supersaturated sugar solution.
- Let syrup sit until it is no longer hot and pour into glass containers. Add food coloring and stir.
- When colored syrup is completely cool, set the sugary end of the sugar-seeded cake pops or skewers into the syrup and let them sit for about a week.
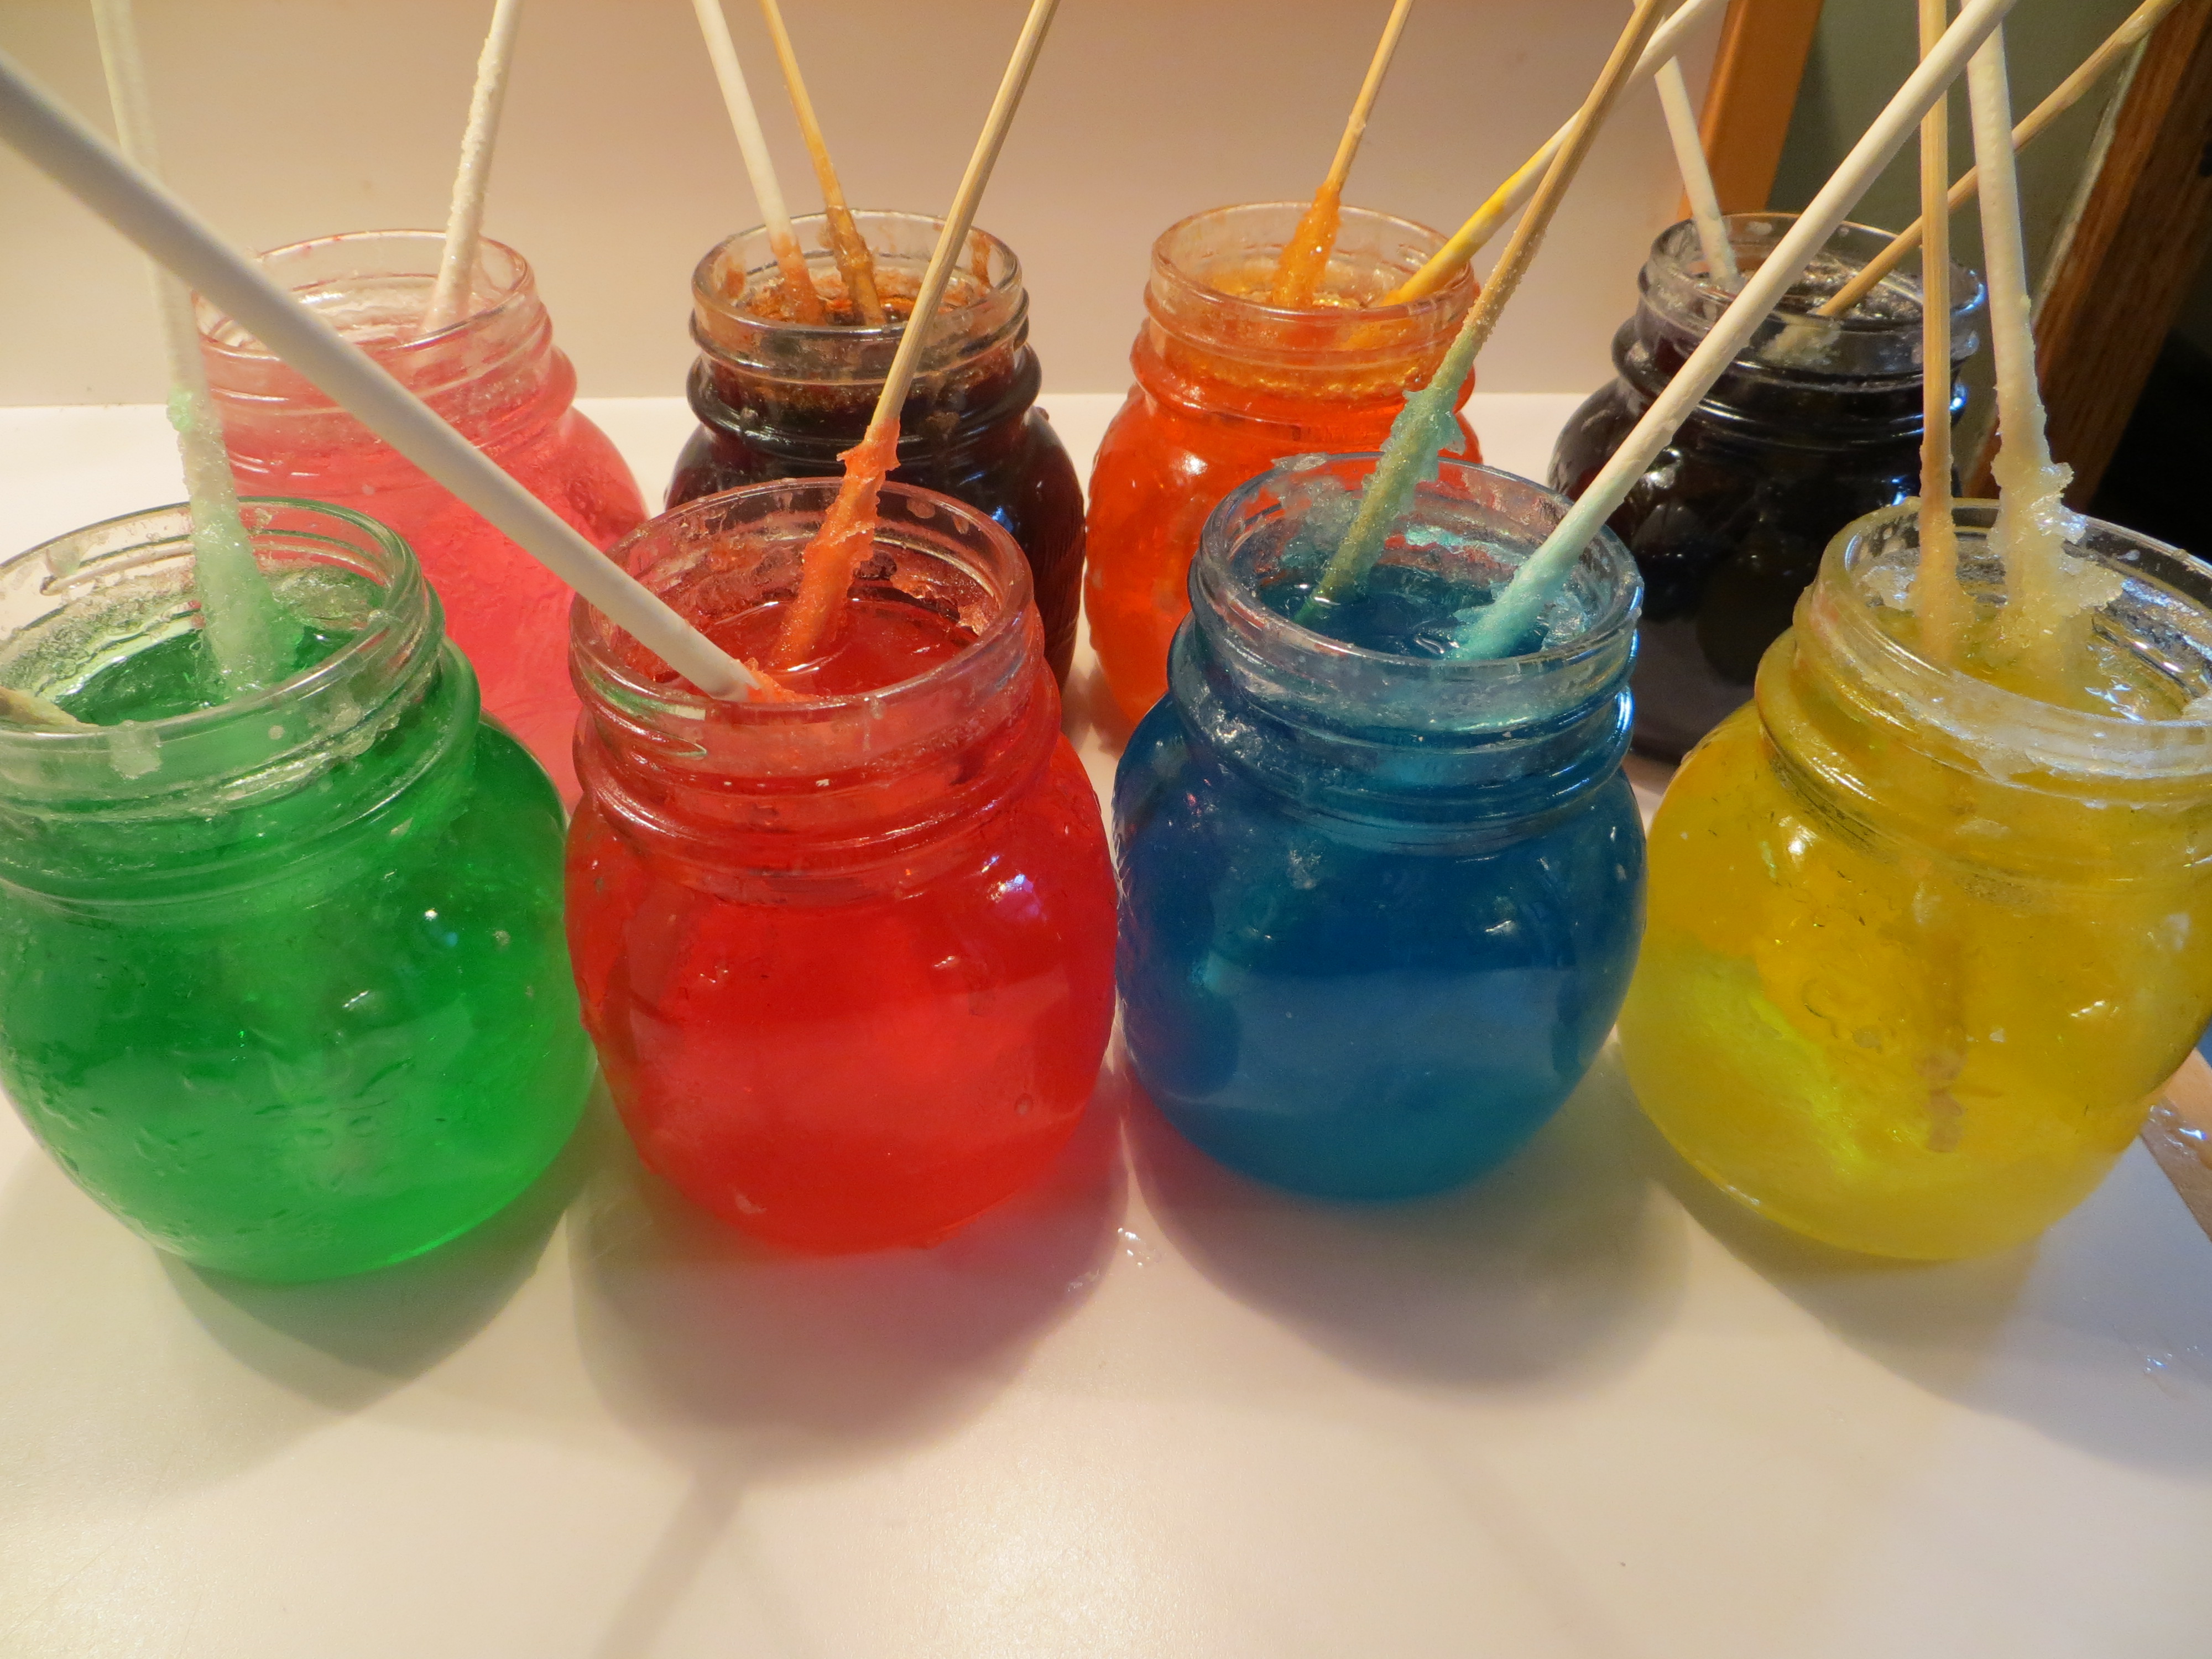
5. Gently move the sticks around occasionally, so they don’t stick to the crystals in the bottom of the glass. If the glass container gets too full of crystals, pour the syrup into a new container and move your stick into the cleaner syrup to grow more crystals. When the rock candy is done, drain the excess syrup and let them dry. Enjoy!

The science behind the candy? A supersaturated solution is one that is forced to hold more atoms in water or another solute than it normally would. Supersaturated solutions can be made using heat or pressure. Crystals start to form when a supersaturated solutions encounters a “seed” atom or molecule, causing the other atoms to come out of the solution and attach to the seed. In this case, the seed molecules were the sucrose molecules we dried onto the sticks.
Butter Candles and Biofuel
- by KitchenPantryScientist
Biofuels are burnable energy sources produced by living organisms, like corn, algae, and even cows. Microorganisms and plants gather carbon from the atmosphere and incorporate it into the organic compounds that make up things like leaves, fruit, stems and wood. When animals eat plants and microbes, they store some of the carbon energy they’ve gobbled up as fat, like the milk fat used to make butter. Scientists call carbon stored in plants, microbes and animals “new” carbon. Old carbon is carbon tied up in fossil fuels like coal and oil, that’s been underground for millions of years.
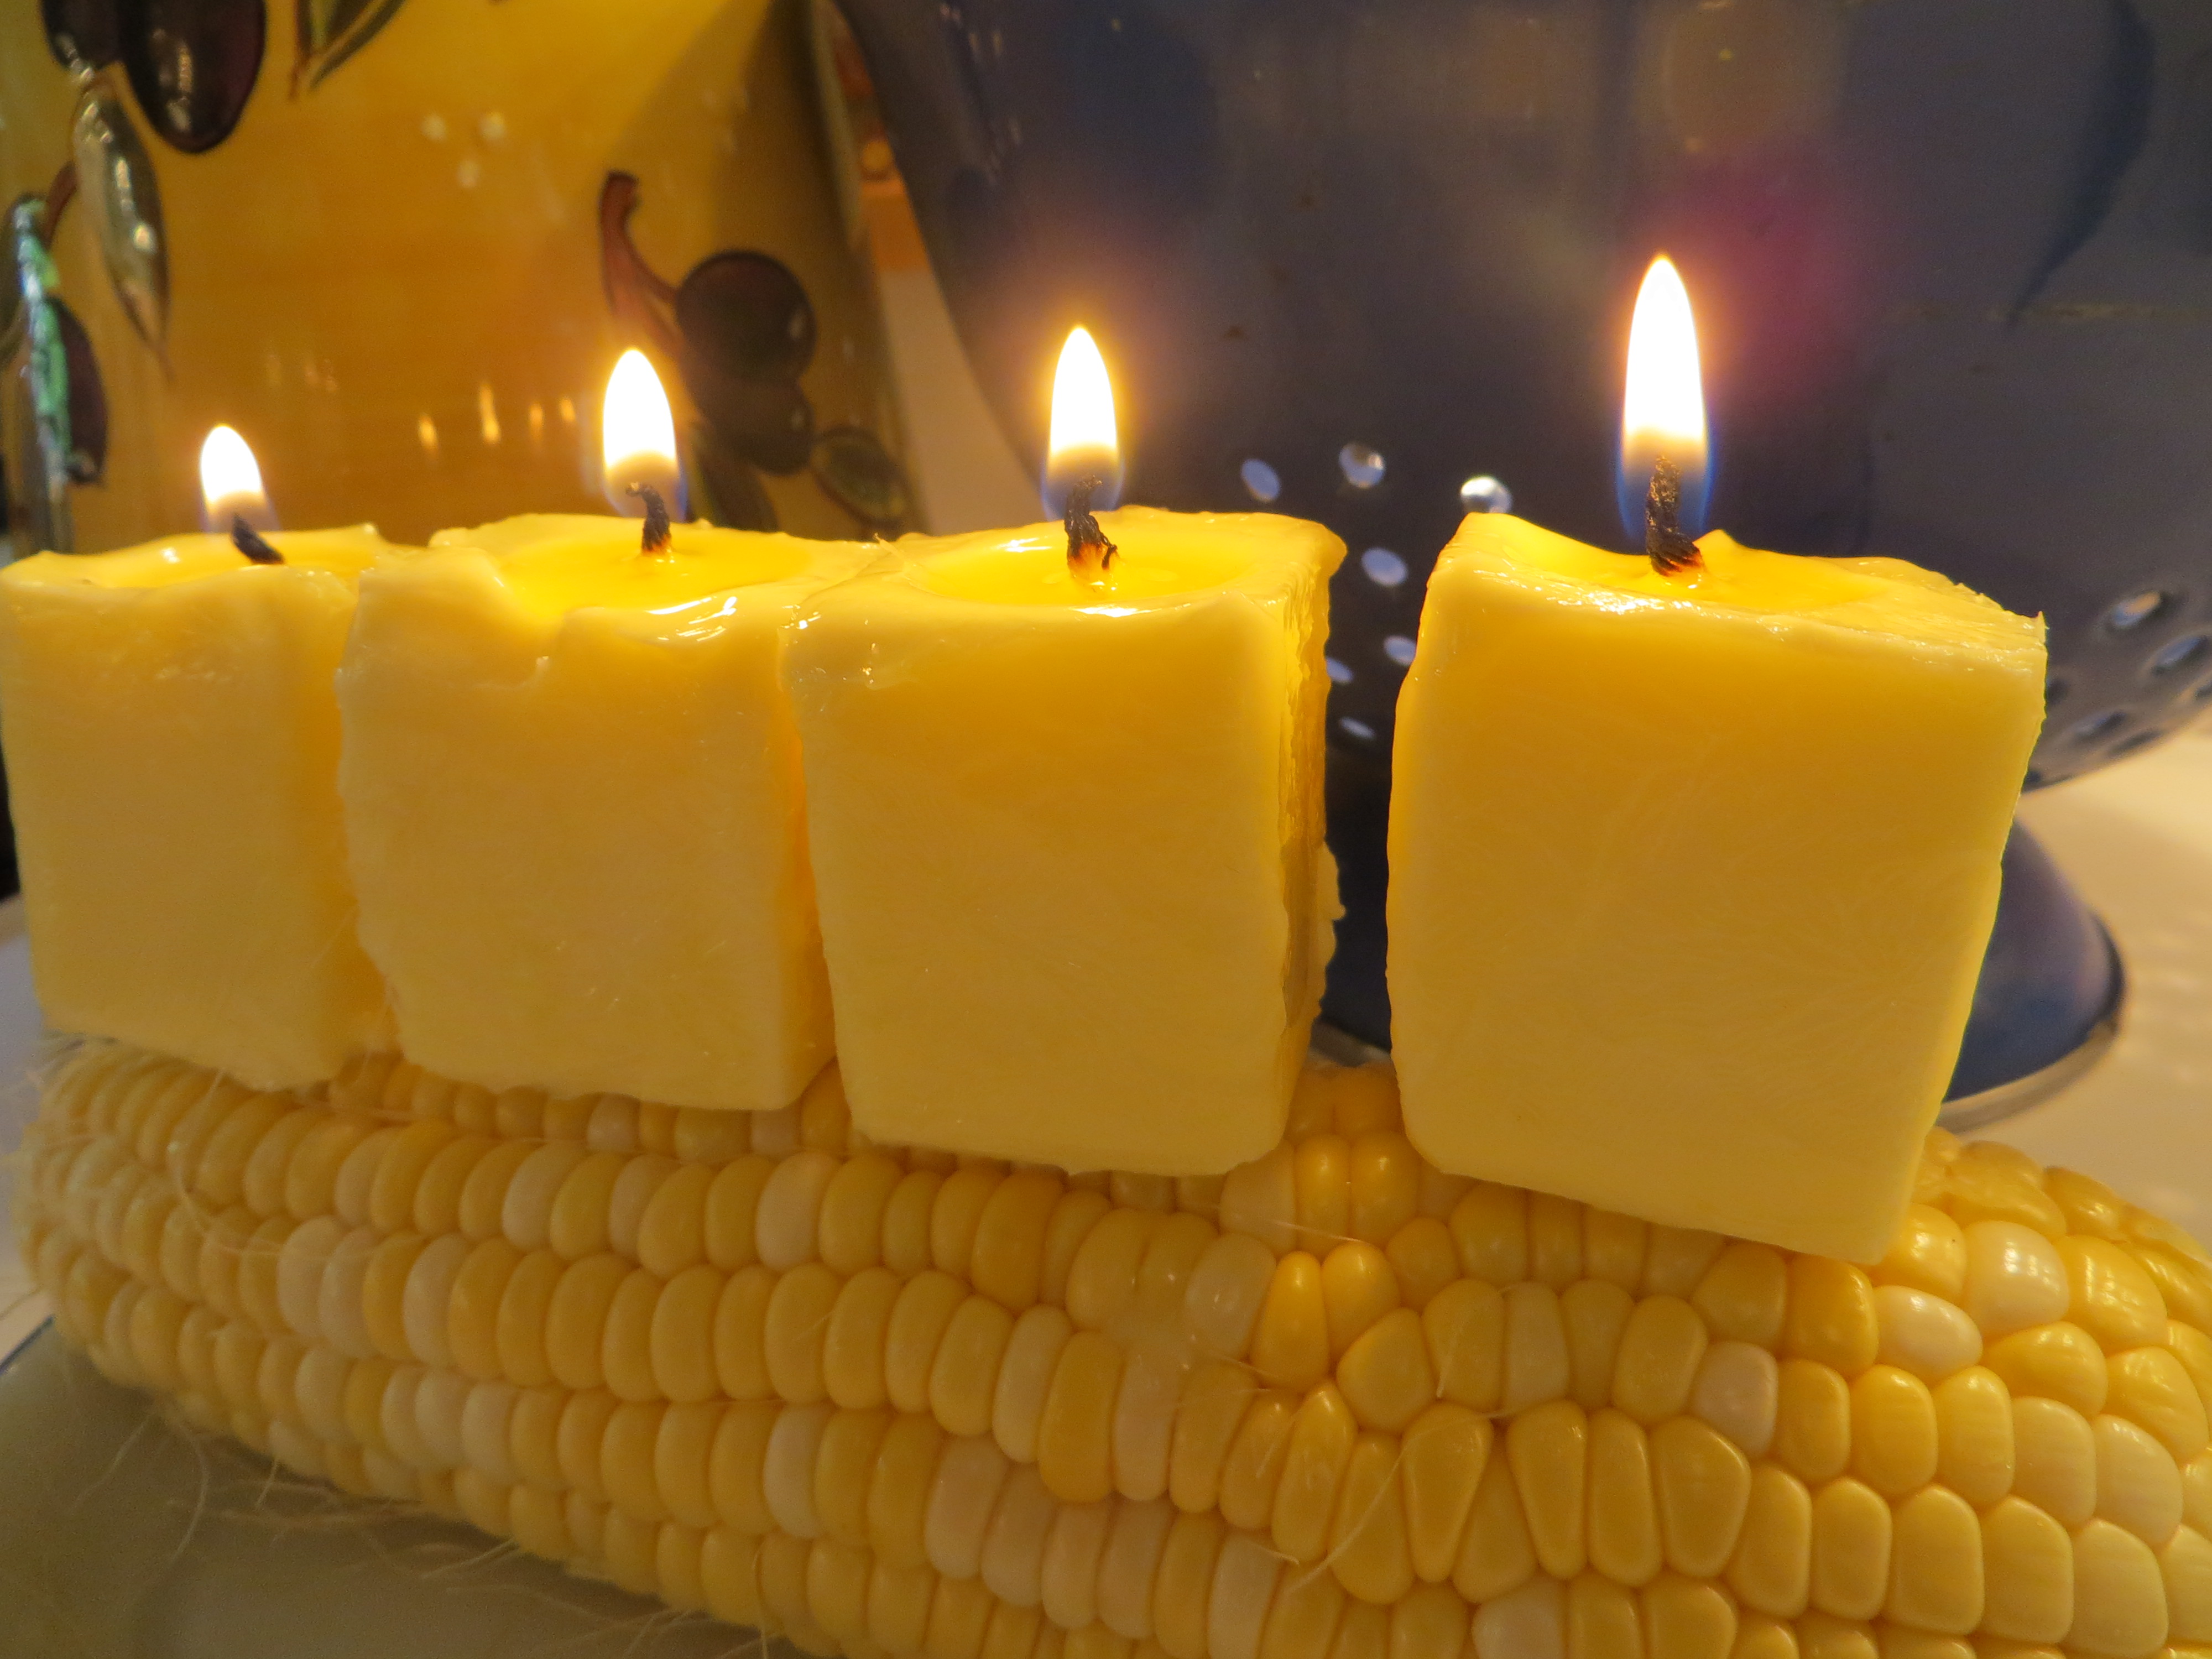
We used broken-off skewers to attach our butter candles to an ear of corn.
Although butter isn’t usually burned as a fuel, a Pennsylvania farm show recently converted their thousand pound butter sculpture into 3 days-worth of power for a local farm, using a methane digester. The New York State Fair turned its butter sculptures into biodiesel fuel. At home, you can make a stick of butter into a candle to see for yourself how an animal product can be used as a fuel.
To make butter candles you’ll need a stick of butter, a toothpick or skewer, some cotton kitchen twine and scissors.
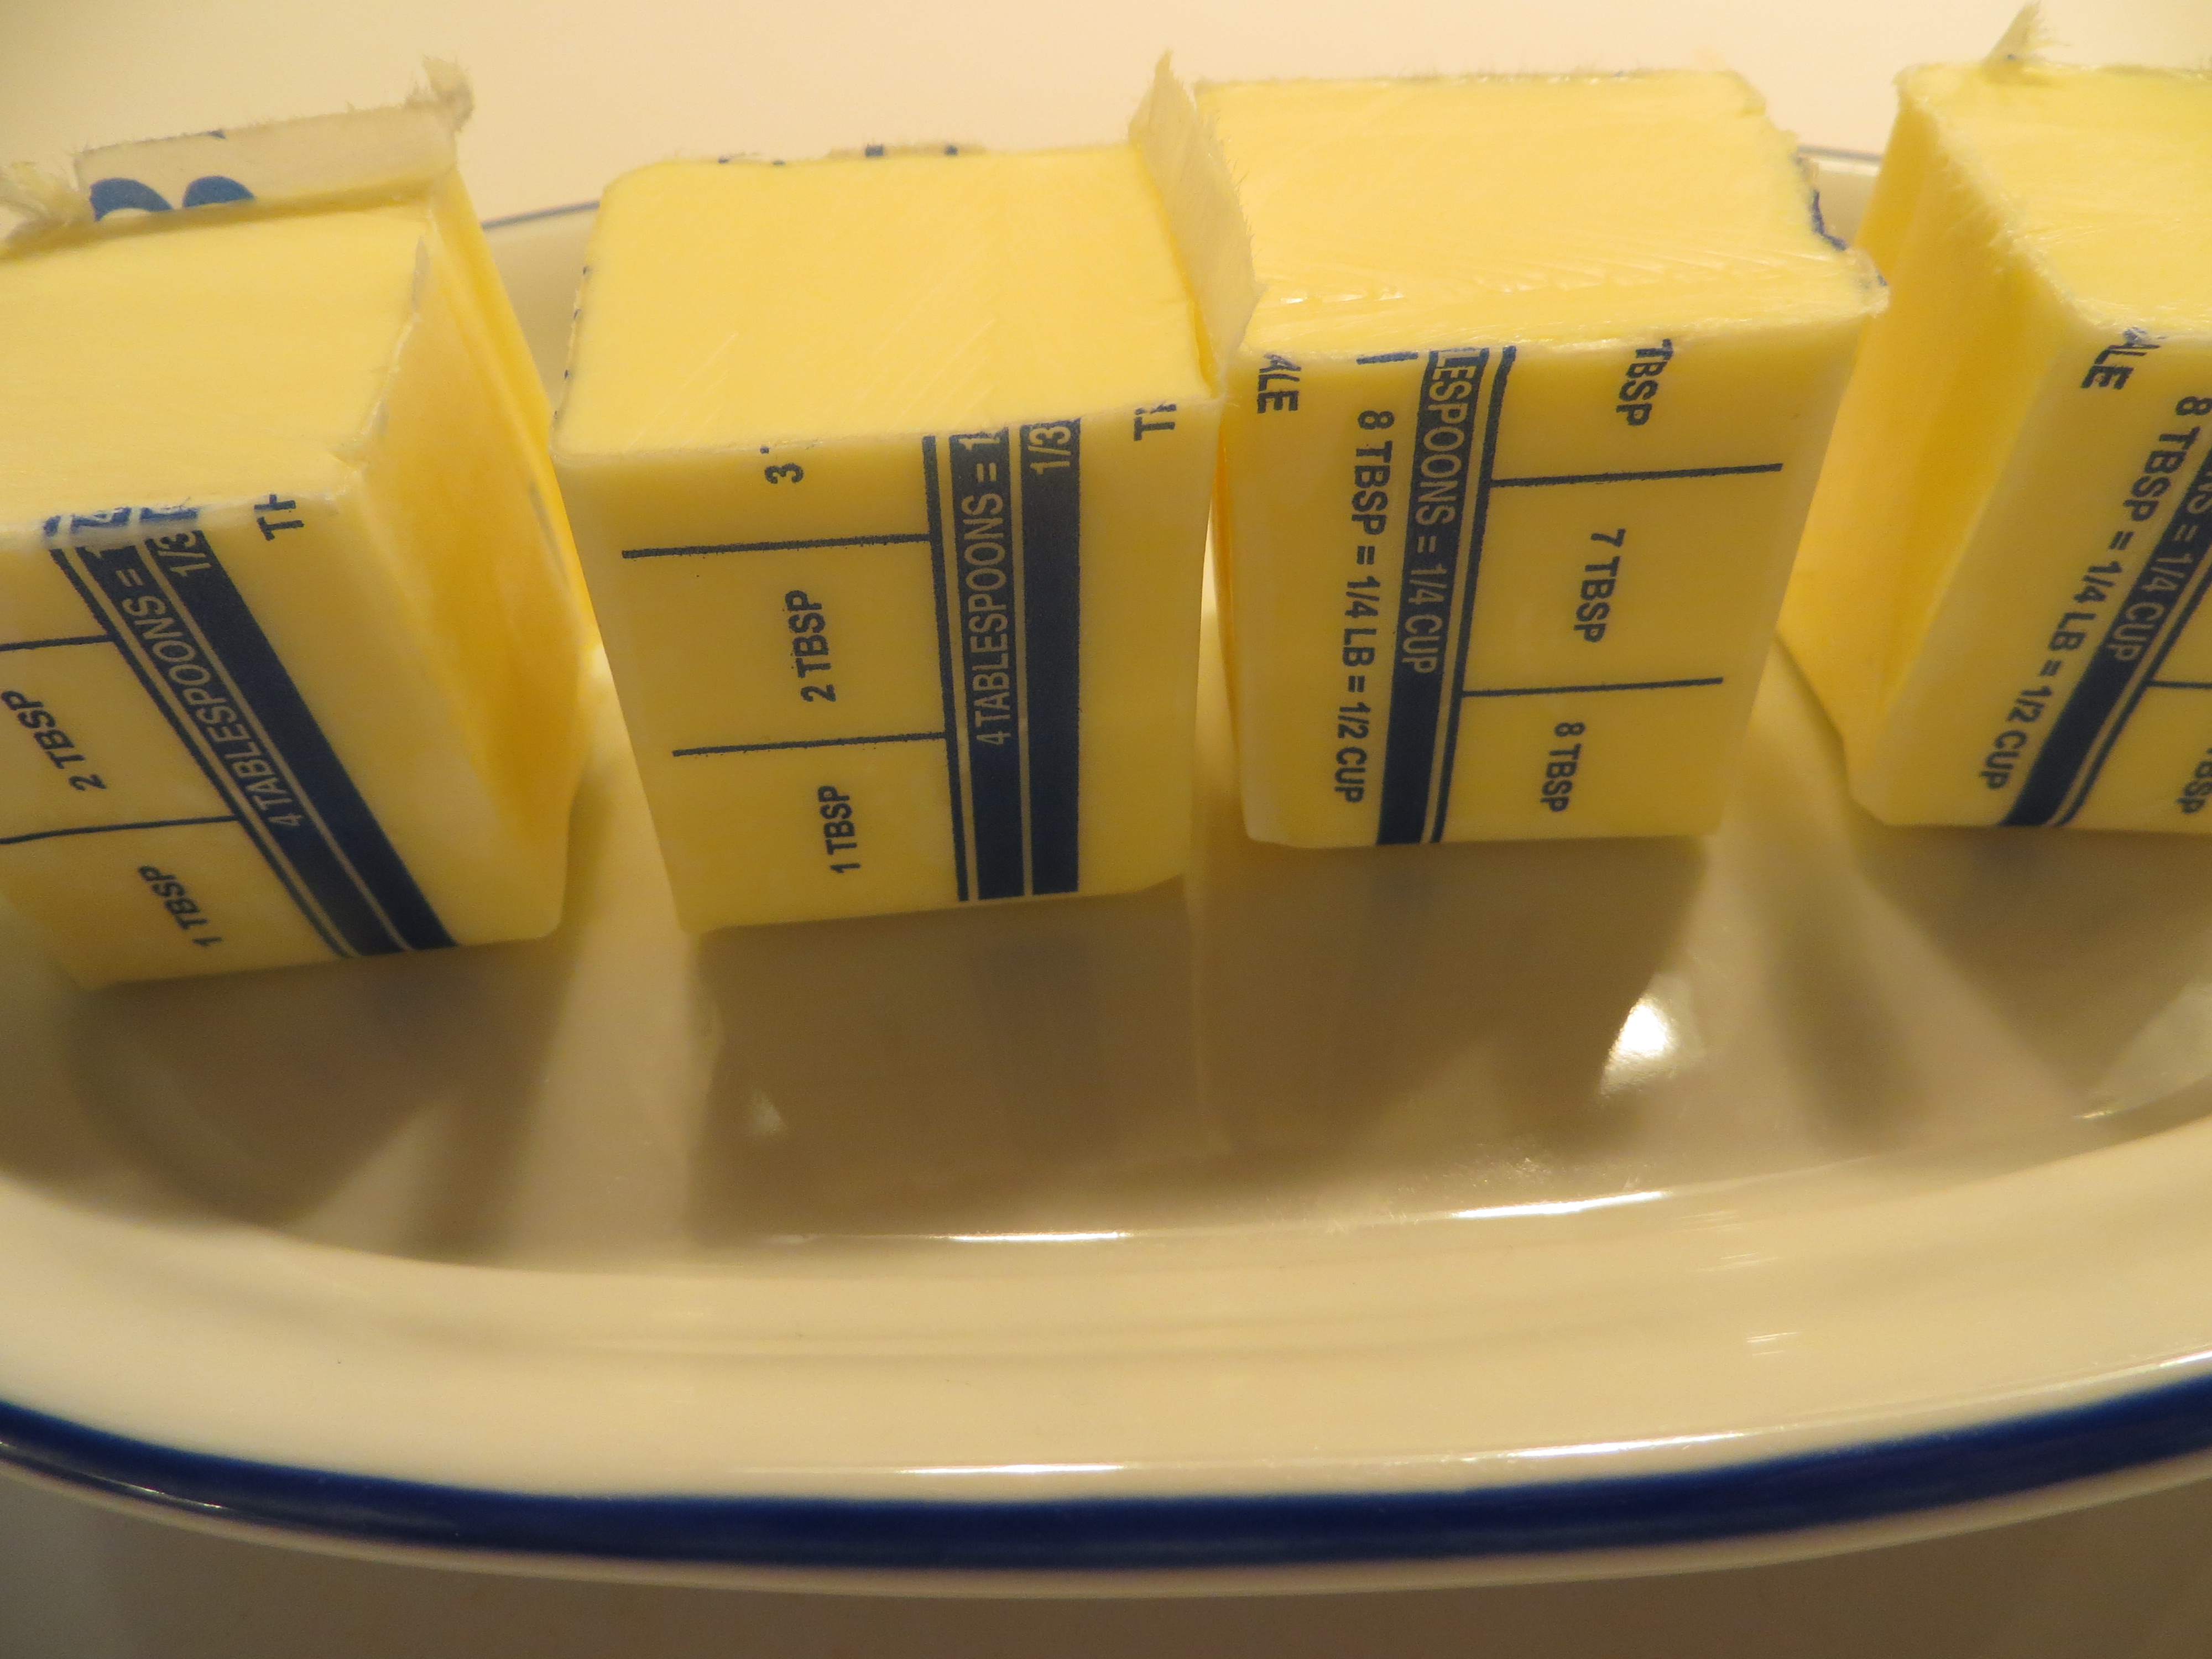
1. Cut the butter into the size candles you want. Place your candles on a fire-proof surface, like a metal plate.
2. Cut pieces of string slightly longer than the height of your candles.
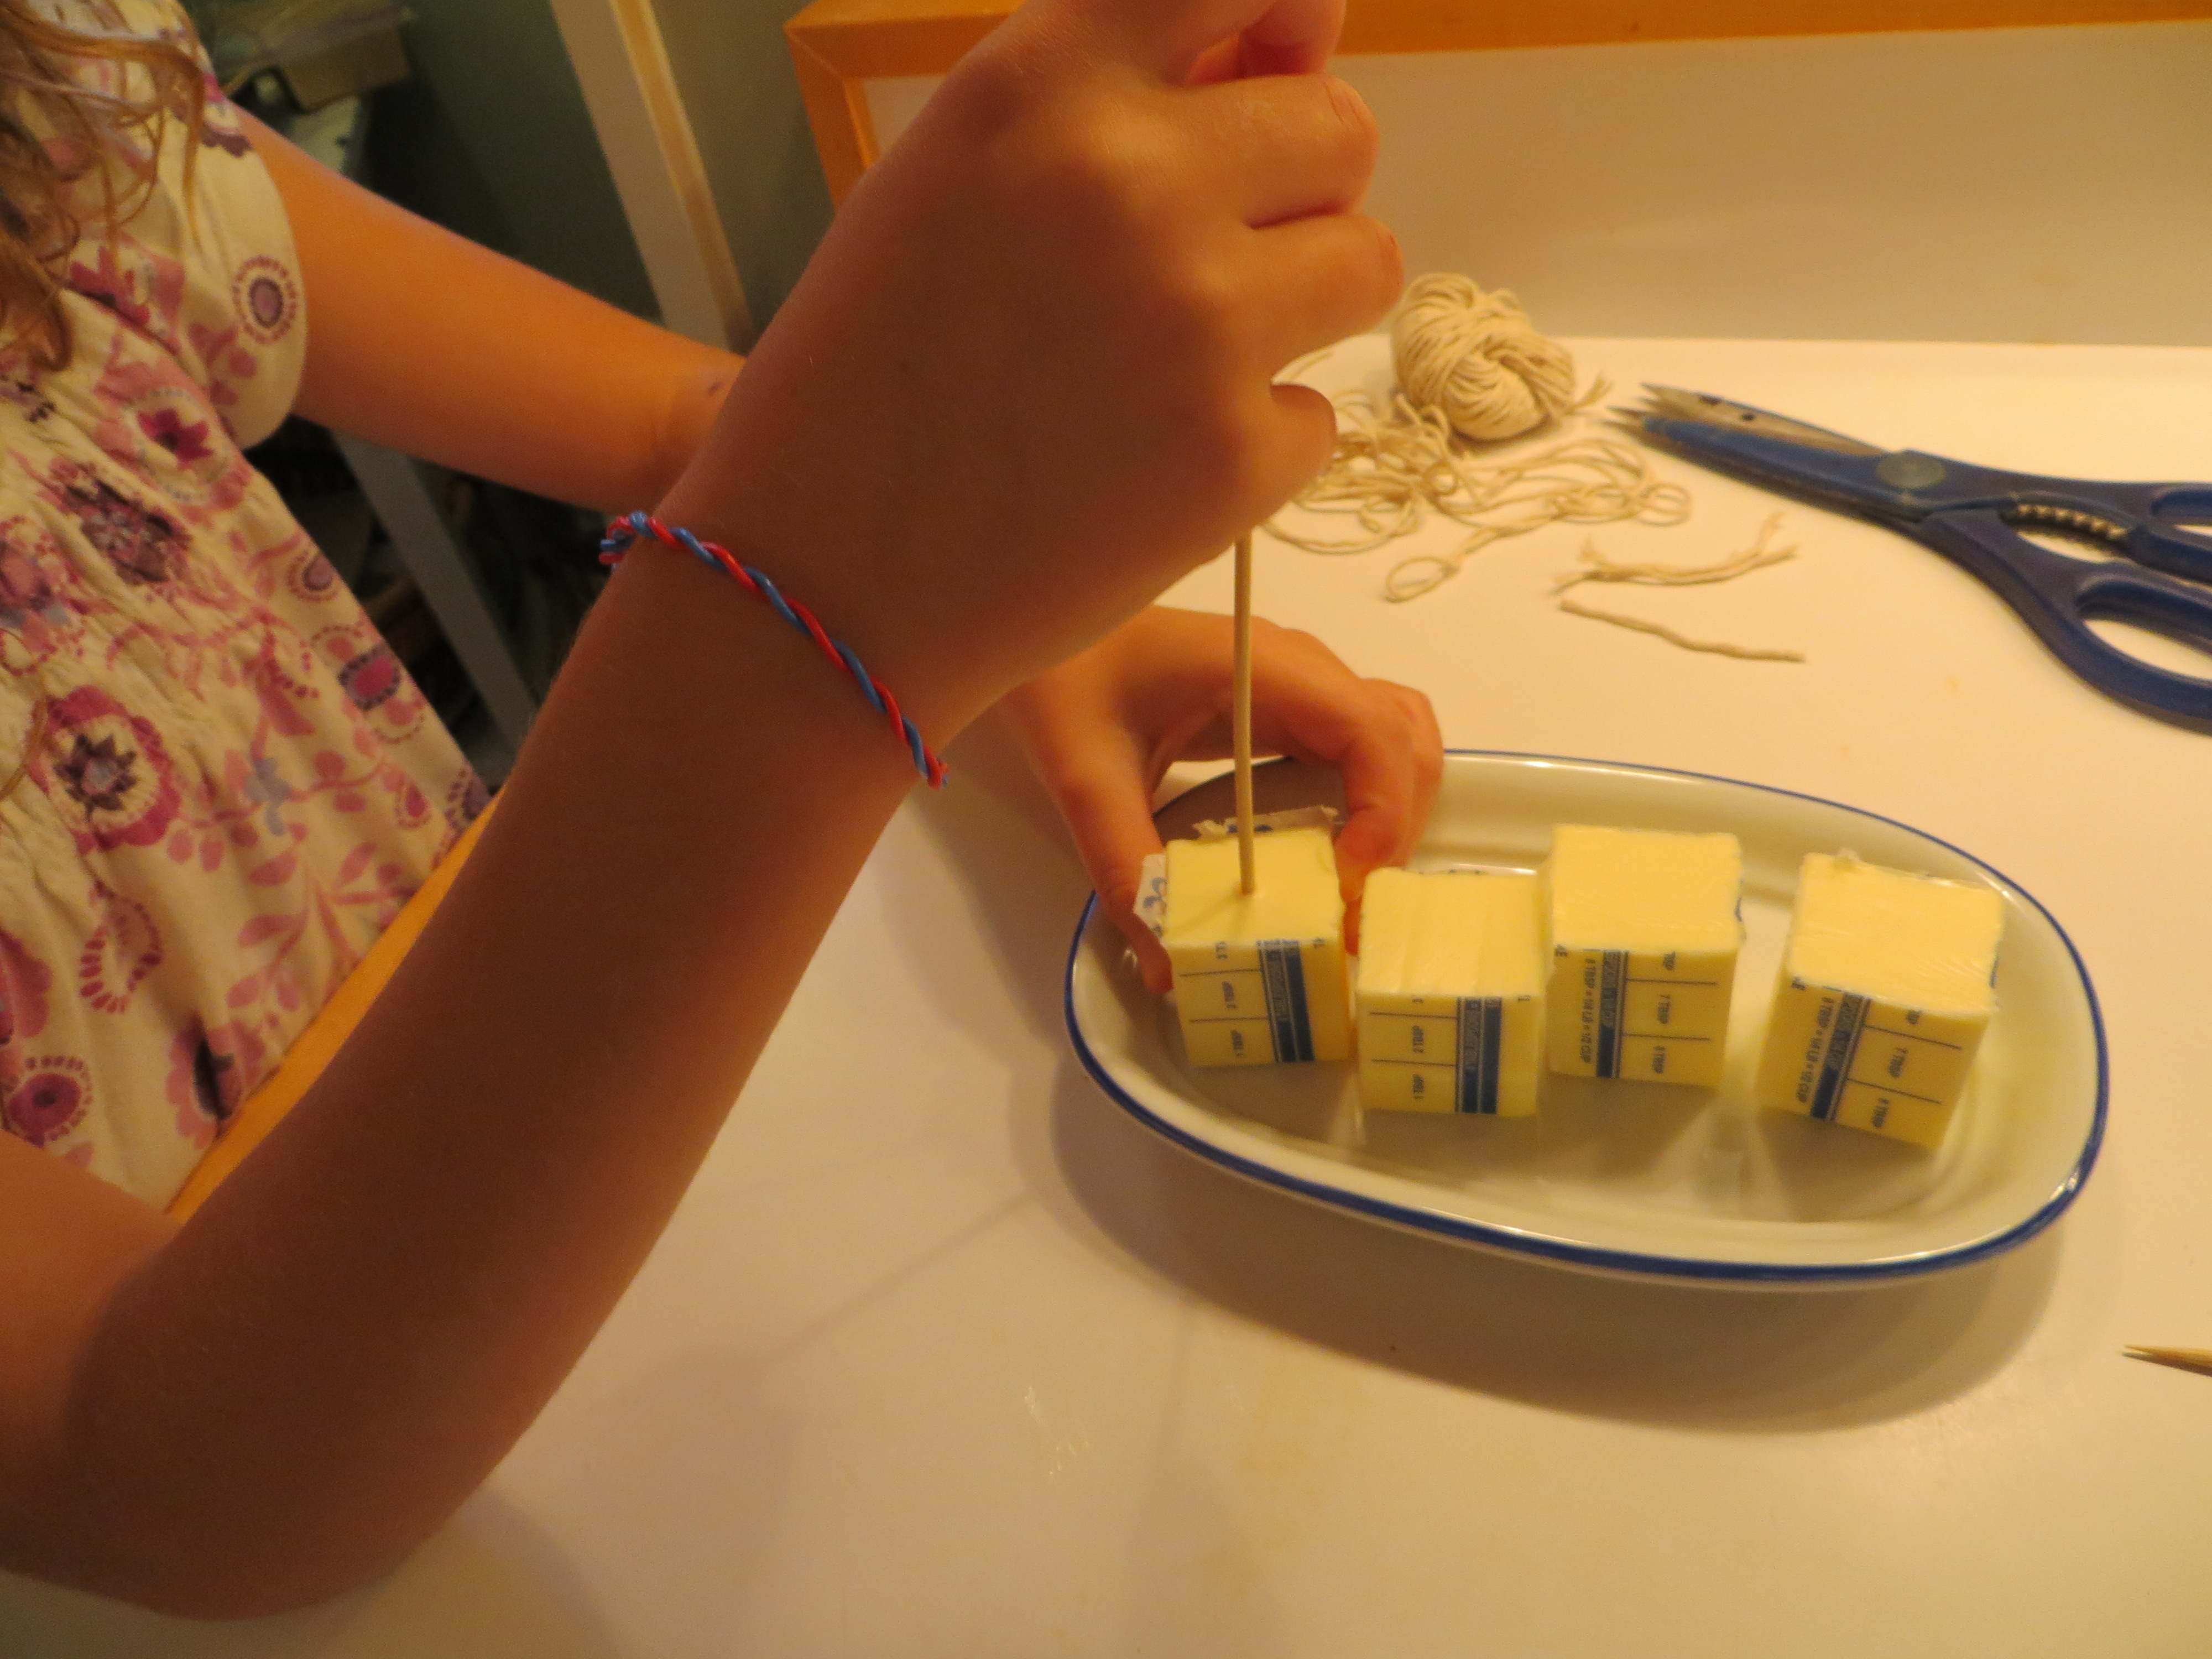
3. Use a skewer or toothpick to poke a hole from the top of your candle to near the bottom.
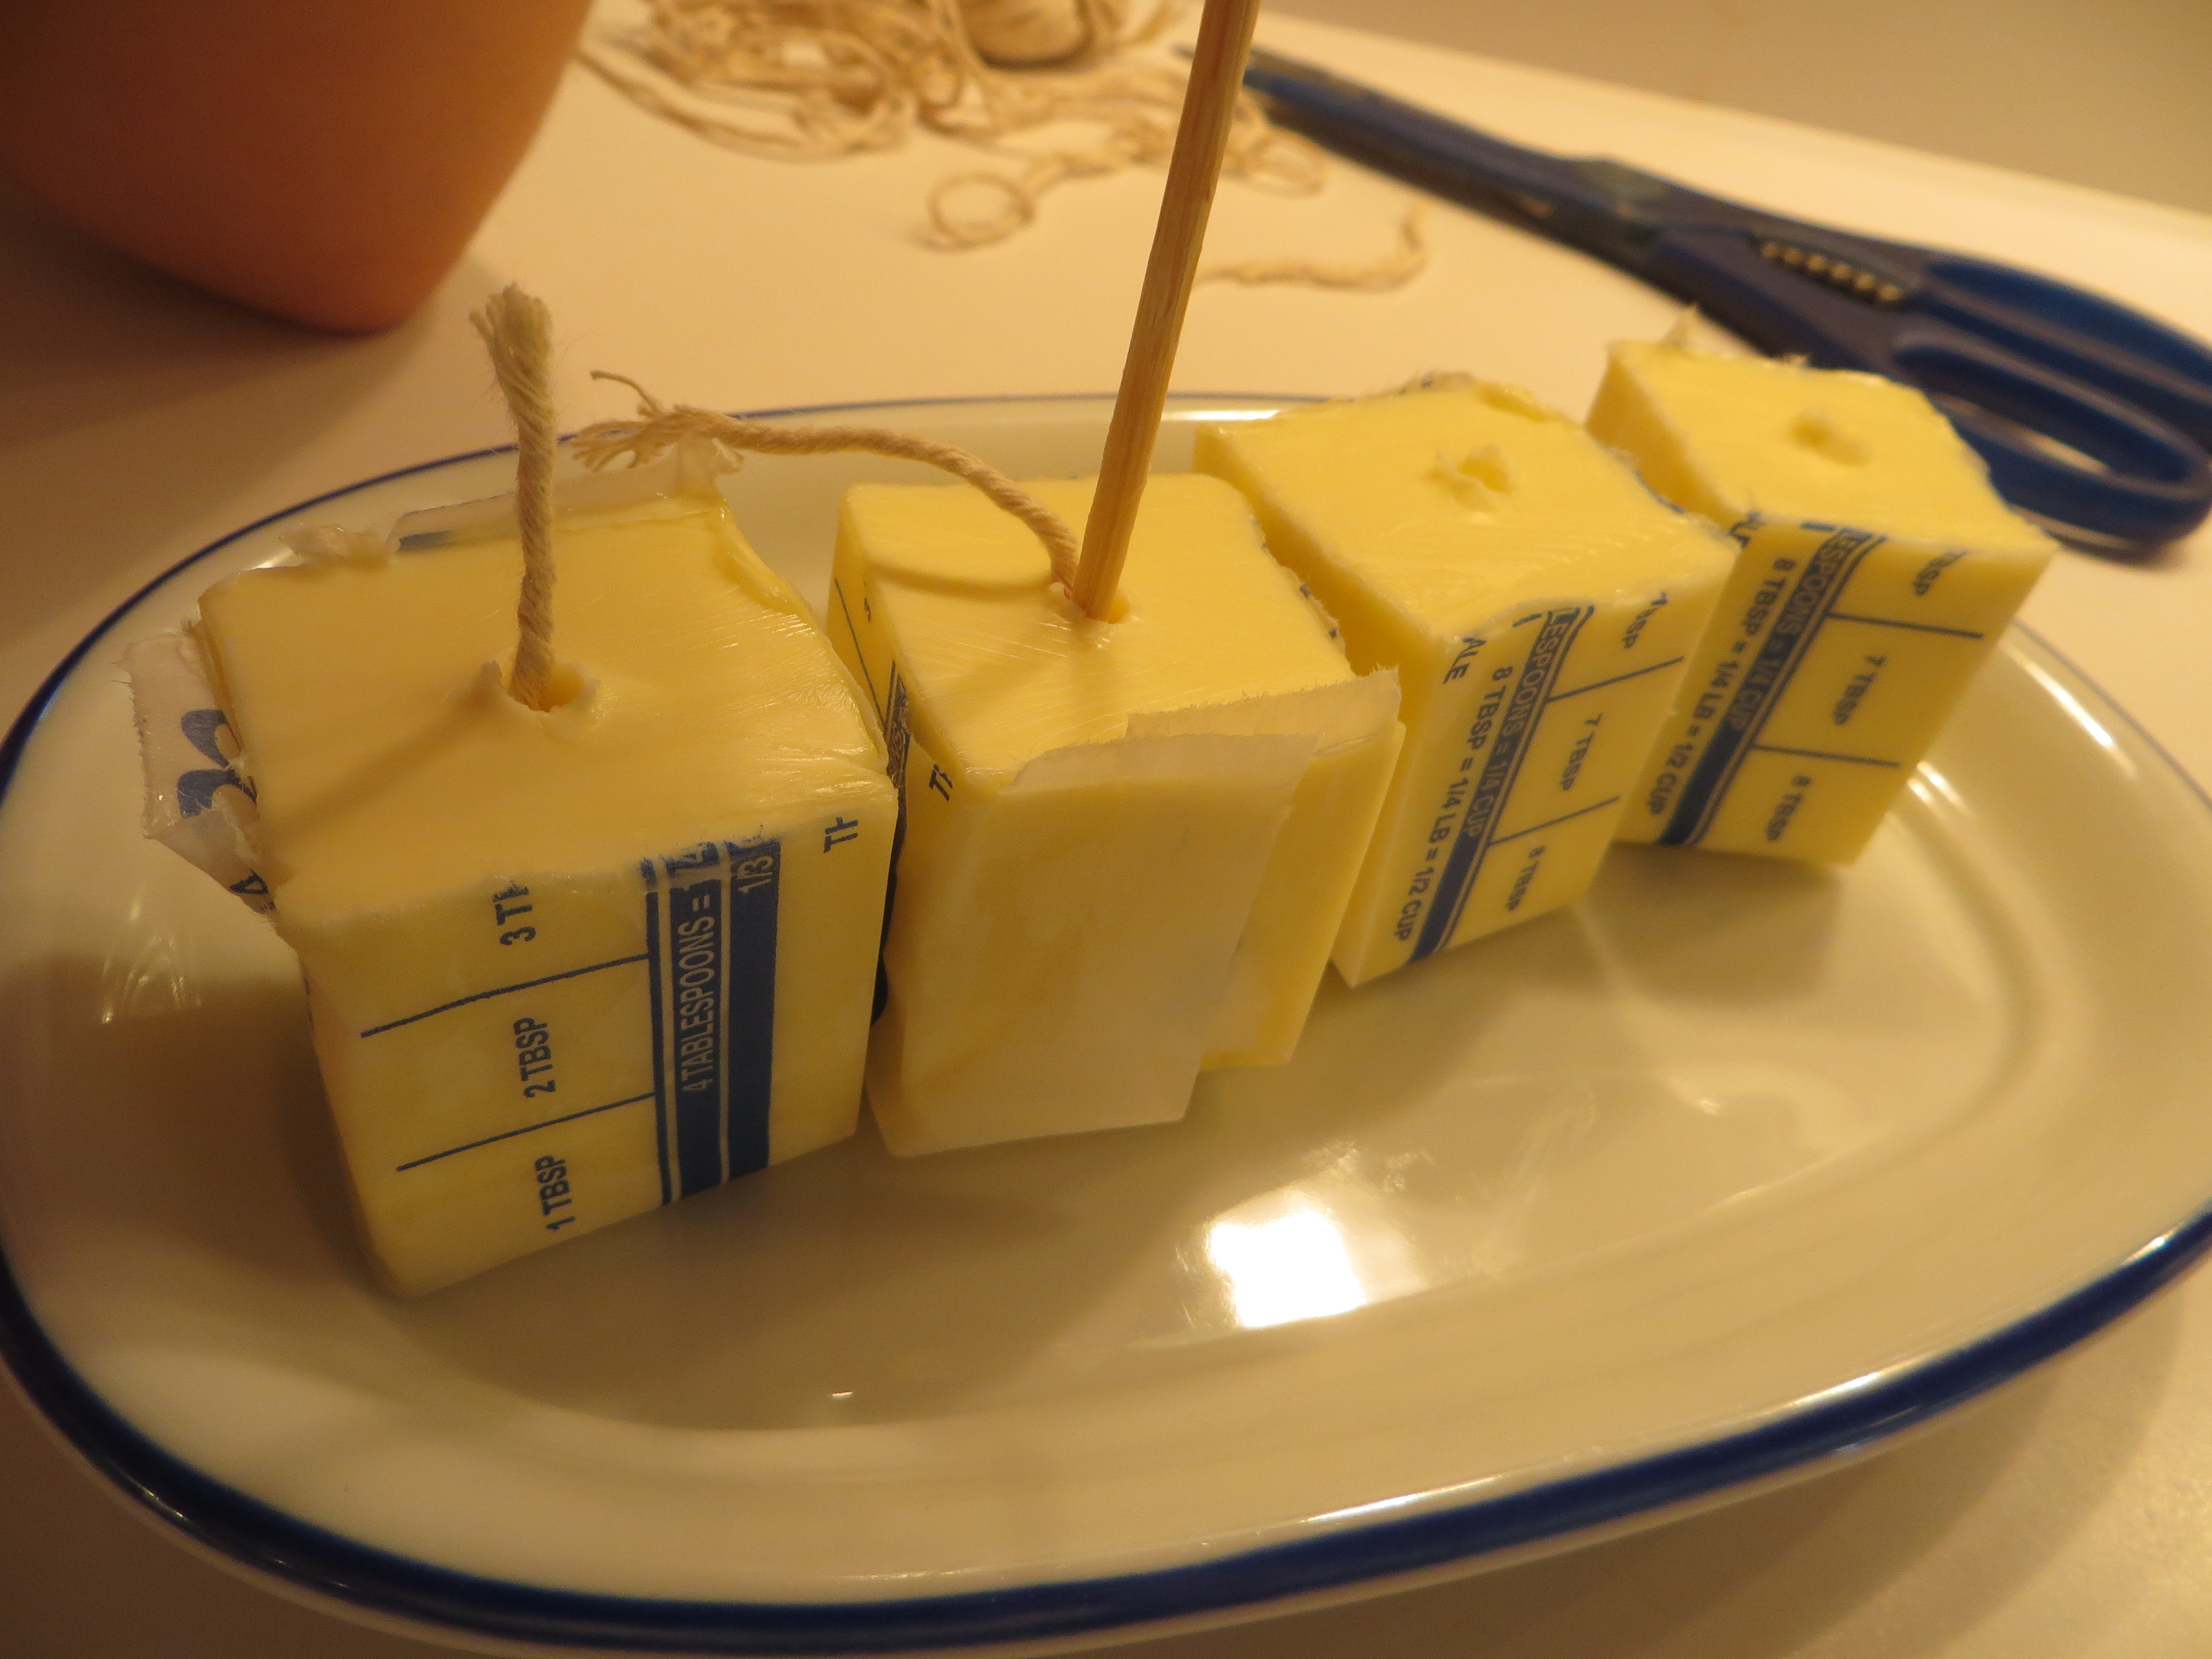
4. Push your string into the hold using your skewer or toothpick. Leave 1/4 inch or so sticking out. This is your candle wick.
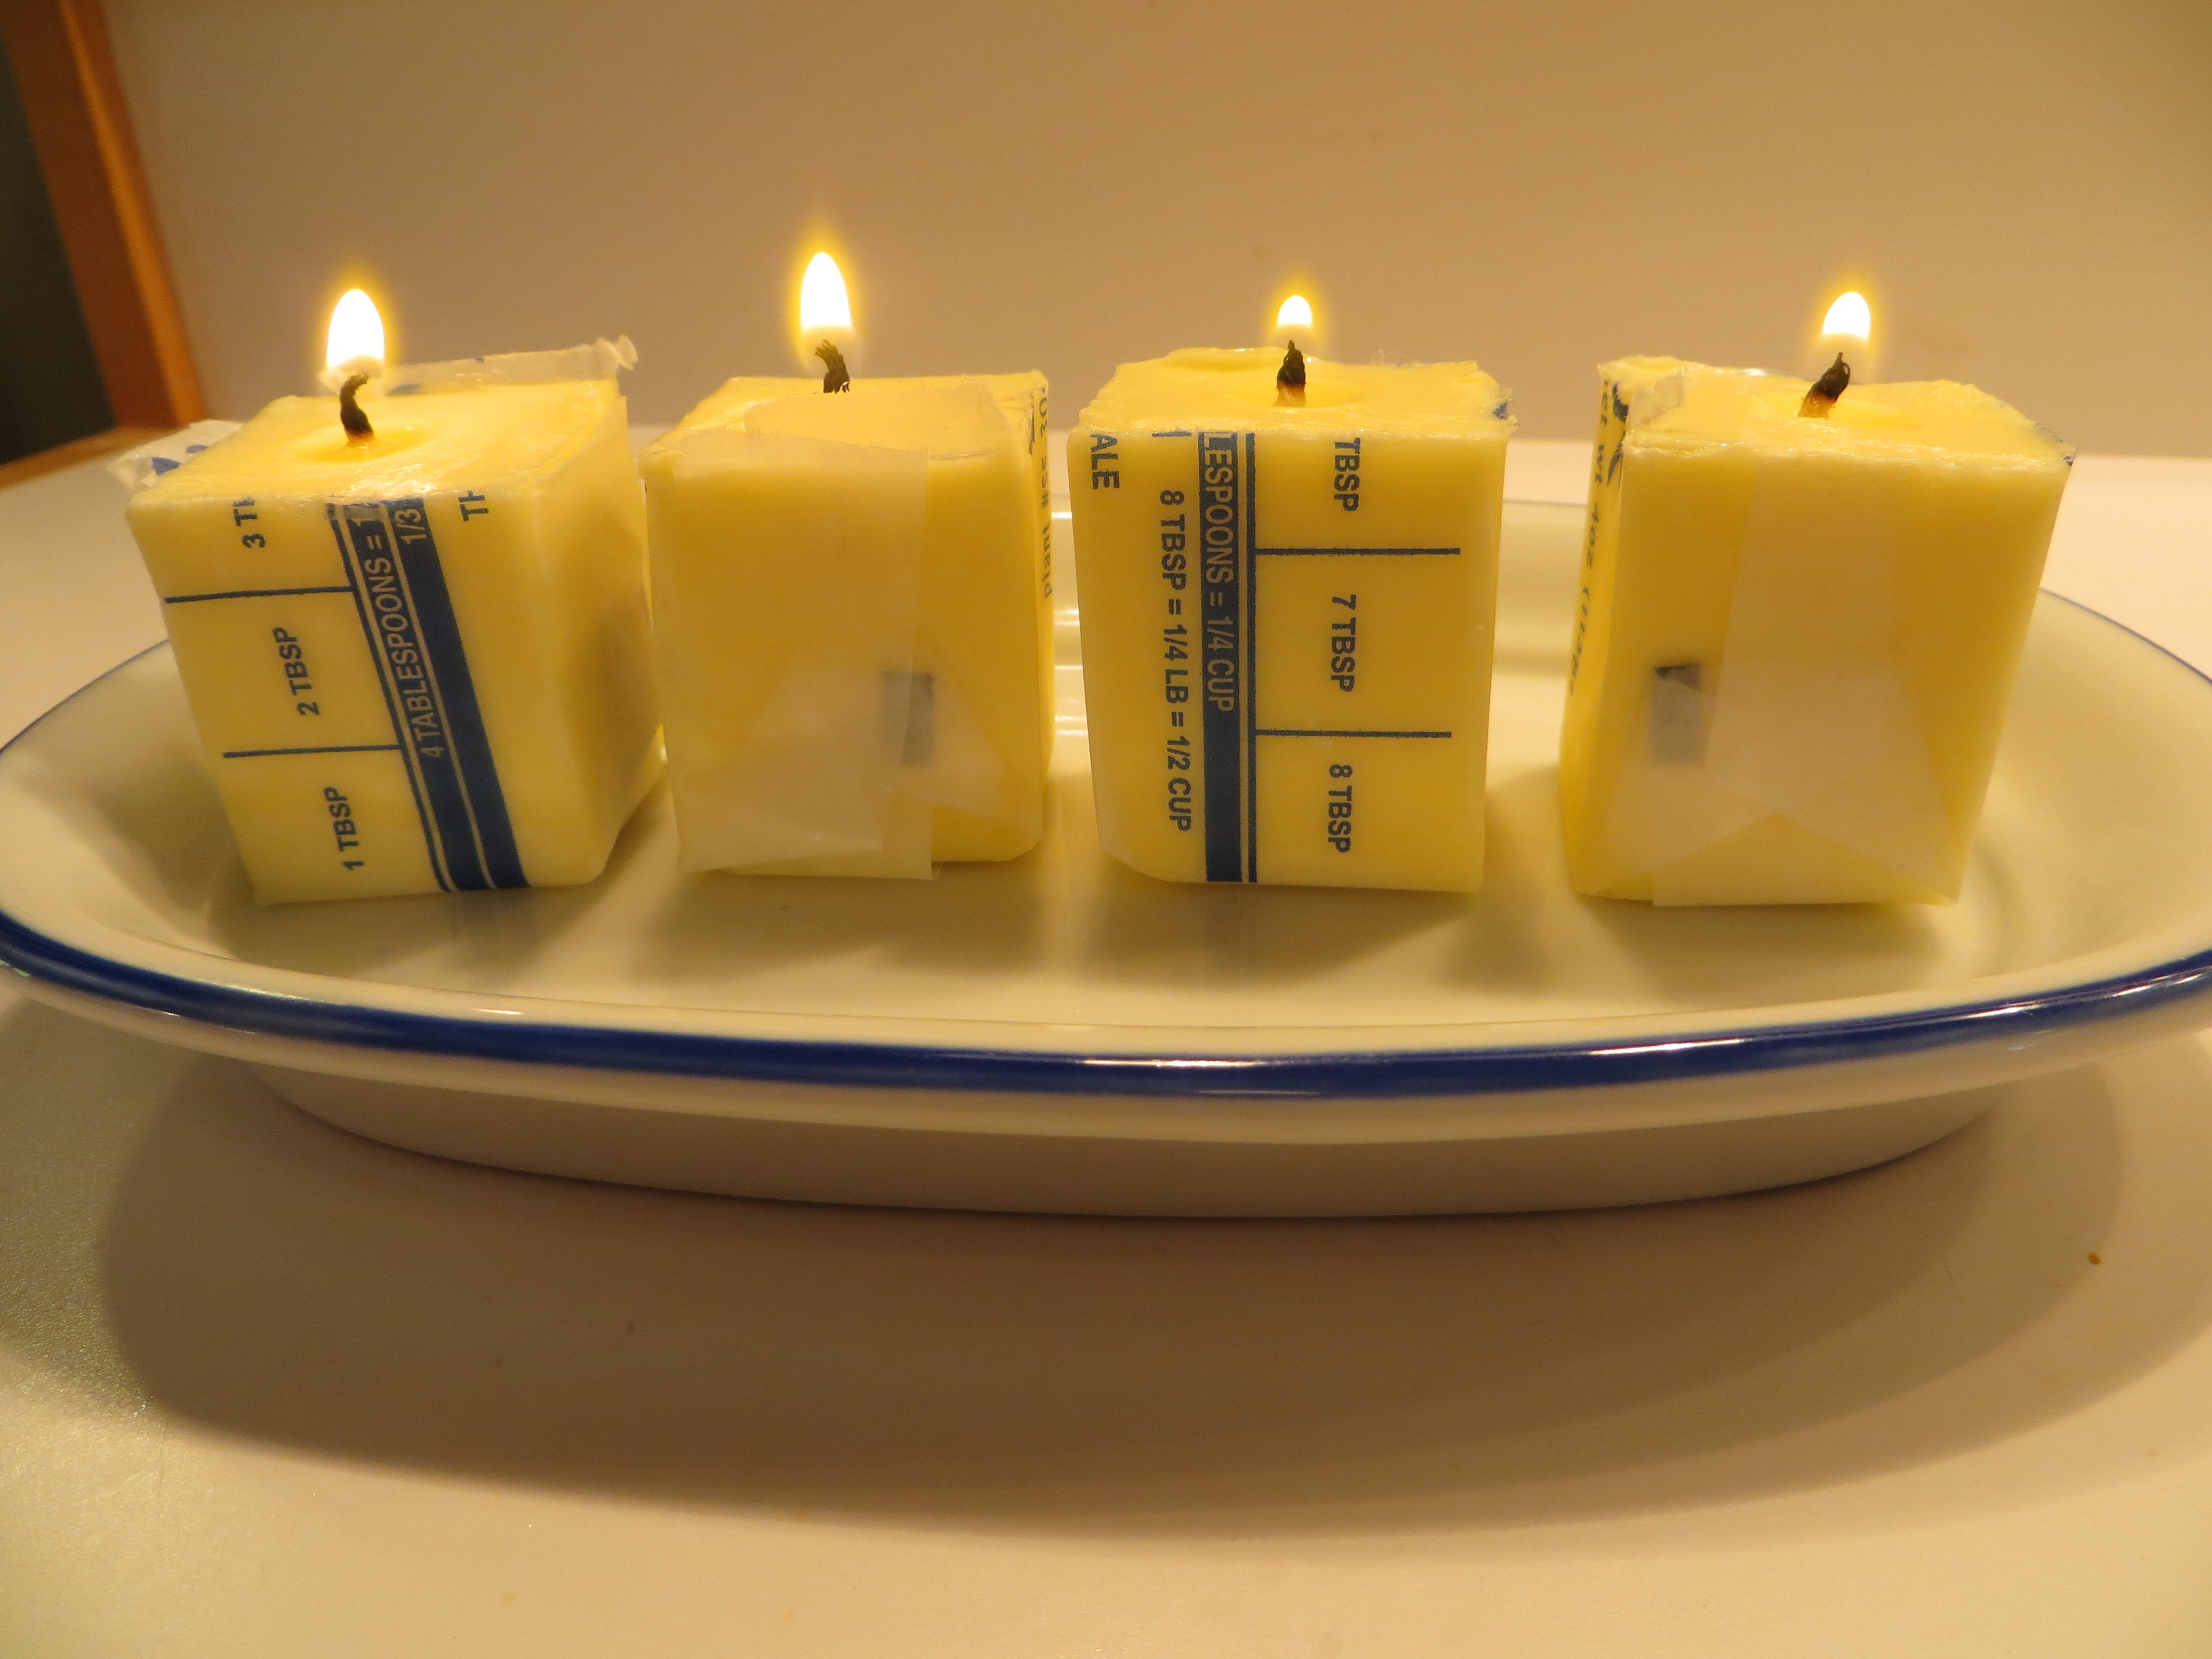
5. Rub a little butter onto the wick. Light your candle. It may take a few tries, but soon it should burn like a wax candle.
*As with all candles, butter candles should never be left unattended. Be sure to place your candles on a surface like a candle holder that cannot catch fire.
What happens? The lit cotton wick starts to burn and liquefies some of the butter fat. The wick then absorbs the melted butter and pulls it up,via capillary action, to the flame. The flame starts to burn the fat vapors rather than the wick, in a combustion reaction. This reaction produces heat, water vapor and carbon dioxide gas, putting the carbon is back in the atmosphere.
Since burning food isn’t an efficient use of energy or money (it takes lots of oil to raise and care for a cow,) scientists are coming up with ways to turn animal fats and byproducts that can’t be used as food into biofuels. Some inedible plant foods can be reused as well. For example, some cars can run on used cooking oil. Can you imagine how much oil a fast food restaurant throws away each week?
Although butter will never replace candle wax, butter candles are a good way to introduce the carbon cycle and get kids thinking about how new fuels and cleaner-burning fuel will impact the future of our planet.
To make the corn candle at the top of this post, we attached the butter candles to an ear of corn with broken off wooden skewers.
Simple Water Rockets
- by KitchenPantryScientist
You’ll have a blast learning physics by making water rockets!
While NASA’s rockets use rocket fuel as their working mass, these rockets use water. As pressurized air forces the water out of your rocket, the rocket moves in the opposite direction, just like Newton’s Third Law says it will. “For every action, there is an equal and opposite reaction.”
Although these rockets lack fins, a payload and a nose cone, you can see from this NASA illustration that they’re very similar to real rockets. You can make a complicated launch pad like this, but we decided to make things easy.
For this experiment, you’ll need:
-an empty one or two liter bottle from a carbonated beverage
-a cork that has been cut in half and will fit in the mouth of your bottle (An adult should do this. I used a serrated knife.)
-a needle for inflating balls
-a bike or ball pump
-a cardboard box cut to hold the bottle at an angle pointing away from you. This is your launch pad.
Push the needle through the cork so that it pokes out of the other side. Use the hole from the corkscrew to make it easier.

Needle should poke all the way through the cork.
Fill the bottle about 1/3 of the way full of water and insert the cork in the bottle.
Set the bottle in the cardboard box so that it’s pointing up, but away from you. See the photograph.

water rocket in launch pad
Attach the needle to the bike pump, stand behind the launch pad and start pumping air into the bottle. The air pressure will build in the bubble at the top of the rocket. When the pressure gets high enough, it will force the cork and water out of the bottle with lots of force, and as the water shoots down, the rocket will shoot up!
What happens if you add more water, or less water to your rocket?
Can you imagine riding a real rocket? Check out Astronaut Abby’s website to meet a girl who wants to ride a rocket some day and ask an astronaut on the International Space Station questions!
The Kaye Effect
- by KitchenPantryScientist
Have you ever wondered why it’s so hard to get ketchup flowing out of a bottle, or why no-drip paint doesn’t drip?

Ketchup, no drip paint, liquid soaps and shampoos are all part of a really amazing category of fluids known as “shearing liquids.” These fluids are pretty thick when they’re sitting still, but they get thinner or more “liquidy” as they flow, because movement decreases their viscosity, or thickness, making them more slippery.
Back in 1963, an engineer named Arthur Kaye noticed streams of liquid shooting from the surface below a stream of shearing liquid he was working with. This strange, short-lived phenomena became known as the Kaye effect.
With a chair, tape, some dish soap and a plastic ziplock bag, you can do your own Kaye effect experiment at home and watch soap jets shoot like ski jumpers from the very slippery shearing liquid soap pile below
-Tape a plastic ziplock bag to a chair with one corner or the bag pointed toward a plate underneath. The bag corner nearest the floor should be around 20 cm (about a foot) from the floor.
-Fill the bag with liquid soap or dish detergent. We added a few drops of food coloring to ours.
-Cut off the corner of the bag closest to the floor with scissors to make a tiny hole for the soap to flow through (1mm.) You may have to make it a little bigger, but you want a very thin, steady stream of soap flowing to the plate.
-Watch for jumping streams of soap. If it’s not working, try changing soap and adjusting bag hole size and bag height! What happens if you put the plate below at an angle?
To learn more about the Kaye effect and other cool physics stuff, visit Dr. Skyskulls’ website. He’s the physicist who told me about this experiment and helped me work out the protocol.
Egg Science: Standing on Raw Eggs
- by KitchenPantryScientist
Here’s the video we made last weekend for KidScience app that shows you how to stand on a carton of raw eggs without breaking them:
Remember, Force is pressure per unit of area. In the video, you’ll see what happens when you try to stand on eggs in high heels and the force isn’t evenly distributed.
Crock Pot Microbiology: Yogurt
- by KitchenPantryScientist
Microbes are always fighting for space.
Bacteria and fungi try to outnumber other tiny competitors using chemical warfare, among other things. That’s why many antibiotics (which kill certain bacteria) are actually produced by other bacteria. One reason foods like yogurt and cheese, which are made by beneficial bacteria like Lactobacillus acidopholis, don’t easily spoil is that these bacteria can turn milk sugars into lactic acid. This makes their environment toxic to some of their competitors, like pathogenic bacteria. Luckily, we humans aren’t harmed by lactic acid and can enjoy its tangy flavor.

To grow bacteria in labs, scientists have to take care of them the way you’d take care of a pet. You have to give them the type of food they like, the right amount of oxygen and moisture, and keep them at their optimal temperature.
The same principles apply to growing the bacteria that make yogurt. You prepare the bacteria’s food by heating some milk and letting it cool to a temperature that the bacteria can tolerate. Then, you add the bacteria and let them grow for about eight hours. During that time, the bacteria will happily divide, multiply and eat milk sugar. In the process, they’ll produce lots of lactic acid which changes the way the proteins and fats in the milk interact, forming a more solid food product.

We made yogurt in our crock pot, which turned out to be a lovely bacterial incubator. The end product was a little runny, but putting it through cheese cloth (or a coffee filter in a plastic bag with the tip cut off) gives you thicker yogurt. It is delicious! Here’s how we made it, thanks to directions from Stephanie O’Dea:
Ingredients: 8 cups (half-gallon) of whole milk , 1/2 cup grocery store yogurt (must contain live/active culture), thick bath towel, slow cooker

Turn crock pot on to low. Add an entire half gallon of milk. Cover and cook for 2 hours and 30 minute. Unplug your crock pot, but leave the cover on. Let it sit for 3 hours so your bacteria will not be overheated when you add them.
After 3 hours, put 2 cups of your warm milk in a bowl. Whisk in 1/2 cup of the live/active culture yogurt. Dump the bowl contents back into the crock pot and stir well. Wrap a heavy bath towel all the way around the unplugged crock pot as insulation and let your bacteria grow for 4-8 hours or until thickened. Refrigerate and enjoy with fruit, honey, or granola. As I mentioned, you can strain the yogurt if you prefer a thicker consistency, and your homemade yogurt will make a great starter culture for the next batch!

If you don’t have cheesecloth, you can strain your yogurt through a coffee filter in a plastic bag with a corner cut off.
Happy kitchen microbiology!
Homemade Petri Plates- Microbial Zoos
- by KitchenPantryScientist
 I’m re-posting this project we did two years ago, since I’m making plates today for a hand-washing experiment that the kids and I will do after school. Stay tuned!
Did you know that every surface in your home is teeming with microorganisms? Culturing microbes from your home on petri dishes lets you grow some of them as colonies that you can see with your naked eye. You might already have what you need in your kitchen cupboard. If not, the ingredients are readily available at most grocery stores. I demonstrated this experiment on Kare11 and you can watch it here, following the yeast experiment.
 To make petri plates, you’ll need disposable containers (see below), beef bouillon cubes or granules, plain gelatin or agar agar*, water, sugar and Q-tips. (*Agar-agar can be found with Asian groceries in some grocery stores.) **Gelatin will melt if it gets too warm, and some strains of bacteria can liquify it, which is why scientists in labs use agar to make their plates. The idea to use agar for plates originally came from Angelina Hess, who used agar for canning food.
For containers, you can use foil muffin tins, clear plastic cups covered with plastic baggies, clear Tupperware with lids, or real petri dishes. We’re going to use clear deli containers, so that we can recycle while we learn. (Containers must be heat-resistant enough to pour warm agar into.)
Start by making microbial growth medium (or microbe food, as we like to call it.) Mix together:
–1 cup water
-1 Tbs. agar-agar (OR one and one half packages gelatin, which is about one and a half oz or 12g)
–1 bouillon cube (or 1 tsp. granules)
–2 tsp. sugar
The next step requires adult assistance, since it involves very hot liquid. Bring the mixture to a boil on the stove or in the microwave, stirring at one minute intervals and watching carefully until the gelatin or agar is dissolved. Remove the boiling liquid from heat and cover. Let cool for about fifteen minutes.

Pour the medium carefully into clean containers, until 1/3 to 1/2 full. Loosely place lids, foil or plastic baggies over containers and allow dishes to cool completely. The geltin or agar should make the growth media hard like jello. When your plates have hardened, store them in a cool place, like a refrigerator, before using. Plates should be used in 2-3 days. When you are working with the plates, try to keep the lids on loosely whenever possible, so that they are not contaminated by microorganisms floating around in the air. If you’re planning to use muffin tins, simply place them in a muffin pan, fill them with agar, and when they’re cool, put them in individual zip-lock baggies. With other containers, put the lids on tightly once the plates harden.


When the plates are ready, shake the condensation (water droplets) off the lids of the containers and put them back on. If you have a clear container, you can draw a grid of four sections on the bottom of the plate with permanent marker. (If using muffin tins, label each bag with the surface you are checking.) Decide which surfaces you’d like to test.
Label your plates with the names of the surfaces you want to test. Be sure to label the bottom of the plate since the lid will move. You should be able to see through the agar to see your lines and your writing. If you want to, you can label a separate plate for each surface, but we had three kids and three plates, so we made sections. TV remotes, kitchen sinks, computer keyboard, doorknobs and piano keys are great surfaces to check. You can even touch your finger to the plate, cough on a plate, or leave one open to the air for half an hour to see what’s floating around! (See the photo at the top of this post for a better picture of how your plate might look.)
Rub a clean Q-tip around on the surface you want to test. Then, remove the lid from the plate and gently rub the Q-tip across the section of the plate labeled for that surface. If you’re careful, the agar shouldn’t break. If it does, it’s no big deal. When you’re done, set the plates on a flat surface with their lids loosened and taped on (do not invert them.)

Here’s what grew on one of our plates (pictured above): The large, fuzzy colonies are fungi and the small, whitish ones are probably bacteria.
See what grows! You will mostly see fungi (molds), but you may also see some tiny clear or white spots that are colonies formed by millions of bacteria. Record and draw how your plates look in your science notebook. Keep track of how long it takes things to grow and the shapes, sizes and colors of the microbial colonies that grow on their plates. Sciencebuddies.org has this great page on interpreting what you find growing on your plates! If you want to learn more about microbes, search for the words fungi and bacteria on the website cybersleuthkids.com and it will give you some great links to microbiology websites. Microbes are everywhere, but that very few of them are harmful, and many of them are essential for good health.
Wash your hands after handling the plates, and throw the plates away when you are done. Remember, if you washyour hands with regular hand soap for the length of time that it takes to say the ABCs, you’ll remove most of the harmful bacteria and viruses on them. (One side effect of this experiment is the sudden urge to disinfect computer keyboards and remote controls.)
Cranberry Science for Thanksgiving
- by KitchenPantryScientist
Grab an extra bag or two of cranberries and you can stir up a Thanksgiving science project: Spy Juice and invisible ink!

Click here for detailed directions.