Category:Biology Experiments’
Dinosaur Science
- by KitchenPantryScientist
Today on Twin Cities Live, we did some dinosaur-related science experiments in honor of the Science Museum of Minnesota’s new Ultimate Dinosaurs exhibit.
Here are directions for doing the experiments in the video. Just click on the name to go to the post.
Window Stickies diffusion experiment
Have fun!
#SpaceMicrobes
- by KitchenPantryScientist
A soil bacterium we swabbed last spring on the set of Twin Cities’ Kare11 News is headed to the International Space Station! Even though we collected it here in Minnesota, Streptomyces kanamyceticus (we’ll call it S.kan for short) was first isolated from dirt in Japan.
It’s a very cool bacterium. Not only does it grow in really interesting colonies like the ones you see in the photo below, but it produces an antibiotic called Kanamycin that’s widely use in research, industry and medicine. Our #MinnesotaMicrobe takes off on March 16th from Kennedy Space Center on a SpaceX-3 rocket! Follow the mission on Project MERCURRI’s website, here on my blog, or using the #spacemicrobes hashtag on Twitter.

After we sent our sample off in the mail, it was swabbed onto bacterial growth medium and these cool little colonies were grown by the scientists from Project MERCURRI, alongside other samples swabbed from NFL and NBA stadiums, NASA spacecraft, and even from a candy jar at Kare11’s sister NBC studio at the Today Show. Around 40 of the samples were chosen to travel to the International Space Station (ISS) for a “Superbowl” of microbes. Scientists want to study how the bacteria grow and change in space and want to get the public excited about the project.
Why should we care how bacteria grow on the ISS, or on any spacecraft?
Microbes behave oddly out in space, and when humans exit Earth’s atmosphere, we carry microscopic inhabitants along with us. Tiny terrestrials (mostly bacteria) outnumber our bodies’ own cells by about ten to one, and microbes too small to see with the naked eye cover everything you around you, assuming you don’t live in a sterile bubble.
Pseudomonas aeruginosa, a funny little bacterium that smells like grapes and loves water, grows differently in microgravity. These bacteria form slime layers called biofilms and can cause problems for extraterrestrial toilets and water systems, like the ones on the International Space Station (ISS). Here on Earth, P. aeruginosa can make people who have been badly burned and people with cystic fibrosis (CF) really sick.
NASA also discovered that spending time on the International Space Station made Salmonella bacteria, which cause food poisoning, more virulent. In other words, they can make you sicker.
By studying what happens to terrestrial bacteria in space, scientists can discover new ways to fight infectious disease on Earth and hope to prevent mechanical and medical disasters on future space missions. Microbes may even offer ways to clean up waste in space or generate new medications mid-mission. After all, it will take a long time to get to Mars, and it may be a one-way trip for the first humans to travel there!
If you want to make your own microbial growth plates at home to see what’s growing around your house, you can find directions and a video on how to do it here. In the next week or so, I’ll post instructions for a cool new microbiology experiment that I’ve been thinking about.
Science Fairs Made Simple (For Parents)
- by KitchenPantryScientist
Parents are under a ridiculous amount pressure to make sure kids finish homework, practice for music lessons and make it to sporting events, among other things. I saw the photo below on Facebook yesterday, and then again in a post on an awesome science blog called “It’s OK to Be Smart . The poster is funny, but kind of sad if you love science. It inspired me to share a few tips on making science fairs less painful for parents and to list of some of my favorite simple experiments. Most of them use ingredients you have on hand and you can also find these experiments and more, like DNA extraction from strawberries, on KidScience app and in my book Kitchen Science Lab for Kids.

Poster/photo by Susan Messina
Parents: Insist that kids take the reins on their science fair projects. Let them look through this list of experiments, and then sit down with them for five minutes and tell them to think about how you can take simple experiments like these to the next level by applying them to real life. (For example, how could you test whether soap or hand sanitizer removes more of the microbes you can grow on a homemade petri dish?) What might happen if you change the variables, like how much water you use, the temperature or even the materials used in the original experiment?
Kids: Here are a few ideas to get you started. Just click on the experiment name or the blue typeface to follow the link to instructions, photos and videos of the experiments. Choose one that you have the ingredients for and try it! You shouldn’t need help for most of these unless you have to boil something. Lots of them even have a video you can watch, if you’re not sure about one of the steps. My kids and I have tested them all and you can leave a comment here if you have any questions. Do more research into the science behind what you’re doing and think about how you could apply this experiment to something in real life.
Diffusion Experiment See how food coloring or other liquids diffuse through gelatin. You could even do this with yellow or orange jello if you don’t have plain. How can you change the rate of diffusion? Think about how the chemicals we add to water, put on our streets to melt ice, and spray on our lawns and crops can move into our soil, ground water, rivers, lakes and oceans.
Microbial Zoos Sample different surfaces with a cotton swab, or do a hand washing experiment, and grow the microbes on a homemade petri plate. (You’ll need some agar for this, so it may require a trip to the store.) Here’s a video on how to make the plates.
Vegetable Vampires See how plants take up water using the forces of physics. Does this experiment work better with some plants than others?
Shocking Machine Make an electrophorus and Leyden jar to shock your friends! Here’s how to do it. We demonstrated it on Kare11!
Frankenworms This is a fun candied chemical reaction. Gummy worms soaked in baking soda and water come to “life” when you drop them into vinegar! Click here for directions and a video.
Oil Spill Experiment: See why oil is so hard to clean up. What works best to remove it from water and feathers?
Goblin Goo (All you need is cornstarch and water. Here’s a video on how to make the goo. You can add a little food coloring to the water if you want, but it may stain your hands!)
Magic Bag (If you have ziplock baggies, water, red food coloring and skewers, you can do this experiment!) Here’s the video.
Fizzy Balloons (After we made Goblin Goo, I demonstrated how to make Fizzy Balloon Monster heads. Click here to watch.)
Magic Potion (Bubbly, stinky Halloween fun: I made a short video on how to make magic potion. Click here to watch it
Mad Scientist’s Green Slime (To see a TV segment where we made Mad Scientist’s Green Slime, click here!) Here’s another video.
Apple Mummies (Here’s a link to a TV segment where the kids and I demonstrated how to make Apple Mummies. Click here.)
Alien Monster Eggs (These make a great centerpiece for a Halloween party, when you’re done playing with them.) I demonstrated how to make them on Kare 11! Click here to watch the video.
Marshmallow Slingshots Lob Marshmallow eyeballs and spiders at a pumpkin or another target in this fun physics experiment. Do different size rubber bands make a difference?
Window Sprouts: Plant a bean in a plastic baggie with a damp paper towel to see how plants need only water and air to sprout roots and leaves. Here’s a short video demonstrating how to make a window garden.
Homemade Solar Oven: Using a pizza box, aluminum foil, plastic wrap, and newspaper, you can harness the sun’s energy to cook your own S’mores!
Carbon Dioxide and Ocean Acidity: See for yourself how the carbon dioxide in your own breath can make a water-based solution more acidic. It’s the same reason too much carbon dioxide in Earth’s atmosphere can be bad for our oceans.
Plant Transpiration: See how trees “sweat” in this survival science experiment.
Earthworm Experiment: Do you know what kind of earthworms are living in your back yard?
Composting: Be a composting detective. Bury some things in your back yard (away from power cables) and dig them up in a few months to see how they look. Composting reduces methane gas emissions (a greenhouse gas) from dumps.
Solar Water Purification: This project illustrates the greenhouse effect and is a fun “survival science” experiment. Requires hot sun and some patience!
Citizen Science: Don’t forget about all the real environmental research projects you can participate in through Citizen Science programs all around the world!
For mores activities and games, check out NASA’s Climate Kids website, to see a kid-friendly diagram of the water cycle, click here.
Spy Juice
- by KitchenPantryScientist
Thanksgiving isn’t the same without cranberries. This year, pick up an extra bag for this fun science experiment.

With cranberries and baking soda, you can create invisible messages that will be revealed to friendly eyes and self-destruct before your enemies have a chance to read them. You’ll see how some pigments in fruit can change color when they’re exposed to an acid or a base. *I discovered that some paper will turn blue in cranberry juice, so test the type of paper you want to use by first dipping a small piece it in the cranberry juice (before you start writing messages!) It should turn pink, not blue. Otherwise, you won’t be able to see your message!
We made Spy Juice on Kare11 Sunrise News a few years ago. Click here to watch.
You’ll need
-half a bag of cranberries
-water
-baking soda
-printer paper.
-a homemade pen: To write your message, you’ll also want to find a small paintbrush, Q-tip, or something else with an absorbent tip. We had the best luck using cake-pop sticks or cotton swabs cut in half (non-cotton end) as pens.
Have an adult or teenager boil the cranberries in about three cups of water for 15 or 20 minutes. Be sure to put a lid on the pan, since the small pockets of air that help cranberries float can make them explode as they cook. If you listen, you’ll hear some of the them popping! Crush the cooked berries and push the liquid through a sieve or colander to collect the concentrated cranberry juice. Most cranberry juice from the grocery store is diluted with water, corn syrup and other juices and won’t work as well!
Let the juice cool and pour it into a casserole dish or cake pan that the paper you’re writing your messages on will fit into. If your cranberry juice seems thick and syrupy, add a little water (maybe half a cup.) It has to have enough water in it so that it will soak into the paper!
To make your invisible ink, add a few teaspoons of baking soda to about 1/3 cup of warm water and dissolve it as well as you can. Don’t worry if you can still see some baking soda. Using your homemade writing tool, use the baking soda solution to write a message on your paper. It may take a little practice, so don’t get frustrated. You’ll get the hang of it!

Let your message air dry, or speed things up with a blow dryer.
To reveal your message, float and then submerge your paper in the cranberry juice and see what happens!

The science behind the fun:
Cranberries contain pigments called anthocyanins (an-tho-SY-a-nins), which give them their bright color. In nature, these pigments attract birds and other animals to fruit. This is important because animals eat the berries and spread plants seeds from one place to another.
These pigments, called flavanoids, change color when they come in contact with acids and bases. Cranberry juice is very acidic, and the pigment is red in acids. When you add it to a base, it turns purple or blue. Baking soda is a base, so your baking soda message will turn blue when it comes into contact with the pigments in the cranberry juice. Eventually, when enough cranberry juice soaks into the paper, it will dilute the baking soda and make the paper acidic, turning the pigment back to red and your message will disappear!
There are over 300 kinds of anthocyanins which are found in many fruits and vegetables including blueberries, red cabbage, grapes and blueberries. Scientists think they may have many health benefits and some researchers are even making organic solar cells using flavanoids!
Enrichment: What other juices can you use to reveal secret messages? What else could you use as ink? If you use lemon juice as ink, does it turn a different color?
Try making your own recipe for spy juice! I’d love to hear how red cabbage works! Check out my red cabbage litmus paper experiment to find out how to make red cabbage juice.
Vegetable Vampires
- by KitchenPantryScientist
Plants love water as much as vampires love blood. Although they don’t have long thin fangs, they’ve developed a great system for pulling water up through their trunks and stems to their highest leaves using capillary action.
The kids and I demonstrated how to make them on WCCO MidMorning. Click here to watch.

after 24 hours of “drinking”
Make a vegetable vampire and watch capillary action move colored water through the cabbage creature you created.
To make a leafy vampire, you’ll need:
-head of fresh napa cabbage
-2 large cups, jars or plasticware containers large enough to hold the base of ½ of your cabbage
-food coloring
-fruits and veggies to use as eyes and eyebrows on your monster
-toothpicks
-rubber bands or string
First, fill your two containers ¾ of the way to the top with warm (not hot) water.
Add 10 or more drops of blue food coloring to one container and 10 or more drops of red food coloring to the other .
With a sharp knife, cut the cabbage in half vertically, from the bottom up, leaving the top 10cm or so intact, so the two pieces are still attached at the crown. If possible, try to cut down the middle of one of the big leaves.
Use rubber bands to secure the bottoms of each side of the cabbage and make a fresh cut at the bottom, a few cm up from the old cut.
Put one half of the base of your cabbage in the red water, and the other half in the blue water.
Decorate your two “vampires” with eyes and spooky eyebrows made from olives and peppers (or whatever you have in the refrigerator.) Secure the decorations with toothpick.

Keep an eye on your cabbage to see how much colored water it’s drinking. Your vegetable vampire will have to drink for 24-48 hours for the best results.
Plants survive by drawing nutrients dissolved in water up into their stems, stalks, trunks, branches and leaves.
Capillary action is the main force that allows the movement of water up into plants. In a narrow tube, on a surface that attracts water, the attraction between the surface and water, coupled with the attraction of the water molecules to each other, pulls water up. Plants are composed of huge numbers of tube-shaped cells that take advantage of these physical forces.
In this experiment, you can see colored water being taken up, via capillary action, into your cabbage.
Imagine how high the water in giant redwoods has to travel to reach the leaves at the top. In very tall trees, a process called transpiration helps the water overcome the forces of gravity. Here’s a transpiration experiment you can try at home.
Halloween Science Roundup
- by KitchenPantryScientist
Halloween Halloween brings out the kid in all of us, and there’s no better way to celebrate than with some ghoulish science experiments. Next week, I’ll be adding Vegetable Vampires and Zombie Candy to the lineup!

Here’s a list of our favorites. Just click on the name of the experiment to go to the instructions, see photos of what to do, and learn a little science. Most have links to videos or TV segments where I demonstrate how to do the experiments.
Shocking Machine Make an electrophorus and Leyden jar to shock your friends! Here’s how to do it. We demonstrated it on Kare11 last week!
Frankenworms Gummy worms soaked in baking soda and water come to “life” when you drop them into vinegar! Click here for directions and a video.
Goblin Goo (All you need is cornstarch and water. Here’s a video on how to make the goo. You can add a little food coloring to the water if you want, but it may stain your hands!)
Bag of Blood (If you have ziplock baggies, water, red food coloring and skewers, you can do this experiment!) Here’s the video.
Fizzy Balloon Monster Heads (After we made Goblin Goo, I demonstrated how to make Fizzy Balloon Monster heads. Click here to watch.)
Magic Potion (Bubbly, stinky Halloween fun: I made a short video on how to make magic potion. Click here to watch it.
Mad Scientist’s Green Slime (To see a TV segment where we made Mad Scientist’s Green Slime, click here!) Here’s another video.
Apple Mummies (Here’s a link to a TV segment where the kids and I demonstrated how to make Apple Mummies. Click here.)
Alien Monster Eggs (These make a great centerpiece for a Halloween party, when you’re done playing with them.) I demonstrated how to make them on Kare 11! Click here to watch the video.
Creepy Critter Slingshots Lob Marshmallow eyeballs and spiders at a pumpkin or another target in this fun physics experiment.
Butter Candles and Biofuel
- by KitchenPantryScientist
Biofuels are burnable energy sources produced by living organisms, like corn, algae, and even cows. Microorganisms and plants gather carbon from the atmosphere and incorporate it into the organic compounds that make up things like leaves, fruit, stems and wood. When animals eat plants and microbes, they store some of the carbon energy they’ve gobbled up as fat, like the milk fat used to make butter. Scientists call carbon stored in plants, microbes and animals “new” carbon. Old carbon is carbon tied up in fossil fuels like coal and oil, that’s been underground for millions of years.
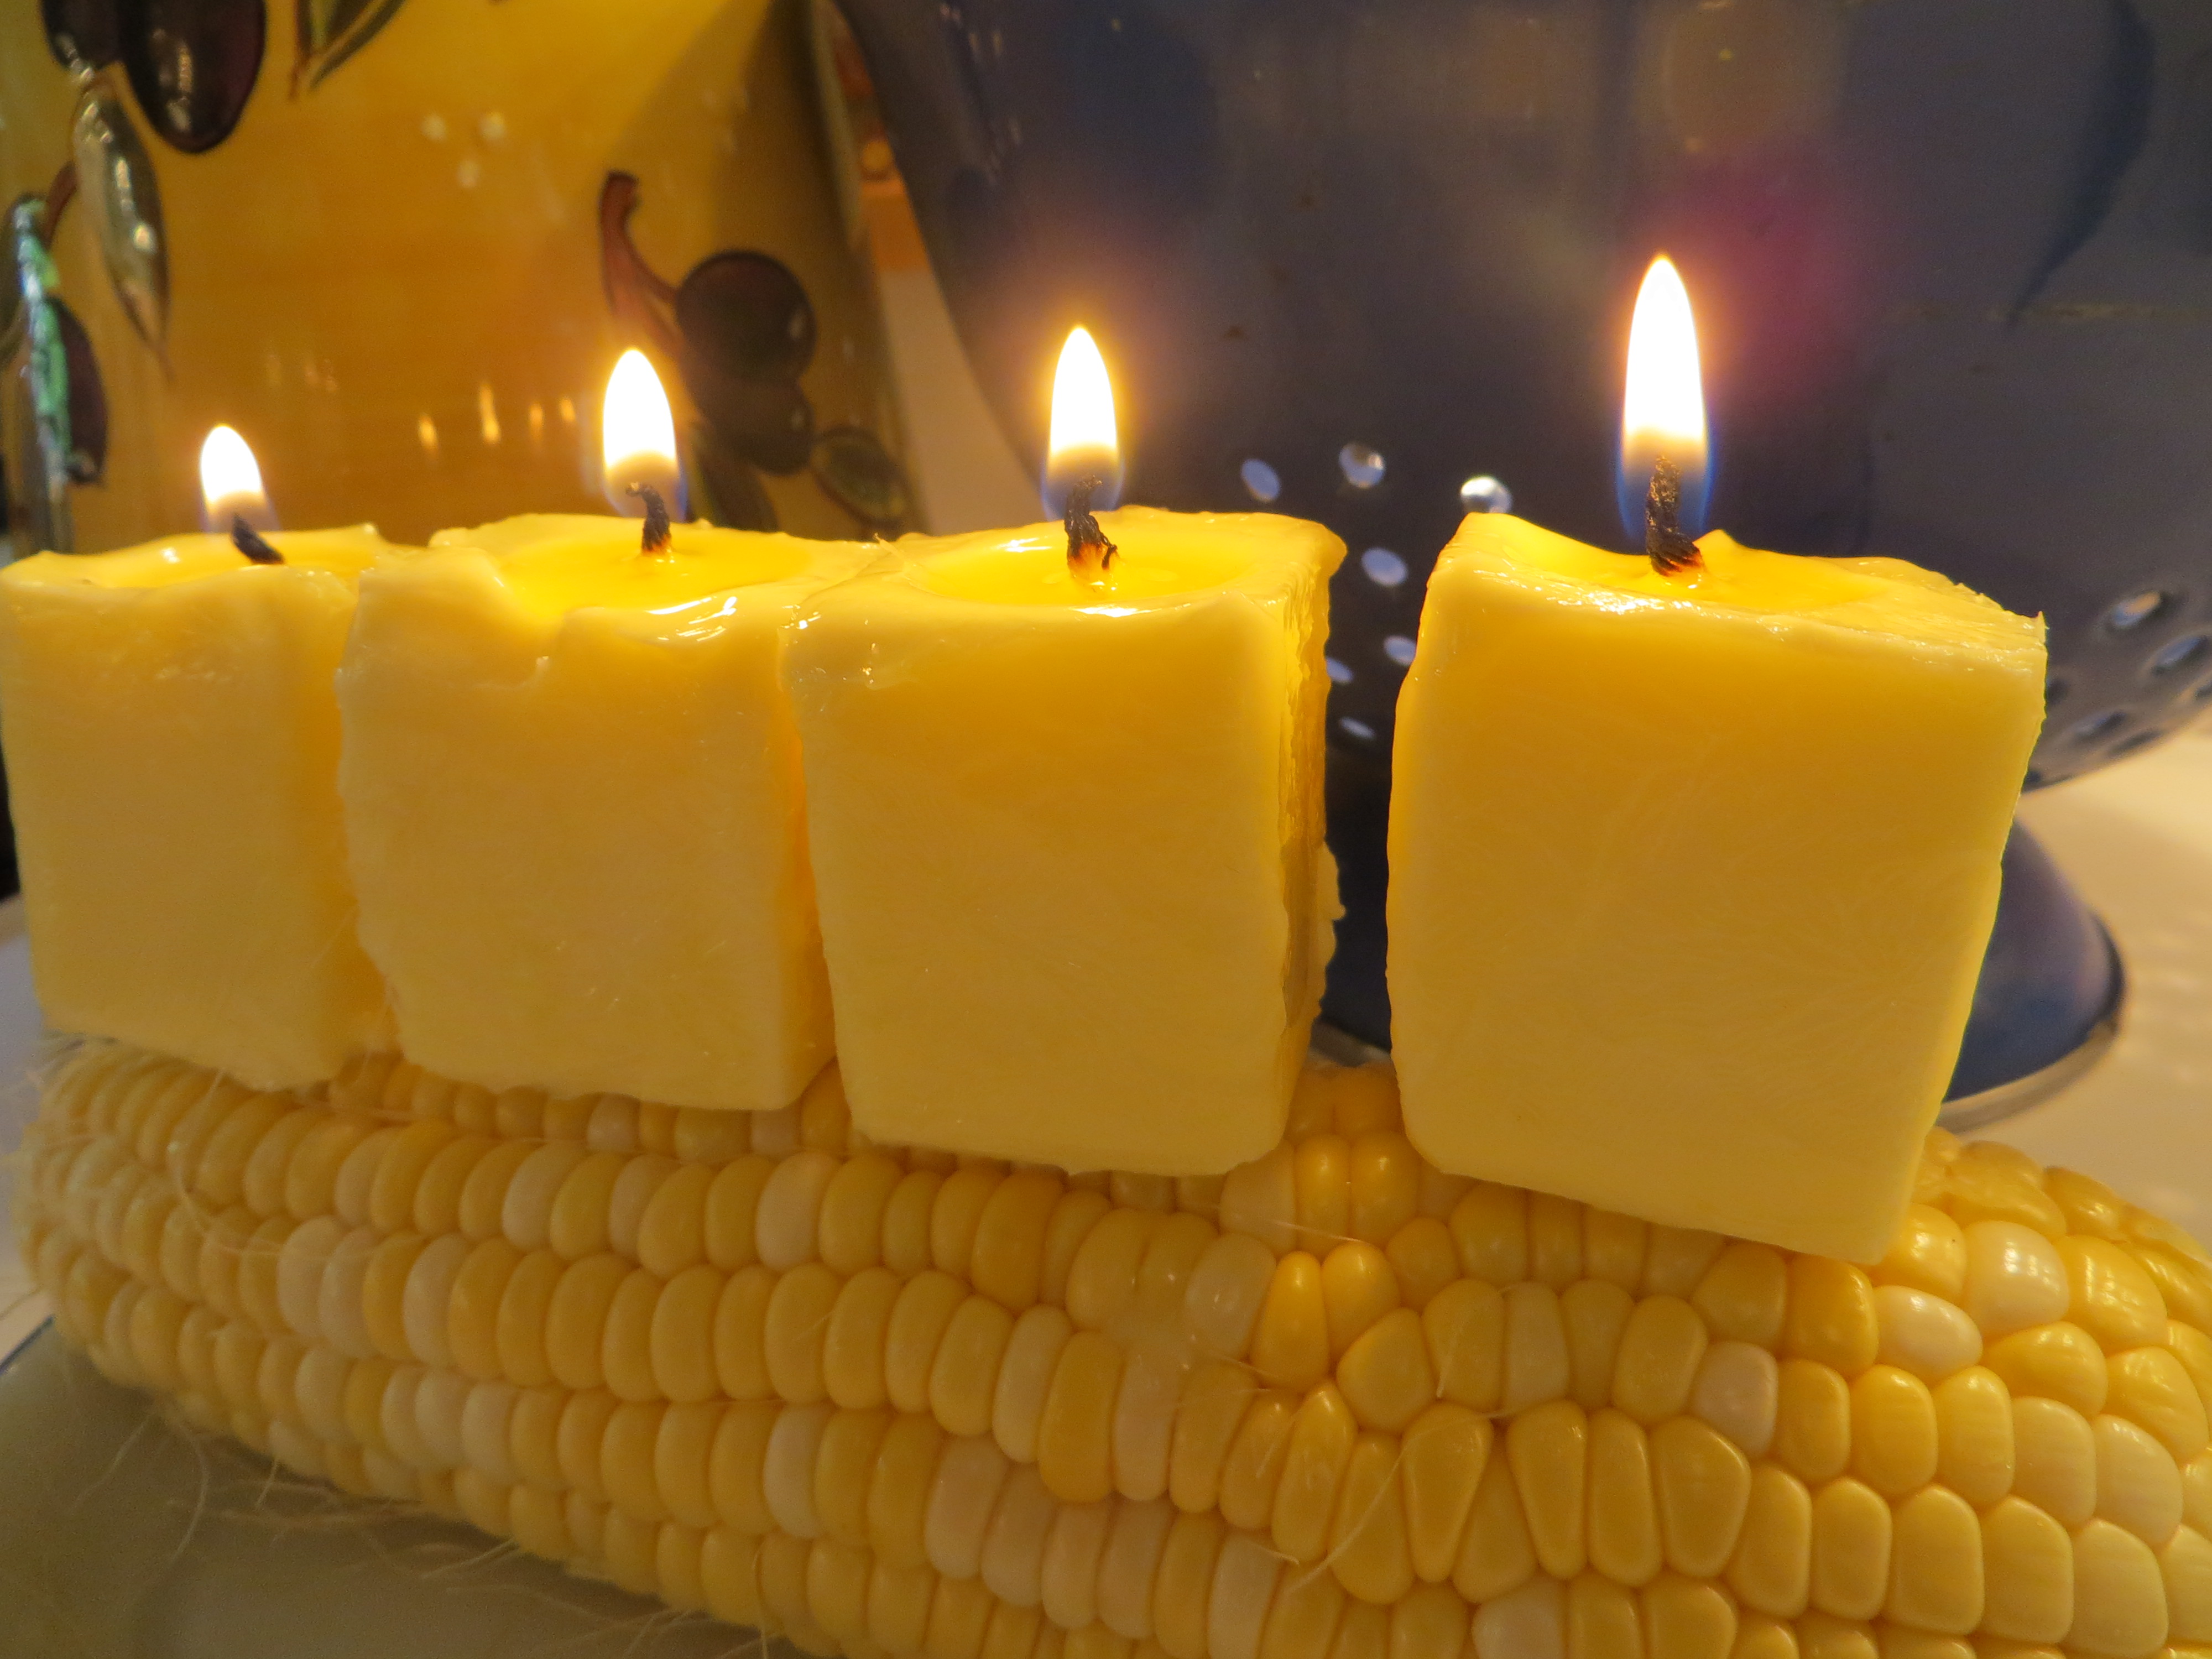
We used broken-off skewers to attach our butter candles to an ear of corn.
Although butter isn’t usually burned as a fuel, a Pennsylvania farm show recently converted their thousand pound butter sculpture into 3 days-worth of power for a local farm, using a methane digester. The New York State Fair turned its butter sculptures into biodiesel fuel. At home, you can make a stick of butter into a candle to see for yourself how an animal product can be used as a fuel.
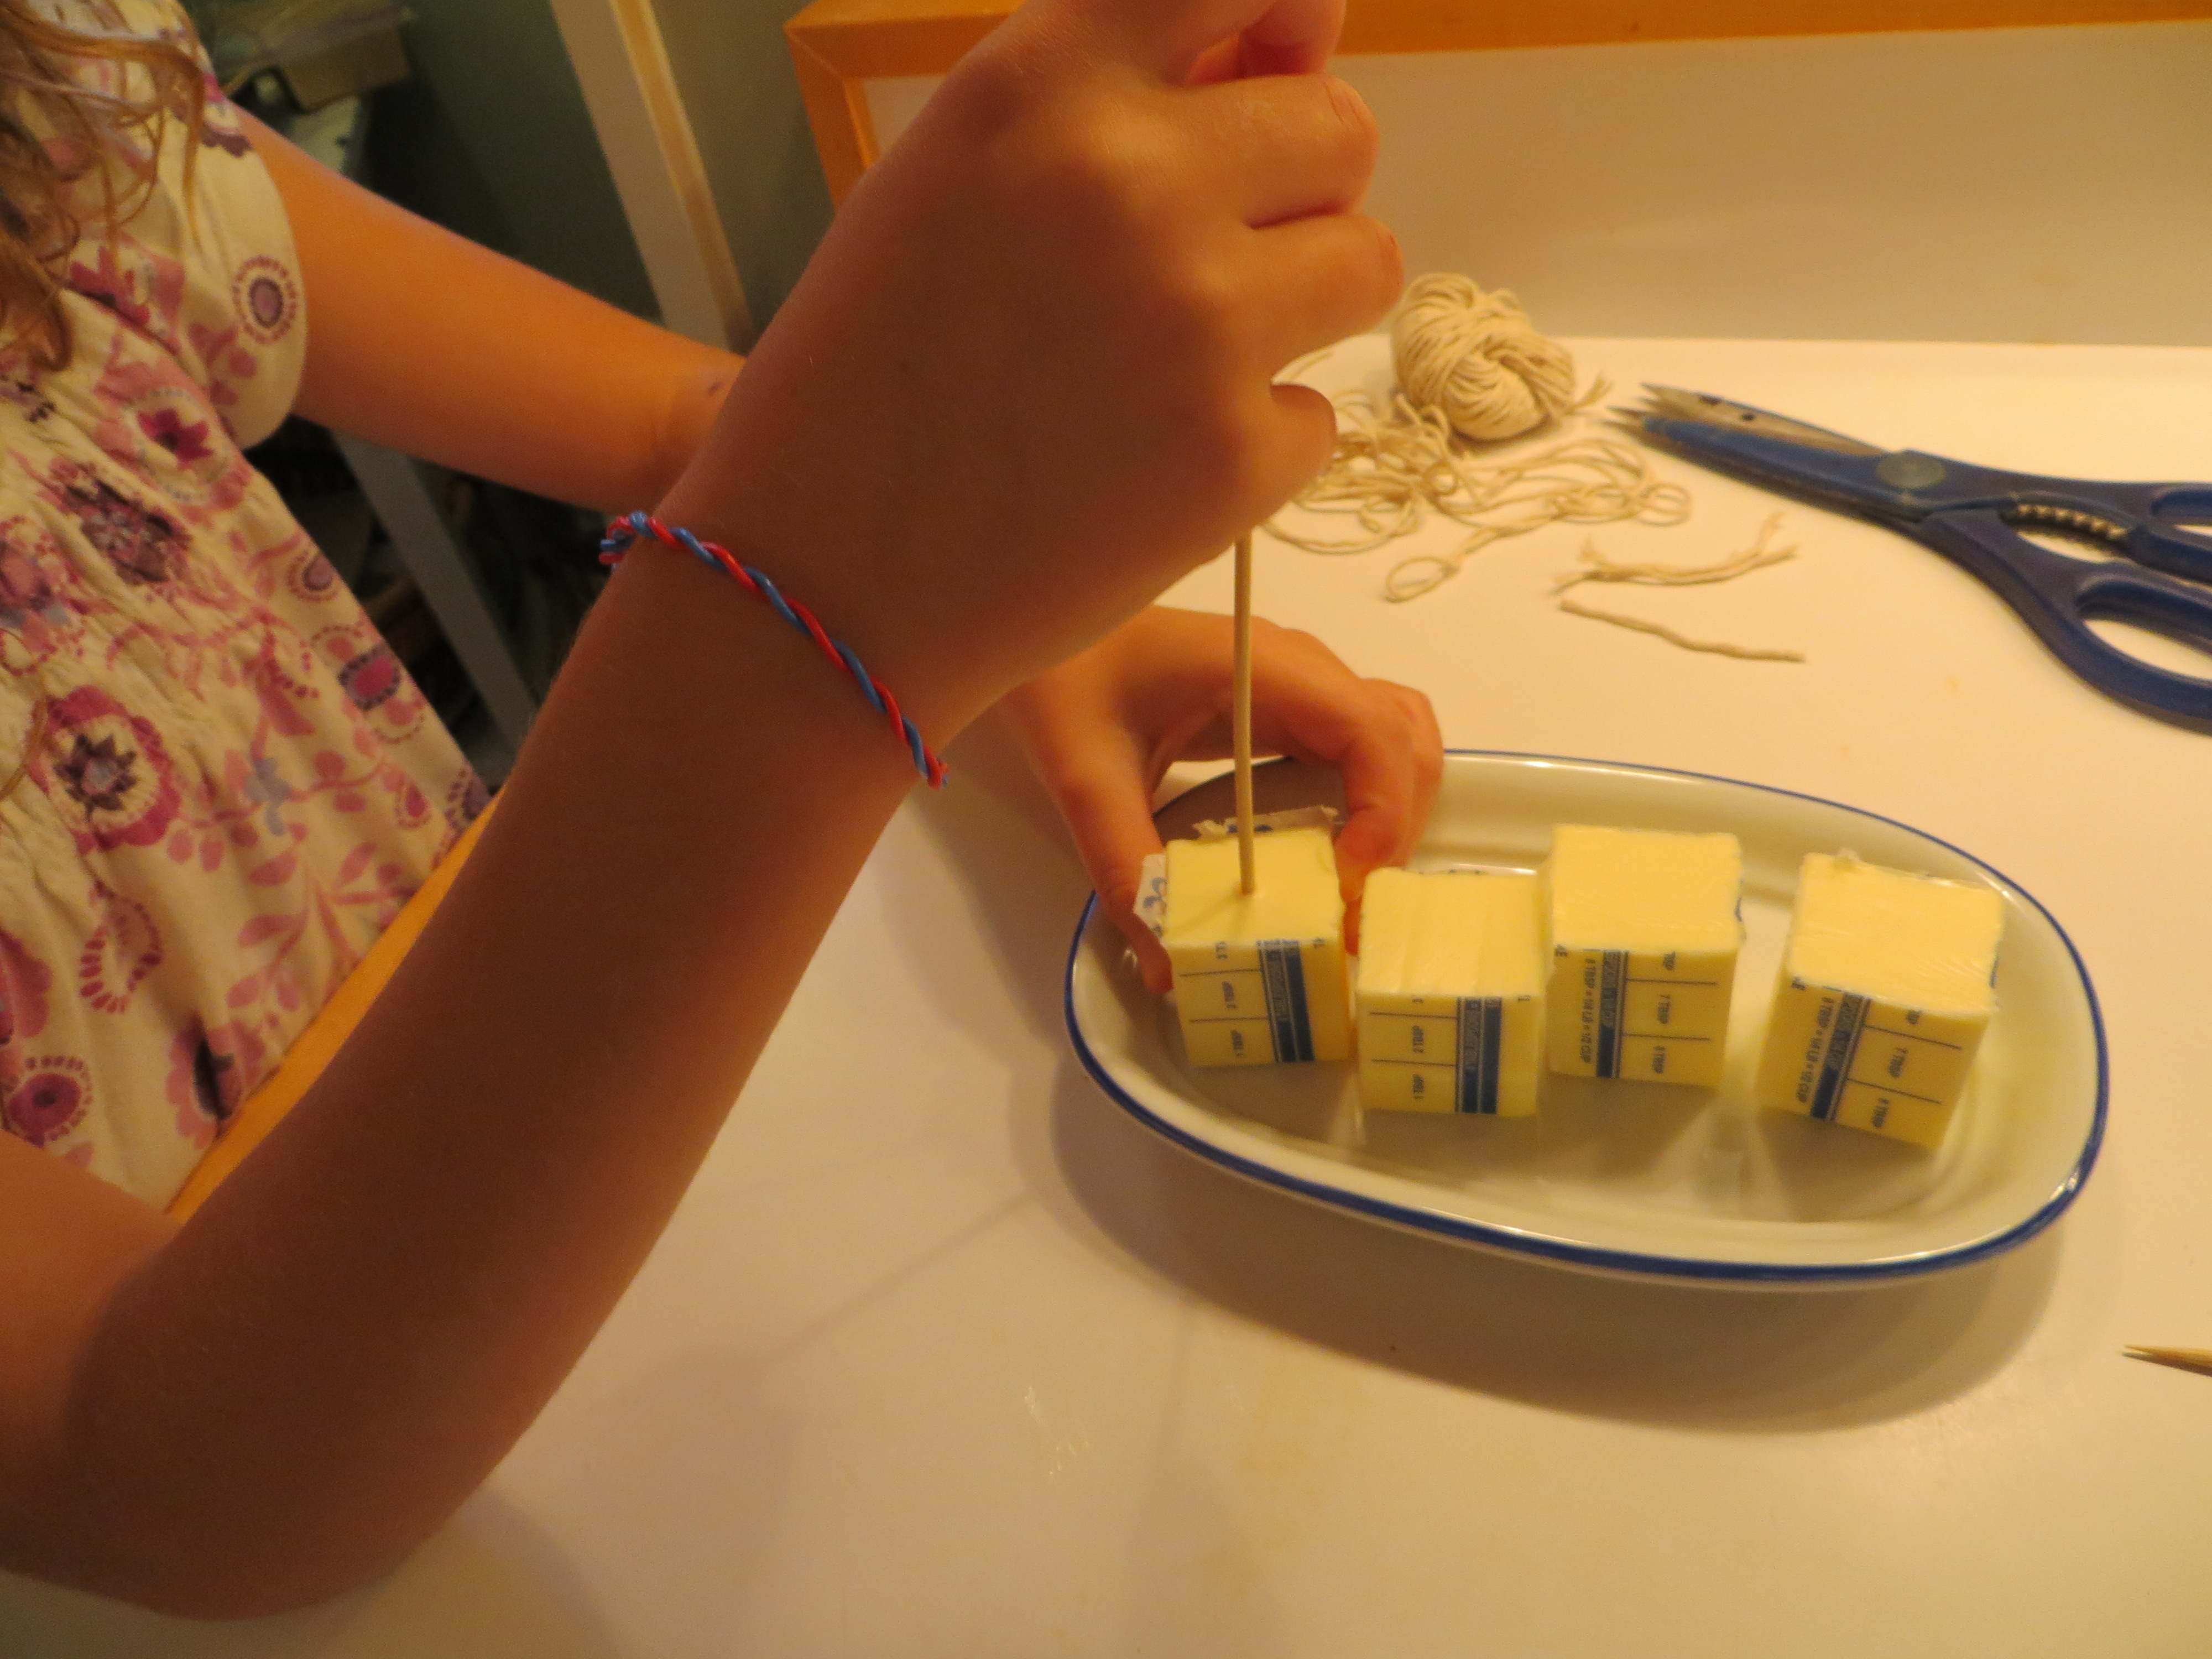
To make butter candles you’ll need a stick of butter, a toothpick or skewer, some cotton kitchen twine and scissors.
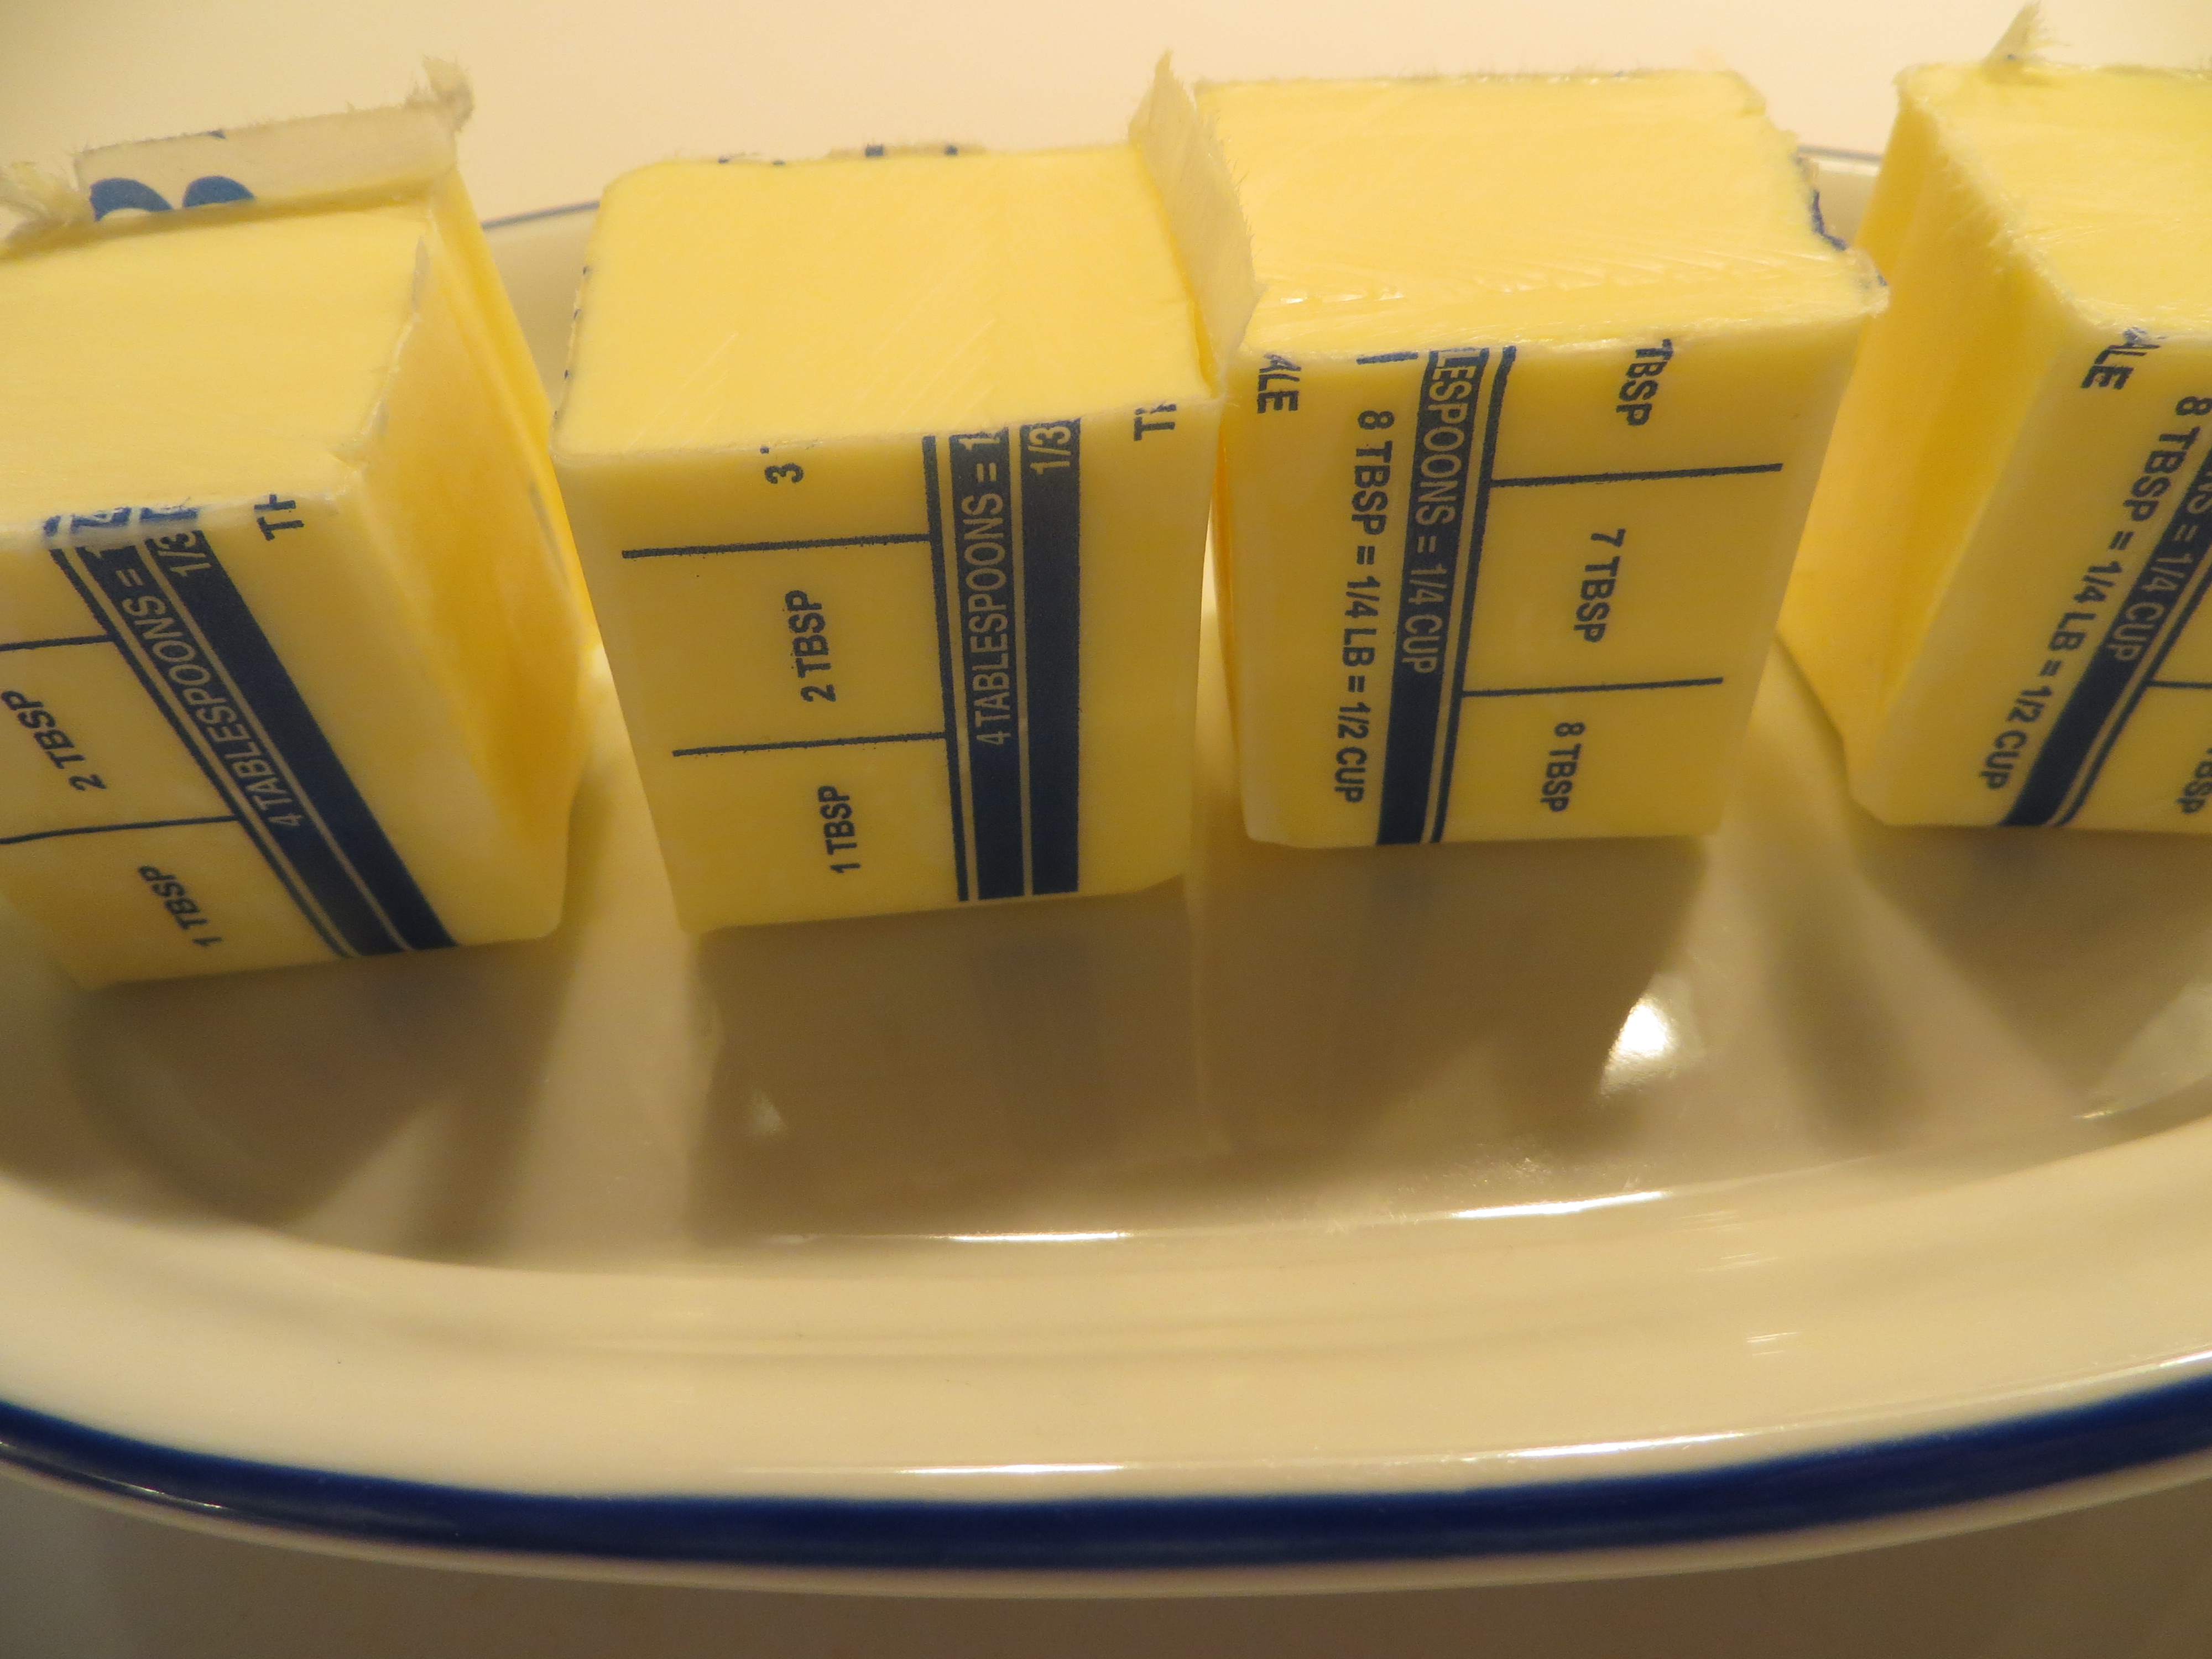
1. Cut the butter into the size candles you want. Place your candles on a fire-proof surface, like a metal plate.
2. Cut pieces of string slightly longer than the height of your candles.
3. Use a skewer or toothpick to poke a hole from the top of your candle to near the bottom.
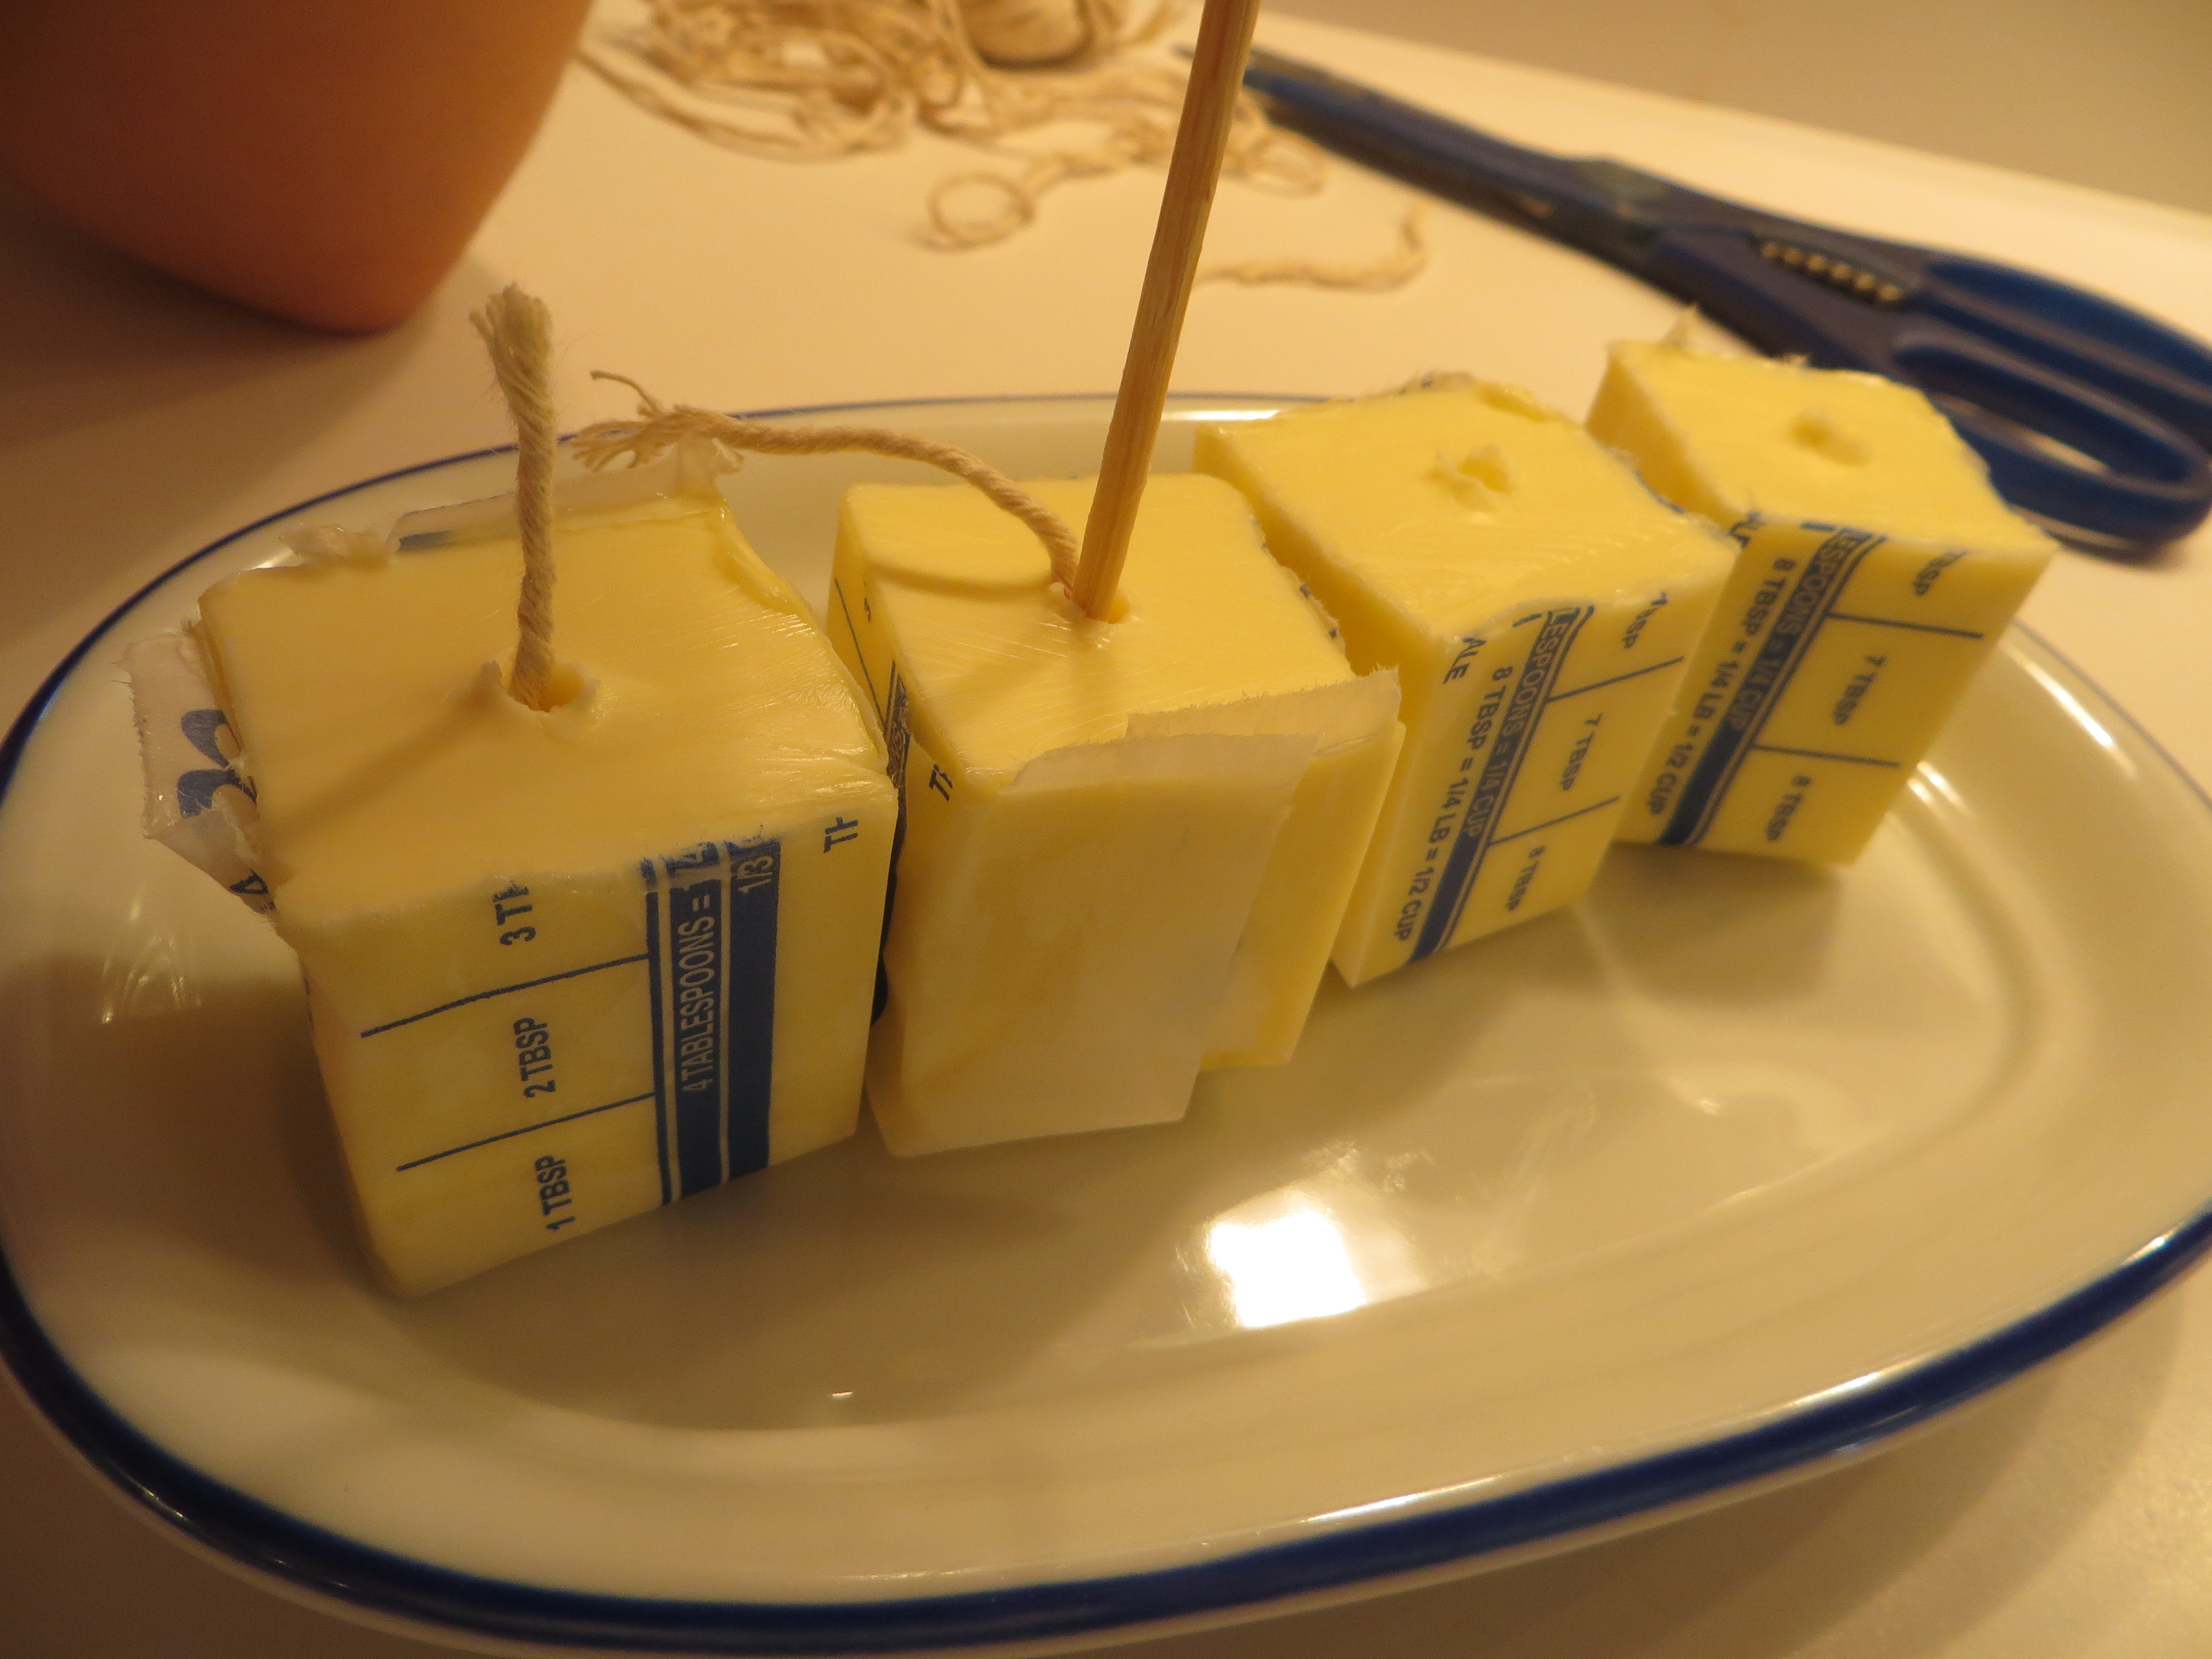
4. Push your string into the hold using your skewer or toothpick. Leave 1/4 inch or so sticking out. This is your candle wick.
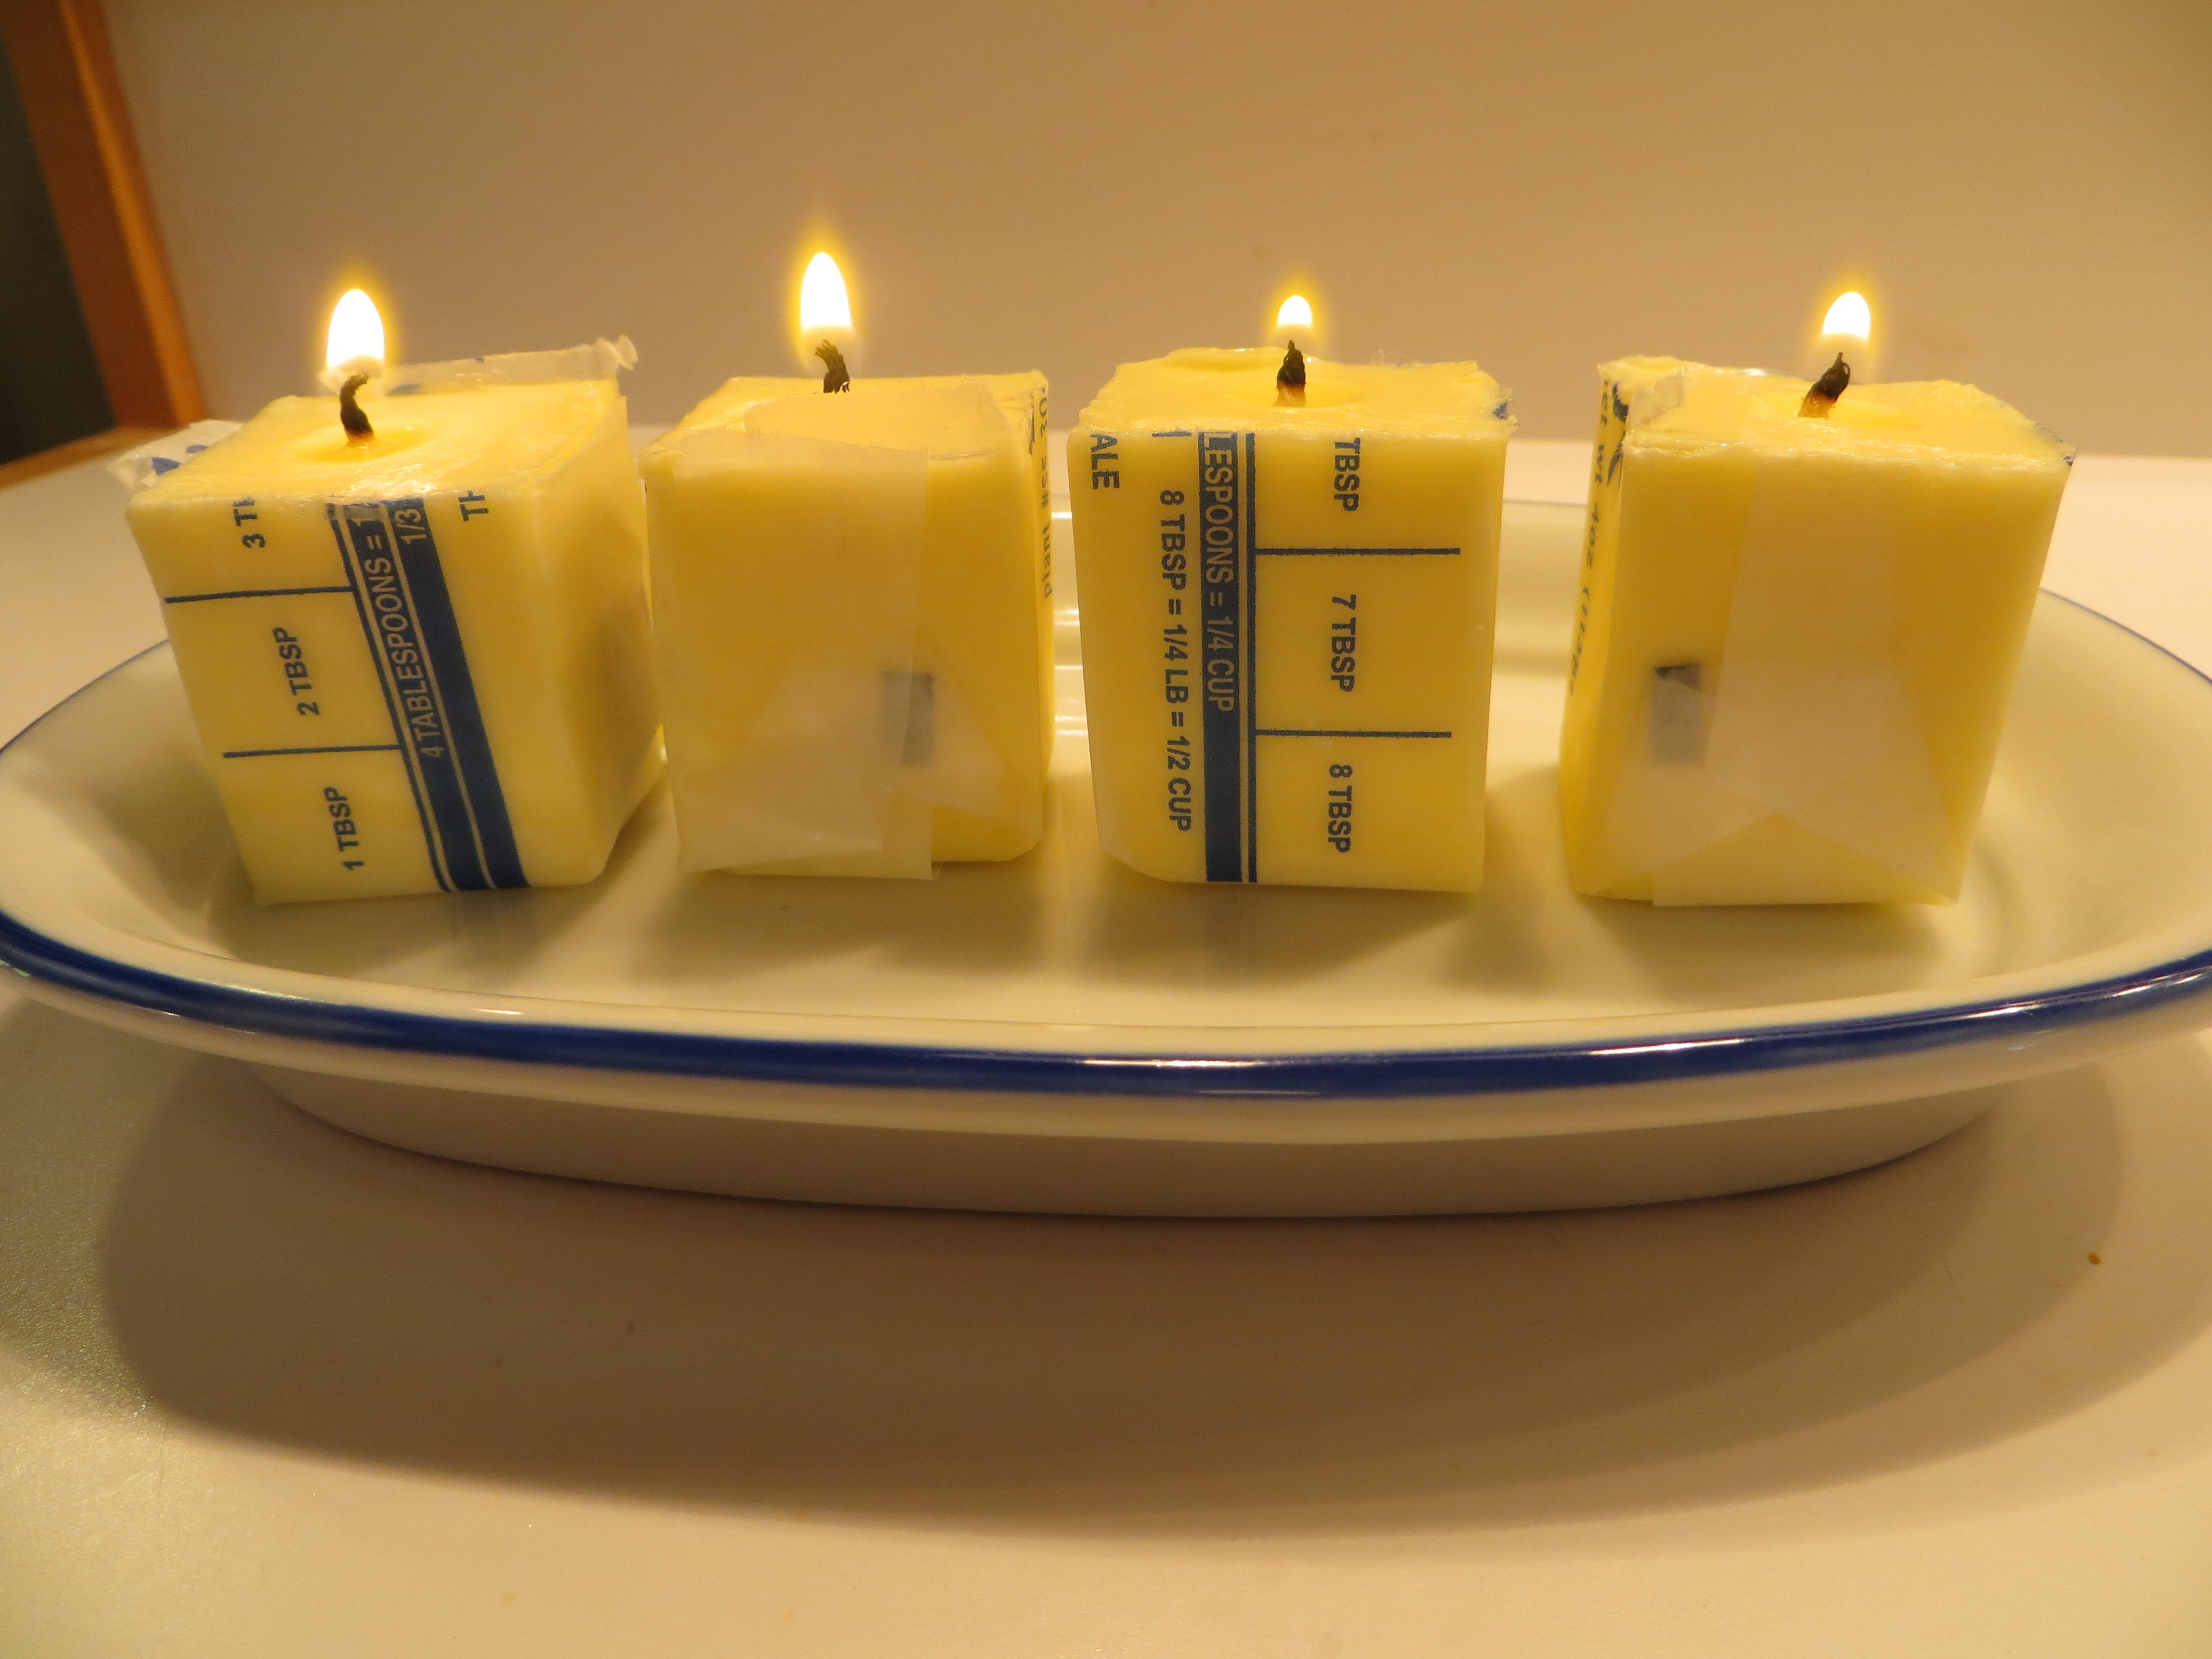
5. Rub a little butter onto the wick. Light your candle. It may take a few tries, but soon it should burn like a wax candle.
*As with all candles, butter candles should never be left unattended. Be sure to place your candles on a surface like a candle holder that cannot catch fire.
What happens? The lit cotton wick starts to burn and liquefies some of the butter fat. The wick then absorbs the melted butter and pulls it up,via capillary action, to the flame. The flame starts to burn the fat vapors rather than the wick, in a combustion reaction. This reaction produces heat, water vapor and carbon dioxide gas, putting the carbon is back in the atmosphere.
Since burning food isn’t an efficient use of energy or money (it takes lots of oil to raise and care for a cow,) scientists are coming up with ways to turn animal fats and byproducts that can’t be used as food into biofuels. Some inedible plant foods can be reused as well. For example, some cars can run on used cooking oil. Can you imagine how much oil a fast food restaurant throws away each week?
Although butter will never replace candle wax, butter candles are a good way to introduce the carbon cycle and get kids thinking about how new fuels and cleaner-burning fuel will impact the future of our planet.
To make the corn candle at the top of this post, we attached the butter candles to an ear of corn with broken off wooden skewers.
Outdoor Science Lab
- by KitchenPantryScientist
It’s hard to believe it’s already August. Other than reading, we don’t do much to fight summer brain drain at our house, but the end of summer is a great time to head to the back yard or driveway for some science experiments. They’re so much fun that kids won’t even realize they’re using their noggins! Just click on the experiment for how-to directions, photos and videos.

Learn physics by throwing eggs!
Got water? Make siphons, a water-purifier, water rockets, or fire-proof water balloons.
Hungry? Build a solar oven from a pizza box and bake s’mores.
Stand on eggs or throw them as hard as you can without breaking them. You can always clean up mistakes with your hose!
Play magician with the tablecloth trick, or make paper bag volcanoes erupt in your back yard.
Of course, there’s always the famous Mentos geyser, and film canister rockets are always a hit.
Nature walk bracelets add fun to any excursion, and you can collect water from trees or make water filters with grass and sand.
August is a great time to find Monarch caterpillars or study the earthworms in your back yard.
And no summer would be complete at our house without an epic marshmallow shooting competition. You’ll even learn some physics!
Photosynthesis Experiment
- by KitchenPantryScientist
Plants are wonderful chemical reorganizers. Using the sun’s energy and a process called photosynthesis, they can turn water and carbon dioxide into sugar (glucose) and oxygen.
Thanks to plants and other autotrophs like algae, Earth has an oxygen-containing atmosphere that can sustain animal and human life.
To watch plants make oxygen, all you need is a water plant like Elodea (available at pet stores), a large container, water and a few small clear glasses or test tubes.

Fill the large container with water and turn your small, clear containers on their sides underwater to remove all the air bubbles.
Cut a branch off of your plant, place it under water in the large container, shake off any air and put it under your small, clear container- stem side up. Invert the small container, allowing no air to enter it. Repeat the experiment with your other small clear container, but don’t add a plant. This is your control. If you’re using test tubes, you can put them in small cups or beakers so they don’t tip over. (See photo above.)

Place your experiment in bright sunlight or near a strong lamp and observe what happens. You should see oxygen bubbles form on the plant as it performs photosynthesis. In a test tube, you will eventually see some water displaced by oxygen.
What happens if you duplicate the experiment in a room with no light?
Tap water contains some carbon dioxide. How do you think the experiment would work with lake or pond water?
Earth Day Science Experiments
- by KitchenPantryScientist
Here are some of our favorite environmental science experiments. Click on the experiment name for directions and photos. I’ll post a new photosynthesis experiment on Monday!

Window Sprouts: Plant a bean in a plastic baggie with a damp paper towel to see how plants need only water and air to sprout roots and leaves. Here’s a short video demonstrating how to make a window garden.
Homemade Solar Oven: Using a pizza box, aluminum foil, plastic wrap, and newspaper, you can harness the sun’s energy to cook your own S’mores!
Nature Walk Bracelets: Wrap some duct tape around your wrist (inside out) and take a walk, sticking interesting natural objects like leaves and flowers to your bracelet. It’s a great way to get outdoors and engage with nature!
Carbon Dioxide and Ocean Acidity: See for yourself how the carbon dioxide in your own breath can make a water-based solution more acidic. It’s the same reason too much carbon dioxide in Earth’s atmosphere can be bad for our oceans.
Plant Transpiration: See how trees “sweat” in this survival science experiment.
Earthworm Experiment: Do you know what kind of earthworms are living in your back yard?
Composting: Be a composting detective. Bury some things in your back yard (away from power cables) and dig them up in a few months to see how they look. Composting reduces methane gas emissions (a greenhouse gas) from dumps.
Diffusion and Osmosis: See for yourself how the chemicals we add to water, put on our streets to melt ice, and spray on our lawns and crops can move into our soil, ground water, rivers, lakes and oceans.
Solar Water Purification: This project illustrates the greenhouse effect and is a fun “survival science” experiment. Requires hot sun and some patience!
Citizen Science: Don’t forget about all the real environmental research projects you can participate in through Citizen Science programs all around the world!
For mores activities and games, check out NASA’s Climate Kids website, to see a kid-friendly diagram of the water cycle, click here, or just get outside and enjoy the beautiful planet that sustains and nurtures us.