Tag: science’
Homemade “Black Snake” Fireworks (Adult Supervision Required)
- by KitchenPantryScientist
I usually only post experiments safe for kids of all ages, but couldn’t resist this guest post from Pat Mullin of Labconco Corporation. Adult supervision is absolutely required due to the alcohol (a few tablespoons), which you light on fire to start the reaction.
As a kid, I remember watching long carbon worms emerge from glowing tablets our parents lit with matches on Independence Day. Pat’s video shows how (with the help of an adult), you can make your own “black snake” fireworks using only sand, powdered sugar, baking soda and denatured alcohol or ethanol. Very cool!
He does the experiment in a fume hood, but ethanol and denatured alcohol burn clean, so it’s perfectly safe to do in the driveway, with kids standing at a safe distance. Can’t wait to try it! Happy Fourth of July!
Tablecloth Trick- More Backyard Science
- by KitchenPantryScientist
This is a fun “magic” experiment to try outside, on the lawn, where your kids can spill as much water as they want to. It’s also nice to have grass under your table, so glass and ceramic dishes won’t break.
Since this can take practice, use old dishes and remind your kids to let you pick up anything that does get broken, so they don’t get cut! All you’ll need is a table, a sturdy, heavy glass that isn’t too tippy (we used a bar glass and it worked pretty well,) a smooth tablecloth and water. You can also try this with a heavy plate or bowl! Tablecloths without seams or old sheets with edge seams cut off work best!

We used easel paper as our tablecloth, but you can try a plastic tablecloth or a cloth one that doesn’t have a heavy seam on the edge. The more slippery the tablecloth, the better it will work. I’d also recommend bringing out a pitcher of water for refilling the glass and a towel for wiping up spills.
Put the paper or tablecloth near the edge of the table (see photo above.) Place the glass of water or plate on the tablecloth near the edge of the table. (I wouldn’t recommend filling your glass to the top.)

This part is important! You MUST pull the tablecloth straight down, along the edge of the table, very fast. If you pull it out, toward you, or pull it too slowly, it won’t work. If you do it correctly (and it may take a few attempts), the water will slosh a little, but the cup will remain on the table, full of water. We spilled a lot, but had a great time. All of the older kids involved were able to do it successfully by themselves, but I had to help my three year old a little.
The science? The law of inertia says that objects don’t want to change how fast they’re moving (or not moving, in the case of our glass.) They heavier something is, the more inertia it has. In our experiment, the heavy glass of water is standing still and doesn’t want to speed up. Since the tablecloth is moving under the glass very quickly, the heavy glass slips on it and doesn’t move very far. Even the friction between the glass and the tablecloth isn’t a strong enough force to make it move much. It seems like magic, but it’s just physics.
We did this experiment on Kare11 Morning news, if you want to see how it works!
How to Mummify Apples
- by KitchenPantryScientist

We had an amazing time at the King Tut exhibit at the Science Museum of Minnesota and the omnitheater film Mummies, Secrets of the Pharaohs, gave us a fascinating look into the rituals of mummification.
We learned that Natron, which was used in Ancient Egypt to preserve mummies, is a natural salt mixture containing sodium carbonate decahydrate (soda ash), sodium bicarbonate (baking soda), sodium chloride (table salt), and another salt called sodium sulfate. Salt is a dessicant, which is a chemical that removes water from things. It also has anti-microbial properties, which means it kills bacteria and fungi. When you remove water and microbes from the picture, mummies bodies’ don’t decompose.
I read that you could use different combinations of table salt, Epsom salts and baking soda to try to replicate Natron and mummify apples, so we tried it out…Here’s a demonstration we did on Kare 11.
First, we decorated some of our plastic cups with Markers, since every mummy should have a fancy sarcophagus (even an apple). Then, we labeled them as follows:
control/table salt alone/Epsom salt alone/baking soda alone/half table salt, half Epsom salt/half table salt,half baking soda/half Epsom salt,half baking soda/ and equal parts table salt, baking soda and Epsom salt.

We cut an apple into 8 equal pieces and added one to each cup, covering them with the appropriate salt mixture and adding a loose top to the cups (we used foil cupcake holders.) We let them sit for a week and exhumed them to see what happened. It was amazing how different each apple looked, and how much liquid was in some of the cups! After we checked them out, we returned them to the cups with some dry salt mixture to let them go for another week!

The Egyptians would dry their mummies with Natron in windy tents in the dry desert air for40 days before wrapping them for their final burial.
You can weigh your apples before drying them to see how much water they lose! We tried the experiment with whole apples too, peeling and coring one, coring another and leaving one intact before covering them with salt mixture. We even wrapped on in cloth strips, just for fun!

What keeps mold from growing? What preserves the apple’s color best? Which salt mixture keeps the apples from smelling bad?
Fingerprint Fun and Homemade Valentines
- by KitchenPantryScientist

Who says science and art can’t go hand-in-hand? It’s easy to lift and study fingerprints using scotch tape, and colorful fingerprint designs make great Valentine’s cards, so what are you waiting for? All you need for the science part is paper, scotch tape and a pencil. For the valentines, you will need an ink pad, paper and markers.
On www.wikieducator.org/Fabulous_Forensic_Fingerprints, I found a fingerprint-lifting technique that works well, even for very young children. Simply take a pencil and scribble on a piece of paper until a small area is covered with the graphite from the pencil lead. Rub your finger around in the graphite until it is covered with gray. Place your finger on the sticky side of a piece of scotch tape and then carefully lift your finger up. A clear fingerprint should be visible. Place the tape face-down on another piece of paper to preserve the fingerprint.


You can then inspect the fingerprint under a magnifying glass, or with your naked eye. If you go to the wiki website I mentioned, you can decipher whether your fingerprint is a whorl, a loop, or an arch. It’s fun to trace your hand, fingerprint each finger and thumb, and tape your fingerprints to the appropriate fingers on the outline of your hand. Fingerprints would be a great addition to your science notebook! Kids have a lot of fun with this project and can do it unassisted once you show them what to do.
Older kids can try lifting a fingerprint from a hard surface! Put an oily fingerprint on a drinking glass, dust it with cocoa powder (you can use a feather), blow on it to remove extra powder, and lift the print using scotch tape. Tape it on some white paper to see it.
To make Valentines, put two fingerprints or thumbprints together in the shape of a heart. It’s also fun to make fish, bugs, and anything else you can think up! I gave my kids some ideas to get them started and they went from there! (You can add details with markers.) Have fun!

Flu Virus vs. Human Cell
- by KitchenPantryScientist
Flu season is in full swing and the Flu virus is everywhere. Show your kids this amazing animation of how a virus can infect a cell! It links to youtube following the video, so be sure to supervise viewing for younger kids!
Recent testing indicates that American kids are lagging far behind in science. We spend hours reading with our kids, and helping them with math, but most parents don’t encourage science learning the same way.
We can teach our kids to love science before they even hit the classroom. It can be as simple as watching a Planet Earth video instead of Nickelodeon, or taking your kids on a nature walk.
The experiments on this website are as simple as baking cookies and are calorie-free. Try one! Maybe you have a future scientist in your house and just don’t know it.
Snow Science
- by KitchenPantryScientist
A fun fact from NGKids :
“Bet You Didn’t Know: Twenty inches of snow equals one inch of water on average.”
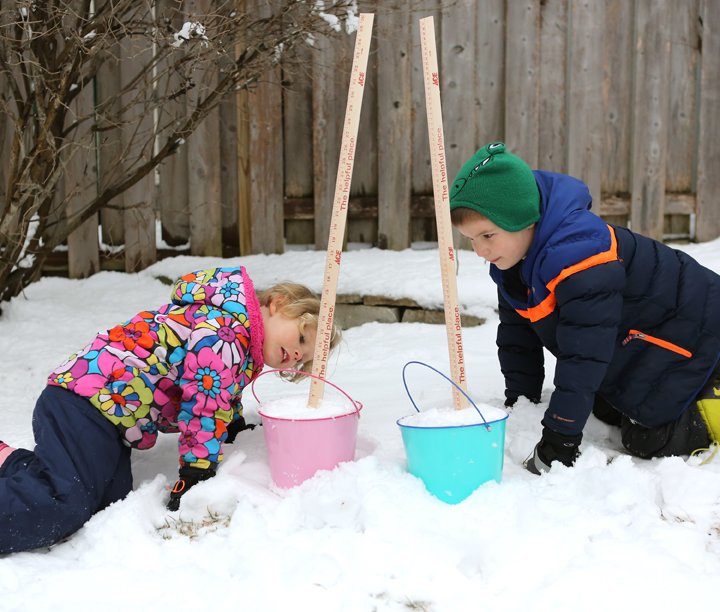
From “Outdoor Science Lab for Kids” (Quarry Books 2016)
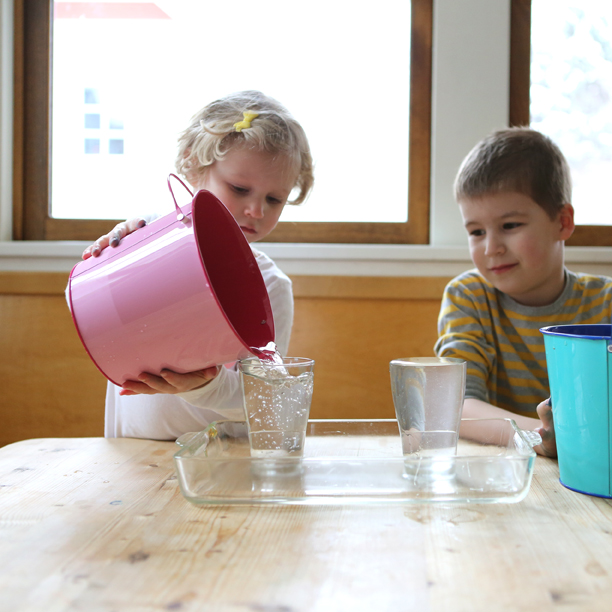
Try it! Put some snow in a clear container and measure how deep it is. Then, allow it to melt. Measure how deep the remaining water is.
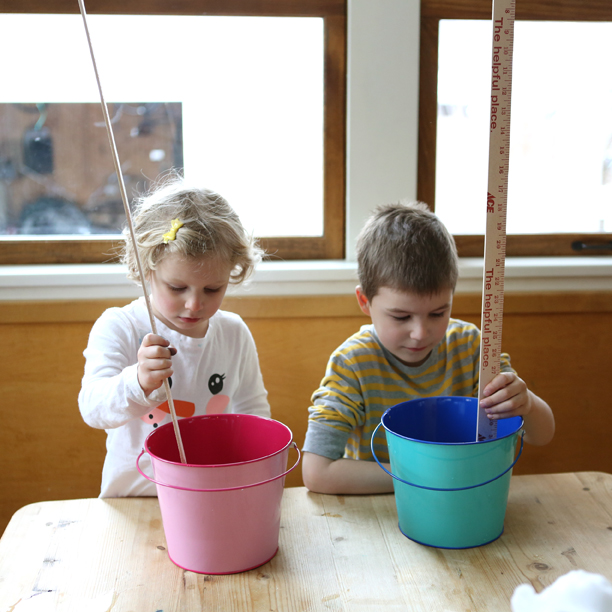
from “Outdoor Science Lab for Kids” Quarry Books 2016
Now observe the melted water in a clear glass. How clear is it?
From “Outdoor Science Lab for Kids” Quarry Books 2016
You can figure out whether your results were consistent with the NG Kids fact (10 inches of snow* should melt down to around 1/2 inch of water or 50cm of snow* should melt down to 2.5cm.)
A snow crystal is a single crystal of ice formed when the water in a cloud freezes around a microbe or piece of dust. Some have long, feathery branches, while others are small and plate-like, but they all have six sides. Snowflakes can contain several snow crystals, stuck together. Sometimes they form large clumps, creating huge, fluffy snowflakes.
The shape of snow crystals, the weather, and the surface where the snow lands all affect how much air is trapped when snow piles up. The amount of air contained in a layer of snow determines much space it takes up.
When snow melts, the snow crystals turn to water and the trapped air is released. That’s why the snow in your bucket is much deeper than the water from the melted snow.
*I’m guessing that NG Kids was referring to unpacked snow. Our kids packed the snow into containers and we go more water than we expected. Ask your kids why they think packed snow melts to give you more water than unpacked snow.
Twenty Questions
- by KitchenPantryScientist
“Dad! Ask me scientific question!” was a common refrain from the backseat of our station wagon when I was a kid. My dad is a physicist, and encouraged my sister and me from a young age to think about the world around us. On one level, I’m sure that talking about science was a way for me to connect with my dad, but after some time, I started to look at the world differently and ask my own questions.
On long car trips, we loved to play twenty questions. Not only was it a fun game, but without realizing it, we were learning to organize information and ask good questions.
“Is it an animal?”
“Yes!”
“Does it eat meat?”
“Yes!”
“Is it a mammal?”
“What’s a mammal?”
In other words, you don’t even need a lab, or even a kitchen table to do science. Every time you bend over to look at a bug, point out a bird or talk about the moon, you’re doing science with your kids. Teaching them to be curious is one of the greatest gifts you can give.
How do you teach your kids to be curious?
Magic Potion
- by KitchenPantryScientist

Making magic potion is simple! Chop a head of red cabbage into small pieces and add it to a pan with enough water to cover it. Boil the cabbage uncovered for about 15 minutes, stirring occasionally, let it cool, and strain the juice into a jar or bowl. (Save the cooked cabbage for dinner.)
If you want to avoid the stove, chop half a head of red cabbage and blend it with about 3 cups of water. Strain the liquid through a colander and then through a coffee filter in a plastic bag with one corner cut off. Blended cabbage juice makes longer-lasting bubbles and turns a slightly brighter shade of blue!
Now, pour about 1/4 cup of the cabbage juice, or “magic potion” into two clear glasses or bowls and set them on a white piece of paper (so you can watch the color change.)
Try adding a Tablespoon of baking soda to one glass of potion. What happens?
To the second cup of potion, add a few Tablespoons of vinegar or lemon juice. Notice anything different?
Finally, mix the two cups of potion together.

Why did the color change when you added two different chemicals to the magic potion? Everything in our world is made of very tiny pieces called atoms. Atoms are so small that if you blow up a balloon, it will contain about a hundred billion billion atoms of the gases that make up air. Atoms are often bonded to other atoms to form a group of linked atoms called a molecule.
Acids usually dissolve in water to form free-floating hydrogen atoms. Bases are the opposite and take up free hydrogen atoms. The molecules in the cabbage juice magic potion change when exposed to an acid or base, making the potion change color. Vinegar is an acid, which turns the potion pink and baking soda is a base, which turns it blue or green.
When you mix the vinegar potion and baking soda potion together, a chemical reaction occurs and you make Carbon Dioxide gas. That’s why you see bubbles!
Try adding some other liquids to your magic potion. Can you tell whether they are acids or bases?
Here’s a short video that shows you exactly how to do the experiment!
Happy experimenting!
Goblin Goo
- by KitchenPantryScientist
 This experiment is easy, non-toxic and so much fun that it is worth every bit of the mess it makes. Your kids will love it!
All you need is a cup of cornstarch and half a cup of water with a little food coloring in it (purple and green are fun for Halloween and red would be gross!) Mix the two ingredients to a medium-size bowl with a spoon or your fingers. The goo should be the consistency of syrup.
Now, play with the mixture! You will discover that it behaves like a solid when you agitate it, or move it quickly, and like a liquid when you let it sit still. Pour some onto plates or into bowls if you want to. We poured it directly onto our table which was pretty messy, but lots of fun! Hold a handful on your palm and watch it drip between your fingers! Roll it into a ball. If it gets too dry, just add a little more water. You can easily clean the goo off of flat surfaces using a plastic spatula. Wash it off hands with water.
Cornstarch molecules are like long ropes. When you leave them alone, or move them slowly, they can slide past each other and look like a liquid. However, if you squeeze them, stir them or roll them around in your hands, the ropey molecules look and feel more like a solid. Materials like cornstarch goo are known as non-Newtonian fluids, since they don’t have the normal properties of either a liquid or a solid.
Click here to watch my video on how to make cornstarch goo.
Mad Scientist’s Green Slime is a homemade polymer that’s as much fun to play with as it is to make. Here’s a demonstration I did on our local morning show: Halloween Science on Kare 11 Sunrise show (It will start playing on the right side of the website after a short ad.)
Alien Monster Eggs
- by KitchenPantryScientist
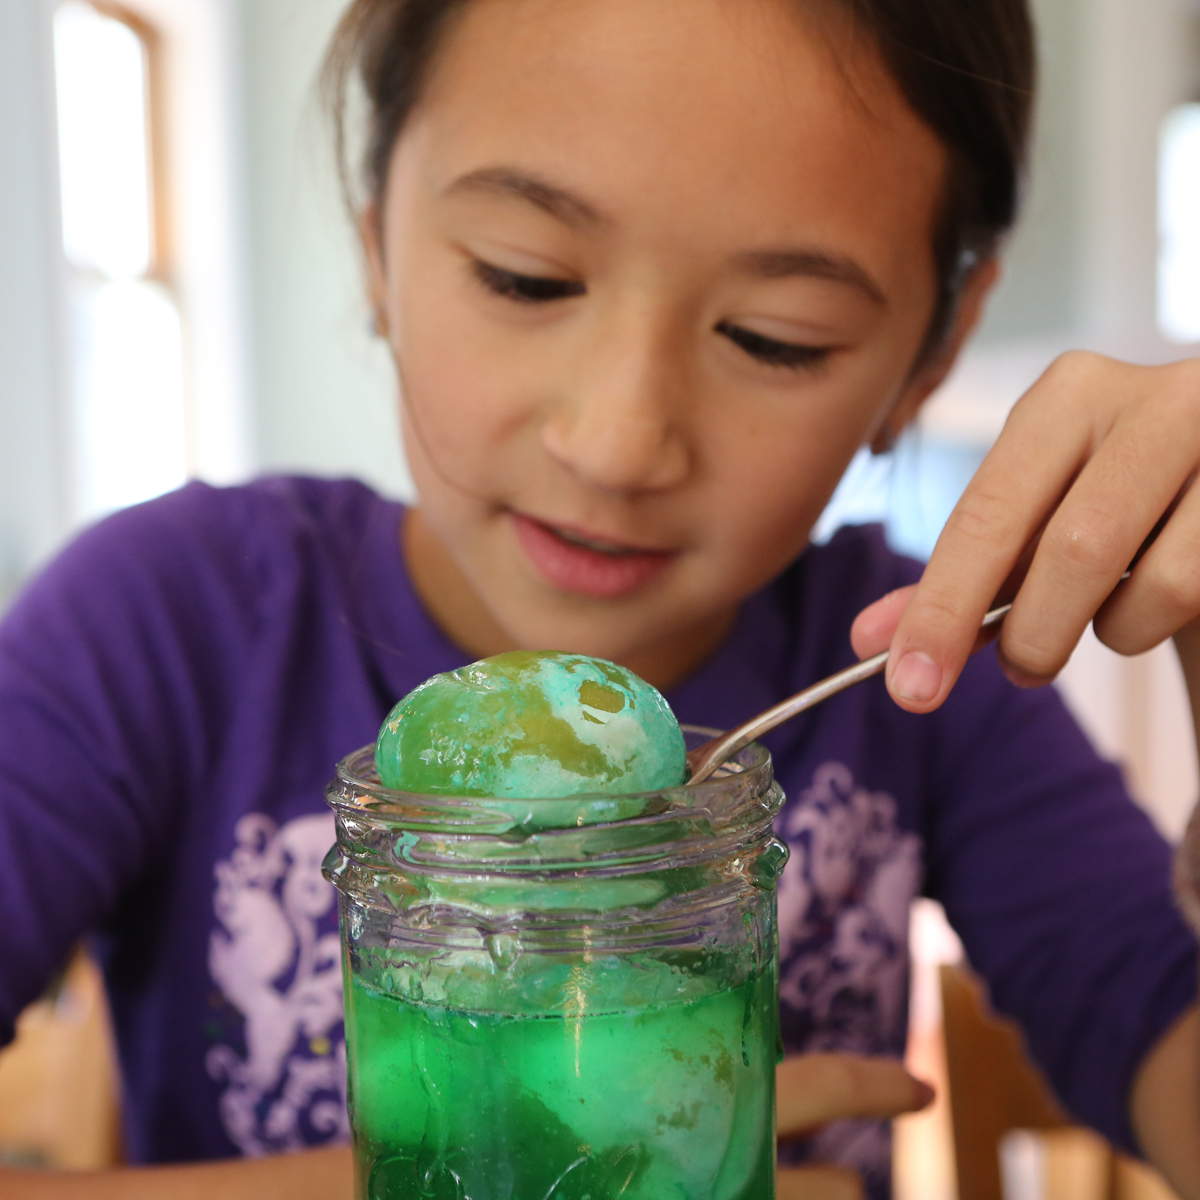
This is a great Halloween eggsperiment and a jar of them would make a spooky centerpiece for a Halloween party!
Put some raw eggs into jars and cover the eggs with (white or cider) vinegar. It’s fun to use permanent markers to make the eggs look like eyeballs before you put them in the vinegar! Remember to always wash your hands after handling raw eggs, since they can carry a bacteria called Salmonella enteriditis!

Do you notice anything happening to the eggs when you add the vinegar?
Let them sit overnight in the refrigerator and see what they feel like the next day. What happened to the sharpie ink? Before handling the eggs, gently rinse them with water, and be careful not to get vinegar in your eyes, since vinegar is an acid and stings!
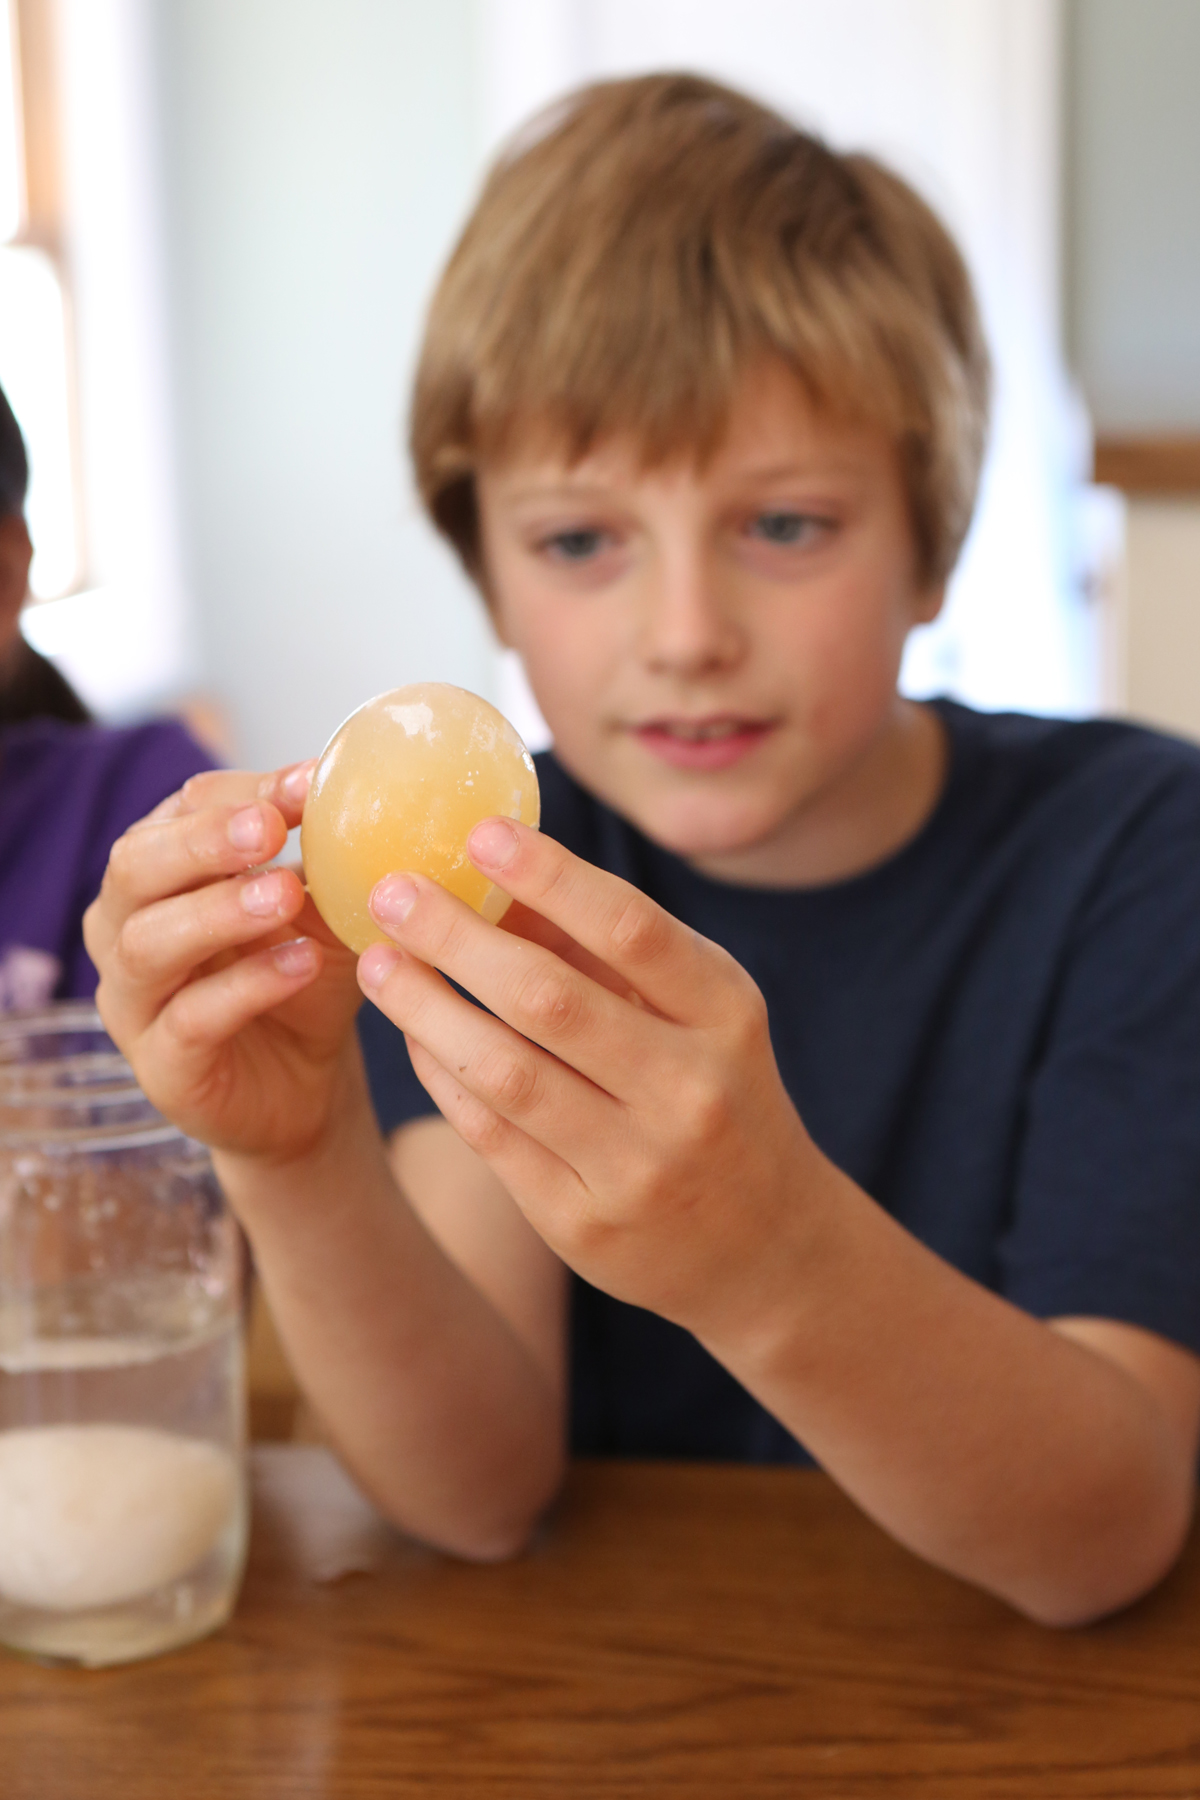
Image from Kitchen Science Lab for Kids (Quarry Books 2014)
Only the membrane of the egg will remain, which is like a rubbery balloon. What does it feel like?
If you want, draw or record what you observed in your science notebook.
What happened? Egg shells are made up of two chemical elements called calcium and carbon, which stick together in calcium carbonate crystals. Vinegar is an acid that break the crystals apart in a chemical reaction. The carbon and vinegar react to form carbon dioxide bubbles, which you probably noticed when you added the vinegar to the eggs.
To make alien monster eggs, return the eggs to the jars. Cover them with corn syrup and add some green food coloring. Leave them for 24 hours in the refrigerator and see how they feel the next day!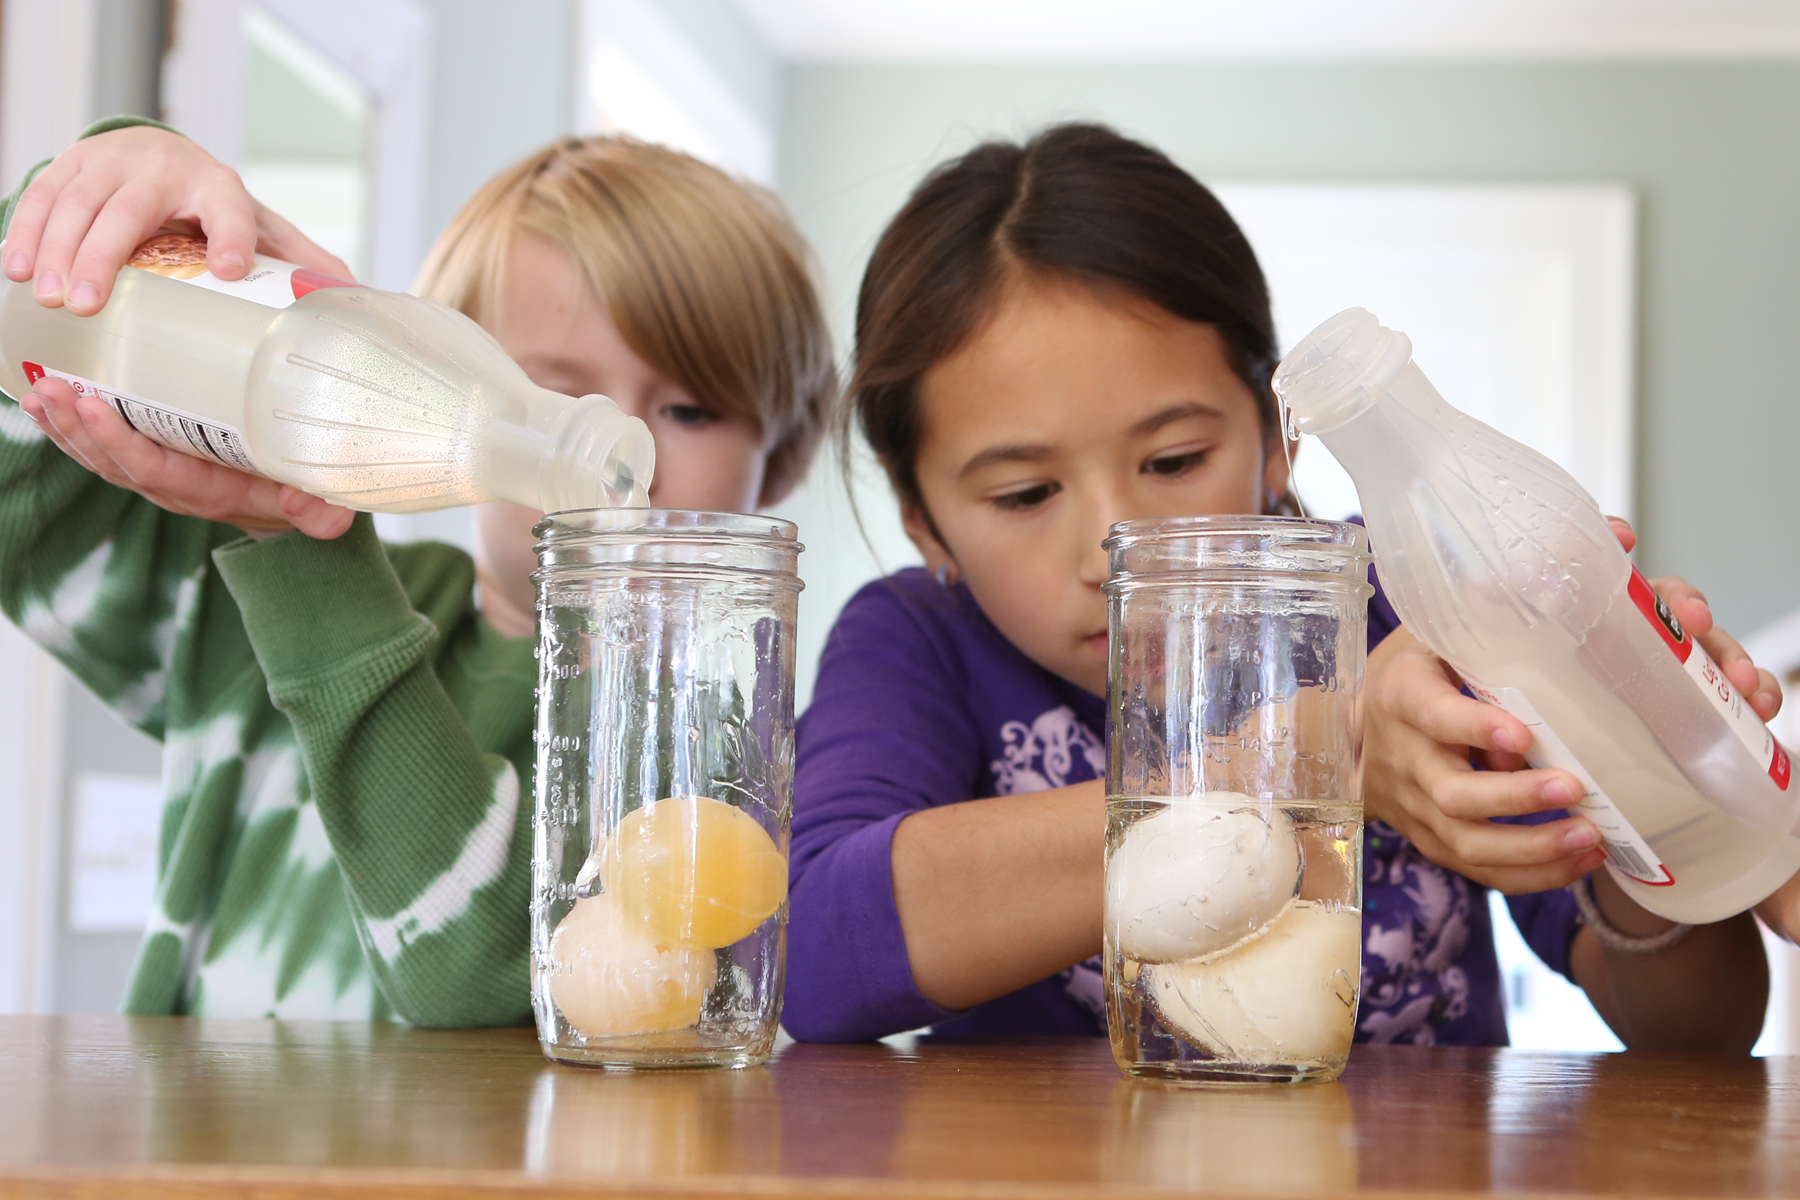
What happens? The balloon-like membrane of the soft eggs let water molecules pass through via a process called osmosis. Corn syrup doesn’t have much water in it, and water molecules move out of the egg into the corn syrup, making the egg shrivel.
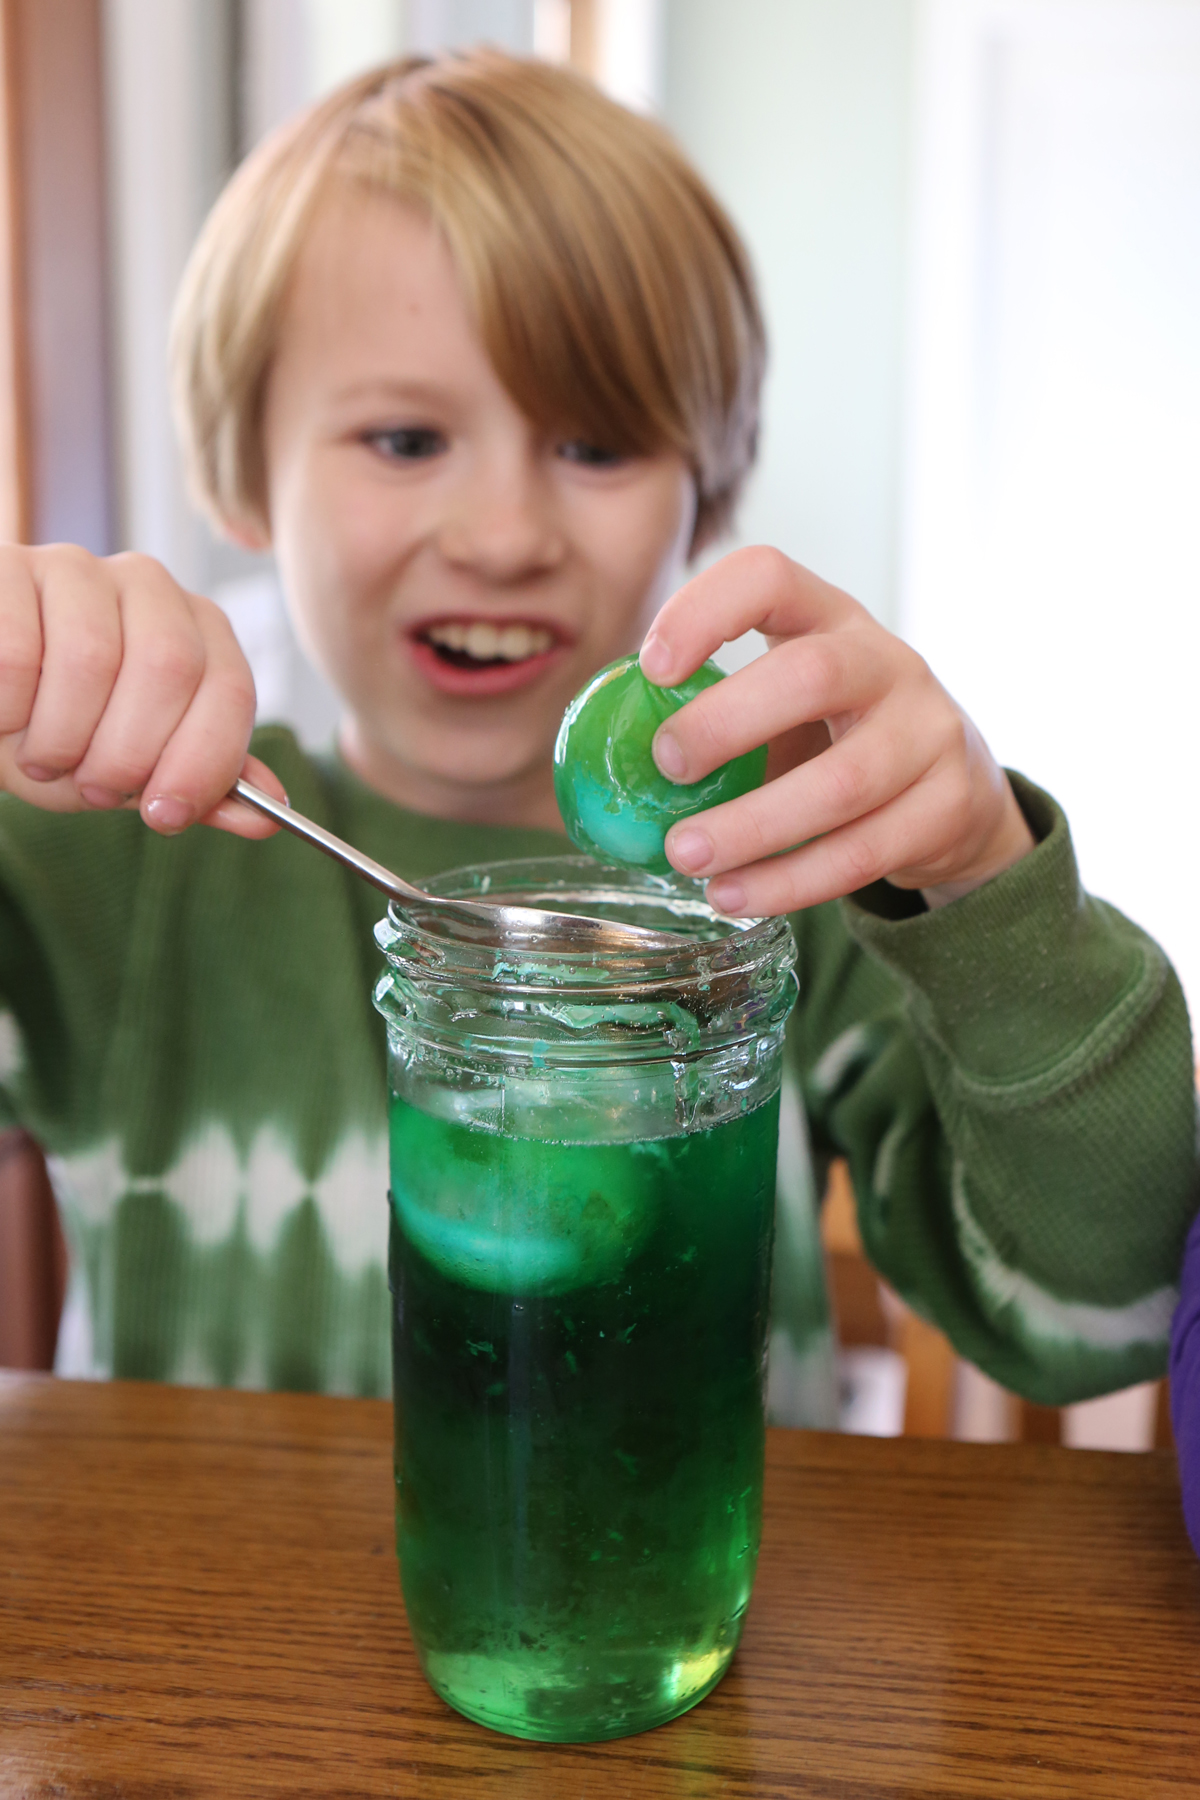
Image from Kitchen Science Lab for Kids (Quarry Books 2014)
If you want to, now try rinsing the eggs and submerging them in water again overnight (in the fridge.)
Happy eggsperimenting!