Tag: kids’
Science Kit for Kids
- by KitchenPantryScientist
I just put together a homemade science kit (for a silent auction at a fundraiser) and it was so cute I had to post a picture.

homemade science kit
Click here to see a post with links to homemade science kit experiments. Love giving these as birthday and holiday gifts too! To take it up a notch, pair your science kit with KidScience app for iPhones/iPods!
Over the next few weeks, I’ll be posting some fun biology experiments, so be sure to check back in!
Shocking Science and Magic Potion
- by KitchenPantryScientist
Doctor Frankenstein would have loved this experiment that makes electrons jump from place to place, with a shocking conclusion. You can watch us demonstrate it on Kare11 Sunrise by clicking here.

To make an electrophorus, or charge carrier, all you need is a Styrofoam plate, a cardboard square large enough to tape the plate onto, an aluminum pie pan, a Styrofoam cup, aluminum foil and wool, like an old mitten or stocking cap.
Tape the foam cup to the inside of the pie pan. Then cover the cardboard with foil and tape the plate on to the surface, facing down.
For your Leyden jar, which can make a bigger spark and shock, you’ll need a plastic film canister or an empty spice jar*, a nail longer than the canister, aluminum foil and water.
Cover the outside of the bottom of the film canister or spice jar with foil, push the nail through the cap, fill it 3/4 up with water and replace the lid/nail so the nail is in the water. *If you’re using a spice jar, put foil on the bottom half of the jar, remove the lid, fill it 3/4 full of water, and make a new “lid” by covering the top of the container with duct tape. Stick your nail through the duct tape and your Leyden jar is ready to go! If your nail doesn’t stay in place, use more duct tape to secure it!

Now rub the foam plate with wool for about a minute. The Styrofoam attracts electrons from the wool, giving the plate a negative charge.
It’s important to do the next steps in order!
1. Put the pie tin on the foam plate. The electrons on the pie tin are repelled by the negative charge on the plate, but they can’t go anywhere.

2. Put your thumb on the foil at the bottom and leave it there while you touch the pie tin with a finger on the same hand. You should feel a small spark as the electrons jump from the pie plate to your hand, leaving the plate with a positive charge.

3. Lift the plate using the foam cup and touch it to the head of the nail on your Leyden jar. Electrons will flow from the nail to the pie plate, leaving the nail and inside of the jar with a positive charge. Repeat steps 1-3 a few times to build up a charge in your Leyden jar.

4. When you’re ready for a shock, put your thumb on the foil on the bottom of your Leyden jar, leave it there, and bring your fingertip close to the nail on the jar. Electrons will jump from the negatively charged foil on the bottom of the jar to the positively charged nail, giving you a shock. If you try it in the dark, you may see a spark as the electrons move through the air to your finger!

When you’re tired of getting shocked, you can always whip up a batch of color-changing, bubbling Magic Potion! Click here for directions and a video.
Earthworm Experiment: Alien Invaders!
- by KitchenPantryScientist
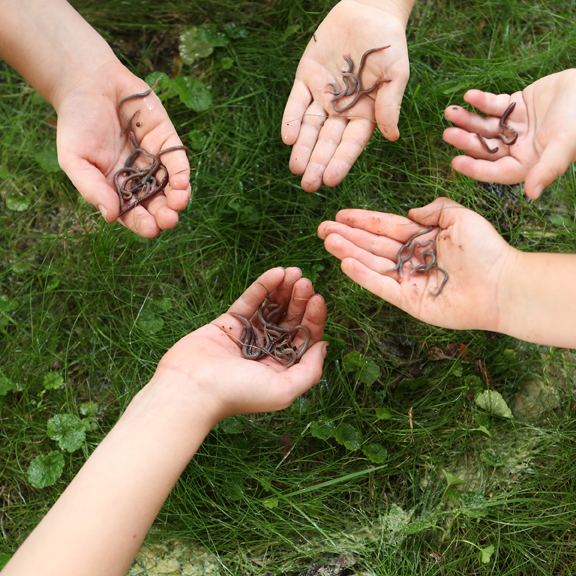
Earthworm Eruption from Outdoor Science Lab for Kids (Quarry Books 2018)
If you’re interested in studying the worms in your back yard, you can bring them to the surface using ground mustard seed dissolved in water.

Earthworm Eruption from Outdoor Science Lab for Kids (Quarry Books 2018)
Measure out a one square foot sample plot (35cmx35cm) with string and stakes, and pour about half of a your mustard mixture (1/3 cup ground mustard dissolved in 4 Liters of water) over the dirt in your grid. Be careful not to splash any in your eyes! Wait for the worms to come up, and when they’ve emerged completely, grab them and put them in a container. When they stop popping up, add the rest of the mustard mixture to the plot and wait for a second batch of worms to appear from deeper in the soil.
Earthworm Eruption from Outdoor Science Lab for Kids (Quarry Books 2018)
How many worms did you find? The Great Lakes Worm Watch is doing a study of worms, so you can preserve the worms and send them to their labs for identification, or you can try to identify them yourself. Great Lakes Worm Watch has other resources if you’re interested in learning more about Earthworms!

Earthworm Eruption from Outdoor Science Lab for Kids (Quarry Books 2018)
One of our favorite stops at the Minnesota State Fair is the Department of Natural Resources (DNR) building. After checking out some birds of prey, the fish pond and some monarch caterpillars, we stumbled on an entire room devoted to educating the public on the control of invasive species. Although I was familiar with buckthorn and Zebra Mussels, it was surprising to see the lowly earthworm represented alongside other more obvious dangers to Minnesota’s ecosystems.
We learned that the earthworms in Minnesota and the entire Great Lakes Region are non-native species, brought over from Europe long ago. They’re beneficial to farmers and gardeners, aerating the soil so water and other organic material can move through, but harmful to woodlands, where they disrupt the “Duff” layer of decomposing material on the forest floor, making it difficult for young plant to take root and grow. The lack of undergrowth affects the animal life as well, as hiding places and nesting grounds disappear.
If you like to fish or do worm composting, you can help! It’s very important never to discard unused worms in forests or even water (worms don’t drown.) Just throw them away in the garbage. Some worm mixes contain Asian earthworms of the genus Amynthas, which have become a threat in Minnesota. These worms are also called Jumping Worms since they are very active and lots of them can live together in one place causing lots of damage to forests.
STEM Chat and Video Inspiration
- by KitchenPantryScientist
Carin Bonder recently wrote a great post for Scientific American’s PsiVid about an autistic boy named Jordan Hilkowitz who is storming YouTube with his fantastic science videos! Parents will enjoy Carin’s post, and kids will love his Doctor Mad Science videos!
If you’re on Twitter, we’ll be chatting about STEM (Science, Technology, Engineering and Math) tonight at 8 Central under the hashtag #STEMchat. Click here for more information if you’re interested in joining us as we talk about kids science at home and in schools.
Fizzy Balloons Video
- by KitchenPantryScientist
Here’s a video that I just made for KidScience app about a fun chemical reaction we call fizzy balloons. Hope you have as much fun watching it as we had making it!
If you haven’t downloaded KidScience, it’s a great way to search for experiments based on kids’ ages, what you have around the house, or how much time you have. There’s a free version and a Premium version with extra videos, so you can have science at your fingertips wherever you go!
DNA Extraction Video
- by KitchenPantryScientist
Got fruit, laundry detergent, coffee filters, salt and alcohol? You can extract DNA!
Here’s a video on how to extract DNA from strawberries. This version was a little long for KidScience app, so I thought I’d post it here.
If you haven’t tried this experiment, you should! It’s a simple version of how scientists in labs really extract DNA for their research. Click here to see my original post on DNA extraction with easy directions and a little more science.
TXT2012
- by KitchenPantryScientist
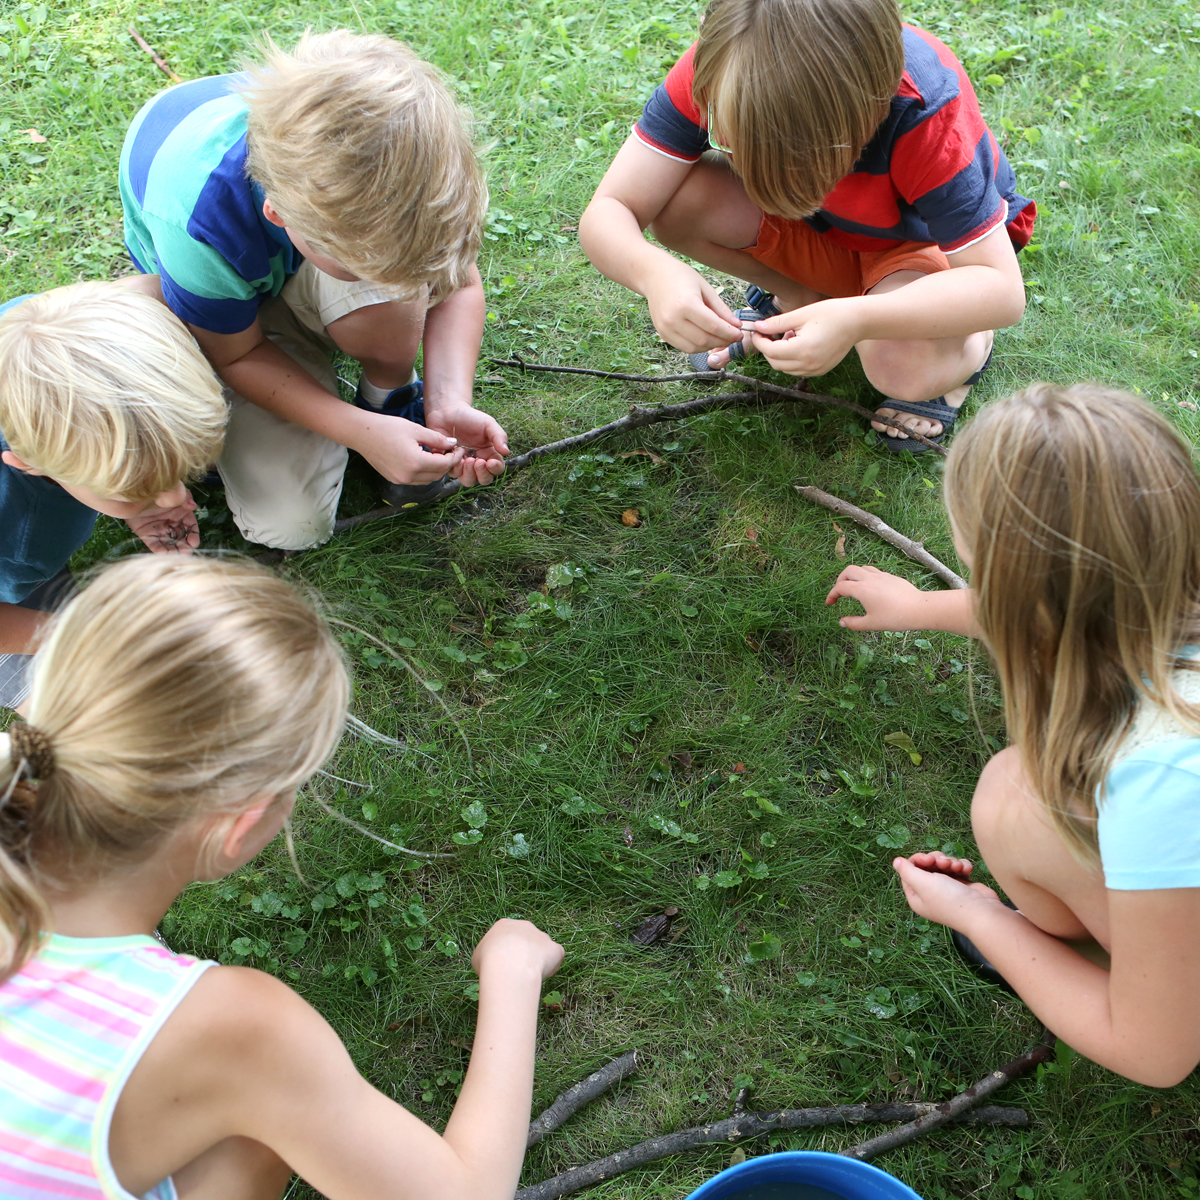
I spent an hour yesterday doing science with the girls at TXT2012 camp at Dakota County Technical College yesterday, where kids get to explore Technology, Science, Transportation, Health, Design, Technical/Industrial, and Business fields with hands-on projects. I showed them how to make a marshmallow slingshots (and talked about conservation of energy,) we talked about the fact that there are fun, safe experiments to do with kids you might be babysitting (with mom and dad’s permission, of course,) and then we played with red cabbage juice, and talked a little about pigments, flavenoids and anthocyanins. Finally, we did a hands-on chemical reaction using the cabbage juice, vinegar and baking soda.
Here are the experiments I demonstrated and mentioned: Marshmallow Slingshots, “Magic Potion” (Red Cabbage Juice chemical reaction,) Homemade Litumus Paper, CO2 breath test with red cabbage juice
and here are some fun, safe experiments for babysitters that can be done (under supervision) with young children: Tie-Dye Milk, Cornstarch Goo. If you have an iPhone or iPod Touch, these experiments are on the free (and Premium) version of KidScience app, so you can have them with you all the time.
Flammable Science: Homemade Black Snake Fireworks
- by KitchenPantryScientist
***Always wear goggles and fireproof aprons, if you have them, when working with flammable substances like ethyl alcohol, which burns very hot with no color! Be sure to pull long hair back as well!
Fireworks are really just explosive chemical reactions, and they’ve been around for thousands of years. Most of them are far too dangerous to make at home, but with some parental supervision, it’s fun to make homemade “black snake” fireworks, which are basically just flambeed powdered sugar and baking soda! Thanks again to Pat Mullin of Labconco who sent me a video of this experiment, which I posted about a year ago.

I had to mess around with the recipe to get it to work consistently, and each time we do it we get different-looking snakes, but it’s pretty neat. The key is to use enough fuel (alcohol) to keep your sugar burning.
BE SAFE! Set this experiment up on a heat-proof surface like a concrete driveway and have a hose ready, just in case. Make sure long hair is pulled back, and don’t try this on a windy day.
You’ll need:
1/3 cup sand, mounded in a pie plate with an indentation in the middle to hold the sugar/baking soda mix.

3 tsp. high-percentage alcohol (ethanol) like Everclear. I chose this as fuel rather than denatured alcohol or lighter fluid since there are no toxic fumes when you burn it.
4 tsp. powdered sugar mixed with 1 tsp. baking soda.
To make your snakes:
-Add the alcohol to the indentation in the sand.
-scoop 1 tsp. of the sugar/baking soda mix into a teaspoon and carefully drop it into the indentation in the sand. It’s fine if it holds the shape of the spoon, but try not to pack it down!

-Have an adult use a grill lighter or a long match to light the alcohol around the sugar on fire. It may be hard to see the flame, so stand back. You’ll see the sugar start to bubble when it’s lit. It will burn until the alcohol is gone, so wait until you’re sure it’s out before you try to touch the snakes!

What happens? When the baking soda gets hot, it makes carbon dioxide gas. The pressure from this gas pushes the carbonate from the burning sugar out of the sand, producing the “black snakes” you see.
Did you know there’s carbon in plants, like sugar cane? It’s called new carbon and is constantly recycled between the environment and living things. There’s also old carbon, like the kind you find in fossil fuels, including coal and oil. Here’s a cool NASA video that talks about the carbon cycle:
Kids Summer Science: Pizza Box Solar Oven
- by KitchenPantryScientist

A warm, sunny spring or summer day is perfect for making a solar oven from a pizza box!
When my friend Sheila, who works at NREL (the National Renewable Energy Laboratory) sent me this project, I couldn’t wait to try it out. We first tried it out on a cool spring day in Minnesota and to my surprise, it worked. The oven didn’t get very hot, but we were able to warm a chocolate chip cookie enough to make it soft and melt the chips.
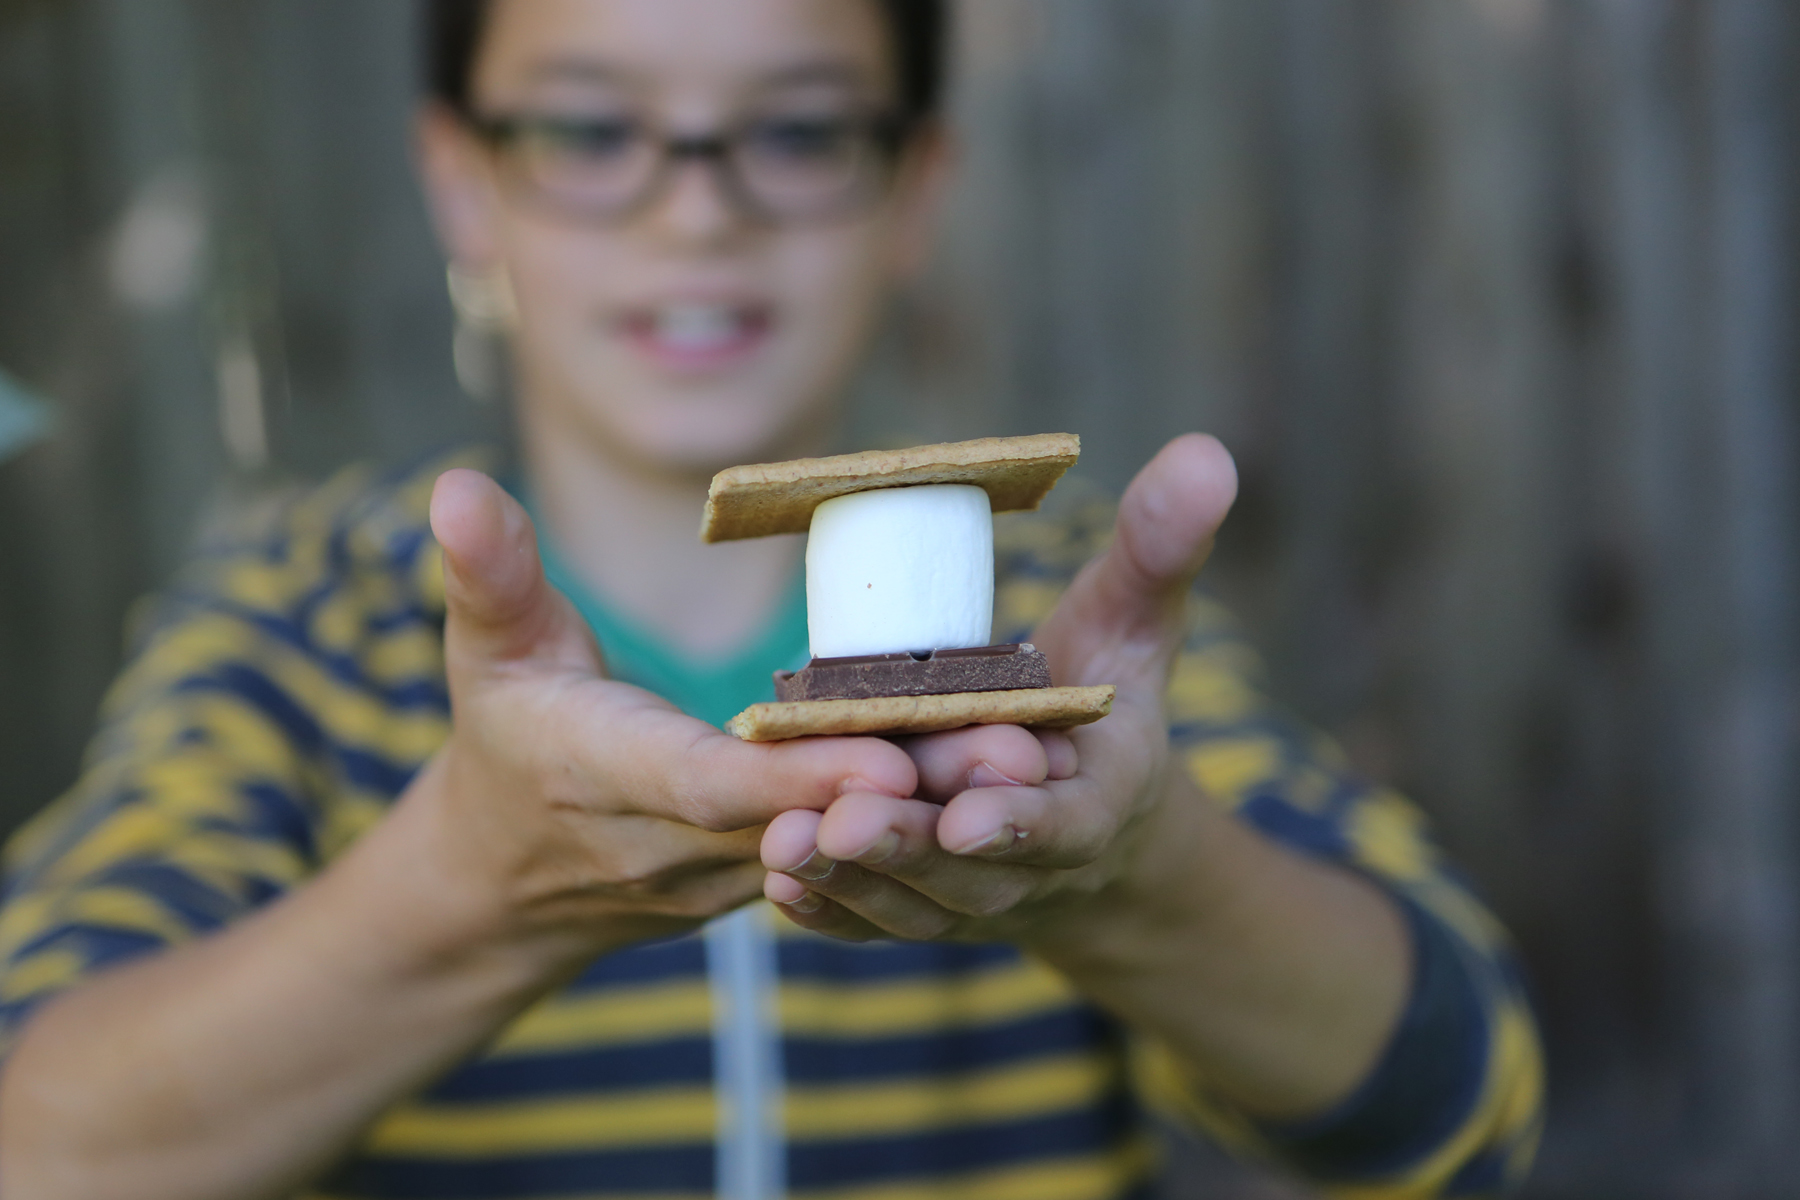
NREL suggests using your oven to make s’mores, which we’ve tried and is really fun. The solar oven is surprisingly easy to make and is one of the experiments featured in my book Kitchen Science Lab for Kids. (Quarry Books 2014)
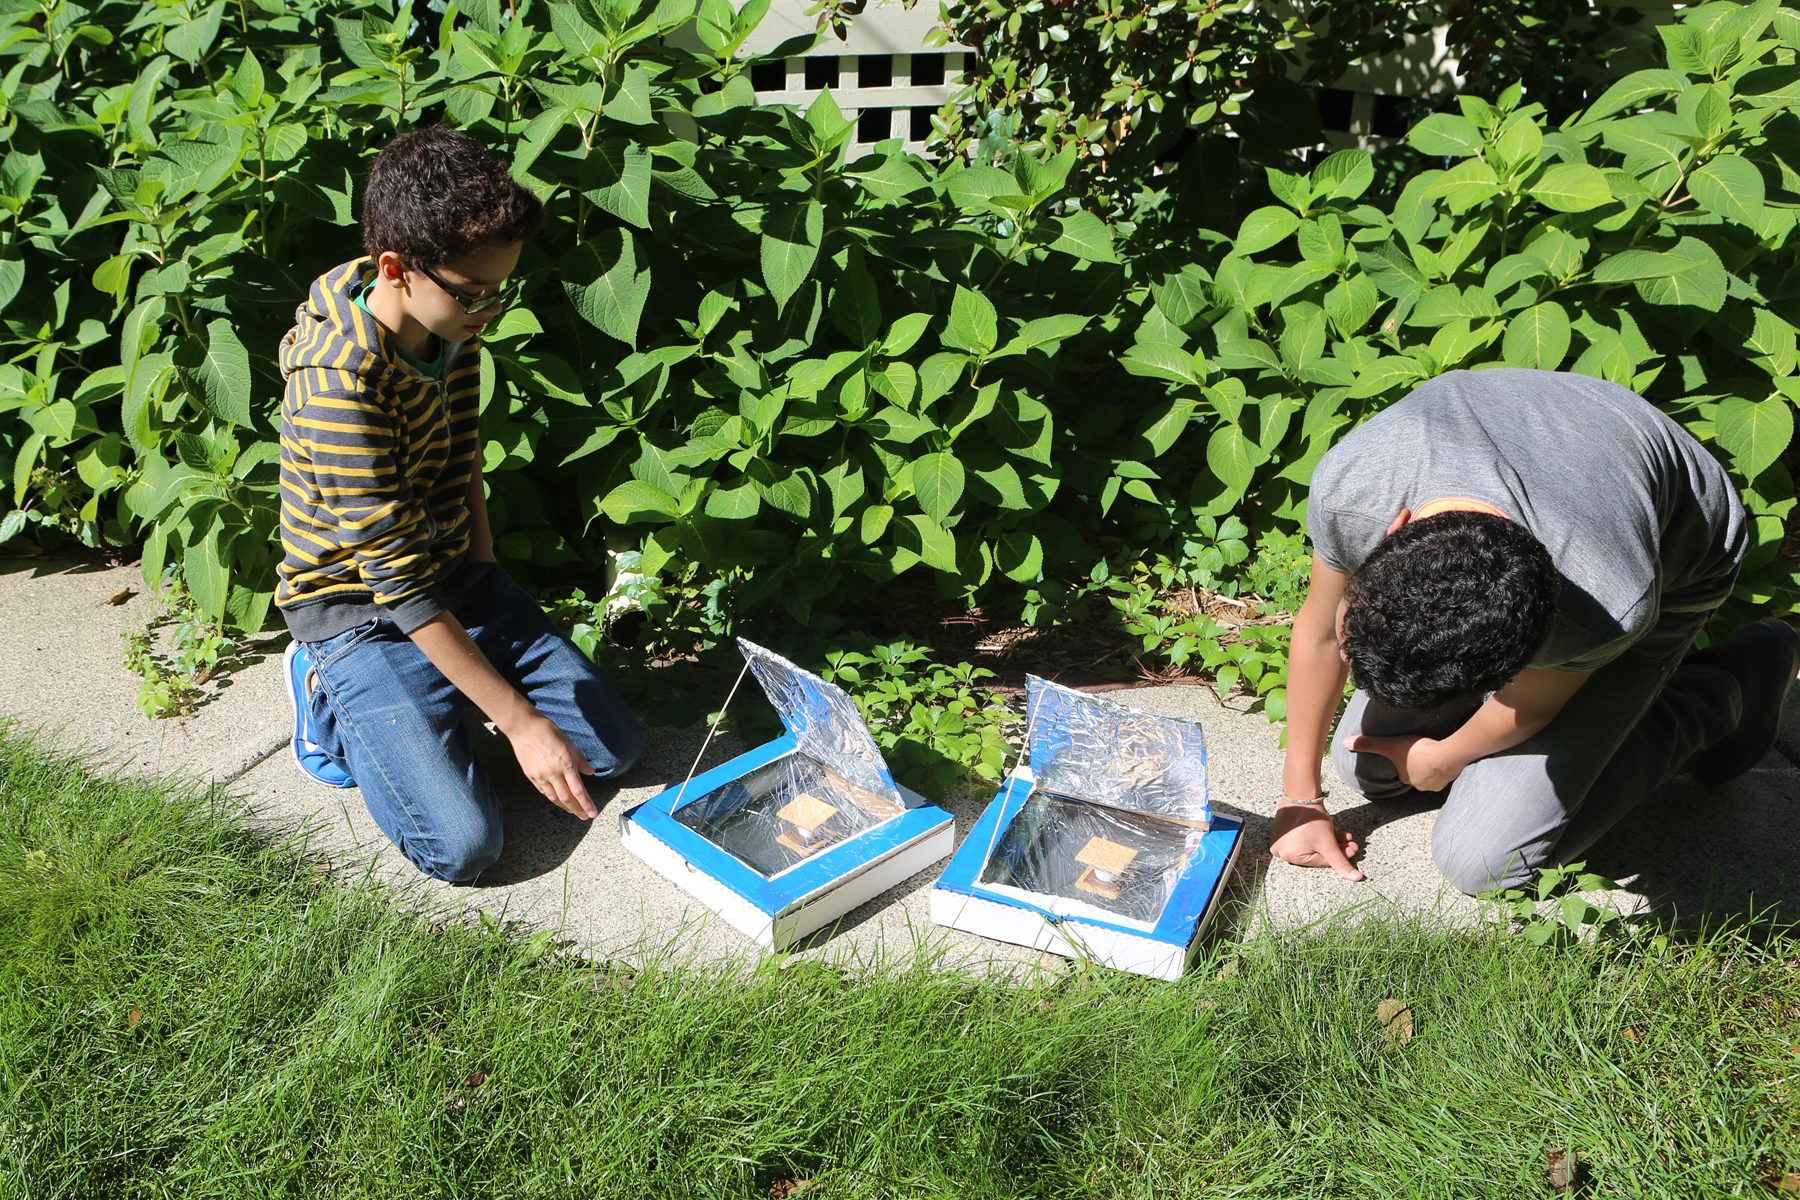
Solar Oven from Kitchen Science Lab for Kids (Quarry Books)
You will need: 1 pizza box from a local pizza delivery store (Little Caesars, Domino’s, Pizza Hut, etc.), newspapers, tape, scissors, black construction paper, clear plastic wrap, aluminum foil and a dowel or stick to prop the lid up. You will also want to have some food to warm in your oven-marshmallows, chocolate, etc.
Make sure the cardboard is folded into its box shape. Carefully cut out 3 sides of a square in the lid of the box. Do not cut out the fourth side of the square, which is the one closest to where the pizza box lid hinges. Gently fold the flap back along the uncut edge to form a crease.
Now, Wrap the underside (inside) face of the flap that you made with aluminum foil. Tape it so that the foil is help firmly but so that there’s not too much tape showing on the foil side of the flap.
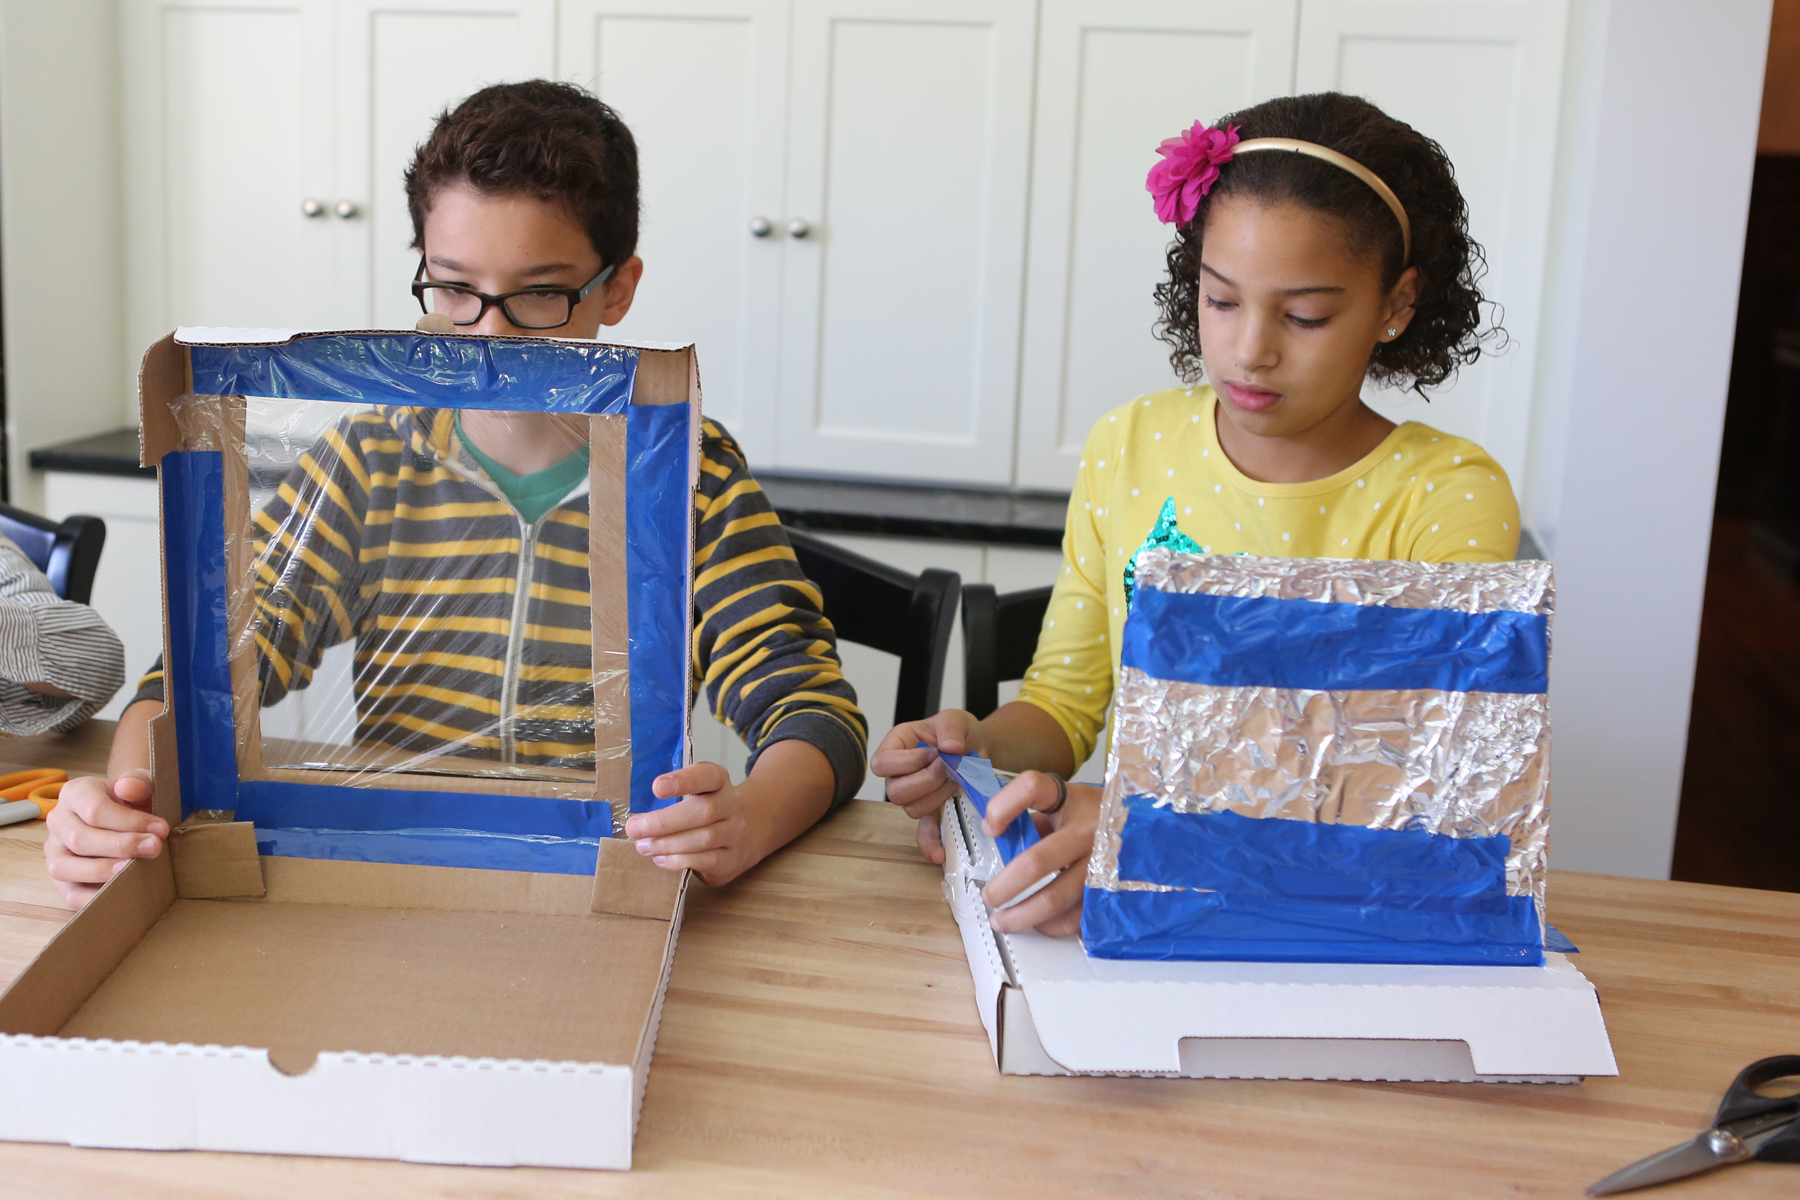
Solar Oven from Kitchen Science Lab for Kids (Quarry Books)
Open the box and place a piece of black construction paper so that it fits the bottom of the box. Tape it by the edges. (We used two pieces.)
Roll up some newspaper and fit it around the inside edges of the box. This is the insulation. It should be about 1-1 ½” thick. Use tape (or other materials you can think of) to hold the newspaper in place. Tape it to the bottom of the box so that you can close the lid. (We taped it to the sides and had to cut the tape so that we could close the lid. Luckily our newspaper fit in tightly enough that we didn’t really even need the tape.)

Finally, cut plastic wrap an inch larger than the lid opening on the box top. Tape it on the underside of the lid opening. Add another piece of plastic wrap to the top of the lid opening. This creates a layer of air as insulation that keeps heat in the box. It also makes a window you can look through at the food you’re “cooking.” BE SURE THE PLASTIC WRAP IS TIGHT.
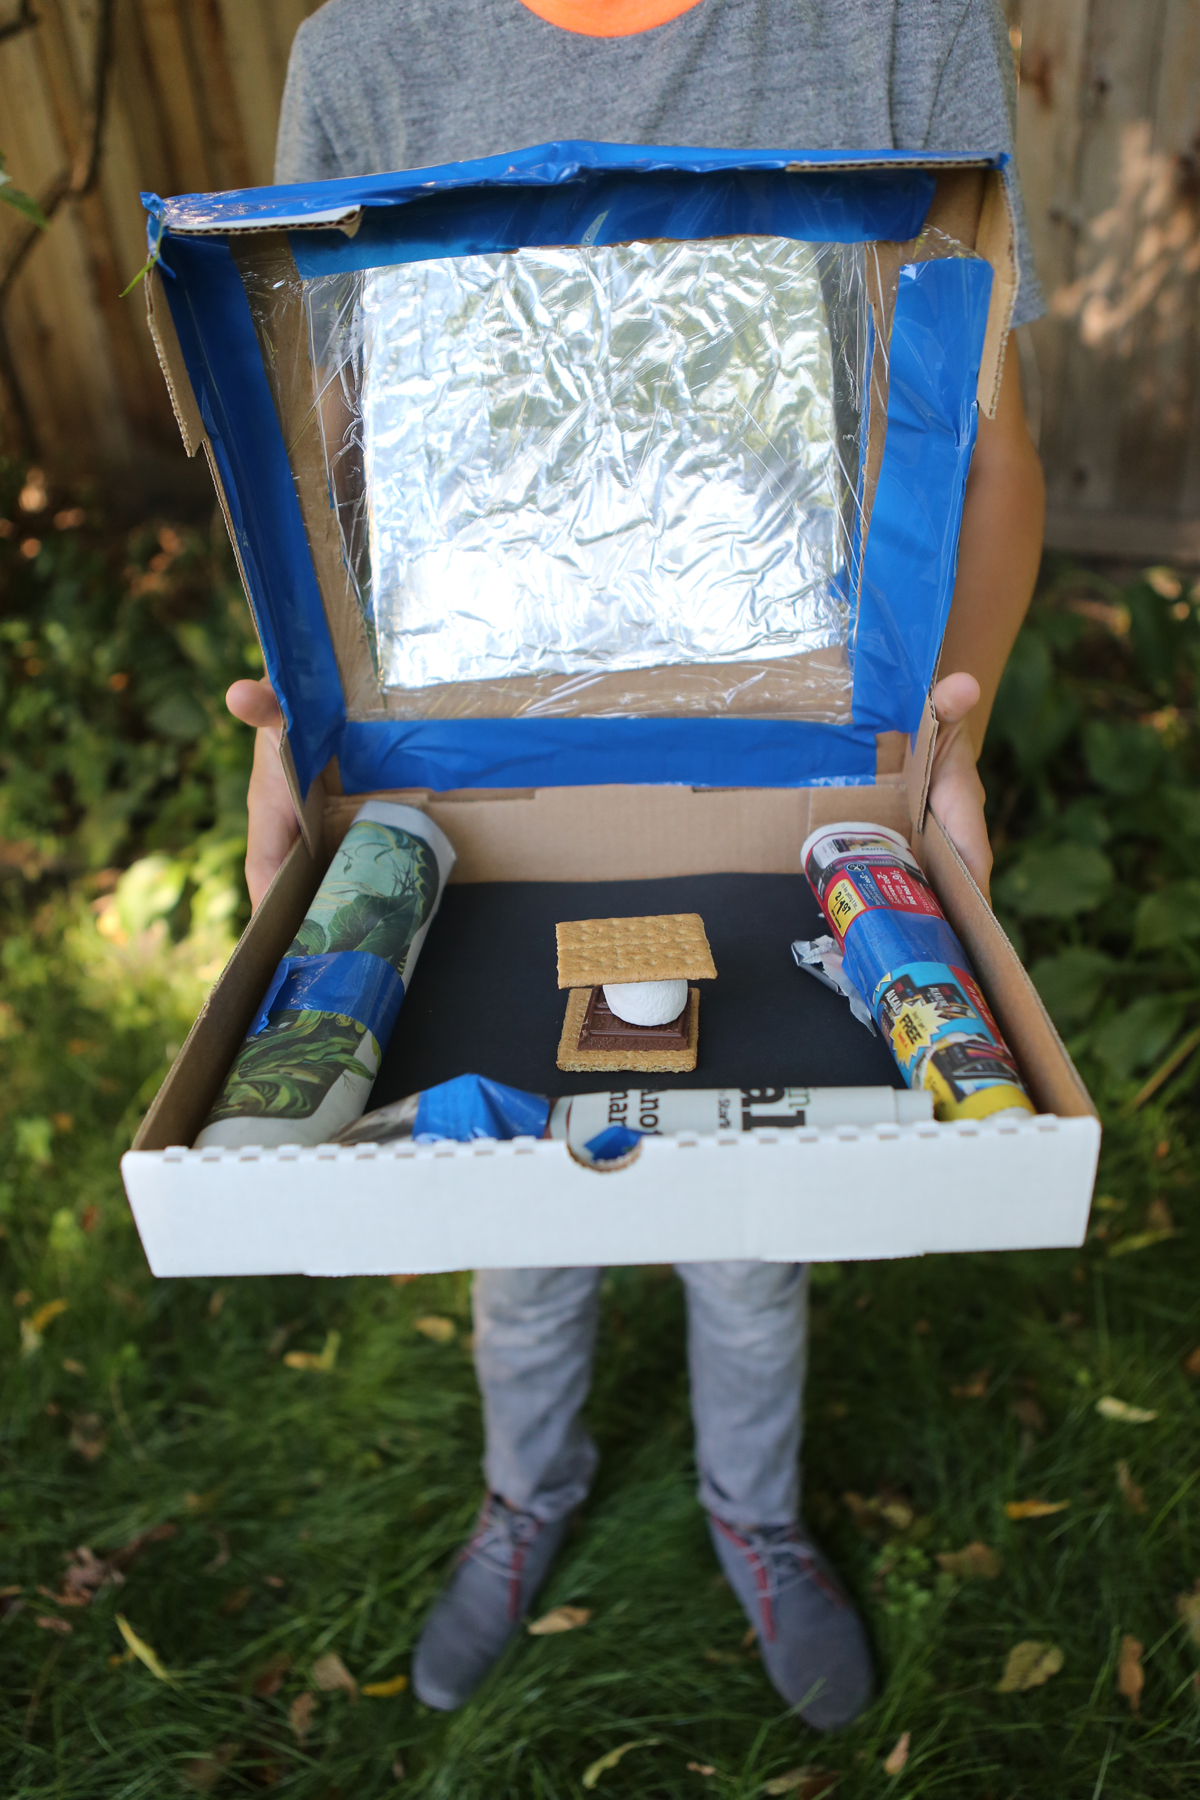
You are almost done! According to NREL, the oven needs to sit at an angle facing the sun directly so you’ll need to make a prop. You could probably just use a book or something under the hinged side of the oven. However, I missed this when I read the directions and we just put it flat on the ground. The flap of the box top needs to be propped open—a dowel or ruler works great. We used a wooden skewer that I broke the sharp point off of. This way you can change the amount of sunlight striking the oven window. Play with the angle of the flap to see how much sunlight you can get to reflect on the food.

Check every once in a while to see how well your food is being heated by solar thermal energy. If you’re is interested in finding out how the sun cooked your food, go to http://www.nrel.gov/ NREL’s website has great information on solar energy and many other sources of renewable energy.
Solar Oven from Kitchen Science Lab for Kids (Quarry Books)
KidScience app is on the App Store!
- by KitchenPantryScientist
I have to admit it. I’m ridiculously excited!
Our KidScience app is now available on the App Store, making it easy for kids of all ages to do science anywhere, any time, or to check out KidScience watch-and-do videos and learn a little science when they (or you) need a little portable screen time.
Let us know how you like it. It’s for you!

Here’s the scoop: If you’re ready to keep the kids busy this summer doing fun, educational projects without shopping trips and complicated directions, you’ll be as excited as we are that KidScience Premium, based on Kitchen Pantry Scientist science projects, has arrived.
Available for iphone, ipod touch and ipad, KidScience Premium brings entertainment and education to your fingertips with a continually updated list of experiments to choose from using things you already have on hand. It includes both photos and watch-and-do videos that make it easy for kids to do projects on their own or you can have fun doing projects together.
A free version of the KidScience app is on the way and will include all the same experiments and photos, but have limited free videos. I’ll let you know when it joins KidScience Premium on the App Store.
There are other kid science apps, but only one KidScience app! You’ll know us by our bright orange and blue logo.
Let’s do some science!