Tag: kids’
Creative Science
- by KitchenPantryScientist
If I give you glue, water and Borax, can you come up with a recipe for perfect polymer slime based solely on what you know about the science?
![IMG_5874[1]](https://kitchenpantryscientist.com/wp-content/uploads/2015/01/IMG_58741.jpg)
Last week, I did hands-on science with 150 third graders at Success Beyond the Classroom’s Creativity Festival at the University of Minnesota. As they came into the room, I asked them to draw a picture on chalkboard of anything related to science. They drew test tubes, trees, volcanoes, and even scientists!
![IMG_5881[1]](https://kitchenpantryscientist.com/wp-content/uploads/2015/01/IMG_58811.jpg)
Then we dug into the science. After doing my favorite large group hands-on experiment with purple cabbage juice to warm them up, I announced that we’d be making polymer slime, but that they would have to invent the recipe for the perfect goo.
To begin with, I talked about the science. We learned that one ingredient in the slime is glue (polyvinyl acetate), which is a polymer, or long chain of molecules. Then, we talked about the fact that adding water to the glue makes it less viscous, or thick. As usual, I had them repeat the vocabulary after me. Finally, I explained that the sodium tetraborate in Borax laundry detergent is a cross-linking substance that makes glue molecules stick together, and that we’d mixed up some Borax and water for them to use as a crosslinker for the slime.
![IMG_5871[1]](https://kitchenpantryscientist.com/wp-content/uploads/2015/01/IMG_58711-e1422370079939.jpg)
Their challenge was to come up with one “recipe” to make a gooey, soft slime and a second recipe for a harder, rubber-like slime that could be rolled into bouncy balls. They each had a note card and pencil to keep track of their work, plastic teaspoons as measuring tools and paper cups for mixing slime. First, they’d stir up different proportions of glue and water, and then they’d add the Borax solution as a cross linker and mix it all together with a popsicle stick. To make it a little more colorful, they could add a drop of food coloring or some cabbage juice.
Needless to say, there were failures and successes and the kids had a blast. We talked about the fact that experiments often don’t work on the first try, and each kid explained to the group how they’d made their perfect slime as they demonstrated how it bounced and stretched.
Try it!
All About That Base
- by KitchenPantryScientist
In addition to some of my neighborhood friends,two awesome chemist friends helped me out with this song: the amazing Dr. Raychelle Burks (with the Bronsted-Lowry line) and bassist Ryan Williams, who happens to have a PhD in Chemistry, with his awesome bass-playing.
The video quality isn’t top-notch, but you’ll get the idea, and hopefully learn a little chemistry!
Physics! Biology! Chemistry! Yeah!
- by KitchenPantryScientist
I got together with some friends this weekend to do a quick iPhone recording of a chemistry song (on my Kitchen Pantry Scientist YouTube channel soon) and these awesome kids were nice enough take a break from playing to sing the Science Song with me. They had me laughing so hard that I could hardly get the words out!
Can you make up a song about science?
New Magic Potion video (acid-base experiment)
- by KitchenPantryScientist
This colorful, fizzy acid/base experiment will liven any kids’ party or rainy day!
Check out my Kitchen Pantry Scientist YouTube channel for more how-to videos!
Halloween Science: Fizzy Balloon Monster Heads, Green Slime and More
- by KitchenPantryScientist
With a few ingredients from your kitchen, you can turn your table into a mad scientist’s laboratory for Halloween! We made Fizzy Balloon Monster Heads, Alien Monster Eggs, Rock Candy and Soda Geysers on Fox9 News this morning. Click on the blue experiment names for directions!
KMSP-TV
Last Saturday morning, I had fun showing Kare11 meteorologist Belinda Jensen how to make Mad Scientist’s Green Slime, Frankenworms and Magic Potion. Click here to watch!
Shoe Box Solar Viewer for Watching a Solar Eclipse
- by KitchenPantryScientist
Here’s how to make simple solar viewers to indirectly view an eclipse.
NEVER look directly at the sun, since you can permanently damage your retinas (the light sensors on the back of your eyeballs.)
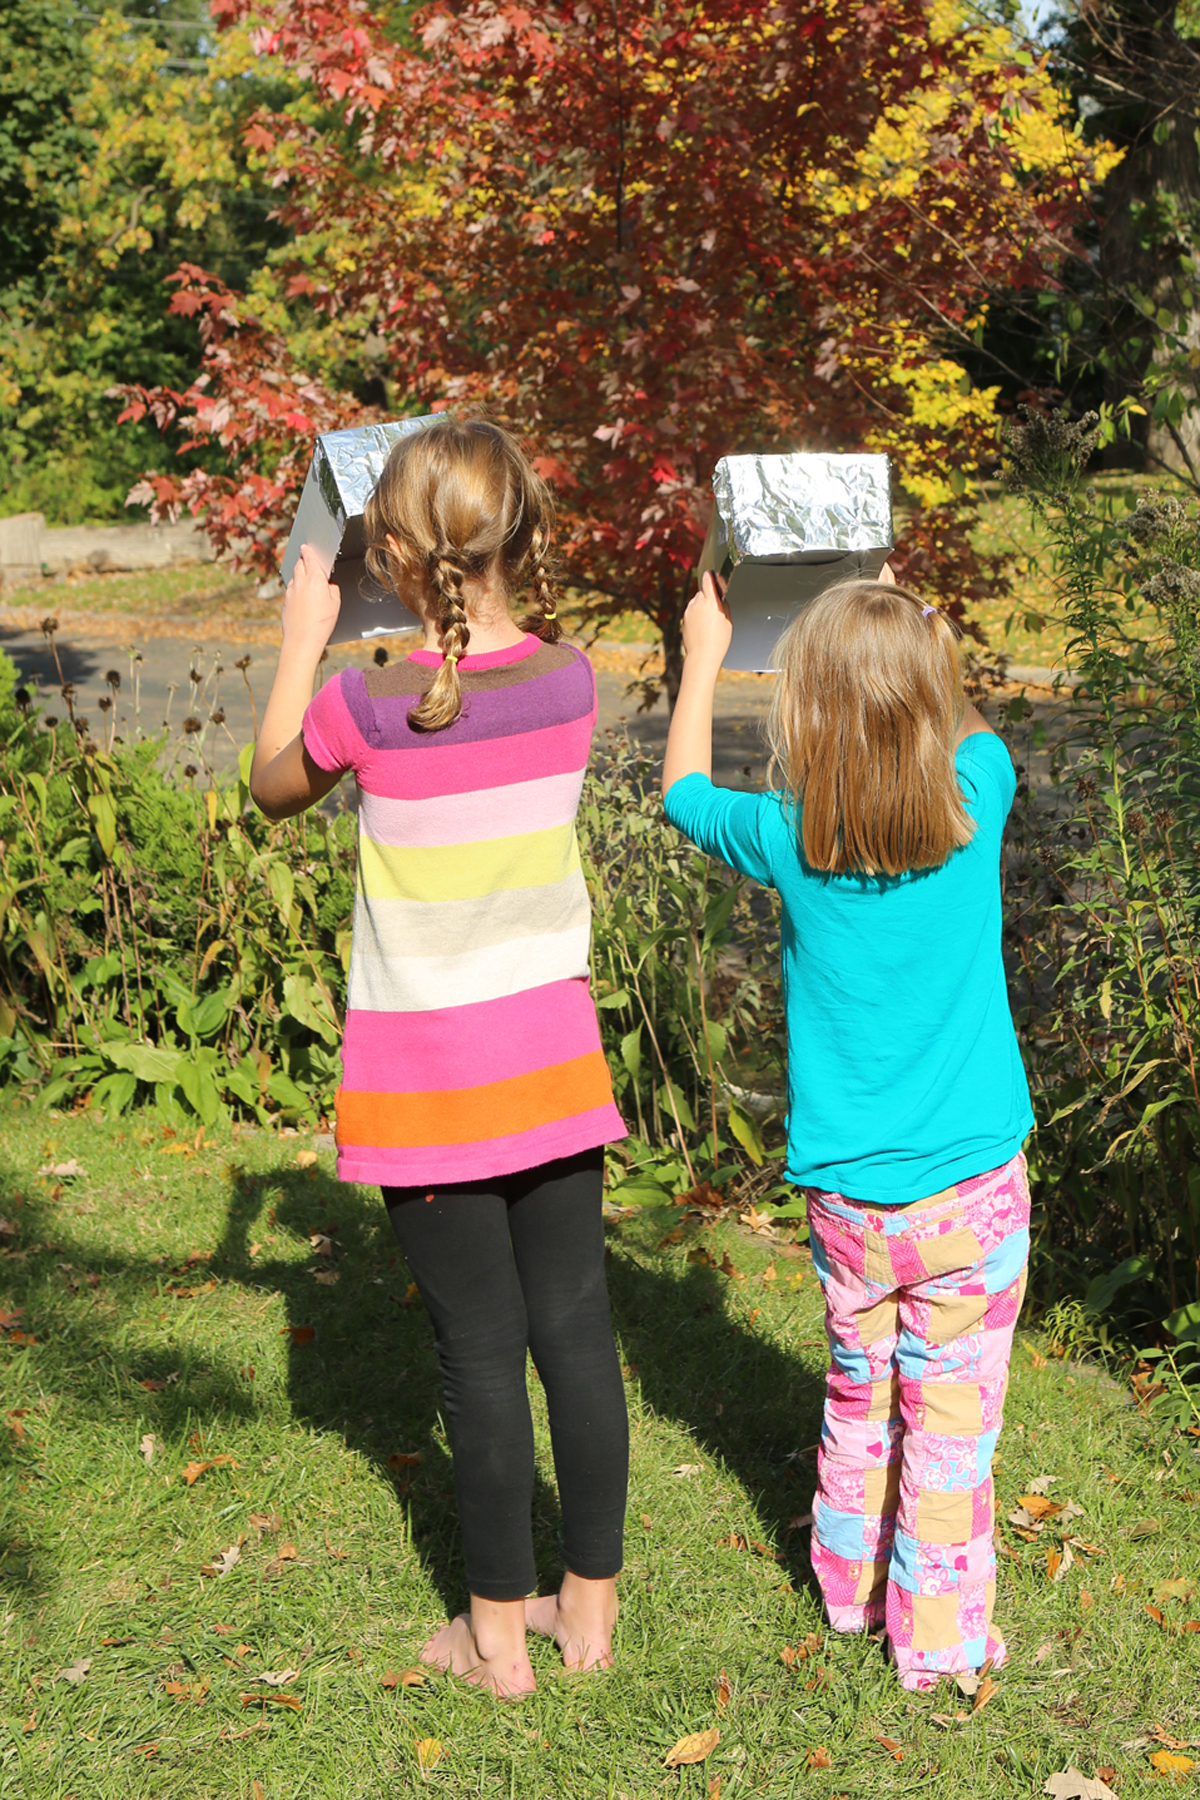
You can safety view the sun (and therefore a solar eclipse) using a shoe box by standing with the sun BEHIND you. All you need is a shoe box without a lid, a piece of white paper, aluminum foil, a pin and tape. It’s perfect for viewing a solar eclipse, like the one coming up this afternoon. It will be visible from around 4:30 CST until 6:00 PM CST here in Minnesota!
A solar eclipse happens when the moon passes between the sun and the earth, blocking the sun from view.Go to this eclipse calculator to see when and where you can best view the eclipse with your viewer! Here in Minnesota, we’ll see a partial eclipse.
First, tape white paper over one end of the shoe box (on the inside.) This is your viewing screen.
Then, cut a big notch out of the other end of the shoe box and tape aluminum foil over it.
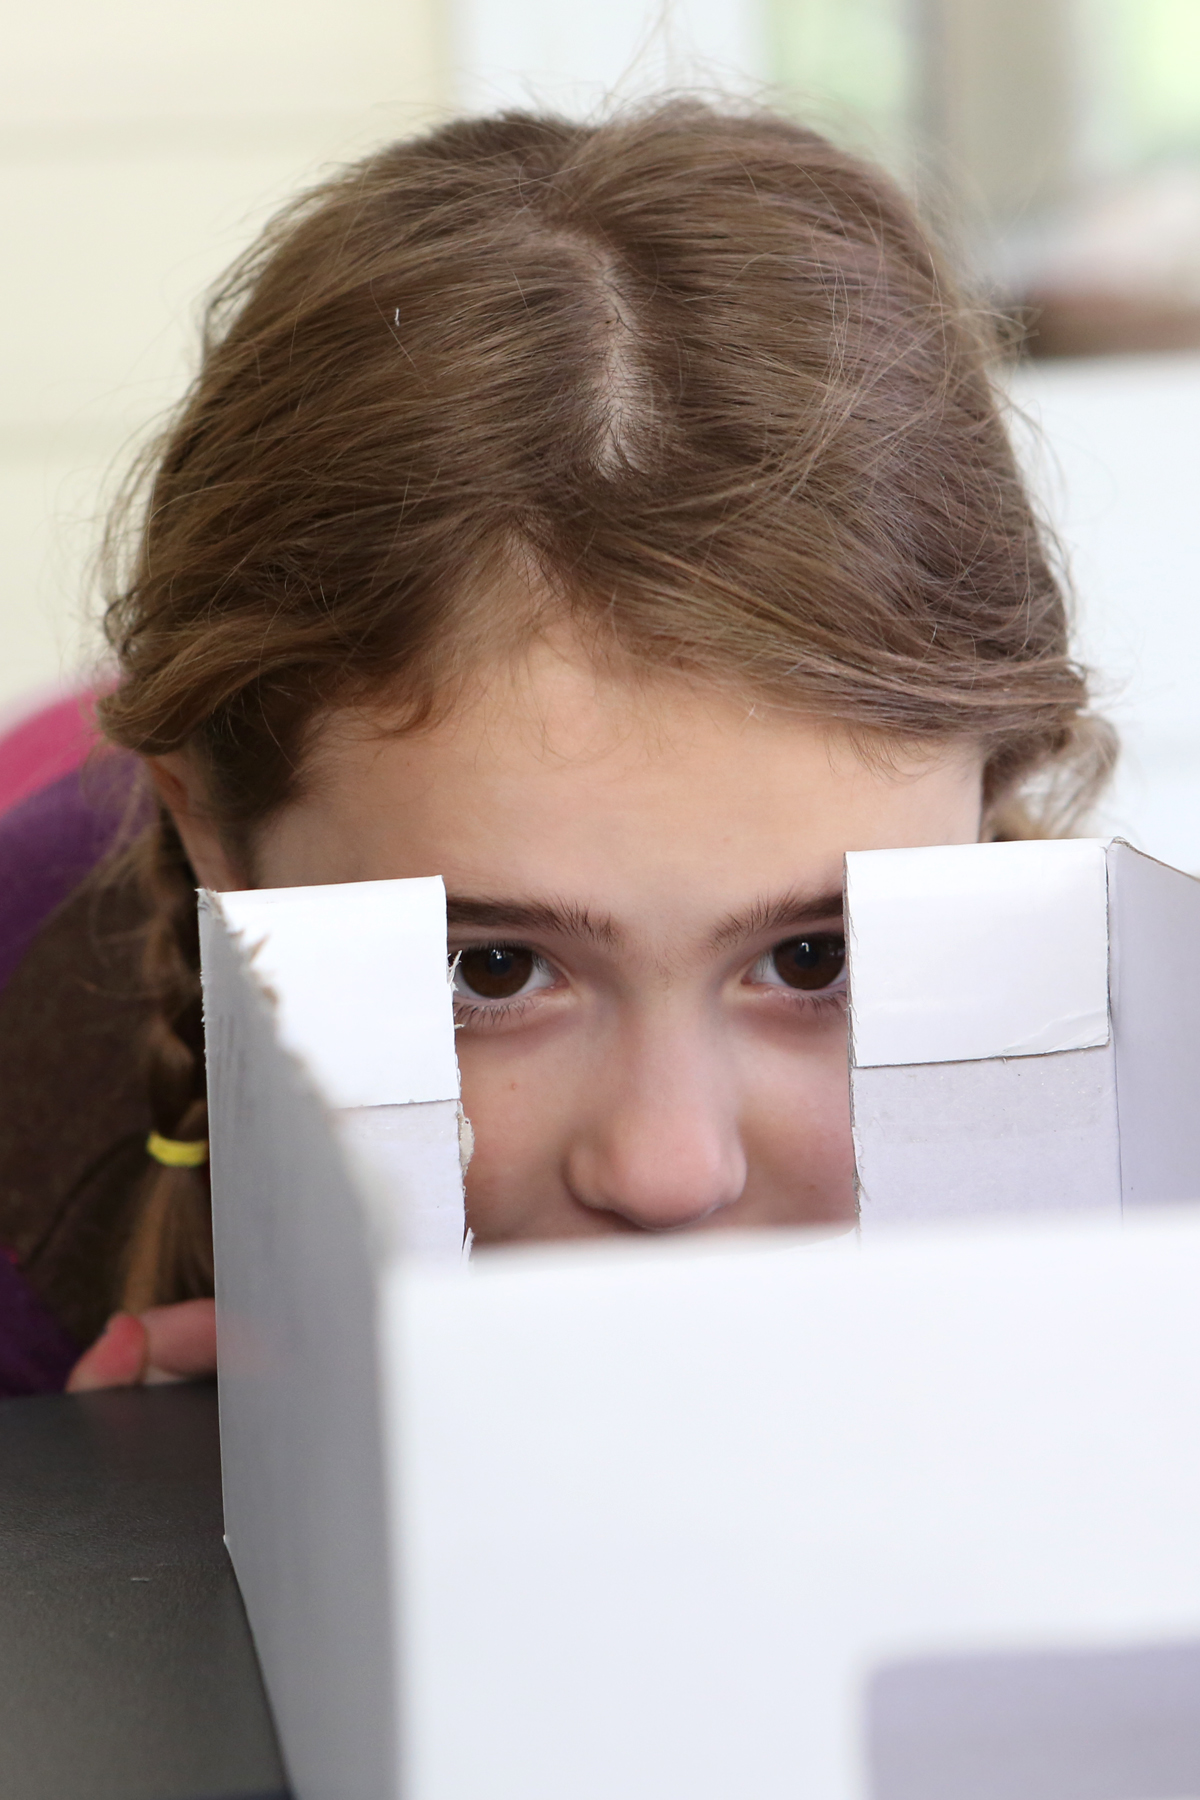

Use a pin to poke a hole in the center of the foil. If you mess up, you can always put new foil on and try again. The smaller the hole, the better the focus, but we made ours a little bigger than the actual size of the pin.
Now, stand with the sun BEHIND you. (See photo at top of post. The sun is behind the girls, high in the sky.) NEVER LOOK AT THE SUN THROUGH THE PINHOLE ITSELF.

Hold the box upside down so the pinhole is pointed at the sun behind you. The foil should be behind your line of sight so it’s not reflecting the sun in your eyes. Light rays from the sun will shine through the pinhole and project an (upside down) image on the white paper.
Practice on a sunny day (or when the sun peeks out between the clouds) so that you know what to do when it’s time for the eclipse. Small children should be supervised so they don’t try to look directly at the sun.
You can do the same thing using two white index card, poking a hole in one you hold nearest to you and projecting the image on the one you hold away from you (with the sun behind you.)
Or, if you’d rather order “eclipse glasses”, here’s a link for where to buy AAS-approved and tested solar viewers.
If you’re interested in projecting a larger image of the sun, try making a solar viewer from binoculars, a tripod and a white piece of paper. Click here for directions!
Enjoy! Watching an eclipse in the 70s after my dad came to school and helped us all make these boxes is one of my earliest “science” memories!
Halloween Soda Geysers
- by KitchenPantryScientist
For an explosive fountain of Halloween fun, try this carbonated chemical reaction!
You’ll need:
-a two liter bottle of Diet Coke
-a roll of Mentos mints
-a piece of paper.
-a disposable plastic table cloth or some construction paper
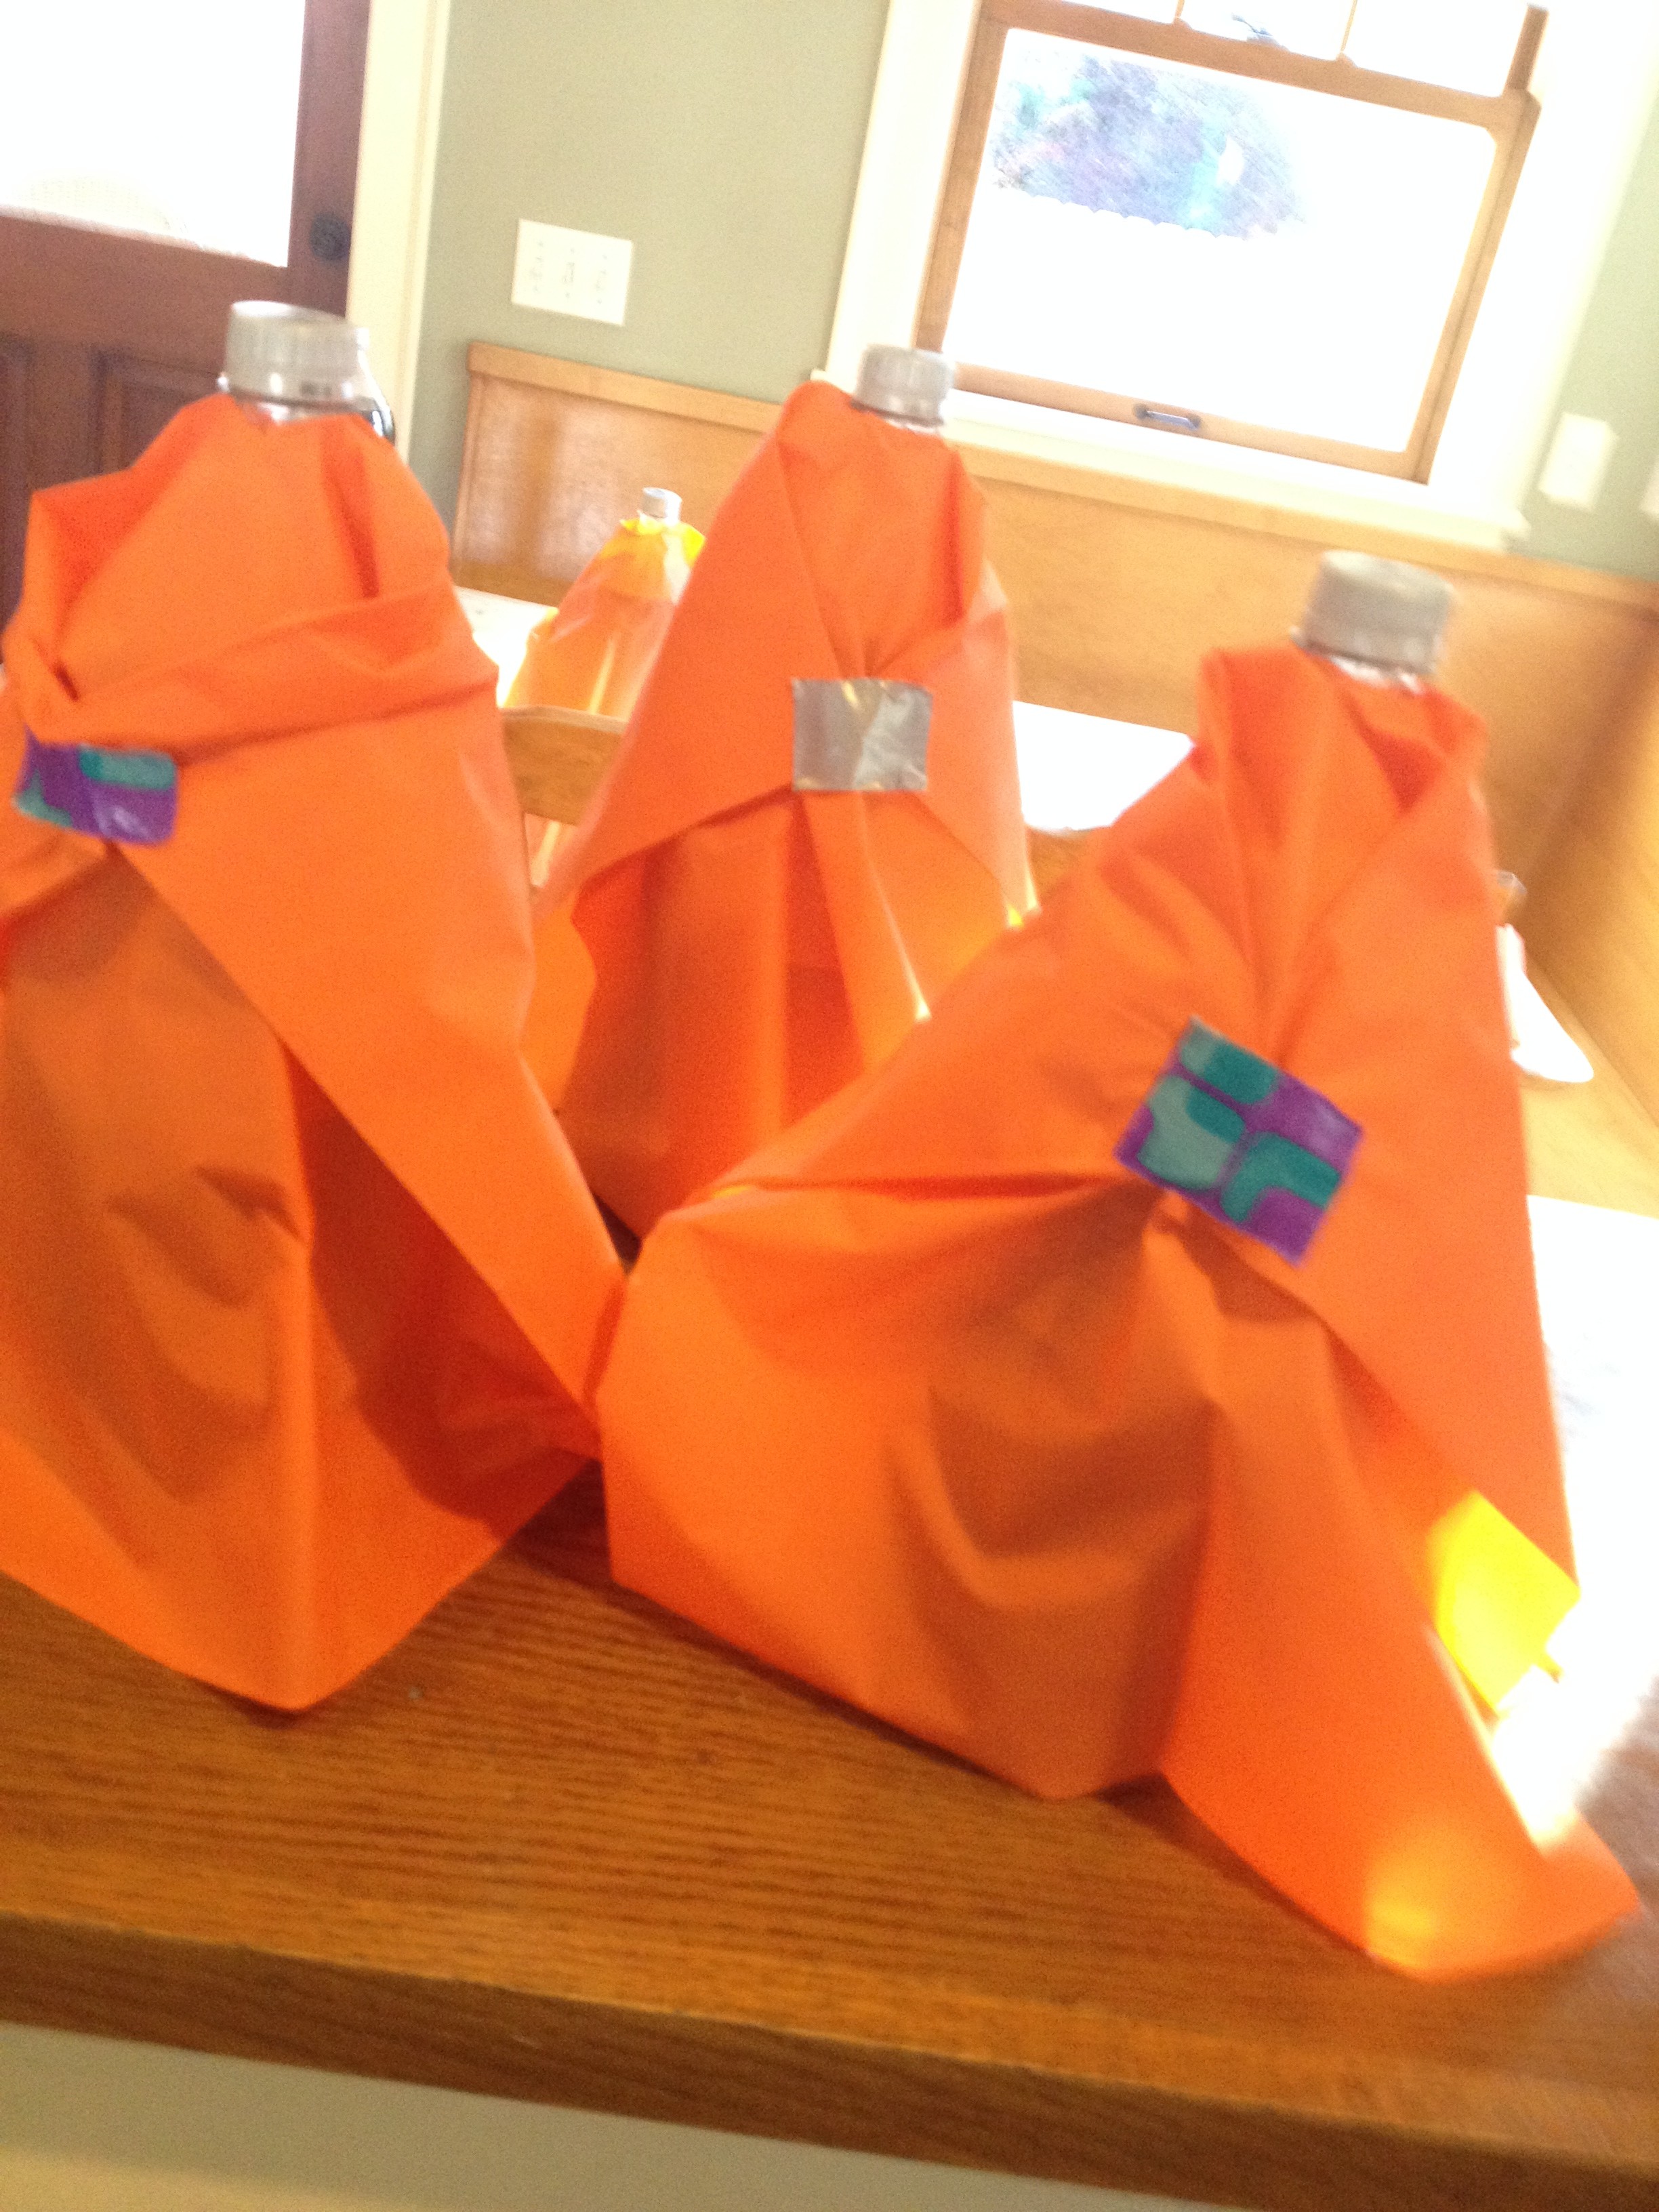
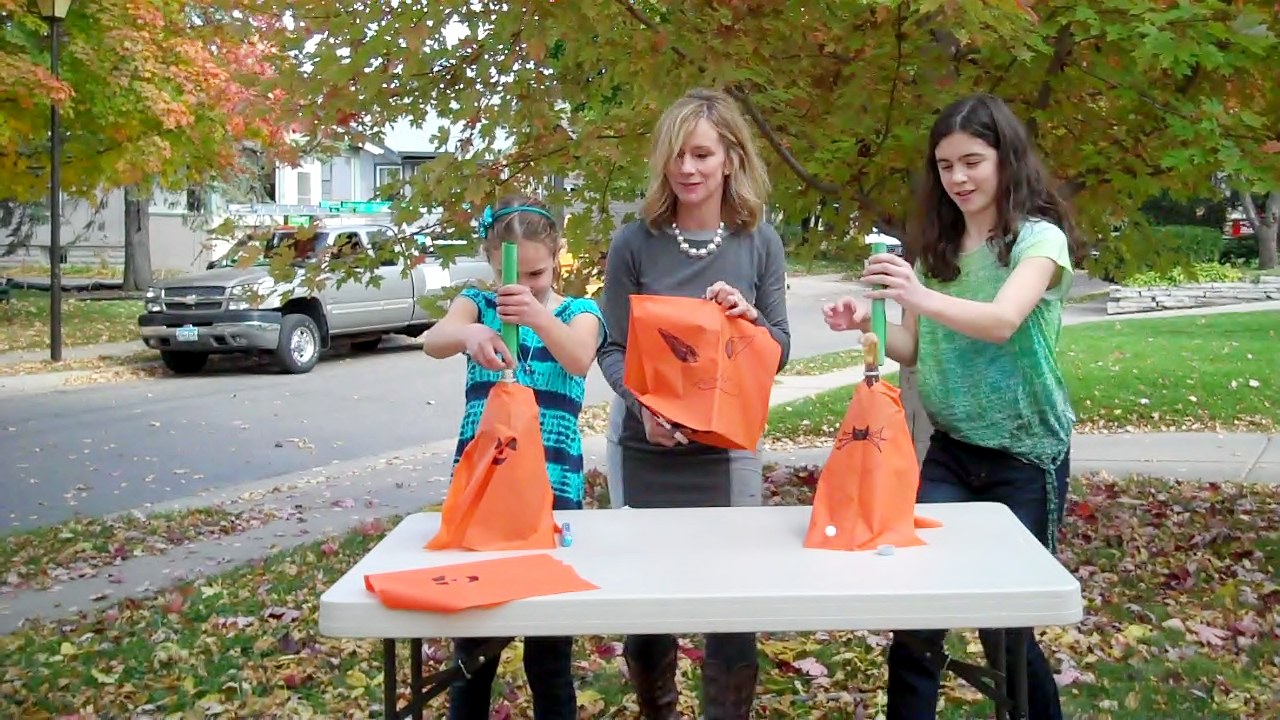
1. Make a Halloween costume for your Diet Coke bottle. We made pumpkins by cutting up a plastic tablecloth into sections and cutting a hole on the fold for the mouth of the bottle. Then, we draped the “costume” over the bottle and decorated it with permanent marker.

2.Remove the lid from the bottle and set the Diet Coke on a flat surface (outside!)
3. Roll some paper so it will fit into the mouth of the bottle, tape it into a tube, and fill it with a roll of Mentos mints.
4. Quickly dump the mints into the bottle and stand back! (Young kids should wear safety goggles or sunglasses to protect their eyes.)
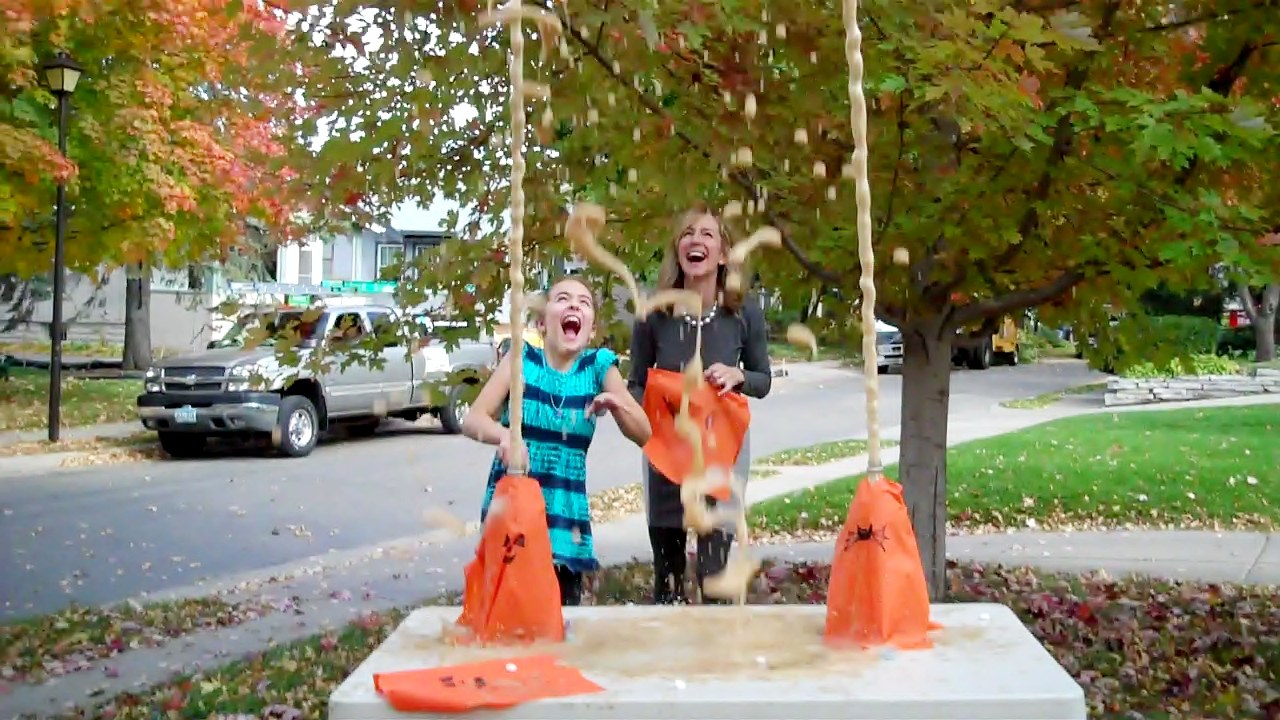
The science behind the fun: Scientists are not sure exactly why the Mentos cause such an explosive reaction, but they think it has to do with the chemical reaction that occurs between the Diet Coke and the Mentos mints, when chemicals in the Mentos break the surface tension in the soda at the same time that carbon dioxide (CO2) bubbles form very rapidly on the surface of the mints, causing a huge, very fast release of carbon dioxide bubbles. The pressure of this gas builds very quickly in the bottle, shooting the liquid and bubbles into the air.
Halloween Science: Mad Scientist’s Green Slime
- by KitchenPantryScientist
What could be more fun than creating your own green slime ? It’s easy to synthesize your own green goo using only Elmer’s glue (the non-washable kind), Borax (found in the laundry detergent section of Target and some grocery stores), green food coloring and water.
Mix together about 1/3 cup glue and 1/3 cup water with a spoon or Popsicle stick. These measurements don’t have to be exact. Add a few drops of green food coloring and stir.
To make the Borax solution, add around a cup of water to a jar. To the water, add about a Tablespoon of Borax. Shake or stir to dissolve as much of the Borax as possible. You’re making a saturated solution, so it may not all dissolve!
Here’s the fun part: Add a teaspoon at a time of the Borax solution to the glue/water mix. After each addition, stir the mixture. You’ll see long strings begin to form and stick together. Keep adding Borax until the mixture doesn’t feel sticky. It will form a shiny playdough-like substance. If you add too much Borax solution, it will feel wet, but you should be able to squish it around in your hands to absorb the extra water! The slime isn’t toxic, but Borax is soap, so don’t eat it!
What happens? Mixing Elmer’s glue with water forms a substance called a polymer, which is a long chain of molecules, sort of like a string of pearls. (A molecule is the smallest amount of a specific chemical substance that can exist alone, like H2O, a single water molecule). The polymer in school glue is called polyvinyl acetate.
The Borax solution (sodium tetraborate) is a cross-linking substance that makes the polymer chains stick together. As more and more chains stick together, they can’t move around and the goo gets thicker and thicker. Eventually, all the chains are bound together and no more Borax solution can be incorporated.
You can store the slime in plastic bags. If you want to make a larger batch, just remember to mix equal amounts of glue and water and then add as much Borax solution as needed.
Frankenworms, Magic Bags and Fall Leaf Chromatography
- by KitchenPantryScientist
This morning, on Kare11 Sunrise, I showed off my new book, Kitchen Science Lab for Kids, and demonstrated three experiments from the book. Just click on the experiment name for directions, photos and more about the science!
Frankenworms– Bring gummy worms to “life” using a chemical reaction.
Magic Bags– Explore the elastic properties of polymers.
Leaf Chromatography– Separate plant pigments on coffee filters.
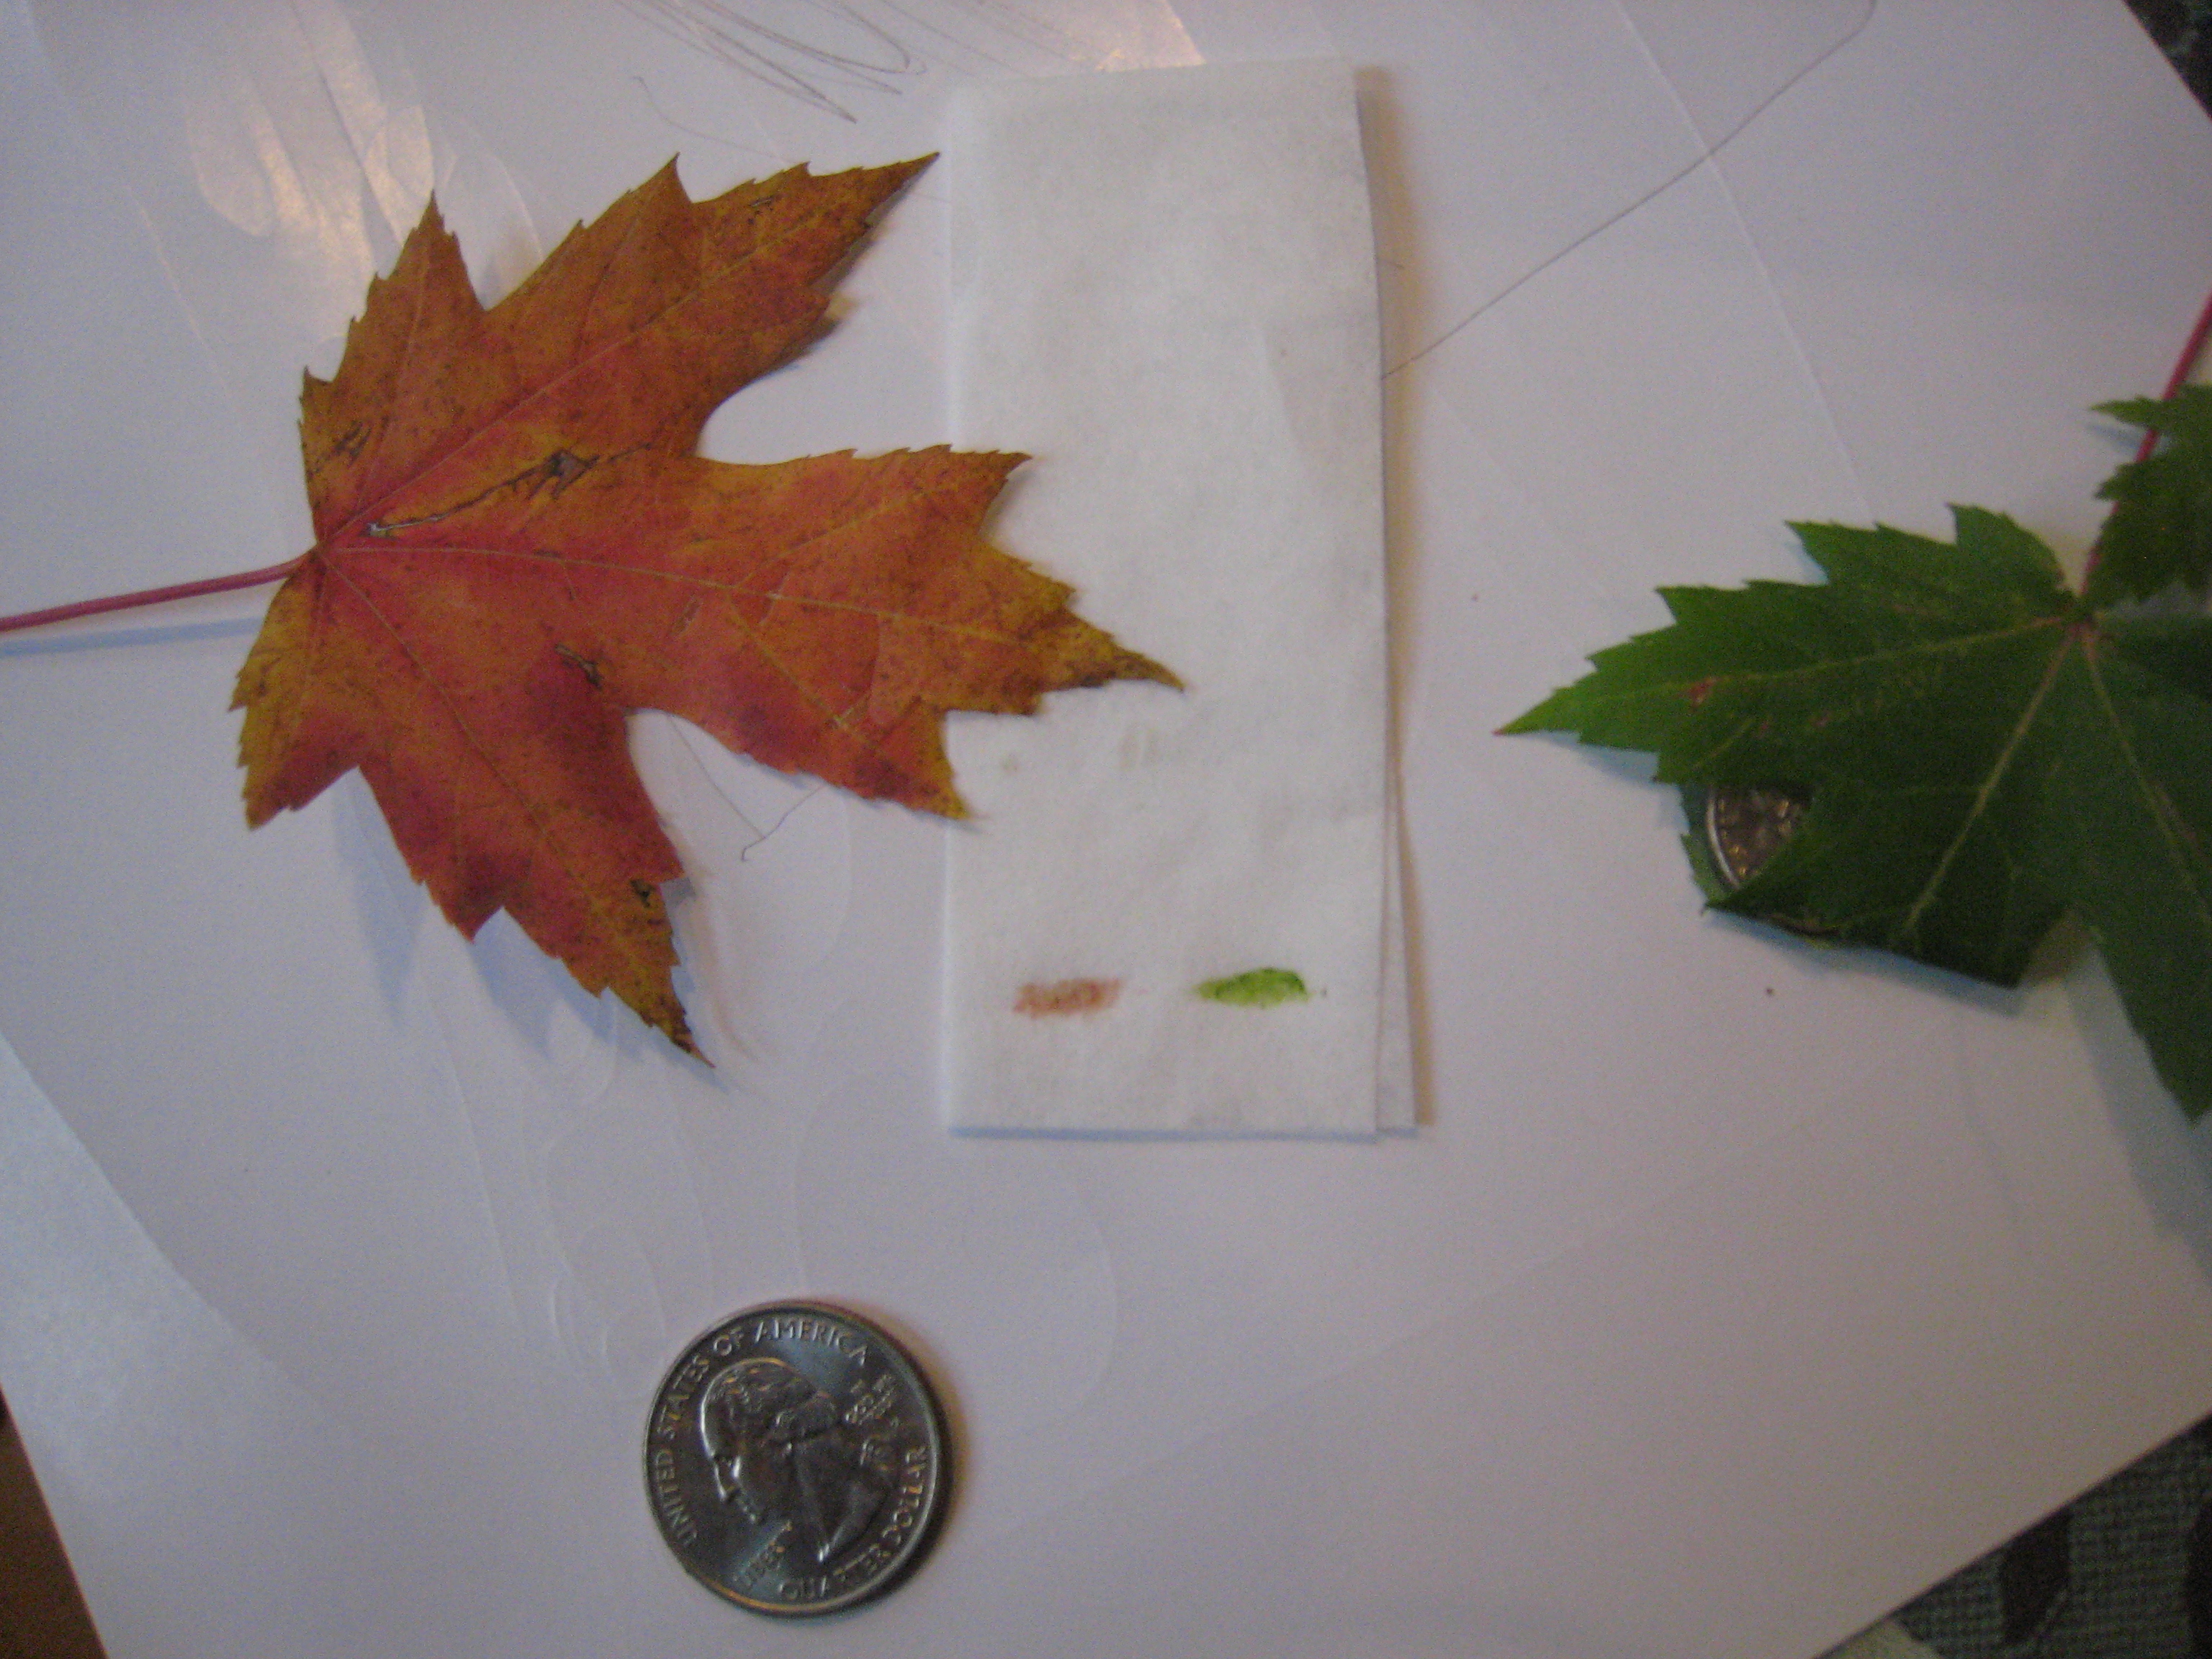
This is especially fun in the fall, when you can compare green leaves to red and yellow ones! Here’s a nice article on the chemistry of the colors of fall leaves (from the Compound Interest website) that my friend Joanne Manaster highlighted on her Joanne Loves Science Facebook page.
Technology and Nature: What’s That Bird?
- by KitchenPantryScientist
Last week, the kids and I saw a bright red bird with a blue head. Baffled, I pulled out my favorite bird identification app: Merlin Bird ID, from the Cornell Lab of Ornithology. The app is free, available on the App Store and Google play, and much of the data in the app has been collected by citizen scientists, like you and me!
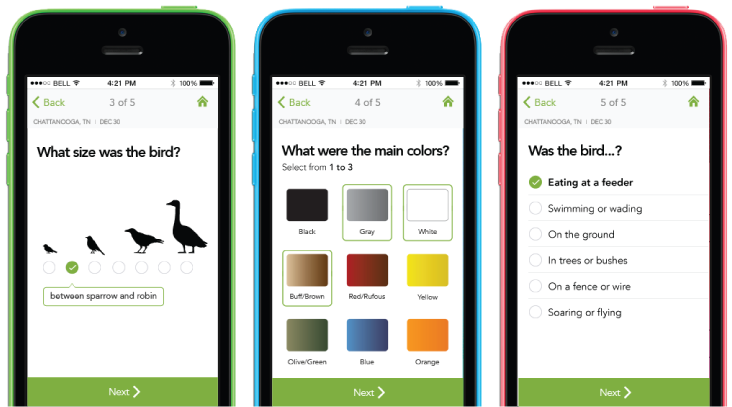
To use the app, you simply answer 5 simple questions about the bird you see and the app draws on a wealth of data to help you identify the bird. It comes up with a list of likely matches, and you choose the bird you’re looking at to learn more about it, and even listen to a recording of its song.
Normally, we can quickly identify the bird we’re stalking using the app, but the blue-headed red bird was tricky, so we went online to do more research. Merlin Bird ID suggested that it might be a cardinal, so we did a search for blue headed cardinals and discovered that we’d seen a bald-headed cardinal. It seems that some cardinals and blue jays molt all their head feathers at once, leaving their bluish skin exposed.
Cool.