Category:Physics Experiments’
Ice Science Video
- by KitchenPantryScientist
Salt lowers the melting/freezing temperature of ice, which is the solid form of water. Here’s a fun experiment you can do to see for yourself how Sodium Chloride (table salt) makes ice melt and water refreeze on a string, allowing you to “magically” lift an ice cube from a glass of water.
Click here for detailed instructions and more about the science.
This video will soon appear on KidScience app‘s Premium version, which allows you to easily search for experiments and videos based on kids’ ages, type of science, what you have on hand, or how much time you have.
Halloween Science on abullseyeview.com
- by KitchenPantryScientist
Today, Target shared three of our favorite Halloween science experiments on abullseyeview.com.

Shocking Science and Magic Potion
- by KitchenPantryScientist
Doctor Frankenstein would have loved this experiment that makes electrons jump from place to place, with a shocking conclusion. You can watch us demonstrate it on Kare11 Sunrise by clicking here.

To make an electrophorus, or charge carrier, all you need is a Styrofoam plate, a cardboard square large enough to tape the plate onto, an aluminum pie pan, a Styrofoam cup, aluminum foil and wool, like an old mitten or stocking cap.
Tape the foam cup to the inside of the pie pan. Then cover the cardboard with foil and tape the plate on to the surface, facing down.
For your Leyden jar, which can make a bigger spark and shock, you’ll need a plastic film canister or an empty spice jar*, a nail longer than the canister, aluminum foil and water.
Cover the outside of the bottom of the film canister or spice jar with foil, push the nail through the cap, fill it 3/4 up with water and replace the lid/nail so the nail is in the water. *If you’re using a spice jar, put foil on the bottom half of the jar, remove the lid, fill it 3/4 full of water, and make a new “lid” by covering the top of the container with duct tape. Stick your nail through the duct tape and your Leyden jar is ready to go! If your nail doesn’t stay in place, use more duct tape to secure it!

Now rub the foam plate with wool for about a minute. The Styrofoam attracts electrons from the wool, giving the plate a negative charge.
It’s important to do the next steps in order!
1. Put the pie tin on the foam plate. The electrons on the pie tin are repelled by the negative charge on the plate, but they can’t go anywhere.

2. Put your thumb on the foil at the bottom and leave it there while you touch the pie tin with a finger on the same hand. You should feel a small spark as the electrons jump from the pie plate to your hand, leaving the plate with a positive charge.

3. Lift the plate using the foam cup and touch it to the head of the nail on your Leyden jar. Electrons will flow from the nail to the pie plate, leaving the nail and inside of the jar with a positive charge. Repeat steps 1-3 a few times to build up a charge in your Leyden jar.

4. When you’re ready for a shock, put your thumb on the foil on the bottom of your Leyden jar, leave it there, and bring your fingertip close to the nail on the jar. Electrons will jump from the negatively charged foil on the bottom of the jar to the positively charged nail, giving you a shock. If you try it in the dark, you may see a spark as the electrons move through the air to your finger!

When you’re tired of getting shocked, you can always whip up a batch of color-changing, bubbling Magic Potion! Click here for directions and a video.
Halloween Science: Creepy Critter Slingshots
- by KitchenPantryScientist
If you love marshmallows, you’ll love this physics experiment for Halloween. We’ve taken our ordinary Marshmallow Slingshot experiment to a spooky new level by adding edible tattoos to the marshmallows for Halloween. (We found them online at Oriental Trading Company.)
They’d be perfect for any Halloween party. Set up some pumpkins as targets and watch elastic energy turn into kinetic energy as you fire away. Click here to see the original post and learn about conservation of energy.
A fun video about making these slingshots and showing them in action is on both the free and Premium versions of KidScience app for iPhones and iPod touch.
Halloween Science: Magic Bag of Blood
- by KitchenPantryScientist
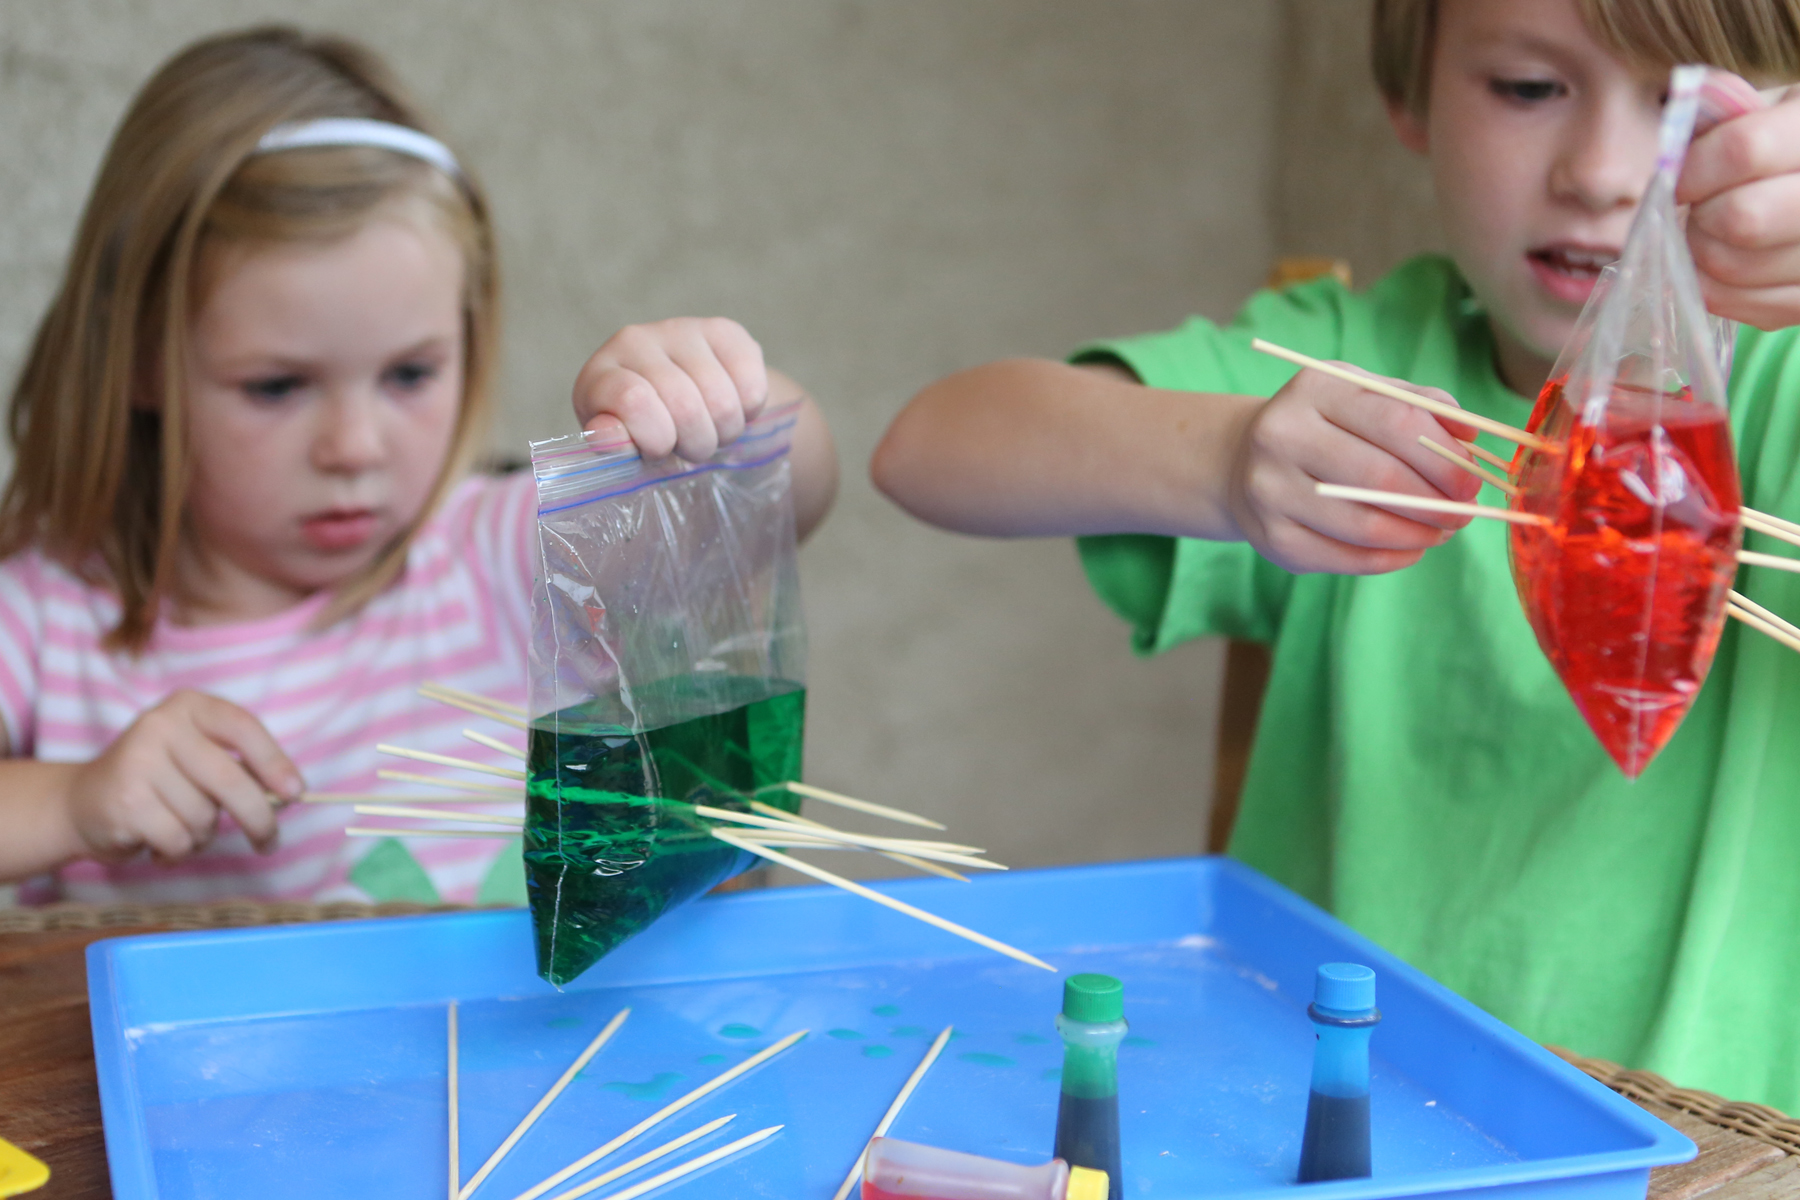
Image from Kitchen Science Lab for Kids (Quarry Books 2014)
You’ll be amazed when you fill a plastic zip-lock bag with “blood” and poke sharp skewers through, only to find that the bag doesn’t leak! All you need is a ziplock bag, water, food coloring and wooden skewers. Heavy-duty ziplocks work best! Fill a quart-sized ziplock bag with water, add a few drops of red food-coloring, and seal it. Slowly poke several wooden skewers completely through the bag, from one side to the other, avoiding the part with air in it. See how many you can push through! (Remember to be careful with the sharp points and I’d recommend putting a bowl underneath to collect drops.)
Why doesn’t the bag leak? Plastic is a polymer, made up of long, elastic molecules that form a seal around the spot where the skewer is poking through. In addition, the bag is sealed and contains very little air, so there isn’t much air pressure pushing on the water. If you make a hole in the part of the bag with air in it, surrounding air pressure (atmospheric pressure) can push on the liquid and make the bag leakier!
Survival Science: Shelter
- by KitchenPantryScientist
Katniss Everdeen had a sleeping bag to keep her warm at night in “The Hunger Games,” but what if you found yourself in the wilderness without a sleeping bag, or even a tent?

The healthy human body maintains a constant temperature between 97.7 and 99.5 degrees Fahrenheit through a process called thermoregulation. To do this, our bodies constantly produce heat and then give it off. Heat can be lost through the processes of conduction (losing heat by contact with another object, like the cold ground,) convection (losing heat to air or water moving across your skin,) radiation (loss of heat through infrared rays), and evaporation (heat loss as water turns to gas, like when sweat evaporates.)
If your body temperature gets too low, you can suffer from a potentially deadly condition called hypothermia. (Hypo=under, thermia=heat) Or, if you get too hot, you can suffer from Hyperthermia, which can lead to heat stroke. (Hyper=over, thermia=heat)
A shelter can protect you from the sun, storms and the elements and help you keep your body temperature steady as you wait for help to arrive, and one of the best items to include in your survival kit is a black plastic “contractor” bag. These large bags can be used as rain gear to keep you dry (cut a hole in the top for your head) or to protect you from wet ground below in your shelter. You can even fill one with leaves to use as a makeshift blanket. A nylon cord, or rope should also be included in a survival kit and can be used for a number of things including building shelters.
 There are lots of ways to build shelters, but grab an old tarp or some big plastic bags, some rope and head to a park, woods or a local nature center to build a shelter. You’ll learn a few things and it’s tons of fun!
You can make a “bent sapling shelter” by bending a small tree down and tying it to the base of a nearby tree. Then put your tarp or bag over the sapling. You could also tie your rope between two trees and hang the tarp over that.

Make an A-frame shelter by lashing two branches together and leaning a long branch between them. 
Then, cover it with your plastic bag or tarp.
You can use small sticks as stakes! 
What if you don’t have a tarp? Try building a shelter from branches you find and weaving tree branches or birch bark through the sticks.
Imagine that there’s a thunderstorm coming from the Northwest and build your shelter with that in mind. Look up! Are there dead branches or rocks that could fall on you? Use existing trees, downed branches and rocks to build your shelter. Can you anchor it with rocks, sticks and your rope? Remember, you want it large enough to lie down in, but small enough to conserve heat.
Make teams and have a contest to see who can build the best shelter!
Katniss would be proud!
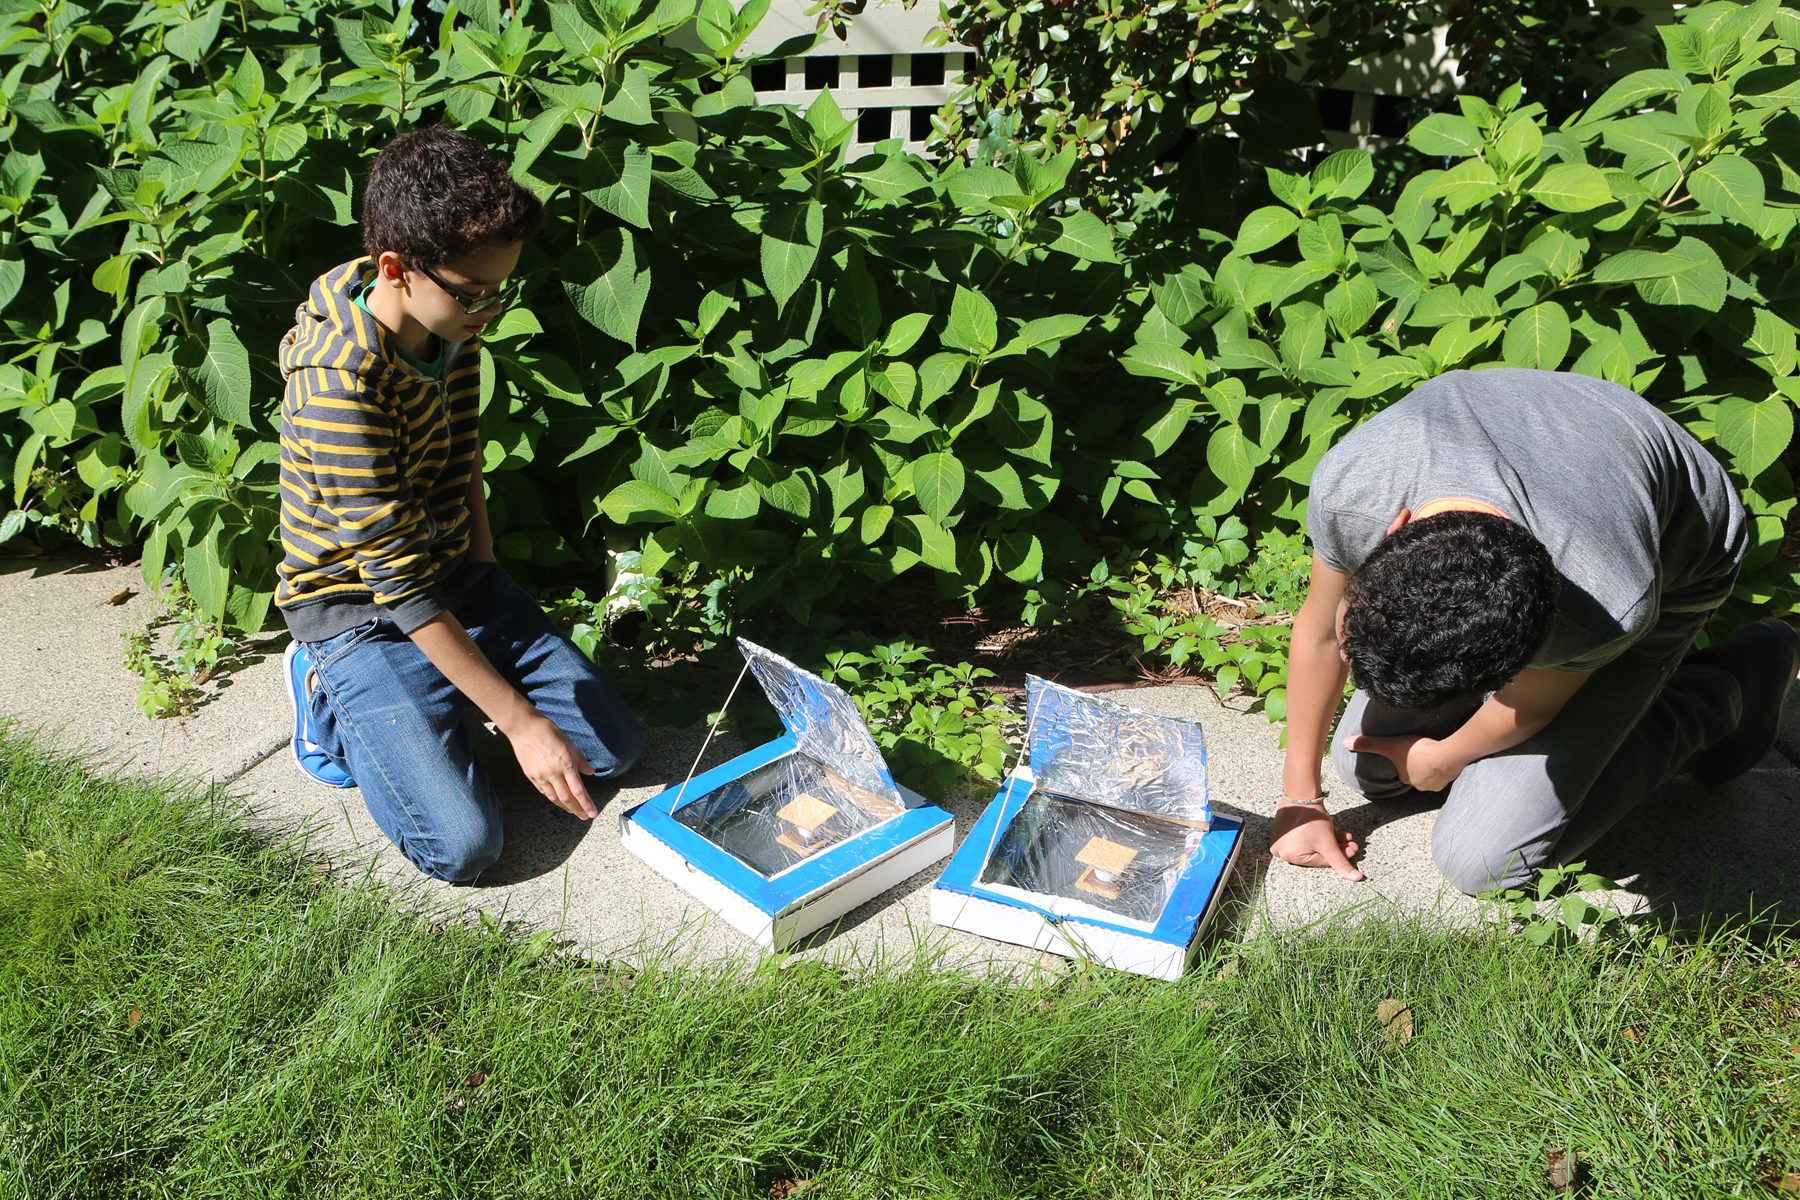
Kids Summer Science: Pizza Box Solar Oven
- by KitchenPantryScientist

A warm, sunny spring or summer day is perfect for making a solar oven from a pizza box!
When my friend Sheila, who works at NREL (the National Renewable Energy Laboratory) sent me this project, I couldn’t wait to try it out. We first tried it out on a cool spring day in Minnesota and to my surprise, it worked. The oven didn’t get very hot, but we were able to warm a chocolate chip cookie enough to make it soft and melt the chips.
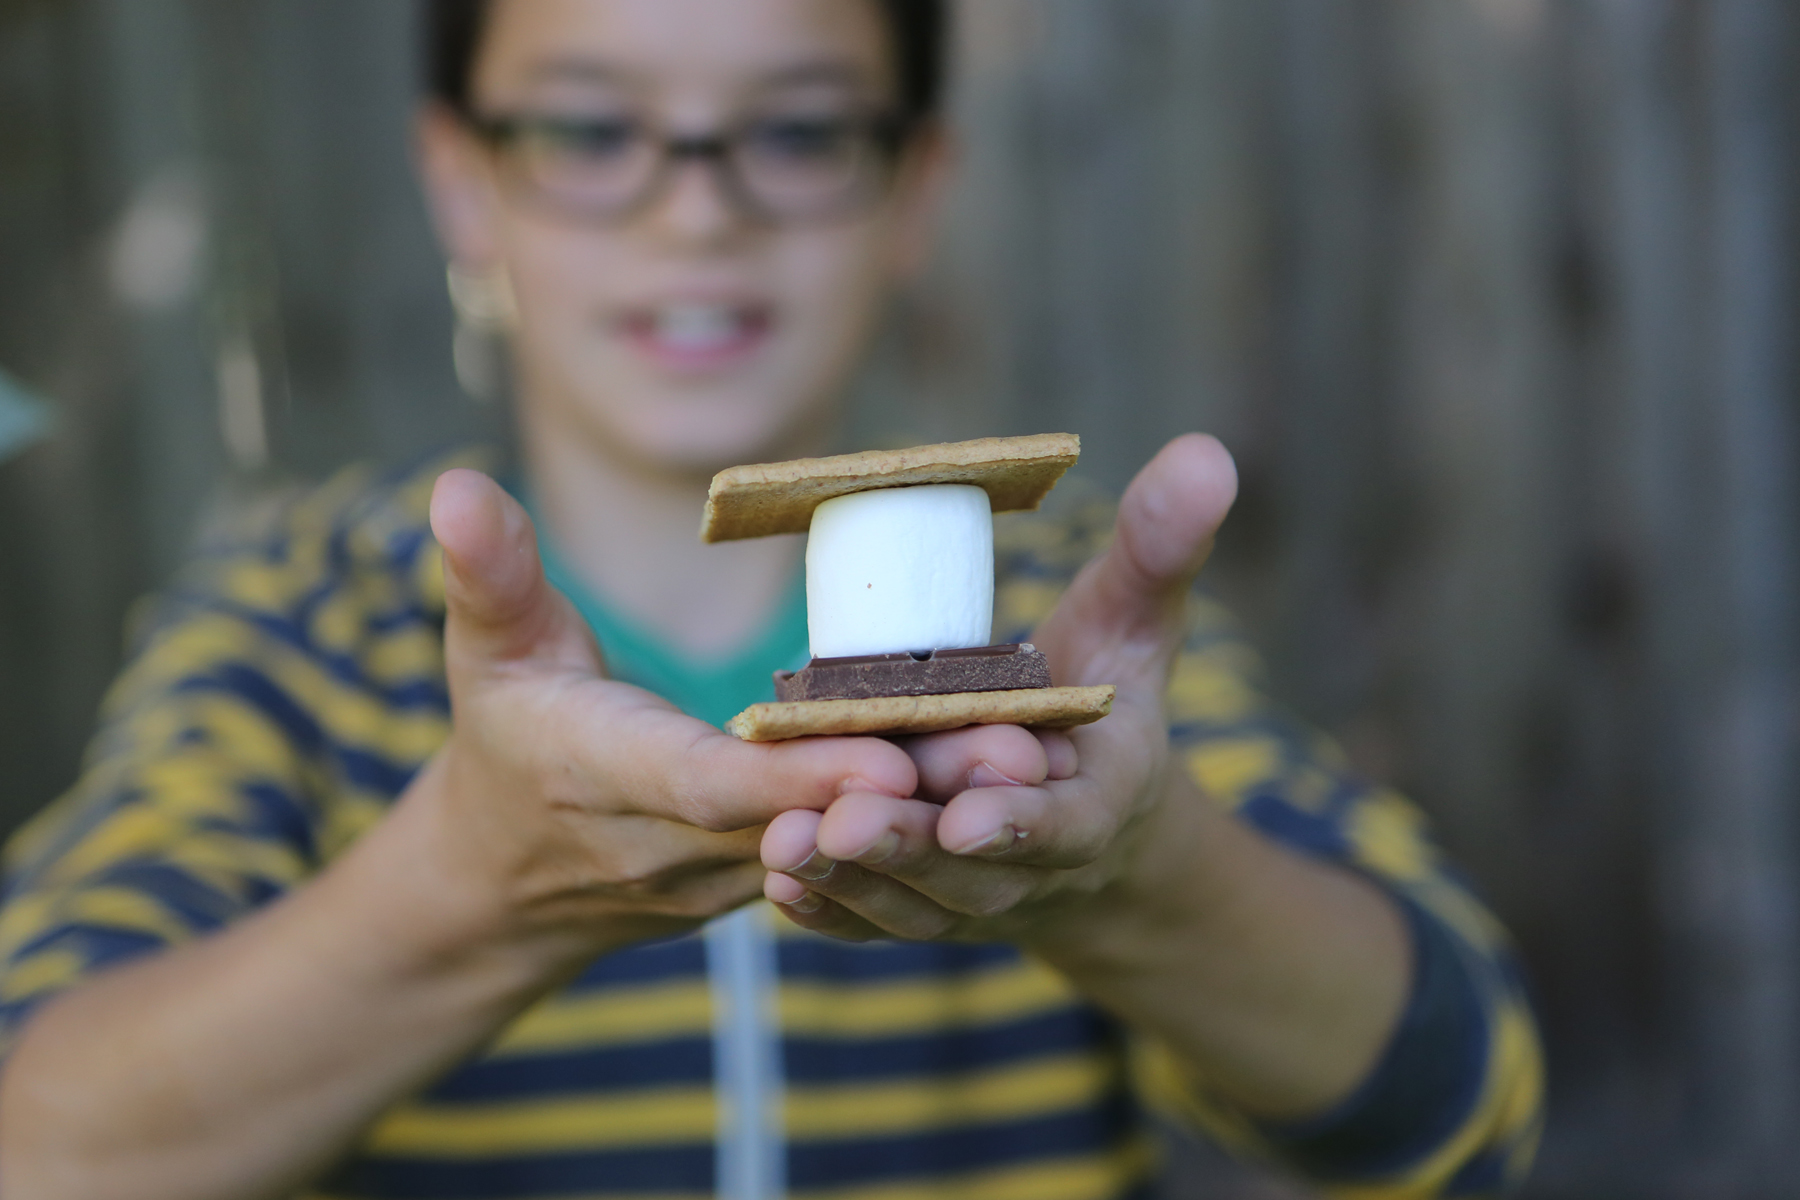
NREL suggests using your oven to make s’mores, which we’ve tried and is really fun. The solar oven is surprisingly easy to make and is one of the experiments featured in my book Kitchen Science Lab for Kids. (Quarry Books 2014)
Solar Oven from Kitchen Science Lab for Kids (Quarry Books)
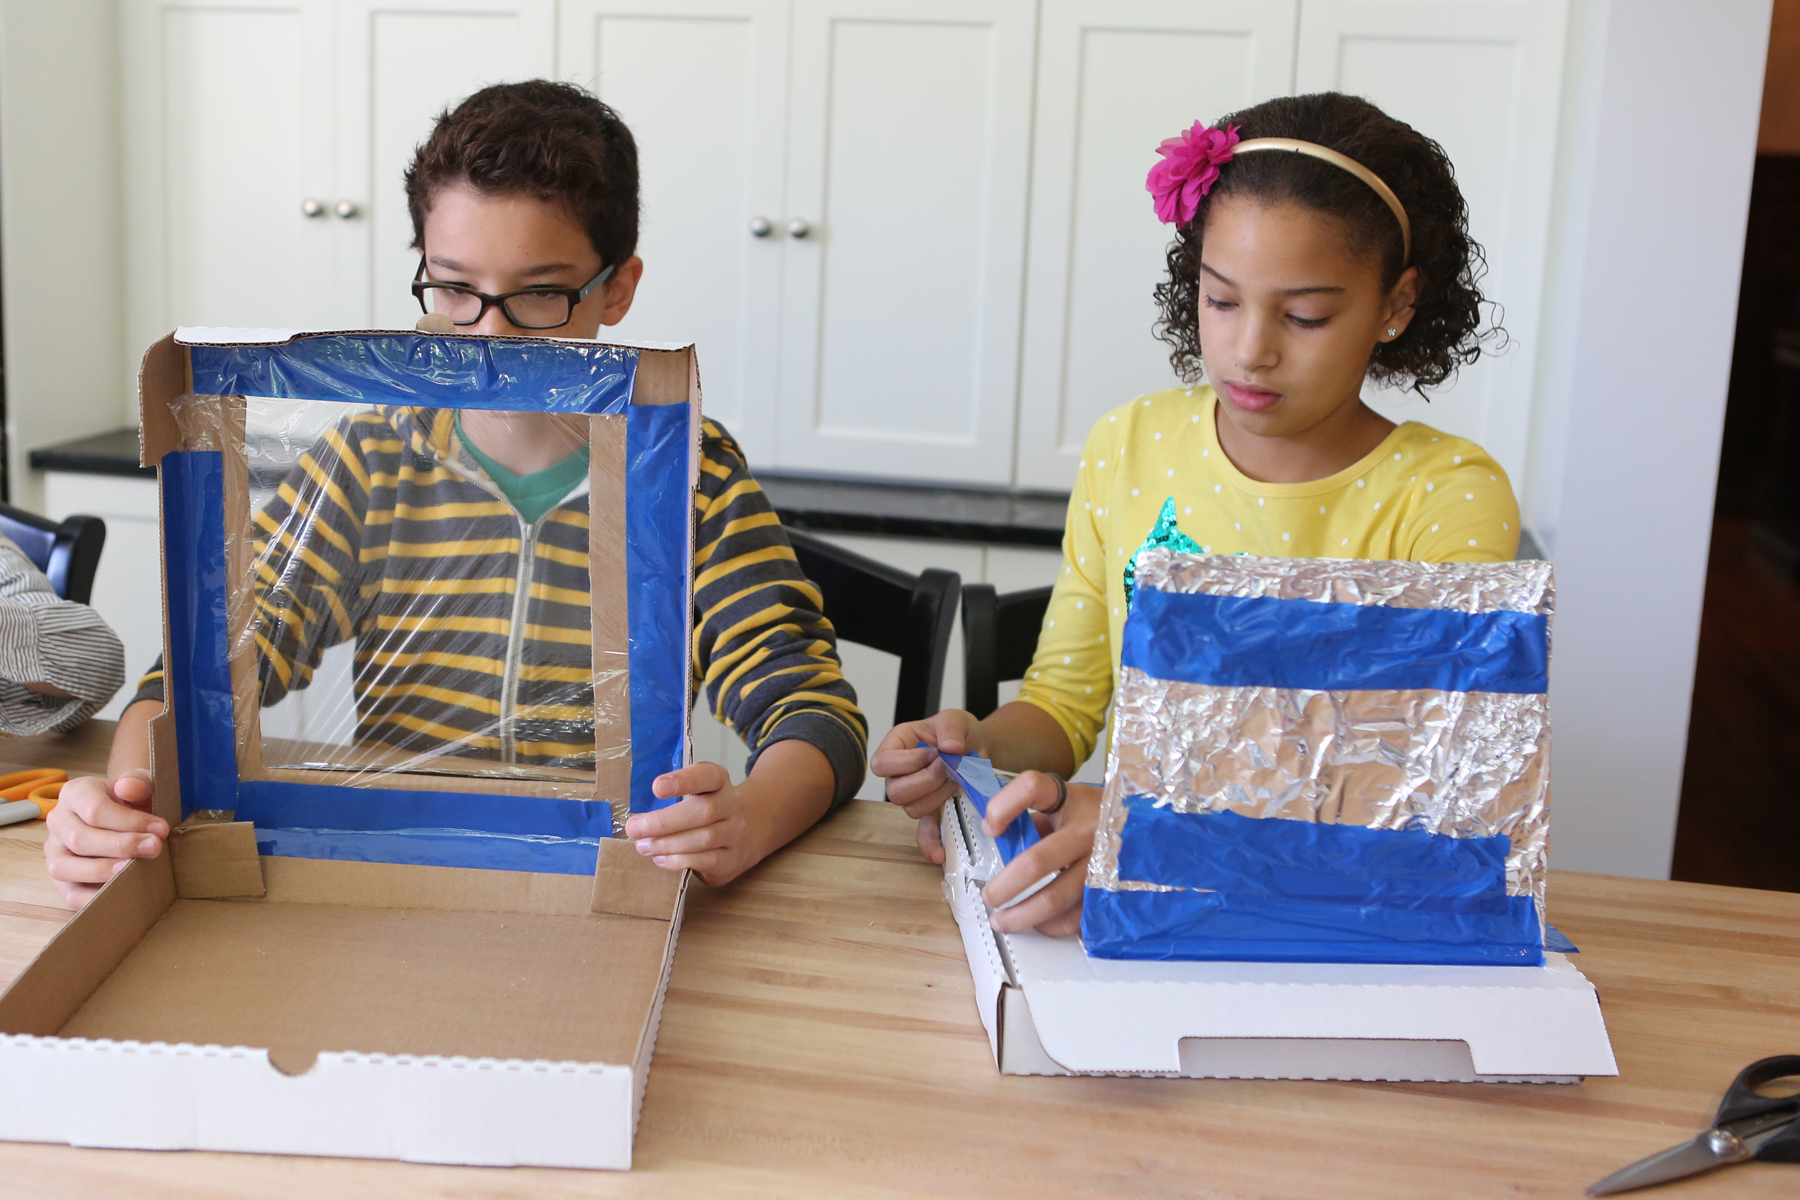
You will need: 1 pizza box from a local pizza delivery store (Little Caesars, Domino’s, Pizza Hut, etc.), newspapers, tape, scissors, black construction paper, clear plastic wrap, aluminum foil and a dowel or stick to prop the lid up. You will also want to have some food to warm in your oven-marshmallows, chocolate, etc.
Make sure the cardboard is folded into its box shape. Carefully cut out 3 sides of a square in the lid of the box. Do not cut out the fourth side of the square, which is the one closest to where the pizza box lid hinges. Gently fold the flap back along the uncut edge to form a crease.
Now, Wrap the underside (inside) face of the flap that you made with aluminum foil. Tape it so that the foil is help firmly but so that there’s not too much tape showing on the foil side of the flap.
Solar Oven from Kitchen Science Lab for Kids (Quarry Books)
Open the box and place a piece of black construction paper so that it fits the bottom of the box. Tape it by the edges. (We used two pieces.)
Roll up some newspaper and fit it around the inside edges of the box. This is the insulation. It should be about 1-1 ½” thick. Use tape (or other materials you can think of) to hold the newspaper in place. Tape it to the bottom of the box so that you can close the lid. (We taped it to the sides and had to cut the tape so that we could close the lid. Luckily our newspaper fit in tightly enough that we didn’t really even need the tape.)

Finally, cut plastic wrap an inch larger than the lid opening on the box top. Tape it on the underside of the lid opening. Add another piece of plastic wrap to the top of the lid opening. This creates a layer of air as insulation that keeps heat in the box. It also makes a window you can look through at the food you’re “cooking.” BE SURE THE PLASTIC WRAP IS TIGHT.
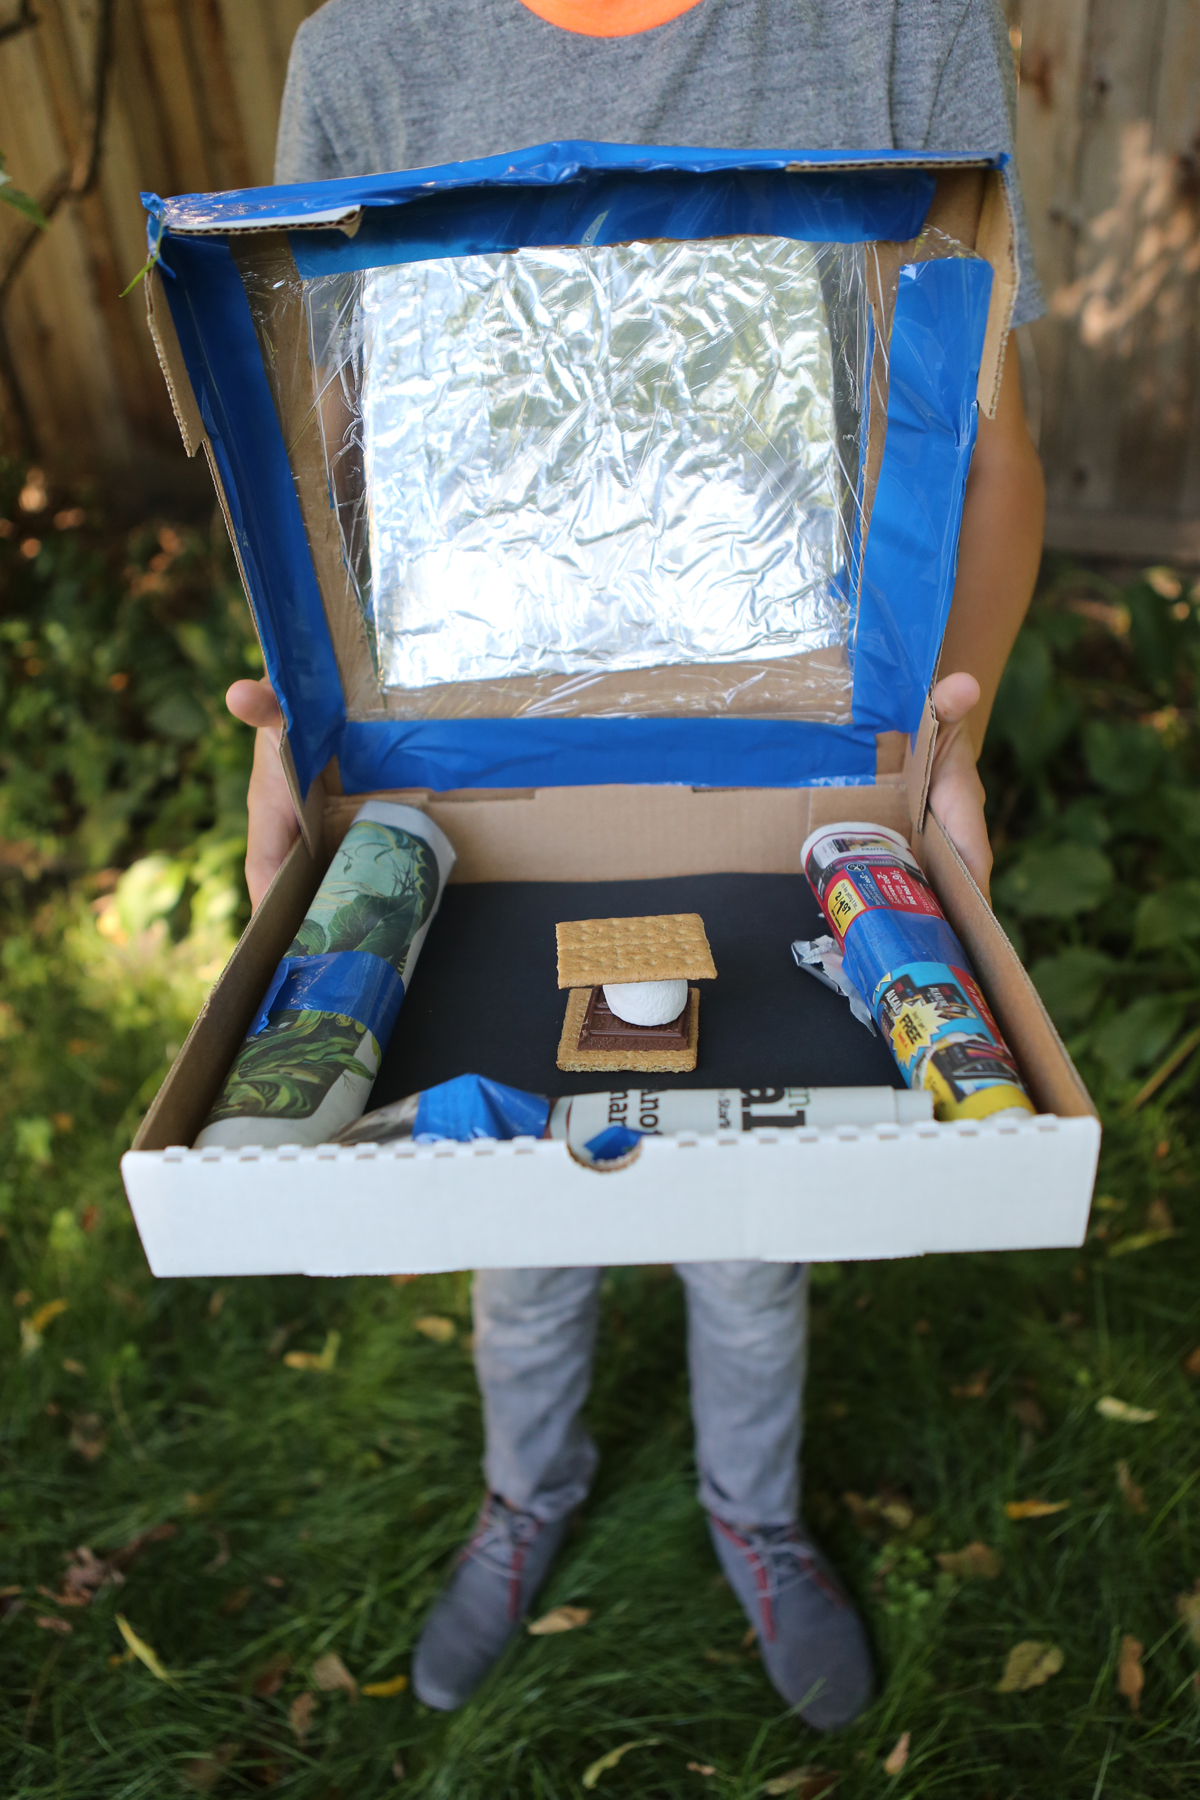
You are almost done! According to NREL, the oven needs to sit at an angle facing the sun directly so you’ll need to make a prop. You could probably just use a book or something under the hinged side of the oven. However, I missed this when I read the directions and we just put it flat on the ground. The flap of the box top needs to be propped open—a dowel or ruler works great. We used a wooden skewer that I broke the sharp point off of. This way you can change the amount of sunlight striking the oven window. Play with the angle of the flap to see how much sunlight you can get to reflect on the food.

Check every once in a while to see how well your food is being heated by solar thermal energy. If you’re is interested in finding out how the sun cooked your food, go to http://www.nrel.gov/ NREL’s website has great information on solar energy and many other sources of renewable energy.
Solar Oven from Kitchen Science Lab for Kids (Quarry Books)
KidScience app is on the App Store!
- by KitchenPantryScientist
I have to admit it. I’m ridiculously excited!
Our KidScience app is now available on the App Store, making it easy for kids of all ages to do science anywhere, any time, or to check out KidScience watch-and-do videos and learn a little science when they (or you) need a little portable screen time.
Let us know how you like it. It’s for you!

Here’s the scoop: If you’re ready to keep the kids busy this summer doing fun, educational projects without shopping trips and complicated directions, you’ll be as excited as we are that KidScience Premium, based on Kitchen Pantry Scientist science projects, has arrived.
Available for iphone, ipod touch and ipad, KidScience Premium brings entertainment and education to your fingertips with a continually updated list of experiments to choose from using things you already have on hand. It includes both photos and watch-and-do videos that make it easy for kids to do projects on their own or you can have fun doing projects together.
A free version of the KidScience app is on the way and will include all the same experiments and photos, but have limited free videos. I’ll let you know when it joins KidScience Premium on the App Store.
There are other kid science apps, but only one KidScience app! You’ll know us by our bright orange and blue logo.
Let’s do some science!
Kid’s Summer Science Activity: Cloud Observation for NASA
- by KitchenPantryScientist
Want to do a science project for NASA this summer? NASA scientists are very interested in learning more about how clouds affect Earth’s climate and you can help them collect data!

Although satellites can look down on the earth and study cloud cover, it can be difficult for them to distinguish clouds from other white surfaces, including snow and ice. Using your eyes, you can observe the clouds over your head within 15 minutes of the time a NASA satellite passes over to confirm what it sees from space.
Learn what’s involved and how to register on NASA’s S’COOL Roving Observation website. Or, if you’re an educator or homeschooler who wants to collect data from the same location each time, you can go to the CERES S’COOL Project website. I know we’re going to sign up!
On another note, our tadpoles are growing legs. We’ll have to put them in a taller container soon so I don’t come down some morning to find frogs hopping around our kitchen.
Homemade Transit of Venus Solar Viewer
- by KitchenPantryScientist

Our viewer is working really well! See Venus? We put a piece of paper behind the binoculars to get a bigger dark area on our viewer.
Although our pinhole viewers were great for watching the solar eclipse a few weeks ago, I was hoping to get a bigger projection of the sun’s image to watch the transit of Venus. (Venus is approximately the same size as earth and will be harder to see as it passes in front of the sun.)
With a pair of binoculars and a tripod, you can project the sun’s image on a piece of white paper so that it’s large enough to see even some sunspots.
DO NOT LOOK AT THE SUN THROUGH THE BINOCULARS!!!
Simply attach them to your tripod so that the eyepieces are pointing away from the sun and the bigger ends are pointing toward the sun. We used duct tape. The sun should be behind the binoculars.
Hold up a piece of paper and adjust the angle of the binoculars on the tripod until you see double suns (there are 2 lenses) appear on your paper. If you can, adjust the angle further so that one of the images appears in the middle of the shadow of the binoculars. This will make it easier to see. You’ll notice that the further from the binoculars you hold the paper, the bigger the image will appear. It will get out of focus if you hold it too far away though.
We taped our white paper to a shoebox that we’ll be able to set on something when we watch the transit and won’t have to hold it the entire time!
Here’s a great article from today’s Science Times about the Transit of Venus.