Category:Chemistry Experiments’
Mentos Geyser (Take Two)
- by KitchenPantryScientist
We tried to make a Mentos geyser again-and it worked! (Last time we tried it with 7-UP and had less-than-spectacular results.) Here’s the (very short) video of our experiment and how to make your own Mentos geyser. I can see why this is many people’s favorite science experiment ever!
If you want to try this experiment, you’ll need a two liter bottle of Diet Coke, a roll of Mentos mints and a piece of paper. Remove the lid from the soda and set it on a flat surface (outside!) Roll the paper so it will fit into the mouth of the bottle and fill it with the Mentos. Quickly dump the mints into the bottle and stand back. Hopefully, you’ll see a huge gyser of soda shoot up from the mouth of the bottle!
Scientists aren’t sure exactly why the Mentos cause such an explosive reaction, but they think it has to do with chemicals in the Mentos breaking the surface tension at the same time that carbon dioxide (CO2) bubbles form on the surface of the mints, causing a huge, very fast release of carbon dioxide bubbles.
Here’s a funny video you won’t want to miss of a car running on the power of the Diet Coke/Mentos reaction.
Soda Geyser? Day 5 of Science Camp
- by KitchenPantryScientist
Sometimes experiments work and sometimes they don’t. The kids have been begging me to do the “Soda Geyser” experiment with Menthos for as long as I can remember, so we finally tried it on day 5 of Science Camp.

It was a flop.
We did everything right, as far as I could tell, but we used 7-UP instead of Diet Coke, since that’s what I had on hand. Some scientists think the artificial sweetener in Diet Coke helps create a more violent reaction. I’m not sure, but all we got when we dumped the Menthos into the soda was a very small geyser. Let’s just say I felt really silly for yelling at the kids to stand back.

We’ll try again soon with Diet Coke and I expect we’ll have better results.
If you want to try this experiment, you’ll need a two liter bottle of Diet Coke, a roll of Menthos mints and a piece of paper.

Remove the lid from the soda and set it on a flat surface (outside!) Roll the paper so it will fit into the mouth of the bottle and fill it with the Menthos. Quickly dump the mints into the bottle and stand back. Hopefully, you’ll see a huge gyser of soda shoot up from the mouth of the bottle!
Scientists aren’t sure exactly why the Menthos cause such an explosive reaction, but they think it has to do with chemicals in the Menthos breaking the surface tension at the same time that carbon dioxide (CO2) bubbles form on the surface of the mints, causing a huge, very fast release of carbon dioxide bubbles.
Try it and let me know how it works!
Curds and Whey- Day 4 of Science Camp
- by KitchenPantryScientist

We discovered two easy experiments you can do with milk and vinegar. One is hot, and requires adult supervision, and the other is done at room temperature. Who knew you could make plastic and glue from milk?
Milk Plastic
The first experiment we tried was making “plastic” from milk curds. Heat about a cup of milk in a pan until it gets a scum on top or gets lumpy.

The scum that forms looks like plastic wrap!

Our milk curds before adding the vinegar
Skim off the scum (curds) with a spoon and put them into a small bowl to cool. Eventually, we got tired of skimming and just let a thick layer form on top of the liquid. Then, I poured the hot milk out of the pan and scraped out the curds with a spoon, adding them to the curds we’d already collected. Add a tsp. of vinegar and let the mixture cool for about an hour. Then, slowly pour off the liquid (we blotted some off with a paper towel too) and knead the “plastic”. You can shape your plastic into anything you want- beads, balls, animals and allow it to dry on a paper towel. When it’s dry, you can even paint it! Our plastic was very soft and gooey, so we rolled it into small balls on toothpicks to make beads.
Milk contains a protein called casein, which is a polymer, or a chain, or long molecules which can bend and move until the plastic hardens.
Homemade Glue
We also made glue using milk and vinegar. Just add a cup of milk and 1/3 cup white vinegar to a clear jar or bowl. Mix gently and allow the mixture to settle until you can see two layers. The curds are the white layer on the bottom of the jar and the whey is the liquid on top. Fish some of the curds out with a spoon or sieve, or just pour off the whey. The curds can be used as glue. We tried it and found that our homemade glue worked pretty well for gluing paper together!

Our glue works!
The vinegar separates the milk, allowing the fat, minerals and casein protein to form curds. White glue is made from caseins of milk curds. Cheeses, as you probably already know, are made from curds.
I wonder how hard it is to make homemade edible cheese curds. Maybe that will be a project for another day.
Homemade Soda- Day 3 of Science Camp
- by KitchenPantryScientist
Day 3 of Science camp was ninety-five degrees and humid, so we spent most of the afternoon studying the cooling effect of water at the city pool.
When we got home, we did an easy experiment using water, fruit juice and baking soda and found that by adding baking soda to different juices, you can see which juices contain citric acid. You can even taste the results! Baking soda is a base, and many fruit juices contain citric acid. When the two are combined, carbon dioxide gas is formed as bubbles in the liquid, carbonating it. My kids loved this experiment!

Just pour about a cup of lemonade, orange juice, grape juice, or any other juice into separate glasses. Pour a glass of water as a control. Water doesn’t contain citric acid, so won’t produce bubbles. Then, add about half a teaspoon of baking soda to each glass and taste the results.

We were surprised to find that our grape juice produced bubbles, but discovered that it contained added citric acid when we read the label! A side effect of this experiment is kids asking to add baking soda to their juice at breakfast so that they can have “pop”.
Coin Batteries
- by KitchenPantryScientist

They say the penny is, or will soon be, obsolete. I beg to differ. My kids had a great time sorting, bouncing and stacking pennies for this project. We even learned a little bit about this humble coin as we figured out the best way to do the experiment. Using only coins, paper towels and vinegar, you can make your own wet cell, a kind of battery.
It’s a safe, easy way to experiment with electricity using pennies and other coins as electrodes (which collect charge) and vinegar, lemon juice or salt water as electrolytes (which pass the charge, or electrons, from coin to coin). Holding this homemade battery between two wet fingers completes the circuit and sends a tingle of electrical current strong enough to feel! In fact, you are making a battery, similar to one in a flashlight and the coins are like the two different ends of any battery, with a positive end (+) and a negative end(-).
What you will need: 10 or more pennies, 10 or more non-copper coins (quarters, dimes or nickels), paper towels, vinegar, salt water (optional) and lemon juice (optional) For simplicity’s sake, I’m going to call the non-copper coins quarters as I describe the experiment, but any of the non-copper coins I suggested may be used!
First, it’s fun to sort the pennies into two piles: pennies made before 1982, and pennies made after 1982. Keep any pennies made in 1982 in a separate pile. Pennies made before 1982 are 95% copper, those made after 1983 are 97.5% zinc with a thin copper coating. Pennies made in 1982 could be either zinc or copper. All pennies will work, if you don’t have enough of one kind or another, since the current travels through the copper surface on the coated ones.

Pour some vinegar in a bowl. Cut the paper towels into small squares around a half an inch on each side. Then, soak the paper towel pieces in the vinegar. Stack ten pennies and ten quarters with a piece of soaked paper towel between each coin (e.g. penny, paper towel, quarter, paper towel, penny, paper towel and so forth.) Be sure to alternate penny, quarter, penny, quarter! It works best if the pieces of paper towel aren’t touching each other. We made ours a little too big, as you can see.

Finally, wet one fingertip on each hand and hold the pile of coins between those two fingers. (See photo at top of this post!) You should feel a slight tingle as the electricity flows between their fingers! I had to hold the stack for several seconds before I felt anything.
Try other variations on the experiment! See how well lemon juice works as the electrolyte. What do vinegar and lemon juice have in common? (They’re both acids!) Try salt water as the electrolyte. Do the pennies made before 1982 make better batteries than the new zinc pennies? Bounce the copper and zinc pennies on a linoleum surface. They should make slightly different sounds. Can you determine whether the 1982 pennies are copper or zinc by the sound they make? Did the vinegar make the old pennies shiny? Why?
Pull out those science notebooks and record your results! Draw a coin battery, make a graph of how many pennies you had from different years, or even do some penny rubbings with a pencil! Who knew pennies were so useful?
Someone recently left the following comment. We’ll try it and I’ll let you know how it works!
“I would point out that when you build your stack you want – penny, electrolyte, quarter, penny, electrolyte, quarter, penny, electrolyte, quarter, etc. If you put electrolyte soaked towels in between the switch from quarter back to penny, you would create a cell of opposite polarity of the first junction and the voltages would cancel. Also, the cladding on the surface of quarters is mostly copper, like the penny, I believe it is about 75% copper and 25% nickel. Nickel and copper do not vary that much in how active they are, so the voltage will be lower, and I would expect the current to be less because of the alloying with copper. If you try the experiment with zinc plated washers and pennies, or aluminum foil and pennies, the result should generate more voltage per cell. Alessandro Volta, for whom the Volt is named, invented chemical batteries in 1800 by doing pretty much the same thing with zinc and copper. All in all it is a fun experiment for kids though.”
Red Cabbage Litmus Paper
- by KitchenPantryScientist
This is a great science project and produces beautifully colored paper that can be dried and used for art projects like collages.

All you’ll need is a head of red cabbage and some paper towels. Alternately, you can just use the juice from canned red cabbage. I’d recommend wearing an old tee shirt or a home-made lab coat for this project, since I’m guessing that cabbage juice will stain. To make a lab coat, just have kids write their name in permanent marker on the pocket of a man’s old button-down shirt. They’ll love it!
Chop half a head of red cabbage into small pieces and add it to a pan with about a cup of water. Boil the cabbage uncovered for about 15 minutes, stirring occasionally, let it cool, and strain the juice into a jar or bowl. (Save the cooked cabbage for your favorite recipe and make cole slaw with the other half!)

Cut the paper towels into strips about an inch wide and a few inches long and soak them in the cabbage juice for about a minute. Remove them and let them dry on something that won’t stain. I blotted them a little to speed up the drying process. You might even try using a blow dryer!

When dry, your litmus paper will be ready to use for testing acidity. Your can dip the paper into orange juice, soapy water, lemon juice, baking soda in water, baking powder in water, vinegar, and anything else they want to test. The paper will turn red-pink in acids and blue or green in bases. Even very young children will love this experiment! The colors we saw were amazing. Have your child tape a strip or two of the paper into their lab notebooks.

Everything in our world is made of very tiny pieces called atoms. Atoms are so small that if you blow up a balloon, it will contain about a hundred billion billion atoms of the gases that make up air. Atoms are often bonded to other atoms to form a group of linked atoms called a molecule. A water molecule, for example, has two hydrogen atoms and one oxygen atom, bonded together.
Acids that usually dissolve in water to form free-floating hydrogen atoms. Bases are the opposite and take up free hydrogen atoms. The molecules in the cabbage juice litmus paper change when exposed to an acid or base, making the paper change color.
Now I know why my mom’s delicious Pennsylvania Red Cabbage recipe turns red when we add the vinegar!
Alum Crystal Mine
- by KitchenPantryScientist

Imagine pieces of matter (too small to see) called atoms that will only fit together in a certain way, like a puzzle. These atoms can attach to each other to form small three-dimensional shapes, or larger ones, but the shape will always be the same, depending on what kind of atoms make up the “puzzle pieces.”
This is what happens when crystals are formed. Diamonds and salt, for example, are crystals shaped like cubes, while quartz crystals are formed in trigonal shapes, sort of like three-dimensional kites. You can have very small diamonds, or huge ones, like the Hope Diamond, which is as big as a silver dollar and blue from impurities in the stone, but they will all have the same basic shape.
We grew alum crystals in a jar last week and I am amazed at how beautiful they are. I couldn’t get a very good picture, but they look like a string of real gems and were simple to grow.
To grow these spectacular crystals, you will need a small jar of alum, which can be found with the spices at the grocery store, water, a glass, a jar, a stick and some thread.

Fill the glass with about 3/4 cup of water and add a few teaspoons of alum powder. Stir until the powder dissolves and repeat until no more alum will dissolve and you can still see some floating around in the glass. Then, let the glass sit overnight or until some small alum crystals form in the bottom or on the sides of the cup. It took two days for us to get some decent crystals, but we got several small ones that were fun to look at!

Fish a large crystal out of the glass with a spoon and tie a thread around it. Tie the other end of the thread around the stick (we used a BBQ skewer) and wind it up so that you can rest the stick over the mouth of the jar and the crystal will hang down about half way. Then, pour the remaining liquid from the cup into the jar. There is still alum in the water, which will add more “puzzle pieces” to the crystal and make it grow bigger.

Now you can watch your crystal grow. What shape is it? Look at your crystals under a magnifying glass. Take a picture of them, or draw them your science notebook! Here is a link to a great Smithsonian website where you can learn more about gems and crystals.
Oil Spill Experiment Revisited
- by KitchenPantryScientist
I first posted this experiment on May 5, certain that the spill would soon be contained. Now we know it’s worse than we imagined and no immediate solution is in sight. If your kids don’t understand why it’s so hard to help the birds, have them try this project.
The oil spill in the Gulf of Mexico is devastating news to the already fragile and damaged ecosystems in the area. To demonstrate how hard it is to remove oil from water, and what materials work best, I found this experiment online at tryscience.org and decided to have my kids try it. It was messy and disgusting and oil got all over everything. In other words, it was a great demonstration of how hard it will be to clean up the mess made by BP’s Deepwater Horizen oil rig, which exploded on April 20th.

- Polyester scraps soak up oil.
You’ll need a clear bowl, water, yellow oil (vegetable, corn or canola will work,) cotton balls, cheese cloth, polyester cloth (the website said polypropylene, but I couldn’t find any,) feathers, and a spoon.
Put some water in the bowl and pour in some oil. I probably added a cup so it would cover the water. Then, using spoons and the other materials, try to remove the oil from the water. What works best?

- Oil is hard to clean off feathers.
We put our feathers in oil and then tried to clean them off using dish soap and water, which is how they clean off marine birds covered with oil following oil spills.
Polypropylene is a synthetic material made from Carbon and Hydrogen, the same elements in oil. Oil is attracted to polypropylene, and both float on water, so polypropylene is often used in cleaning up oil spills. You can also find it in gloves and sock liners.
If one cup of oil is this hard to clean up, can you imagine the mess pouring into the Gulf of Mexico right now, at the rate of about 210,000 gallons a day (according to the New York Times.) Here is a link to a map that is tracking the spill.
Fizzy Balloons
- by KitchenPantryScientist

I was never an enthusiastic chemistry student. That being said, I have to admit that chemical reactions can be lots of fun to watch as things turn colors, make bubbles, or smell different. They can change from liquids to solids and they can even explode.
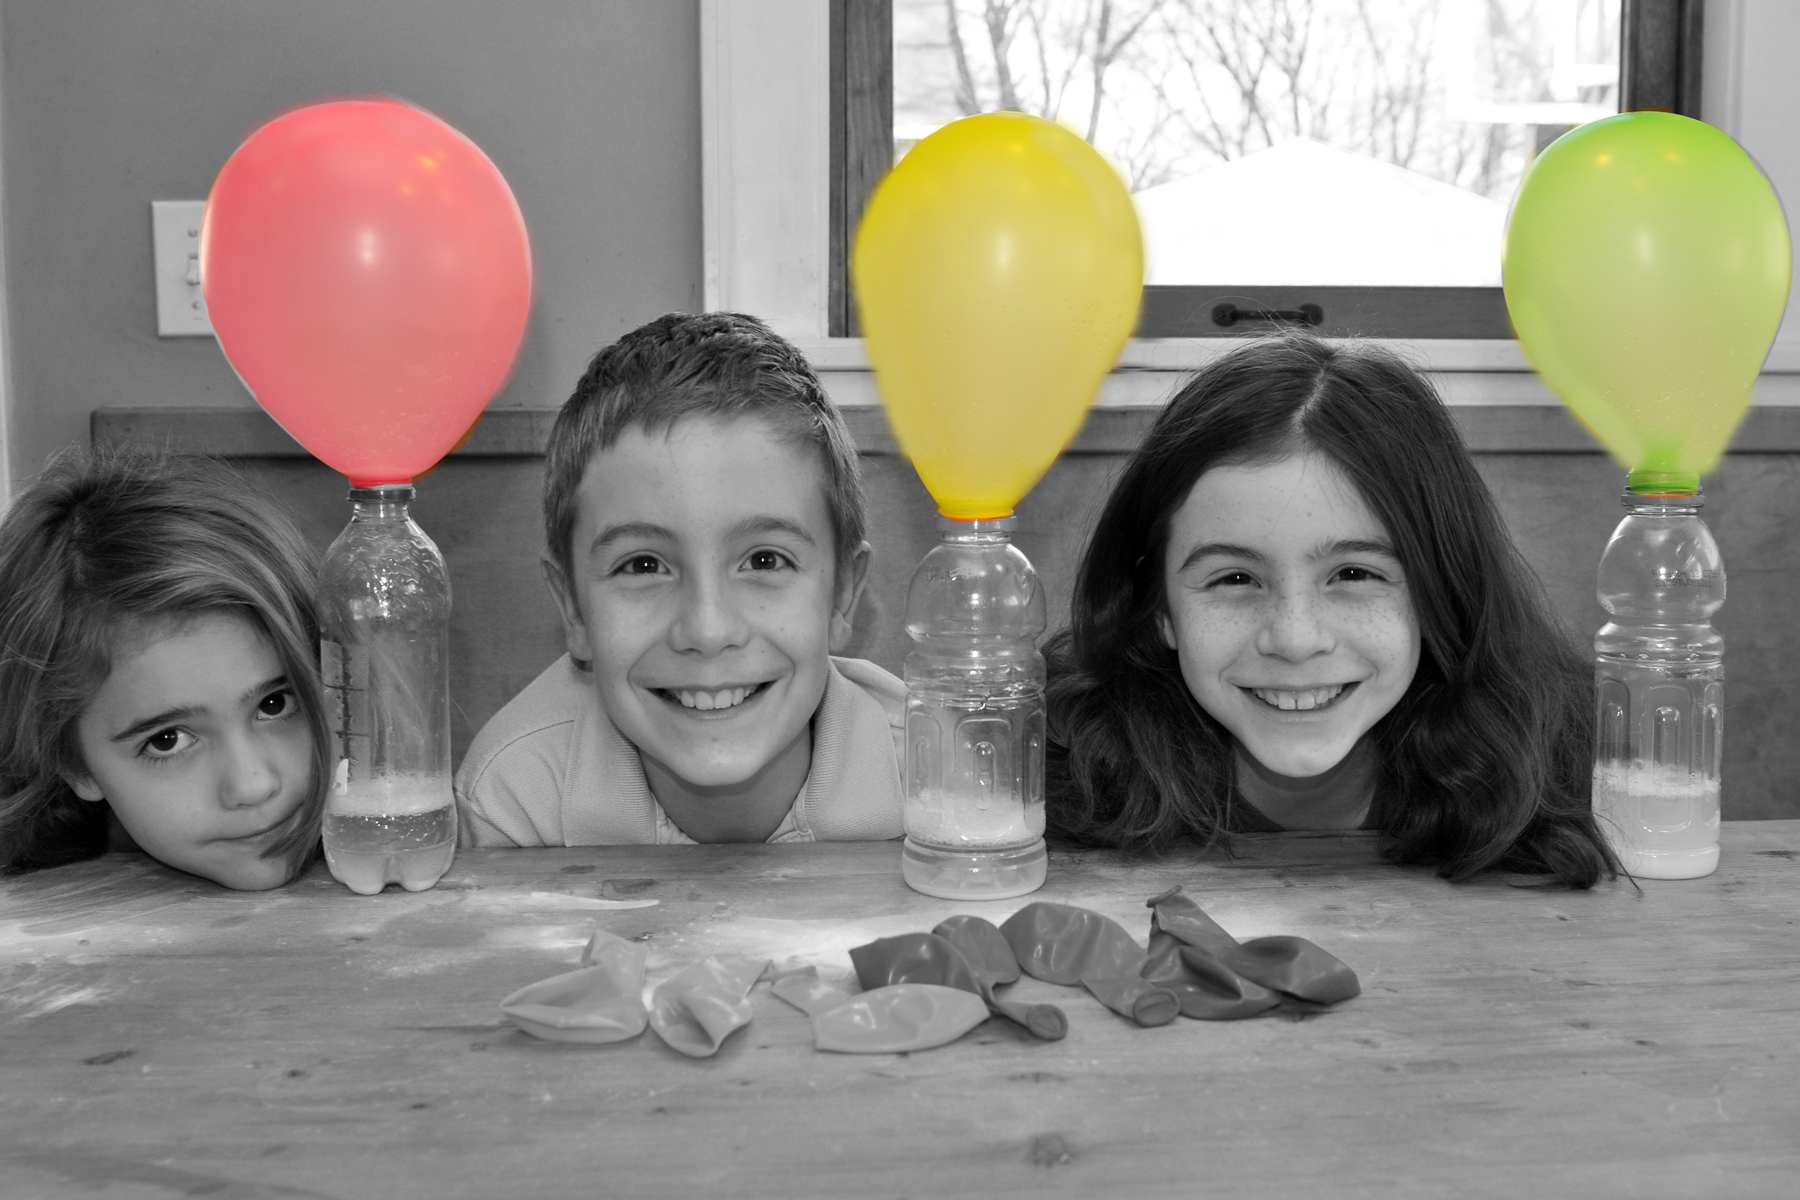
There are many fun, safe chemical reactions you can perform with your kids. I’d recommend having them put on safety goggles or sunglasses, if you have them, for most experiments where you mix things together. As you can see, my children aren’t wearing any eye protection for this project, but I did have them stand back to make sure the balloon wouldn’t explode the first time we did it. Just use common sense.

You will need: a balloon, an empty soda bottle, white vinegar, and baking soda. Put 1/4 to 1/2 cup vinegar into the soda bottle. Then, hold the mouth of the balloon open and have your child pour about a teaspoon of baking soda into the balloon. Shake the soda into the “bulb” or the main part of the balloon. Then, stretch the mouth of the balloon over the mouth of the bottle, trying to keep the main part of the balloon off to the side (so the soda isn’t dumped into the bottle right away.) Ask them what they think will happen when you mix the two things together. Finally, let your child shake the soda into the bottle, all at once.

Stand back and watch what happens!
If the seal is tight, which it should be, the reaction between the soda and the vinegar will form a gas that inflates the balloon. Our balloon was big enough that it didn’t explode, but if your balloon is over-inflating, simply take it off of the bottle. Just pay attention and you’ll be fine.
What happened?
Baking soda is a chemical called sodium bicarbonate. Vinegar is called acetic acid. These two chemicals react to form some different chemicals. One of these is carbon dioxide gas. This is called a chemical reaction. The gas is what inflates the balloon. We know a reaction is happening because we can see bubbles forming.
What else do your kids notice about the reaction? Have them record (or help them to record) what they see in their science notebooks. Older kids can draw what they see and then try to describe it. My kids loved it when I wrote down their descriptions for them before they could write. Have them touch the bottle. Does it feel warmer or cooler than room temperature? A temperature change is also a clue that a chemical reaction is occurring! They could even time how long it takes for the balloon to inflate.
My kids did this experiment three times and would have kept doing it all day. They thought it was pretty great. Give it a try! Put those budding brains to work!
Oil Spill Experiment
- by KitchenPantryScientist
The oil spill in the Gulf of Mexico is devastating news to the already fragile and damaged ecosystems in the area. To demonstrate how hard it is to remove oil from water, and what materials work best, I found this experiment online at tryscience.org and decided to have my kids try it. It was messy and disgusting and oil got all over everything. In other words, it was a great demonstration of how hard it will be to clean up the mess made by BP’s Deepwater Horizen oil rig, which exploded on April 20th.

Polyester scraps soak up oil.
You’ll need a clear bowl, water, yellow oil (vegetable, corn or canola will work,) cotton balls, cheese cloth, polyester cloth (the website said polypropylene, but I couldn’t find any,) feathers, and a spoon.
Put some water in the bowl and pour in some oil. I probably added a cup so it would cover the water. Then, using spoons and the other materials, try to remove the oil from the water. What works best?

Oil is hard to clean off feathers.
We put our feathers in oil and then tried to clean them off using dish soap and water, which is how they clean off marine birds covered with oil following oil spills.
Polypropylene is a synthetic material made from Carbon and Hydrogen, the same elements in oil. Oil is attracted to polypropylene, and both float on water, so polypropylene is often used in cleaning up oil spills. You can also find it in gloves and sock liners.
If one cup of oil is this hard to clean up, can you imagine the mess pouring into the Gulf of Mexico right now, at the rate of about 210,000 gallons a day (according to the New York Times?) I’m attempting to find out if there’s any way to help, aside from travelling to the area to help clean off wildlife by hand. As soon as I learn anything, I’ll post it here! Here is a link to a map that is tracking the spill.