Tag: science’
Survival Science: Shelter
- by KitchenPantryScientist
Katniss Everdeen had a sleeping bag to keep her warm at night in “The Hunger Games,” but what if you found yourself in the wilderness without a sleeping bag, or even a tent?

The healthy human body maintains a constant temperature between 97.7 and 99.5 degrees Fahrenheit through a process called thermoregulation. To do this, our bodies constantly produce heat and then give it off. Heat can be lost through the processes of conduction (losing heat by contact with another object, like the cold ground,) convection (losing heat to air or water moving across your skin,) radiation (loss of heat through infrared rays), and evaporation (heat loss as water turns to gas, like when sweat evaporates.)
If your body temperature gets too low, you can suffer from a potentially deadly condition called hypothermia. (Hypo=under, thermia=heat) Or, if you get too hot, you can suffer from Hyperthermia, which can lead to heat stroke. (Hyper=over, thermia=heat)
A shelter can protect you from the sun, storms and the elements and help you keep your body temperature steady as you wait for help to arrive, and one of the best items to include in your survival kit is a black plastic “contractor” bag. These large bags can be used as rain gear to keep you dry (cut a hole in the top for your head) or to protect you from wet ground below in your shelter. You can even fill one with leaves to use as a makeshift blanket. A nylon cord, or rope should also be included in a survival kit and can be used for a number of things including building shelters.
 There are lots of ways to build shelters, but grab an old tarp or some big plastic bags, some rope and head to a park, woods or a local nature center to build a shelter. You’ll learn a few things and it’s tons of fun!
You can make a “bent sapling shelter” by bending a small tree down and tying it to the base of a nearby tree. Then put your tarp or bag over the sapling. You could also tie your rope between two trees and hang the tarp over that.

Make an A-frame shelter by lashing two branches together and leaning a long branch between them. 
Then, cover it with your plastic bag or tarp.
You can use small sticks as stakes! 
What if you don’t have a tarp? Try building a shelter from branches you find and weaving tree branches or birch bark through the sticks.
Imagine that there’s a thunderstorm coming from the Northwest and build your shelter with that in mind. Look up! Are there dead branches or rocks that could fall on you? Use existing trees, downed branches and rocks to build your shelter. Can you anchor it with rocks, sticks and your rope? Remember, you want it large enough to lie down in, but small enough to conserve heat.
Make teams and have a contest to see who can build the best shelter!
Katniss would be proud!
Survival Science: Water Filters
- by KitchenPantryScientist
 I demonstrated this experiment on Kare11. Click here to watch the clip.
Don’t drink the water you purify when you do this experiment at home, since it may still contain harmful microbes!!! You can use homemade Petri dishes to see how clean you got your water though, by swabbing the unfiltered water on one dish and the water you purified on another to see what grows!
If you’re desperate for water, and you don’t have a plastic bag, or it’s too cloudy or cool to get water from tree respiration, you can always look for a pond or stream as a water source. Unfortunately, pond and stream water is often teeming with life, and some of the bacteria, viruses, parasites, protozoa and fungi in the water can make you sick. Boiling water purifies it, but what if you can’t make a fire? Katniss had Iodine in her backpack, which is another great way to kill microorganisms and purify water, but what if you don’t have iodine or a water filter?
If you’re in a survival situation, it’s important to do everything you can to make sure the water is safe, before you drink it! The first thing you have to do is make the water you find clear enough to read a paper through (get out the gunk, in other words.) Then, you have to put it in the sun for six hours so ultraviolet rays will kill anything living in the water. Digging a hole next to a pond and collecting the water that seeps in will pre-filter the water for you!

Using grass, charcoal, sandy soil, you can make a water filter. A plastic water bottle with the bottom cut off works best as a filter-holder, but you can use a cone made of birch bark if you don’t have a bottle!
We cut the bottoms off of some water bottles, pounded up some charcoal (you could use campfire coals for the charcoal layer!), pulled some grass and found some sand (don’t use sand from a sandbox, which may contain cat feces.)
Next, we layered grass, charcoal and sand in our bottles, packing each layer down as much as possible. I tried grass, charcoal, sand, charcoal and more grass, but the girls made more layers than I did. We wrote down what we did to see who got the cleanest water!

Then, we poured stream water through our filters and collected what flowed through in empty sports drink bottles. We covered the bottles and left them in the sun for at least six hours. Last night, we stuck cotton swabs in each water sample and swabbed homemade petri dishes to test the water for fungi and bacterial growth. (You can’t see viruses, but the sun will often kill them efficiently.) Our controls were stream water that was unfiltered and keep out of the sun and stream water that was unfiltered, but put in the sun with the other samples. Note: If you want to make petri dishes to test your water, use agar instead of gelatin to make the plates! Some bacteria are good at breaking down gelatin, turning it into a liquid, and this happened to a few of our samples (including the unfiltered water.)

We observed that putting the water through our filters made it yellow and one sample was a little cloudy, so it will be interesting to see how it compares to the stream water we didn’t filter or put in the sun. It would be fun to test the filter ingredients to see what made it yellow.
Survival Science: Water Collection
- by KitchenPantryScientist
At the beginning of “The Hunger Games,” by Suzanne Collins, the heroine Katniss risks her life to retrieve an orange backpack and a sheet of plastic. In the backpack, she finds a black sleeping bag, a pack of crackers, a pair of dried beef strips, a bottle of iodine, a box of wooden matches, a small coil of wire, a pair of night glasses, a bottle of iodine and a half-gallon plastic bottle for carrying water. According to the book “Stay Alive,” by John D. McCann, she’s off to a pretty good start in terms of basic survival. He says that the following components should be included in any survival kit: fire and light, signalling, water and food collection, knives and tools, shelter and protection, navigation, and medical. I demonstrated how to do this experiment on Kare11. Click here to watch the clip.

Our maple tree let transpired around half a cup of water into two bags in 24 hours.
The survival “Rule of Three” says that you can go 3 minutes without air, 3 hours without shelter (from heat or cold), 3 days without water and 3 weeks without food. That means that water is one of the first things you have to think about in a survival situation. Your body is about 75% water.

Pocket knives always come in handy in outdoor situations!
If it’s hot outside, you can easily collect water from non-poisonous leafy trees using a plastic bag. Clear works best, like a large oven bag. (Ours was for turkeys!)
Yesterday, we took 2 bags outside and put them over tree branches, enclosing as many maple leaves as we could and putting a small rock in the corner of each bag to weight them. Finally, we tied them around each branch securely with a twisty-tie. What else could you use if you didn’t have a tie? A shoelace? After 24 hours, we collected our water by cutting the corner of the bag and collecting it in a clear bottle.

You can re-tie the corner after collecting water and re-use the bag.
Katniss had iodine to purify her water, but if you don’t have a water filter or iodine tablets to kill harmful bacteria, viruses and parasites, you could filter the clear water from plant transpiration through cloth, like a tee shirt or bandana, and leave it in a clear bottle in the sun for 6-10 hours to kill most pathogens. Don’t try drinking the water you get from this experiment, as it may not be safe!
Why to trees produce water? All plants carry water from their roots to small pores called stromata on the underside of their leaves. These pores release water into the air in a process called transpiration. Transpiration helps cool plants, but is also involved in moving nutrients from root to leaf. Plants transpire the most on hot, dry days and trees that have gotten plenty of water give off the most water. According to the U.S. Geological Survey, a large Oak tree can transpire 40,000 gallons of water a year! Our area is very dry at the moment. We probably could have collected more water from our tree following some rain!
So, as of today, our survival kit will include a pocket knife, a clear plastic oven bag, and a bandana. What should we add next?
Katniss Camp: Survival Science
- by KitchenPantryScientist
This week, the kids and I are embarking on a survival science camp. We won’t face starvation or dehydration, but we’ll learn some wilderness survival skills and the scientific concepts behind them. You could put some of these ideas together and take a group of kids to a local park or nature center for a fun, educational field trip or birthday party!

We’re planning to learn about the best way to collect and purify water, how to figure out which way is North, how to build a shelter and stay warm, the art of making a whistle from an acorn and what really works for building a fire (with adult supervision, of course.) Along the way, we can talk about practical things- like what to do if you get lost.
We visited our library and checked out “STAY ALIVE- Survival Skills You Need” by John D. McCann for inspiration and information.

Today, we kicked things off by making a TRANSPIRATION bag, which is a solar still assembled using a clear oven bag, a twisty-tie, and a non-poisonous tree (like a maple.) I’ll write more about transpiration tomorrow, when we measure how much water we’ve collected! We read that in a sunny spot, you can collect between 1 and 2 cups a day.
Kids Summer Science: Pizza Box Solar Oven
- by KitchenPantryScientist

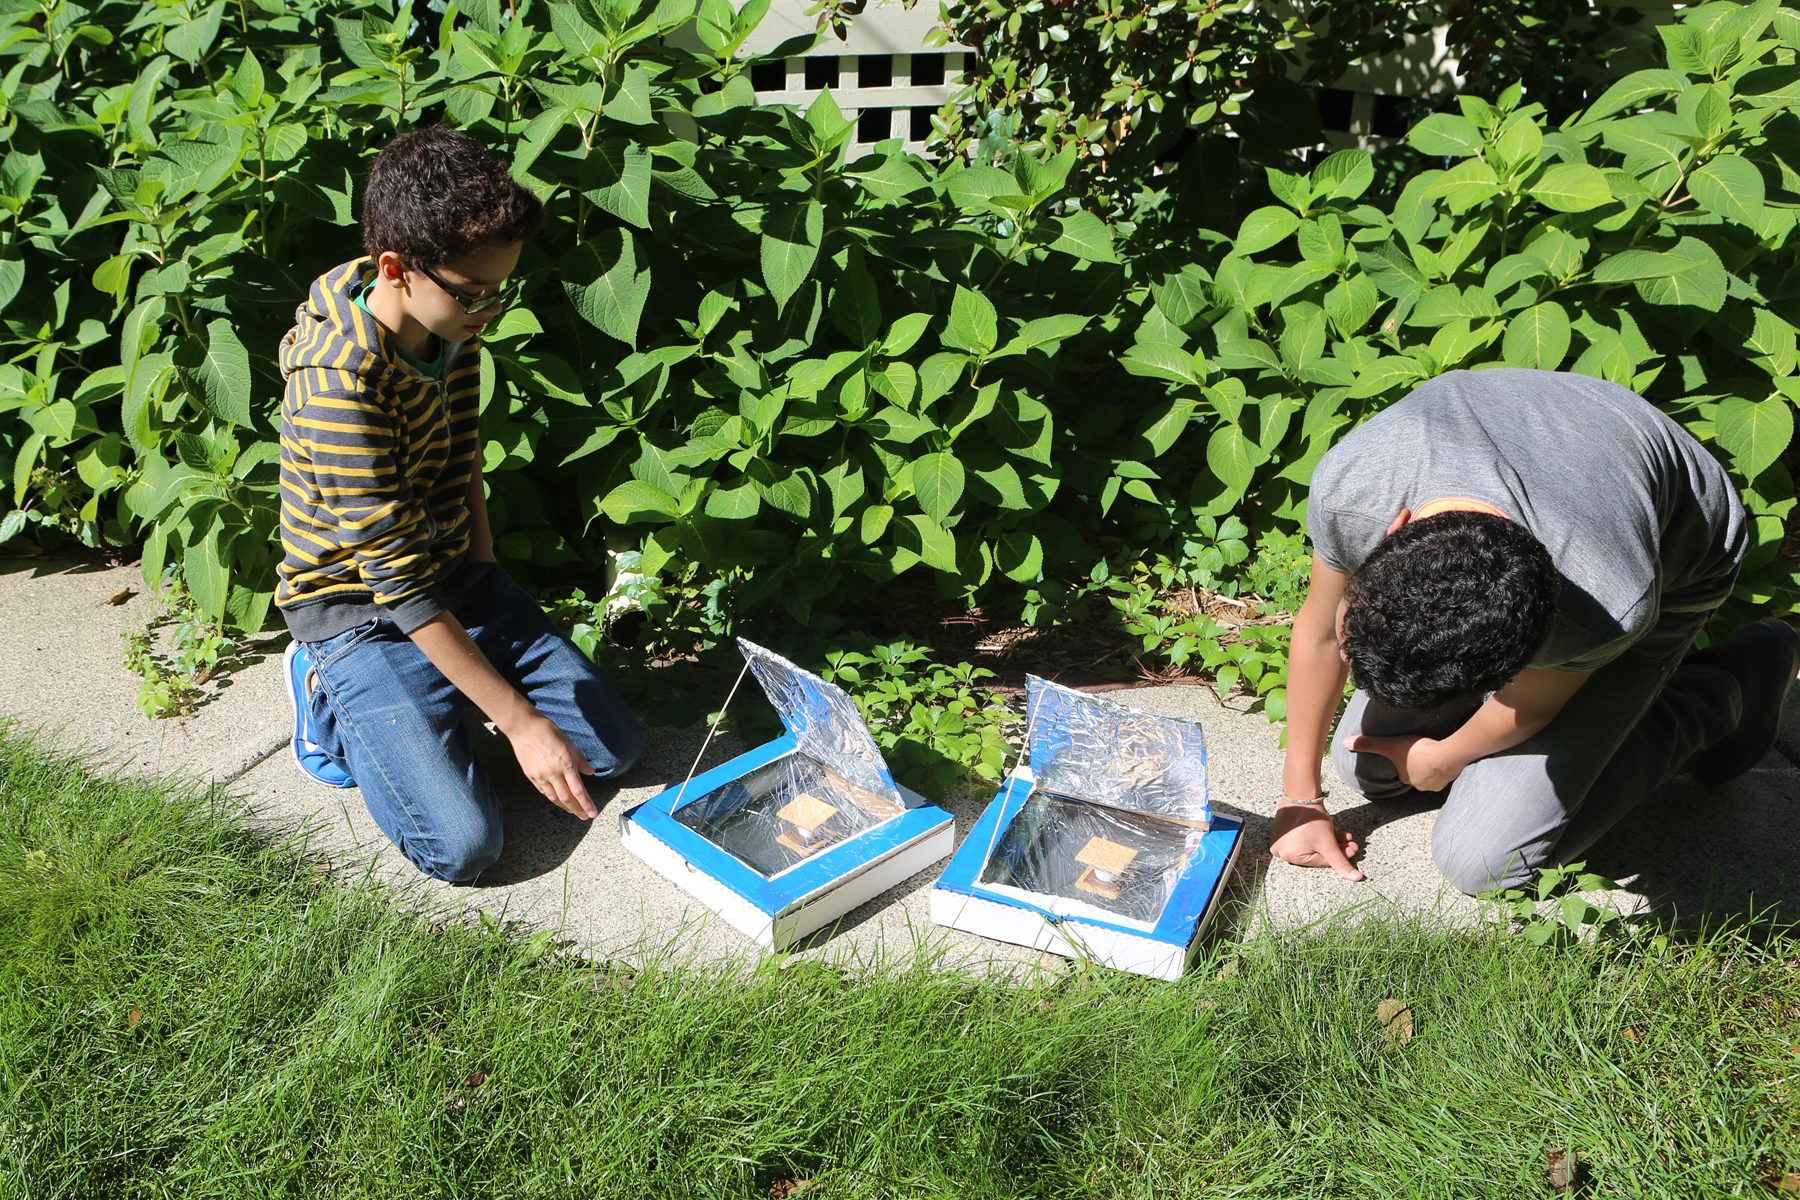
A warm, sunny spring or summer day is perfect for making a solar oven from a pizza box!
When my friend Sheila, who works at NREL (the National Renewable Energy Laboratory) sent me this project, I couldn’t wait to try it out. We first tried it out on a cool spring day in Minnesota and to my surprise, it worked. The oven didn’t get very hot, but we were able to warm a chocolate chip cookie enough to make it soft and melt the chips.
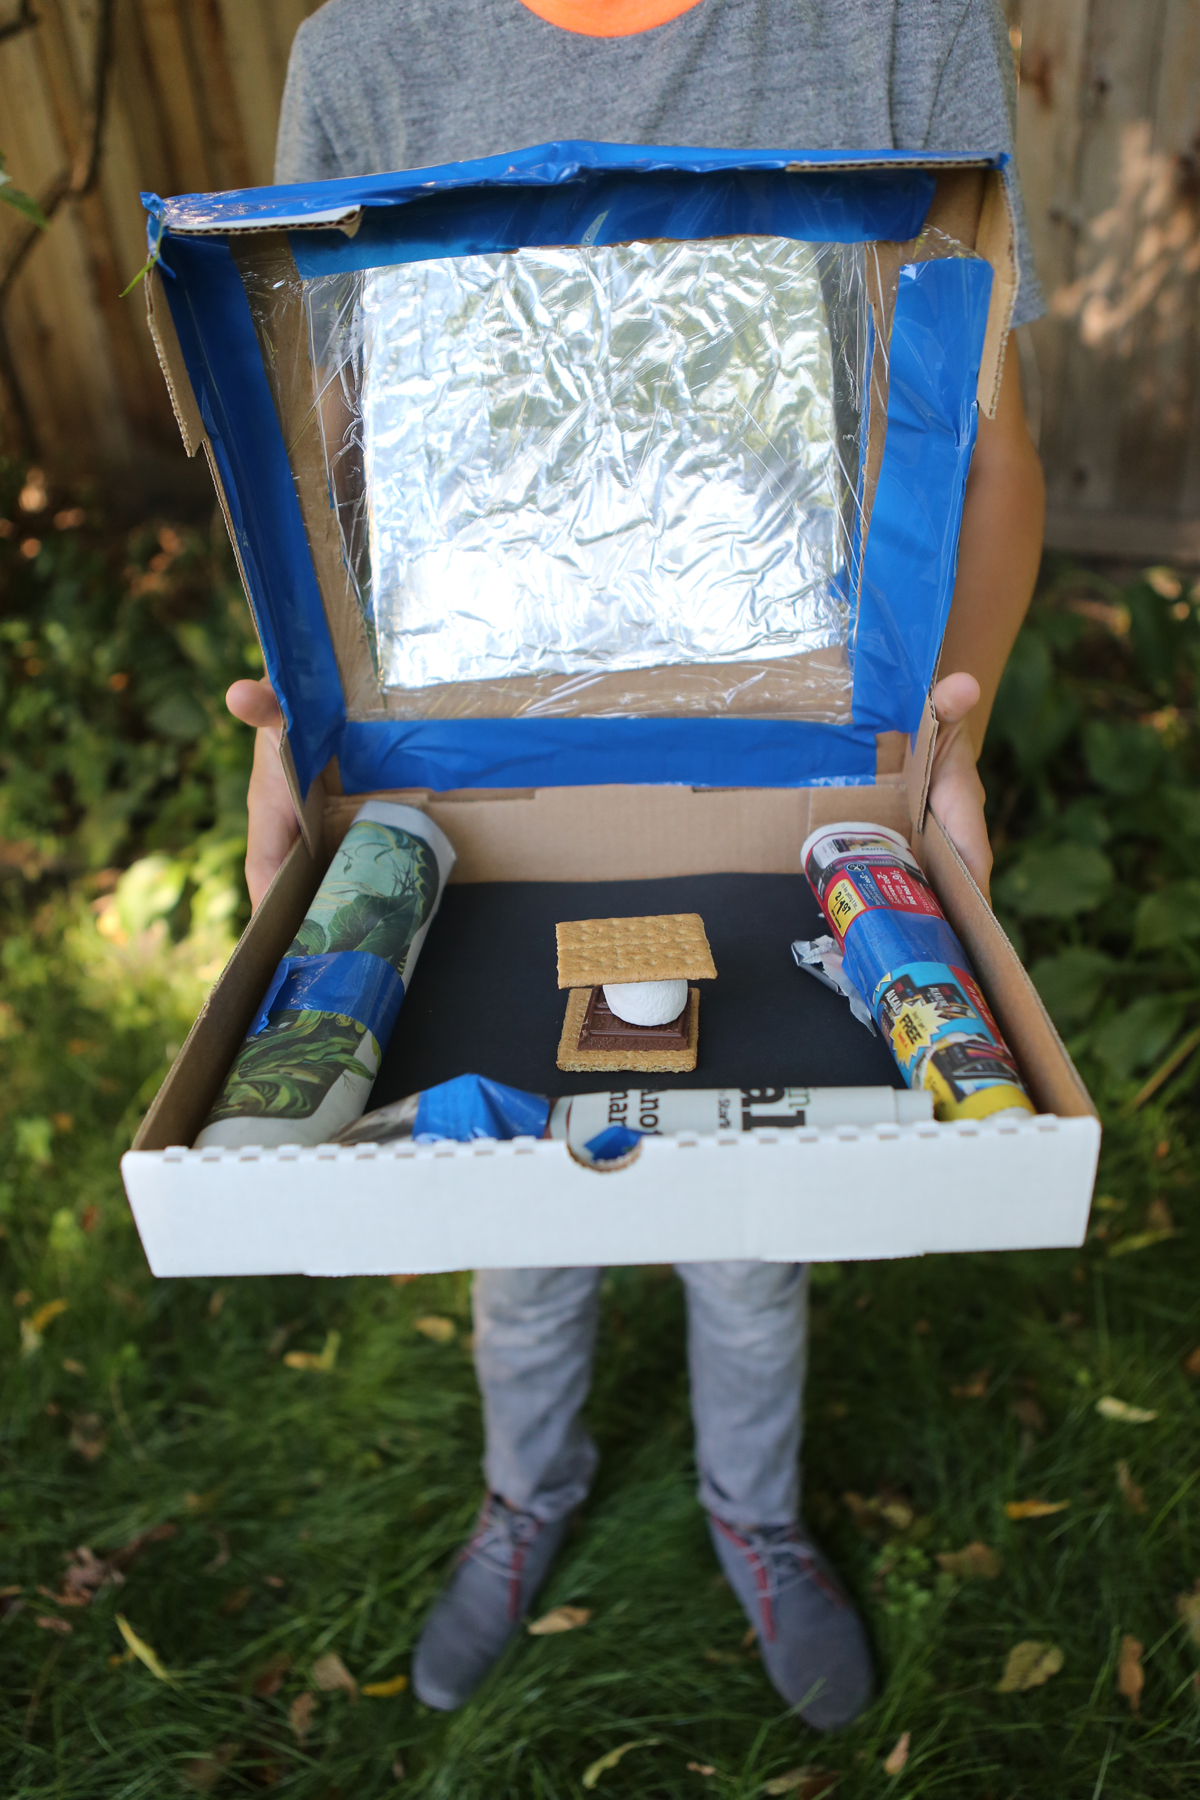
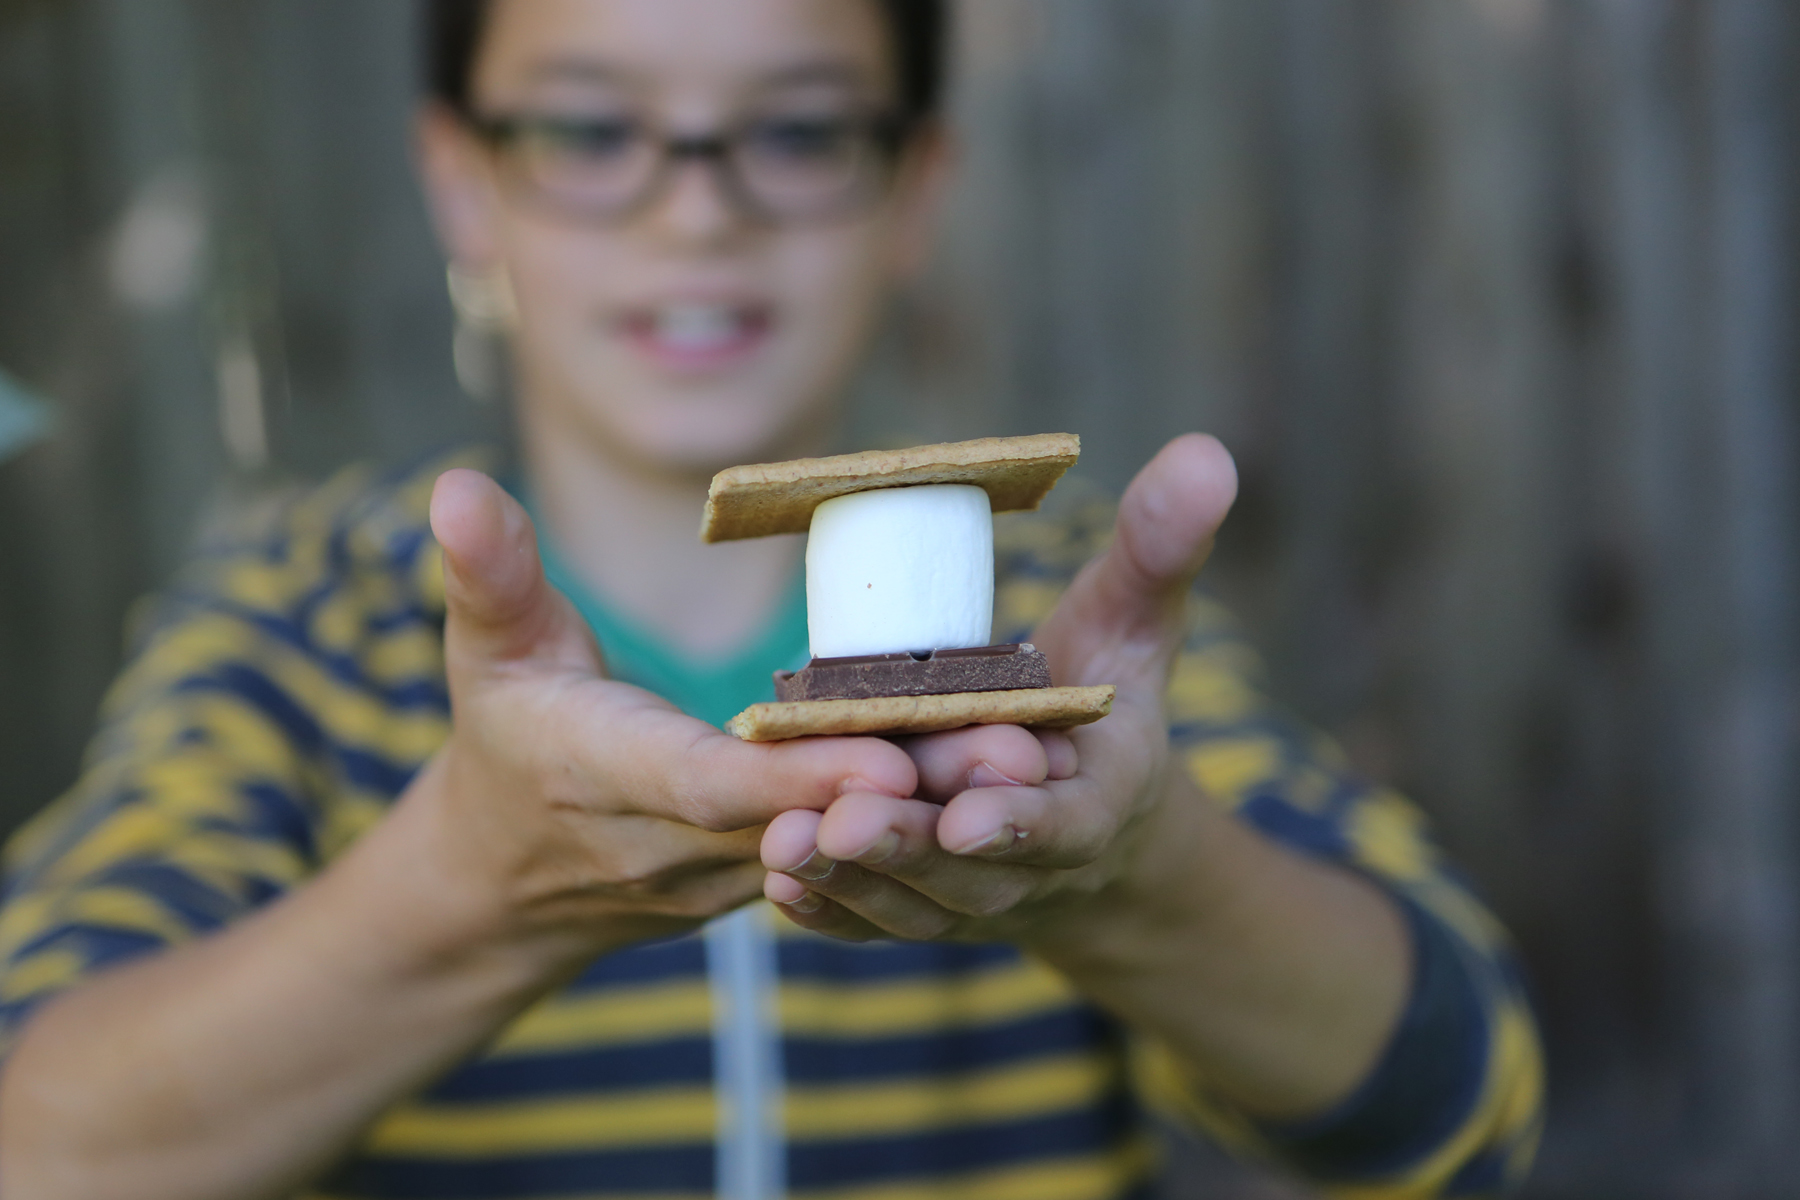
NREL suggests using your oven to make s’mores, which we’ve tried and is really fun. The solar oven is surprisingly easy to make and is one of the experiments featured in my book Kitchen Science Lab for Kids. (Quarry Books 2014)
Solar Oven from Kitchen Science Lab for Kids (Quarry Books)
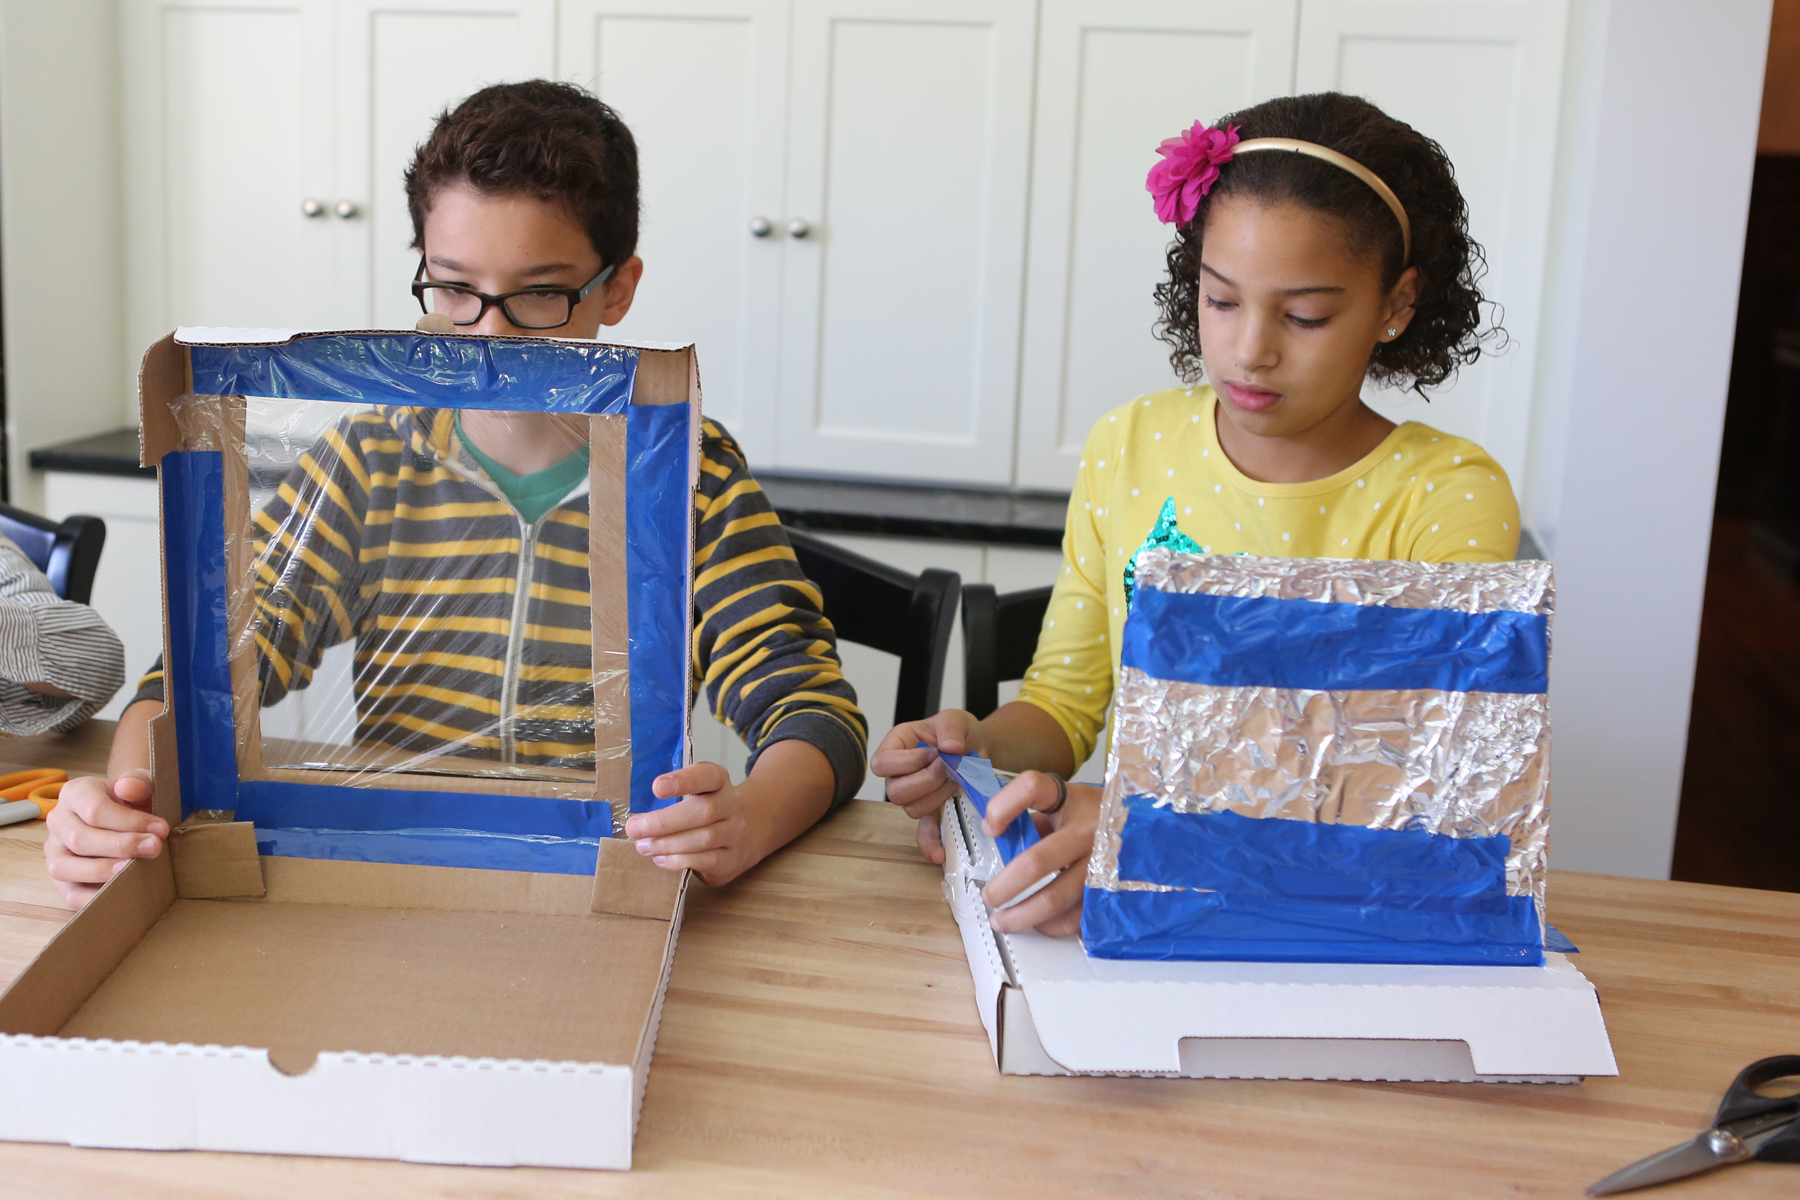
You will need: 1 pizza box from a local pizza delivery store (Little Caesars, Domino’s, Pizza Hut, etc.), newspapers, tape, scissors, black construction paper, clear plastic wrap, aluminum foil and a dowel or stick to prop the lid up. You will also want to have some food to warm in your oven-marshmallows, chocolate, etc.
Make sure the cardboard is folded into its box shape. Carefully cut out 3 sides of a square in the lid of the box. Do not cut out the fourth side of the square, which is the one closest to where the pizza box lid hinges. Gently fold the flap back along the uncut edge to form a crease.
Now, Wrap the underside (inside) face of the flap that you made with aluminum foil. Tape it so that the foil is help firmly but so that there’s not too much tape showing on the foil side of the flap.
Solar Oven from Kitchen Science Lab for Kids (Quarry Books)
Open the box and place a piece of black construction paper so that it fits the bottom of the box. Tape it by the edges. (We used two pieces.)
Roll up some newspaper and fit it around the inside edges of the box. This is the insulation. It should be about 1-1 ½” thick. Use tape (or other materials you can think of) to hold the newspaper in place. Tape it to the bottom of the box so that you can close the lid. (We taped it to the sides and had to cut the tape so that we could close the lid. Luckily our newspaper fit in tightly enough that we didn’t really even need the tape.)

Finally, cut plastic wrap an inch larger than the lid opening on the box top. Tape it on the underside of the lid opening. Add another piece of plastic wrap to the top of the lid opening. This creates a layer of air as insulation that keeps heat in the box. It also makes a window you can look through at the food you’re “cooking.” BE SURE THE PLASTIC WRAP IS TIGHT.
You are almost done! According to NREL, the oven needs to sit at an angle facing the sun directly so you’ll need to make a prop. You could probably just use a book or something under the hinged side of the oven. However, I missed this when I read the directions and we just put it flat on the ground. The flap of the box top needs to be propped open—a dowel or ruler works great. We used a wooden skewer that I broke the sharp point off of. This way you can change the amount of sunlight striking the oven window. Play with the angle of the flap to see how much sunlight you can get to reflect on the food.

Check every once in a while to see how well your food is being heated by solar thermal energy. If you’re is interested in finding out how the sun cooked your food, go to http://www.nrel.gov/ NREL’s website has great information on solar energy and many other sources of renewable energy.
Solar Oven from Kitchen Science Lab for Kids (Quarry Books)
KidScience app is on the App Store!
- by KitchenPantryScientist
I have to admit it. I’m ridiculously excited!
Our KidScience app is now available on the App Store, making it easy for kids of all ages to do science anywhere, any time, or to check out KidScience watch-and-do videos and learn a little science when they (or you) need a little portable screen time.
Let us know how you like it. It’s for you!

Here’s the scoop: If you’re ready to keep the kids busy this summer doing fun, educational projects without shopping trips and complicated directions, you’ll be as excited as we are that KidScience Premium, based on Kitchen Pantry Scientist science projects, has arrived.
Available for iphone, ipod touch and ipad, KidScience Premium brings entertainment and education to your fingertips with a continually updated list of experiments to choose from using things you already have on hand. It includes both photos and watch-and-do videos that make it easy for kids to do projects on their own or you can have fun doing projects together.
A free version of the KidScience app is on the way and will include all the same experiments and photos, but have limited free videos. I’ll let you know when it joins KidScience Premium on the App Store.
There are other kid science apps, but only one KidScience app! You’ll know us by our bright orange and blue logo.
Let’s do some science!
Kid’s Summer Science Activity: Cloud Observation for NASA
- by KitchenPantryScientist
Want to do a science project for NASA this summer? NASA scientists are very interested in learning more about how clouds affect Earth’s climate and you can help them collect data!

Although satellites can look down on the earth and study cloud cover, it can be difficult for them to distinguish clouds from other white surfaces, including snow and ice. Using your eyes, you can observe the clouds over your head within 15 minutes of the time a NASA satellite passes over to confirm what it sees from space.
Learn what’s involved and how to register on NASA’s S’COOL Roving Observation website. Or, if you’re an educator or homeschooler who wants to collect data from the same location each time, you can go to the CERES S’COOL Project website. I know we’re going to sign up!
On another note, our tadpoles are growing legs. We’ll have to put them in a taller container soon so I don’t come down some morning to find frogs hopping around our kitchen.
Tadpole Experiment
- by KitchenPantryScientist
The kids and I have been keeping an eye on a local pond, and this week we were rewarded with the sight of tadpoles dotting the sand at the bottom like a swarm of commas. We pulled out a butterfly net, scooped up a bucket of pond water, and gently snagged a few of the frogs-to-be. Some tiny plants, baby fish, snails and a waterbug hitched a ride as well.
At home, we put our pollywogs in a bigger container (rinsed well with distilled water,) added more pond water and put some rocks in our tadpole habitat to make our visitors feel at home. A few times a week, we’ll siphon out some of the old water and add more pond water to keep our tadpoles healthy as they grow and change. When they’re almost frogs, we’ll lower the water level and be sure there are plenty of rocks for them to hop onto when metamorphosis is complete.
I’ll post a video of our tadpoles every so often so you can see how they’re changing. Eventually, we’ll release our frogs, along with the other plants and critters in our habitat, back into the pond where we found them!
Can you find some tadpoles of your own? If you do, be sure to keep them in pond/lake water and change it frequently. Chlorinated water will kill them! We’re feeding our tadpoles frog pellets and a little fish food, but I suspect they’re mostly eating algae in the pond water.
Science Notebooks
- by KitchenPantryScientist
Summer is a great time to start a science notebook! Not only can you keep track of experiments, you can take your notebook with you when you go hiking, camping, to the lake, or on even on a walk through the neighborhood. How many different kind of trees do you see? Draw a bug, leaf or mushroom that you’re not familiar with and see if you can identify it when you get home. Walk the same trail every few weeks and record how the plants and animals you see change with through the season.
Note for parents: It is amazing how well kids observe the world. Mine notice things that I have become completely oblivious to, after years of exposure. If you look closely at children’s drawings, you’ll see that seemingly insignificant details achieve huge scale. Very young kids don’t understand perspective, but they also haven’t put on blinders the way most adults have.
A science notebook is a great way for kids to illustrate and catalog their discoveries and observations. You can buy a lab notebook, but it work equally well to just use a spiral notebook, a loose leaf binder they can add pages to, or a composition book. You can even staple some pieces of paper together and write “Lab Notebook” on the cover!
Send your kid outside to draw a bug or plant. Have them keep tally of how many birds they hear sing in five minutes. In the fall, they can press leaves in their notebook. If it’s rainy, have them find a rock or shell from one of their collections and draw it. My son loves to copy facts about his favorite animals from National Geographic!
Do a science experiment and have them draw a picture of what they did and make a chart of the results (there are tons of easy experiments on this website.) Anything they can think of is great. Be sure to have them or help them write the date on each page they write something on. Tell them this is very important for a junior scientist! Older kids will be able to write great descriptions and even take photos to tape into their notebooks.
Someday, far in the future, your kid’s lab notebook may help them remember what it is like to look at the world through a child’s eyes.
Levers and Fulcrums
- by KitchenPantryScientist
The word lever comes from the french verb “lever” which means “to raise.” A lever amplifies force, so you can lift something heavier with a lever than you would be able to lift without a lever. Scientists think the ancient Egyptians used levers to lift huge stones. 
Levers are simple machines that require only a beam (a long piece of wood, metal or steel) and a fulcrum, the support on which a lever pivots. It’s easy to make your own lever using a can, a rag, a yardstick and some sticks of butter. We cut our sticks of butter in half, but you don’t have to.
The can is your fulcrum and you can keep it from rolling by placing it on a folded rag. Balance your yardstick (your beam) on the can. It’s nice to do this experiment with a yardstick, since you can use the markings to find the halfway point.
Place a stick of butter on either side of the ruler, halfway between the fulcrum (the can) and the end of the ruler. Is it balanced?
Here’s the neat part. Slide one of the sticks of butter all the way to the end of the ruler. What happens? Put a second stick of butter on the stick of butter that you left in its original position. Now is it balanced? You can move it a little if it’s not perfect, since it’s hard to get the can exactly in the center.
See how one stick of butter further from the fulcrum (the can) can easily hold the weight of two sticks of butter that are positioned closer to the can? This demonstrates how a lever can help you lift something heavy.
What happens if you move the two sticks of butter even closer to the fulcrum? Can you add more butter and make it balance?
The mathematical expression for how a lever works is M=f times d. M is the turning force, or torque, f is the force you apply and d is the perpendicular distance between the force and the fulcrum. Basically, this “law of the lever” tells you exactly what you see: that the further you are from the fulcrom, the more weight you can lift using a lever. (So one stick of butter at the end of a ruler can lift two or more sticks of butter on the other side of the fulcrum, depending on how far they are from the fulcrum.) You can also see why a longer lever might work better than a short lever.
The famous Greek mathematician Archimedes was also a physicist, engineer, inventor and astronomer, and he is credited with first explaining how levers work. Later, in the renaissance, levers were classified as one of six simple machines, which can be combined with other simple machines and devices to form more complicated machines, like a bicycles. What levers can you think of on a bike?
I don’t have Archimedes to help me out with physics, but I’m lucky enough to have a dad who is physicist and came up with the idea for this project. Not only is he my scientific consultant, but he’s the one who got me interested in science in the first place.