Category:Biology Experiments’
Earthworm Experiment: Alien Invaders!
- by KitchenPantryScientist
Earthworm Eruption from Outdoor Science Lab for Kids (Quarry Books 2018)
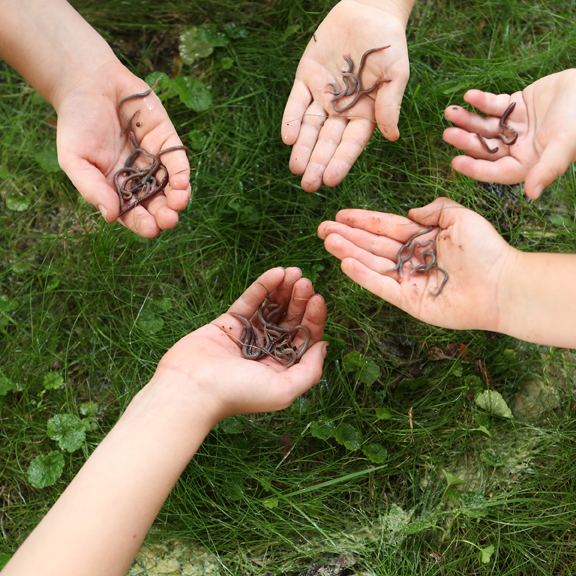
If you’re interested in studying the worms in your back yard, you can bring them to the surface using ground mustard seed dissolved in water.

Earthworm Eruption from Outdoor Science Lab for Kids (Quarry Books 2018)
Measure out a one square foot sample plot (35cmx35cm) with string and stakes, and pour about half of a your mustard mixture (1/3 cup ground mustard dissolved in 4 Liters of water) over the dirt in your grid. Be careful not to splash any in your eyes! Wait for the worms to come up, and when they’ve emerged completely, grab them and put them in a container. When they stop popping up, add the rest of the mustard mixture to the plot and wait for a second batch of worms to appear from deeper in the soil.
Earthworm Eruption from Outdoor Science Lab for Kids (Quarry Books 2018)
How many worms did you find? The Great Lakes Worm Watch is doing a study of worms, so you can preserve the worms and send them to their labs for identification, or you can try to identify them yourself. Great Lakes Worm Watch has other resources if you’re interested in learning more about Earthworms!

Earthworm Eruption from Outdoor Science Lab for Kids (Quarry Books 2018)
One of our favorite stops at the Minnesota State Fair is the Department of Natural Resources (DNR) building. After checking out some birds of prey, the fish pond and some monarch caterpillars, we stumbled on an entire room devoted to educating the public on the control of invasive species. Although I was familiar with buckthorn and Zebra Mussels, it was surprising to see the lowly earthworm represented alongside other more obvious dangers to Minnesota’s ecosystems.
We learned that the earthworms in Minnesota and the entire Great Lakes Region are non-native species, brought over from Europe long ago. They’re beneficial to farmers and gardeners, aerating the soil so water and other organic material can move through, but harmful to woodlands, where they disrupt the “Duff” layer of decomposing material on the forest floor, making it difficult for young plant to take root and grow. The lack of undergrowth affects the animal life as well, as hiding places and nesting grounds disappear.
If you like to fish or do worm composting, you can help! It’s very important never to discard unused worms in forests or even water (worms don’t drown.) Just throw them away in the garbage. Some worm mixes contain Asian earthworms of the genus Amynthas, which have become a threat in Minnesota. These worms are also called Jumping Worms since they are very active and lots of them can live together in one place causing lots of damage to forests.
DNA Extraction Video
- by KitchenPantryScientist
Got fruit, laundry detergent, coffee filters, salt and alcohol? You can extract DNA!
Here’s a video on how to extract DNA from strawberries. This version was a little long for KidScience app, so I thought I’d post it here.
If you haven’t tried this experiment, you should! It’s a simple version of how scientists in labs really extract DNA for their research. Click here to see my original post on DNA extraction with easy directions and a little more science.
Survival Science: Water Filters
- by KitchenPantryScientist
 I demonstrated this experiment on Kare11. Click here to watch the clip.
Don’t drink the water you purify when you do this experiment at home, since it may still contain harmful microbes!!! You can use homemade Petri dishes to see how clean you got your water though, by swabbing the unfiltered water on one dish and the water you purified on another to see what grows!
If you’re desperate for water, and you don’t have a plastic bag, or it’s too cloudy or cool to get water from tree respiration, you can always look for a pond or stream as a water source. Unfortunately, pond and stream water is often teeming with life, and some of the bacteria, viruses, parasites, protozoa and fungi in the water can make you sick. Boiling water purifies it, but what if you can’t make a fire? Katniss had Iodine in her backpack, which is another great way to kill microorganisms and purify water, but what if you don’t have iodine or a water filter?
If you’re in a survival situation, it’s important to do everything you can to make sure the water is safe, before you drink it! The first thing you have to do is make the water you find clear enough to read a paper through (get out the gunk, in other words.) Then, you have to put it in the sun for six hours so ultraviolet rays will kill anything living in the water. Digging a hole next to a pond and collecting the water that seeps in will pre-filter the water for you!

Using grass, charcoal, sandy soil, you can make a water filter. A plastic water bottle with the bottom cut off works best as a filter-holder, but you can use a cone made of birch bark if you don’t have a bottle!
We cut the bottoms off of some water bottles, pounded up some charcoal (you could use campfire coals for the charcoal layer!), pulled some grass and found some sand (don’t use sand from a sandbox, which may contain cat feces.)
Next, we layered grass, charcoal and sand in our bottles, packing each layer down as much as possible. I tried grass, charcoal, sand, charcoal and more grass, but the girls made more layers than I did. We wrote down what we did to see who got the cleanest water!

Then, we poured stream water through our filters and collected what flowed through in empty sports drink bottles. We covered the bottles and left them in the sun for at least six hours. Last night, we stuck cotton swabs in each water sample and swabbed homemade petri dishes to test the water for fungi and bacterial growth. (You can’t see viruses, but the sun will often kill them efficiently.) Our controls were stream water that was unfiltered and keep out of the sun and stream water that was unfiltered, but put in the sun with the other samples. Note: If you want to make petri dishes to test your water, use agar instead of gelatin to make the plates! Some bacteria are good at breaking down gelatin, turning it into a liquid, and this happened to a few of our samples (including the unfiltered water.)

We observed that putting the water through our filters made it yellow and one sample was a little cloudy, so it will be interesting to see how it compares to the stream water we didn’t filter or put in the sun. It would be fun to test the filter ingredients to see what made it yellow.
Survival Science: Water Collection
- by KitchenPantryScientist
At the beginning of “The Hunger Games,” by Suzanne Collins, the heroine Katniss risks her life to retrieve an orange backpack and a sheet of plastic. In the backpack, she finds a black sleeping bag, a pack of crackers, a pair of dried beef strips, a bottle of iodine, a box of wooden matches, a small coil of wire, a pair of night glasses, a bottle of iodine and a half-gallon plastic bottle for carrying water. According to the book “Stay Alive,” by John D. McCann, she’s off to a pretty good start in terms of basic survival. He says that the following components should be included in any survival kit: fire and light, signalling, water and food collection, knives and tools, shelter and protection, navigation, and medical. I demonstrated how to do this experiment on Kare11. Click here to watch the clip.

Our maple tree let transpired around half a cup of water into two bags in 24 hours.
The survival “Rule of Three” says that you can go 3 minutes without air, 3 hours without shelter (from heat or cold), 3 days without water and 3 weeks without food. That means that water is one of the first things you have to think about in a survival situation. Your body is about 75% water.

Pocket knives always come in handy in outdoor situations!
If it’s hot outside, you can easily collect water from non-poisonous leafy trees using a plastic bag. Clear works best, like a large oven bag. (Ours was for turkeys!)
Yesterday, we took 2 bags outside and put them over tree branches, enclosing as many maple leaves as we could and putting a small rock in the corner of each bag to weight them. Finally, we tied them around each branch securely with a twisty-tie. What else could you use if you didn’t have a tie? A shoelace? After 24 hours, we collected our water by cutting the corner of the bag and collecting it in a clear bottle.

You can re-tie the corner after collecting water and re-use the bag.
Katniss had iodine to purify her water, but if you don’t have a water filter or iodine tablets to kill harmful bacteria, viruses and parasites, you could filter the clear water from plant transpiration through cloth, like a tee shirt or bandana, and leave it in a clear bottle in the sun for 6-10 hours to kill most pathogens. Don’t try drinking the water you get from this experiment, as it may not be safe!
Why to trees produce water? All plants carry water from their roots to small pores called stromata on the underside of their leaves. These pores release water into the air in a process called transpiration. Transpiration helps cool plants, but is also involved in moving nutrients from root to leaf. Plants transpire the most on hot, dry days and trees that have gotten plenty of water give off the most water. According to the U.S. Geological Survey, a large Oak tree can transpire 40,000 gallons of water a year! Our area is very dry at the moment. We probably could have collected more water from our tree following some rain!
So, as of today, our survival kit will include a pocket knife, a clear plastic oven bag, and a bandana. What should we add next?
Frogs!
- by KitchenPantryScientist
Soon I’ll be posting some fun summer science camp ideas for you to do at home! But today we have some good news: our little tadpoles are all grown up! A few still have small tails, but they’re climbing onto rocks and leaves, so we’re taking them back to their pond to set them free.
We lost 2 tadpoles to voracious water bugs (vicious things that looked like ticks and sneaked in with some pond water vegetation) but most of them survived to froghood.
KidScience app is on the App Store!
- by KitchenPantryScientist
I have to admit it. I’m ridiculously excited!
Our KidScience app is now available on the App Store, making it easy for kids of all ages to do science anywhere, any time, or to check out KidScience watch-and-do videos and learn a little science when they (or you) need a little portable screen time.
Let us know how you like it. It’s for you!

Here’s the scoop: If you’re ready to keep the kids busy this summer doing fun, educational projects without shopping trips and complicated directions, you’ll be as excited as we are that KidScience Premium, based on Kitchen Pantry Scientist science projects, has arrived.
Available for iphone, ipod touch and ipad, KidScience Premium brings entertainment and education to your fingertips with a continually updated list of experiments to choose from using things you already have on hand. It includes both photos and watch-and-do videos that make it easy for kids to do projects on their own or you can have fun doing projects together.
A free version of the KidScience app is on the way and will include all the same experiments and photos, but have limited free videos. I’ll let you know when it joins KidScience Premium on the App Store.
There are other kid science apps, but only one KidScience app! You’ll know us by our bright orange and blue logo.
Let’s do some science!
Tadpole Experiment
- by KitchenPantryScientist
The kids and I have been keeping an eye on a local pond, and this week we were rewarded with the sight of tadpoles dotting the sand at the bottom like a swarm of commas. We pulled out a butterfly net, scooped up a bucket of pond water, and gently snagged a few of the frogs-to-be. Some tiny plants, baby fish, snails and a waterbug hitched a ride as well.
At home, we put our pollywogs in a bigger container (rinsed well with distilled water,) added more pond water and put some rocks in our tadpole habitat to make our visitors feel at home. A few times a week, we’ll siphon out some of the old water and add more pond water to keep our tadpoles healthy as they grow and change. When they’re almost frogs, we’ll lower the water level and be sure there are plenty of rocks for them to hop onto when metamorphosis is complete.
I’ll post a video of our tadpoles every so often so you can see how they’re changing. Eventually, we’ll release our frogs, along with the other plants and critters in our habitat, back into the pond where we found them!
Can you find some tadpoles of your own? If you do, be sure to keep them in pond/lake water and change it frequently. Chlorinated water will kill them! We’re feeding our tadpoles frog pellets and a little fish food, but I suspect they’re mostly eating algae in the pond water.
Earth Day Science
- by KitchenPantryScientist
On April 21st (the day before Earth Day), the Science Museum of Minnesota will celebrate Earth Day and open their new Future Earthexhibit to the public. Exploring the amazing planet that nurtures and sustains us, the thought-provoking exhibit examines climate science, looks at the impact of humans, and considers Earth’s future. Today’s young people will play an essential role in determining that future, and it’s essential that we raise our kids to be critical thinkers, as well as creators and innovators! Abby Harrison, a.k.a. Astronaut Abby, wants to be the first person on Mars and she visited Kare11 Sunrise news with me to talk about NASA and Earth Day.
 Every time you encourage a kid to ask “why?” or get them out into nature, you’re engaging their scientific brains! When they see you recycle, turn out the lights, walk instead of drive, or pick up a piece of trash, you’re teaching them lessons about stewardship and responsibility.
Here are some easy experiments that would be fun to do with your kids to help celebrate Earth Day. If you click on the experiment name, it will take you to directions and photos!
Window Sprouts: Plant a bean in a plastic baggie with a damp paper towel and see how plants need only water and air to sprout roots and leaves. Here’s a short video demonstrating how to put a window garden together.
Homemade Solar Oven: Using a pizza box, aluminum foil, plastic wrap, and newspaper, you can harness the sun’s energy to cook your own S’mores! Try it!
Nature Walk Bracelets: Wrap some duct tape around your wrist (inside out) and take a walk, sticking interesting natural objects like leaves and flowers to your bracelet. It’s a great way to get outdoors and engage with nature!
Carbon Dioxide and Ocean Acidity: See for yourself how the carbon dioxide in your own breath can make a water-based solution more acidic. It’s the same reason too much carbon dioxide in Earth’s atmosphere can be bad for our oceans.
Composting: Be a composting detective. Bury some things in your back yard (away from power cables) and dig them up in a few months to see how they look. Composting reduces methane gas emissions (a greenhouse gas) from dumps.
Diffusion and Osmosis: See for yourself how chemicals we add to water, put on our streets to melt ice, and spray on our lawns and crops can move into our soil, ground water, rivers, lakes and oceans.
Solar Water Purification: Another great illustration of the greenhouse effect and a fun experiment in general. Requires hot sun and some patience!
To continue to thrive, we’ll need countless innovations in energy, agriculture, health and environmental stewardship. Our children are our greatest natural resource, and we will depend on them to make a better future for us all. It’s up to us to nurture them, educate them, foster their innate sense of curiosity and fan their creative spark. Happy Earth Day!
Diffusion and Osmosis experiments
- by KitchenPantryScientist
 Diffusion is the name for the way molecules move from areas of high concentration, where there are lots of other similar molecules, to areas of low concentration, where there are fewer similar molecules. When the molecules are evenly spread throughout the space, it is called equilibrium. Imagine half a box filled with yellow balls and the other half filled with blue ones. If you set the box on something that vibrates, the balls will start to move around randomly, until the blue and yellow balls are evenly mixed up.
Think about the way pollutants move from one place to another through air, water and even soil. Or consider how bacteria are able to take up the substances they need to thrive. Your body has to transfer oxygen, carbon dioxide and water by processes involving diffusion as well.
Lots of things can affect how fast molecules diffuse, including temperature. When molecules are heated up, they vibrate faster and move around faster, which helps them achieve equilibrium more quickly than they would if it were cold.
Diffusion takes place in gases (like air), liquids (like food coloring moving through water,) and even solids (semiconductors for computers are made by diffusing elements into one another.)
You can watch food coloring diffuse through a colloid (gelatin) at home and measure how long it takes. Gelatin is a good substance to use for diffusion experiments since it doesn’t support convection, which is another kind of movement in fluids. You’ll need clear gelatin (from the grocery store or Target), food coloring and water.
Add 4 packs of plain, unflavored gelatin (1 oz or 28 gm) to 4 cups of boiling water. Pour the liquid gelatin into petri dishes, cups, or tupperware and let it harden. Then, using a straw, poke a hole or two in the gelatin, removing the plug so that you have a hole in the jello about 1/2 inch deep. Add a drop of food coloring in the hole in the jello.

Every so often, measure the circle of food coloring as it diffuses into the jello around it. How many cm per hour is it diffusing? If you put one plate in the refrigerator and an identical one at room temperature, do they diffuse at the same rate? Why do you think you see more than one color for certain shades of food coloring? What else could you try?
Here’s a post on how to use this experiment to make sticky window decorations: https://kitchenpantryscientist.com/?p=4489
We made plates and did the same experiment using 2 cups of red cabbage juice, 2 cups of water and 4 packs of gelatin to see how fast a few drops of vinegar or baking soda solution would diffuse (a pigment in red cabbage turns pink when exposed to acid, and blue/green when exposed to a base!)


 You can see the pink circle from the vinegar and the green one from the baking soda solution.
It’s also fun to experiment with the diffusion of substances across a membrane, like a paper towel. This is called osmosis. Membranes like the ones around your cells are selectively permeable and let water and oxygen in and out, but keep other, larger molecules from freely entering and exiting your cells.
For this experiment, you’ll need a jar (or two), paper towels, rubber bands and food coloring. Fill a jar with water and secure a paper towel in the jar’s mouth (with a rubber band) so that it hangs down into the water, making a water-filled chamber that you can add food coloring to. Put a few drops of food coloring into the chamber and see what happens.

top “chambers” for food coloring


Are the food coloring molecules small enough to pass through the paper towel “membrane?” What happens if you put something bigger, like popcorn kernels in the chamber? Can they pass through the small pores in the paper towel?
Do the same experiment in side-by-side jars, but fill one with ice water and the other with hot water. Does this affect the rate of osmosis or how fast the food coloring molecules diffuse throughout the water?
Think about helium balloons. If you take identical balloons and fill one with helium and the other with air, the helium balloon will shrink much faster as the smaller helium atoms diffuse out more quickly than the larger oxygen molecules.
Kitchen Table DNA Extraction
- by KitchenPantryScientist

DNA, or deoxyribonucleic acid, contains all of the information needed to make every protein in a living thing and is sometimes called the “blueprint of life.”
This morning, on Kare11 Sunrise news, the kids and I showed viewers how easy it is to extract DNA from strawberries.
In higher organisms like plants and animals, DNA is stored in a compartment called a nucleus where the long, string-like DNA is tightly coiled. To separate DNA from the organism that contains it, you have to break the cells apart (lysis), filter out the big pieces of cell parts and collect the remaining liquid, or supernatent, and add chemicals like salt and alcohol to separate (precipitate) the DNA from the rest of the supernatent.
To extract DNA from strawberries at your own kitchen table, you’ll need: 3 strawberries, measuring spoons, 2 one or two-cup pyrex measuring cups, a cone-shaped coffee filter, a plastic zip-lock bag, small clear plastic or glass cups, laundry detergent (liquid or powdered), ice cubes, 2 big bowls, a timer, salt and ice-cold rubbing alcohol. *Always supervise children around cutting tools and alcohol.
Put the alcohol in the freezer at least an hour before you start the experiment so it gets cold enough to precipitate DNA. Make sure the bottle is well-labeled and you remove it when you are done since rubbing alcohol is poisonous if it is consumed by accident.

Cut strawberries into small pieces.
First, cut the strawberries into small pieces using a butter knife. Put the pieces in one of the pyrex measuring cups and mash them up well with a fork until you can’t see chunks any more.

Mix mashed strawberries with detergent and 1/2 cup water.
Add a teaspoon of liquid or solid detergent to 1/2 cup of warm tap water, mix and pour this soapy mix over the strawberries. Fill one of the big bowls about half way with hot tap water (as hot as it comes from the faucet) and set the pyrex cup containing strawberries inside the bowl of warm water. Mix well with your fork. The detergent and warm temperature will start lysing (breaking up) the strawberry cells and proteins called enzymes will start chewing up cell parts, releasing the DNA from the nucleus. Wait 12 minutes, stirring the strawberry mixture once in a while.

Set strawberry/detergent mix in warm water bath for 12 minutes, then ice bath for 5 minutes.
Fill the other bowl about halfway with water and lots of ice cubes to make an “ice bath”. When the 12 minutes are up, set the cup containing the strawberry mixture into the ice bath for around 5 minutes, stirring once or twice. The cold temperature will slow the enzymes down so they don’t start chewing up the strawberry DNA.
While you wait, cut a plastic bag into a funnel the same size as your coffee filter and clip off the corner of the plastic bag so liquid can flow out (see photo). Put the coffee filter inside your plastic bag funnel and set the whole thing in your other pyrex measuring cup (or a wide glass.)

Put coffee filter inside plastic bag with tip cut off, pour strawberry mixture in and collect the supernatent.
When the 5 minutes are up, pour the strawberry solution into the filter/funnel and hold it while the strawberry gunk is filtered out and the supernatent containing the DNA flow through and into the cup below. If your filter gets clogged, use a spoon to carefully remove some of the strawberry gunk so more liquid can flow through. Don’t worry if you don’t collect every drop.
Now you get to precipitate the DNA! Pour some supernatent into your small, clear glass until it is about 1/3 full. Add about 1/4 teaspoon salt to the supernatant and mix it up well with a spoon or knife. Now, gently pour an equal volume (the same amount as your supernatent) of ice-cold alcohol into your supernatent. Do not mix it, but put your hand over the top of the glass and rock it gently. Set it down on the table and let it sit for a few minutes.

Cloudy white DNA precipitate will form near the top of your glass.
You should see a cloudy goo forming near the top of the liquid. It may look bubbly or slightly white. This is strawberry DNA.

Remove DNA with a toothpick, stirring stick or plastic fork.
You can use a toothpick or plastic fork to gently lift the DNA from the glass. It will look like clear slime.
Put it on a plate and touch it… how does it feel?
Congratulation scientist! You’ve just extracted DNA from a living organism!
*If you don’t see DNA, make sure you’ve added the salt. You can also set the entire glass in the freezer for half an hour if your alcohol wasn’t cold enough and the DNA should precipitate out!