Tag: Halloween’
Vegetable Vampires
- by KitchenPantryScientist
Plants love water as much as vampires love blood. Although they don’t have long thin fangs, they’ve developed a great system for pulling water up through their trunks and stems to their highest leaves using capillary action.
The kids and I demonstrated how to make them on WCCO MidMorning. Click here to watch.

after 24 hours of “drinking”
Make a vegetable vampire and watch capillary action move colored water through the cabbage creature you created.
To make a leafy vampire, you’ll need:
-head of fresh napa cabbage
-2 large cups, jars or plasticware containers large enough to hold the base of ½ of your cabbage
-food coloring
-fruits and veggies to use as eyes and eyebrows on your monster
-toothpicks
-rubber bands or string
First, fill your two containers ¾ of the way to the top with warm (not hot) water.
Add 10 or more drops of blue food coloring to one container and 10 or more drops of red food coloring to the other .
With a sharp knife, cut the cabbage in half vertically, from the bottom up, leaving the top 10cm or so intact, so the two pieces are still attached at the crown. If possible, try to cut down the middle of one of the big leaves.
Use rubber bands to secure the bottoms of each side of the cabbage and make a fresh cut at the bottom, a few cm up from the old cut.
Put one half of the base of your cabbage in the red water, and the other half in the blue water.
Decorate your two “vampires” with eyes and spooky eyebrows made from olives and peppers (or whatever you have in the refrigerator.) Secure the decorations with toothpick.

Keep an eye on your cabbage to see how much colored water it’s drinking. Your vegetable vampire will have to drink for 24-48 hours for the best results.
Plants survive by drawing nutrients dissolved in water up into their stems, stalks, trunks, branches and leaves.
Capillary action is the main force that allows the movement of water up into plants. In a narrow tube, on a surface that attracts water, the attraction between the surface and water, coupled with the attraction of the water molecules to each other, pulls water up. Plants are composed of huge numbers of tube-shaped cells that take advantage of these physical forces.
In this experiment, you can see colored water being taken up, via capillary action, into your cabbage.
Imagine how high the water in giant redwoods has to travel to reach the leaves at the top. In very tall trees, a process called transpiration helps the water overcome the forces of gravity. Here’s a transpiration experiment you can try at home.
Halloween Science Roundup
- by KitchenPantryScientist
Halloween Halloween brings out the kid in all of us, and there’s no better way to celebrate than with some ghoulish science experiments. Next week, I’ll be adding Vegetable Vampires and Zombie Candy to the lineup!

Here’s a list of our favorites. Just click on the name of the experiment to go to the instructions, see photos of what to do, and learn a little science. Most have links to videos or TV segments where I demonstrate how to do the experiments.
Shocking Machine Make an electrophorus and Leyden jar to shock your friends! Here’s how to do it. We demonstrated it on Kare11 last week!
Frankenworms Gummy worms soaked in baking soda and water come to “life” when you drop them into vinegar! Click here for directions and a video.
Goblin Goo (All you need is cornstarch and water. Here’s a video on how to make the goo. You can add a little food coloring to the water if you want, but it may stain your hands!)
Bag of Blood (If you have ziplock baggies, water, red food coloring and skewers, you can do this experiment!) Here’s the video.
Fizzy Balloon Monster Heads (After we made Goblin Goo, I demonstrated how to make Fizzy Balloon Monster heads. Click here to watch.)
Magic Potion (Bubbly, stinky Halloween fun: I made a short video on how to make magic potion. Click here to watch it.
Mad Scientist’s Green Slime (To see a TV segment where we made Mad Scientist’s Green Slime, click here!) Here’s another video.
Apple Mummies (Here’s a link to a TV segment where the kids and I demonstrated how to make Apple Mummies. Click here.)
Alien Monster Eggs (These make a great centerpiece for a Halloween party, when you’re done playing with them.) I demonstrated how to make them on Kare 11! Click here to watch the video.
Creepy Critter Slingshots Lob Marshmallow eyeballs and spiders at a pumpkin or another target in this fun physics experiment.
Halloween Science on abullseyeview.com
- by KitchenPantryScientist
Today, Target shared three of our favorite Halloween science experiments on abullseyeview.com.

Shocking Science and Magic Potion
- by KitchenPantryScientist
Doctor Frankenstein would have loved this experiment that makes electrons jump from place to place, with a shocking conclusion. You can watch us demonstrate it on Kare11 Sunrise by clicking here.

To make an electrophorus, or charge carrier, all you need is a Styrofoam plate, a cardboard square large enough to tape the plate onto, an aluminum pie pan, a Styrofoam cup, aluminum foil and wool, like an old mitten or stocking cap.
Tape the foam cup to the inside of the pie pan. Then cover the cardboard with foil and tape the plate on to the surface, facing down.
For your Leyden jar, which can make a bigger spark and shock, you’ll need a plastic film canister or an empty spice jar*, a nail longer than the canister, aluminum foil and water.
Cover the outside of the bottom of the film canister or spice jar with foil, push the nail through the cap, fill it 3/4 up with water and replace the lid/nail so the nail is in the water. *If you’re using a spice jar, put foil on the bottom half of the jar, remove the lid, fill it 3/4 full of water, and make a new “lid” by covering the top of the container with duct tape. Stick your nail through the duct tape and your Leyden jar is ready to go! If your nail doesn’t stay in place, use more duct tape to secure it!

Now rub the foam plate with wool for about a minute. The Styrofoam attracts electrons from the wool, giving the plate a negative charge.
It’s important to do the next steps in order!
1. Put the pie tin on the foam plate. The electrons on the pie tin are repelled by the negative charge on the plate, but they can’t go anywhere.

2. Put your thumb on the foil at the bottom and leave it there while you touch the pie tin with a finger on the same hand. You should feel a small spark as the electrons jump from the pie plate to your hand, leaving the plate with a positive charge.

3. Lift the plate using the foam cup and touch it to the head of the nail on your Leyden jar. Electrons will flow from the nail to the pie plate, leaving the nail and inside of the jar with a positive charge. Repeat steps 1-3 a few times to build up a charge in your Leyden jar.

4. When you’re ready for a shock, put your thumb on the foil on the bottom of your Leyden jar, leave it there, and bring your fingertip close to the nail on the jar. Electrons will jump from the negatively charged foil on the bottom of the jar to the positively charged nail, giving you a shock. If you try it in the dark, you may see a spark as the electrons move through the air to your finger!

When you’re tired of getting shocked, you can always whip up a batch of color-changing, bubbling Magic Potion! Click here for directions and a video.
Halloween Science: Creepy Critter Slingshots
- by KitchenPantryScientist
If you love marshmallows, you’ll love this physics experiment for Halloween. We’ve taken our ordinary Marshmallow Slingshot experiment to a spooky new level by adding edible tattoos to the marshmallows for Halloween. (We found them online at Oriental Trading Company.)
They’d be perfect for any Halloween party. Set up some pumpkins as targets and watch elastic energy turn into kinetic energy as you fire away. Click here to see the original post and learn about conservation of energy.
A fun video about making these slingshots and showing them in action is on both the free and Premium versions of KidScience app for iPhones and iPod touch.
Halloween Science: Magic Bag of Blood
- by KitchenPantryScientist
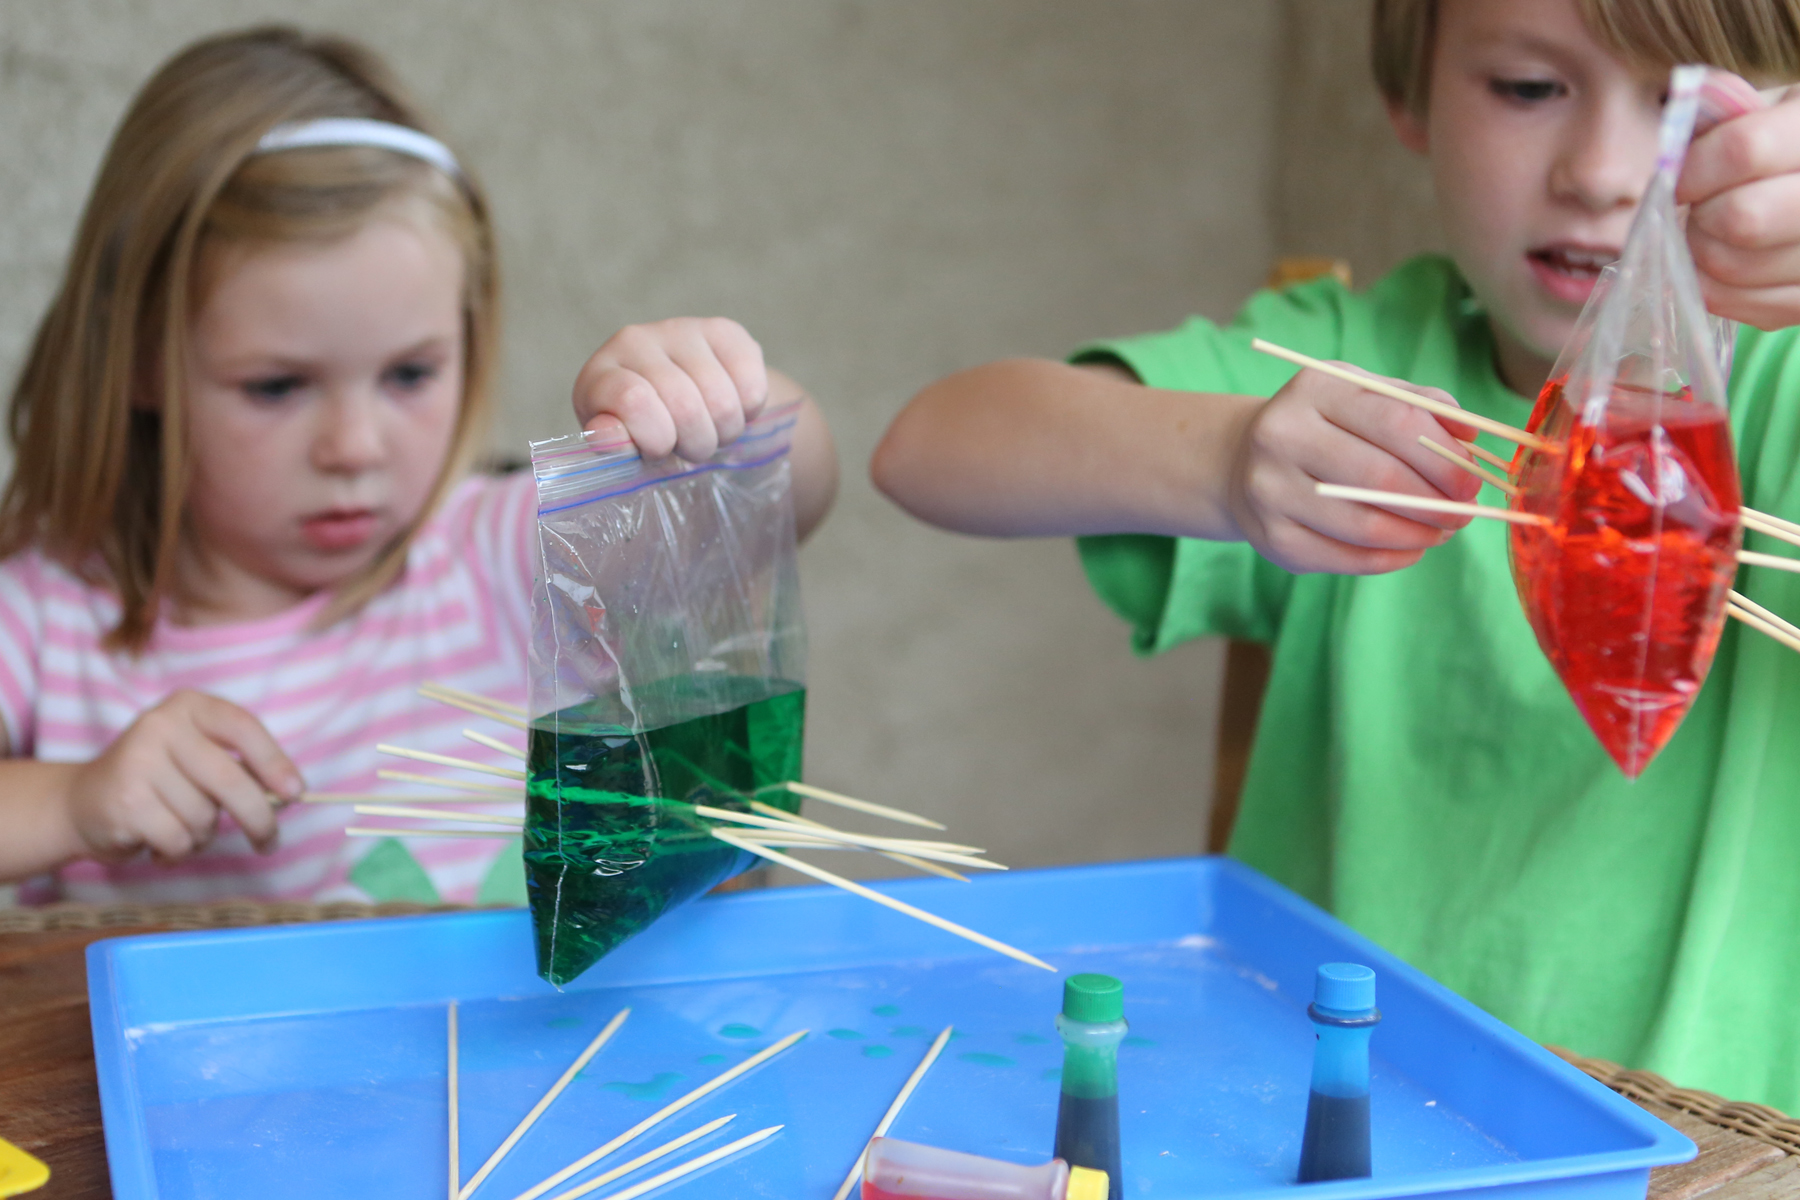
Image from Kitchen Science Lab for Kids (Quarry Books 2014)
You’ll be amazed when you fill a plastic zip-lock bag with “blood” and poke sharp skewers through, only to find that the bag doesn’t leak! All you need is a ziplock bag, water, food coloring and wooden skewers. Heavy-duty ziplocks work best! Fill a quart-sized ziplock bag with water, add a few drops of red food-coloring, and seal it. Slowly poke several wooden skewers completely through the bag, from one side to the other, avoiding the part with air in it. See how many you can push through! (Remember to be careful with the sharp points and I’d recommend putting a bowl underneath to collect drops.)
Why doesn’t the bag leak? Plastic is a polymer, made up of long, elastic molecules that form a seal around the spot where the skewer is poking through. In addition, the bag is sealed and contains very little air, so there isn’t much air pressure pushing on the water. If you make a hole in the part of the bag with air in it, surrounding air pressure (atmospheric pressure) can push on the liquid and make the bag leakier!
Halloween Science Experiments
- by KitchenPantryScientist
Update! I’ve added a few more experiments for your Mad Scientist’s laboratory. Here’s an new post of 10 spooky Halloween Science experiments (including those below) posted this Oct. (2012) : Click here to check them out.
Since lots of people are looking for fun science experiments to do for Halloween, I compiled some of mine so that they’re easy to find. Just click on the name of the experiment to go to the instructions, see photos of what to do, and learn a little science. Some of them also have links to my videos or TV segments where I demonstrate how to do the experiments. They’re all really easy and lots of fun!
Goblin Goo (All you need is cornstarch and water. Here’s a video on how to make the goo. You can add a little food coloring to the water if you want, but it may stain your hands!)
Bag of Blood (If you have ziplock baggies, water, red food coloring and skewers, you can do this experiment!)
Fizzy Balloon Monster Heads (After we made Goblin Goo, I demonstrated how to make Fizzy Balloon Monster heads. Click here to watch.)
Magic Potion (Bubbly, stinky Halloween fun: I made a short video on how to make magic potion. Click here to watch it.
Mad Scientist’s Green Slime (To see a TV segment where we made Mad Scientist’s Green Slime, click here!)
Apple Mummies (Here’s a link to a TV segment where the kids and I demonstrated how to make Apple Mummies. Click here.)
Alien Monster Eggs (These make a great centerpiece for a Halloween party, when you’re done playing with them.) I demonstrated how to make them on Kare 11 this week! Click here to watch the video.
Frankenworms Gummyworms soaked in baking soda and water come to “life” when you drop them into vinegar! Click here for directions and a video.
Here’s a video of Halloween science experiments you can find on KidScience app for iPhones and iPod Touch. Kids will love watching how-to videos of all the experiments on KidScience Premium!
Next week, I’m headed to Goddard Space Flight Center in Maryland to learn more about climate change for my role as an Earth Ambassador for NASA! When I return, I’ll talk about my trip and demonstrate an all-new Halloween science experiment on Kare11’s Sunrise News on Oct. 19th.
Magic Potion Video
- by KitchenPantryScientist
With Halloween around the corner, you’ll love this bubbly, color-changing, stinky chemical reaction. All you need is a head of red cabbage, vinegar and baking soda for this mad scientist experiment!
Click here for more detailed instructions. If you want to avoid the stove, chop half a head of red cabbage and blend it with about 3 cups of water. Strain the liquid through a colander and then through a coffee filter in a plastic bag with one corner cut off. Blended cabbage juice makes longer-lasting bubbles and turns a slightly brighter shade of blue!
Spooky Disappearing Face Chromatography
- by KitchenPantryScientist

This morning, my daughter and I got out some white coffee filters and started playing with liquid chromatography, which is defined as: a process in which a chemical mixture carried by a liquid is separated into components as a result of differential distribution of the solutes as they flow around or over a stationary liquid or solid phase.


In other words, you can use chromatography to separate pigments, or color molecules, using water (the solute) to carry them up a strip of coffee filter (the solid phase.) Different molecules travel at different speeds, so you can see some of the many colors contained in a black marker as the pigments race up the strip.
You’ll need white coffee filters, or paper towels, cut into strips just long enough to hang over a pencil or ruler that is balanced on the lip of a jar or cup without quite touching the bottom of the jar. We cut wider strips and hung them over a ruler balanced on two water glasses over a tupperware container. Look at the pictures and you’ll get the idea. You want the bottom of the paper just barely touching the water and not touching the sides of the container.
To see what colors are contained in different markers, draw dots about half an inch above the bottom of the paper and drape the paper over the pencil, just letting the bottom of the strip barely touch the water. You don’t want to submerge the marker dots. Let the water travel up to the top of the strip to see good separation. (See top photos.) Black and brown markers are especially interesting. Try several of them- they’re not all alike.
I was trying to think of a fun Halloween science experiment, so we came up with this variation on magic marker chromatography. Start by drawing faces with markers on the bottom of filter strips and hanging them over pencils on cups with the bottoms of the strip barely submerged in water at the bottom of the glass. The water will slowly travel up the paper, taking the pigment with it. It’s fun to watch the face blur and slowly disappear into line of color.


My daughter did this for an hour without getting bored. You can also do marker chromatography with thin strips of paper containing just one color or by dropping water on a dot you draw with a marker.
Magic Potion
- by KitchenPantryScientist

Making magic potion is simple! Chop a head of red cabbage into small pieces and add it to a pan with enough water to cover it. Boil the cabbage uncovered for about 15 minutes, stirring occasionally, let it cool, and strain the juice into a jar or bowl. (Save the cooked cabbage for dinner.)
If you want to avoid the stove, chop half a head of red cabbage and blend it with about 3 cups of water. Strain the liquid through a colander and then through a coffee filter in a plastic bag with one corner cut off. Blended cabbage juice makes longer-lasting bubbles and turns a slightly brighter shade of blue!
Now, pour about 1/4 cup of the cabbage juice, or “magic potion” into two clear glasses or bowls and set them on a white piece of paper (so you can watch the color change.)
Try adding a Tablespoon of baking soda to one glass of potion. What happens?
To the second cup of potion, add a few Tablespoons of vinegar or lemon juice. Notice anything different?
Finally, mix the two cups of potion together.

Why did the color change when you added two different chemicals to the magic potion? Everything in our world is made of very tiny pieces called atoms. Atoms are so small that if you blow up a balloon, it will contain about a hundred billion billion atoms of the gases that make up air. Atoms are often bonded to other atoms to form a group of linked atoms called a molecule.
Acids usually dissolve in water to form free-floating hydrogen atoms. Bases are the opposite and take up free hydrogen atoms. The molecules in the cabbage juice magic potion change when exposed to an acid or base, making the potion change color. Vinegar is an acid, which turns the potion pink and baking soda is a base, which turns it blue or green.
When you mix the vinegar potion and baking soda potion together, a chemical reaction occurs and you make Carbon Dioxide gas. That’s why you see bubbles!
Try adding some other liquids to your magic potion. Can you tell whether they are acids or bases?
Here’s a short video that shows you exactly how to do the experiment!
Happy experimenting!