Category:Chemistry Experiments’
Starch Test
- by KitchenPantryScientist
You probably know that lots of foods are full of starch, but did you know you can test foods in your own kitchen to see what has starch and what doesn’t? You can even see how starch is broken down by your own saliva by chewing a cracker for a long time and testing it for starch.
 A simple disinfectant called iodine that kills bacteria and viruses can also be used to test for the presence of starch.
Starch is a carbohydrate, or a long chain of glucose (sugar) molecules stuck together by chemical bonds. All plants make starch, but some contain more than others. It is the most common carbohydrate in the human diet!
Iodine usually looks brown, but when long chains of starch interact with iodine, scientists think the iodine molecules get wrapped up in the chains, as if a snake is coiling around them. This changes the way the iodine reflects light, and it starts to look black or blue, instead of reddish-brown. Sugar that is not in long chains doesn’t do the same thing to iodine.
To test for starch in your own kitchen, you’ll need iodine, an eyedropper and the food you want to test. I’d suggest table sugar, potato slices, banana slices, cucumber slices, bread or anything else that is light colored. Dilute some iodine by adding about a teaspoon (5ml) of it to a teaspoon of water (5ml.) For each sample, have a control. For example, have two slices of bread: one to drop water on and another to drop iodine on. This experiment should be done with adult supervision since iodine should not be ingested!

Add a drop of water to each control sample. Then, add a drop of iodine the other samples. Watch and wait for about 5 minutes. Can you tell which samples contain starch? The ones that contain the most starch will turn the iodine blue or black.

Now, take a cracker, chew it for a minute or so and spit it out into a dish. Mash another cracker up with water and put in another dish. Drip iodine on both of them and wait. What happens?
Gluten Ball
- by KitchenPantryScientist
Gluten is a hot topic these days, but most people aren’t really sure what it is.

Gluten is a protein found in wheat, rye and barley. It makes bread chewy and helps hold the bubbles that yeast makes in dough so that it can rise. (Here’s a fun yeast experiment!) Although some people have a disorder called celiac disease which impedes them from digesting gluten properly, most people can eat it without any problem.

You can easily extract a ball of gluten from flour using nothing but your hands and cold water, to see for yourself what this stretchy grain protein looks like. Just add a cup of water to a cup of flour, mix it together and knead it for about 5 minutes. (Add more flour if it’s too sticky to handle.)

Now, put the dough under COLD water and start “washing” out the carbohydrates so that mostly the gluten remains. Your hands will freeze, so you may need to take a break. If you keep going until the water coming off the dough is mostly clear, you’ll be left with a gluten ball.
Some types of flour have more gluten than others, and sometimes extra gluten is added to pizza dough to make it chewier! Try this with several types of flour to see what has the most gluten (or no gluten.)
Ocean Acidification Experiment/ CO2 Breath Test
- by KitchenPantryScientist
Last week, I wrote about Carbon, Bananas, Coal and You and promised to try to come up with a safe, easy way to see the carbon dioxide in your breath, so here it is! (It’s one of the experiments featured in my book Kitchen Science Lab for Kids.)
Ocean Acidification Experiment from Kitchen Science Lab for Kids (Quarry Books)
For both experiments, the star of the show is red cabbage juice, a safe, natural, easy-to-make acid/base indicator and the same one you can use to make magic potion and red cabbage litmus paper.
For the CO2 Breath Test, the trick is to use a very small volume of cabbage juice, since it’s not a very sensitive acid indicator.
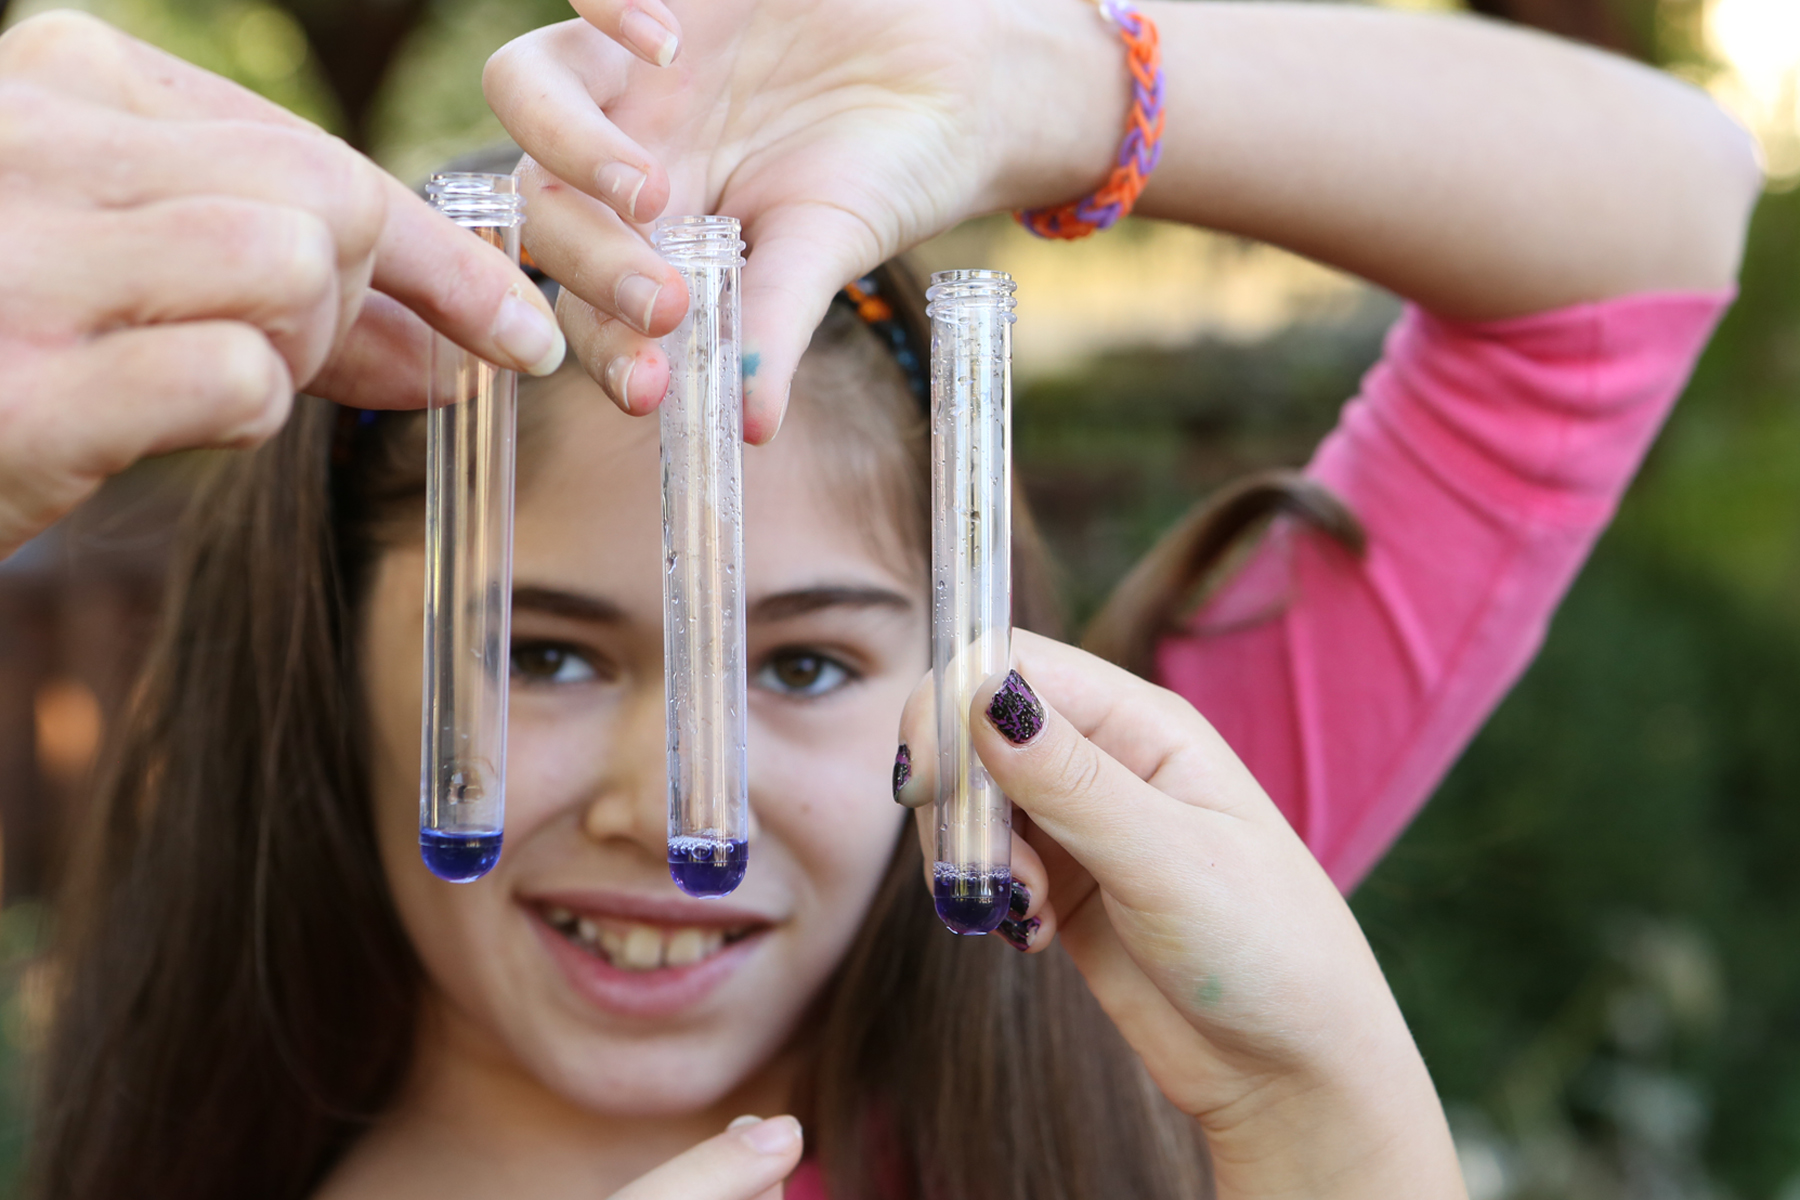
You’ll need red cabbage, drinking straws, and very small cups (the ones you measure kids’ medicine with work well) or test tubes.
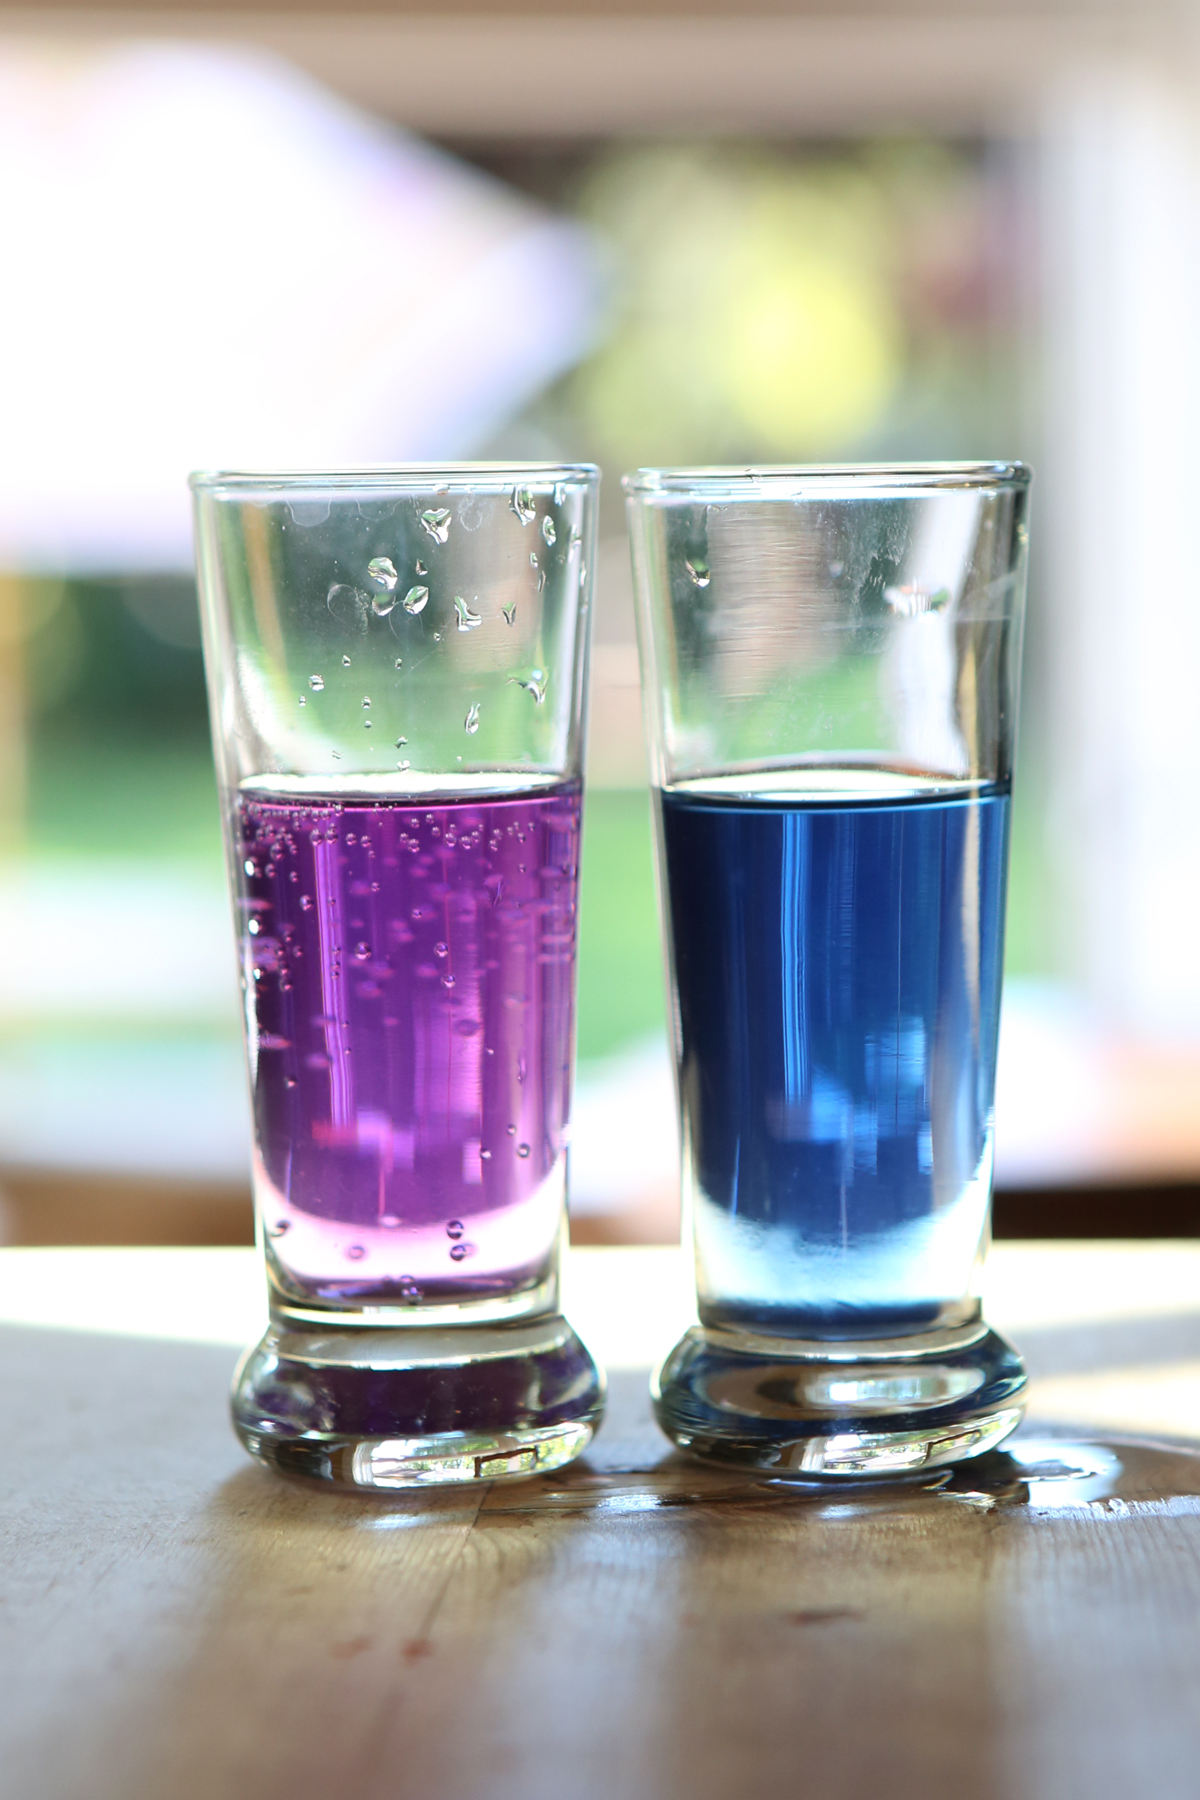
- Chop a head of red cabbage, boil it for 15 minutes, cool and collect the juice. It will be purplish in water and turns blue when exposed to a base or pink when exposed to an acid. (The molecule that gives it color can change shape to absorb light differently.)
- Pour a very small volume- a teaspoon or two (5 to 10 ml)- of the (cooled) juice into two small cups. Take a straw, put it all the way against the bottom of one cup and blow through the straw repeatedly for a few minutes until you see the cabbage juice turn noticeably pinker than the juice in the control cup. It may take several minutes to see a difference, so be patient! Test tubes are less messy since the juice can’t splatter so much.
 or
or 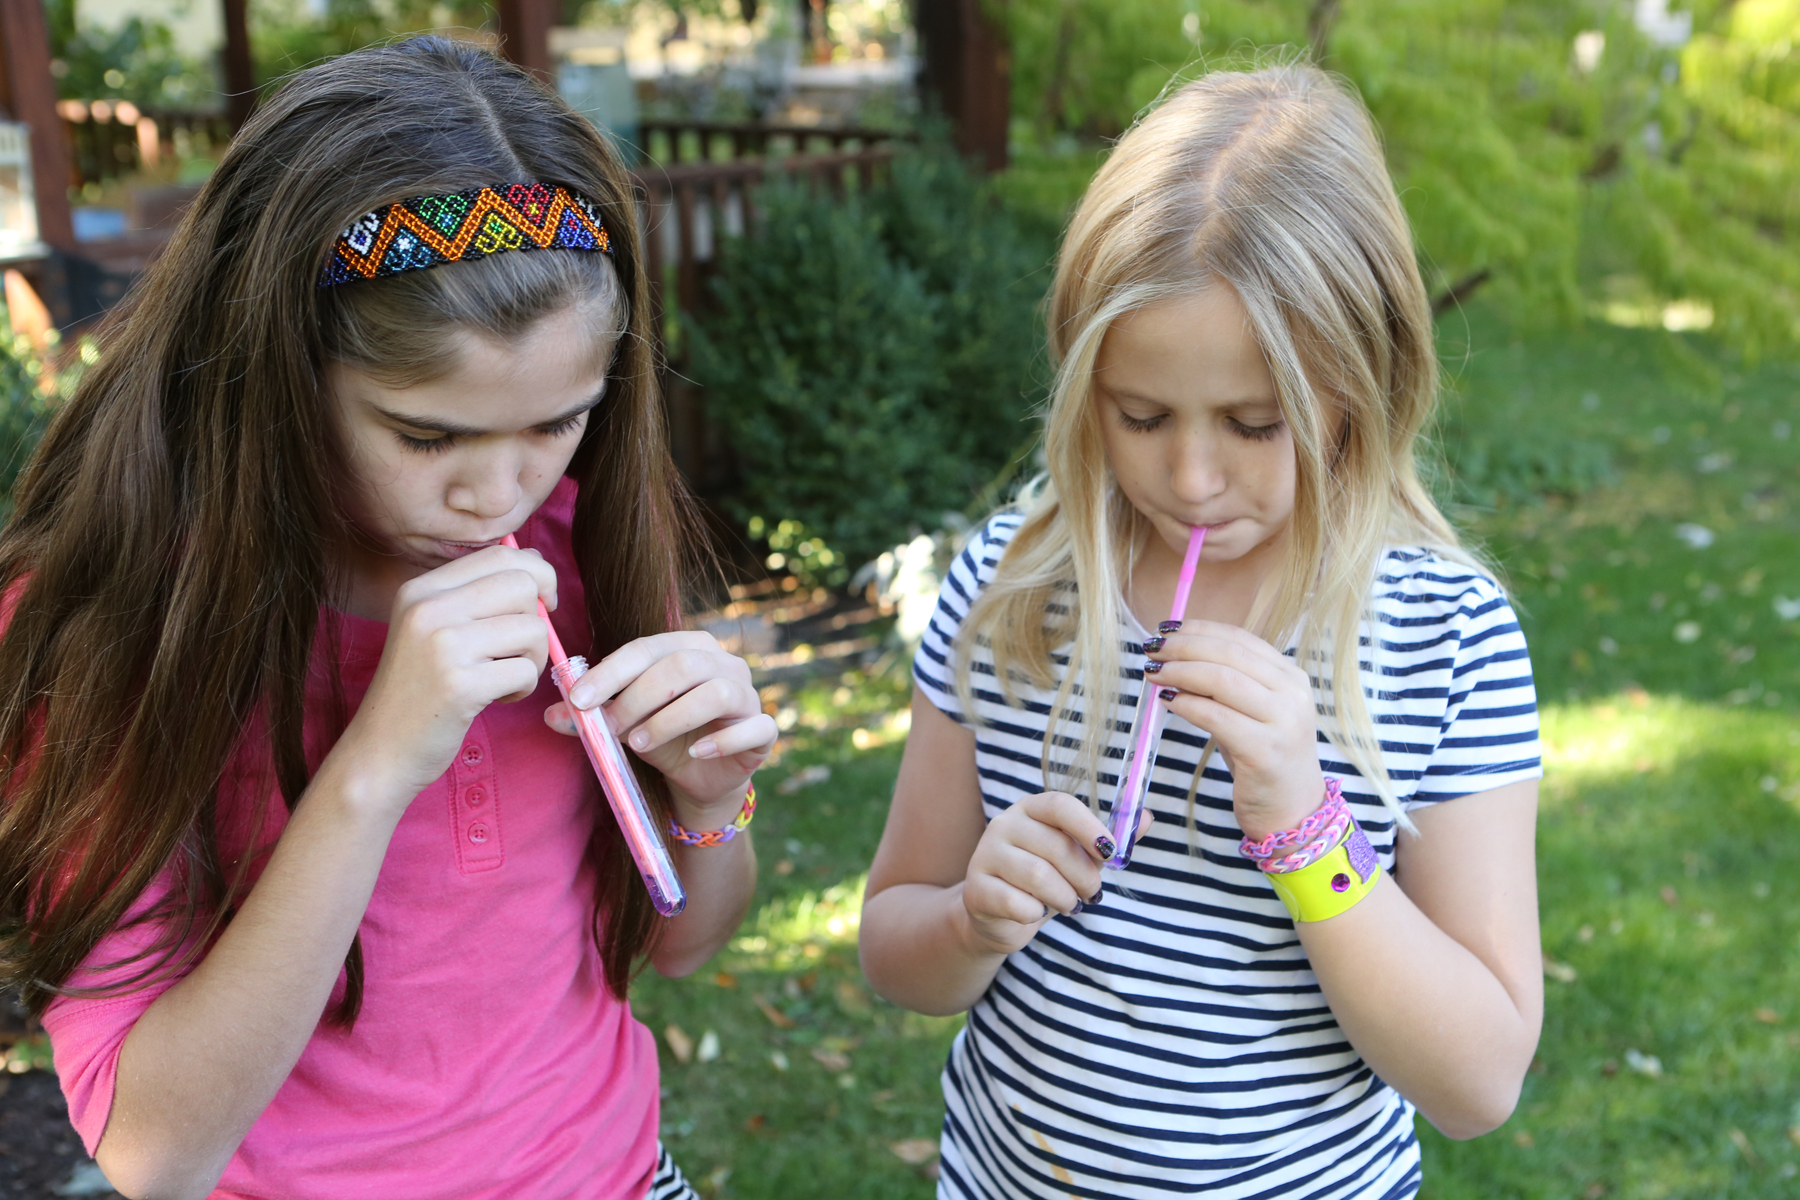
Ocean Acidification Experiment from Kitchen Science Lab for Kids (Quarry Books)
What happens? The carbon dioxide in your breath combines with the water in the cabbage juice to form carbonic acid, causing the pH of the solution to drop and the cabbage juice to take on a pinkish hue.
Ocean Acidification Experiment from Kitchen Science Lab for Kids (Quarry Books)
Why is this interesting? About a quarter of the carbon dioxide released by activities like burning fossil fuels and burning down rainforests is absorbed by our world’s oceans. This results in the ocean water becoming more acidic, like the cabbage juice in the experiment, and can have an effect on sea life, like coral. To learn more about ocean acidification and the chemistry of ocean acidification, check out NOAA’s amazing website.
You can explore the same concept (and see why carbonated drinks are hard on your teeth) by pouring uncarbonated water into one cup of cabbage juice and carbonated water into another. If you can, choose water from the same source, so you know the only difference is the carbon dioxide that’s been added to make it fizzy! Or, you could use dry ice to add carbon dioxide bubbles to water and test it before and after you add bubbles! 
What happens if you add yeast to cabbage juice and let it grow for a while?
You can use your leftover cabbage juice to make red cabbage litmus paper and then for a “magic potion” experiment.
Frankenworms
- by KitchenPantryScientist
All you’ll need for this spooktacular experiment that we demonstrated on Kare11, are some gummy worms, scissors, baking soda, vinegar and water.
Cut some gummy worms into extra skinny worms by cutting them the long way with kitchen shears. If it’s too tricky, ask an adult to help with this part. Cut each worm lengthwise at least four times. The skinnier, the better! *Not all gummy worms are created equal. If your worms aren’t wriggling, dip them in baking soda before putting them in the vinegar!
Mix a few Tablespoons of baking soda into a cup or so of water, stir, and put your skinny gummy worms in the cup of baking soda solution. Let them soak for 15 or 20 minutes.
Fill a clear glass or jar up with vinegar. (Be careful not to splash any in your eyes.) When the 15 minutes are up, pull your worms out of the baking soda solution with a fork, and drop them into the glass of vinegar. What happens?
Your worms should start to float and move as the vinegar (acetic acid) reacts with the baking soda (sodium bicarbonate) to form carbon dioxide gas bubbles on the worms. They look like they’re alive and will wriggle until the chemical reaction stops!
Magic Potion Video
- by KitchenPantryScientist
With Halloween around the corner, you’ll love this bubbly, color-changing, stinky chemical reaction. All you need is a head of red cabbage, vinegar and baking soda for this mad scientist experiment!
Click here for more detailed instructions. If you want to avoid the stove, chop half a head of red cabbage and blend it with about 3 cups of water. Strain the liquid through a colander and then through a coffee filter in a plastic bag with one corner cut off. Blended cabbage juice makes longer-lasting bubbles and turns a slightly brighter shade of blue!
Plant Chromatography for Kids
- by KitchenPantryScientist
What started out as a food science experiment turned into a seasonal one this morning, and we ended up outside pulling leaves off our Maple tree to see how the pigments from a red leaf would compare to those from a green one. Liquid chromatography allows you to separate the pigments (molecules that give plants color) using paper as a solid medium for the molecules to travel up, and alcohol as the solvent that separates and carries the pigments up the paper at different speeds, depending on how large they are.

To do this experiment, you’ll need a green leaf, and one or more that has turned color (we found a red and green one from the same tree!) In addition, you’ll need a coin, a jar, a pencil, paper towels or coffee filters and rubbing alcohol. Young children MUST be supervised during this experiment since rubbing alcohol is a toxic substance if ingested!
Balance the pencil on the lip of the jar and cut a strip of paper towel or coffee filter long enough to hang (folded in half) over your pencil and dangle with both ends just above the bottom.
Draw a pencil line about half an inch above the bottom of the strip on one side. Wrap a leaf around the coin (dimes work well) and press it down against the line on the left side, hard enough to rub color onto the line. (See photo above!) Do the same thing with the other leaf. Get as much color as possible onto each spot and let dry for a few minutes, or dry with a blow dryer.

Fill the jar with just enough rubbing alcohol so that the bottom of the strip will touch it, but the spots of color will not. Hang your paper strip over the pencil with the bottom touching the alcohol. (You can have it doubled or have one half hanging outside the jar. Both worked for us.) Try to make sure that the strip is hanging evenly so the color will travel straight up.
Watch as the colors travel up the strip and take the strip out of the alcohol before they reach the top. Let it dry and observe. The colors may be faint, but you should be able to make them out.

What do you see? Green leaves contain a pigment called chlorophyll, which helps plants do photosynthesis (get energy from sunlight, water and carbon dioxide.) In the fall, many trees stop making this pigment, which is why the other colors in the leaves become visible. Are your results consistent with this?
We tried the same experiment to compare spinach leaves that were fresh or had been microwaved in a ziplock (blanched). Although I read that the pigments change when vegetables are cooked or stored, we didn’t see much difference, except a brown smear near the very bottom. What other veggies could you try this experiment with?

Spooky Disappearing Face Chromatography
- by KitchenPantryScientist

This morning, my daughter and I got out some white coffee filters and started playing with liquid chromatography, which is defined as: a process in which a chemical mixture carried by a liquid is separated into components as a result of differential distribution of the solutes as they flow around or over a stationary liquid or solid phase.


In other words, you can use chromatography to separate pigments, or color molecules, using water (the solute) to carry them up a strip of coffee filter (the solid phase.) Different molecules travel at different speeds, so you can see some of the many colors contained in a black marker as the pigments race up the strip.
You’ll need white coffee filters, or paper towels, cut into strips just long enough to hang over a pencil or ruler that is balanced on the lip of a jar or cup without quite touching the bottom of the jar. We cut wider strips and hung them over a ruler balanced on two water glasses over a tupperware container. Look at the pictures and you’ll get the idea. You want the bottom of the paper just barely touching the water and not touching the sides of the container.
To see what colors are contained in different markers, draw dots about half an inch above the bottom of the paper and drape the paper over the pencil, just letting the bottom of the strip barely touch the water. You don’t want to submerge the marker dots. Let the water travel up to the top of the strip to see good separation. (See top photos.) Black and brown markers are especially interesting. Try several of them- they’re not all alike.
I was trying to think of a fun Halloween science experiment, so we came up with this variation on magic marker chromatography. Start by drawing faces with markers on the bottom of filter strips and hanging them over pencils on cups with the bottoms of the strip barely submerged in water at the bottom of the glass. The water will slowly travel up the paper, taking the pigment with it. It’s fun to watch the face blur and slowly disappear into line of color.


My daughter did this for an hour without getting bored. You can also do marker chromatography with thin strips of paper containing just one color or by dropping water on a dot you draw with a marker.
Fireproof Water Balloon
- by KitchenPantryScientist

Living thing are made mostly of water. Humans are, on average, are 60-70% water and the water in our bodies helps to stabilize our temperature. A great way to illustrate this concept requires no more than a balloon, some water and a grill lighter. (If young kids are doing the experiment, adult supervision is absolutely required.)
Simply fill the balloon with water, tie it and hold a flame to the bottom of the balloon. We did the experiment outside, just to be safe!

What do you think will happen?
Specific heat is the amount of heat required to raise the temperature of a substance by one degree Celsius. The specific heat of water is higher than any other common substance, which allows water to absorb and release large quantities of heat with very little change in temperature. Because of this, the water in the balloon absorbs the heat from the flame, and the rubber doesn’t melt. Imagine that the balloon is a living cell, and you can see how the fluid in a cell helps keep it safe when the temperature changes!

The balloon will turn black where you flame it, but it won’t pop. When you’re done with the experiment, fill a few more balloons and have a water balloon fight!
Enrichment: What happens if you try the same experiment with a frozen water balloon?
Homemade “Black Snake” Fireworks (Adult Supervision Required)
- by KitchenPantryScientist
I usually only post experiments safe for kids of all ages, but couldn’t resist this guest post from Pat Mullin of Labconco Corporation. Adult supervision is absolutely required due to the alcohol (a few tablespoons), which you light on fire to start the reaction.
As a kid, I remember watching long carbon worms emerge from glowing tablets our parents lit with matches on Independence Day. Pat’s video shows how (with the help of an adult), you can make your own “black snake” fireworks using only sand, powdered sugar, baking soda and denatured alcohol or ethanol. Very cool!
He does the experiment in a fume hood, but ethanol and denatured alcohol burn clean, so it’s perfectly safe to do in the driveway, with kids standing at a safe distance. Can’t wait to try it! Happy Fourth of July!
Food Science: Red Cabbage Litmus Paper
- by KitchenPantryScientist
This is a great science project and results in beautifully colored paper that can be dried and used for art projects like collages.

All you’ll need is a head of red cabbage and some paper towels or white coffee filters. Alternately, you can just use the juice from canned red cabbage. I’d recommend wearing an old tee shirt or a home-made lab coat for this project, since I’m guessing that cabbage juice stains. To make a lab coat, just have kids write their name in permanent marker on the pocket of an old button-down shirt.
Chop half a head of red cabbage into small pieces and add it to a pan with about a cup of water. Boil the cabbage uncovered for about 15 minutes, stirring occasionally, let it cool, and strain the juice into a jar or bowl. (Save the cooked cabbage for your favorite recipe and make cole slaw with the other half!)

If you want to avoid the stove, chop half a head of red cabbage and blend it with about 3 cups of water. Strain the liquid through a colander and then through a coffee filter in a plastic bag with one corner cut off. Blended cabbage juice makes longer-lasting bubbles and turns a slightly brighter shade of blue!
Cut the paper towels or coffee filters into strips about an inch wide and a few inches long and soak them in the cabbage juice for about a minute. Remove them and let them dry on something that won’t stain. I blotted them a little to speed up the drying process. You might even try using a blow dryer!

When dry, your litmus paper will be ready to use for testing acidity. Your can dip the paper into orange juice, soapy water, lemon juice, baking soda in water, baking powder in water, vinegar, and anything else they want to test. The paper will turn red-pink in acids and blue or green in bases.

Everything in our world is made of very tiny pieces called atoms. Atoms are so small that if you blow up a balloon, it will contain about a hundred billion billion atoms of the gases that make up air. Atoms are often bonded to other atoms to form a group of linked atoms called a molecule. A water molecule, for example, has two hydrogen atoms and one oxygen atom, bonded together.
Acids usually dissolve in water to form free-floating hydrogen atoms. Bases are the opposite and take up free hydrogen atoms. The molecules in the cabbage juice litmus paper change when exposed to an acid or base, making the paper change color.