Category:Biology Experiments’
Sun Chips Bag Experiment
- by KitchenPantryScientist
On August 8, the kids and I became consumer detectives as we buried a Sun Chips bag to see if it would break down. We don’t have a compost heap, since our neighborhood has organic compost collection, so we buried it about a foot down with some vegetable waste and melon rinds and watered it to kick the decomposing microbes into full gear. The hot August sun added heat to the brew and we imagined the bag slowly breaking down, like it does in the commercials.

Yesterday, after about 7 weeks, we unearthed the bag to see how the experiment was going. All of the organic compost we’d buried with the bag was gone-turned to black dirt, but to our eyes the Sun Chips bag looked almost as good as new, except where the shovel had torn it. It may be breaking down, but it’s hard to tell. We reburied it. It’s supposed to take 13 weeks to completely break down under ideal conditions, but we thought we’d see more progress.

I’ll admit, we didn’t have ideal conditions (a hot compost heap), but I wonder how many garbage dumps have ideal conditions? I don’t know. We’ll see what happens when we dig it up again next summer.
At least Frito Lay is making an effort. (I’m sure the bag will eventually break down.)
I think it’s good to teach kids to question companies’ claims. After all, you can’t believe everything you read.
Composting Detectives- Day 2 of Science Camp
- by KitchenPantryScientist
Not only are Sun Chips bags the noisiest chip bags ever manufactured, but the company claims that they’re biodegradable and will break down completely in about 13 week, in a hot compost pile.

Yesterday, the kids and I became consumer detectives as we buried a Sun Chips bag to see how well it breaks down in our own back yard. All we needed was a Sun Chips bag (which had been quickly emptied by my chip-deprived children), a few fruit scraps, and a shovel. (Be sure to dig in a spot where there are no power lines buried. You can check with your local electric company if you’re not sure.)
First, we dug a shallow hole near our garden, in a spot that gets lots of sun and put our chip bag in the hole. We’re lucky enough to have a curbside organic recycling program in our neighborhood, so we don’t have a compost heap of our own. To make up for the compost deficit, and add some heat and microbes from rotting vegetation, we threw in a few watermelon rinds, tomato scraps and avacado skins from the compost bin in our sink. Then, we put dirt on top of our little “compost heap” and put a rock on top to mark the spot. Finally, we watered the dirt to get the process started.

In about three weeks, we’ll dig under the rock to see what is happening. According to the information on the Sun Chips bag, it should be starting to break down. After that, we’ll check it every four weeks or so. The bag says it takes about 13 weeks to break down completely.
Do you have a compost heap? Composting is a great way to make beautiful, nutrient-filled dirt for your garden and reduces greenhouse gas emissions. According to the Environmental Protection agency, 26% of the solid waste we produce is made up of yard and food waste. You can go to their website for more information on composting.
Homemade Petri Plates
- by KitchenPantryScientist

Culturing microbes (bacteria and fungi) on petri dishes lets you test different surfaces for microbes and grow your own germs. It’s also a great reminder of why it’s important to wash your hands. Even very young children will have fun helping with the Q-tips and seeing what grows in their microbial zoo. It’s fun, easy, and you might even already have what you need in your kitchen cupboard. If not, the ingredients are readily available at any grocery store.
 You will need disposable containers to grow cultures in (see below), beef bouillon cubes or granules, plain gelatin or agar agar* (seaweed gelatin), water, sugar and Q-tips. (*Agar-agar can be found with Asian ingredients in some grocery stores.)
Note: Gelatin will melt if it gets too warm,and some bacteria make enzymes which can liquefy it, which is why scientists in labs use agar to make their plates. The idea to use agar for plates originally came from the wife of a famous microbiologist who used agar for canning food. Try to keep petri plates away from hot lights, etc. so they won’t melt.
For containers, you can use foil muffin tins, clear plastic cups covered with plastic baggies, clear plasticware with lids, or real petri dishes to grow fungi and some bacteria. We’re going to use clear deli containers, so that we can recycle while we learn. (They look like they will be heat-resistant enough to pour warm agar into.)
You’ll start by making microbial growth medium (or germ food, as we like to call it.)
Mix together a little less than 1 cup water, one and one half packages gelatin (Or 1 and 1/2 Tbs. agar-agar), one bouillon cube (or 1 tsp. granules), and 2 tsp. sugar. The next step is for an adult to help with, since it involves very hot liquid. Bring the mixture to a boil on the stove, stirring constantly, or boil in the microwave, stirring at one minute intervals and watching carefully until the gelatin or agar is dissolved. Remove the boiling liquid from heat and cover it with aluminum foil. Let the growth medium cool for about fifteen minutes.

Pour the medium carefully into clean containers, until 1/3 to 1/2 full. Loosely place lids, foil or plastic baggies over containers and allow dishes to cool completely. The geltin or agar should make the growth media hard like jello. When your plates have hardened, store them in a cool place, like a refrigerator, before using. Plates should be used in 2-3 days. When you are working with the plates, try to keep the lids on loosely whenever possible, so that they are not contaminated by the air. If you’re planning to use muffin tins, simply place them in a muffin pan, fill them with agar, and when they’re cool, put them in individual zip-lock baggies. With other containers, put the lids on tightly once the plates harden.
When the plates have hardened and you’re ready swab, shake the condensation off the lids of the containers and put them back on. Then, draw a grid of four sections on the bottom of the plate with permanent marker. (If you are using muffin tins, you’ll just label each bag with the surface you are checking.) Decide which surfaces you’d like to test. It’s always fun to label one section of the grid “fingerprint” to see what grows when you touch your finger to the plate.
Label each section with the surface you want to test. Be sure to label the bottom of the plate since the lid will move. You should be able to see through the agar to see your lines and your writing. If you want to, you can label a separate plate for each surface, but we had three kids and three plates, so we made sections. TV remotes, kitchen sinks, computer keyboard, doorknobs and piano keys are great surfaces to check. You can even cough on a plate or leave one open to the air for half an hour to see what’s floating around! (See the photo at the top of this post for a better picture of how your plate might look.)

Now comes the fun part. Rub a clean Q-tip around on the surface you want to test. Then, remove the lid from the plate and gently rub the Q-tip across the section of the plate labeled for that surface. If you are careful, the agar shouldn’t break. If it does, it’s no big deal. When you have finished, set the plates on a flat surface with their lids loosened and taped on (do not invert them.) I set our plates on a countertop where they wouldn’t be in the way. Check your plates every day, and soon you will observes colonies of different shapes, sizes and colors starting to grow.


You will mostly see fungi (molds), but you may also see some tiny clear or white spots that are colonies formed by millions of bacteria. Record and draw how your plates look in your science notebook. Older kids can keep track of how long it takes things to grow and the shapes, sizes and colors of the microbial colonies that grow on their plates. If you want to learn more about microbes, search for the words fungi and bacteria on the website cybersleuthkids.com and it will give you some great links to microbiology websites. Microbes are everywhere, but that very few of them are harmful, and many of them are essential for good health.

Be sure to wash your hands after handling the plates, and throw the plates away when you are done. Remind your kids that if they wash their hands with regular hand soap for the length of time that it takes to say the ABCs, they’ll remove most of the harmful bacteria and viruses on them. (For adults, a severe side effect of this experiment is the sudden urge to disinfect computer keyboards and remote controls.)

Here’s what grew on one of our plates: The large, fuzzy colonies are fungi and the small, whitish ones are probably bacteria. The grid with the most fungi was cultured from our piano keys. The one with both fungi and bacterial colonies visible was cultured from our bathroom sink. One grid has mostly small, white bacterial colonies and was cultured from a water-glass my son drank from. The fingerprint grid has only a single fungal spot. My daughter must have washed her hands before touching it! Our other two plates were pushed too close to the under-counter lights in our kitchen and the gelatin melted, so we threw them away.
Caterpillars Everywhere!
- by KitchenPantryScientist

It’s August and Minnesota is crawling with Monarch caterpillars! They’re on the swamp milkweed and the ditch milkweed almost everywhere you look! We brought one home from the cabin with us last weekend and it’s happily munching milkweed and growing fat on our screened-in porch, soon to be dreaming in a chrysalis. If you get a chance, check out my post on finding and taking care of your own monarch caterpillar and go on a hunt for your own caterpillar!
Metamorphosis from caterpillar to butterfly is truly one of nature’s more spectacular exhibits and is absolutely free of charge!
Aug.8th…

Our caterpillar has attached itself to a leaf and is hanging upside down in a J. We’re watching for it to change into a chrysalis and will try to capture it on film, although it happens very fast!
Avocado Sprouts
- by KitchenPantryScientist
When I was mashing up avocados with lime juice and salt the other day to satisfy my craving for guacamole, my kids asked if they could keep the pits. I suggested we sprout them and showed them how to poke toothpicks into the pits and balance them in a glass of water with the pointed end up and the round end sitting in the water. I had no idea that our little experiment would send me on a trip down memory lane.

As a kid, I spent my summers living in California while my dad did research at a physics laboratory in the Bay Area. Around 1976, we spent an entire year there when my dad took a sabbatical. We rode the ferry to Sausalito, feasted on hot fudge sundaes at Ghiradelli square and sat on the Berkeley pier eating clam chowder from Spanger’s. Every summer, we took backpacking trips along the coast of Point Reyes, fished in the Truckee river near Lake Tahoe and explored the High Sierras. I was a lucky kid.
The funny thing is, what I remember as clearly as all those adventures is that we almost always had an avocado seed sitting in our kitchen window and now, every time I look at our science experiment, I think about my mom and the summers of my youth. Maybe I’ll try to keep an avocado pit growing in my kitchen from May to August so that some day, one of my kids will show their own children how to sprout an avocado pit and remember our summers together.
Backyard Birding
- by KitchenPantryScientist

The weekend started off when I took our four-year old to see the movie “How to Train Your Dragon” (I think I liked it as much as she did) and left the theater talking about what it would be like to fly. We did a craft project, taking a butterfly from egg to wings, and toppped Sunday off by going for a bird-watching walk through the neighborhood and nearby woods.
With the arrival of spring in Minnesota, birds are everywhere! Cardinals are singing outside as I type. On our walk, we saw dozens of robins and woodpeckers. A hawk soared over and a nearby crow cawed at a Turkey Buzzard that soared down too close to his meal. I knew it was a buzzard because it was entirely black and I recognized the shape of its wingtips.
Do you know how to tell what kind of bird you’re looking at? The study of birds is called Ornithology and bird watching can be fun for all ages.

Why not go on a bird walk with your kids? Take a bird guide, if you have one, a notebook (their science notebook would be perfect) or a piece of paper and write down or draw what the birds you see look like. Binoculars would be great too, but aren’t necessary. Be sure to notice what color the birds you see are, special markings they might have, how big they are, and how their wings are shaped. You can even memorize or record how their song sounds. Do they sing “chick-a-dee-dee-dee” or “who-cooks-for-you?” If you feel like it, count how many robins or cardinals you see!
When you get home from your walk, you can use a Bird Identification book to look up your discoveries, or you can go online and use one of the many, interactive resources there. I decided to use whatbird.com and allaboutbirds.org from the Cornell Lab of Ornithology, to try to identify the hawk that we saw. Although I thought it was a red-tail hawk, I wasn’t sure. Both websites were helpful. Whatbird.com offered a visual search, where you could choose from different fields, like color and wing shape to narrow your identification. It worked pretty well, but didn’t seem foolproof. Allaboutbirds.org had a field where you could search birds by name and shape, which had nice photos you could use to identify what you had seen. Your kids could even make a guide of birds in your area!

So get those kids outside and let them hone their observations skills! No one offers a better show at a better price than Mother Nature!
Window Sprouts
- by KitchenPantryScientist

Window Sprouts from Kitchen Science Lab for Kids Quarto Books
When I was growing up, we always had a vegetable garden. My mom grew up on a farm and was appalled when my sister or I would throw a fit upon finding a tiny bug in our lovely, homegrown lettuce salad. “Where do you think the lettuce came from?” she would ask, and we’d have to admit that it grew in dirt, outside, and that there are bugs out there. It was an invaluable lesson and one I hope I can pass along to my kids. Our world has become too sterile and disconnected from nature. Like plants, we need dirt, sunshine, fresh air and clean water to survive. Who cares about a few bugs?
Try planting a few bean and pea sprouts in plastic bags to show your kids how sunshine and water can make a plant sprout!
You’ll need a few plastic zip-lock bags, dry beans from your pantry (or peas and beans from the garden seed packs you can find almost anywhere ), paper towels and water. Cut a paper towel so that you can fold it a few times and it will fit into the zip-lock baggie. Have your child soak it with water and help them put it into the bag so that it’s relatively flat. Then, give them two beans or seeds to place in the bag, near the bottom.
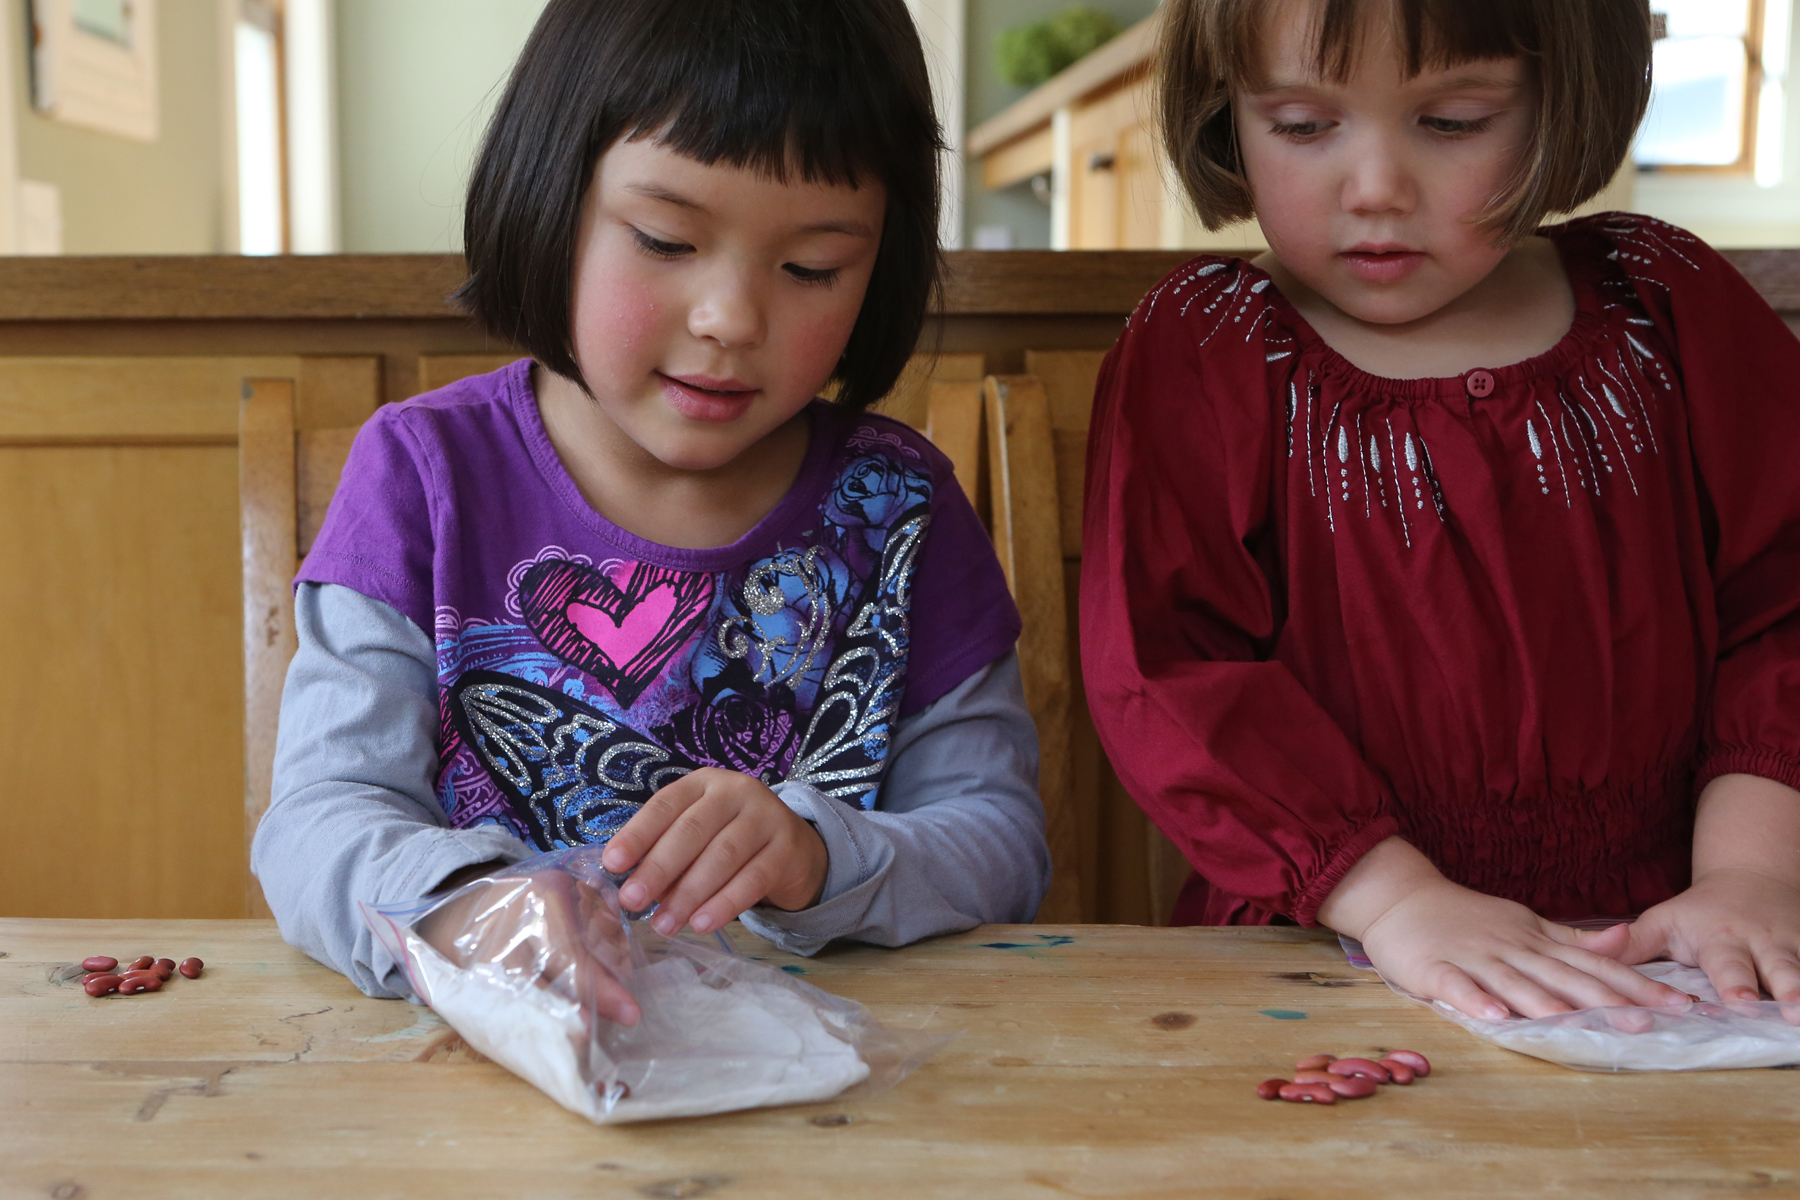
Window Sprouts from Kitchen Science Lab for Kids Quarto Books
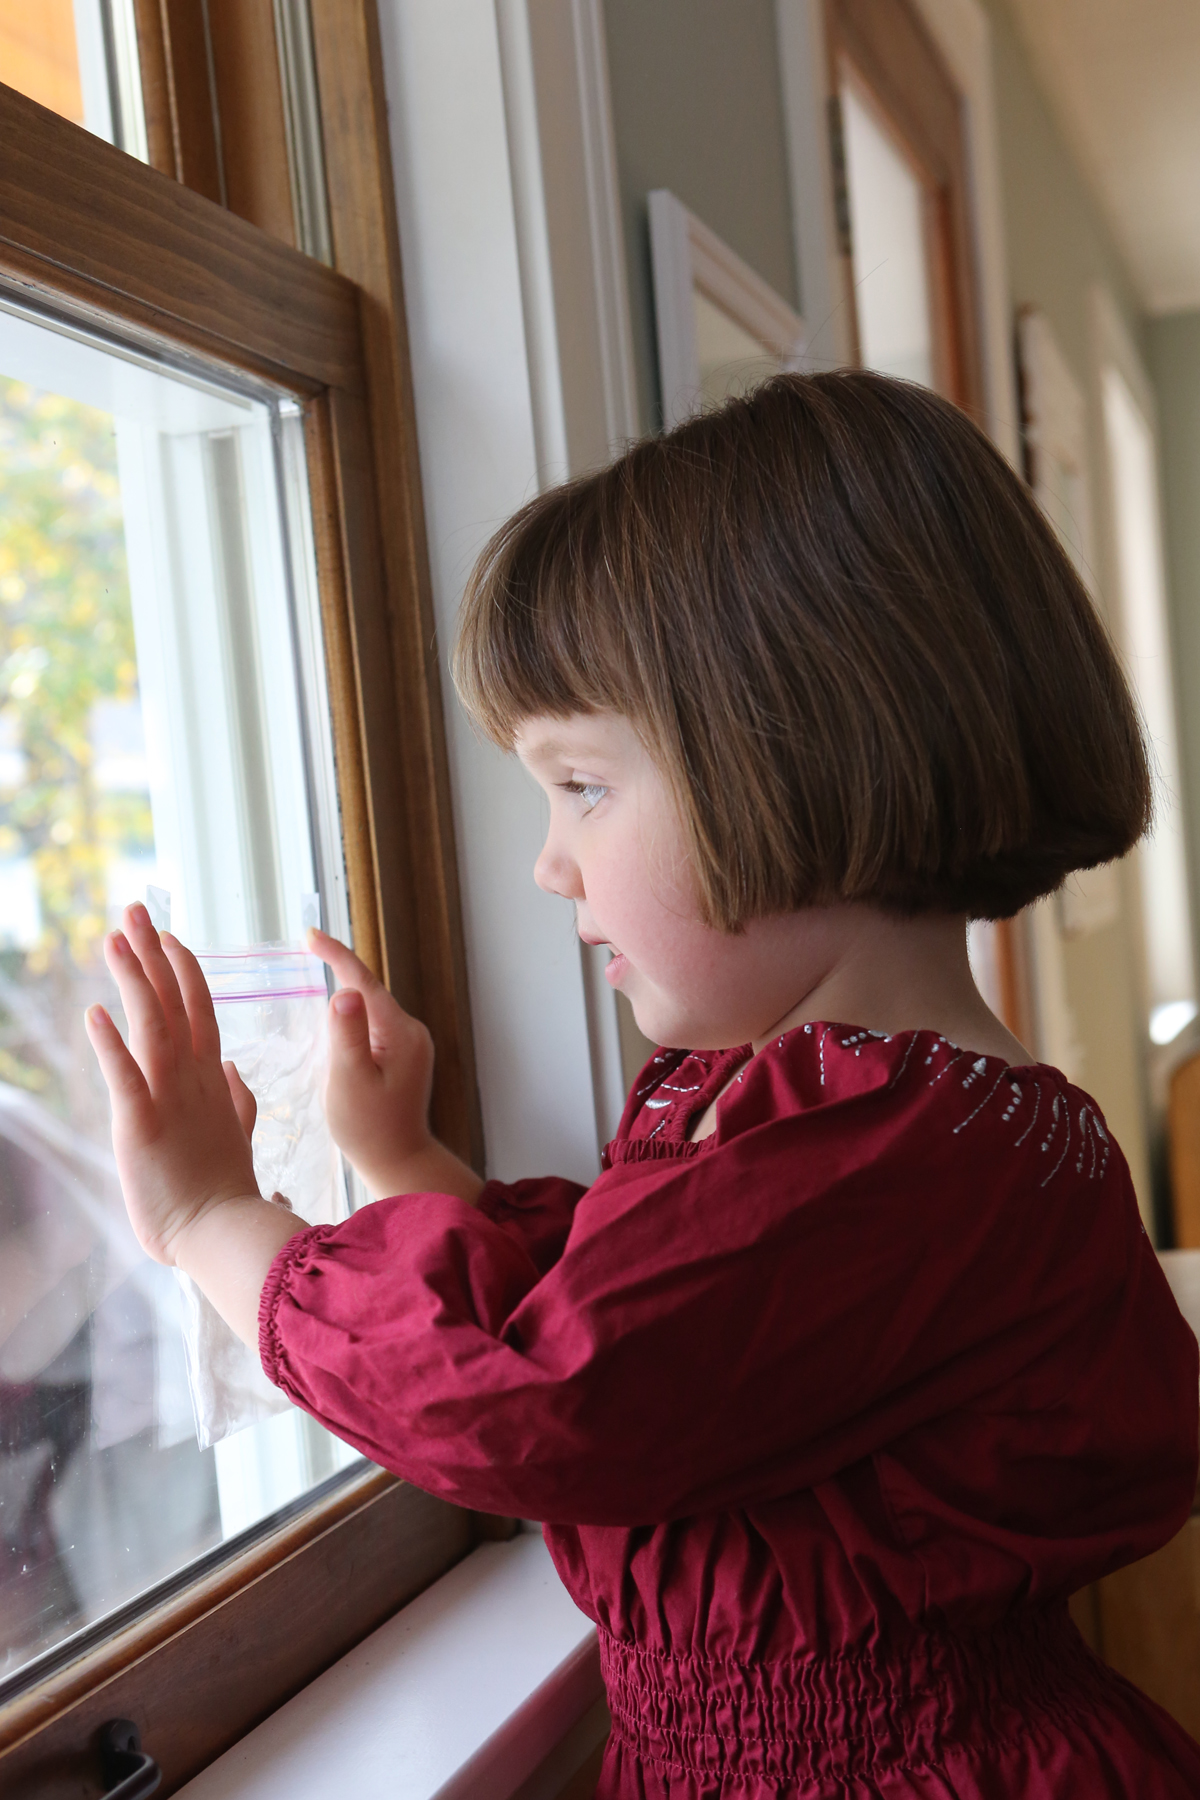
I had to stuff a little piece of paper towel into the bottom of the bags so that the seeds wouldn’t sit in the extra water at the bottom. Let your child help seal the bag. Leave an opening near the top so the plants can get some air. Finally, tape the bag in a window with the beans facing you so that your child can watch them as they grow. (I’d recommend finding a window where they won’t get blasted by hot sun all day, or they might fry.)
Window Sprouts from Kitchen Science Lab for Kids Quarto Books
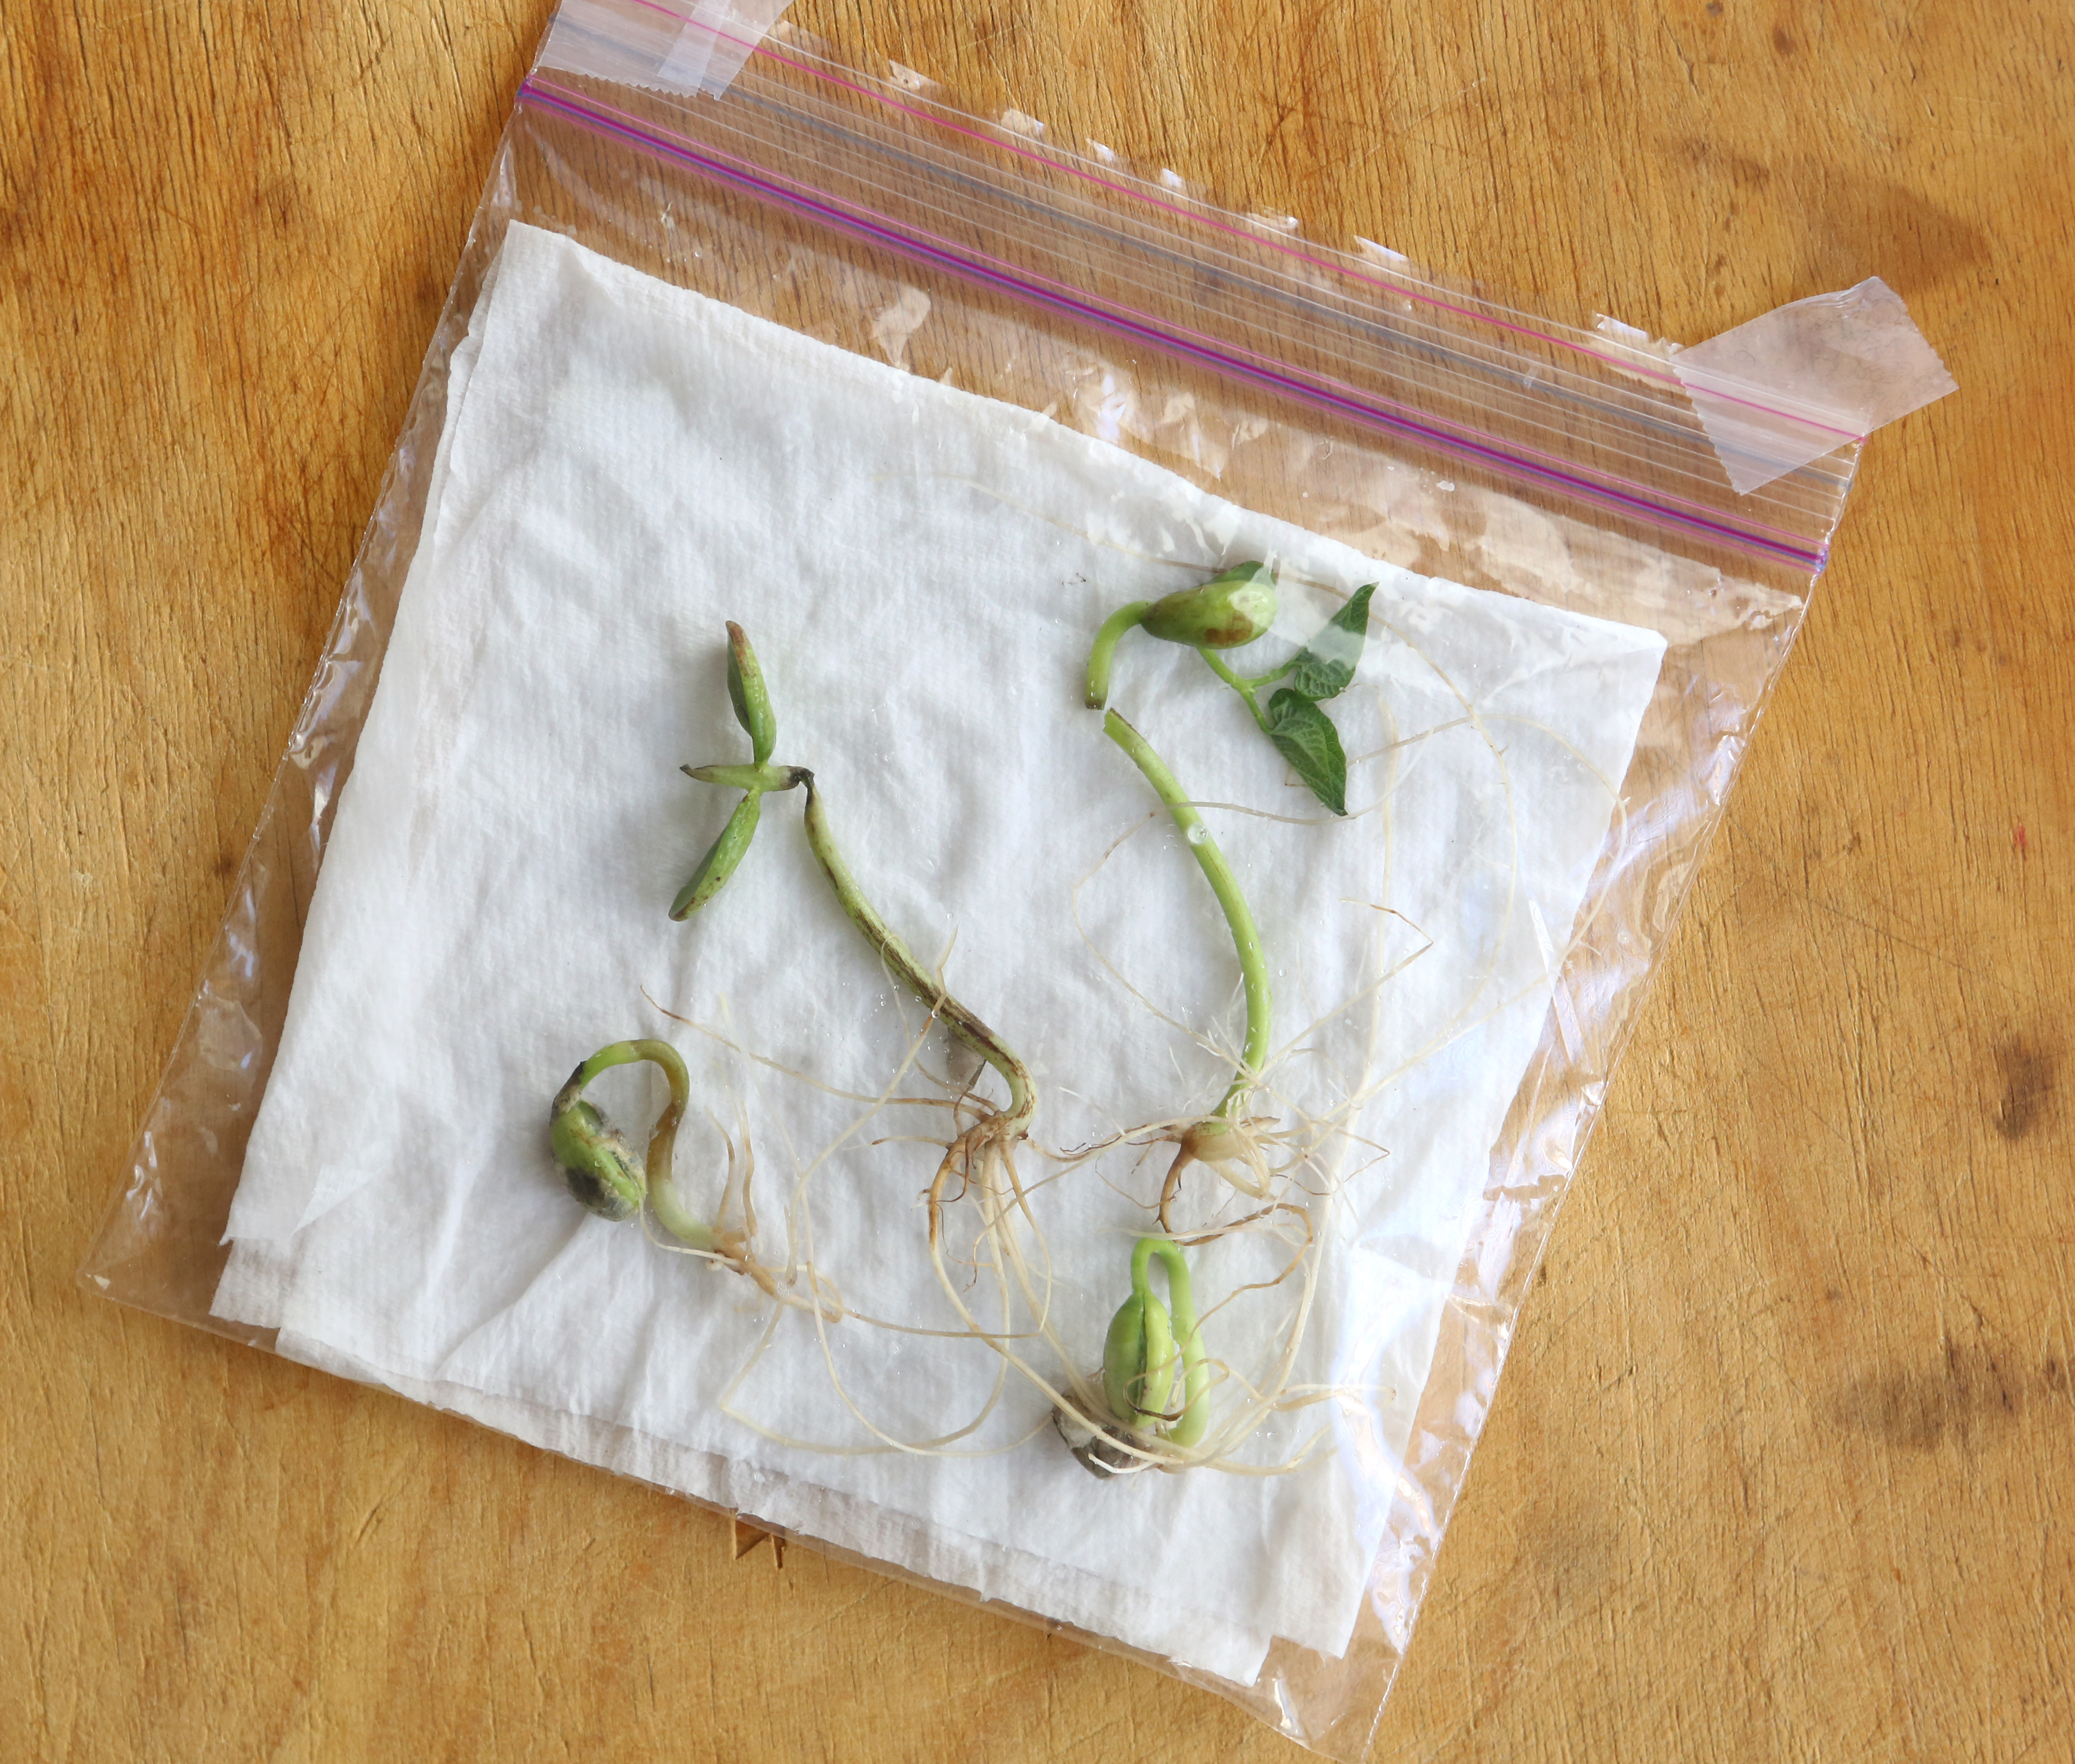
As you do the project, ask your child what they think plants need to grow (Plants need light, air, water and nutrients, or “food.”) Ask them how they think the seed can grow without the dirt as “food.” Tell them that when a plant first sprouts, it gets its nutrients from the seed itself. They can watch the seed shrink as the plant grows. Have them draw the seed/plant in their science notebook as it changes. Older kids can measure the plants as they grow. Eventually, you should be able to transplant them to a cup with dirt, or directly into a garden. You may have to add water to the paper towels if they dry out. Play it by ear.
Window Sprouts from Kitchen Science Lab for Kids Quarto Books
Plant a garden this spring, even a very tiny one in pots! Let your kids get their hands in the dirt. Help them nurture plants that will eventually nurture them. (Children are much more interested in tasting vegetables that they’ve grown themselves. ) It is one of the most rewarding activities you can do with your children, and takes only dirt, seeds and water! Find your inner farmer and let your children find theirs- organic food is cheap when you grow it yourself!
Fingerprint Fun
- by KitchenPantryScientist

For this project, I thought that it would be fun to mix a little science and a little art. My sister told me that she heard you could make Valentine’s cards using fingerprints. I’ve also heard that it’s pretty easy to lift fingerprints using scotch tape, so I thought we’d give it a try. All you need for the science part is paper, scotch tape and a pencil. For the valentines, you will need an ink pad, paper and markers.
On www.wikieducator.org/Fabulous_Forensic_Fingerprints, I found a fingerprint-lifting technique that works well, even for very young children. Simply take a pencil and scribble on a piece of paper until a small area is covered with the graphite from the pencil lead. Have your child rub his or her finger around in the graphite until it is covered with gray. Then, have your child carefully place their finger on the sticky side of a piece of scotch tape and carefully lift their finger off of the tape. A clear fingerprint should be visible. Place the tape face-down on another piece of paper to preserve the fingerprint.


Your child can then inspect the fingerprint under a magnifying glass, or just with their naked eye. If you go to the wiki website I mentioned, your child can decipher whether they think their fingerprint is a whorl, a loop, or an arch. It is fun to have them trace their hand, fingerprint each finger and thumb, and tape their fingerprints to the appropriate fingers. Your child’s fingerprints would be a great addition to their science notebook! I’ve found that their notebooks are great keepsakes of their drawings and observations at different ages. The kids had a lot of fun with this project and could do it unassisted once I showed them what to do.
For the Valentines, have your children put two fingerprints or thumbprints together in the shape of a heart. Of course, they will also want to make fish, bugs, and who knows what else? I gave my kids some ideas to get them started and they went from there! (It’s fun to add details with markers.) Have fun!
