Tag: holiday’
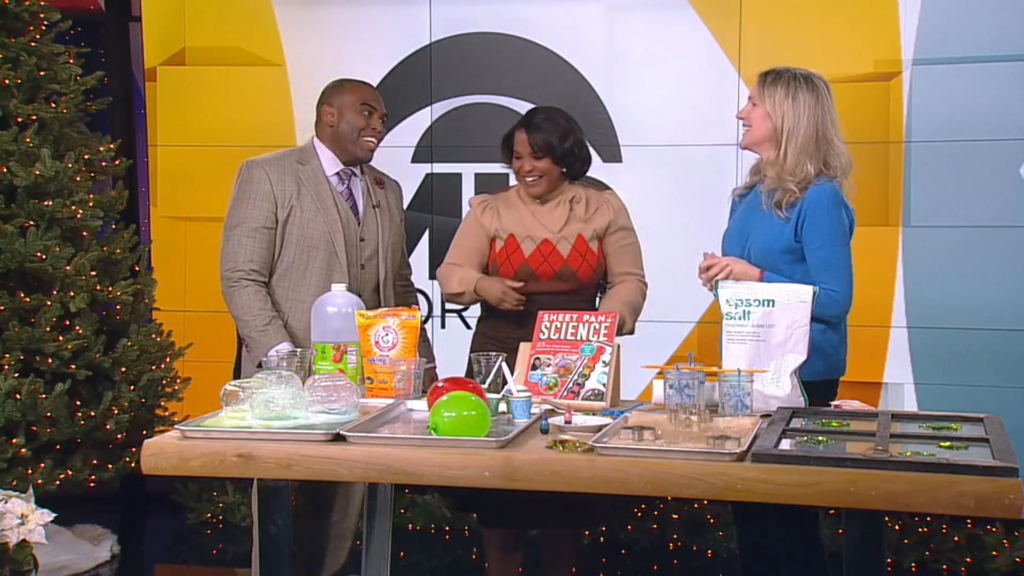
Three DIY Home Science Experiments for the Holidays
- by KitchenPantryScientist
It’s fun to bring a little science into the holidays! Here are three fun projects from my new book Sheet Pan Science. Click here to watch the segment and learn to make Ice Globe Volcanoes, Epsom Salt Crystal Ornaments and Gelatin Window Stickies.
For more detailed instructions, more science and more sheet pan science, click here to order the book ($19.99) from Amazon, here to order from other online retailers or grab a copy at your favorite brick and morter bookstore!
Homemade Holiday Light-Up Ornaments and Crystal Snowflakes
- by KitchenPantryScientist
Use science to make your holidays shine! Here are a few fun ornaments adapted from projects in my book “STEAM Lab for Kids.” Basic instructions can be found below. Buy your own copy of “STEAM Lab for Kids” anywhere books are sold to learn more about the “Science Behind the Fun!” Happy Holidays!
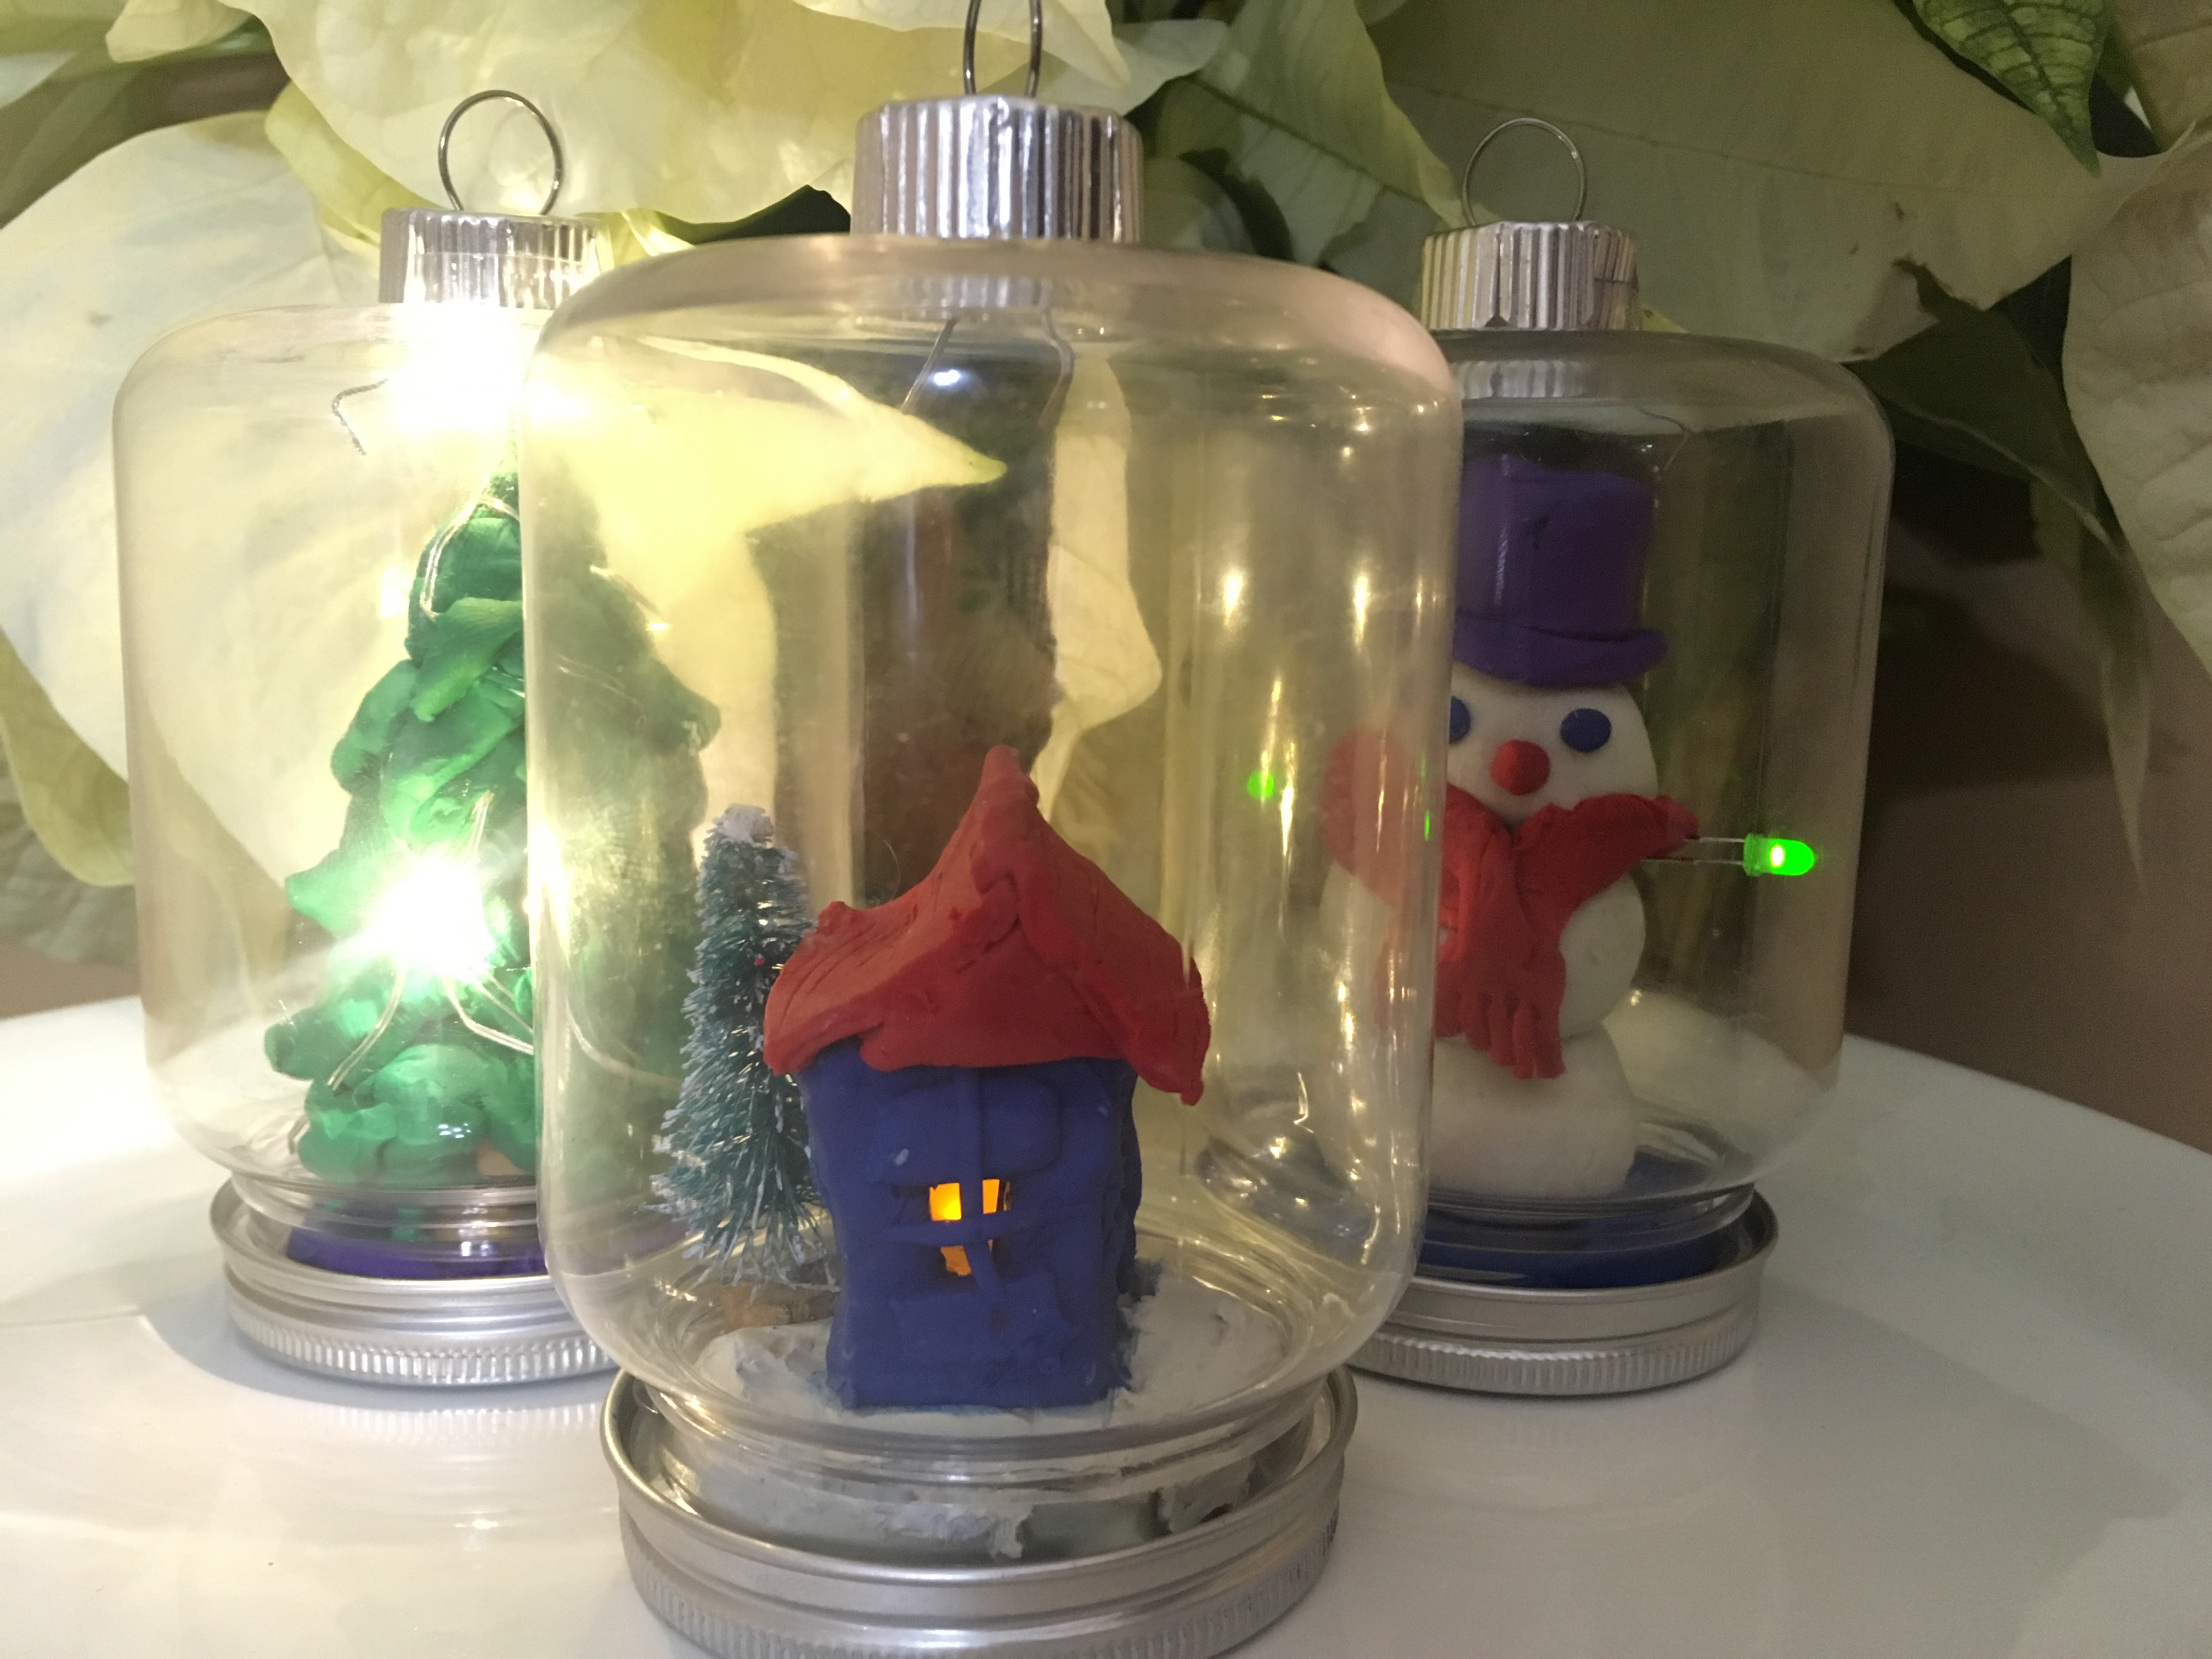
LED ornaments (or jar globes) made using circuit from Light-Up Creatures (STEAM Lab for Kids (Quarry Books 2018)
Epsom salt crystals from STEAM Lab for Kids (Quarry Books 2018)
LED Ornaments and Jar Globes:
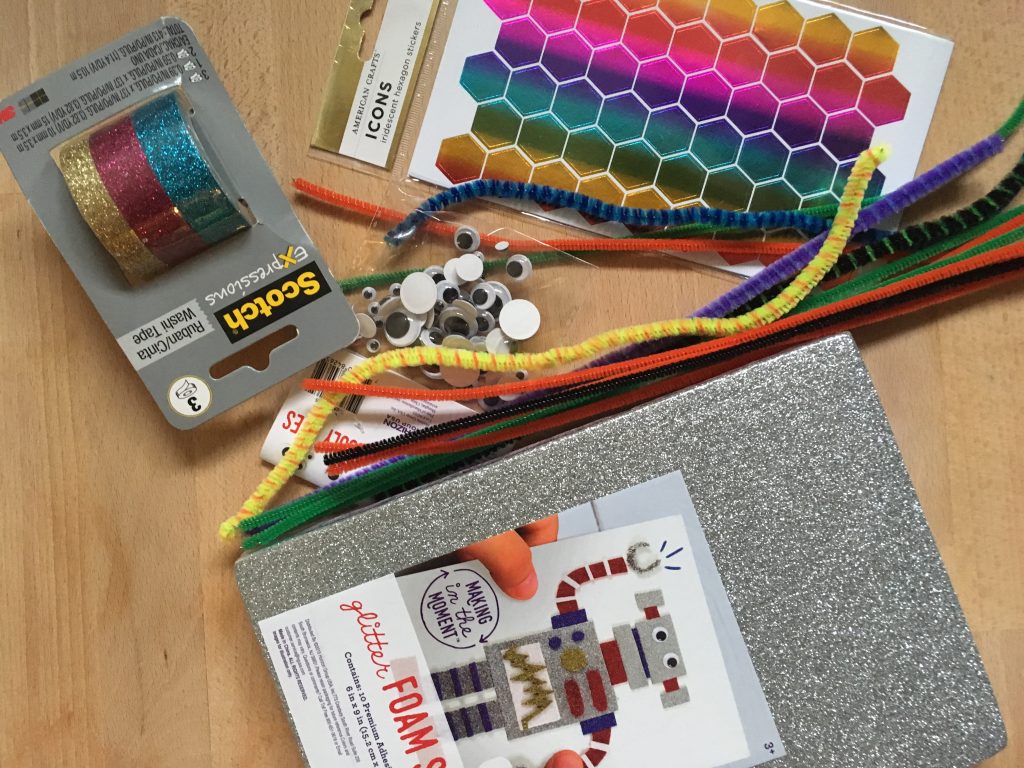
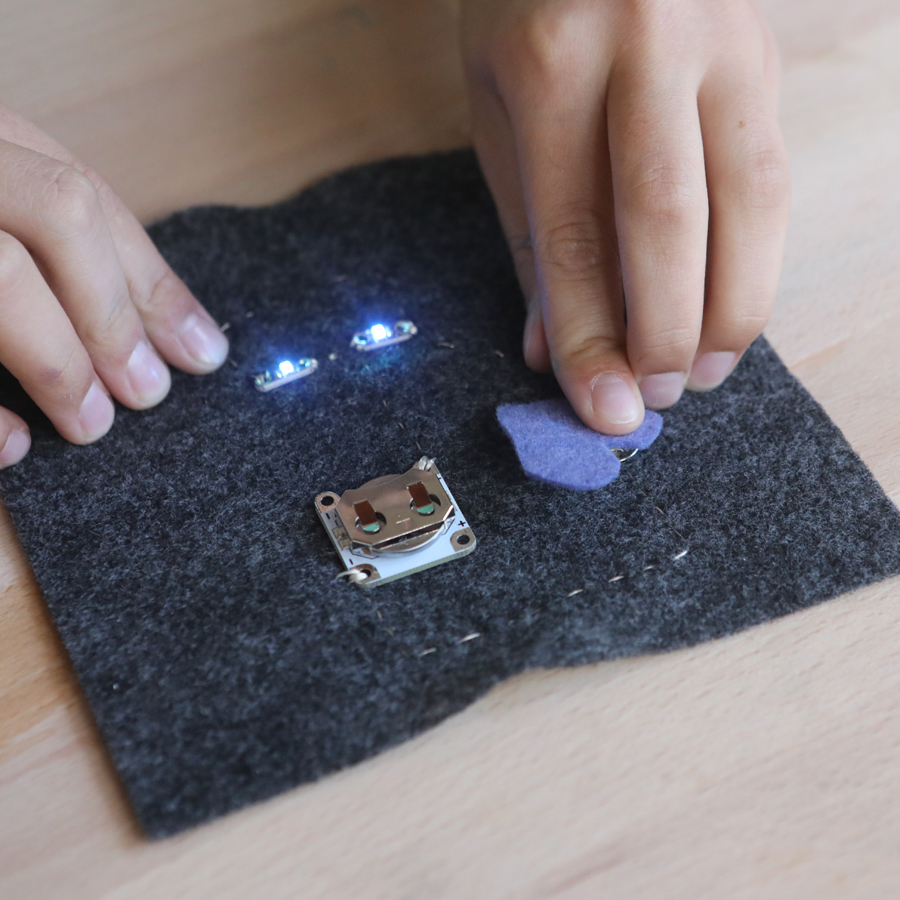
To make LED ornaments, buy plastic jars or ornaments with removable bases. Use sculpting clay (the kind that won’t harden) to design a scene and add LEDs connected to a coin-cell battery to light your creation. LEDs can be ordered online. See images below.
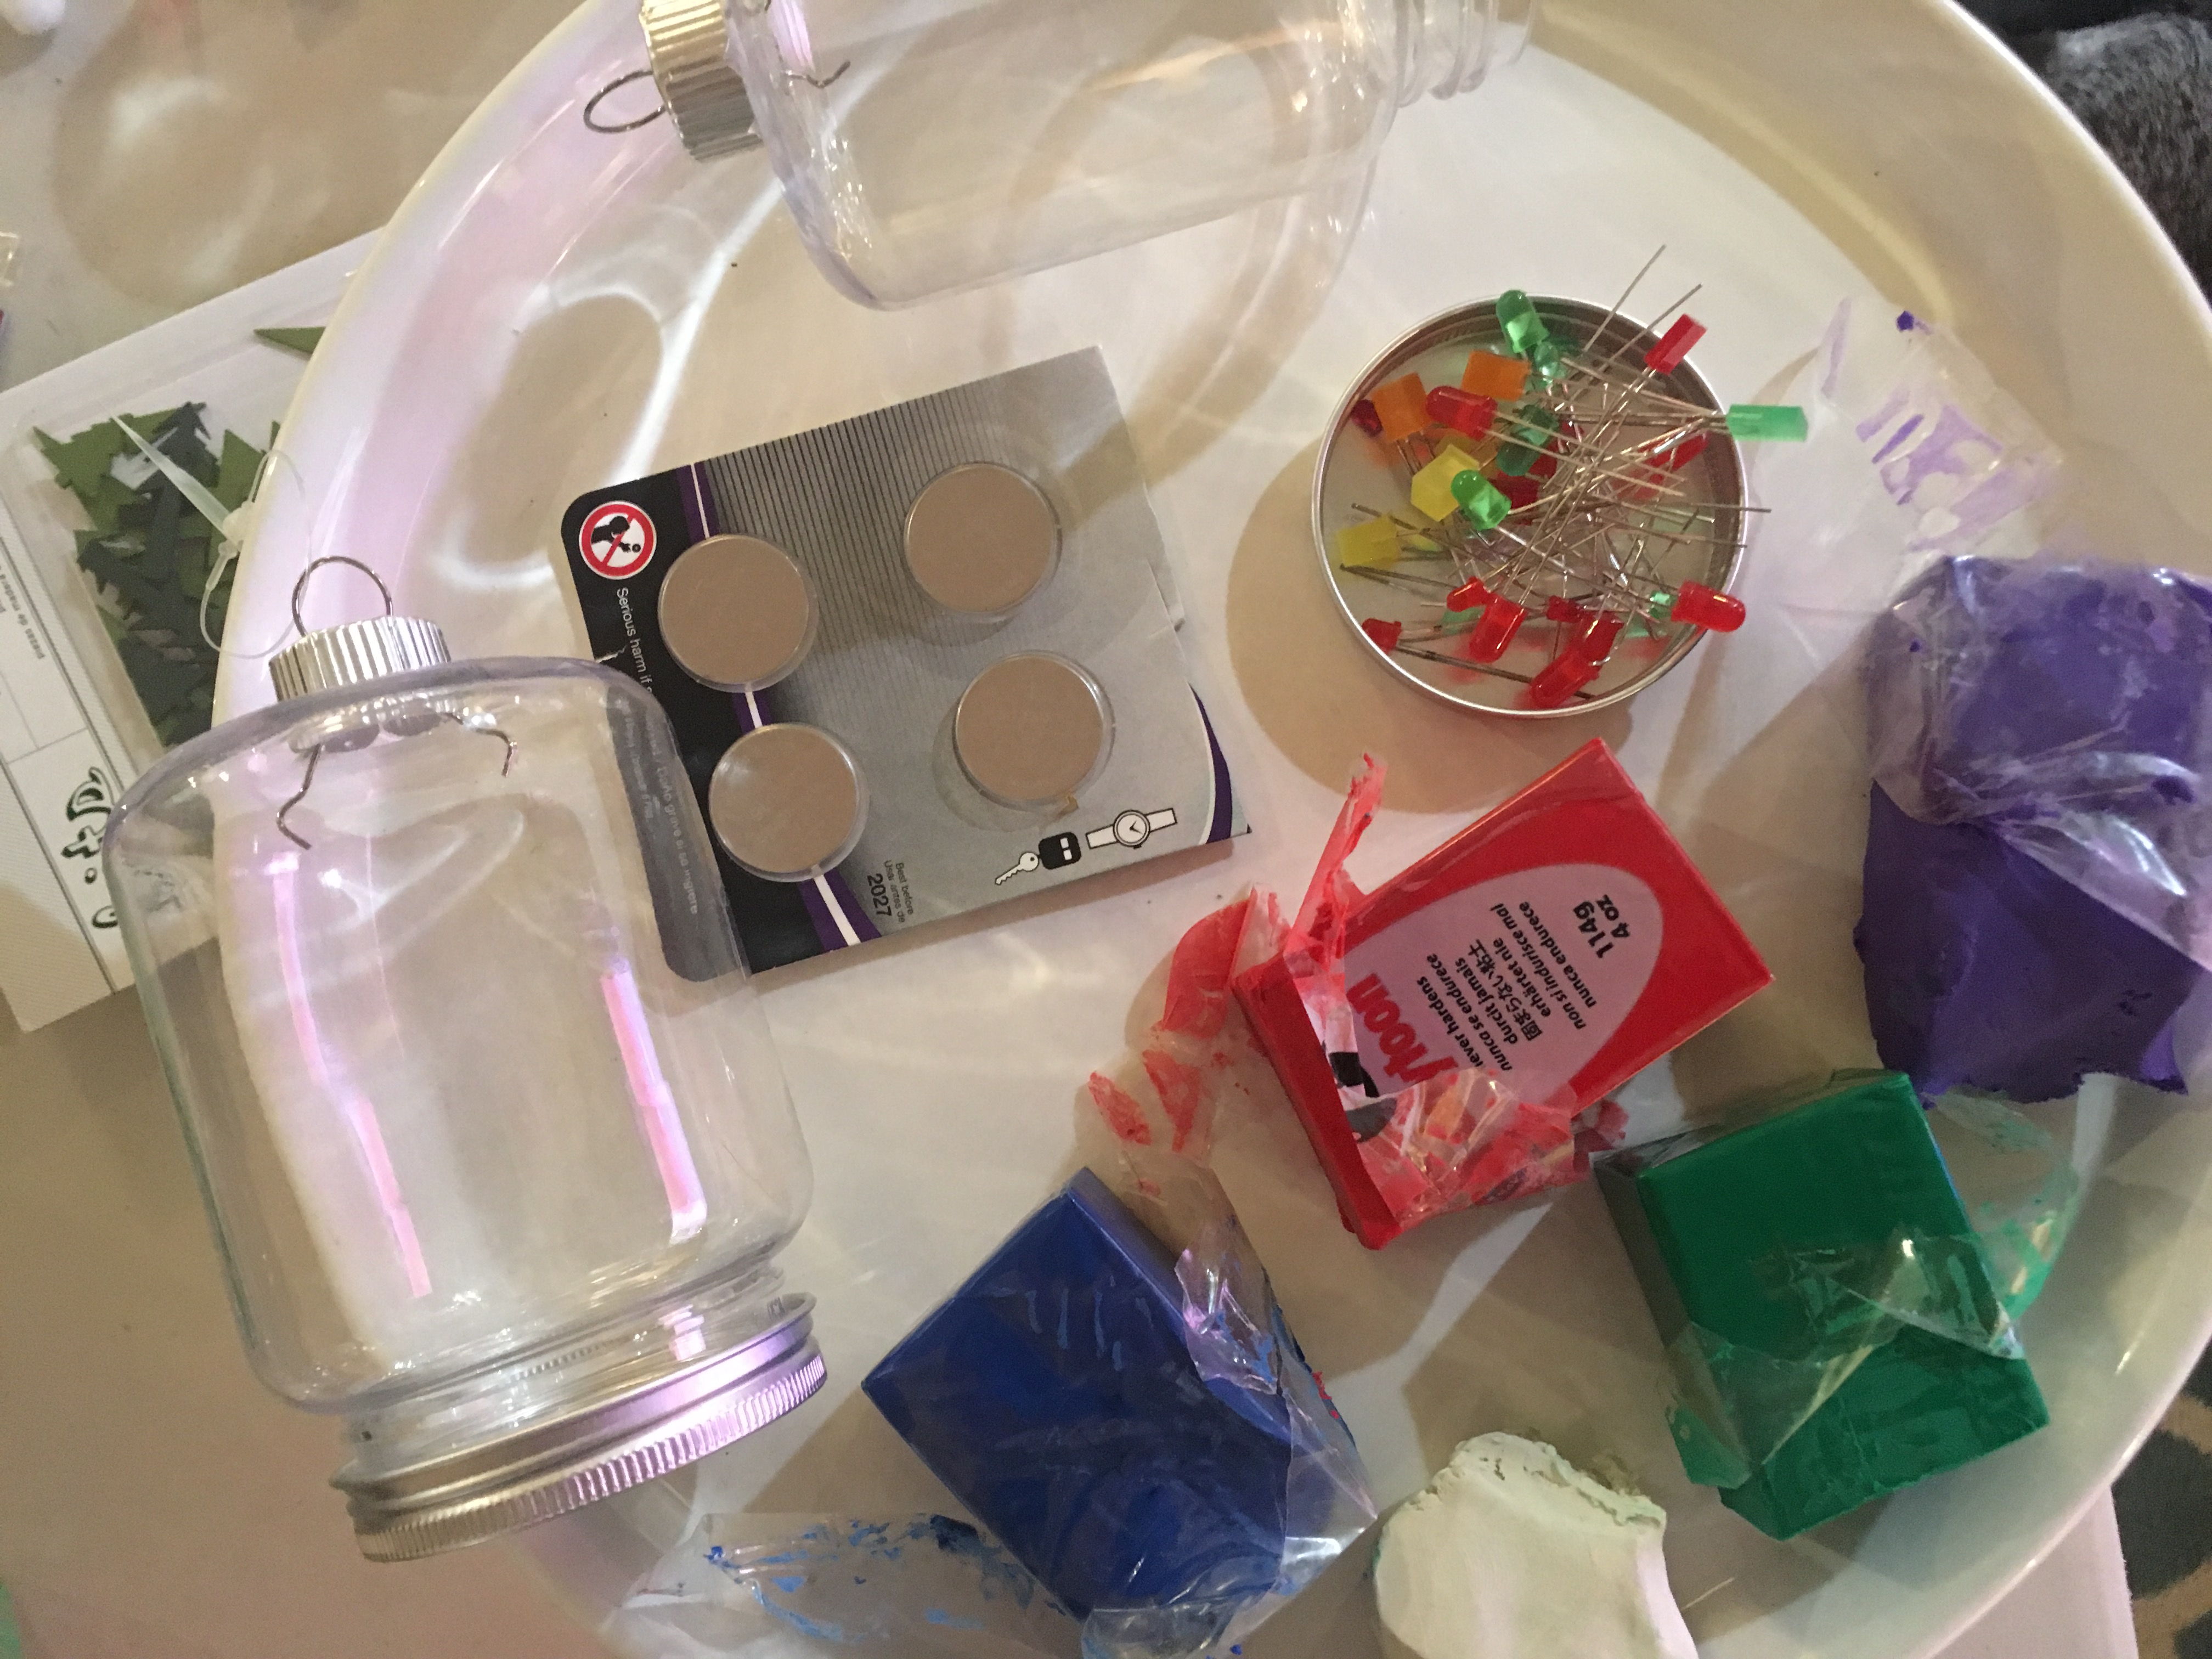
supplies for building LED-lit ornaments
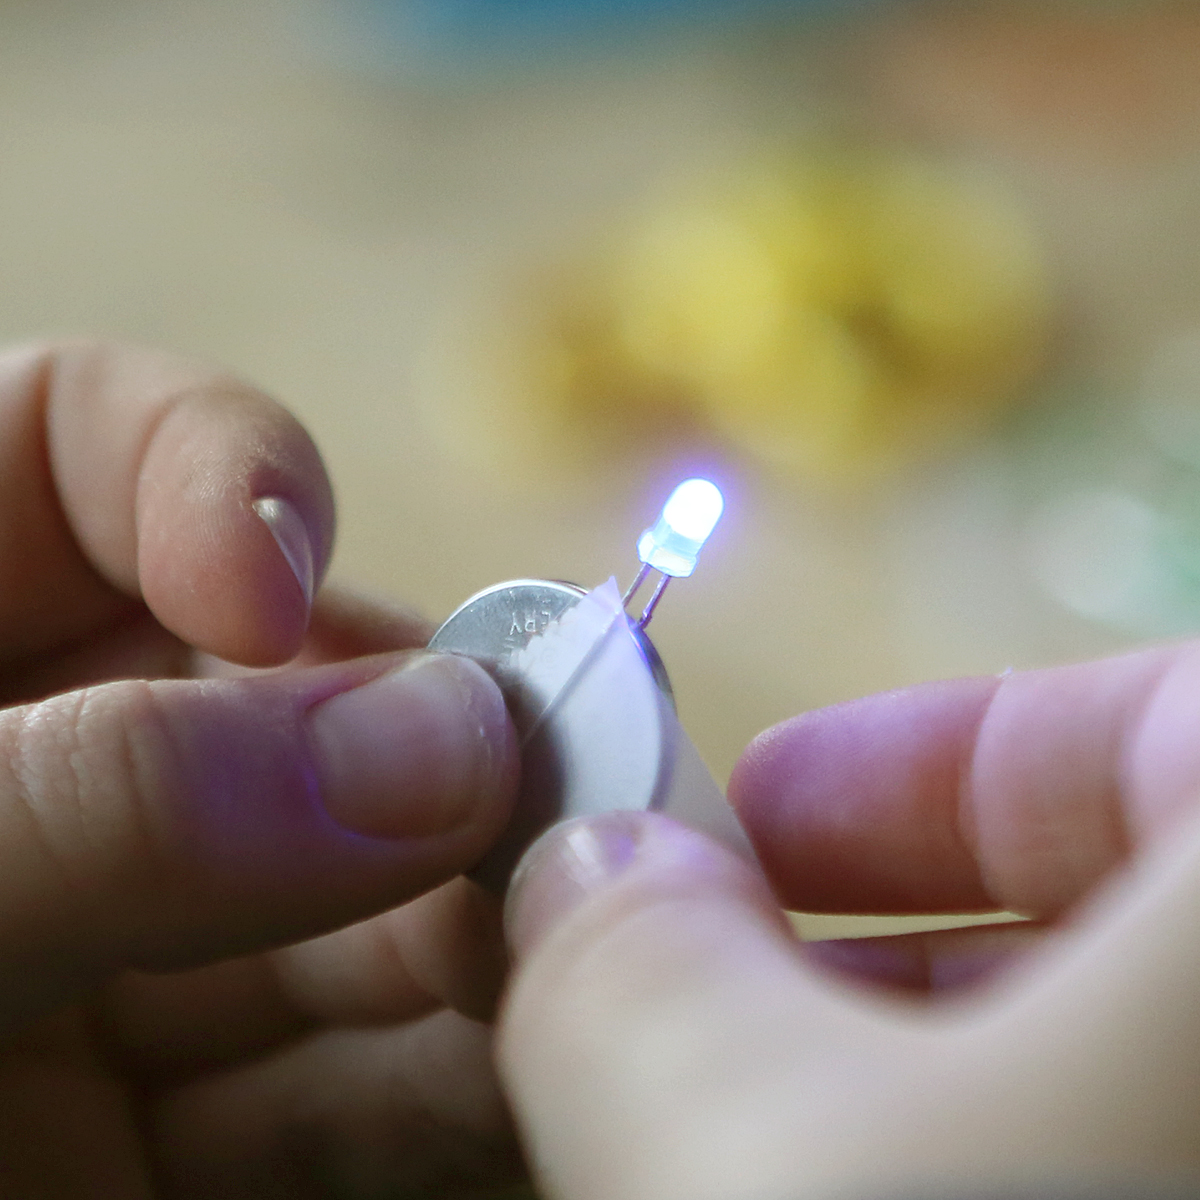
Connect the legs of the LED so that each leg touches a different side of the battery to complete the circuit. If it doesn’t light, try switching the legs to the opposite sides. (Image from STEAM Lab for Kids-Quarry Books 2018)
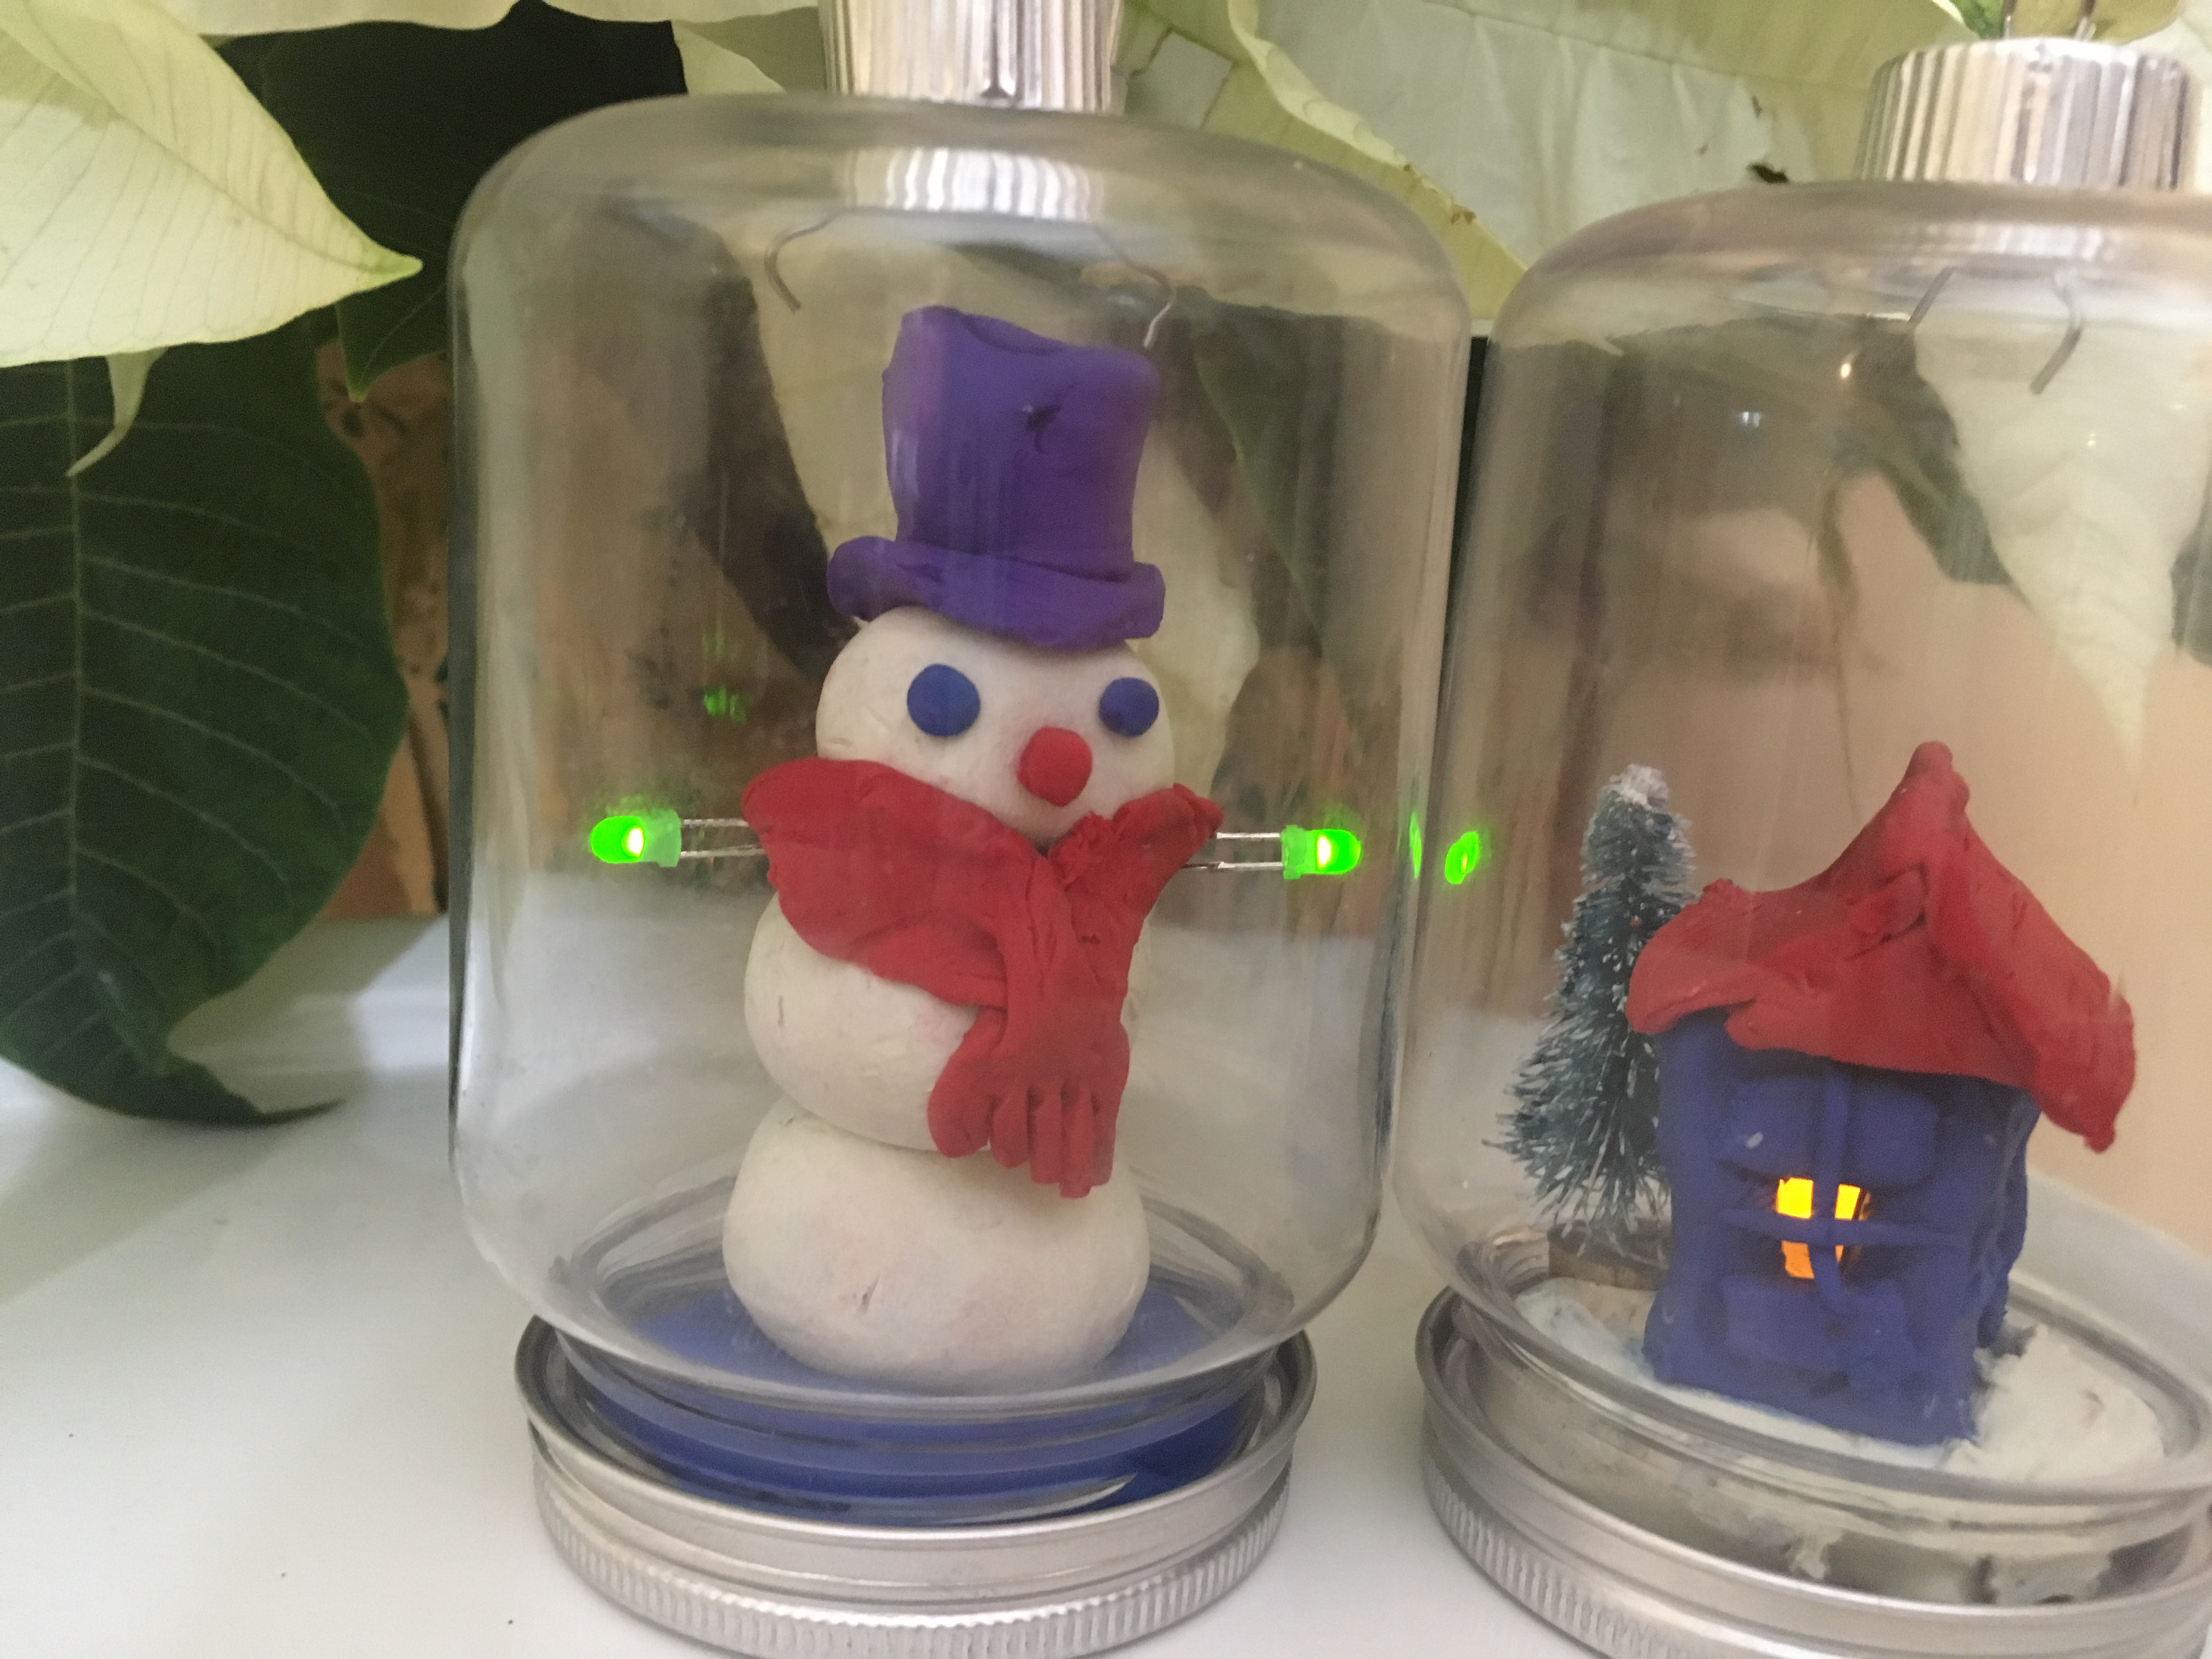
Hide the battery in the clay, keeping the connection tight so the LEDs stay lit. You can have more than one LED on a single battery. Put the bottom back on the jar and Voila!
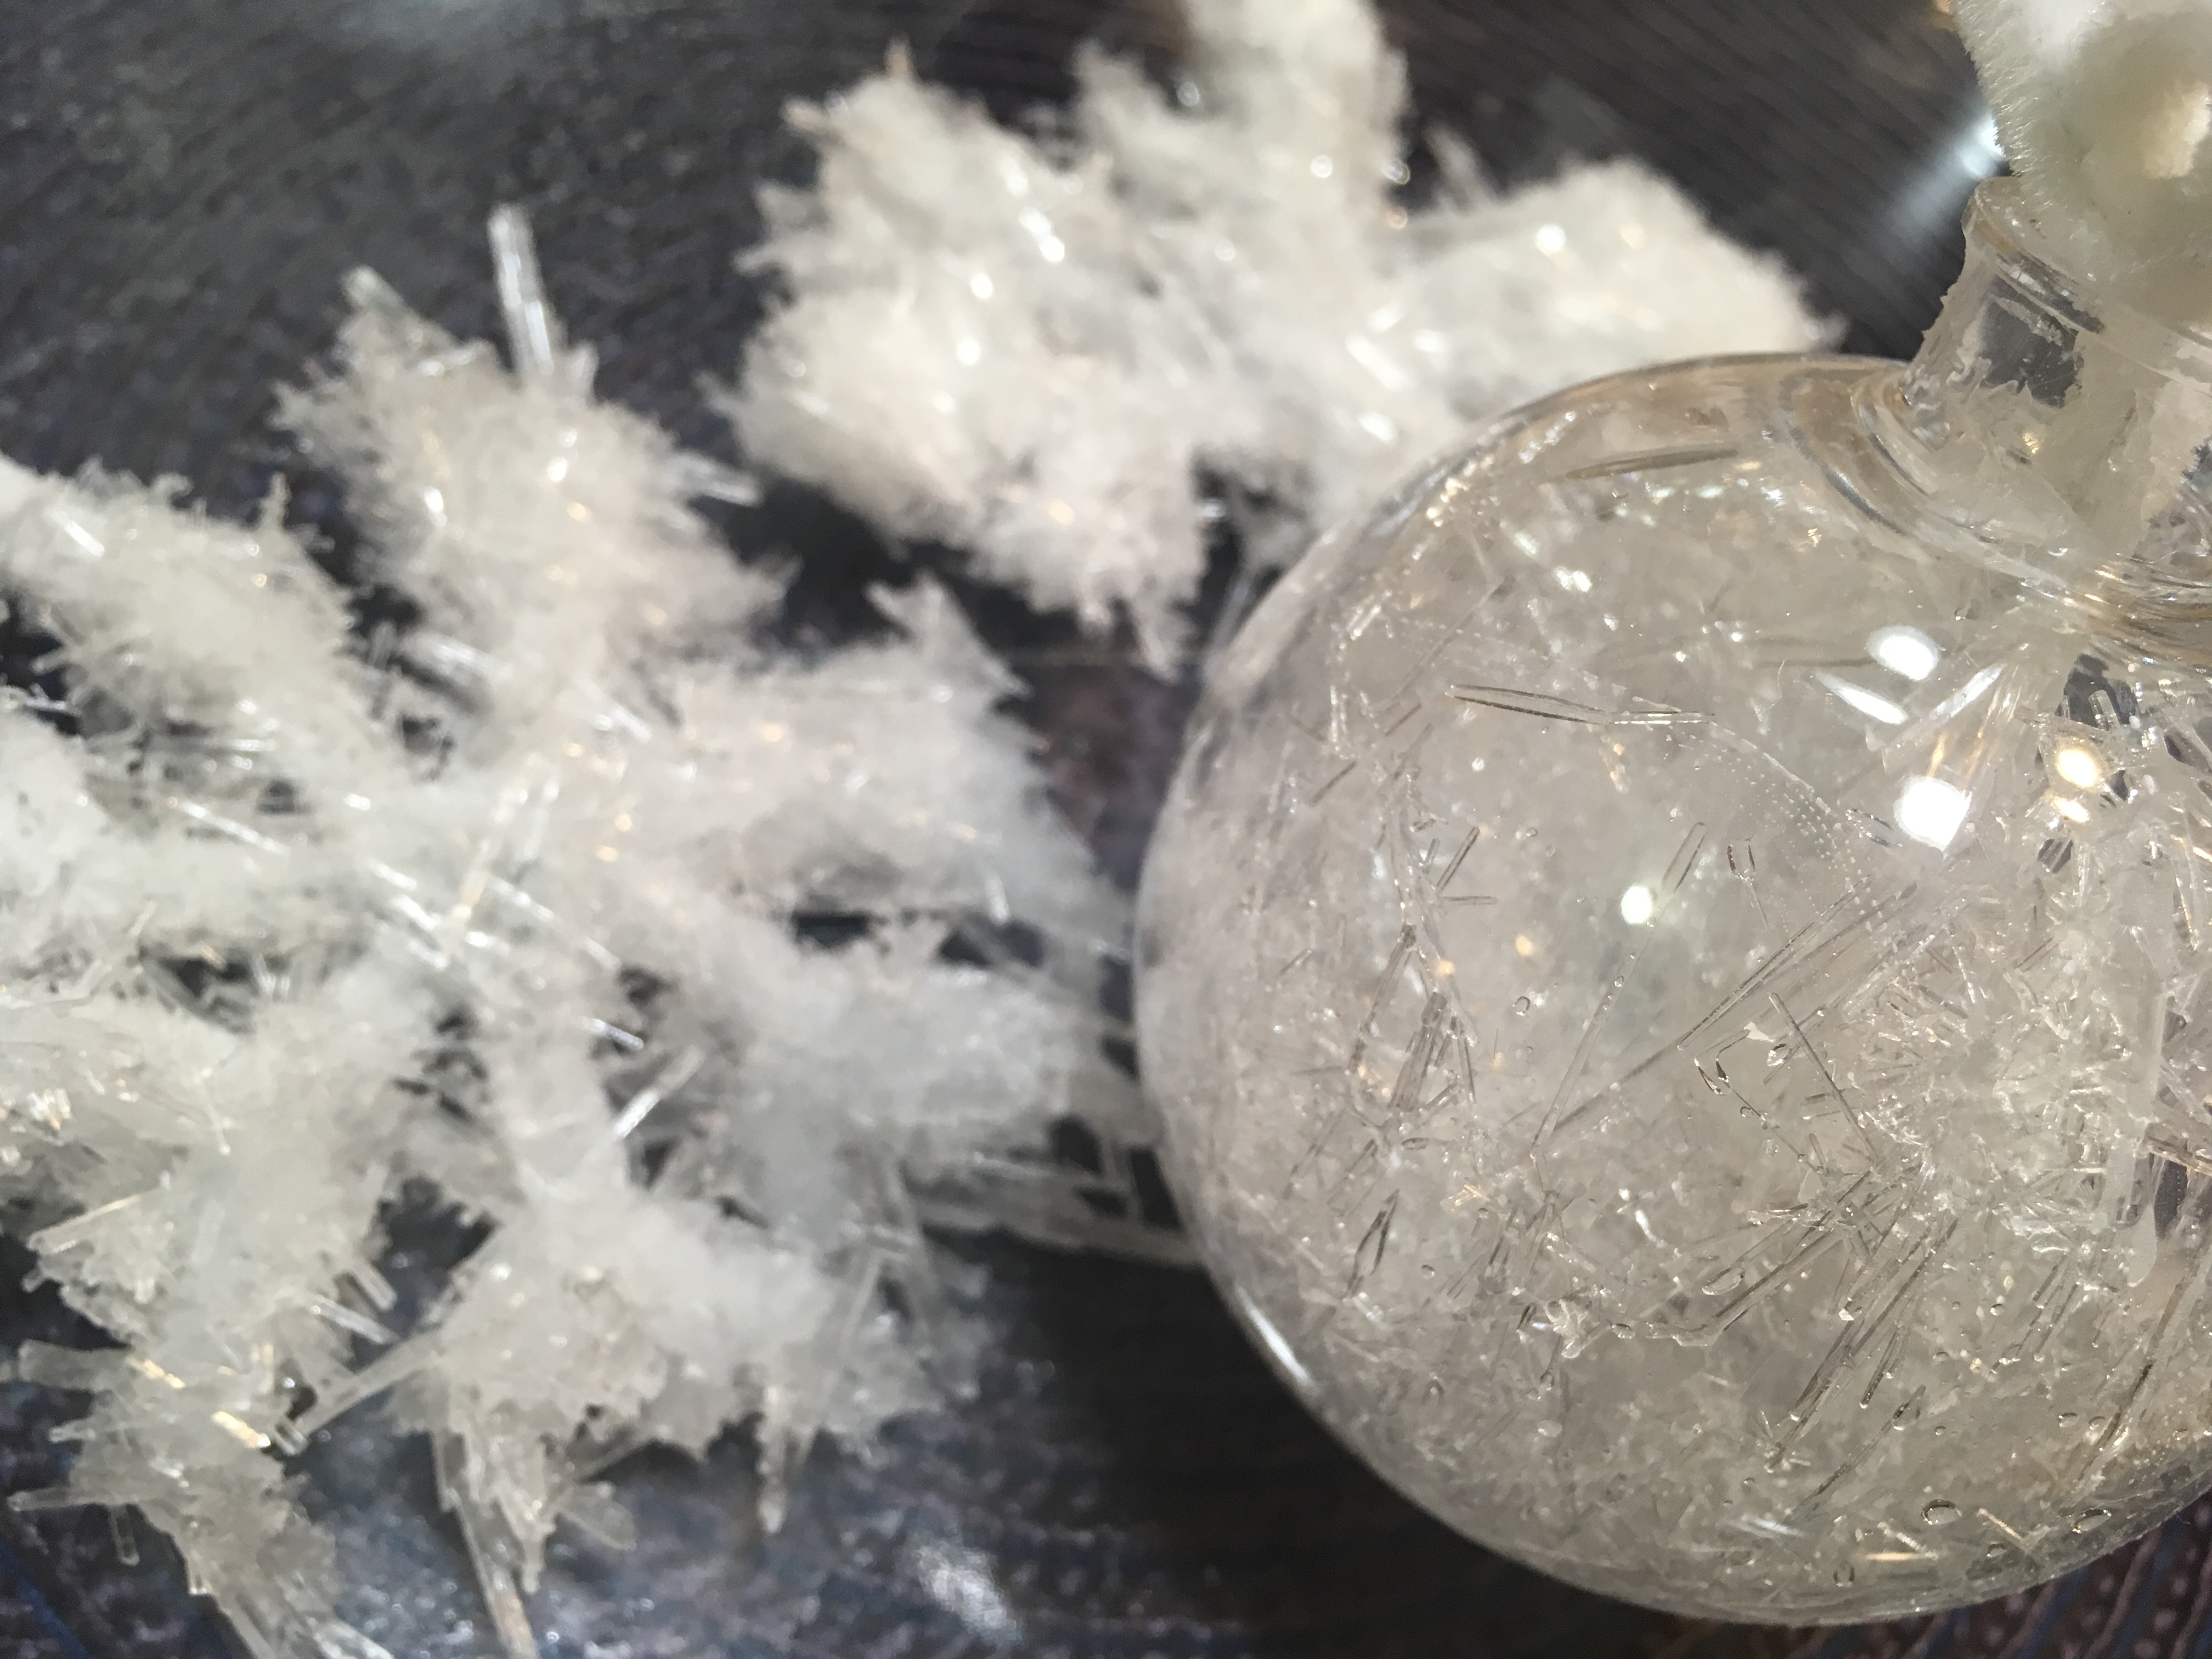
Epsom Salt Crystal Ornaments:
(Warning: Hot liquids require adult supervision.) To make the Epsom Salt crystals, dissolve 3 cups of Epsom salts in 2 cups of water by heating and stirring until no more crystals are visible. This creates a supersaturated solution. Allow the solution to cool slightly. Hang pipe cleaners formed into snowflakes in jars or hollow ornaments and pour the solution in. When long, needle-like crystals have formed, remove the pipe cleaners from the jars. You can leave them in the ornaments, and drain the liquid.

Hang pipe cleaners in supersaturated Epsom salt solution, or add them to ornaments and fill them with solution.
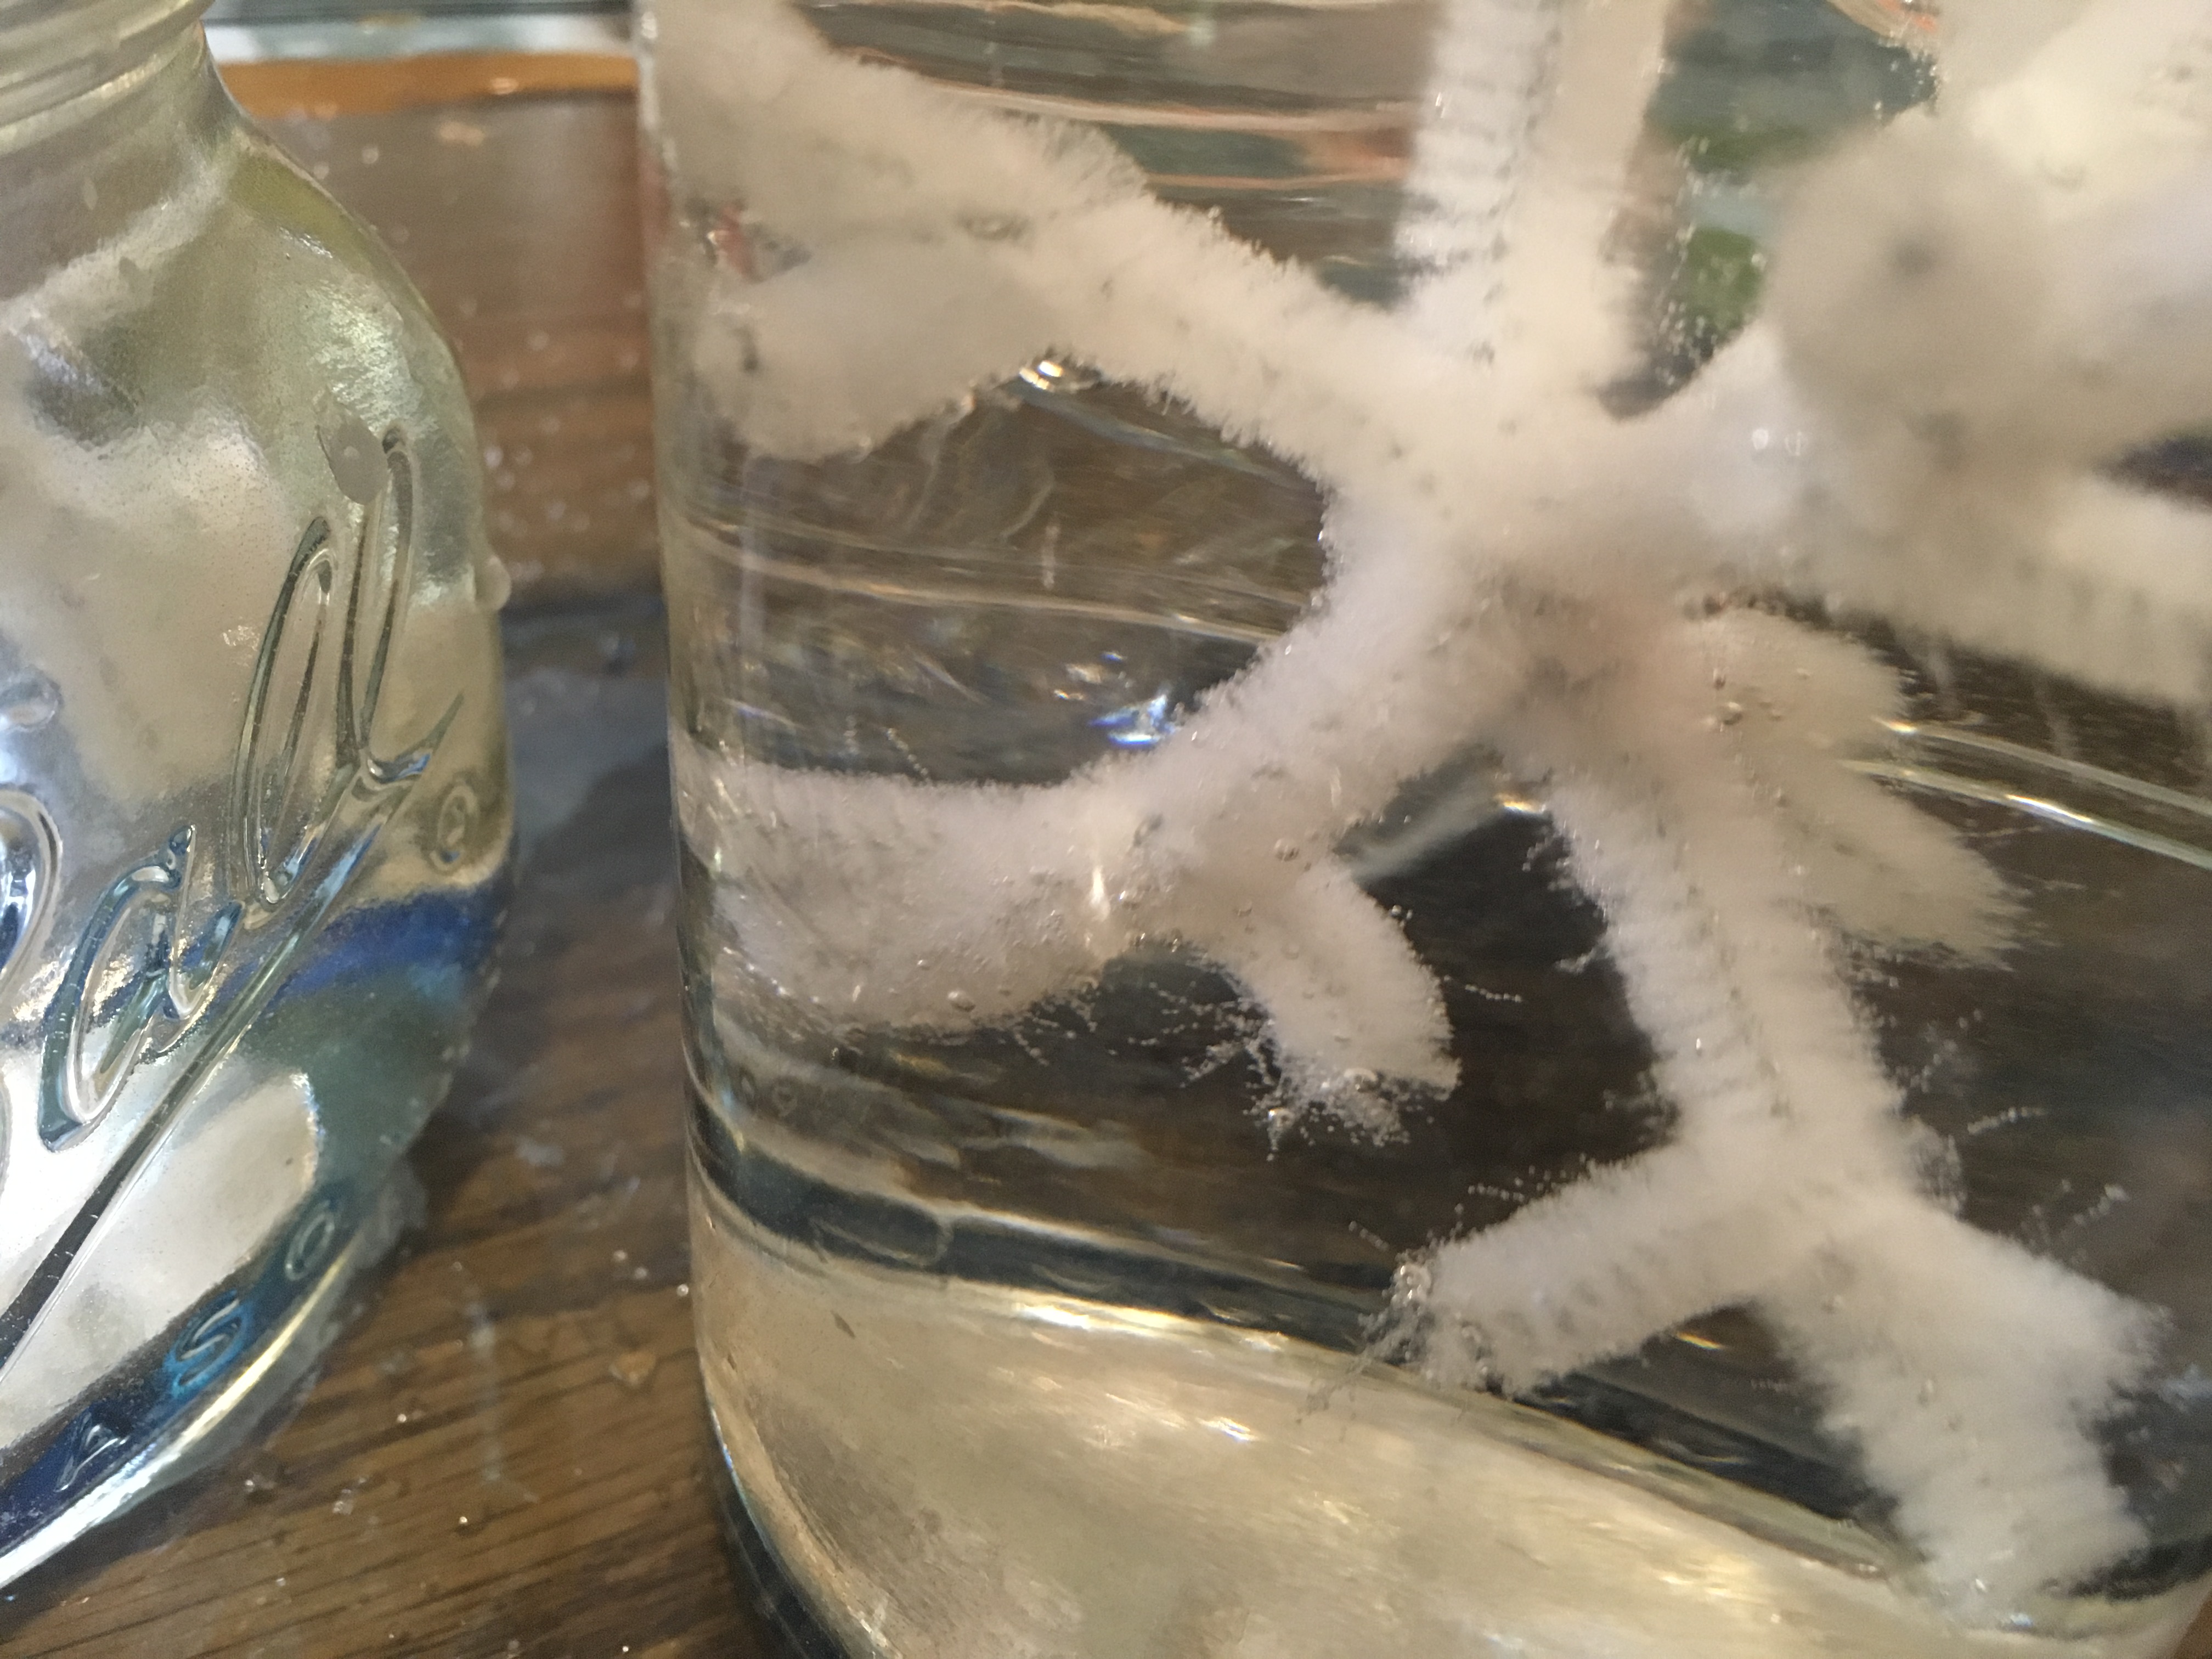
Wait for the crystals to grow. (4-12 hours.)
Remove the pipe cleaners from the solution. Knock off excess crystals.
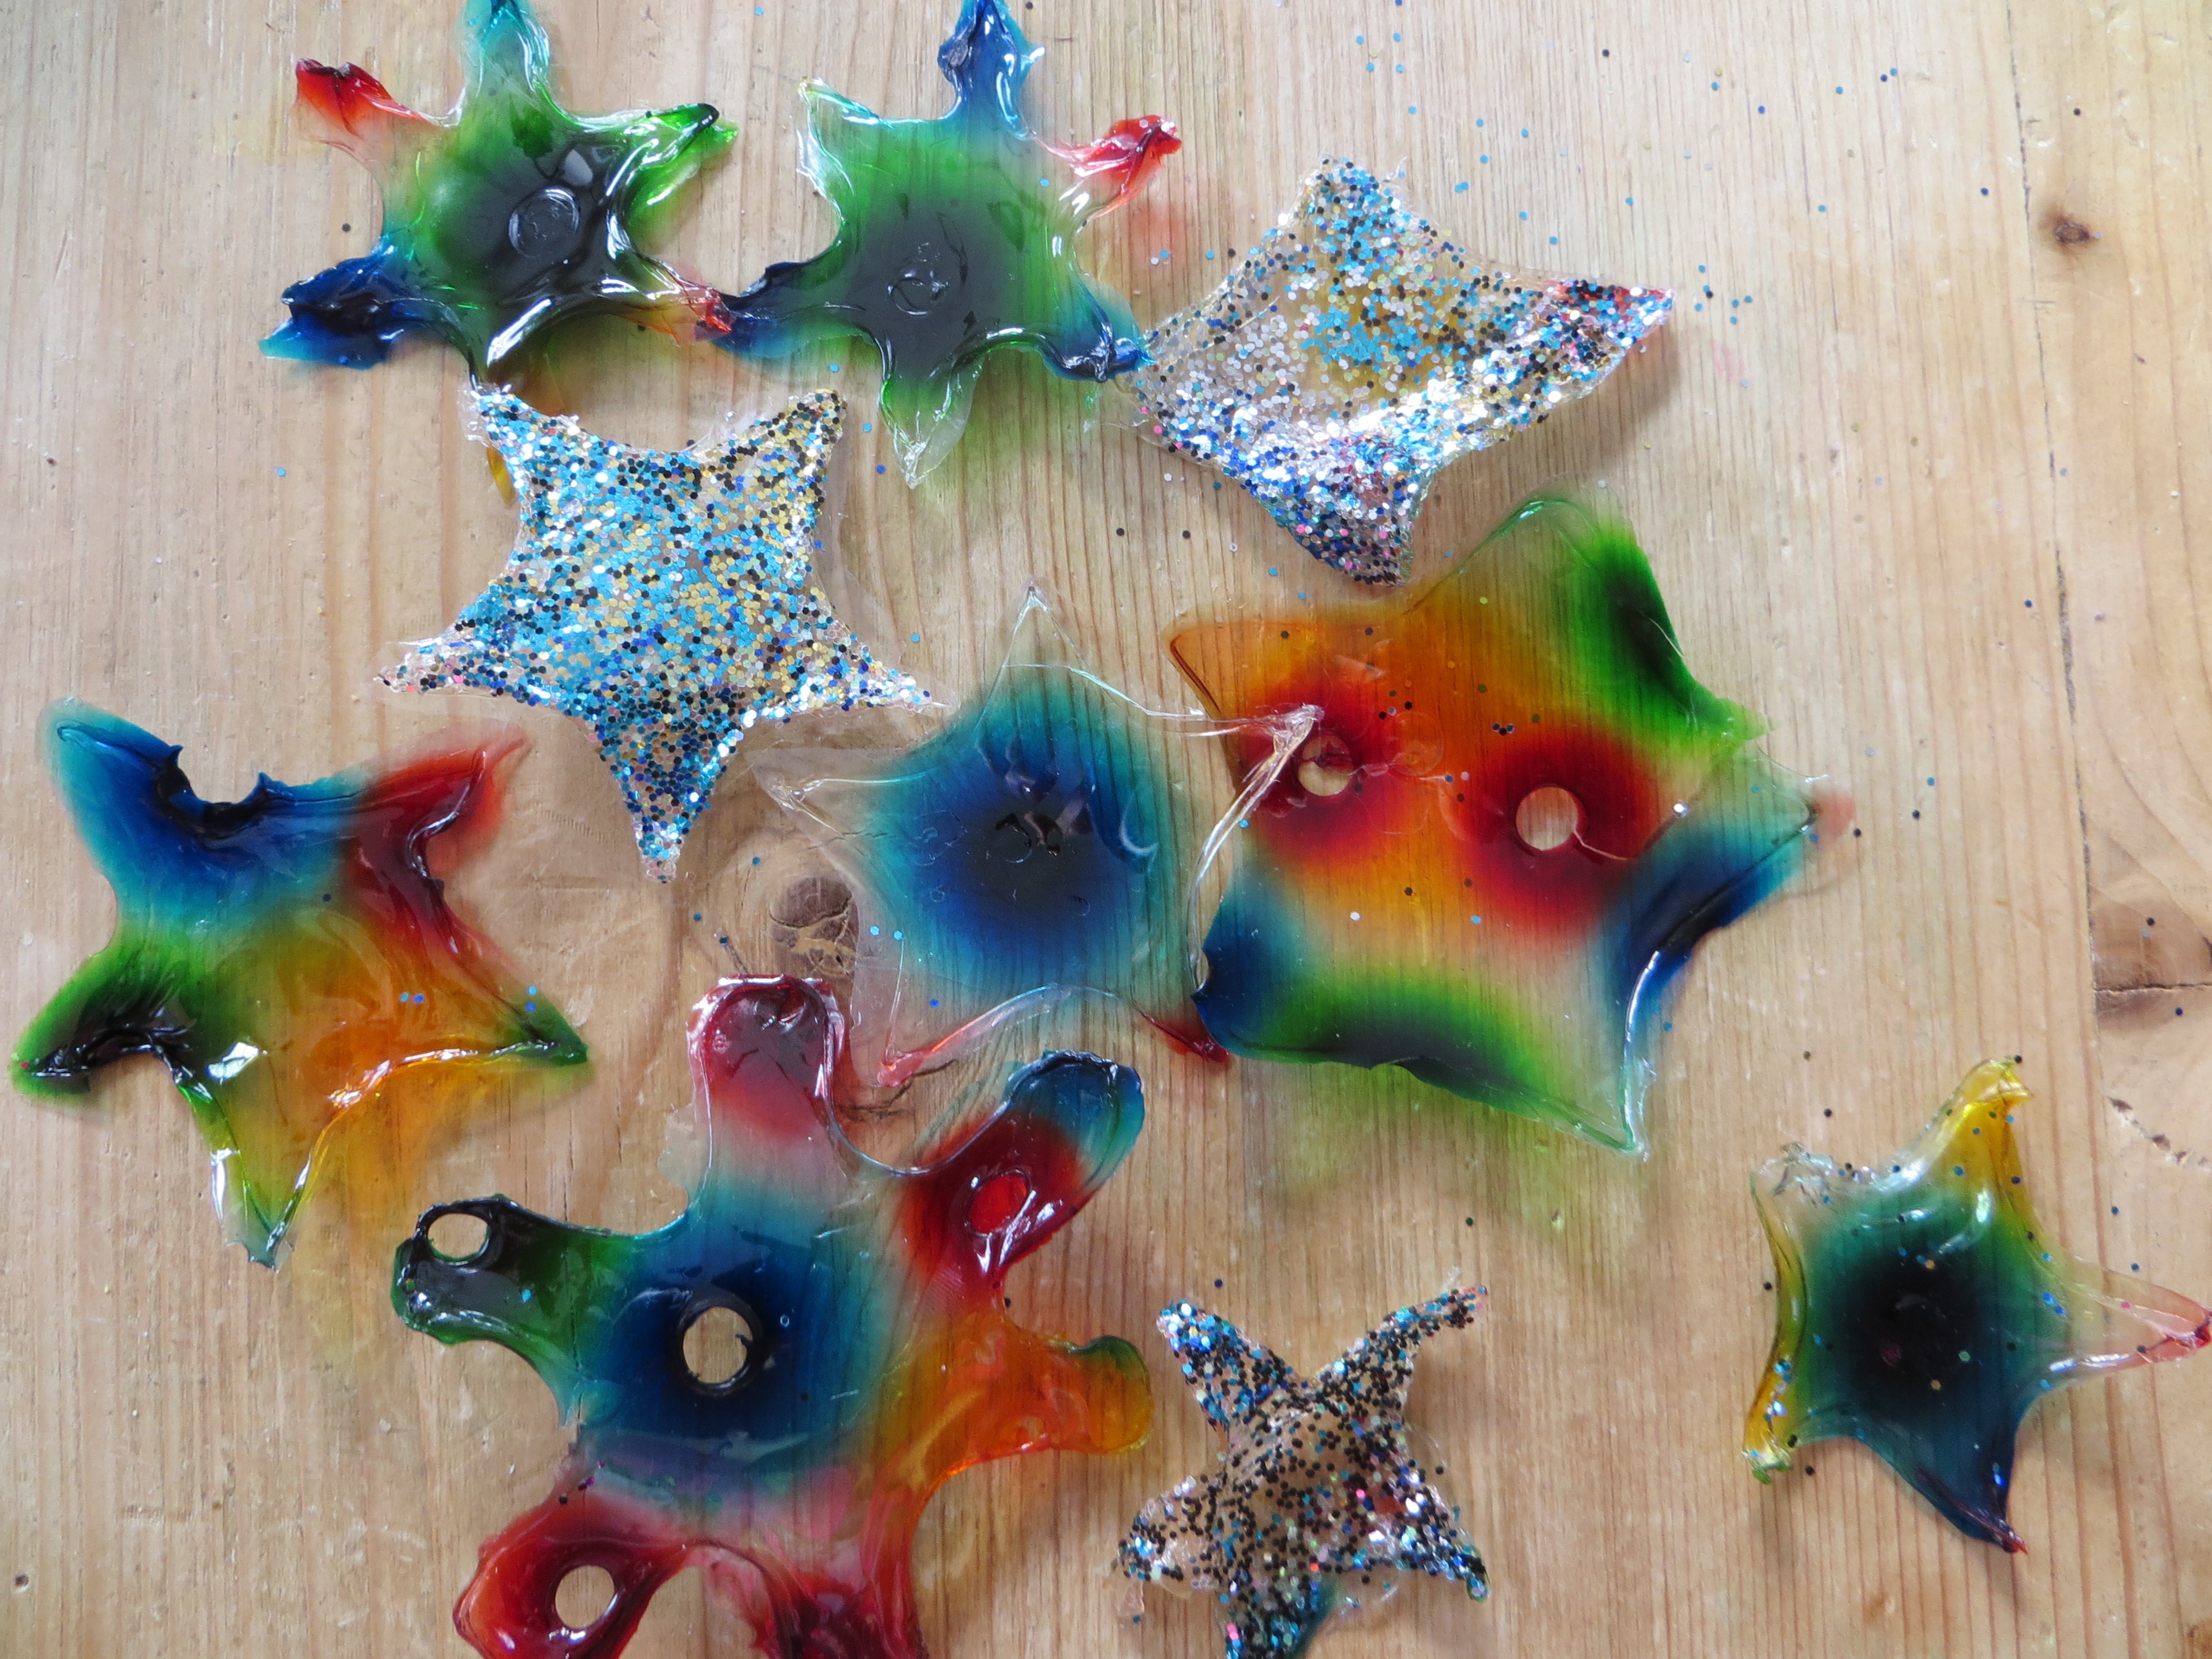
Think #STEAM! Homemade Holiday Window Stickies
- by KitchenPantryScientist
Gelatin is the substance that makes Jell-O jiggle. See what happens when food coloring molecules move, or DIFFUSE through Jell-O.
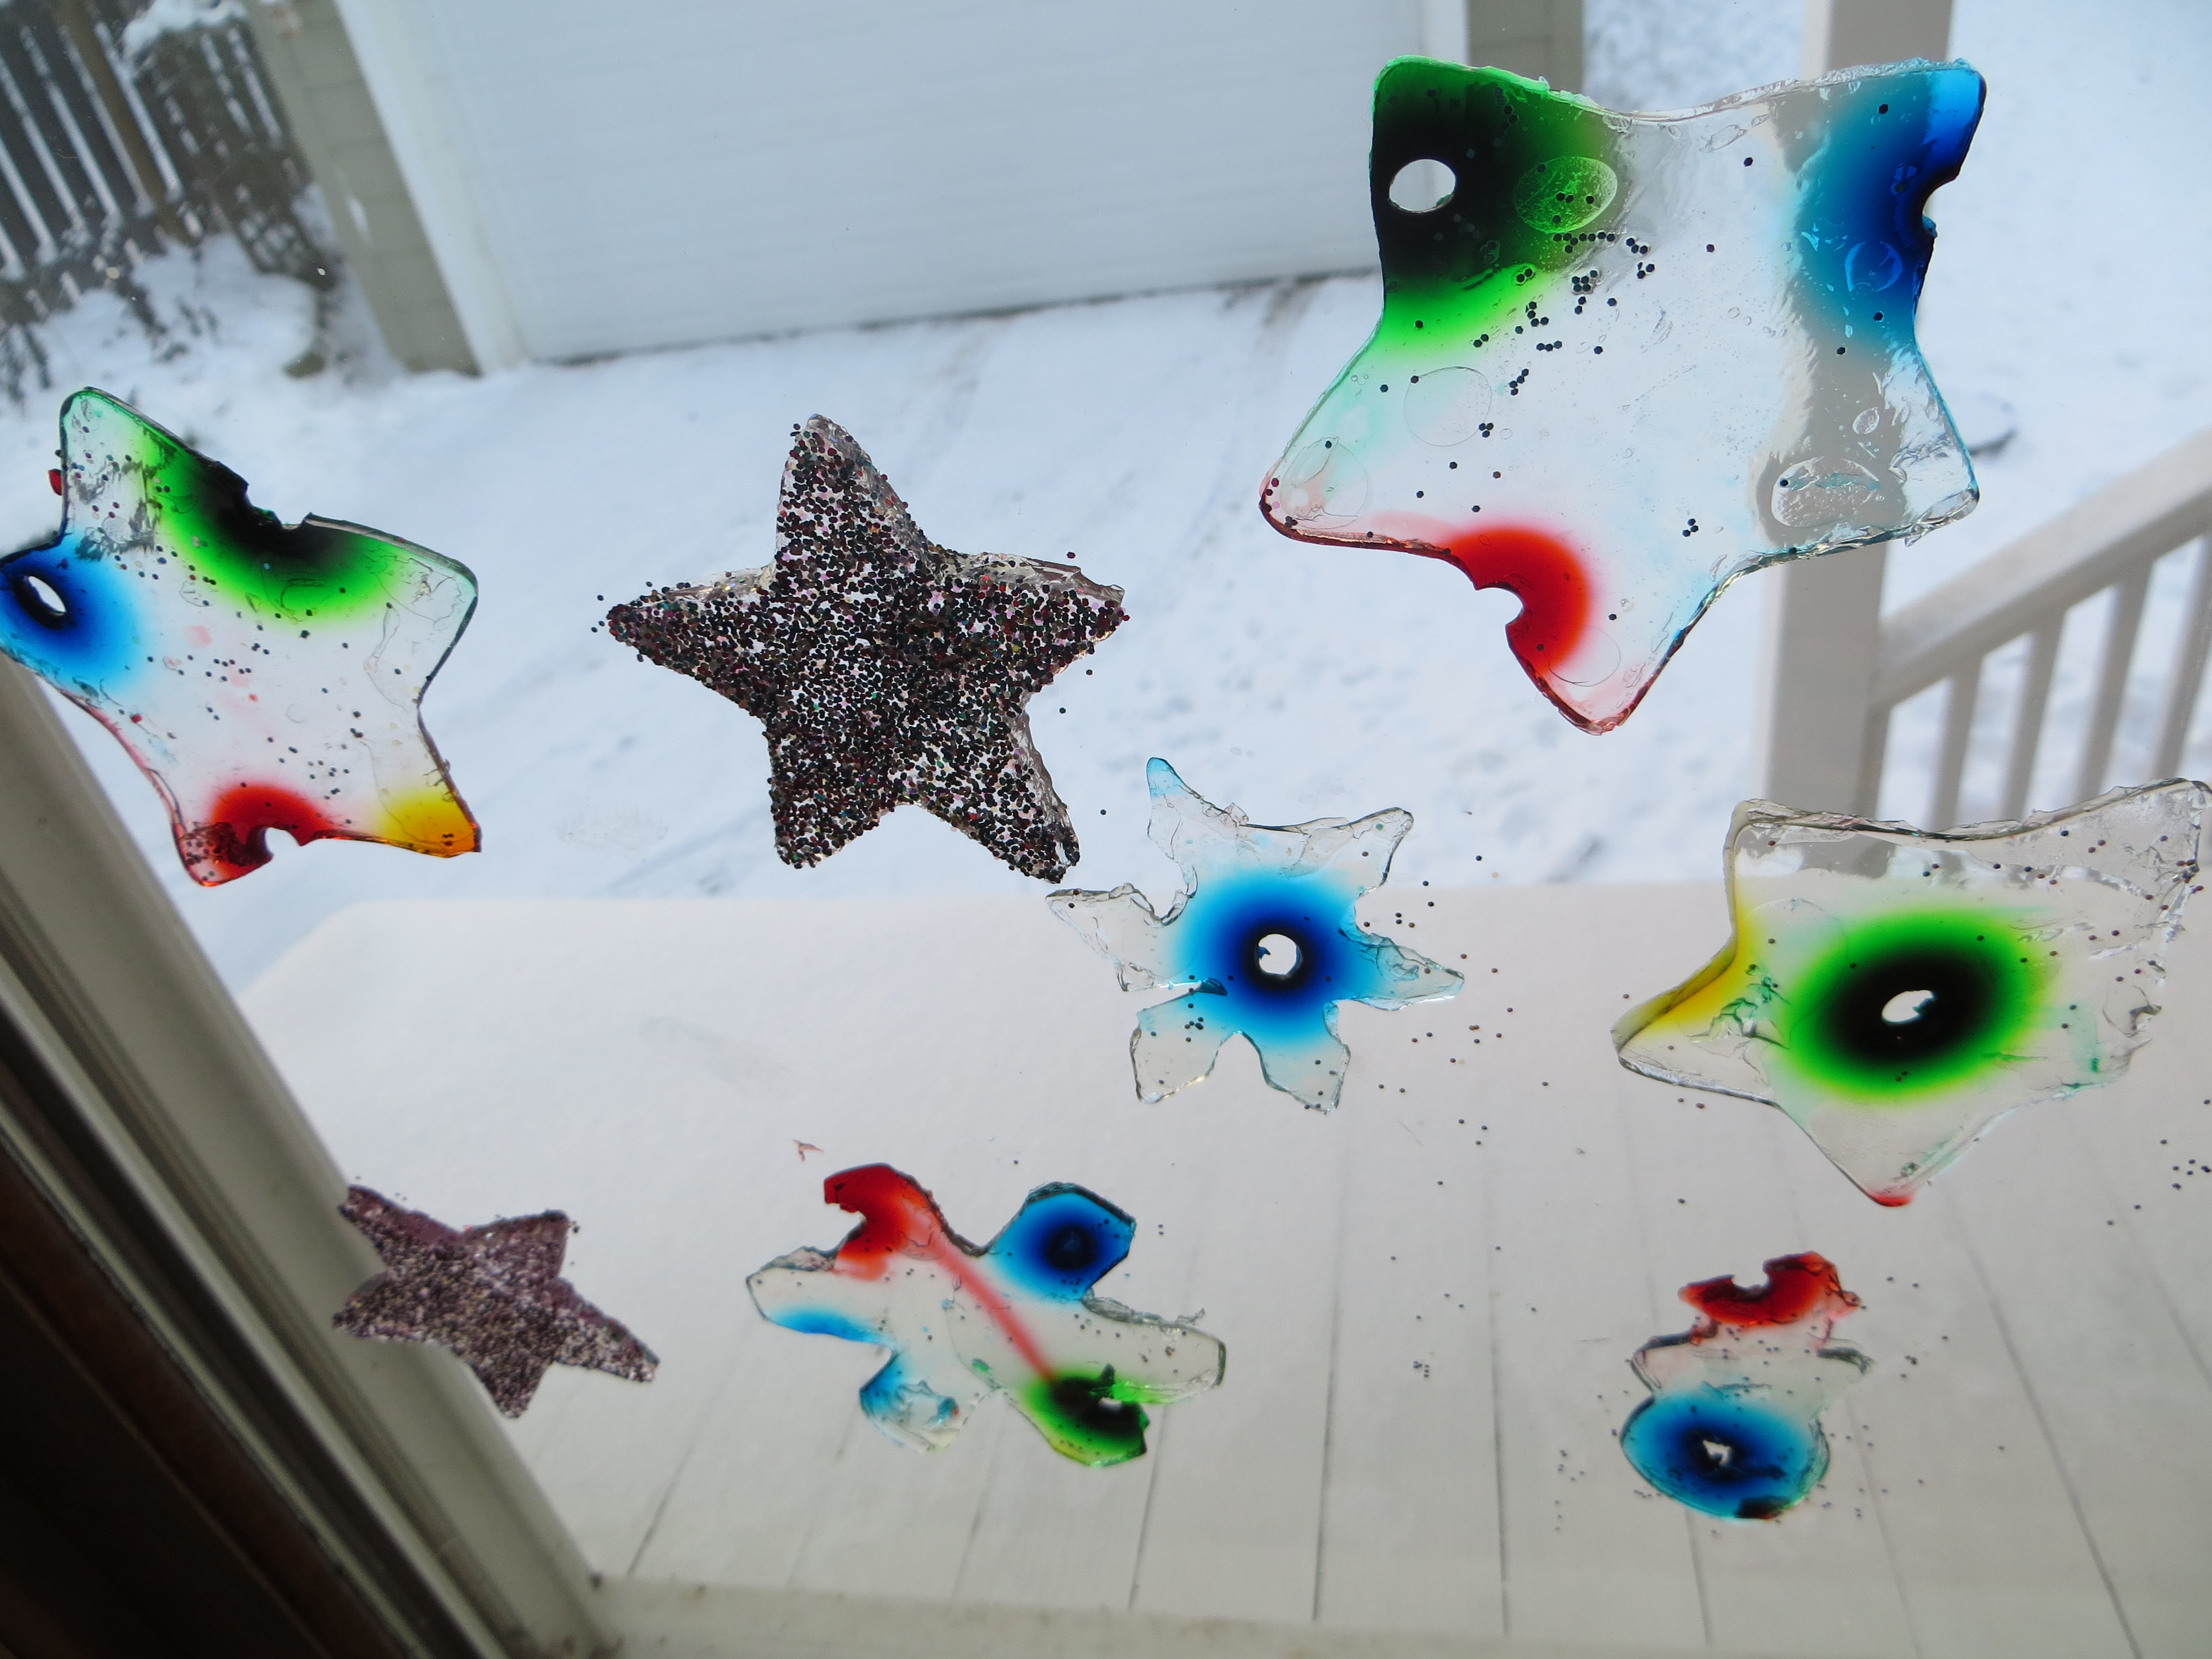
This creative science experiment that my kids and I invented lets you play with floatation physics by sprinkling glitter on melted gelatin, watch colorful dyes diffuse to create patterns and then use cookie cutters to punch out sticky window decorations. Water will evaporate from the gelatin, leaving you with paper-thin “stained glass” shapes.
You’ll need
-plain, unflavored gelatin from the grocery store or Target
-food coloring
–a drinking straw or toothpicks
-water
-a ruler
-glitter
*You can use the recipe below for two pans around 8×12 inches, or use large, rimmed cookie sheets for your gelatin. For a single pan, cut the recipe in half.
Step 1. Add 6 packs of plain, unflavored gelatin (1 oz or 28 gm) to 4 cups of boiling water. Stir well until all the gelatin has dissolved and remove bubbles with a spoon.
Step 2. Allow gelatin to cool to a kid-safe temperature. Pour the liquid gelatin into two large pans so it’s around 1-1.5 cm deep. It doesn’t have to be exact.
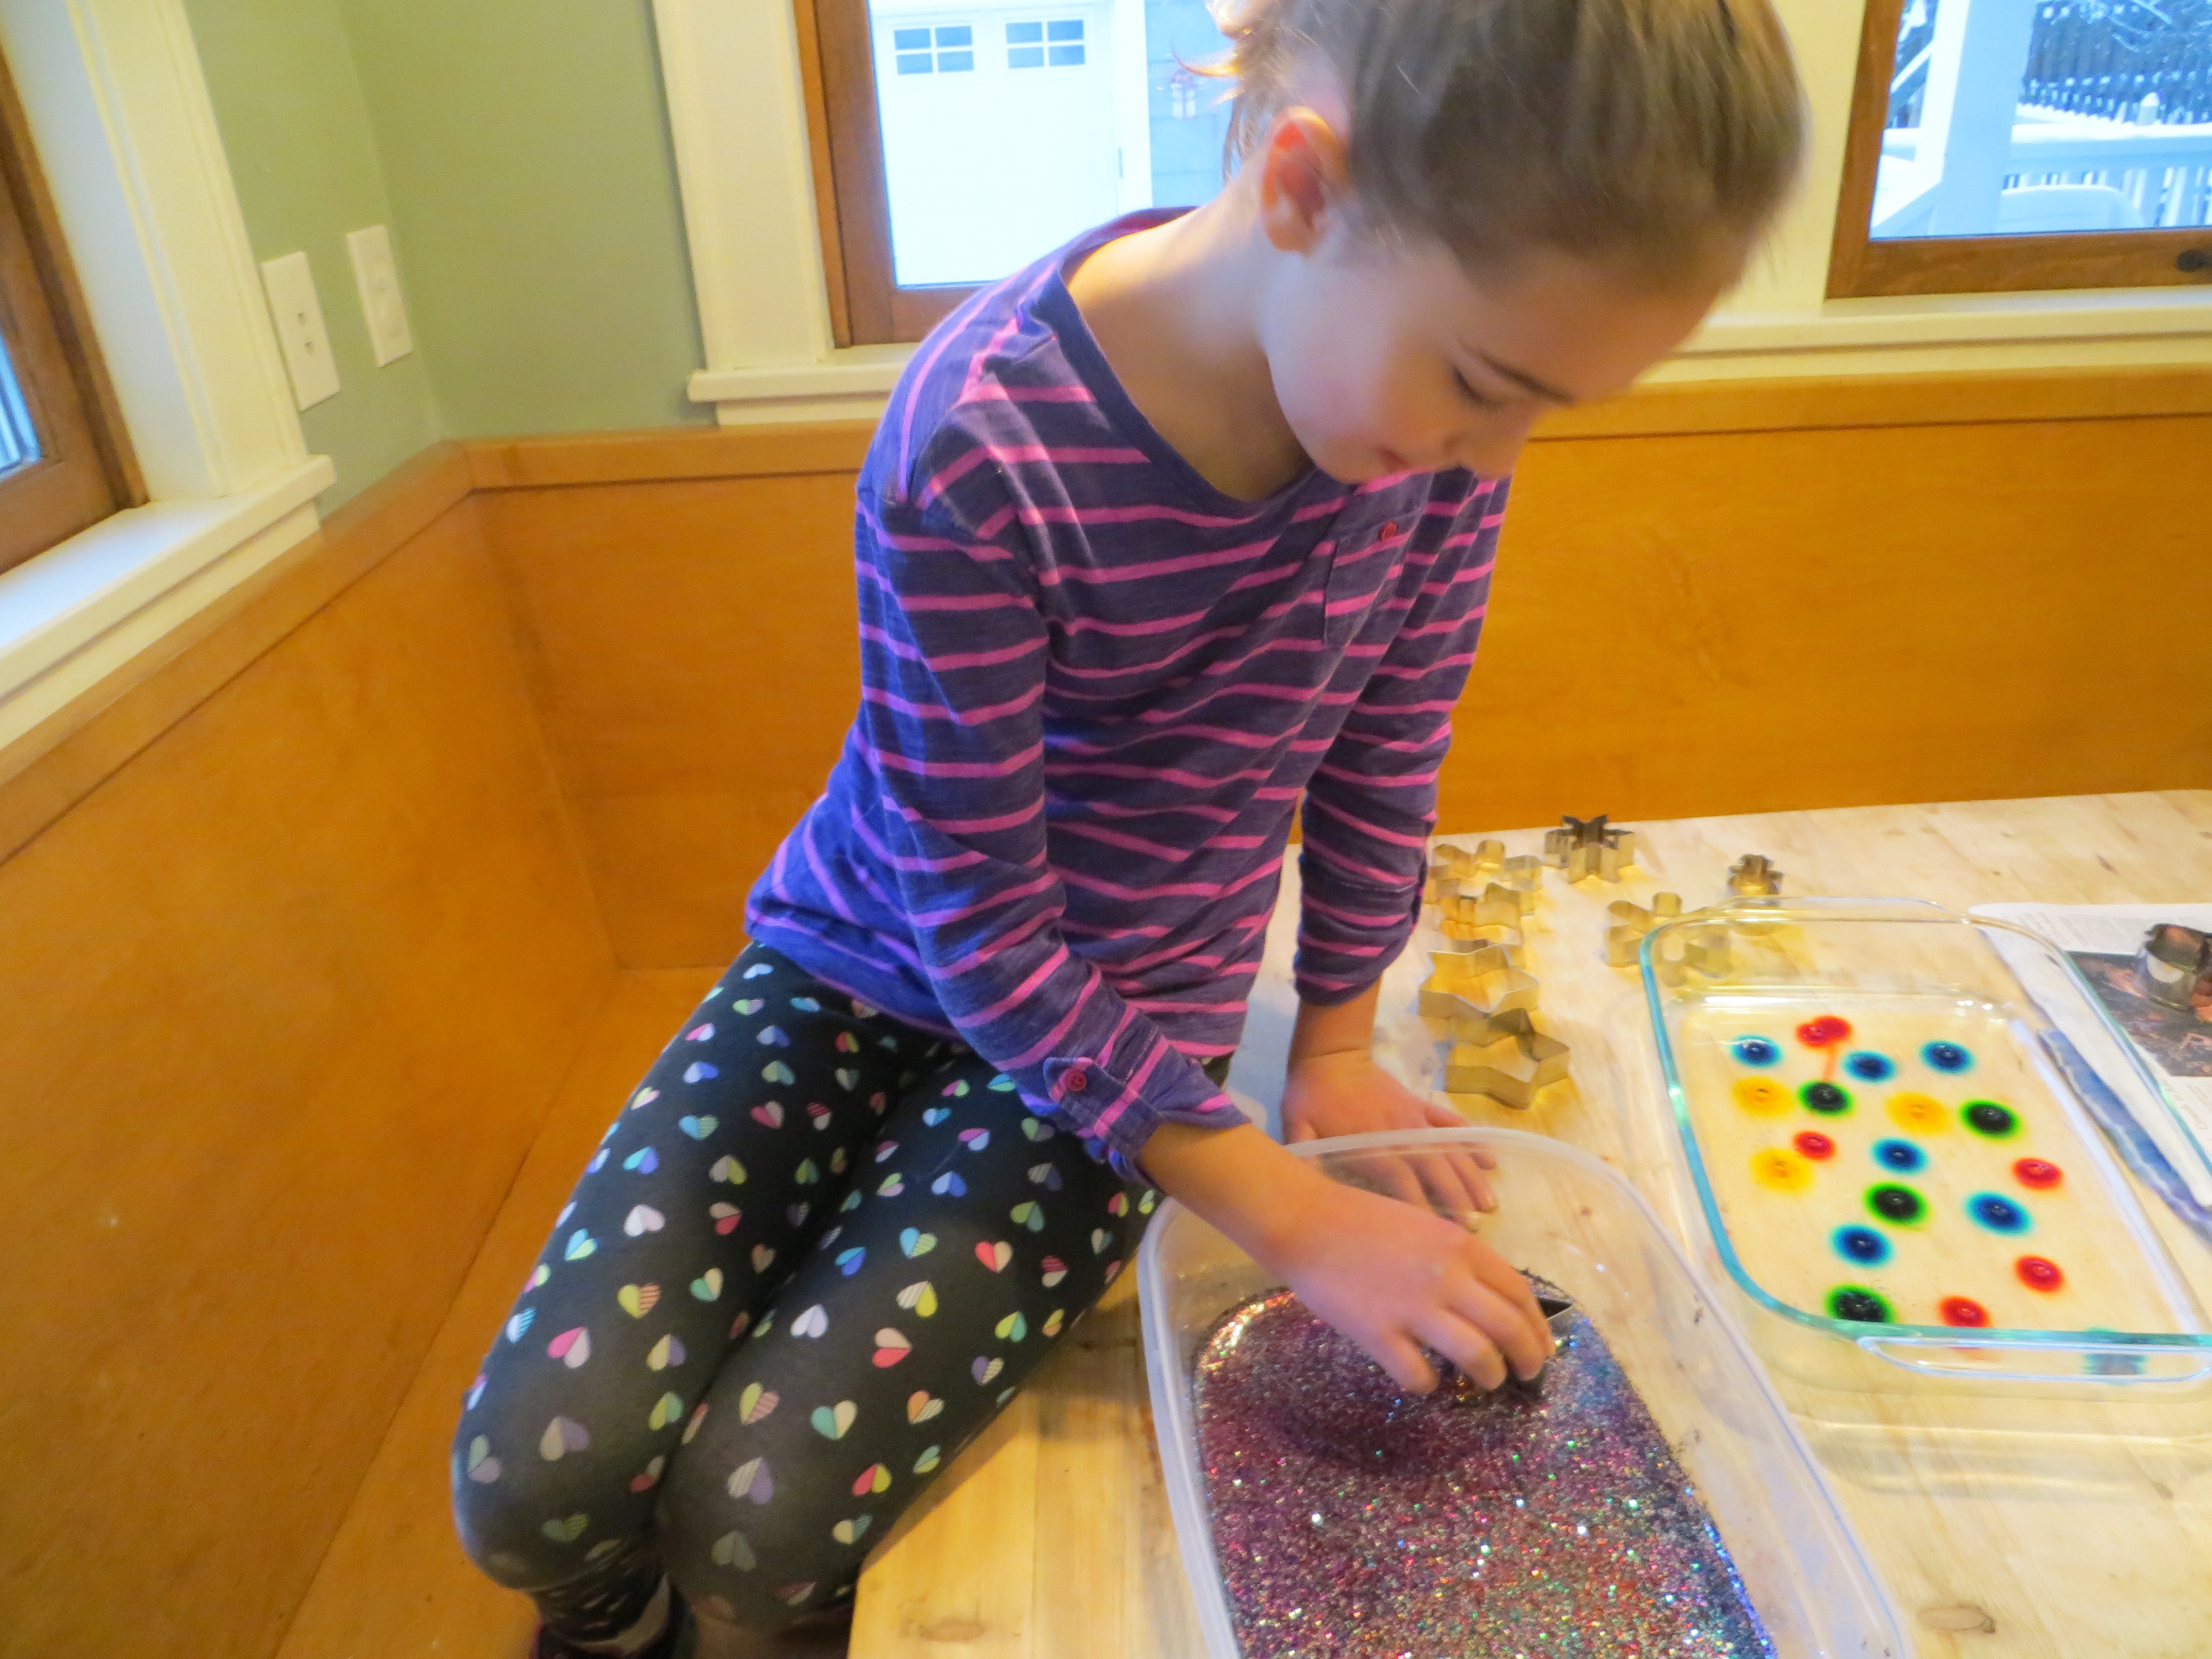
Step 3. Sprinkle glitter on the gelatin in one pan. What happens?

Step 4. Allow the gelatin to harden in both pans.
Step 5. In the pan with no glitter, use a toothpick dipped in food coloring to make designs in the gelatin. Alternately, use straw to create holes in the gelatin, a few cm apart, scattered across the surface. It works best to poke a straw straight into the gelatin, but not all the way to the bottom. Spin the straw and remove it. Then, use a toothpick or skewer to pull out the gelatin plug you’ve created. This will leave a perfect hole for the food coloring. Very young children may need help.
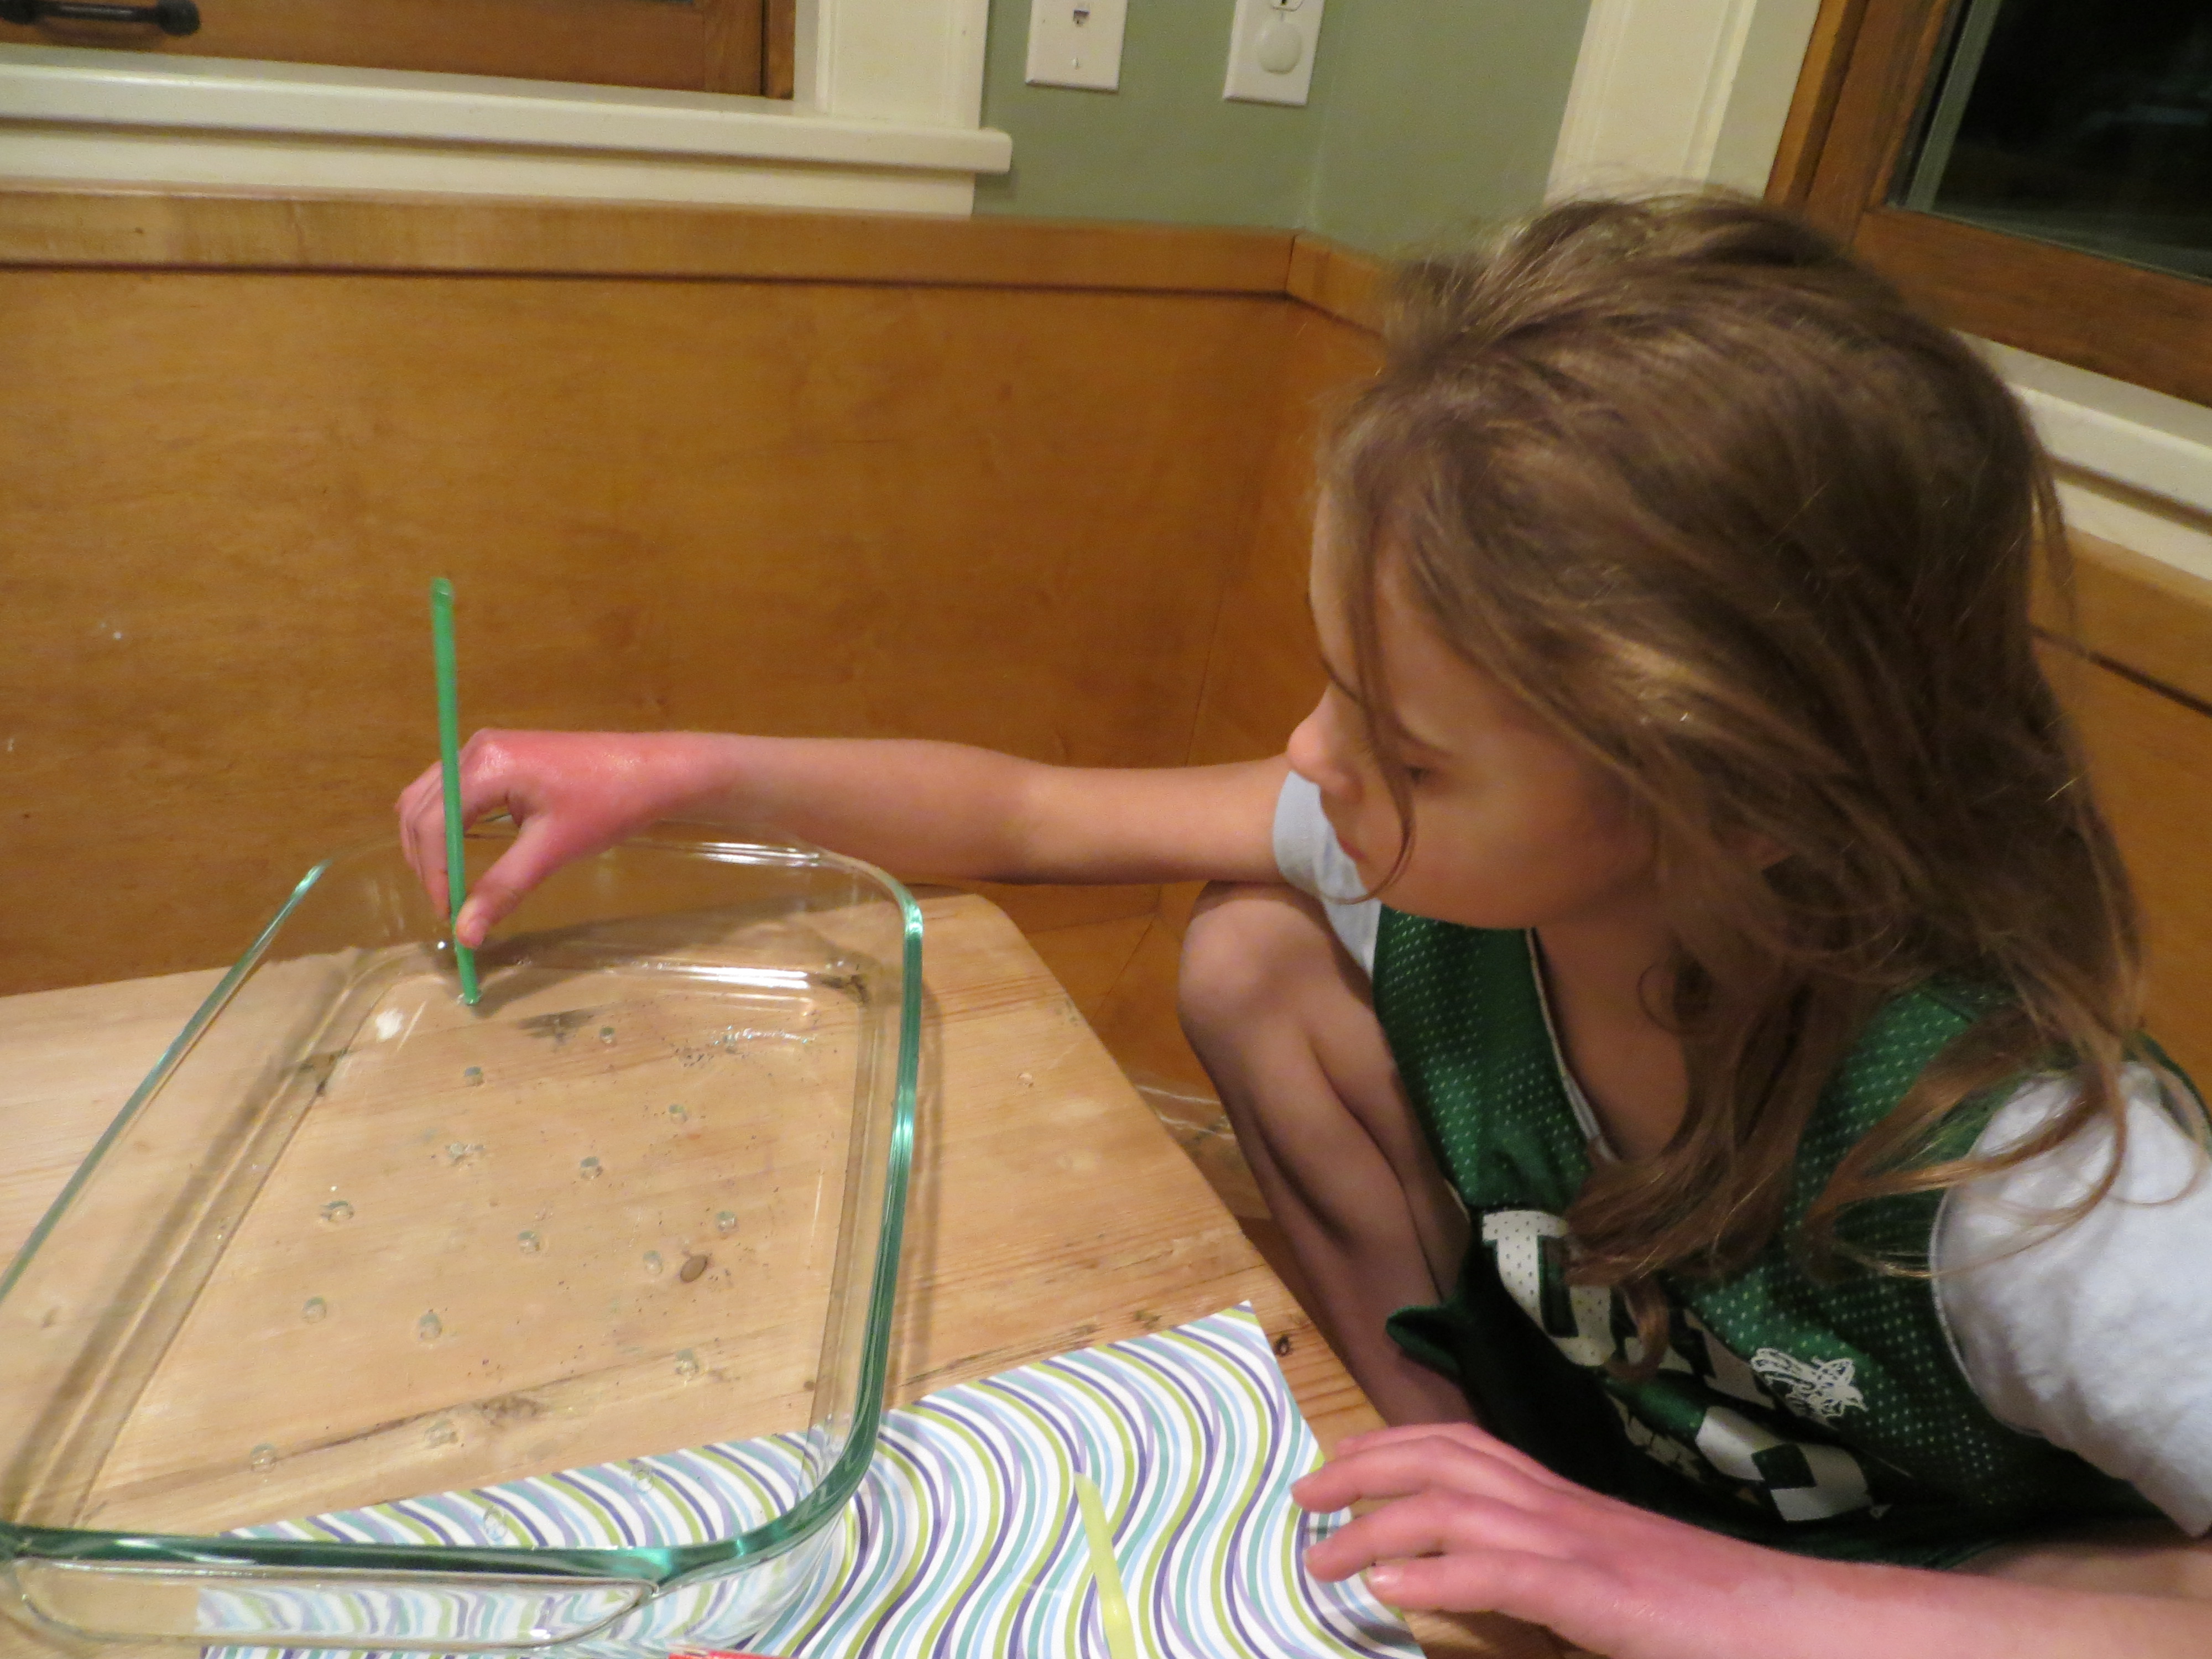
Step 6. If you poked holes with a straw, add a drop of food coloring to each hole in the gelatin.
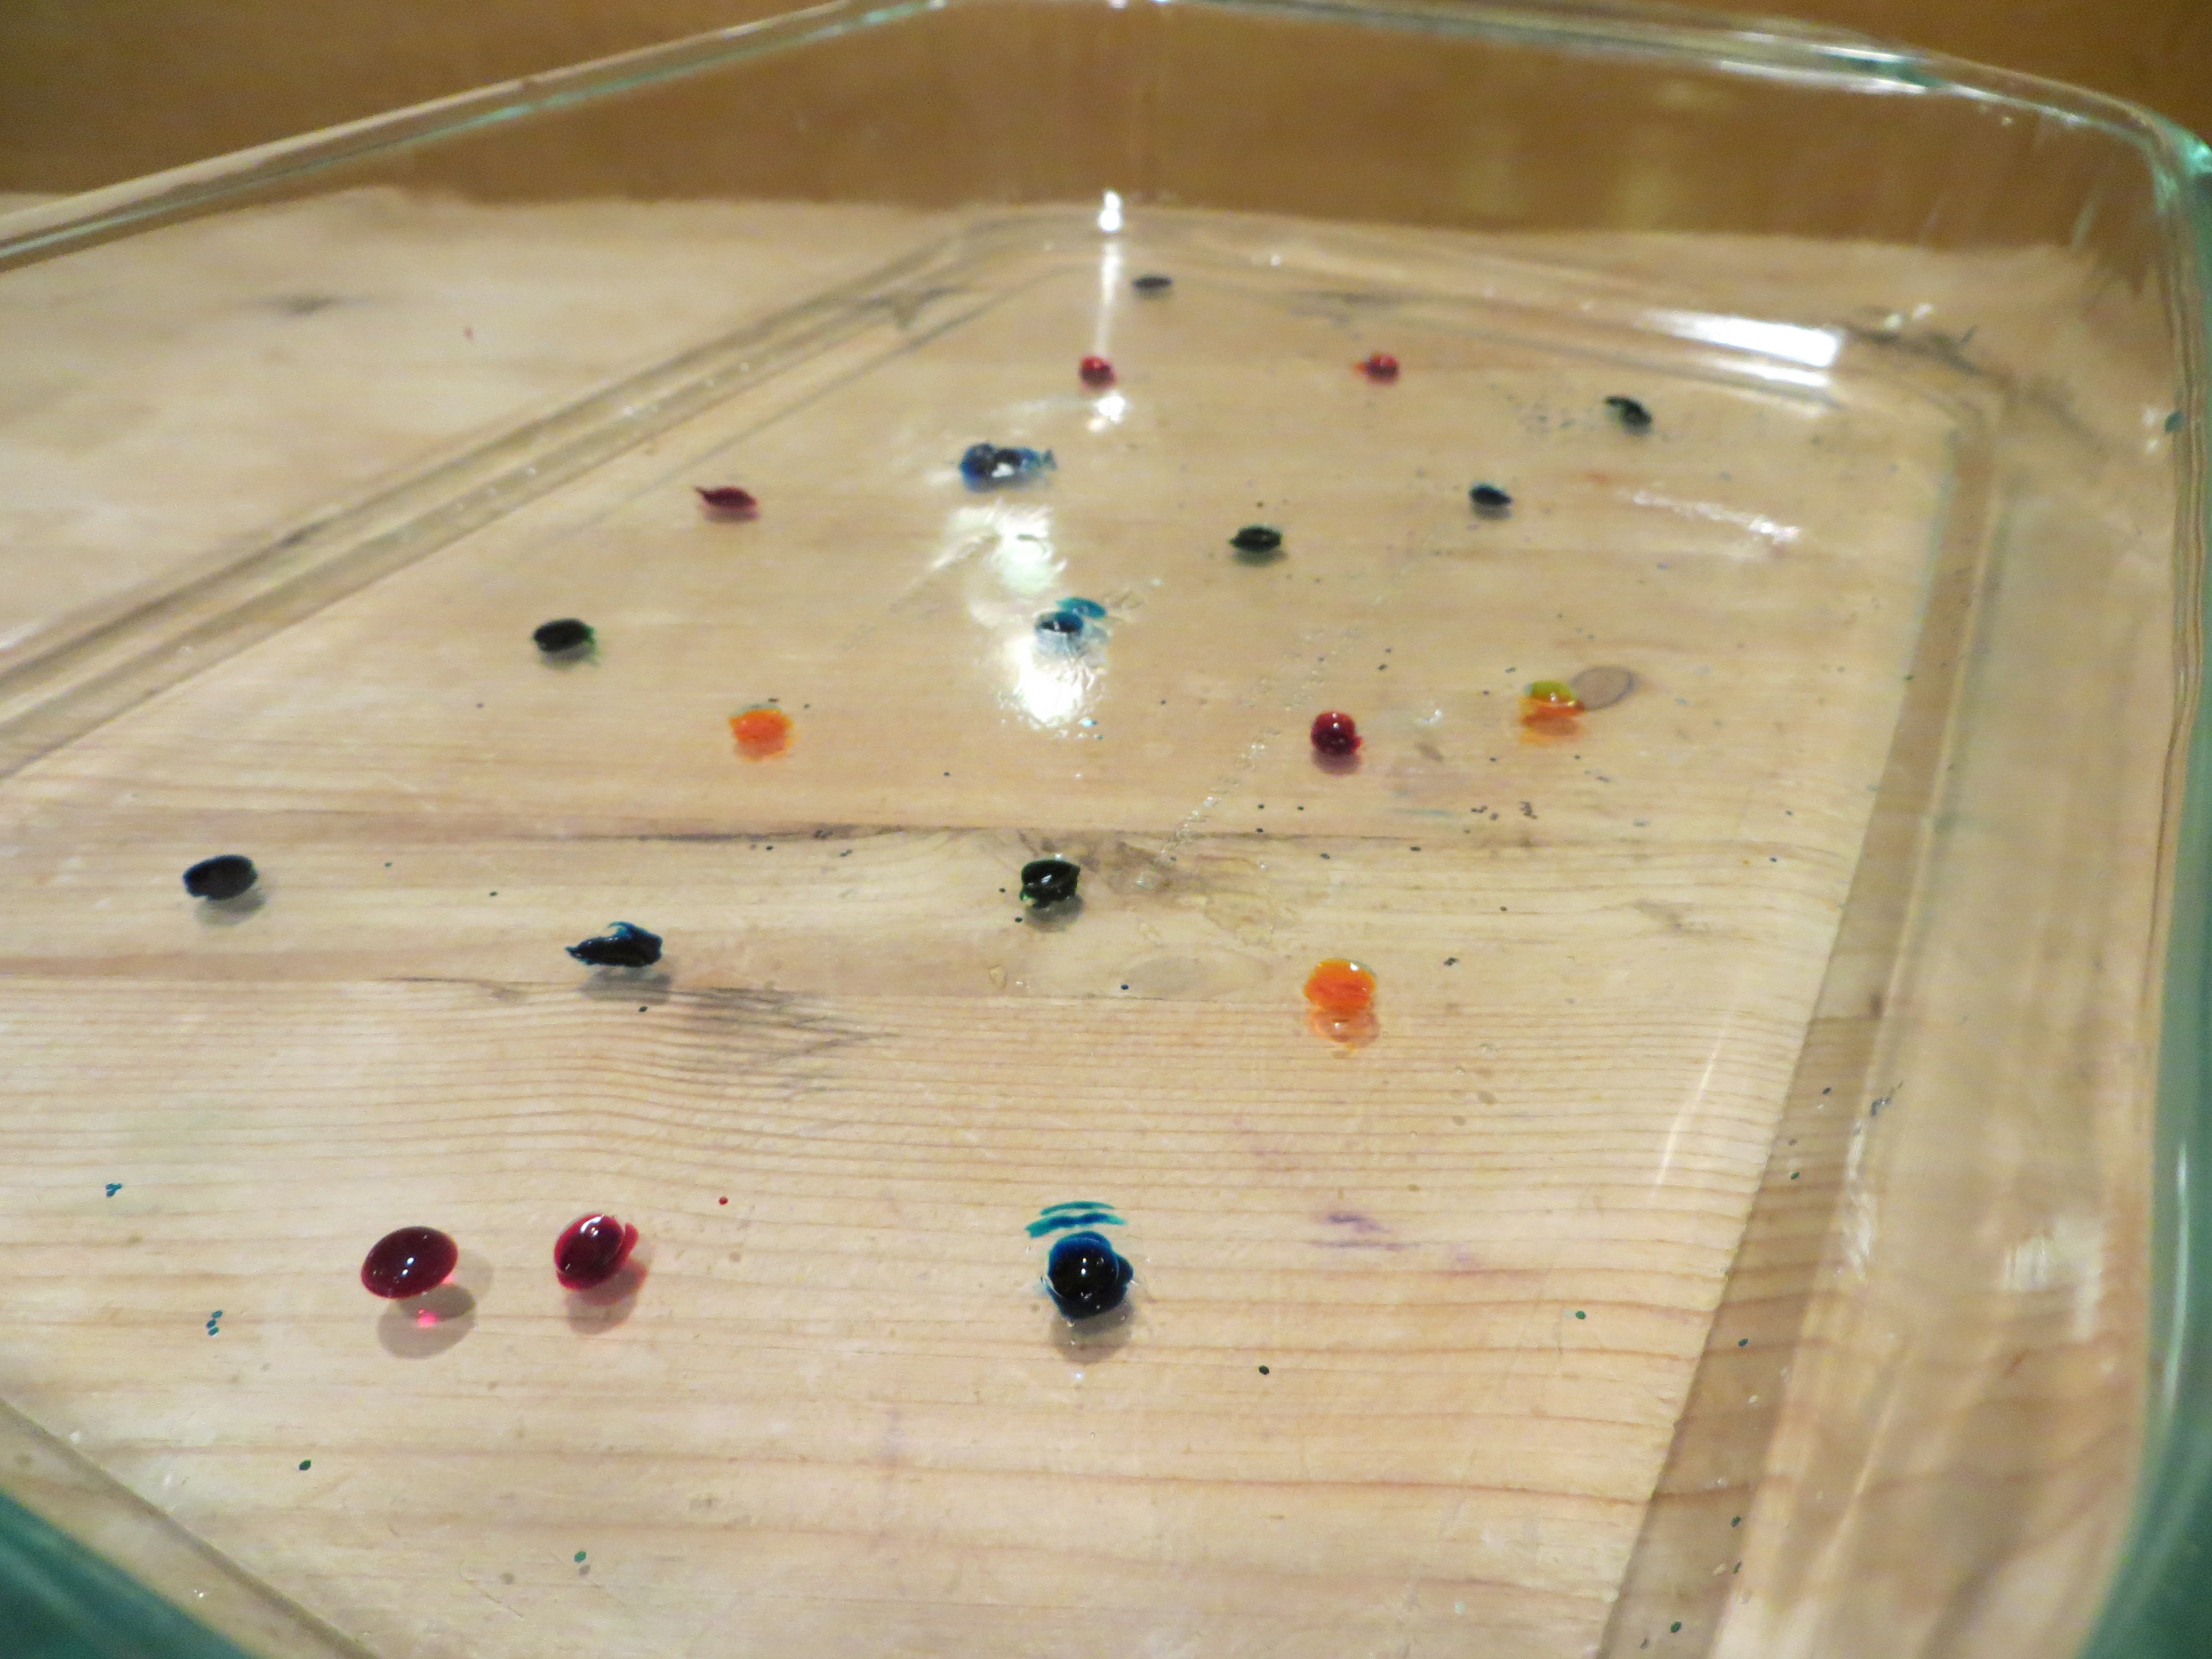
Step 7. Let the gelatin pans sit for 24 hours. Every so often, use a ruler to measure the circle of food coloring molecules as they diffuse (move) into the gelatin around them (read about diffusion at the bottom of this post.) How many cm per hour is the color diffusing? Do some colors diffuse faster than others? If you put one pan in the refrigerator and an identical one at room temperature, does the food coloring diffuse at the same rate?
Step 8. When the food coloring has made colorful circles in the gelatin, use cookie cutters to cut shapes from both pans of gelatin (glitter and food coloring), carefully remove them from the pan with a spatula or your fingers, and use them to decorate a window. (Ask a parent first, since some glitter may find its way to the floor!) Don’t get frustrated if they break, since you can stick them back together on the window.
Step 9. Observe your window jellies each day to see what happens when the water evaporates from the gelatin.
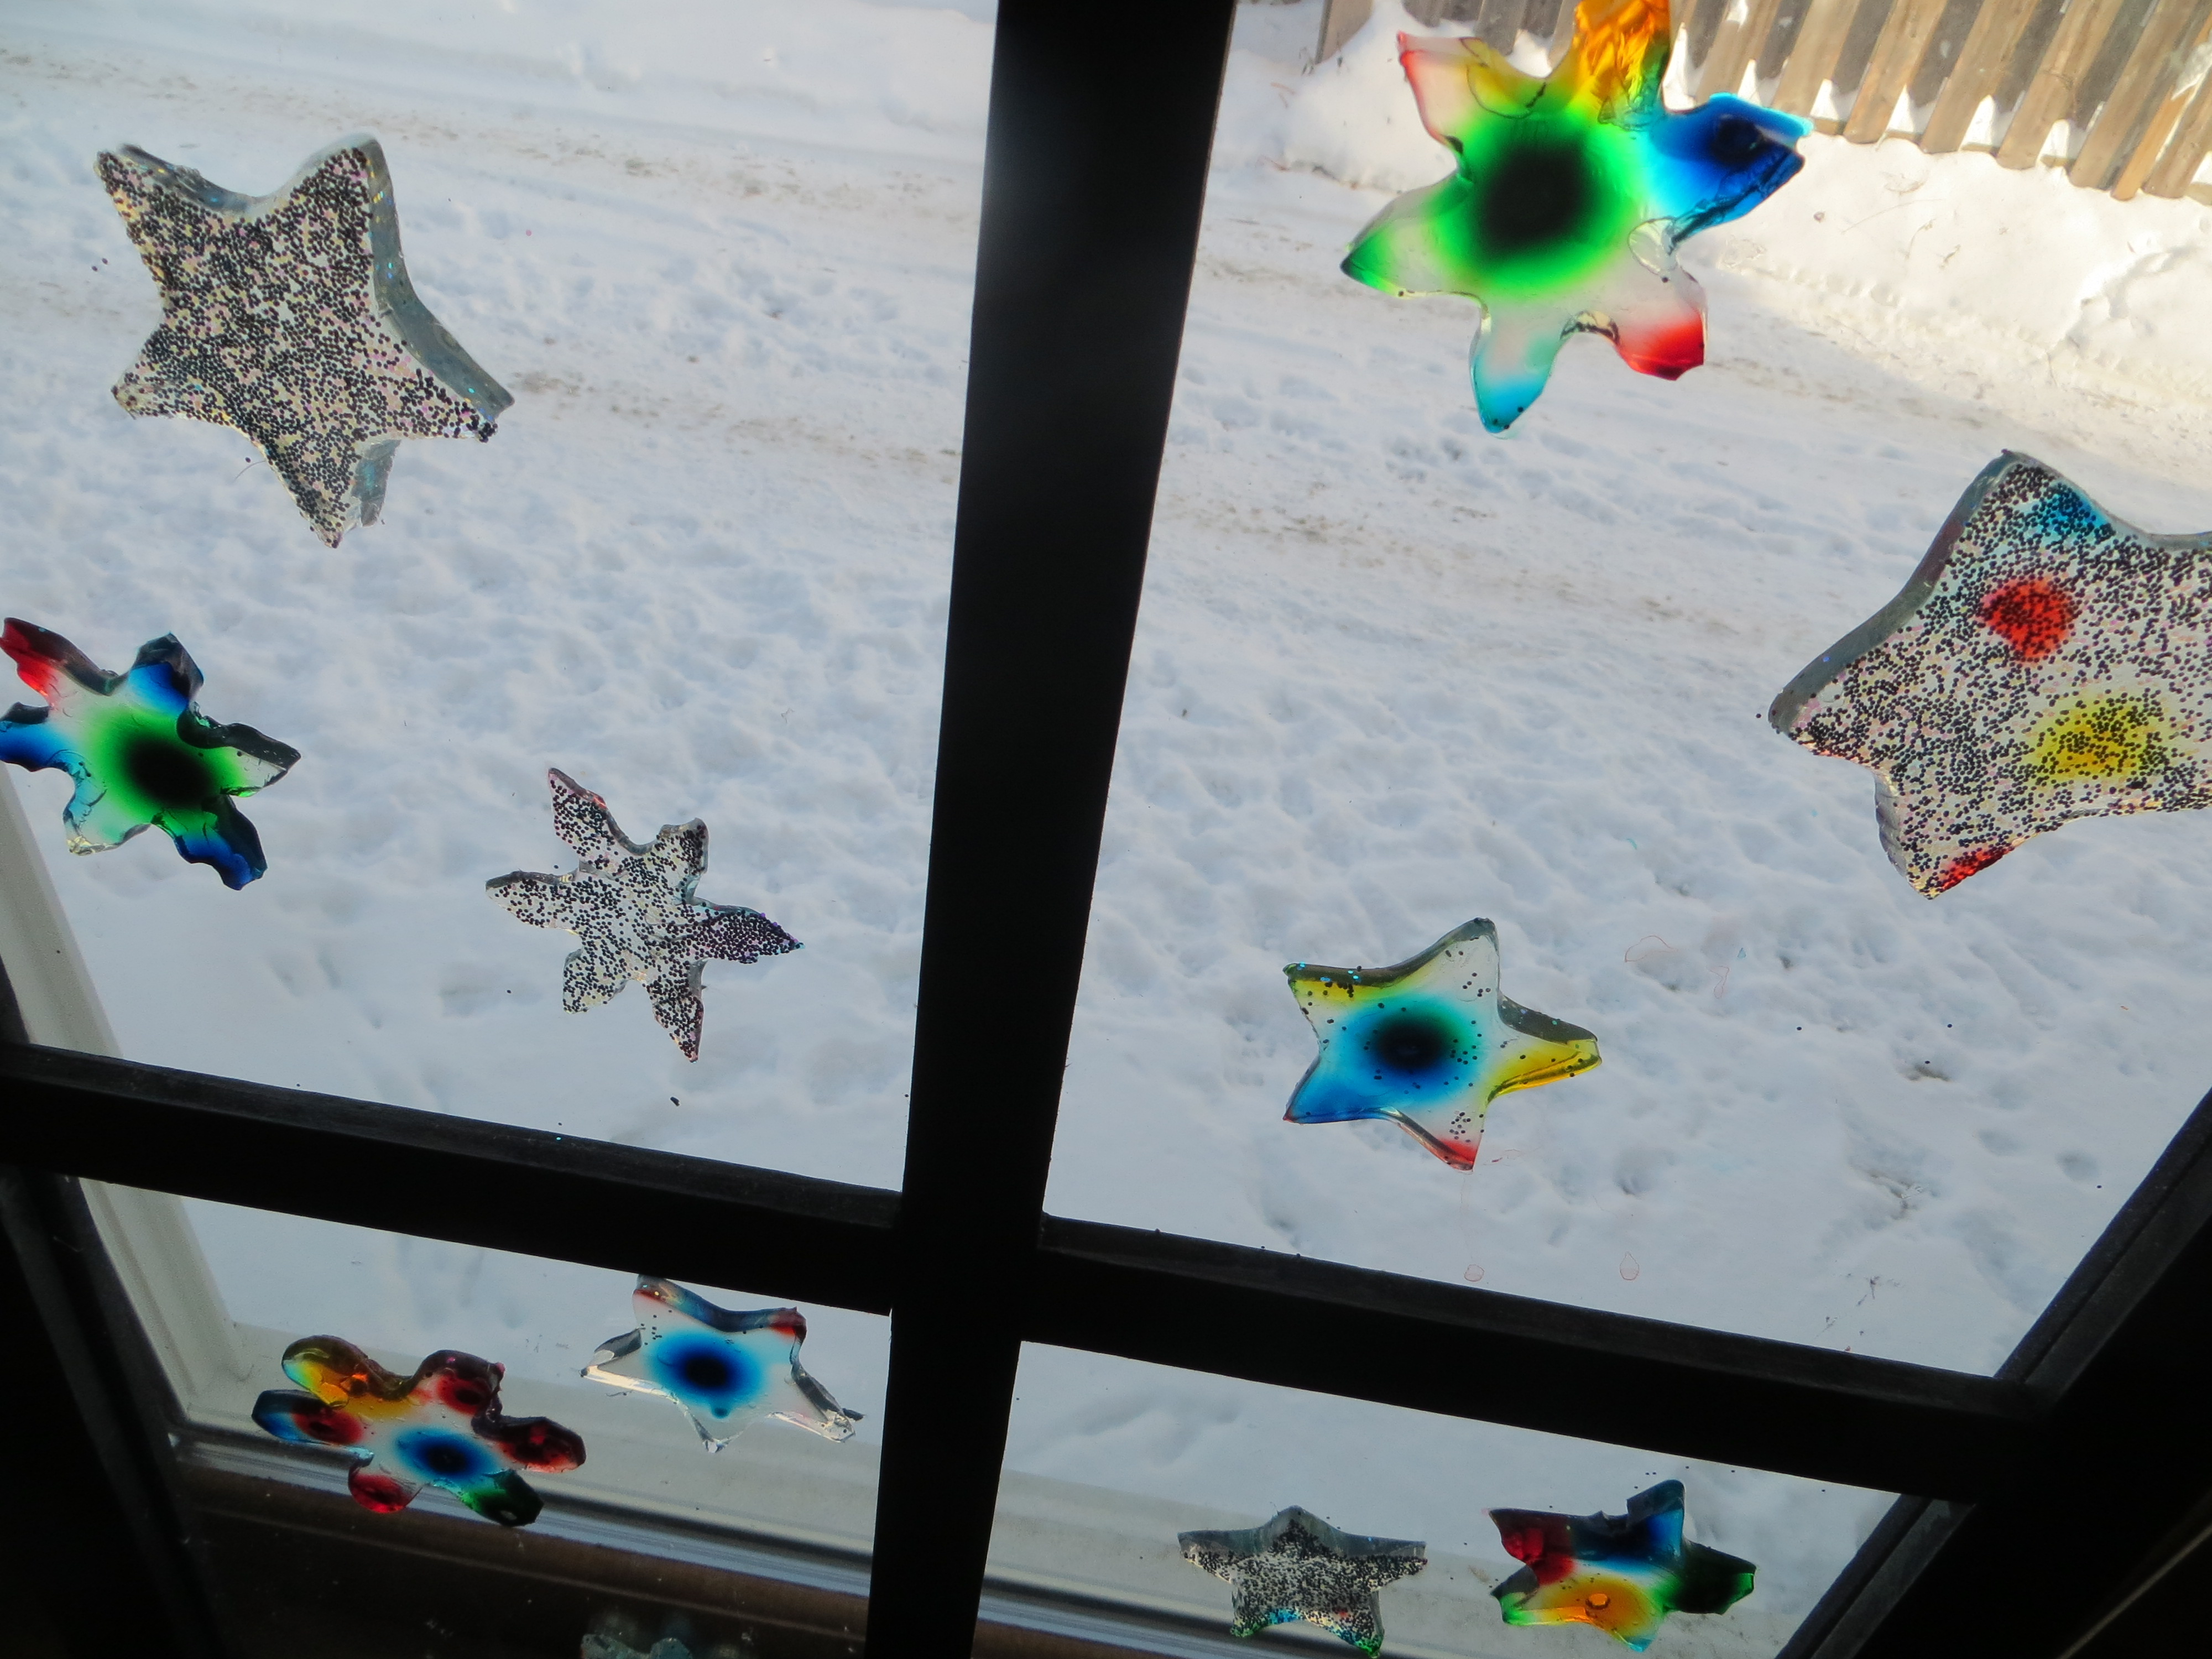 When they’re dry, peel them off the window. Are they thinner than when you started? Why? Can you re-hydrate them by soaking the dried shapes in water?
 The Science Behind the Fun:
Imagine half a box filled with red balls and the other half filled with yellow ones. If you set the box on something that vibrates, the balls will move around randomly, until the red and yellow balls are evenly mixed up.
Scientists call this process, when molecules move from areas of high concentration, where there are lots of other similar molecules, to areas of low concentration, where there are fewer similar molecules DIFFUSION. When the molecules are evenly spread throughout the space, it is called EQUILIBRIUM.
Lots of things can affect how fast molecules diffuse, including temperature. When molecules are heated up, they vibrate faster and move around faster, which helps them reach equilibrium more quickly than they would if it were cold. Diffusion takes place in gases like air, liquids like water, and even solids (semiconductors for computers are made by diffusing elements into one another.)
Think about the way pollutants move from one place to another through air, water and even soil. Or consider how bacteria are able to take up the substances they need to thrive. Your body has to transfer oxygen, carbon dioxide and water by processes involving diffusion as well.
Why does glitter float on gelatin? An object’s density and it’s shape help determine its buoyancy, or whether it will float or sink. Density is an object’s mass (loosely defined as its weight) divided by its volume (how much space it takes up.) A famous scientist named Archimedes discovered that any floating object displaces its own weight of fluid. Boats have to be designed in shapes that will displace, or push, at least as much water as they weigh in order to float.
For example, a 100 pound block of metal won’t move much water out of the way, and sinks fast since it’s denser than water. However , a 100 pound block of metal reshaped into a boat pushes more water out of the way and will float if you design it well!
What is the shape of your glitter? Does it float or sink in the gelatin?
Here’s a video I made for KidScience app that demonstrates how to make window gellies
Credit: My 11 YO daughter came up with the brilliant idea to stick this experiment on windows. I was just going to dry out the gelatin shapes to make ornaments. Kids are often way more creative than adults!
Holiday Science: Candy Cane Art
- by KitchenPantryScientist
Crying over broken candy canes? Cry no more. Make art!
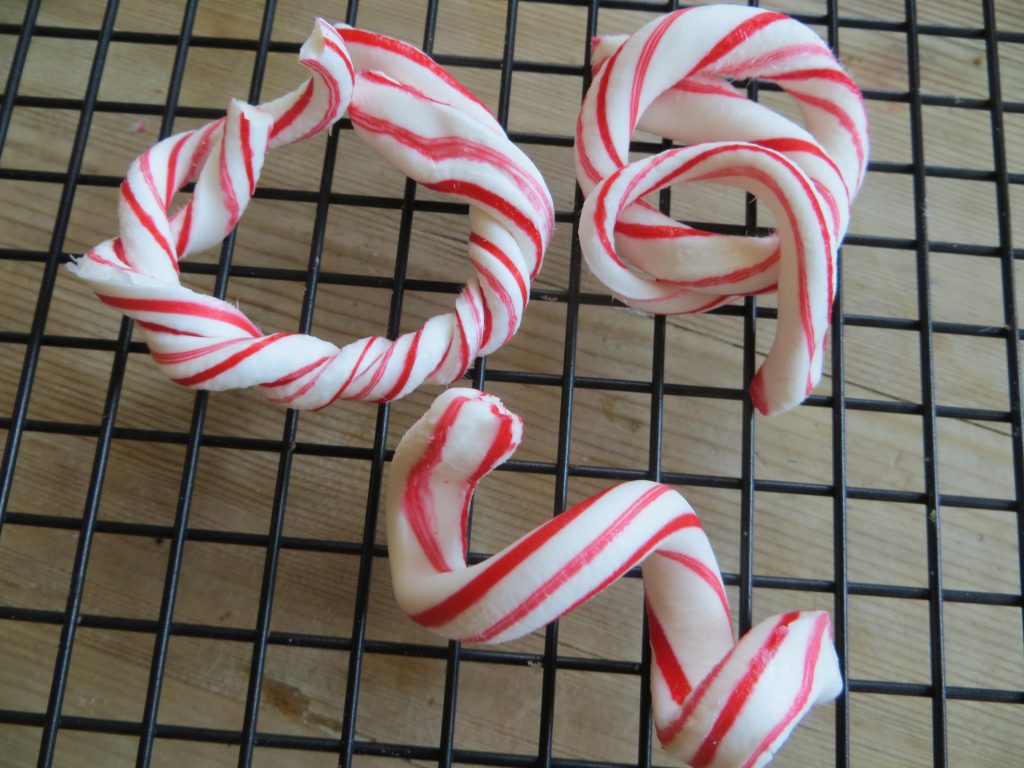
Candy Cane Art- image KitchenPantryScientist.com
This project is from “Amazing (Mostly) Edible Science,” by Andrew Schloss. For a cookbook full of delicious recipes and the Science-Behind-the-Fun, buy my book Kitchen Science Lab for Kids: Edible Edition here!
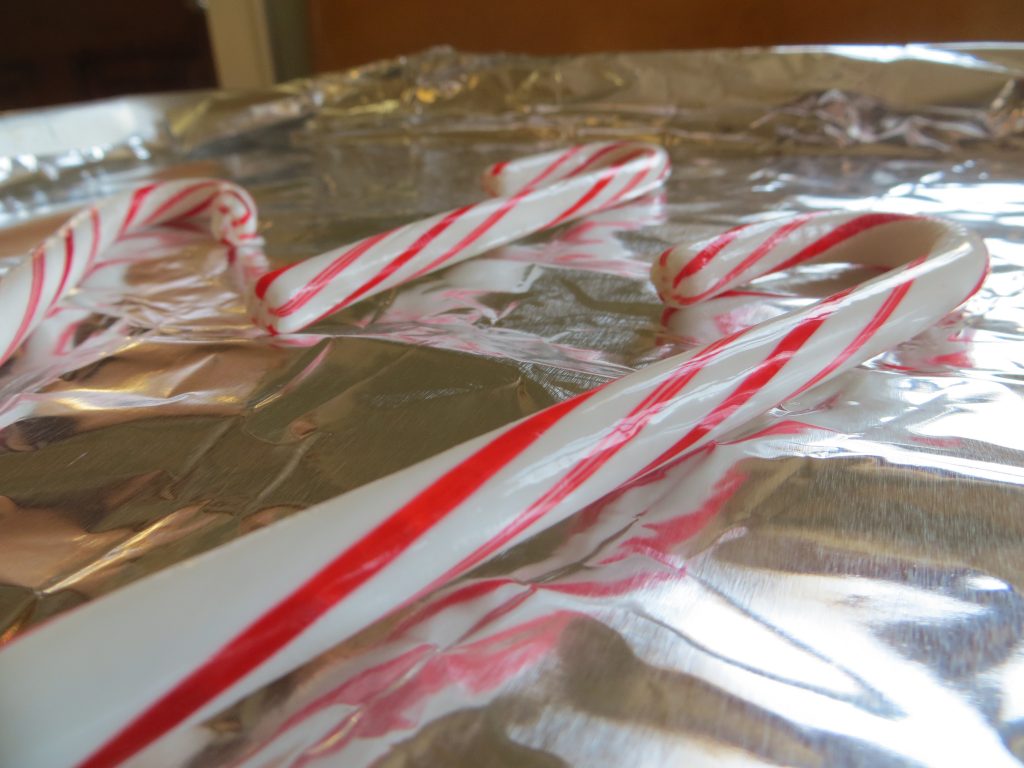
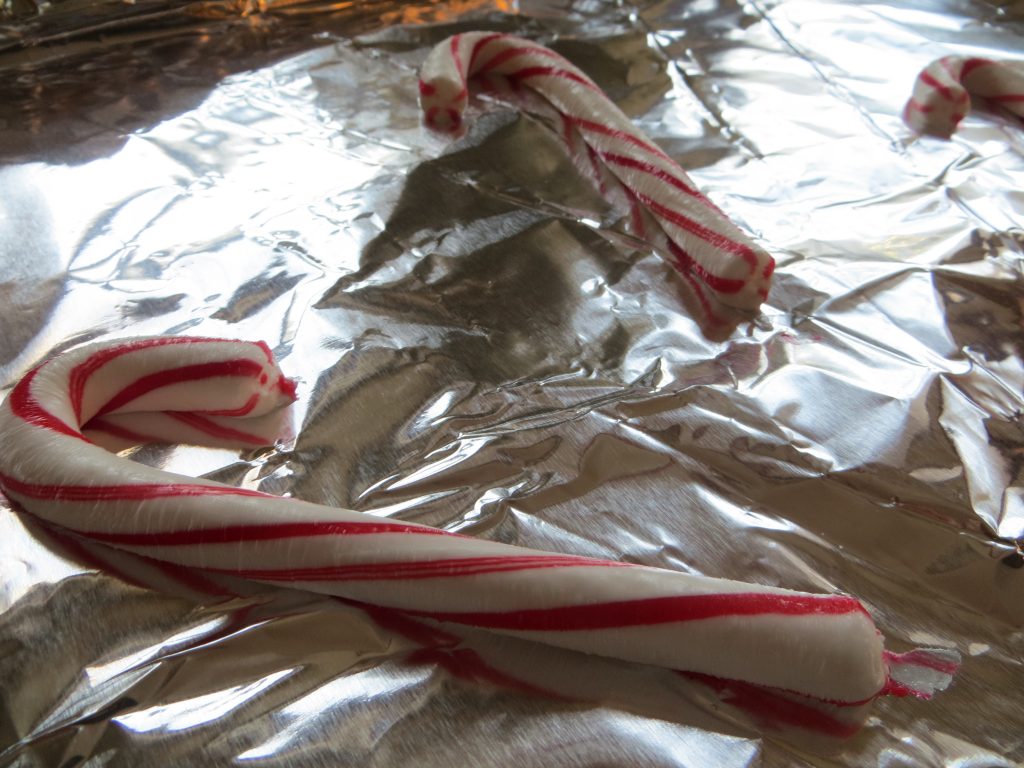
*Melted candy can get dangerously hot, so parental supervision is required!
You’ll need:
-candy canes (broken or whole), wrappers removed
-heavy-duty aluminum foil
-a cookie sheet
-a wire cooling rack
-an oven
What to do:
- Preheat oven to 250F.
- Cover cookie sheet with foil
- Place candy canes on foil, not touching each other
- Bake candy canes for around 10 minutes and have an adult check them. They should be stretchy, but not too hot to touch.
- When the candy canes are ready, bend, fold, twist and pull them into cool shapes. Try pulling one long and wrapping it around a chopstick to make a spiral. What else could you try?
- If the candy gets to brittle to work with, put it back in the oven for a few minutes to make it soft again.
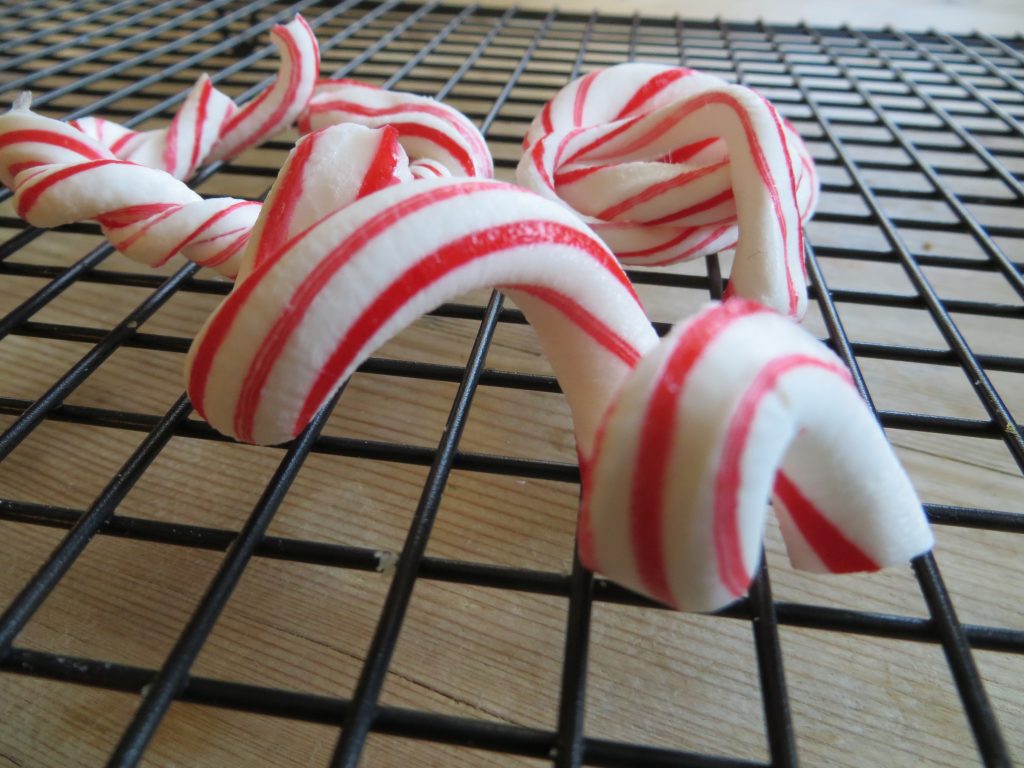
Candy Cane Art- image KitchenPantryScientistcom
The science behind the fun:
If you looks at the ingredients of candy canes, they’re usually made of table sugar (sucrose), corn syrup, flavoring, and food coloring. Glucose and fructose are sweet-tasting molecules that stick together to make up most of the sugars we eat, like table sugar (sucrose) and corn syrup. You can think of them as the building blocks of candy.
At room temperature, candy canes are hard and brittle, but adding heat changes the way the molecules behave. Both table sugar and corn syrup contain linked molecules of glucose and fructose, but corn syrup has much more fructose than glucose, and the fructose interferes with sugar crystal formation. According to Andrew Schloss, “the corn syrup has more fructose, which means the sugar crystals in the candy don’t fit tightly together. The crystals have space between them, which allows them to bend and move without cracking.”
Here’s a great article on the science of candy-making.
If you’re looking for holiday gifts for a science-loving kid, my books Chemistry Lab for Kids, Kitchen Science Lab for Kids and Outdoor Science Lab for Kids include over 100 fun family-friendly experiments! They’re available wherever books are sold.
Hot Chocolate Bombs (Holiday Science)
- by KitchenPantryScientist
Here’s a video on how to make hot chocolate bombs. My tips below.
- Buy thin silicone molds like these that make it easy to pop chocolate half-domes out.
- Melt chocolate (chips or a chopped chocolate bar) in the microwave at 15 second intervals until almost all of it is melted, but there is still some solid chocolate. Stir until the last of the solid chocolate melts. (If you get the chocolate too hot, it ruins the crystal structure of the fat in the cocoa butter and it won’t re-harden very well.)
- Use a spoon or brush to coat the sides of the mold. Put in the freezer (or outdoors if it’s below freezing) for five minutes.
- Add a second layer of chocolate to cover any holes and thicken the structure. Put outside for five more minutes and then carefully remove the chocolate.
- Put hot chocolate mix and marshmallows in half of a dome.
- Add melted chocolate to a small plastic bag, cut the corner off and pipe the chocolate around the edge of the filled half-dome.
- Put a second half-dome on top, smooth the seam with your finger and allow the chocolate to hard.
- Decorate by piping more chocolate on top and adding crushed candy or sprinkles.
- Add to hot milk, stir and enjoy!
Science Books for Kids (Holidays 2020)
- by KitchenPantryScientist
If you’re looking for holiday gift ideas for the young scientist on your list, here’s Science Magazine’s 2020 list of science books for kids and teens! They’re all finalists for the AAAS (American Association for the Advancement of Science)/Subaru Science prize and I’m thrilled to have my latest book, Chemistry for Kids, included on the list.
Find the entire list here, along with descriptions and brief reviews of each book: https://blogs.sciencemag.org/books/2020/12/01/books-for-young-readers-2020/

From the Science Magazine review of Chemistry for Kids:
“If you were to choose 25 discoveries to document the progress of chemistry through millennia, what would you pick? In Chemistry for Kids, Liz Lee Heinecke takes us on such a journey, using familiar objects and simple scientific instruments to create straightforward chemistry experiments that chart the field’s evolution over time.
Each chapter is centered on a different experiment and begins with a vivid illustration that highlights a scientist and his or her work. A few paragraphs of engagingly written introduction are followed by colorful photographs of youngsters demonstrating the steps of the experiment. A brief explanation of the chemistry that underlies each experiment wraps up each chapter”
Homemade Robotics Kit (Holiday Gift Idea)
- by KitchenPantryScientist
With a few simple technology and art supplies, you can put together a simple kit that lets kids design and build bristle bots, art bots and light-up creatures.
The Science Behind the Fun: Hooking an unbalanced spinning toy motor to a brush sends vibrations through the bristles. The vibrating bristles move the brush, and anything attached to it, around on a flat surface. Make a disc robot by attaching toothbrushes to a CD and attaching a motor, or make a drawing robot with legs made of pens.
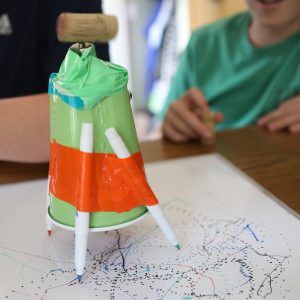
Art Bot from “STEAM Lab for Kids” (Quarry Books 2018)
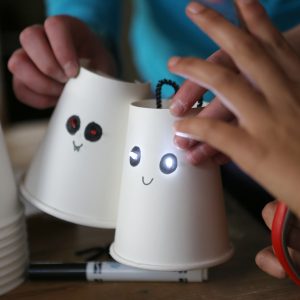
Light Up Creatures from “STEAM Lab for Kids” (Quarry Books 2018)
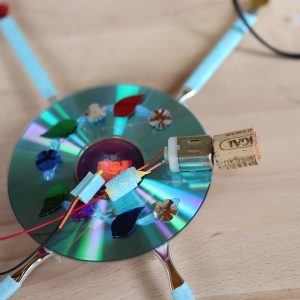
CD Bot from “STEAM Lab for Kids” (Quarry Books 2018)
I’ve included ideas for items to put in a kit, along with a tech supply list and photos of the robots from STEAM Lab for Kids. Use your imagination for art supplies! Pair the kit with a book, like STEAM Lab for Kids (Amazon.com), which has instructions for making bristle bots, art bots and light-up creatures, or let tech-savvy kids take the reigns and start building!
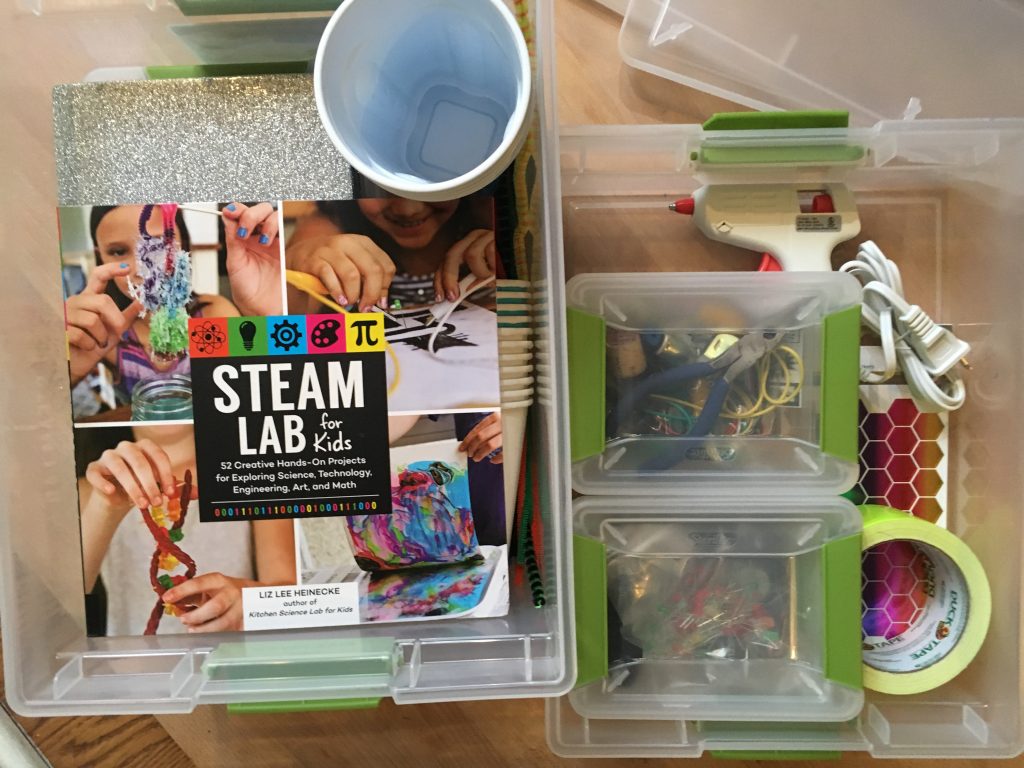
Homemade robotics kit- kitchenpantryscientist.com
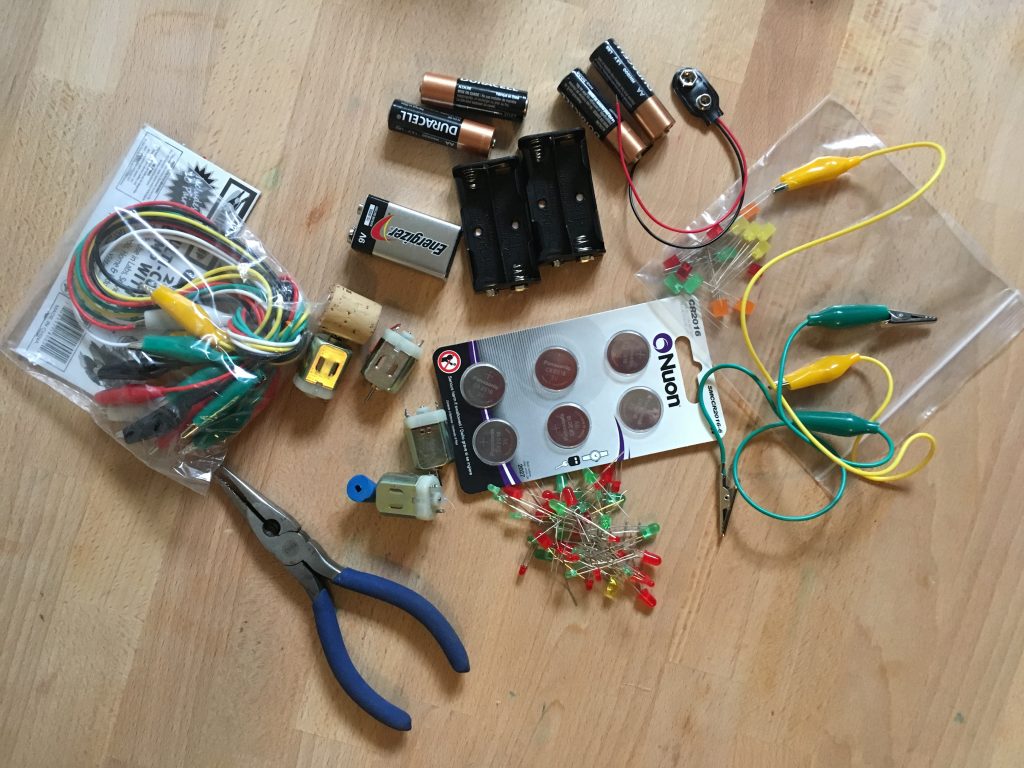
LEDs, alligator clip test leads, toy motors and batteries let kids assemble simple circuits. (Supply list below photo)
tech components for robot kit- kitchenpantryscientist.com
Basic 3mm and 5mm through-hole LEDs (Art Bot, CD Bot, Light-Up Creature)
Small alligator clip test leads (Art Bot, CD Bot, Light-Up Creature)
AA battery holders (Art Bot, CD Bot )
AA batteries and 9V batteries (Art Bot, CD Bot )
9V battery clip snap-on connectors (battery snaps)
3V coin cell batteries (Light-Up Creature)
Mini electric motor for DIY toys (1500 rpm) for Art Bot, CD Bot
(Find these supplies at your favorite bricks and mortar location, like Axman Surplus stores, or get them online at Amazon.com or another tech retailer.)
USA https://www.amazon.com Canada https://www.amazon.ca
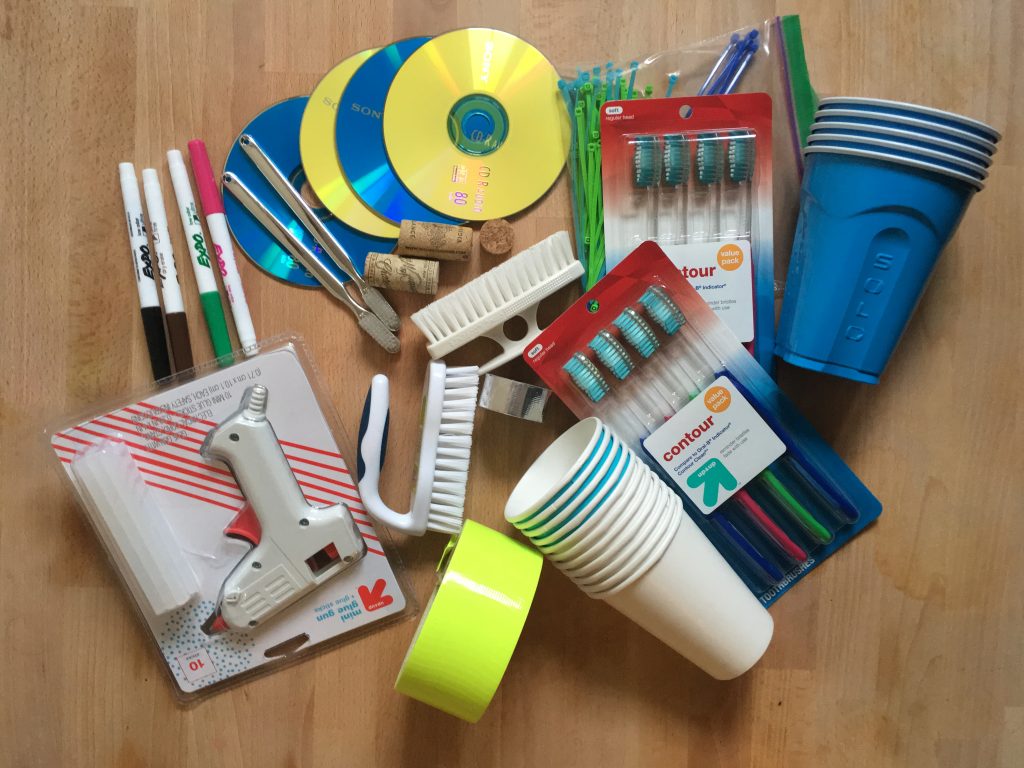
Paper and plastic cups, brushes, toothbrushes, duct tape, zip-ties, and CDs all make great building supplies, and a glue gun always comes in handy.
building components for robotics kit- kitchenpantryscientist.com
Use your imagination for the art supplies.
art supplies for homemade robotics kit- kitchenpantryscientist.com
And if you’ve got a kid who likes to sew, it’s fun to add supplies to make sewable circuits!
Sewable electronics: coin cell battery holders, sewable LEDs, snaps and conductive thread
USA https://www.sparkfun.com/lilypad_sewable_electronics and https://www.adafruit.com
Canada https://www.amazon.ca
Europe https://www.amazon.co.uk
Here are instructions for building a simple bristle bot.
Have fun!
Thanksgiving Science: Pumpkin Spice Bath Bombs
- by KitchenPantryScientist
To make a holidays version of the fizzing bath tablets in the video, we scented them with pumpkin pie spice and added a little more oil to incorporate the extra ingredients.
1 cup baking soda
¼ cup cream of tartar
3 Tbsp. coconut oil, melted to liquid
food coloring
rounded tablespoon
1 tsp. pumpkin spices
-Whisk together baking soda, cream of tartar and pumpkin spices. Slowly drizzle in coconut oil, mixing immediately. Stir for several minutes until you get a nice even mixture that holds together when you press it between your fingers. Add a little more oil if it is too powdery.
-Add a few drops of food coloring and mix again until the color is incorporated.
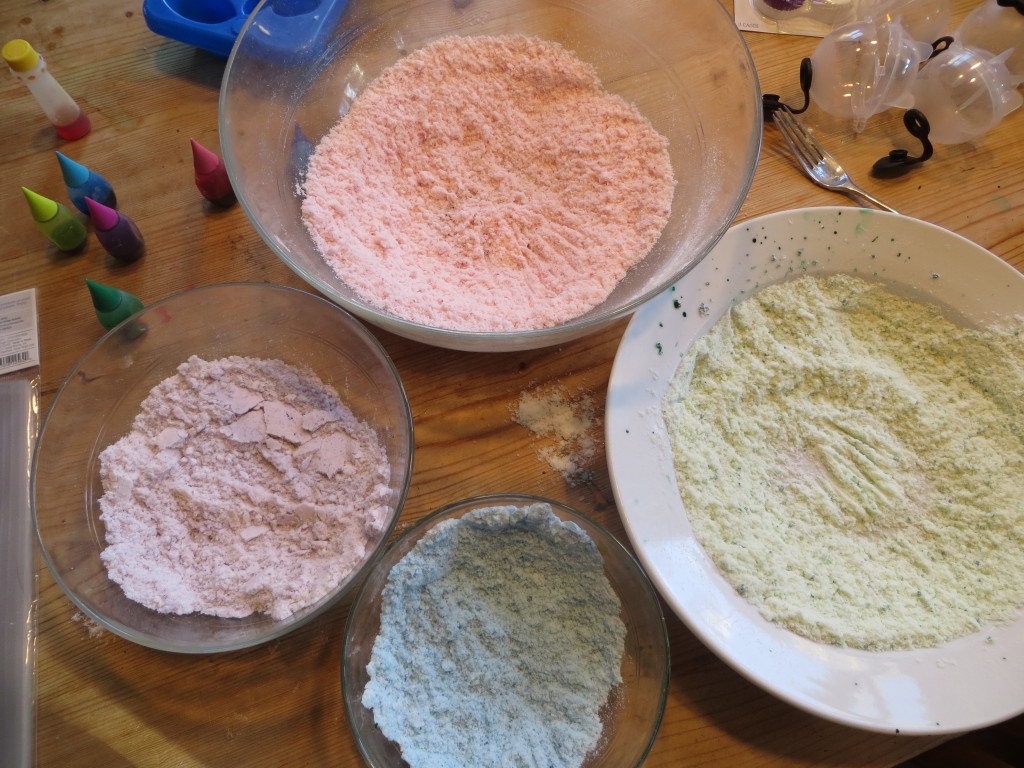
-Press the bath bomb mixture into a tablespoon and tap in on a tray to remove the bath tablet. If they don’t hold together, try adding a little more oil and mixing again. Dry the bath fizzies on a plate or cooking sheet and package them in cellophane bags or pretty baking cups for friends and family. Use the fizz bombs within a few weeks for maximum fizziness!
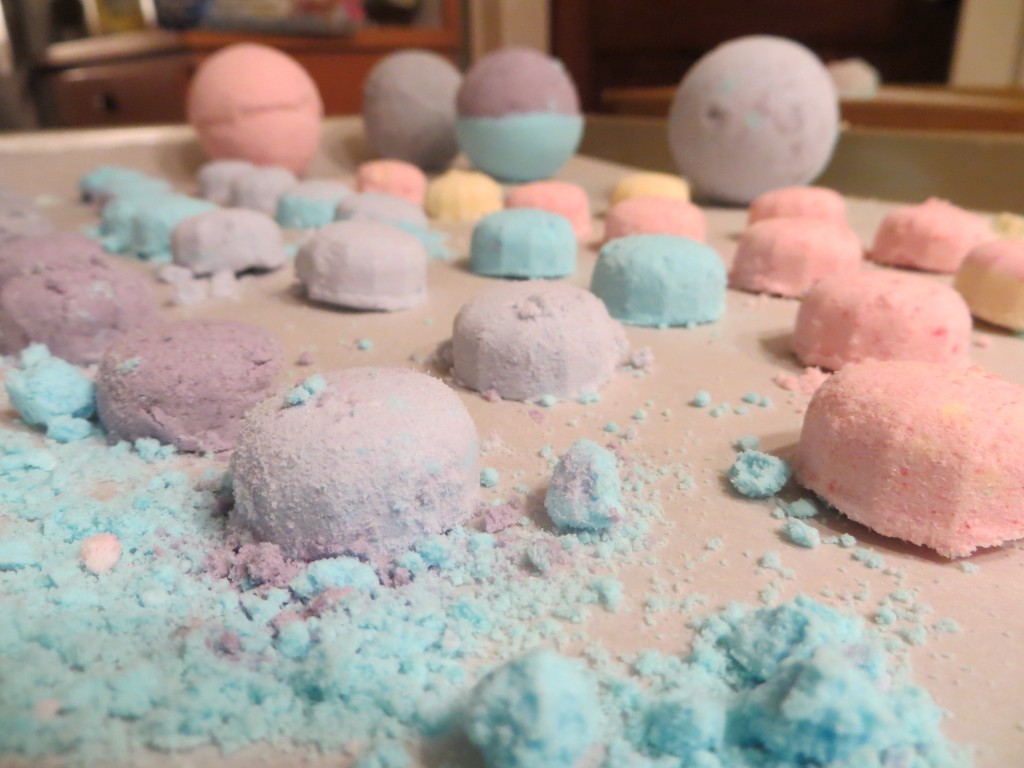
You can make larger “bath bombs” using molds for round ice cubes (which we found at Target.) Double or triple the recipes, gently press some mixture into each side of the mold, and mound a little extra on each side. Press the mold together to compress the bath bomb mixture into a single ball. Tap one side gently with the back of a spoon and gently open the mold to release that side of the sphere. Hold it in your palm and repeat with the other side to release the entire bath bomb from the mold.
The science behind the fun: The chemical name for baking soda is sodium bicarbonate , and cream of tartar is an acid called potassium bitartrate, or potassium hydrogen tartrate . When you mix them together in water, you create a chemical reaction that forms carbon dioxide gas bubbles! It’s interesting to note that at temperatures below 76 degrees F (25 C), coconut oil is a solid, but that at temperatures above this, it melts into a clear liquid. How does this affect your bath fizzies? Will they work in cold water as well as they do in warm water? Try it!
Air Plant (Tillandsia) Holiday Ornaments
- by KitchenPantryScientist
Tillandsia, also known as Air Plants, come in many shapes, sizes and colors. In nature, you’ll find them living in trees in warm places like South America. They collect moisture from the air and rain, rather than pulling it up via roots like most plants, so you can care for them with a weekly misting.
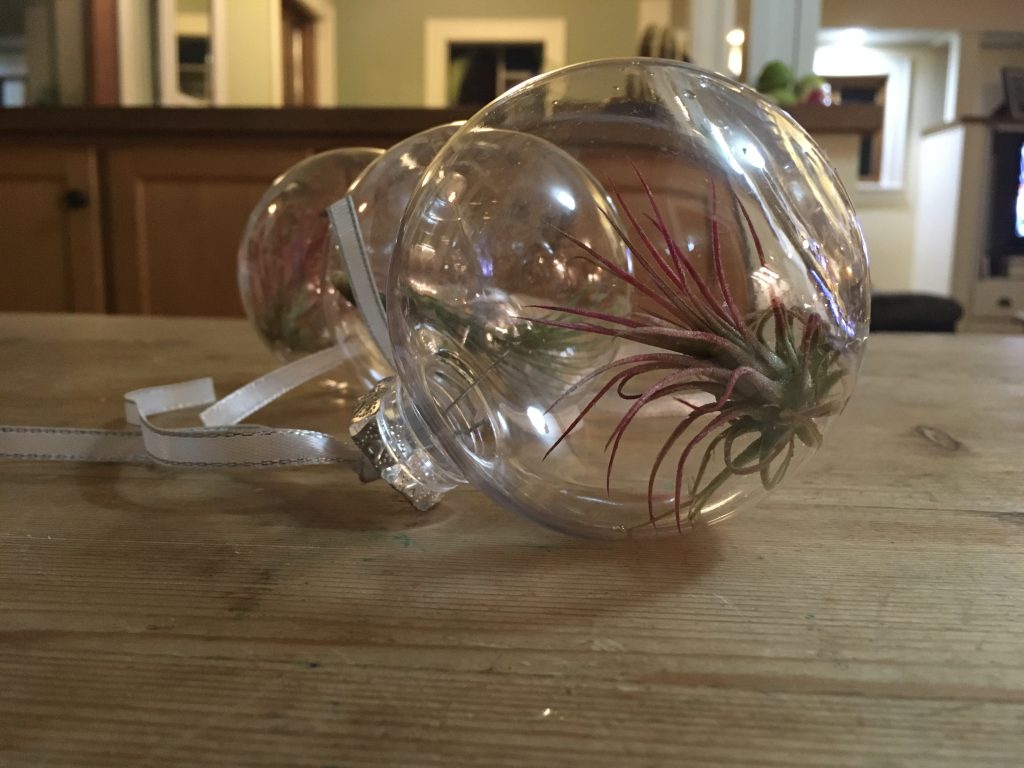
Tillandsia ornament (KitchenPantryScientist.com)
Pick up a few clear, hollow “decorate your own” ornaments, and you can use these living wonders to make unique homemade decorations. We’re giving them as gifts this year.
You’ll need:
-clear ornaments with removable tops
-small Tillandsia that will fit through ornament tops (Air Plants are available at most nurseries. Ask for care instructions, if they have them.)
-needle nose pliars, or tweezers
Note: Choose plants that are small enough to fit through the openings of your ornament!
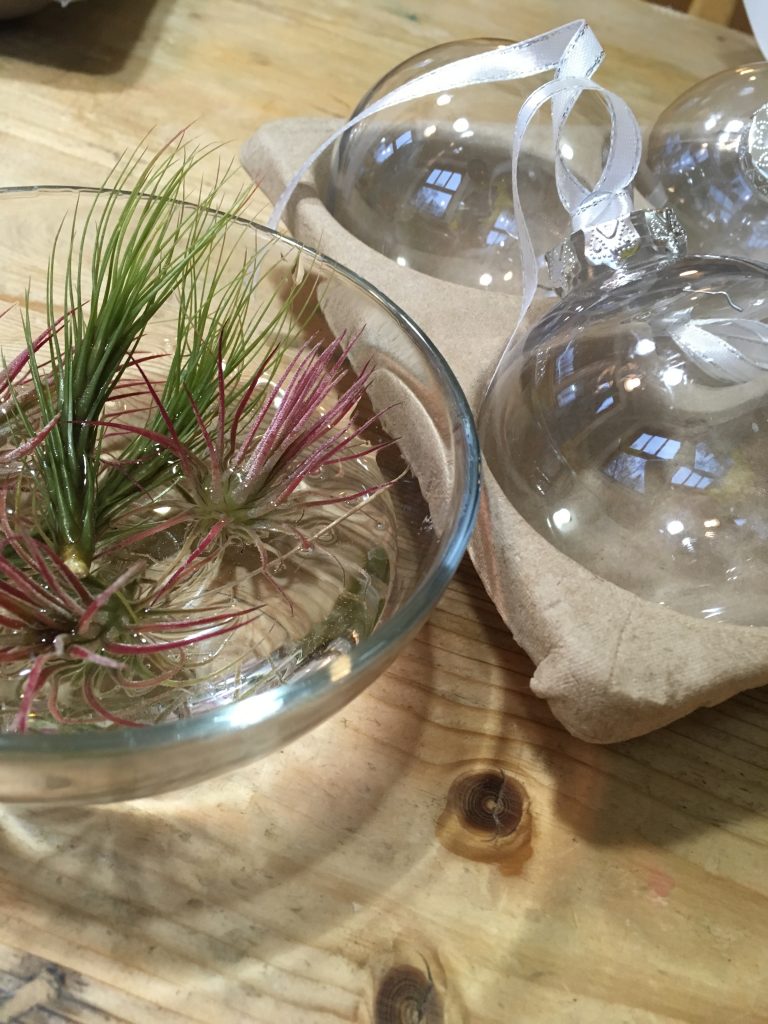
Tillandsia ornaments (Kitchen Pantry Scientist.com)
Mist your plants, or soak them in a bowl of clean water for 15 minutes or so, gently shake off the excess water, and carefully push them into the ornaments, bottom first so you don’t harm the plant. Put the top back on the ornament, leaving it loose enough for air to circulate.
Once a week or so, remove the top of the ornament and add some water. Coat the entire plant with water, pour out the excess and put the top back on. After the holidays, you can remove the plants with tweezers and move them to a new home in a vase, bowl or other clear container.
Egg Drop
- by KitchenPantryScientist
How would you safely land a spacecraft on a planet with no atmosphere if you couldn’t use rockets? A parachute wouldn’t work, since there’s no air resistance. You’d have to design your craft with a protective shell so the impact wouldn’t destroy it.
Pretend a raw egg is your spacecraft and Voila: you have a science experiment. Besides being lots of fun, an egg drop experiment is a great way to try your hand at engineering and is a fantastic STEM (Science, Technology, Engineering and Math) project for kids and adults alike!.
The law of motion says that the faster you change the speed of an object, the greater the force applied to the object will be. We demonstrated this concept with our egg-throwing experiment by smashing eggs against a table, which stopped them fast, and watching them survive being hurled against a hanging sheet, which slowed them down. This same law explains why, if you drop an egg on the floor, it will break. When you change the speed of the egg slowly,by suspending it or surrounding it with material that helps absorb or redirect the force, less force is applied to the egg and it may remain intact. Can you design a container to protect an egg?
Why not have a holiday egg drop competition with your out-of town cousins, or other friends and family? Here are the rules we came up with. (We have a no parachute rule, but if you’d really like to design a parachute for your egg, that would be fun too!) I’m thinking an egg nogg carton might be a good place to start.
-Container made up of 100% holiday material like wrapping paper, bows, cardboard, tinsel, food, glue, toothpicks, wood, tape, plastic, Easter basket grass, candy and string. No Styrofoam, bubble wrap or packing peanuts are allowed.
-Container must contain one RAW egg.
-No Parachutes (defined as any material attached to your egg craft in such a way that it will expand outward as it falls, catching air.)
-Container should be no larger than 20 inches in any direction
-No tape or glue must touch the egg.
Drop your egg from different heights to see how well it survives. (Make sure you’re supervised by an adult when you do your egg drop!)
You can calculate the force of gravity on your egg and container by multiplying its weight in kilograms by 9.8meters/second (the acceleration due to gravity.