Tag: experiment’
Thanksgiving Science Experiment: testing foods for starch
- by KitchenPantryScientist
Ever wonder how much starch is in your Thanksgiving dinner? Click here for a fun experiment that lets you test your favorite foods for starch using iodine from the medicine cabinet.

Remember to supervise small children if you do this experiment, since iodine should not be ingested! Happy Thanksgiving!
Fall Leaf Chromatography
- by KitchenPantryScientist
Why do leaves change color? Here’s a fun experiment that I posted last September. Try it!

Fall Leaf Chromotography
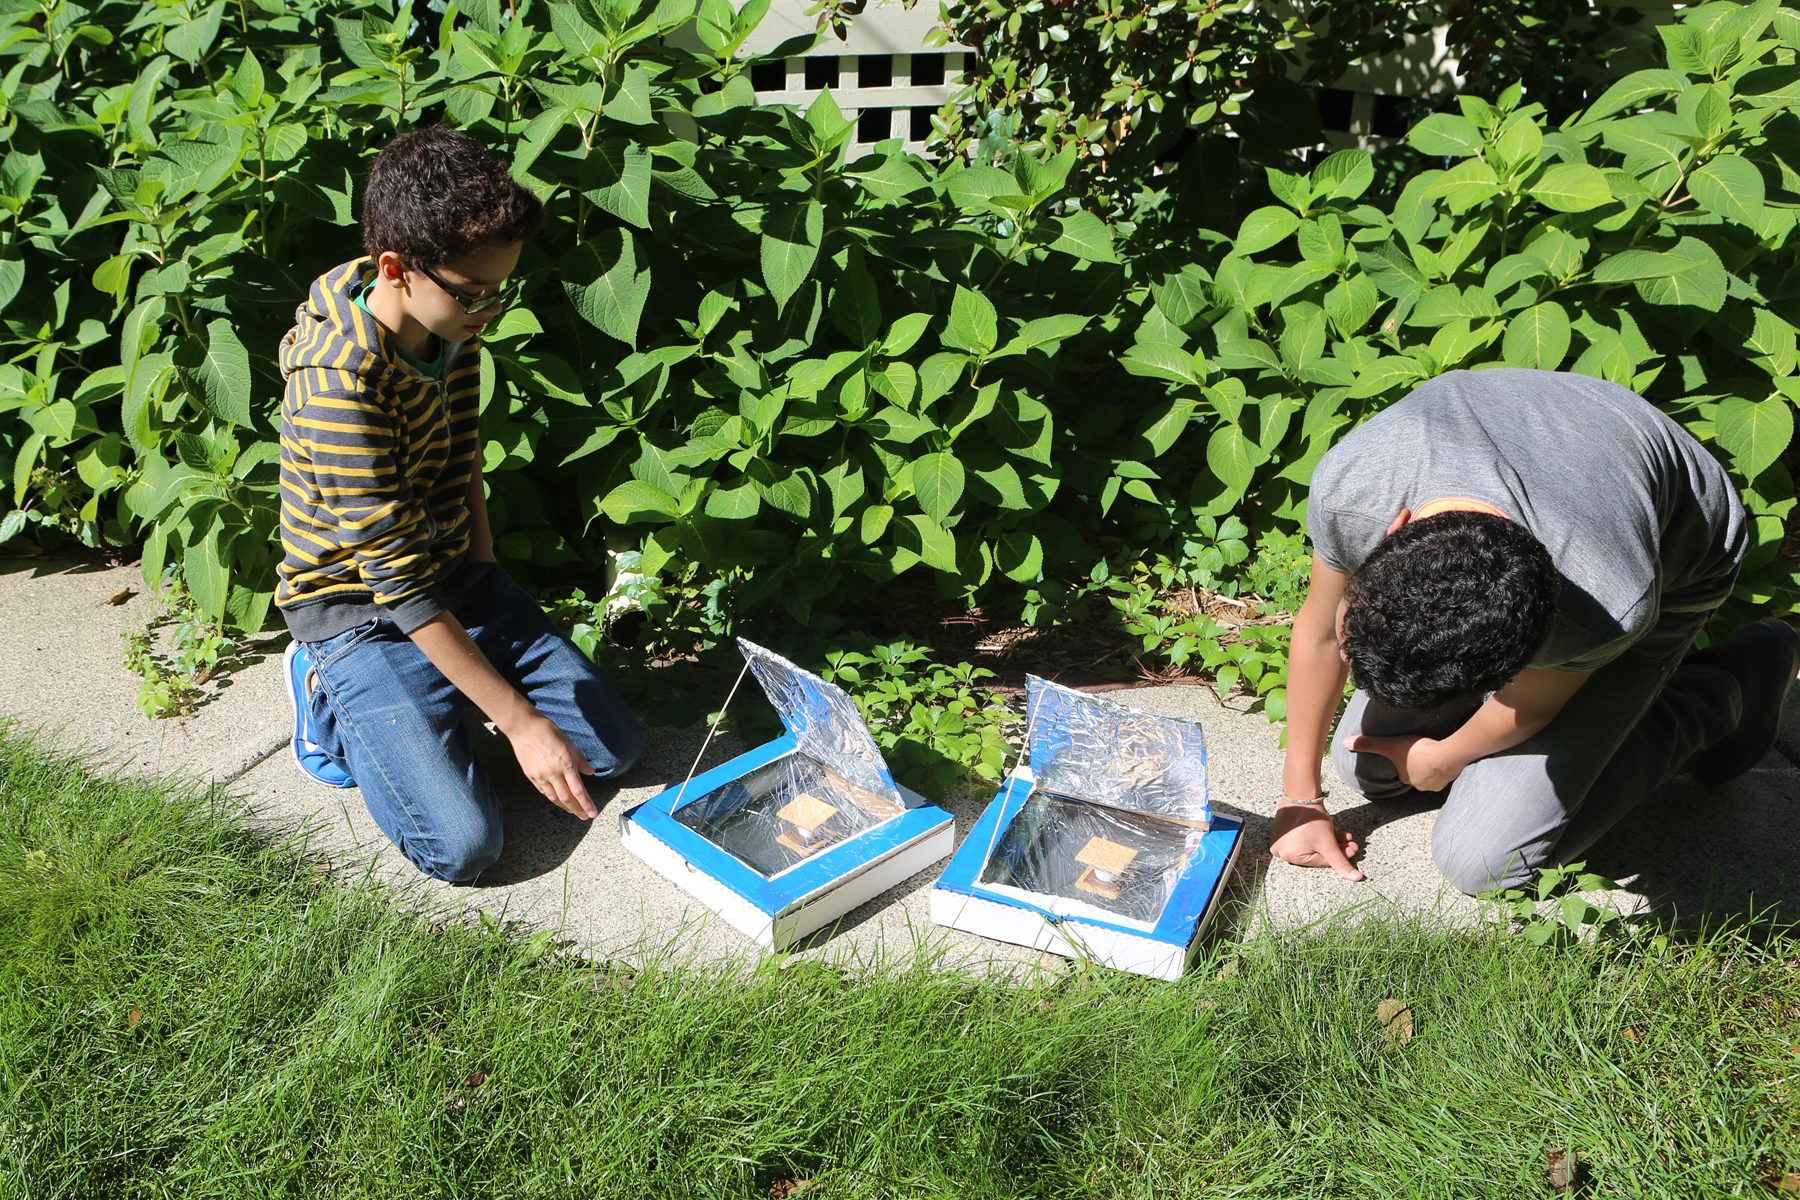
Kids Summer Science: Pizza Box Solar Oven
- by KitchenPantryScientist

A warm, sunny spring or summer day is perfect for making a solar oven from a pizza box!
When my friend Sheila, who works at NREL (the National Renewable Energy Laboratory) sent me this project, I couldn’t wait to try it out. We first tried it out on a cool spring day in Minnesota and to my surprise, it worked. The oven didn’t get very hot, but we were able to warm a chocolate chip cookie enough to make it soft and melt the chips.
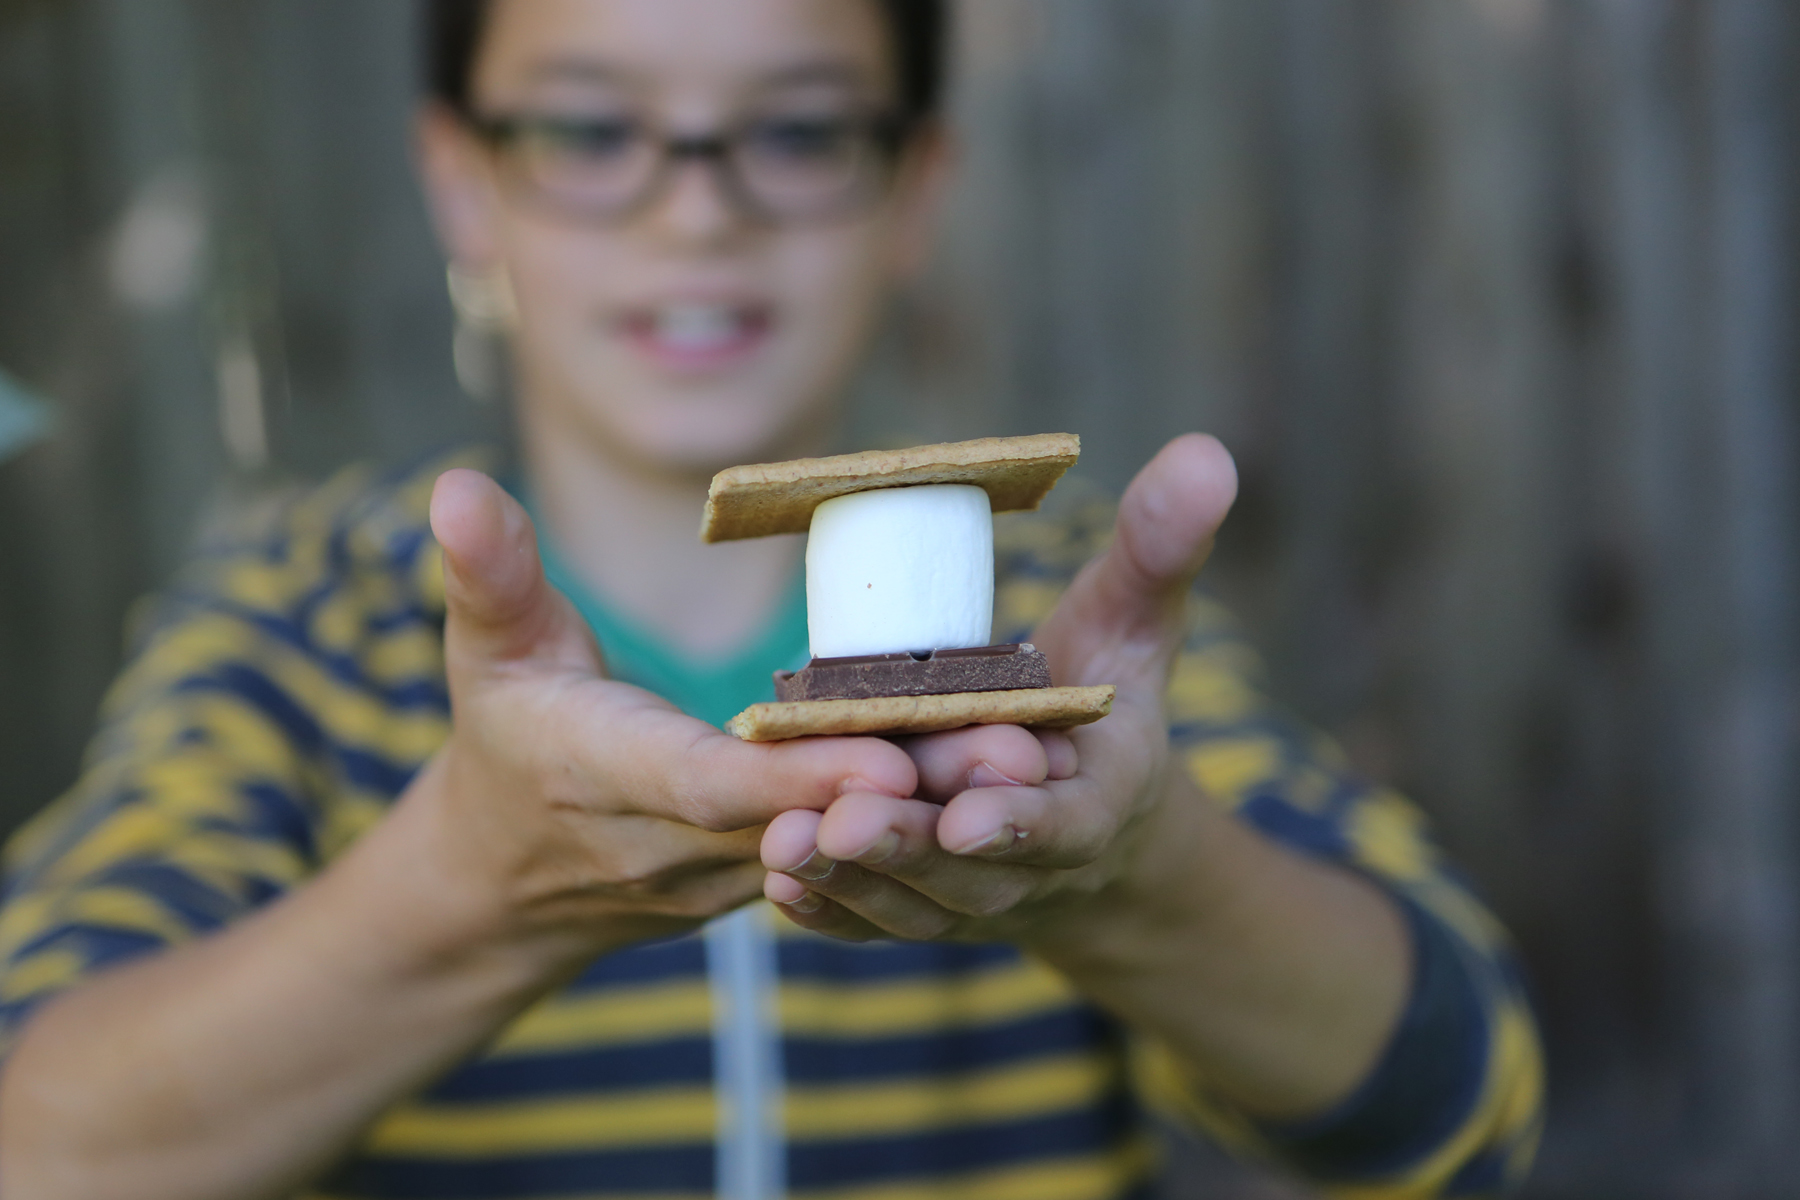
NREL suggests using your oven to make s’mores, which we’ve tried and is really fun. The solar oven is surprisingly easy to make and is one of the experiments featured in my book Kitchen Science Lab for Kids. (Quarry Books 2014)
Solar Oven from Kitchen Science Lab for Kids (Quarry Books)
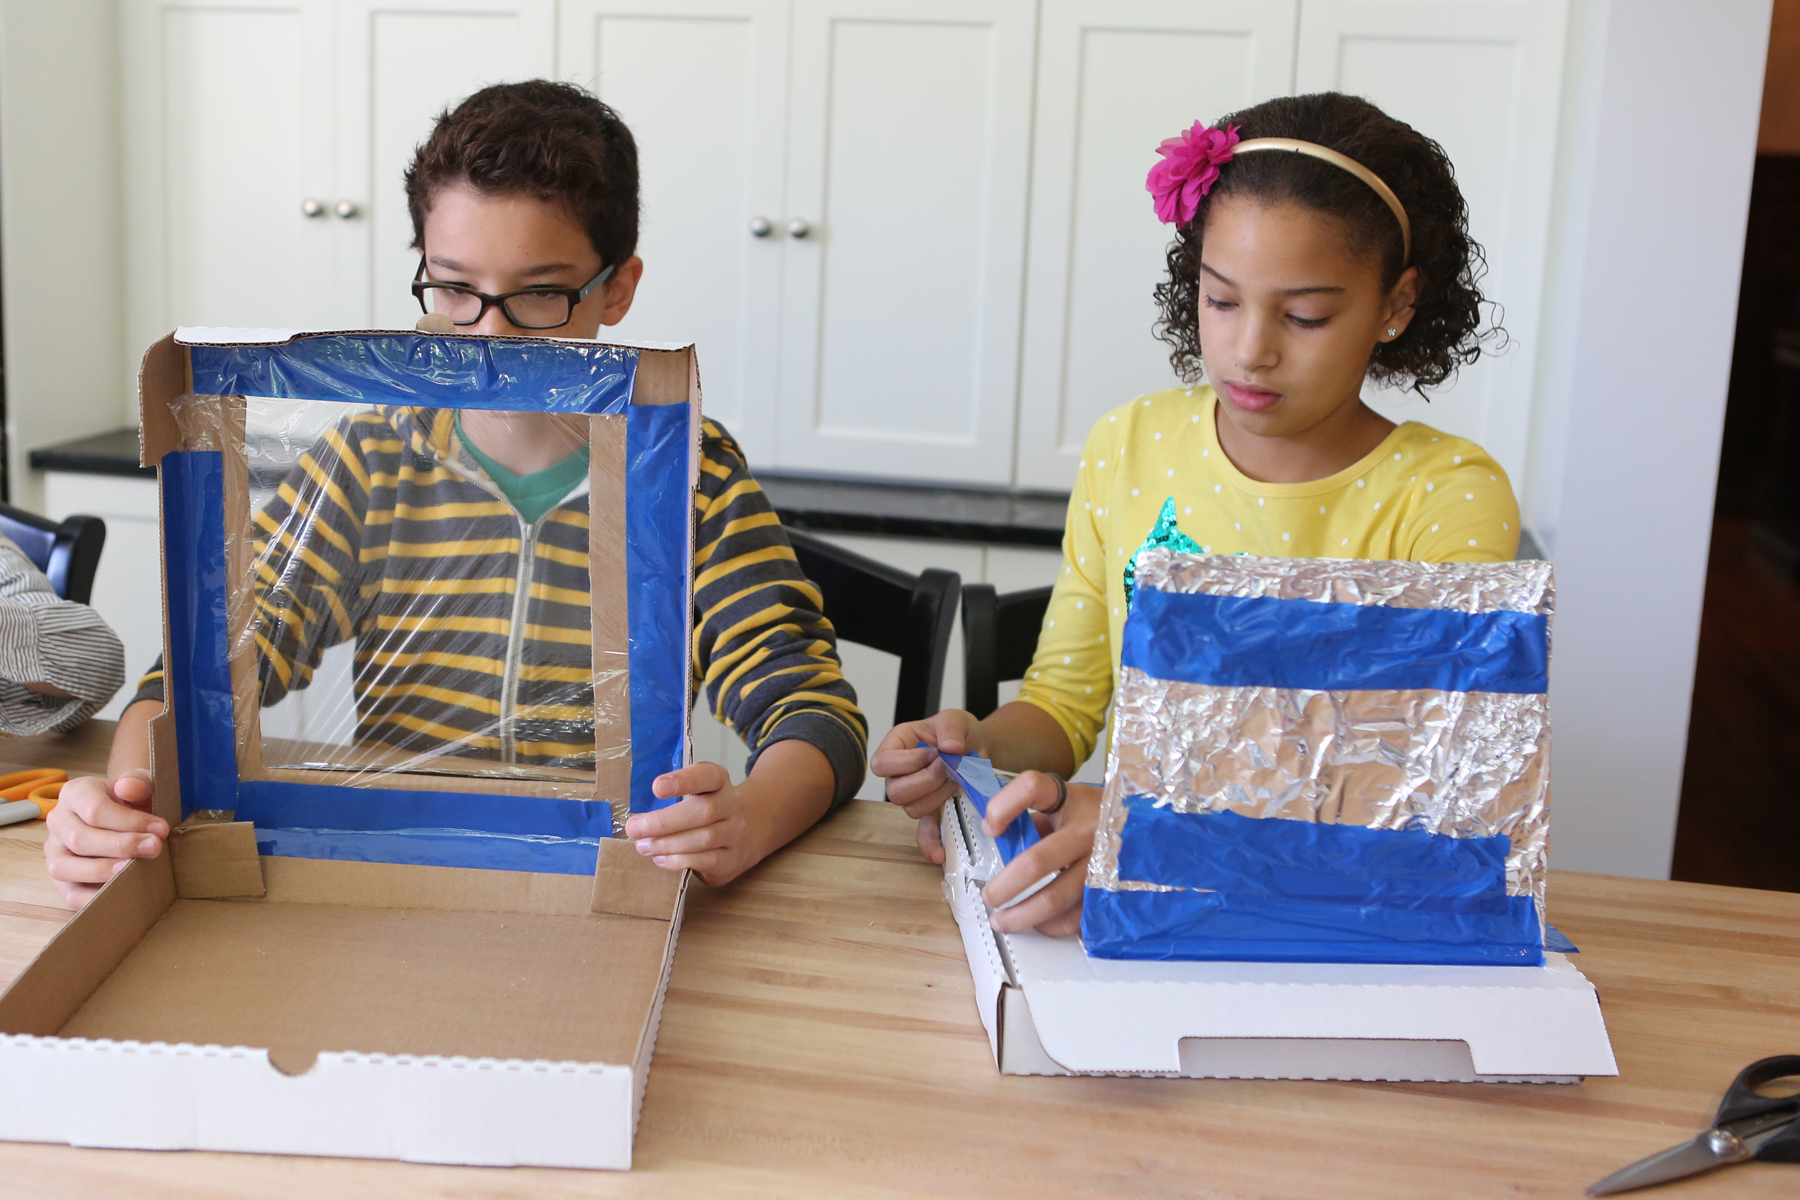
You will need: 1 pizza box from a local pizza delivery store (Little Caesars, Domino’s, Pizza Hut, etc.), newspapers, tape, scissors, black construction paper, clear plastic wrap, aluminum foil and a dowel or stick to prop the lid up. You will also want to have some food to warm in your oven-marshmallows, chocolate, etc.
Make sure the cardboard is folded into its box shape. Carefully cut out 3 sides of a square in the lid of the box. Do not cut out the fourth side of the square, which is the one closest to where the pizza box lid hinges. Gently fold the flap back along the uncut edge to form a crease.
Now, Wrap the underside (inside) face of the flap that you made with aluminum foil. Tape it so that the foil is help firmly but so that there’s not too much tape showing on the foil side of the flap.
Solar Oven from Kitchen Science Lab for Kids (Quarry Books)
Open the box and place a piece of black construction paper so that it fits the bottom of the box. Tape it by the edges. (We used two pieces.)
Roll up some newspaper and fit it around the inside edges of the box. This is the insulation. It should be about 1-1 ½” thick. Use tape (or other materials you can think of) to hold the newspaper in place. Tape it to the bottom of the box so that you can close the lid. (We taped it to the sides and had to cut the tape so that we could close the lid. Luckily our newspaper fit in tightly enough that we didn’t really even need the tape.)

Finally, cut plastic wrap an inch larger than the lid opening on the box top. Tape it on the underside of the lid opening. Add another piece of plastic wrap to the top of the lid opening. This creates a layer of air as insulation that keeps heat in the box. It also makes a window you can look through at the food you’re “cooking.” BE SURE THE PLASTIC WRAP IS TIGHT.
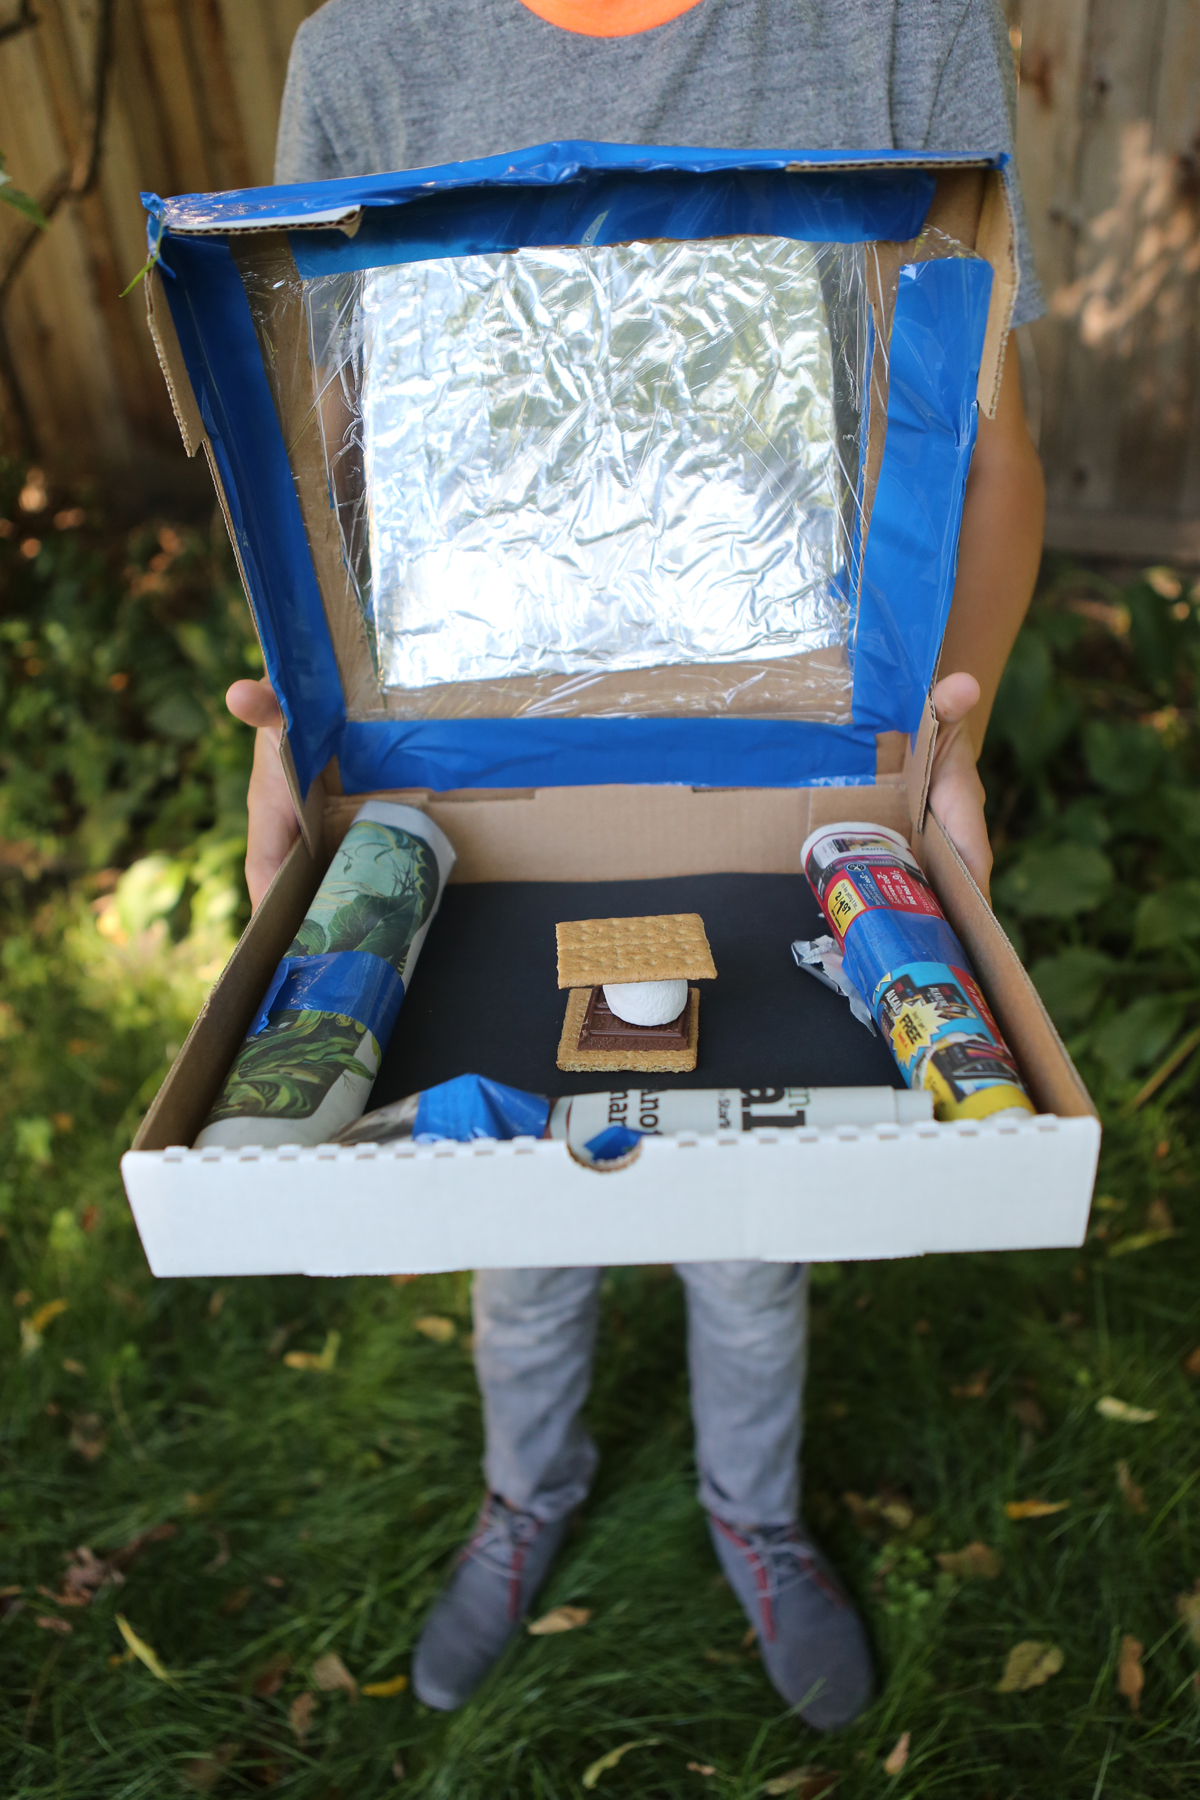
You are almost done! According to NREL, the oven needs to sit at an angle facing the sun directly so you’ll need to make a prop. You could probably just use a book or something under the hinged side of the oven. However, I missed this when I read the directions and we just put it flat on the ground. The flap of the box top needs to be propped open—a dowel or ruler works great. We used a wooden skewer that I broke the sharp point off of. This way you can change the amount of sunlight striking the oven window. Play with the angle of the flap to see how much sunlight you can get to reflect on the food.

Check every once in a while to see how well your food is being heated by solar thermal energy. If you’re is interested in finding out how the sun cooked your food, go to http://www.nrel.gov/ NREL’s website has great information on solar energy and many other sources of renewable energy.
Solar Oven from Kitchen Science Lab for Kids (Quarry Books)
Incredible “Feets” with Eggs
- by KitchenPantryScientist
Would you be surprised if I told you that you could stand on a carton of raw eggs barefoot without breaking them? Or that you can squeeze an egg with all your might without even cracking it (provided there are no cracks in the egg and you’re not wearing a ring?) Here’s a video of us doing these eggsperiments on Kare 11 Sunrise news!
Chicken eggs have delicate enough shells that chicks can peck their way out, but their architecture is nothing short of amazing. Their arched shape makes them able to handle large amounts of pressure without cracking, which is extremely important, since hens must sit on them in order to hatch them out. Humans use arches too, for designing strong building and bridges.
Remove any rings you’re wearing, place a raw egg in a plastic baggie and wrap your hand around it evenly. Squeeze as hard as you can. Did you break it?
 If you’re feeling brave, open a carton of raw eggs, remove any that are cracked and make sure they’re all pointing in the same direction (pointy side up or round side up) and set them on the floor.
Remove your socks and hold on to a chair or someone’s hand. Carefully step onto the eggs with your entire foot. Remember: pressure is force per unit of area. The idea is to equally distribute your weight, and therefore the pressure, across all twelve eggs. Let go of the chair.
Did it work? How important do you think it is to keep your foot flat? What would happen if you tried the same experiment in pointy high-heels?
Remember to wash your hands after touching raw eggs so you don’t spread Salmonella bacteria around!
Diffusion and Osmosis experiments
- by KitchenPantryScientist
 Diffusion is the name for the way molecules move from areas of high concentration, where there are lots of other similar molecules, to areas of low concentration, where there are fewer similar molecules. When the molecules are evenly spread throughout the space, it is called equilibrium. Imagine half a box filled with yellow balls and the other half filled with blue ones. If you set the box on something that vibrates, the balls will start to move around randomly, until the blue and yellow balls are evenly mixed up.
Think about the way pollutants move from one place to another through air, water and even soil. Or consider how bacteria are able to take up the substances they need to thrive. Your body has to transfer oxygen, carbon dioxide and water by processes involving diffusion as well.
Lots of things can affect how fast molecules diffuse, including temperature. When molecules are heated up, they vibrate faster and move around faster, which helps them achieve equilibrium more quickly than they would if it were cold.
Diffusion takes place in gases (like air), liquids (like food coloring moving through water,) and even solids (semiconductors for computers are made by diffusing elements into one another.)
You can watch food coloring diffuse through a colloid (gelatin) at home and measure how long it takes. Gelatin is a good substance to use for diffusion experiments since it doesn’t support convection, which is another kind of movement in fluids. You’ll need clear gelatin (from the grocery store or Target), food coloring and water.
Add 4 packs of plain, unflavored gelatin (1 oz or 28 gm) to 4 cups of boiling water. Pour the liquid gelatin into petri dishes, cups, or tupperware and let it harden. Then, using a straw, poke a hole or two in the gelatin, removing the plug so that you have a hole in the jello about 1/2 inch deep. Add a drop of food coloring in the hole in the jello.

Every so often, measure the circle of food coloring as it diffuses into the jello around it. How many cm per hour is it diffusing? If you put one plate in the refrigerator and an identical one at room temperature, do they diffuse at the same rate? Why do you think you see more than one color for certain shades of food coloring? What else could you try?
Here’s a post on how to use this experiment to make sticky window decorations: https://kitchenpantryscientist.com/?p=4489
We made plates and did the same experiment using 2 cups of red cabbage juice, 2 cups of water and 4 packs of gelatin to see how fast a few drops of vinegar or baking soda solution would diffuse (a pigment in red cabbage turns pink when exposed to acid, and blue/green when exposed to a base!)


 You can see the pink circle from the vinegar and the green one from the baking soda solution.
It’s also fun to experiment with the diffusion of substances across a membrane, like a paper towel. This is called osmosis. Membranes like the ones around your cells are selectively permeable and let water and oxygen in and out, but keep other, larger molecules from freely entering and exiting your cells.
For this experiment, you’ll need a jar (or two), paper towels, rubber bands and food coloring. Fill a jar with water and secure a paper towel in the jar’s mouth (with a rubber band) so that it hangs down into the water, making a water-filled chamber that you can add food coloring to. Put a few drops of food coloring into the chamber and see what happens.

top “chambers” for food coloring


Are the food coloring molecules small enough to pass through the paper towel “membrane?” What happens if you put something bigger, like popcorn kernels in the chamber? Can they pass through the small pores in the paper towel?
Do the same experiment in side-by-side jars, but fill one with ice water and the other with hot water. Does this affect the rate of osmosis or how fast the food coloring molecules diffuse throughout the water?
Think about helium balloons. If you take identical balloons and fill one with helium and the other with air, the helium balloon will shrink much faster as the smaller helium atoms diffuse out more quickly than the larger oxygen molecules.
Starch Test
- by KitchenPantryScientist
You probably know that lots of foods are full of starch, but did you know you can test foods in your own kitchen to see what has starch and what doesn’t? You can even see how starch is broken down by your own saliva by chewing a cracker for a long time and testing it for starch.
 A simple disinfectant called iodine that kills bacteria and viruses can also be used to test for the presence of starch.
Starch is a carbohydrate, or a long chain of glucose (sugar) molecules stuck together by chemical bonds. All plants make starch, but some contain more than others. It is the most common carbohydrate in the human diet!
Iodine usually looks brown, but when long chains of starch interact with iodine, scientists think the iodine molecules get wrapped up in the chains, as if a snake is coiling around them. This changes the way the iodine reflects light, and it starts to look black or blue, instead of reddish-brown. Sugar that is not in long chains doesn’t do the same thing to iodine.
To test for starch in your own kitchen, you’ll need iodine, an eyedropper and the food you want to test. I’d suggest table sugar, potato slices, banana slices, cucumber slices, bread or anything else that is light colored. Dilute some iodine by adding about a teaspoon (5ml) of it to a teaspoon of water (5ml.) For each sample, have a control. For example, have two slices of bread: one to drop water on and another to drop iodine on. This experiment should be done with adult supervision since iodine should not be ingested!

Add a drop of water to each control sample. Then, add a drop of iodine the other samples. Watch and wait for about 5 minutes. Can you tell which samples contain starch? The ones that contain the most starch will turn the iodine blue or black.

Now, take a cracker, chew it for a minute or so and spit it out into a dish. Mash another cracker up with water and put in another dish. Drip iodine on both of them and wait. What happens?
Gluten Ball
- by KitchenPantryScientist
Gluten is a hot topic these days, but most people aren’t really sure what it is.

Gluten is a protein found in wheat, rye and barley. It makes bread chewy and helps hold the bubbles that yeast makes in dough so that it can rise. (Here’s a fun yeast experiment!) Although some people have a disorder called celiac disease which impedes them from digesting gluten properly, most people can eat it without any problem.

You can easily extract a ball of gluten from flour using nothing but your hands and cold water, to see for yourself what this stretchy grain protein looks like. Just add a cup of water to a cup of flour, mix it together and knead it for about 5 minutes. (Add more flour if it’s too sticky to handle.)

Now, put the dough under COLD water and start “washing” out the carbohydrates so that mostly the gluten remains. Your hands will freeze, so you may need to take a break. If you keep going until the water coming off the dough is mostly clear, you’ll be left with a gluten ball.
Some types of flour have more gluten than others, and sometimes extra gluten is added to pizza dough to make it chewier! Try this with several types of flour to see what has the most gluten (or no gluten.)
Ocean Acidification Experiment/ CO2 Breath Test
- by KitchenPantryScientist
Last week, I wrote about Carbon, Bananas, Coal and You and promised to try to come up with a safe, easy way to see the carbon dioxide in your breath, so here it is! (It’s one of the experiments featured in my book Kitchen Science Lab for Kids.)
Ocean Acidification Experiment from Kitchen Science Lab for Kids (Quarry Books)
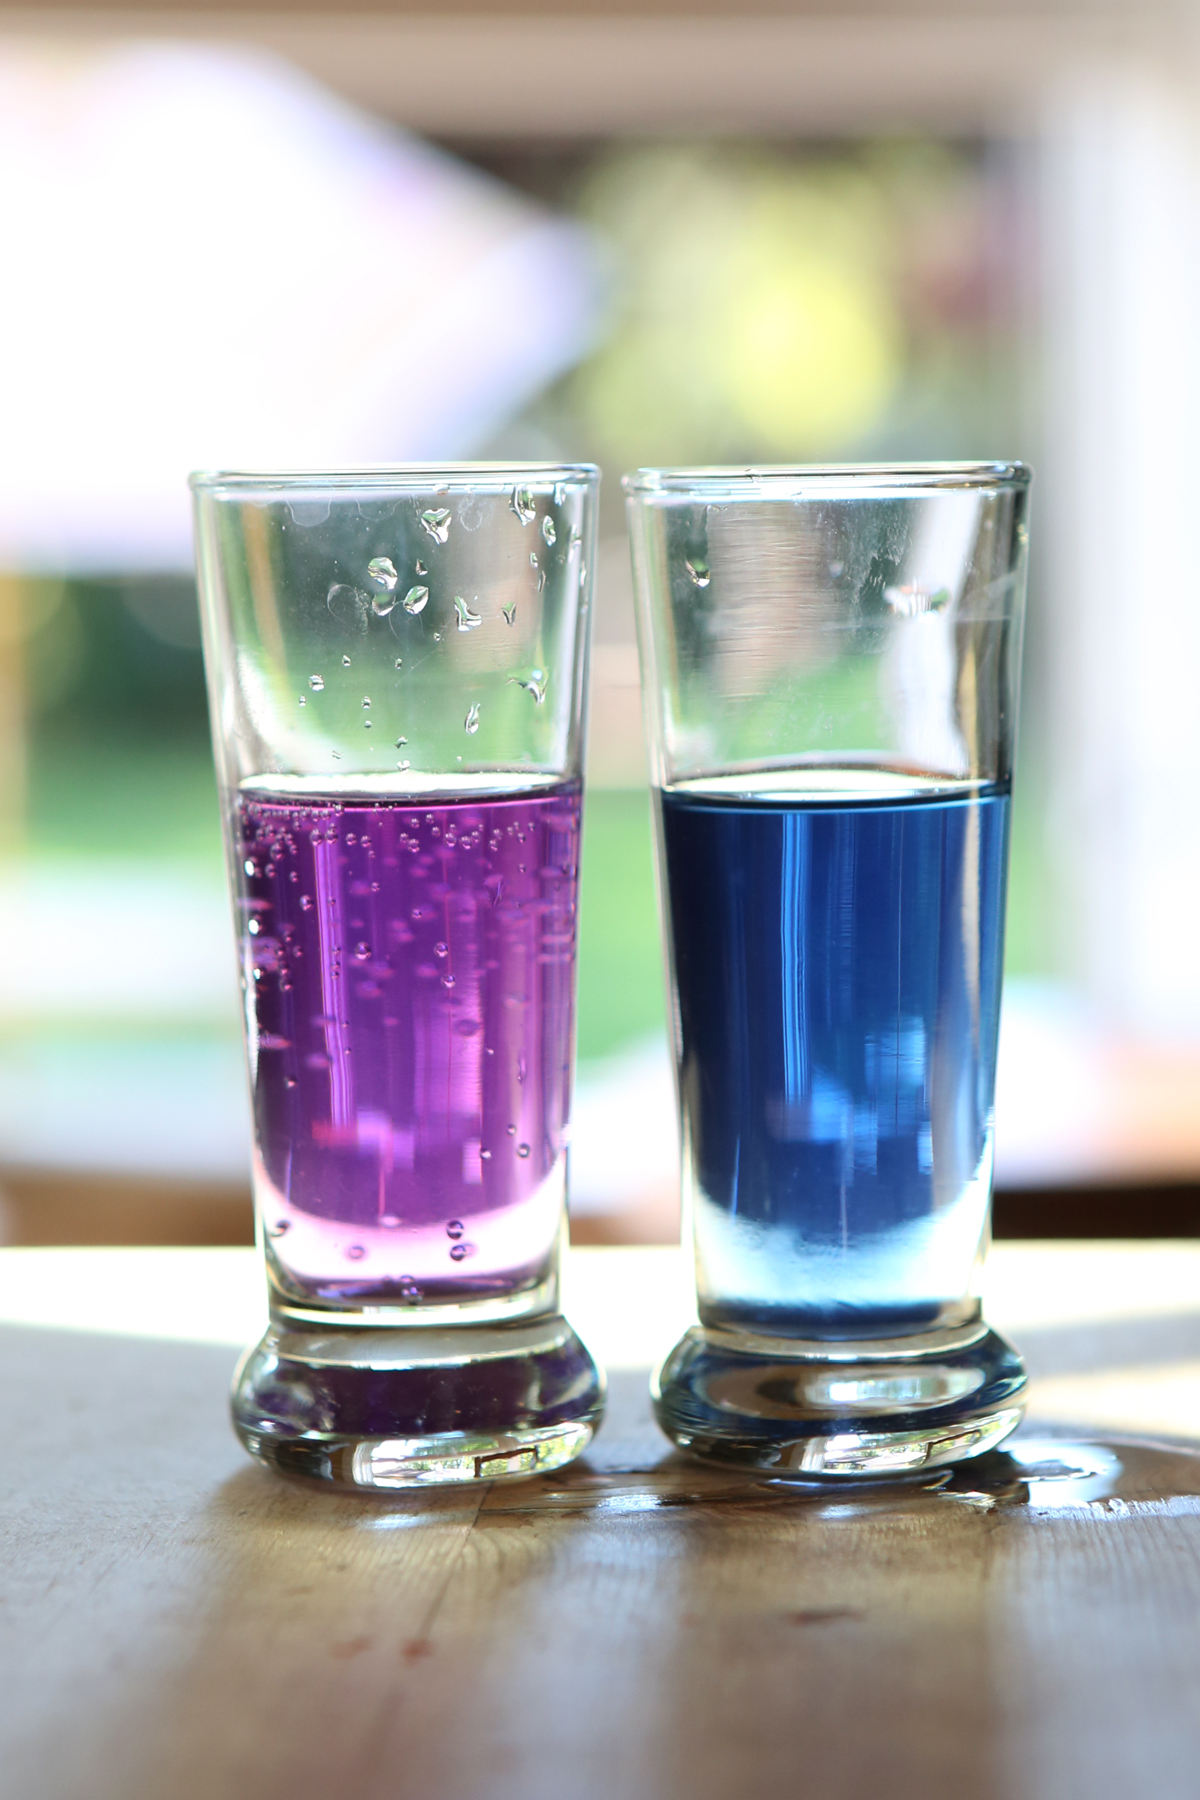
For both experiments, the star of the show is red cabbage juice, a safe, natural, easy-to-make acid/base indicator and the same one you can use to make magic potion and red cabbage litmus paper.
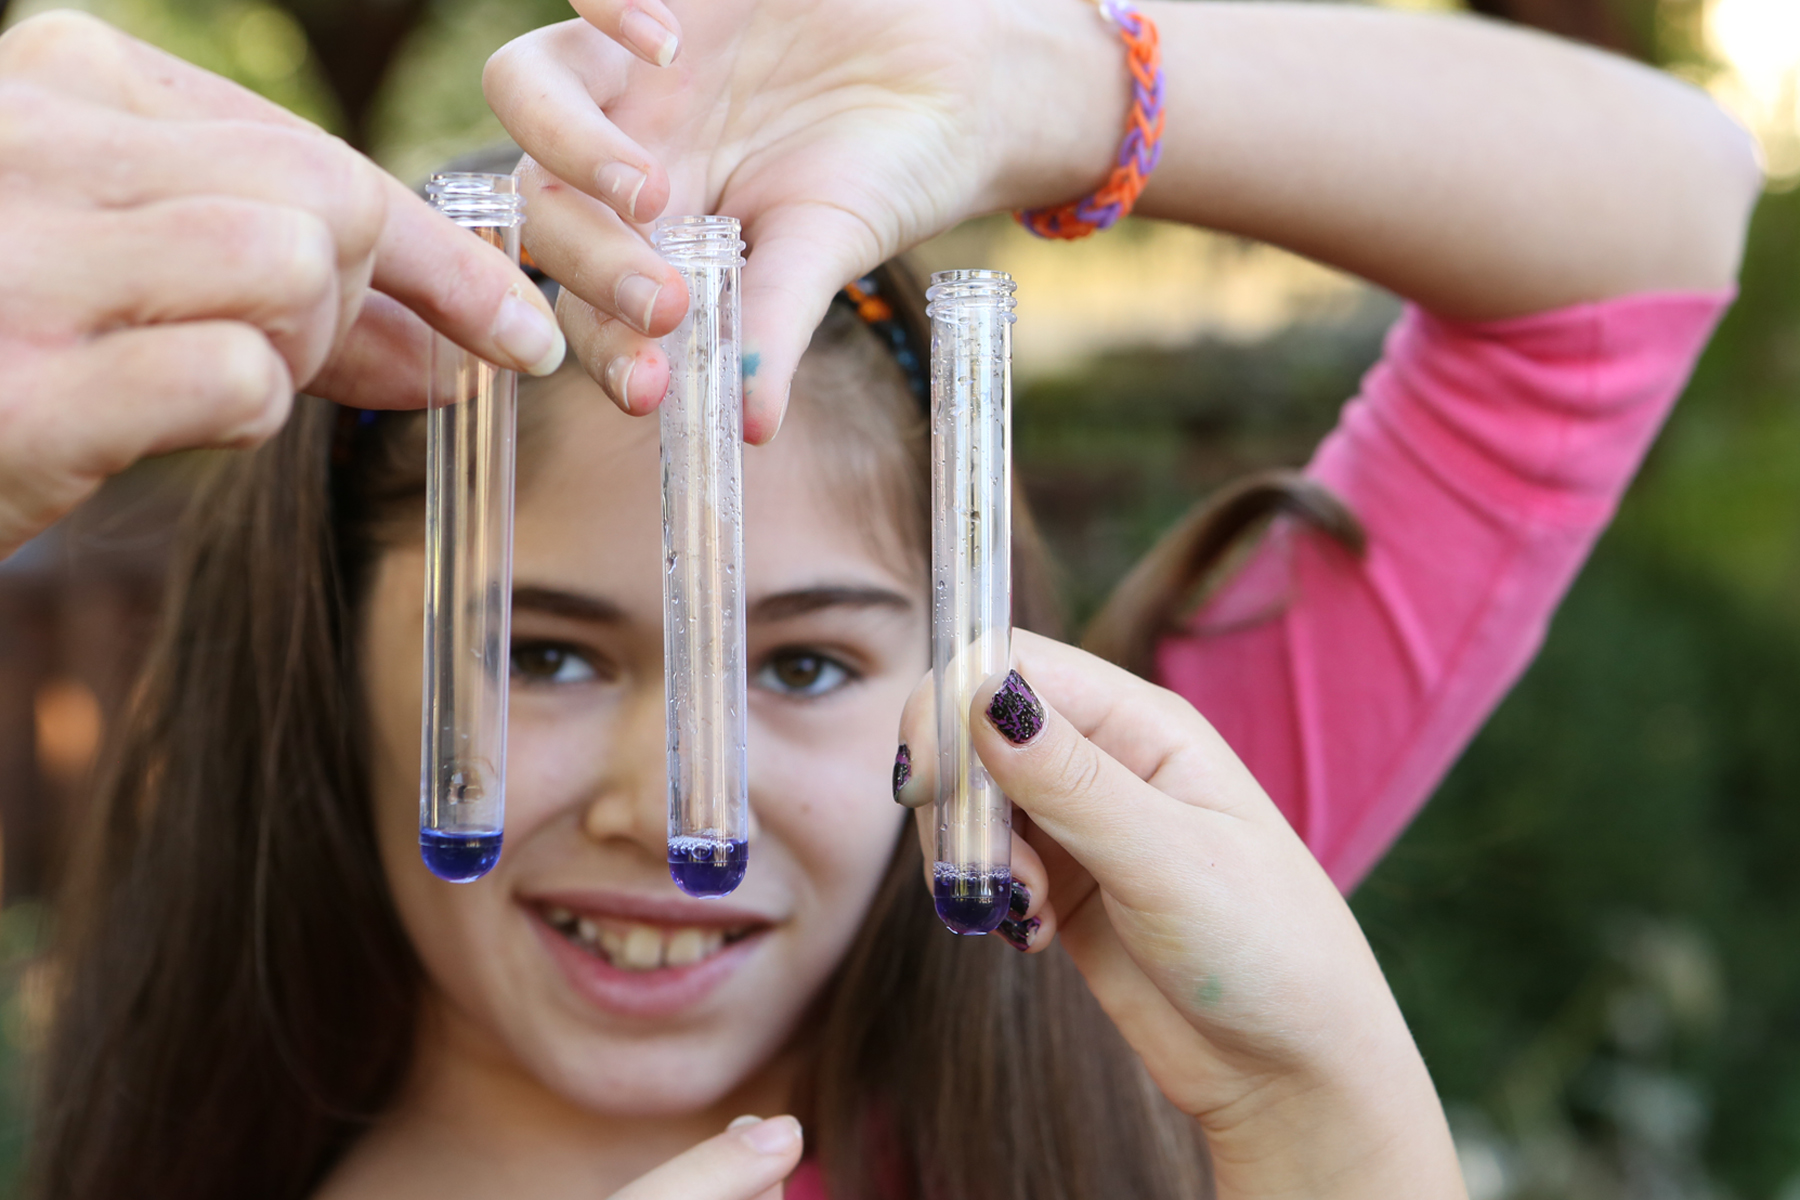
For the CO2 Breath Test, the trick is to use a very small volume of cabbage juice, since it’s not a very sensitive acid indicator.
You’ll need red cabbage, drinking straws, and very small cups (the ones you measure kids’ medicine with work well) or test tubes.
- Chop a head of red cabbage, boil it for 15 minutes, cool and collect the juice. It will be purplish in water and turns blue when exposed to a base or pink when exposed to an acid. (The molecule that gives it color can change shape to absorb light differently.)
- Pour a very small volume- a teaspoon or two (5 to 10 ml)- of the (cooled) juice into two small cups. Take a straw, put it all the way against the bottom of one cup and blow through the straw repeatedly for a few minutes until you see the cabbage juice turn noticeably pinker than the juice in the control cup. It may take several minutes to see a difference, so be patient! Test tubes are less messy since the juice can’t splatter so much.
 or
or 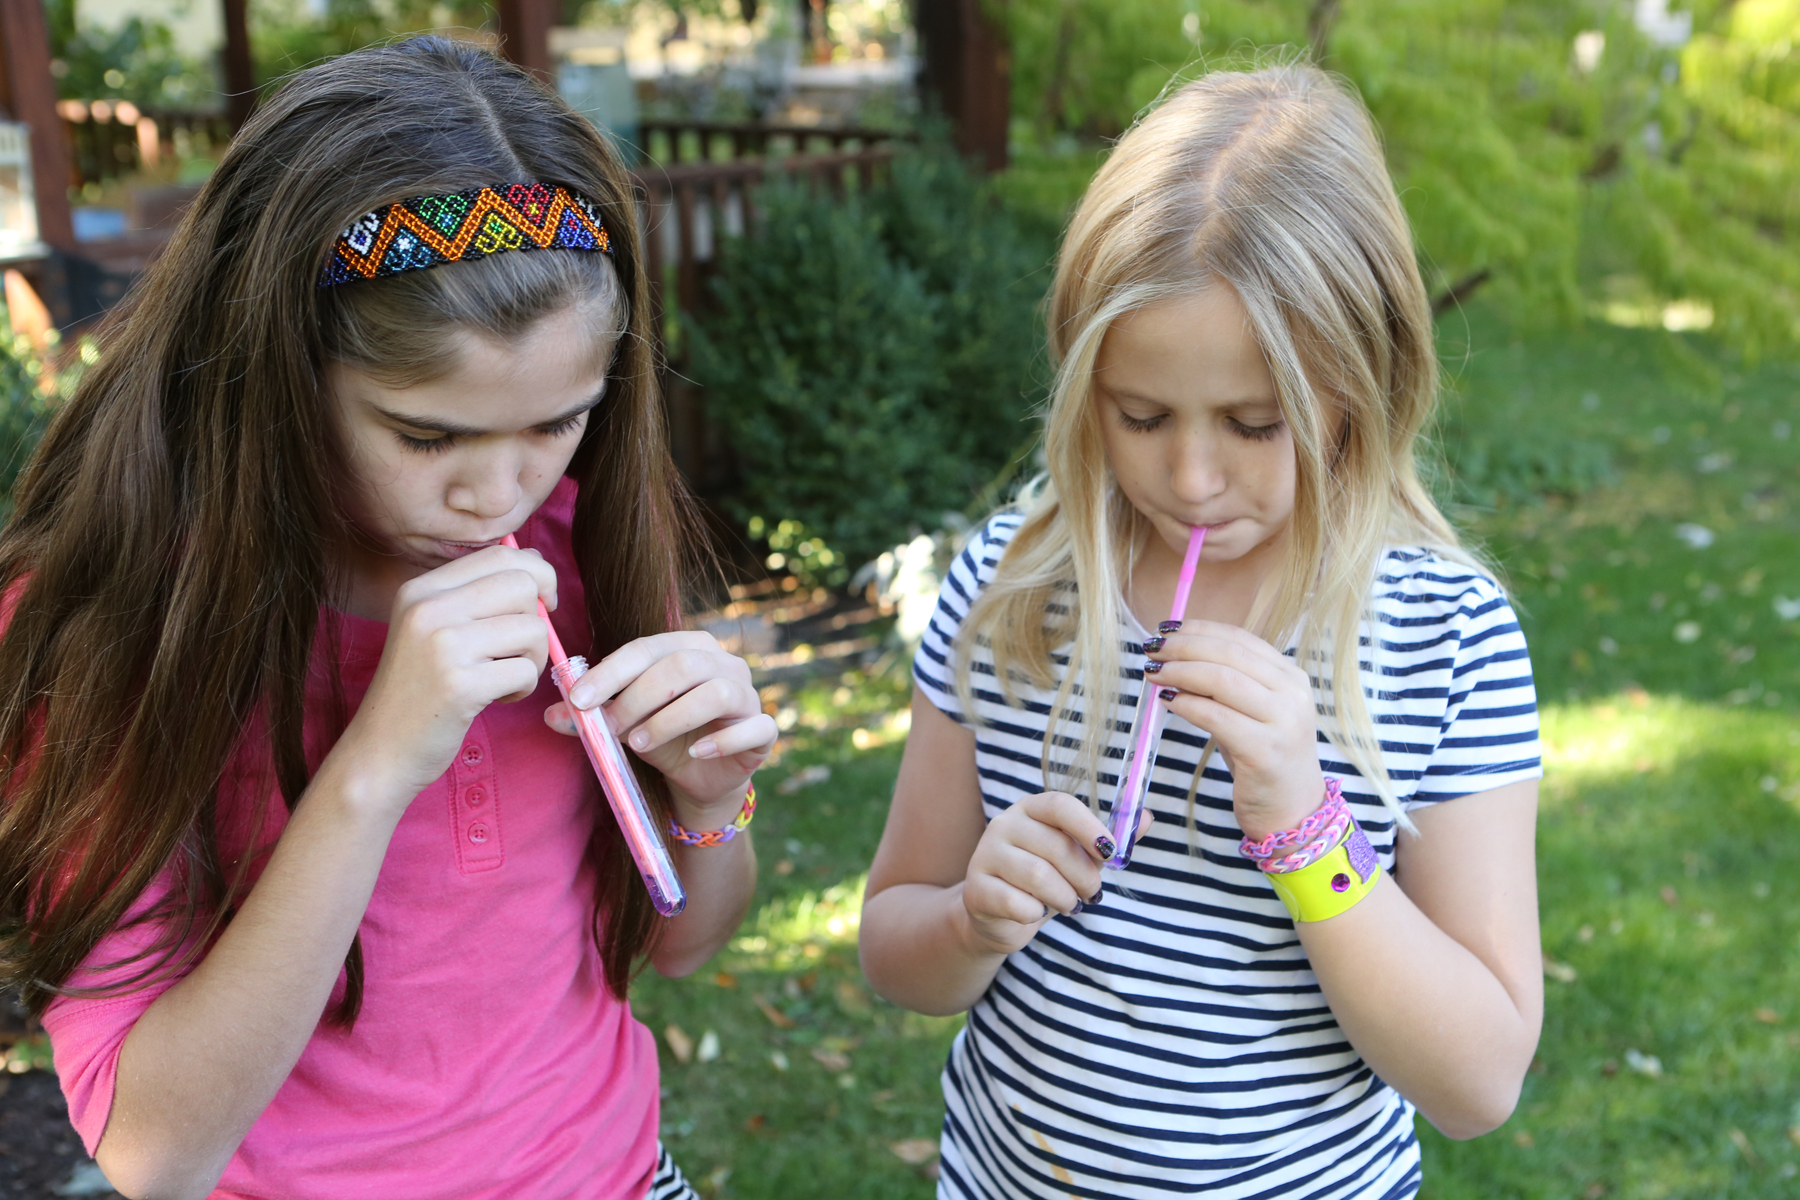
Ocean Acidification Experiment from Kitchen Science Lab for Kids (Quarry Books)
What happens? The carbon dioxide in your breath combines with the water in the cabbage juice to form carbonic acid, causing the pH of the solution to drop and the cabbage juice to take on a pinkish hue.
Ocean Acidification Experiment from Kitchen Science Lab for Kids (Quarry Books)
Why is this interesting? About a quarter of the carbon dioxide released by activities like burning fossil fuels and burning down rainforests is absorbed by our world’s oceans. This results in the ocean water becoming more acidic, like the cabbage juice in the experiment, and can have an effect on sea life, like coral. To learn more about ocean acidification and the chemistry of ocean acidification, check out NOAA’s amazing website.
You can explore the same concept (and see why carbonated drinks are hard on your teeth) by pouring uncarbonated water into one cup of cabbage juice and carbonated water into another. If you can, choose water from the same source, so you know the only difference is the carbon dioxide that’s been added to make it fizzy! Or, you could use dry ice to add carbon dioxide bubbles to water and test it before and after you add bubbles! 
What happens if you add yeast to cabbage juice and let it grow for a while?
You can use your leftover cabbage juice to make red cabbage litmus paper and then for a “magic potion” experiment.
Magic Potion Video
- by KitchenPantryScientist
With Halloween around the corner, you’ll love this bubbly, color-changing, stinky chemical reaction. All you need is a head of red cabbage, vinegar and baking soda for this mad scientist experiment!
Click here for more detailed instructions. If you want to avoid the stove, chop half a head of red cabbage and blend it with about 3 cups of water. Strain the liquid through a colander and then through a coffee filter in a plastic bag with one corner cut off. Blended cabbage juice makes longer-lasting bubbles and turns a slightly brighter shade of blue!
Plant Chromatography for Kids
- by KitchenPantryScientist
What started out as a food science experiment turned into a seasonal one this morning, and we ended up outside pulling leaves off our Maple tree to see how the pigments from a red leaf would compare to those from a green one. Liquid chromatography allows you to separate the pigments (molecules that give plants color) using paper as a solid medium for the molecules to travel up, and alcohol as the solvent that separates and carries the pigments up the paper at different speeds, depending on how large they are.

To do this experiment, you’ll need a green leaf, and one or more that has turned color (we found a red and green one from the same tree!) In addition, you’ll need a coin, a jar, a pencil, paper towels or coffee filters and rubbing alcohol. Young children MUST be supervised during this experiment since rubbing alcohol is a toxic substance if ingested!
Balance the pencil on the lip of the jar and cut a strip of paper towel or coffee filter long enough to hang (folded in half) over your pencil and dangle with both ends just above the bottom.
Draw a pencil line about half an inch above the bottom of the strip on one side. Wrap a leaf around the coin (dimes work well) and press it down against the line on the left side, hard enough to rub color onto the line. (See photo above!) Do the same thing with the other leaf. Get as much color as possible onto each spot and let dry for a few minutes, or dry with a blow dryer.

Fill the jar with just enough rubbing alcohol so that the bottom of the strip will touch it, but the spots of color will not. Hang your paper strip over the pencil with the bottom touching the alcohol. (You can have it doubled or have one half hanging outside the jar. Both worked for us.) Try to make sure that the strip is hanging evenly so the color will travel straight up.
Watch as the colors travel up the strip and take the strip out of the alcohol before they reach the top. Let it dry and observe. The colors may be faint, but you should be able to make them out.

What do you see? Green leaves contain a pigment called chlorophyll, which helps plants do photosynthesis (get energy from sunlight, water and carbon dioxide.) In the fall, many trees stop making this pigment, which is why the other colors in the leaves become visible. Are your results consistent with this?
We tried the same experiment to compare spinach leaves that were fresh or had been microwaved in a ziplock (blanched). Although I read that the pigments change when vegetables are cooked or stored, we didn’t see much difference, except a brown smear near the very bottom. What other veggies could you try this experiment with?
