Tag: Candy’
Hard Candy Stained Glass- Edible Science
- by KitchenPantryScientist
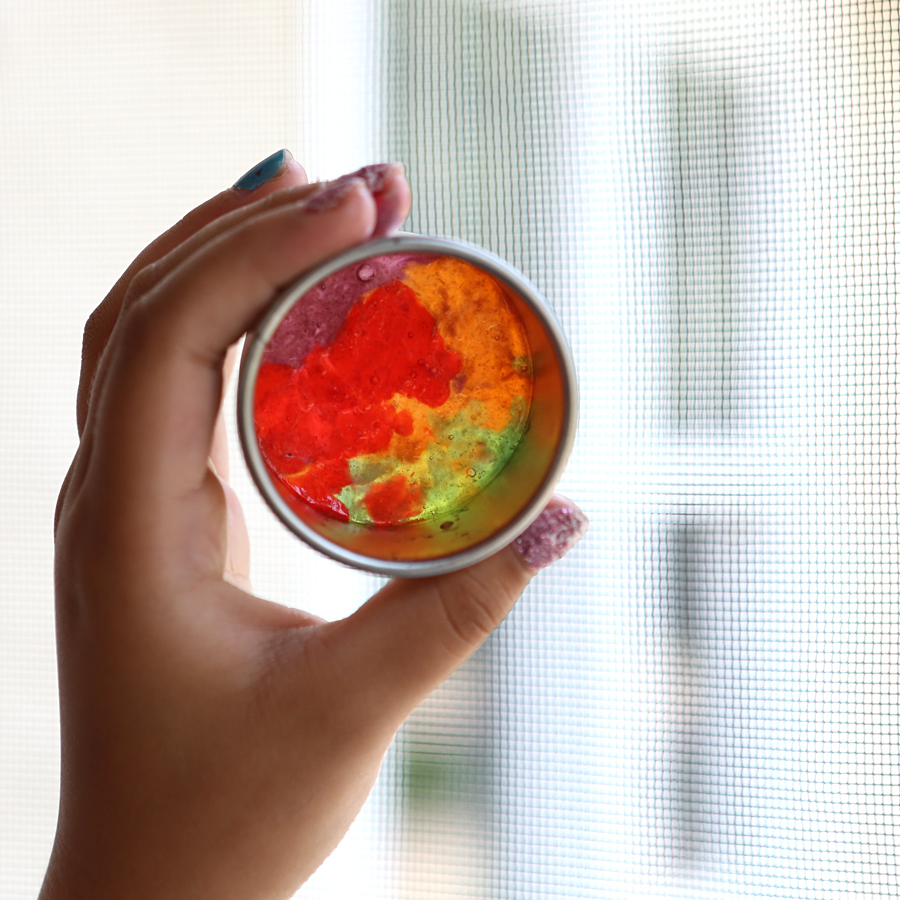
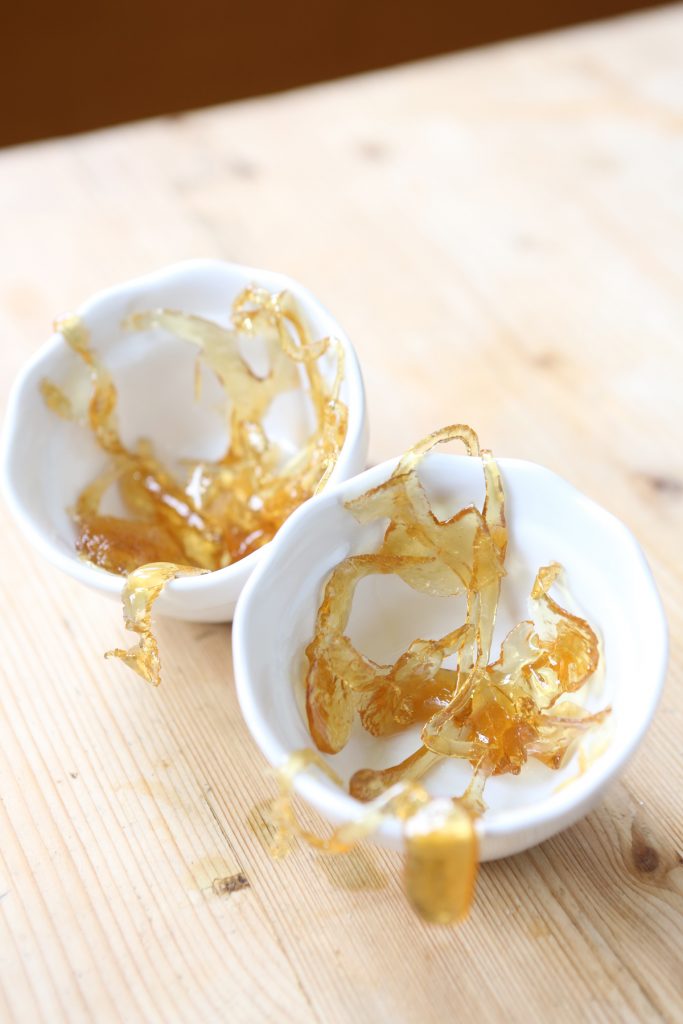
Most clear hard candy has what scientists call a glass structure. It’s a disorganized jumble of three kinds of sugar: glucose, fructose and sucrose, which can’t assemble into organized crystals, so it remains transparent when you melt it and allow it to re-harden.
Hard Candy Stained Glass “STEAM Lab for Kids” Quarry Books 2018
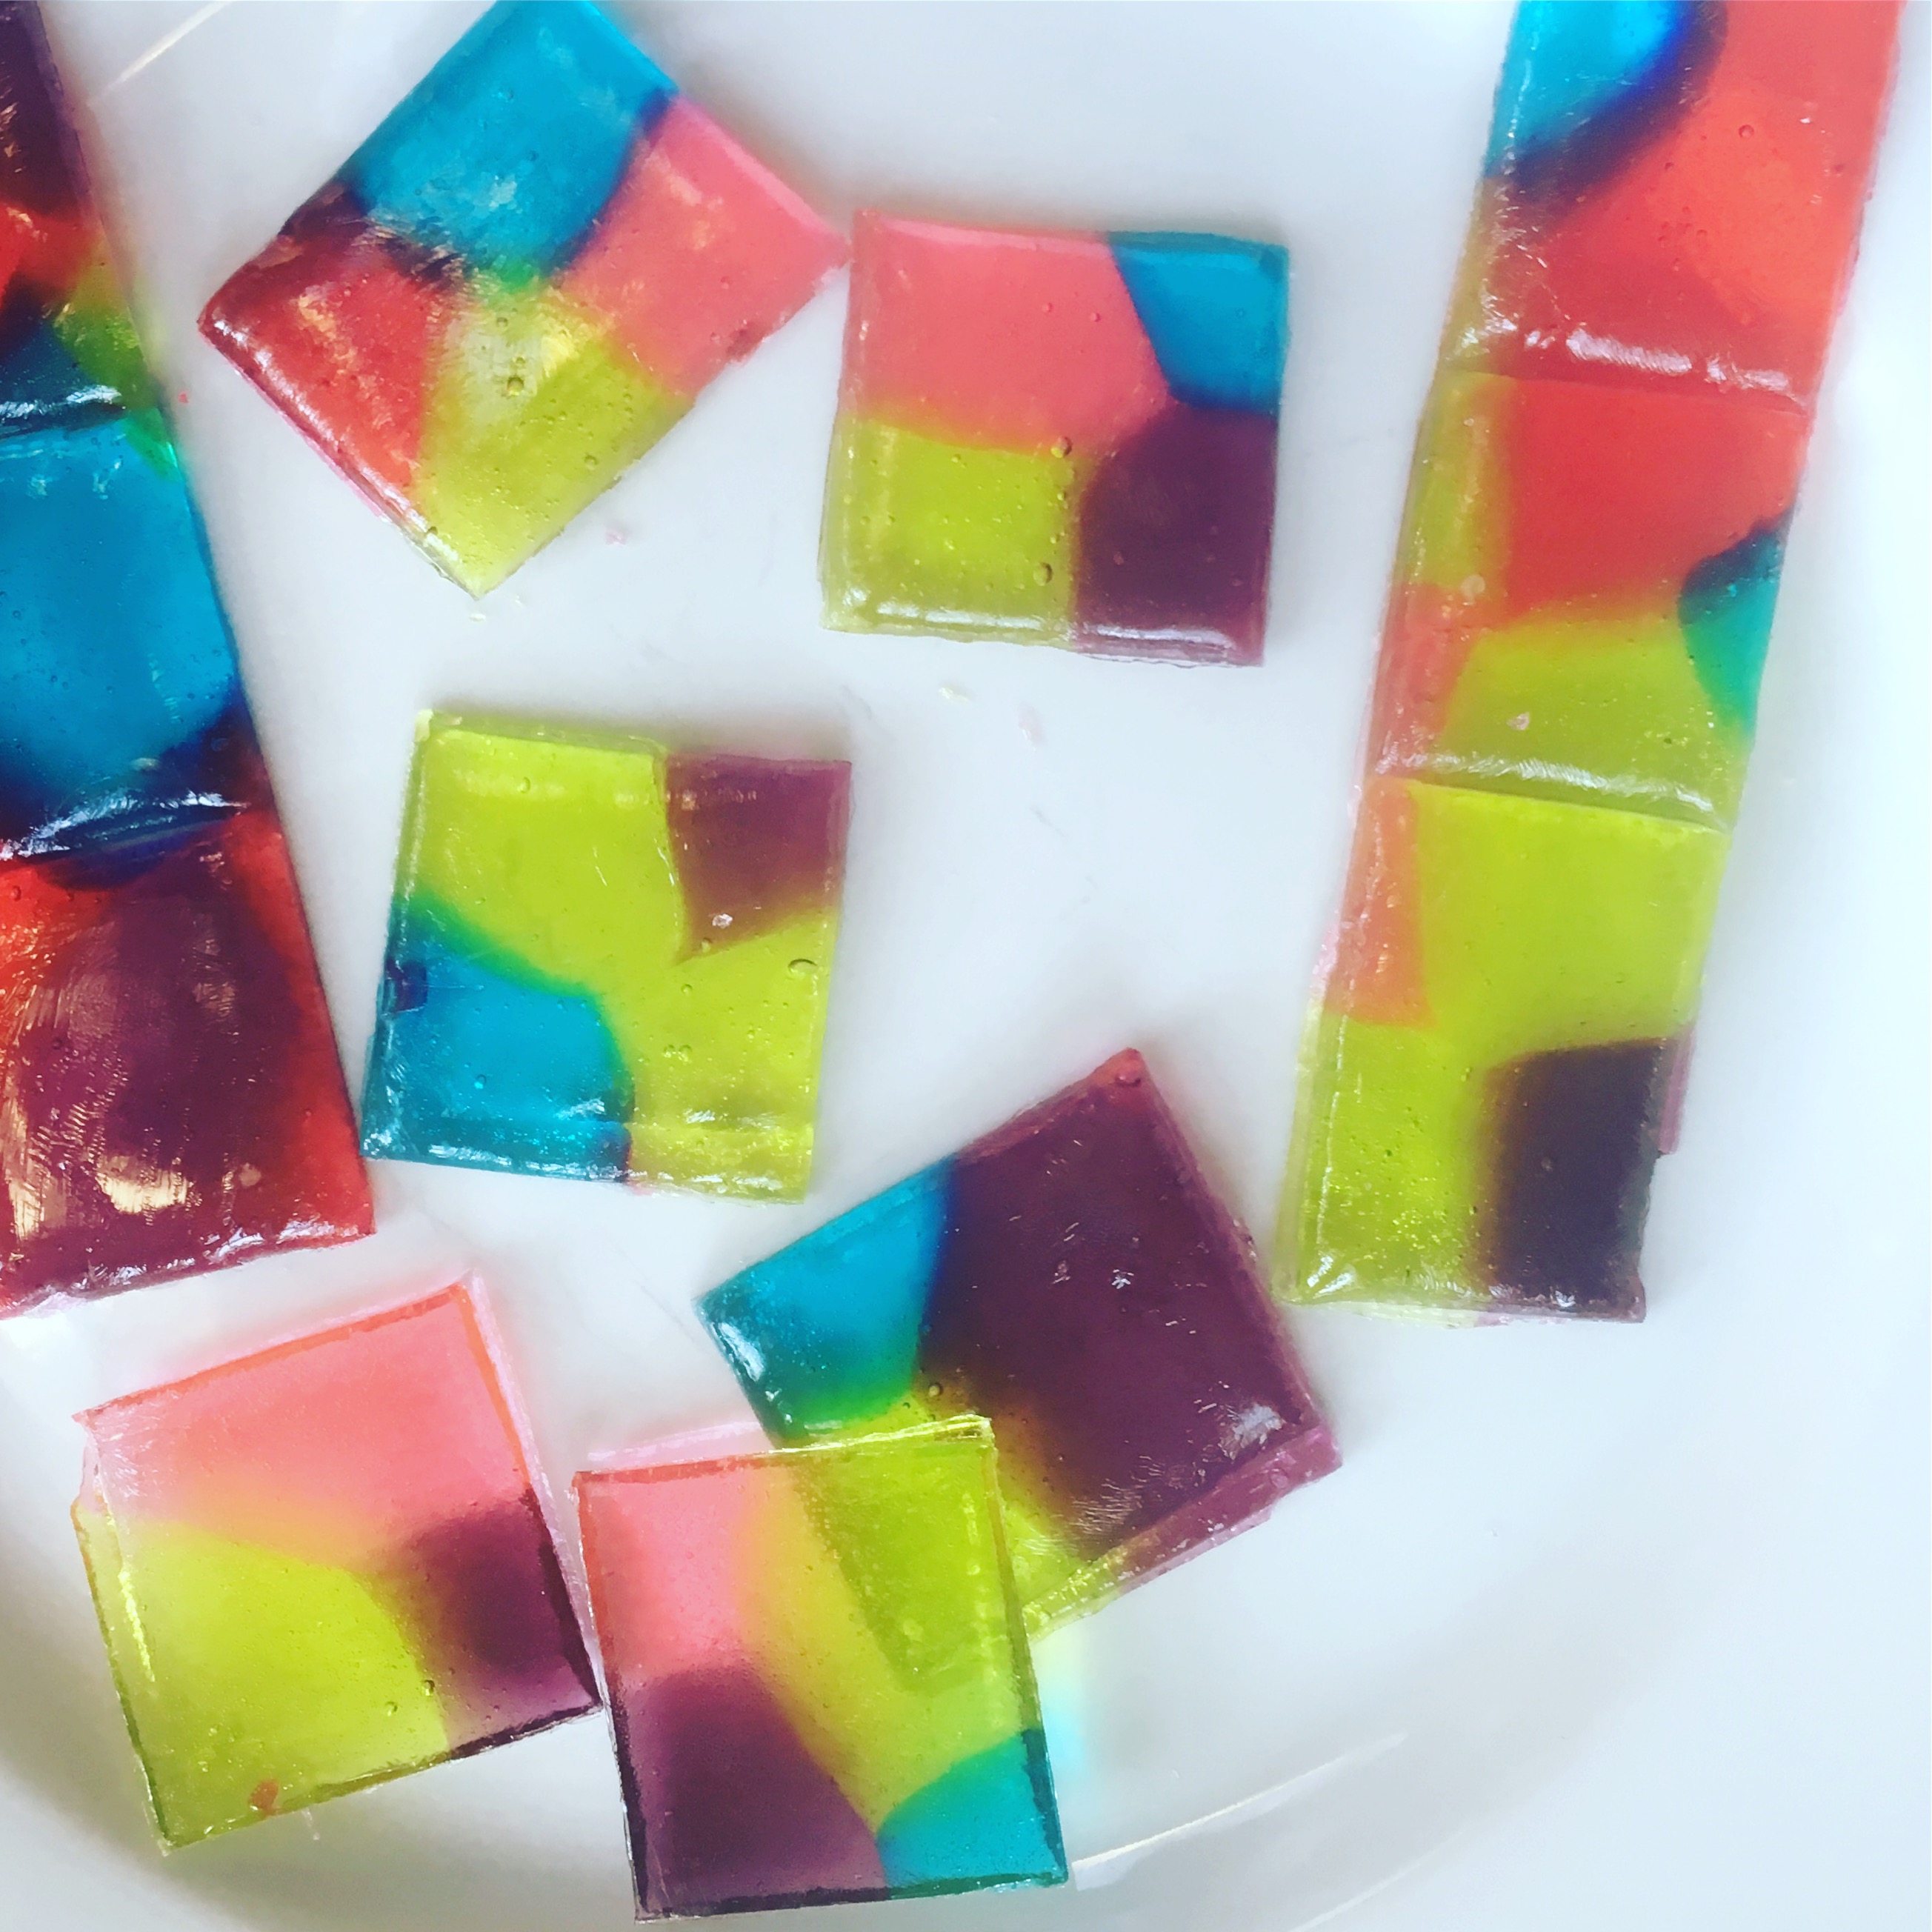
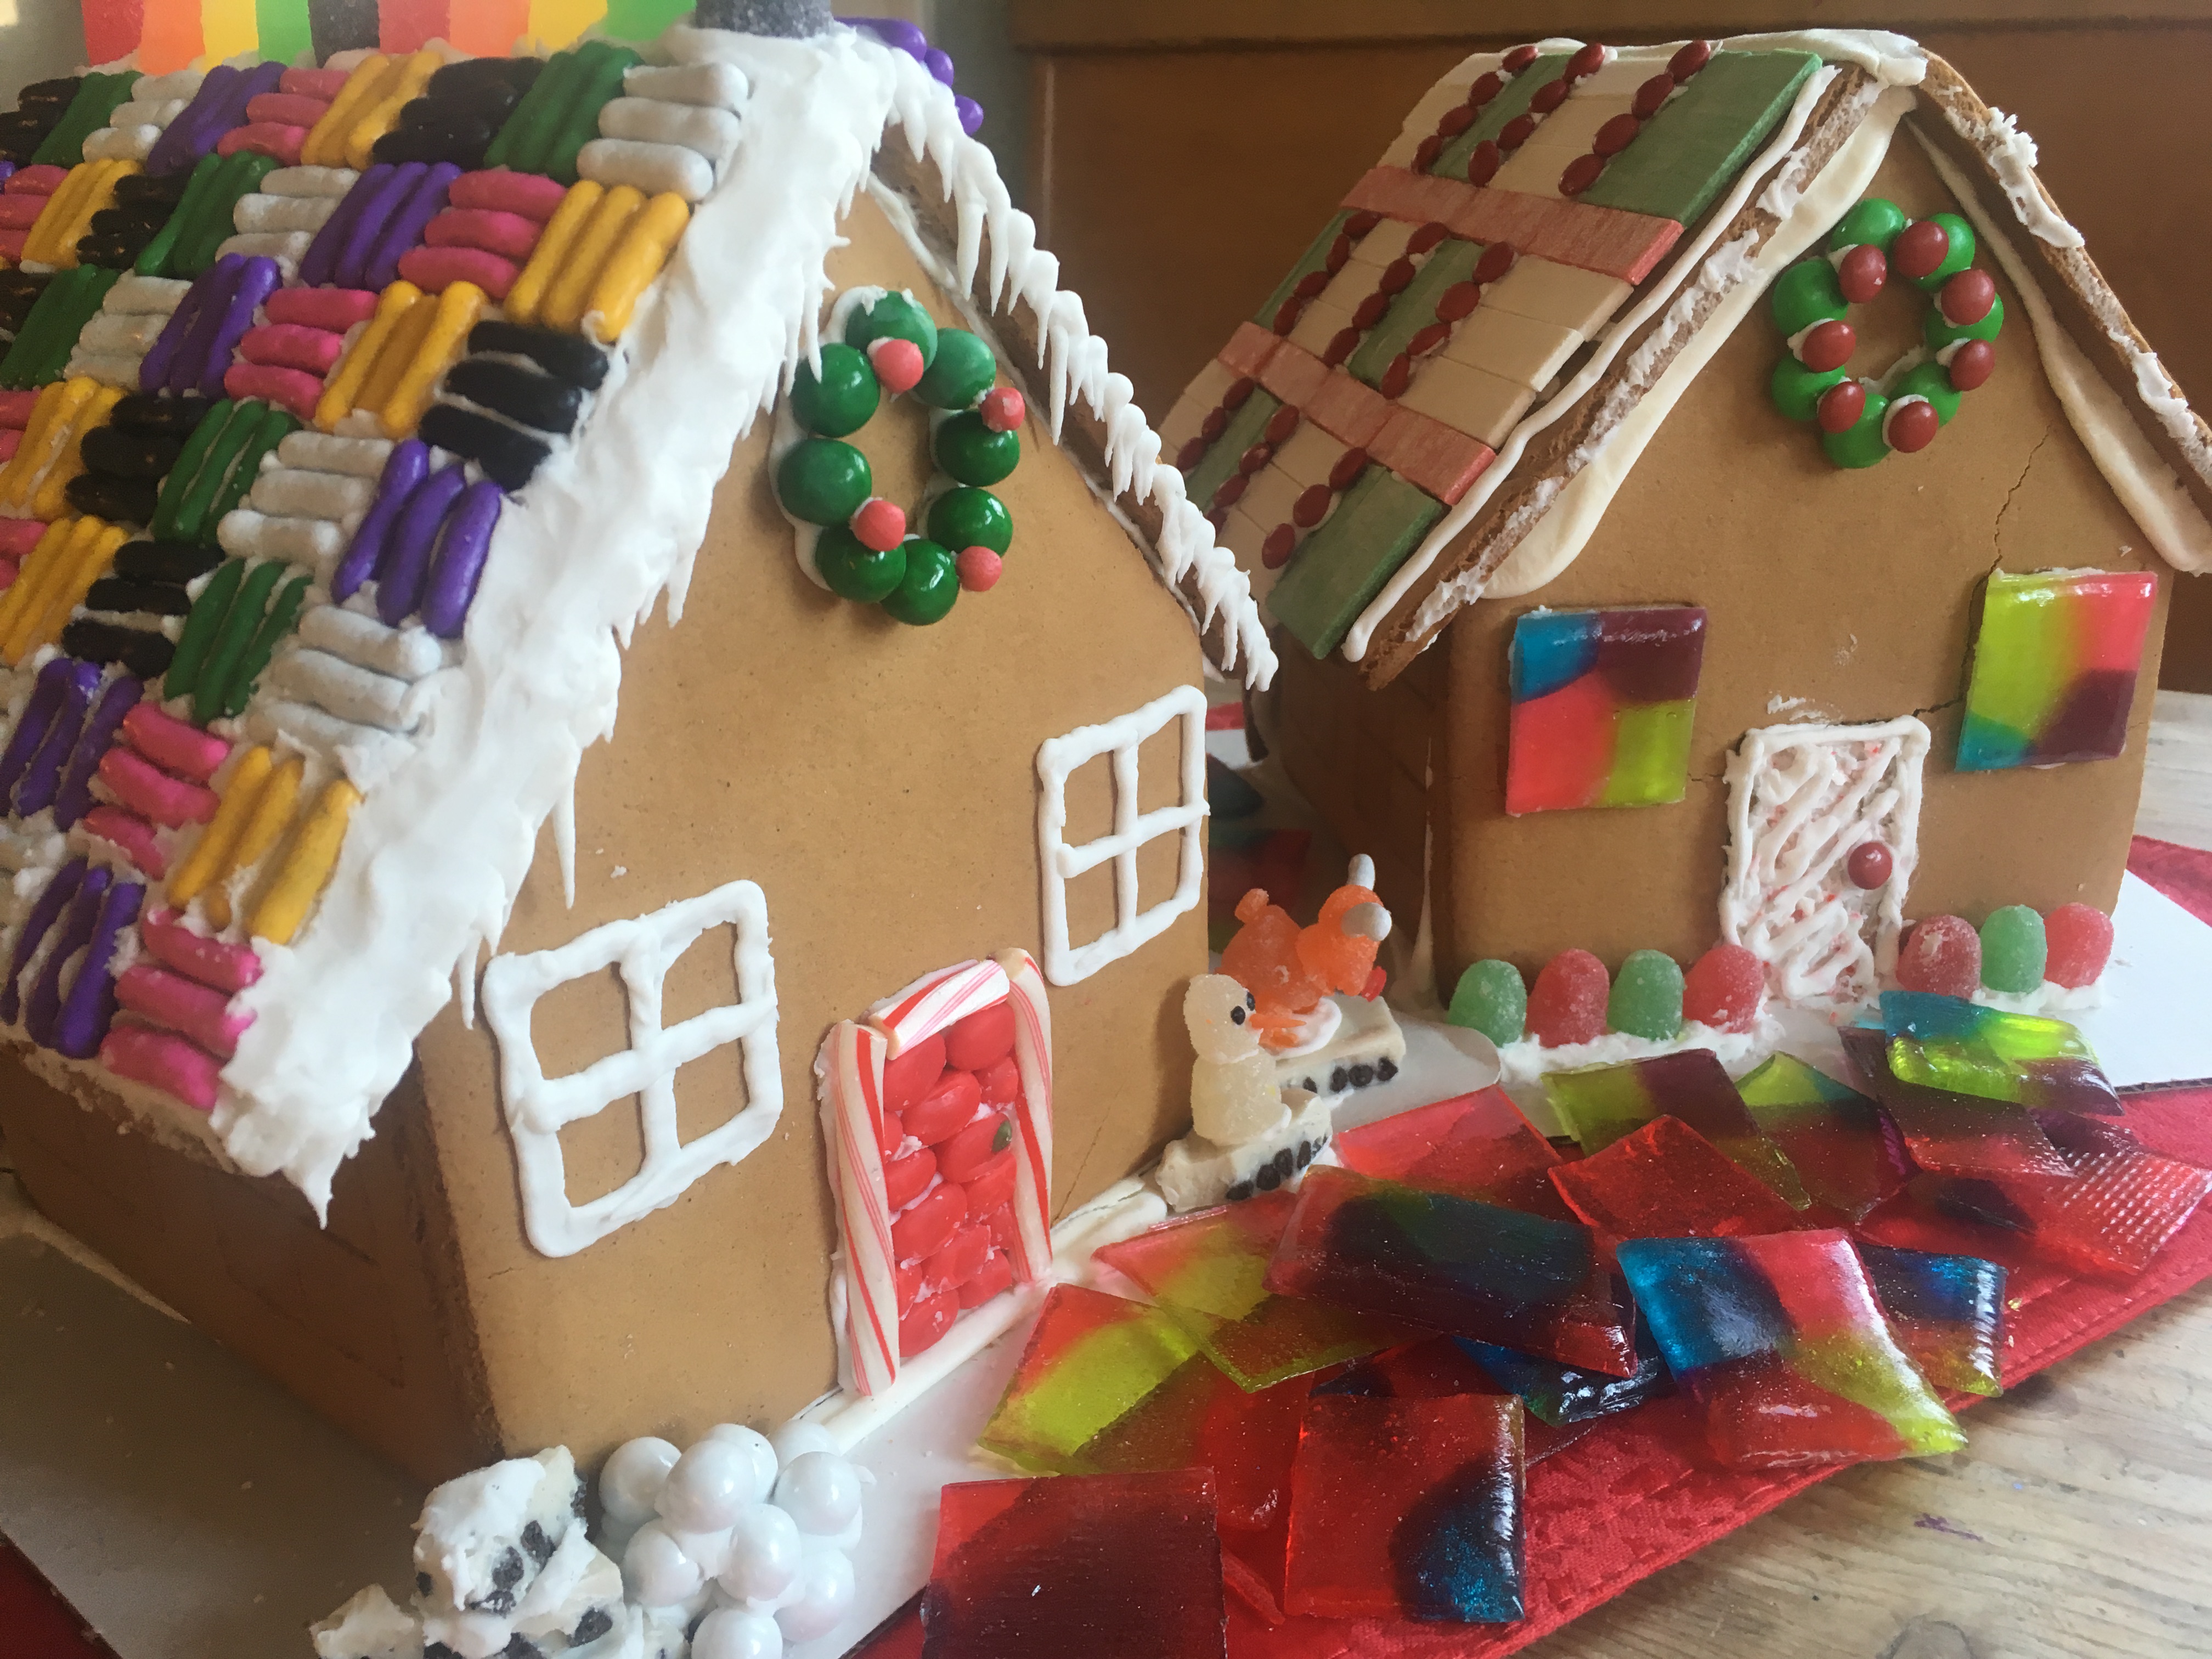
To make stained glass for our gingerbread house windows, I adapted the crushed stained glass candy project from my book “STEAM Lab for Kids.” The challenge was figuring out how to create perfect rectangles. After some trial and error, I discovered that scoring the candy when it was still warm and soft created weak points, which allowed me to snap the candy into clean shapes once it had hardened.
Stained Glass Candy “STEAM Lab for Kids” Quarry Books 2018
You’ll need:
-Jolly Ranchers, Life Savers or another clear, hard candy
-a baking sheet (spray or grease the baking sheet, if not using a silicon liner)
-a silicon liner for the baking sheet, if you have one
-a metal spatula or dough scraper
-an oven
Safety tip: Adult supervision recommended. Hot, melted candy can cause burns. Don’t touch it until it has cooled.
What to do:
- Pre-heat the oven to 350F.
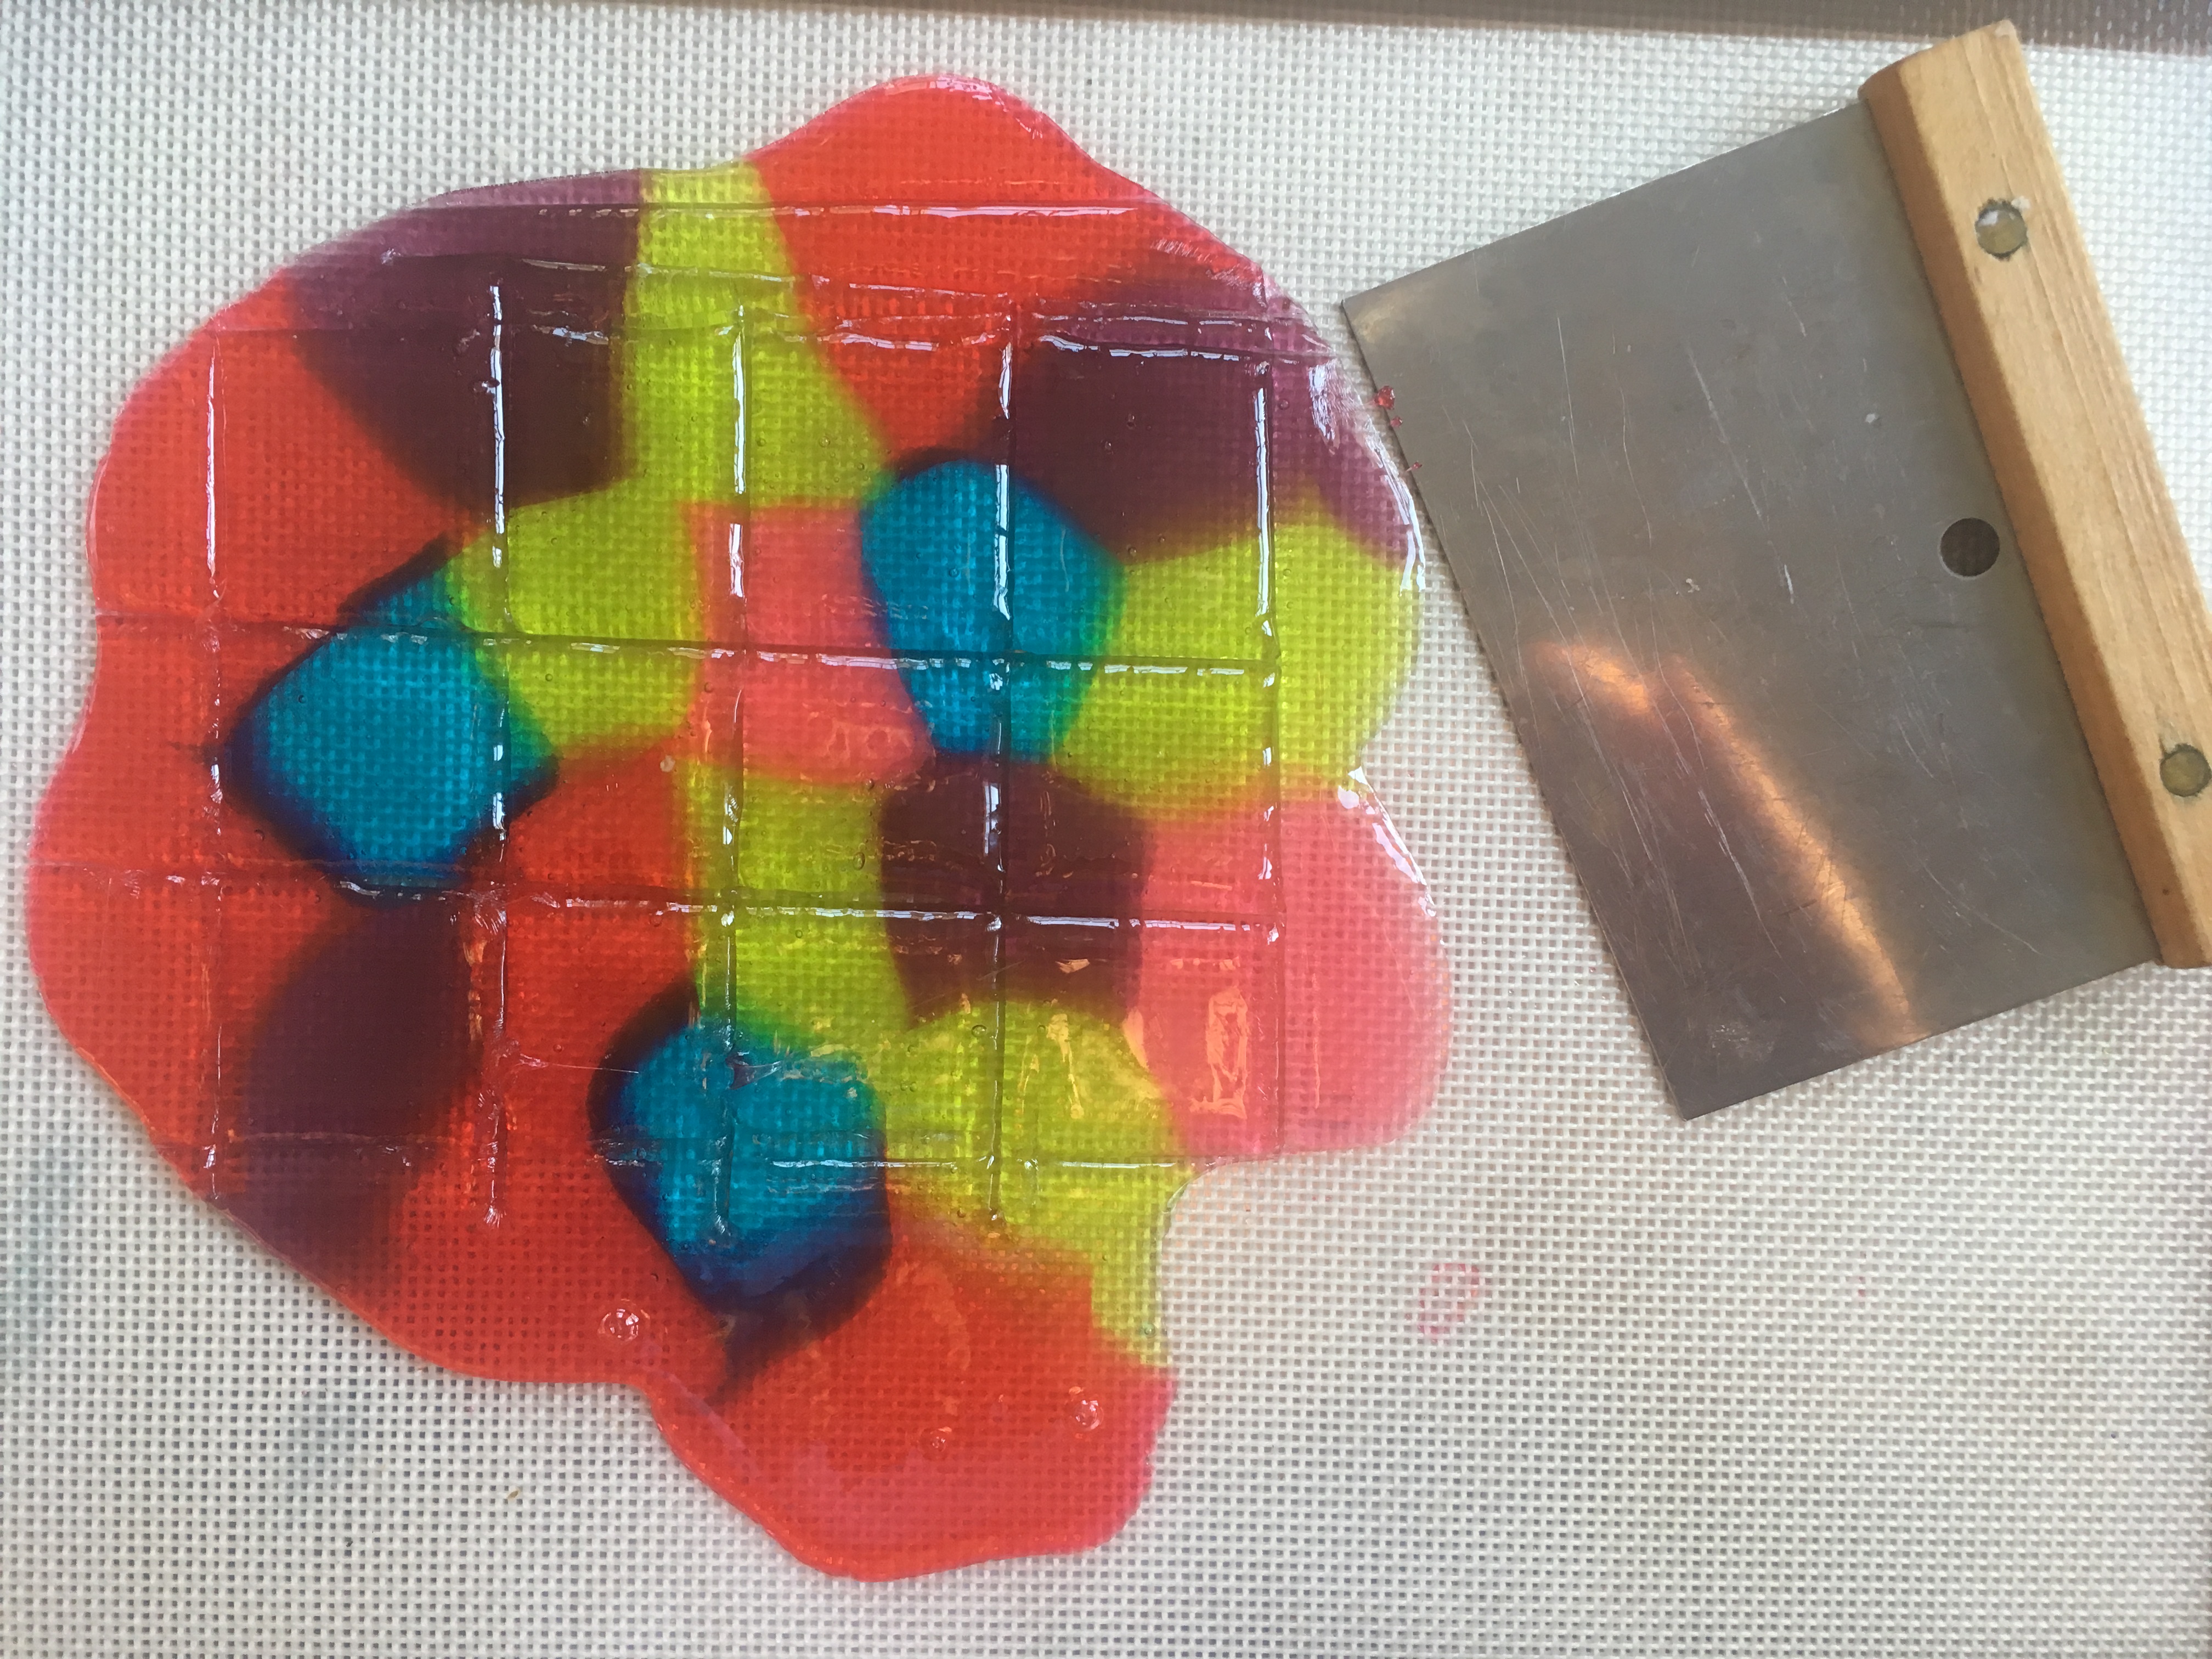
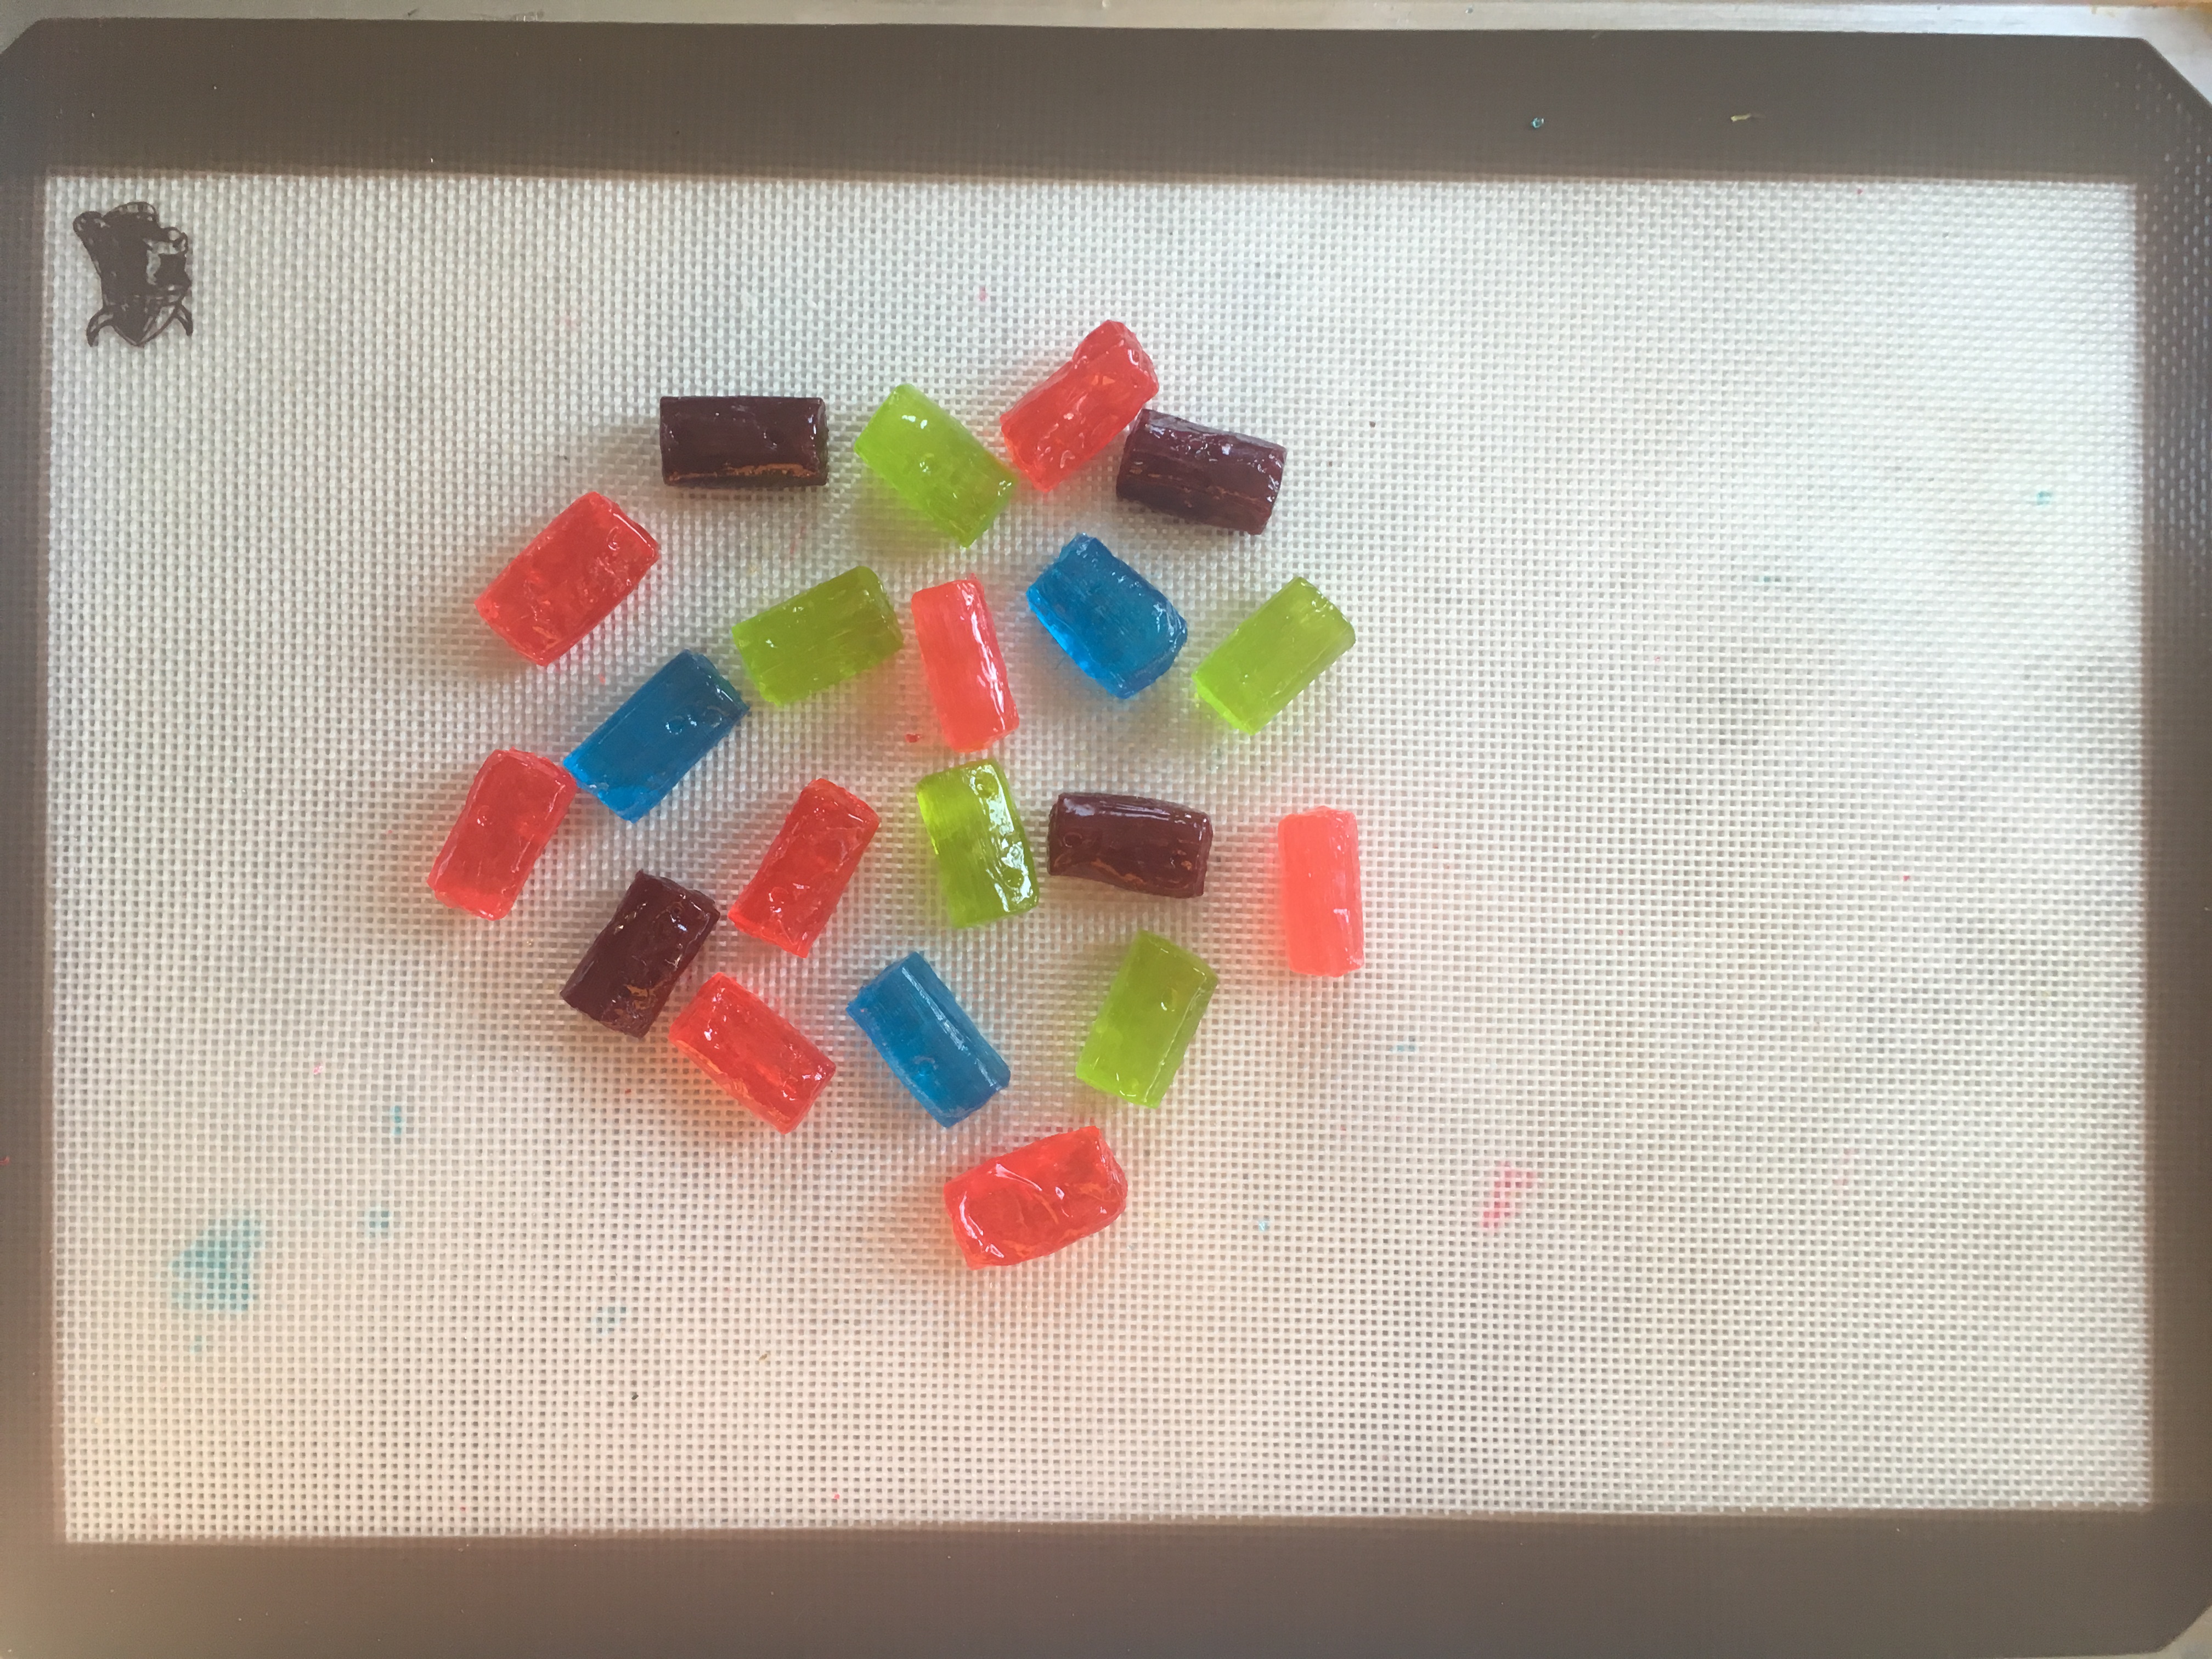
- Unwrap the candy and arrange the pieces on a baking sheet so that they’re close together, but not touching.
Stained Glass Candy “STEAM Lab for Kids” Quarry Books 2018
- Bake the candy for 7 to 8 minutes, or until it has melted.
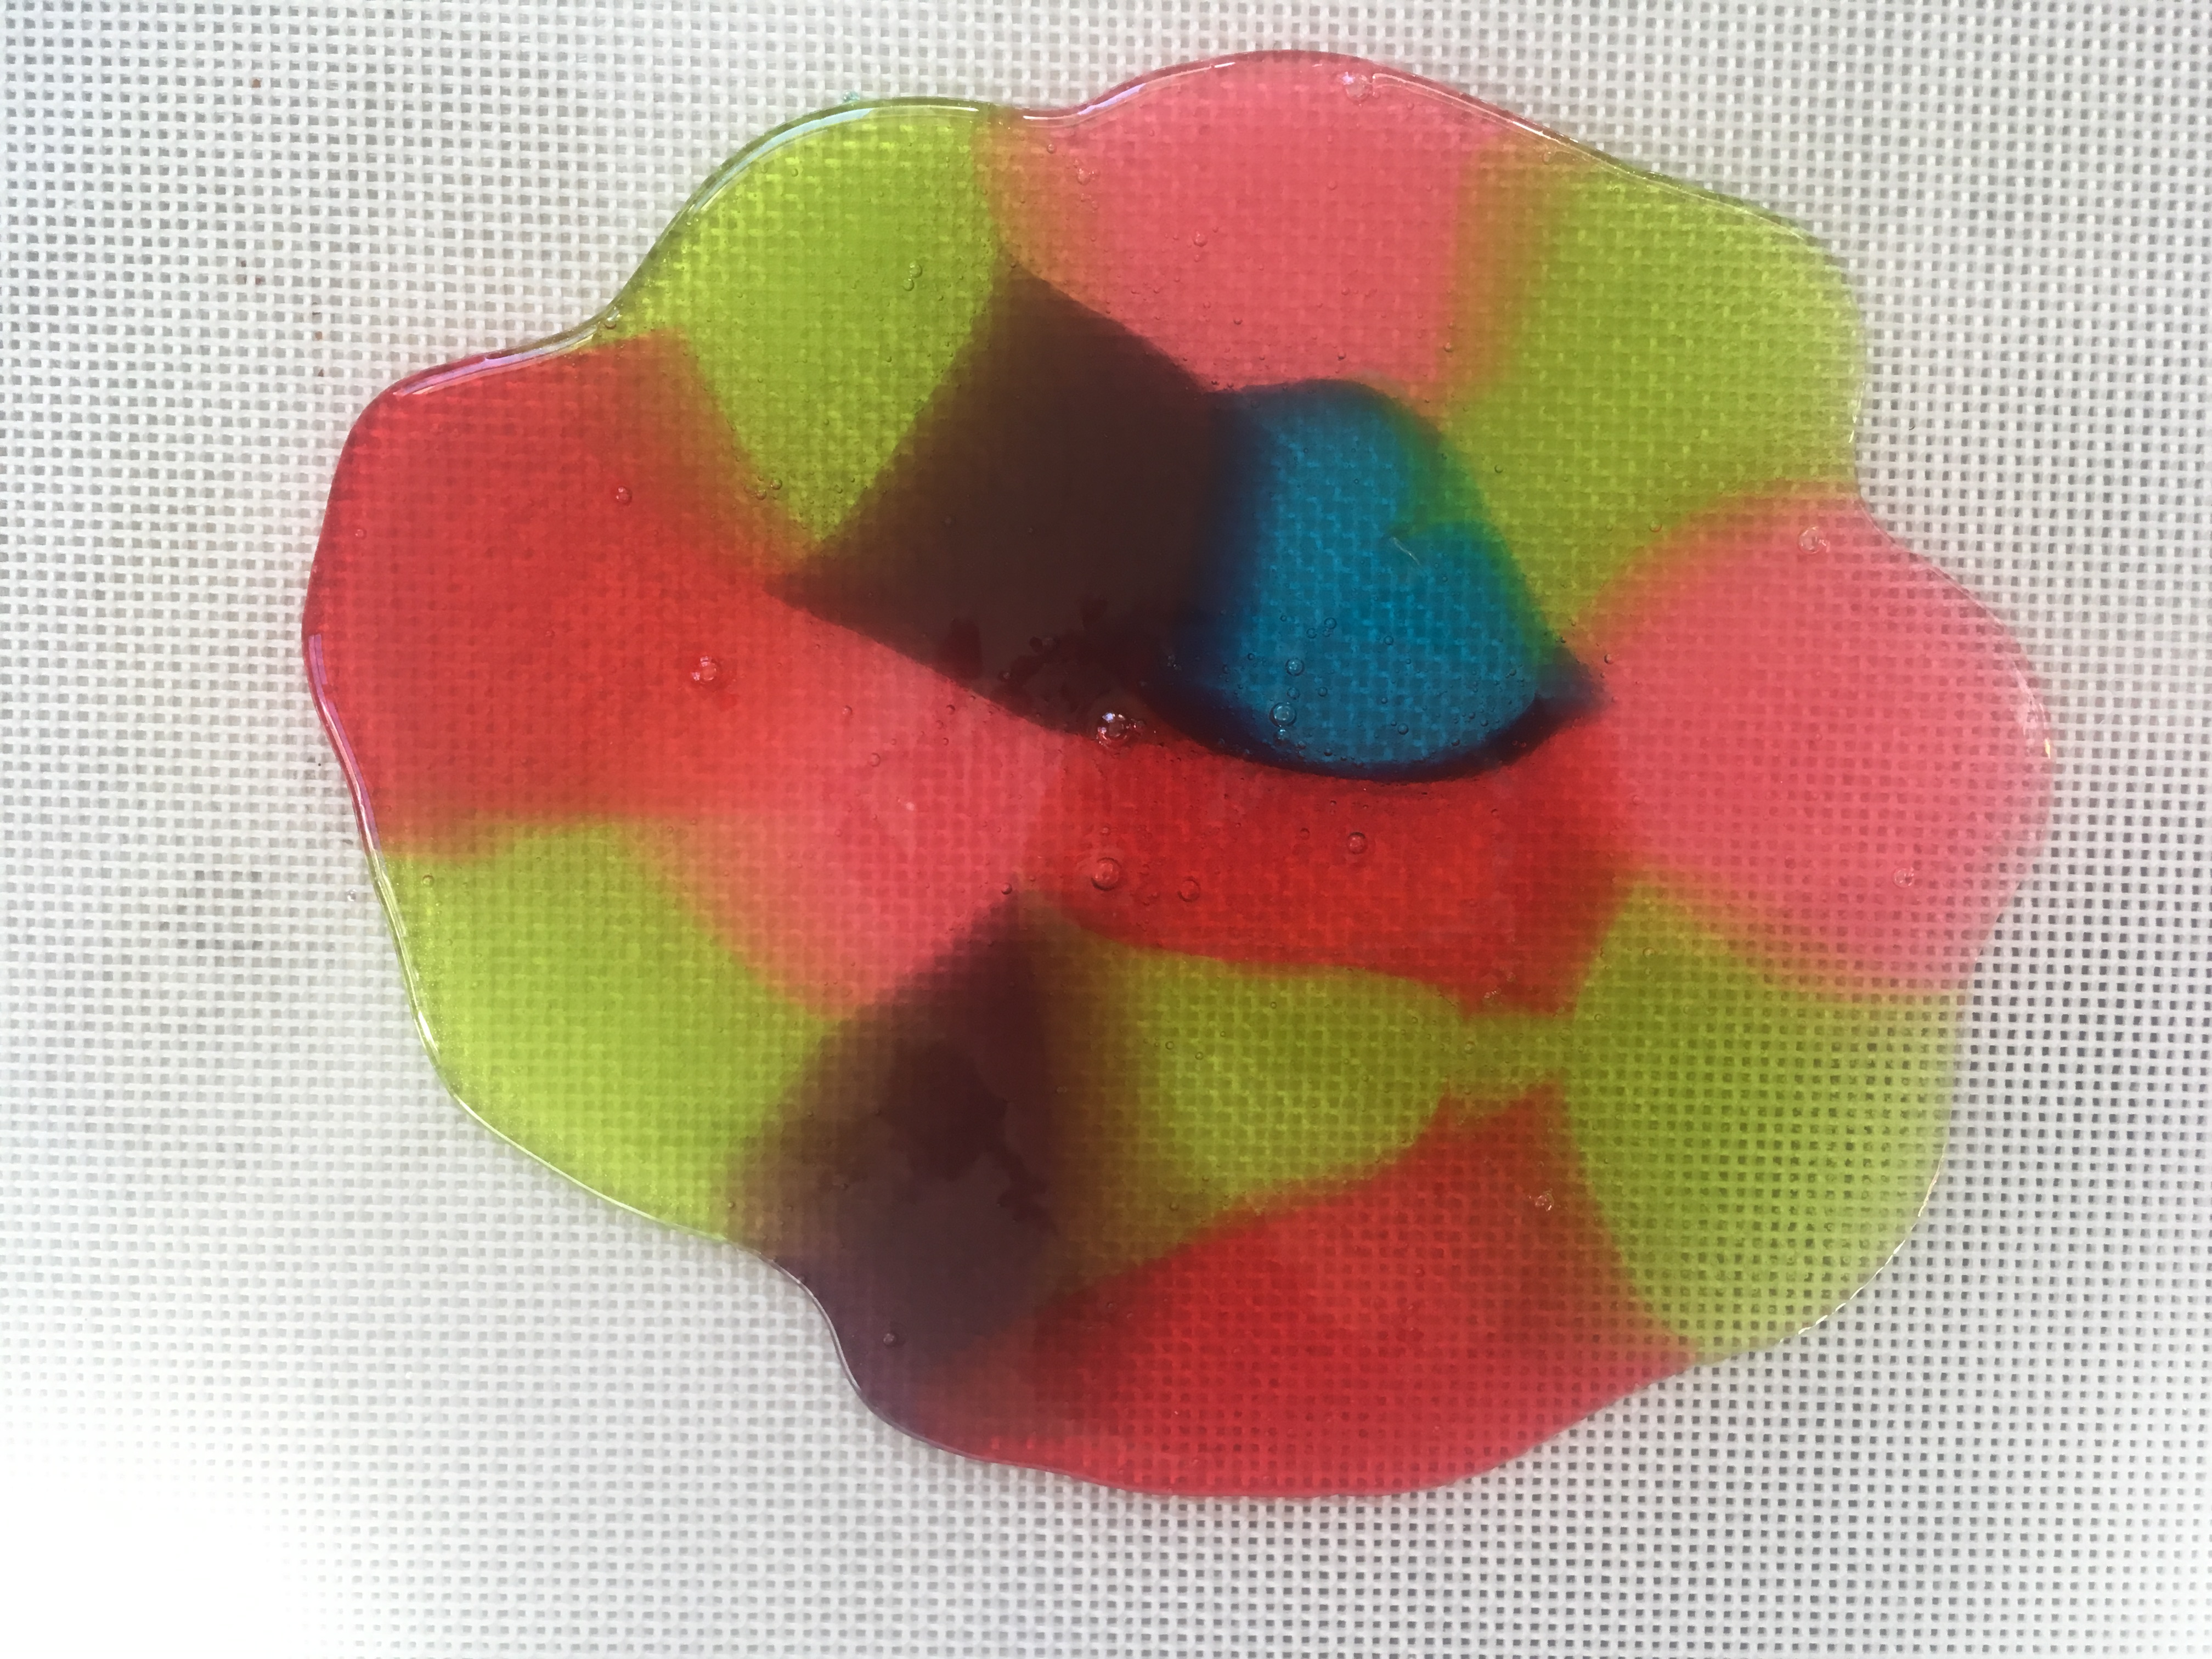
- Remove the candy from the oven. Tilt the baking sheet, if needed, to fill gaps.
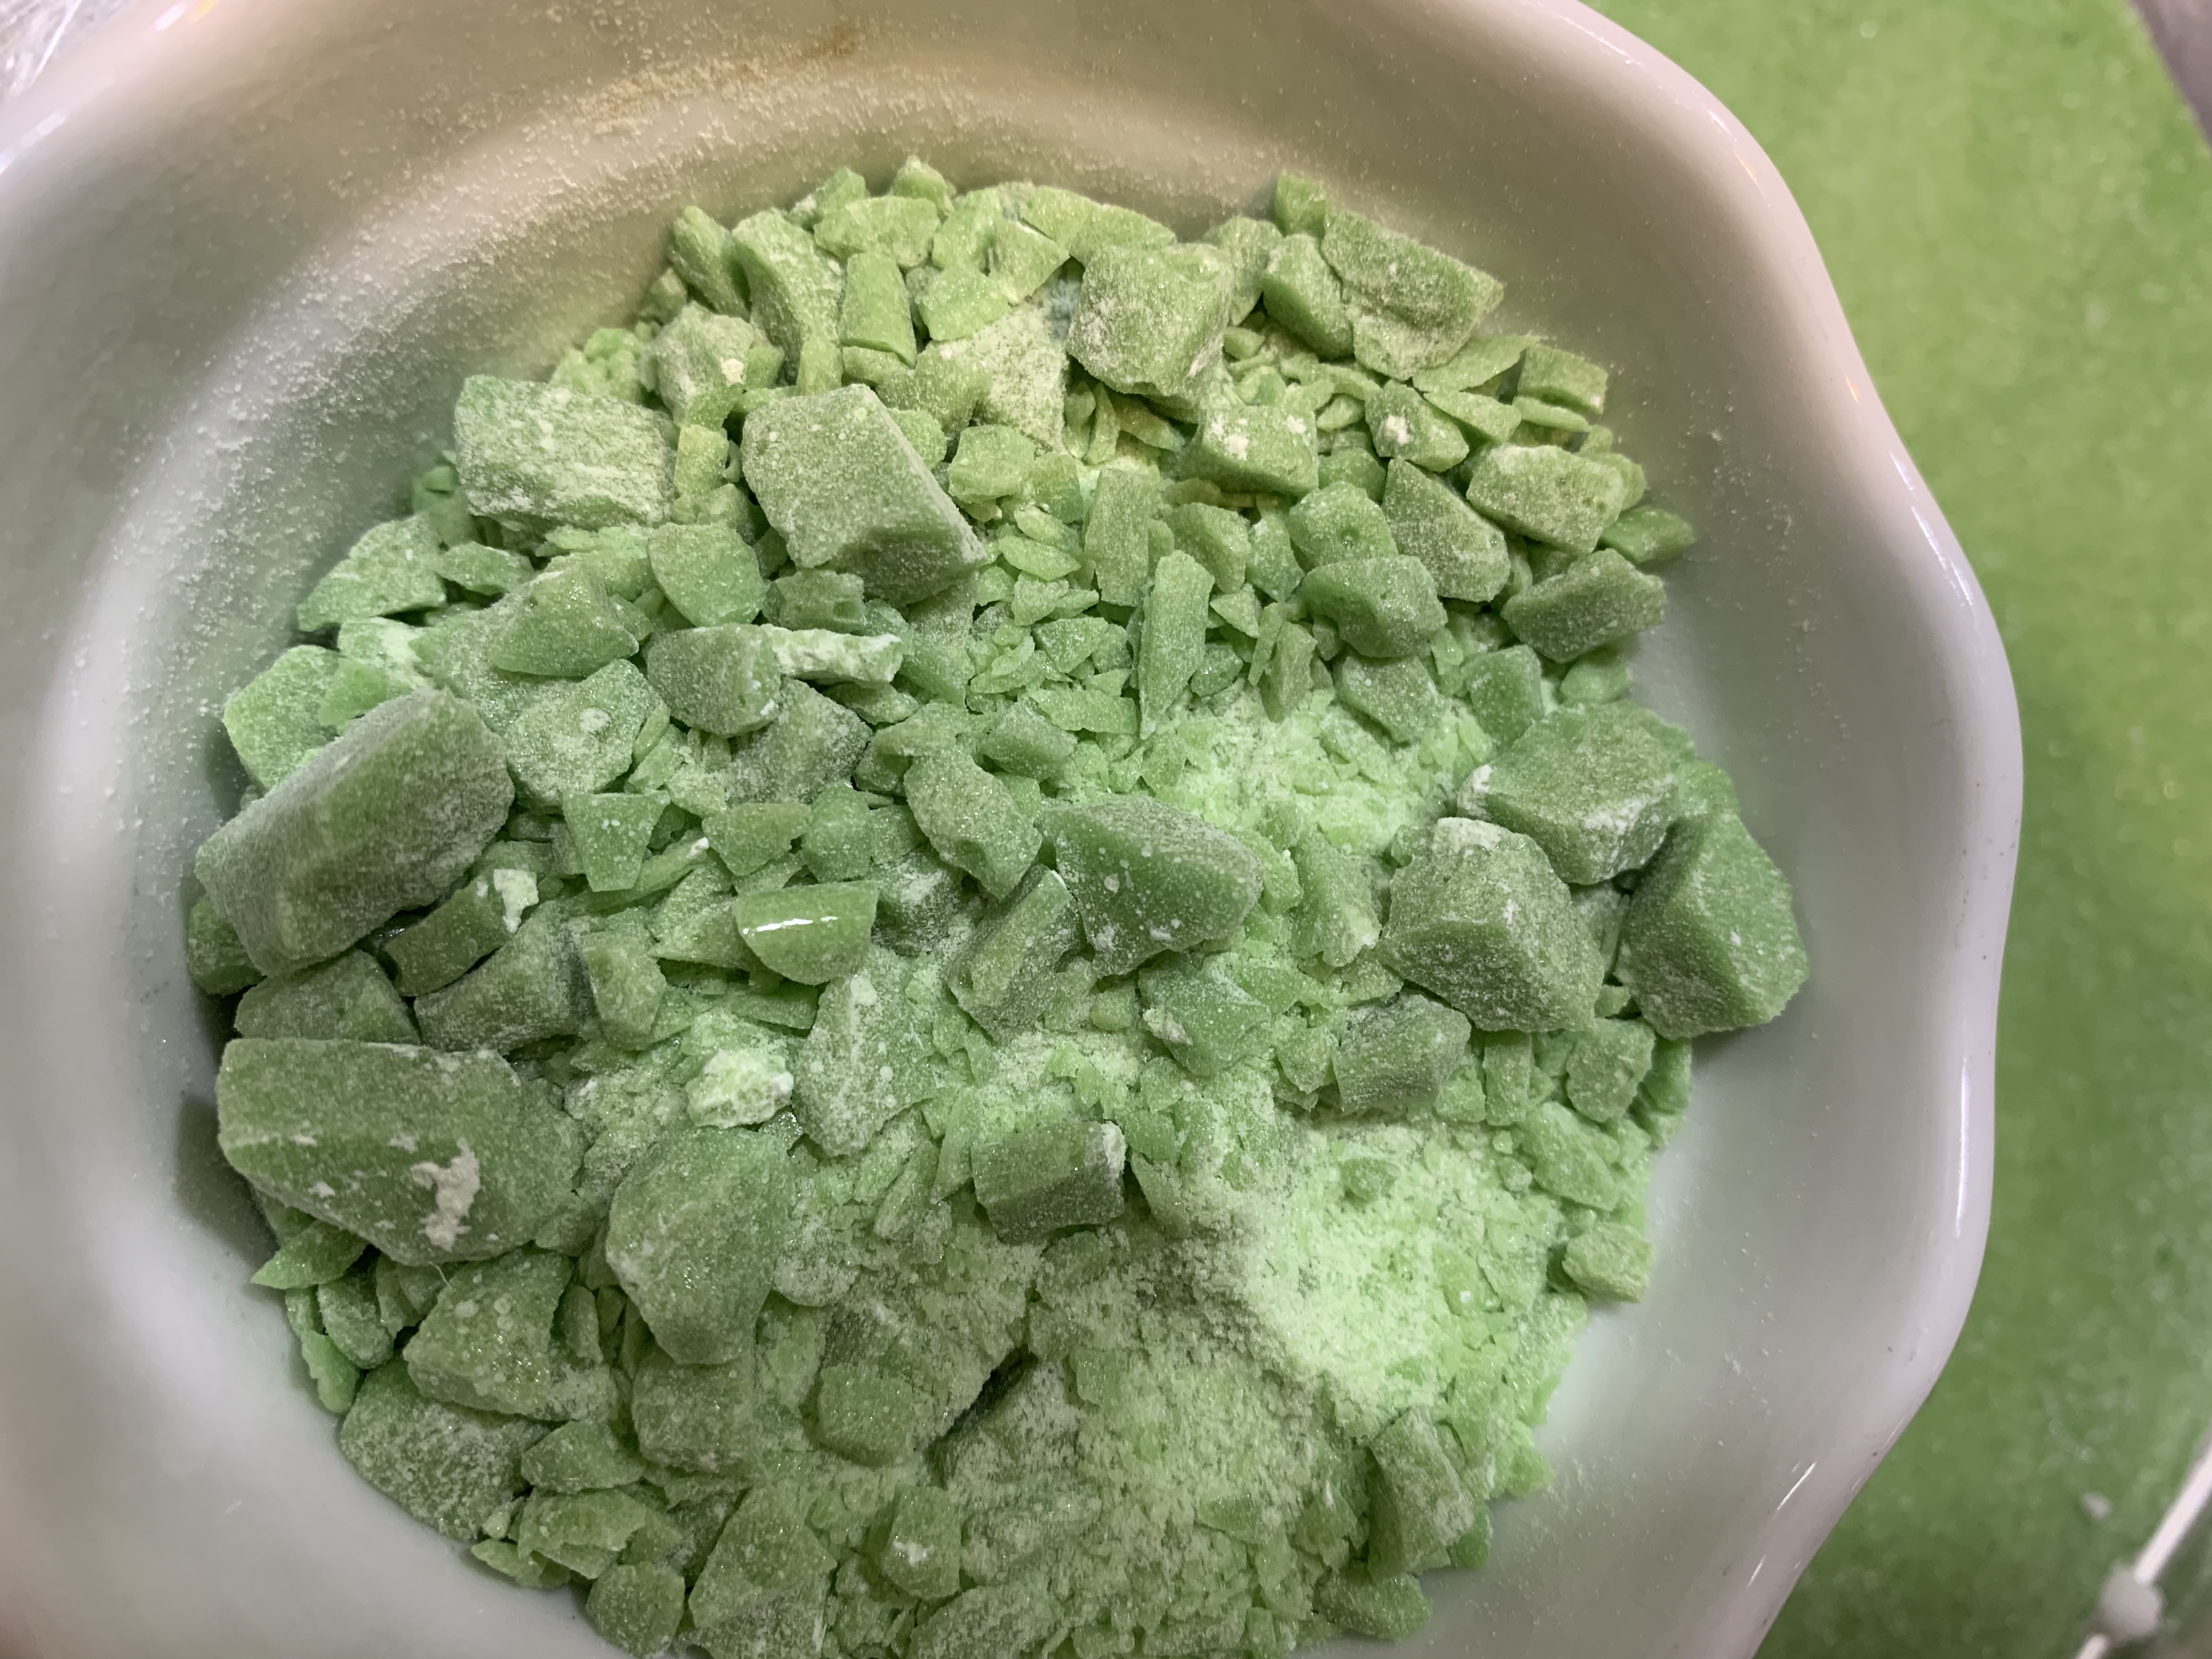
- Use the spatula to score (make lines in) the candy, creating whatever shapes/sizes you need.
Stained Glass Candy “STEAM Lab for Kids” Quarry Books 2018
- When the candy has cooled, snap it carefully along the lines you made. (See photo at the top of this post.)
- Eat your creations, or use them to decorate some edible architecture.
Stained Glass Candy “STEAM Lab for Kids” Quarry Books 2018
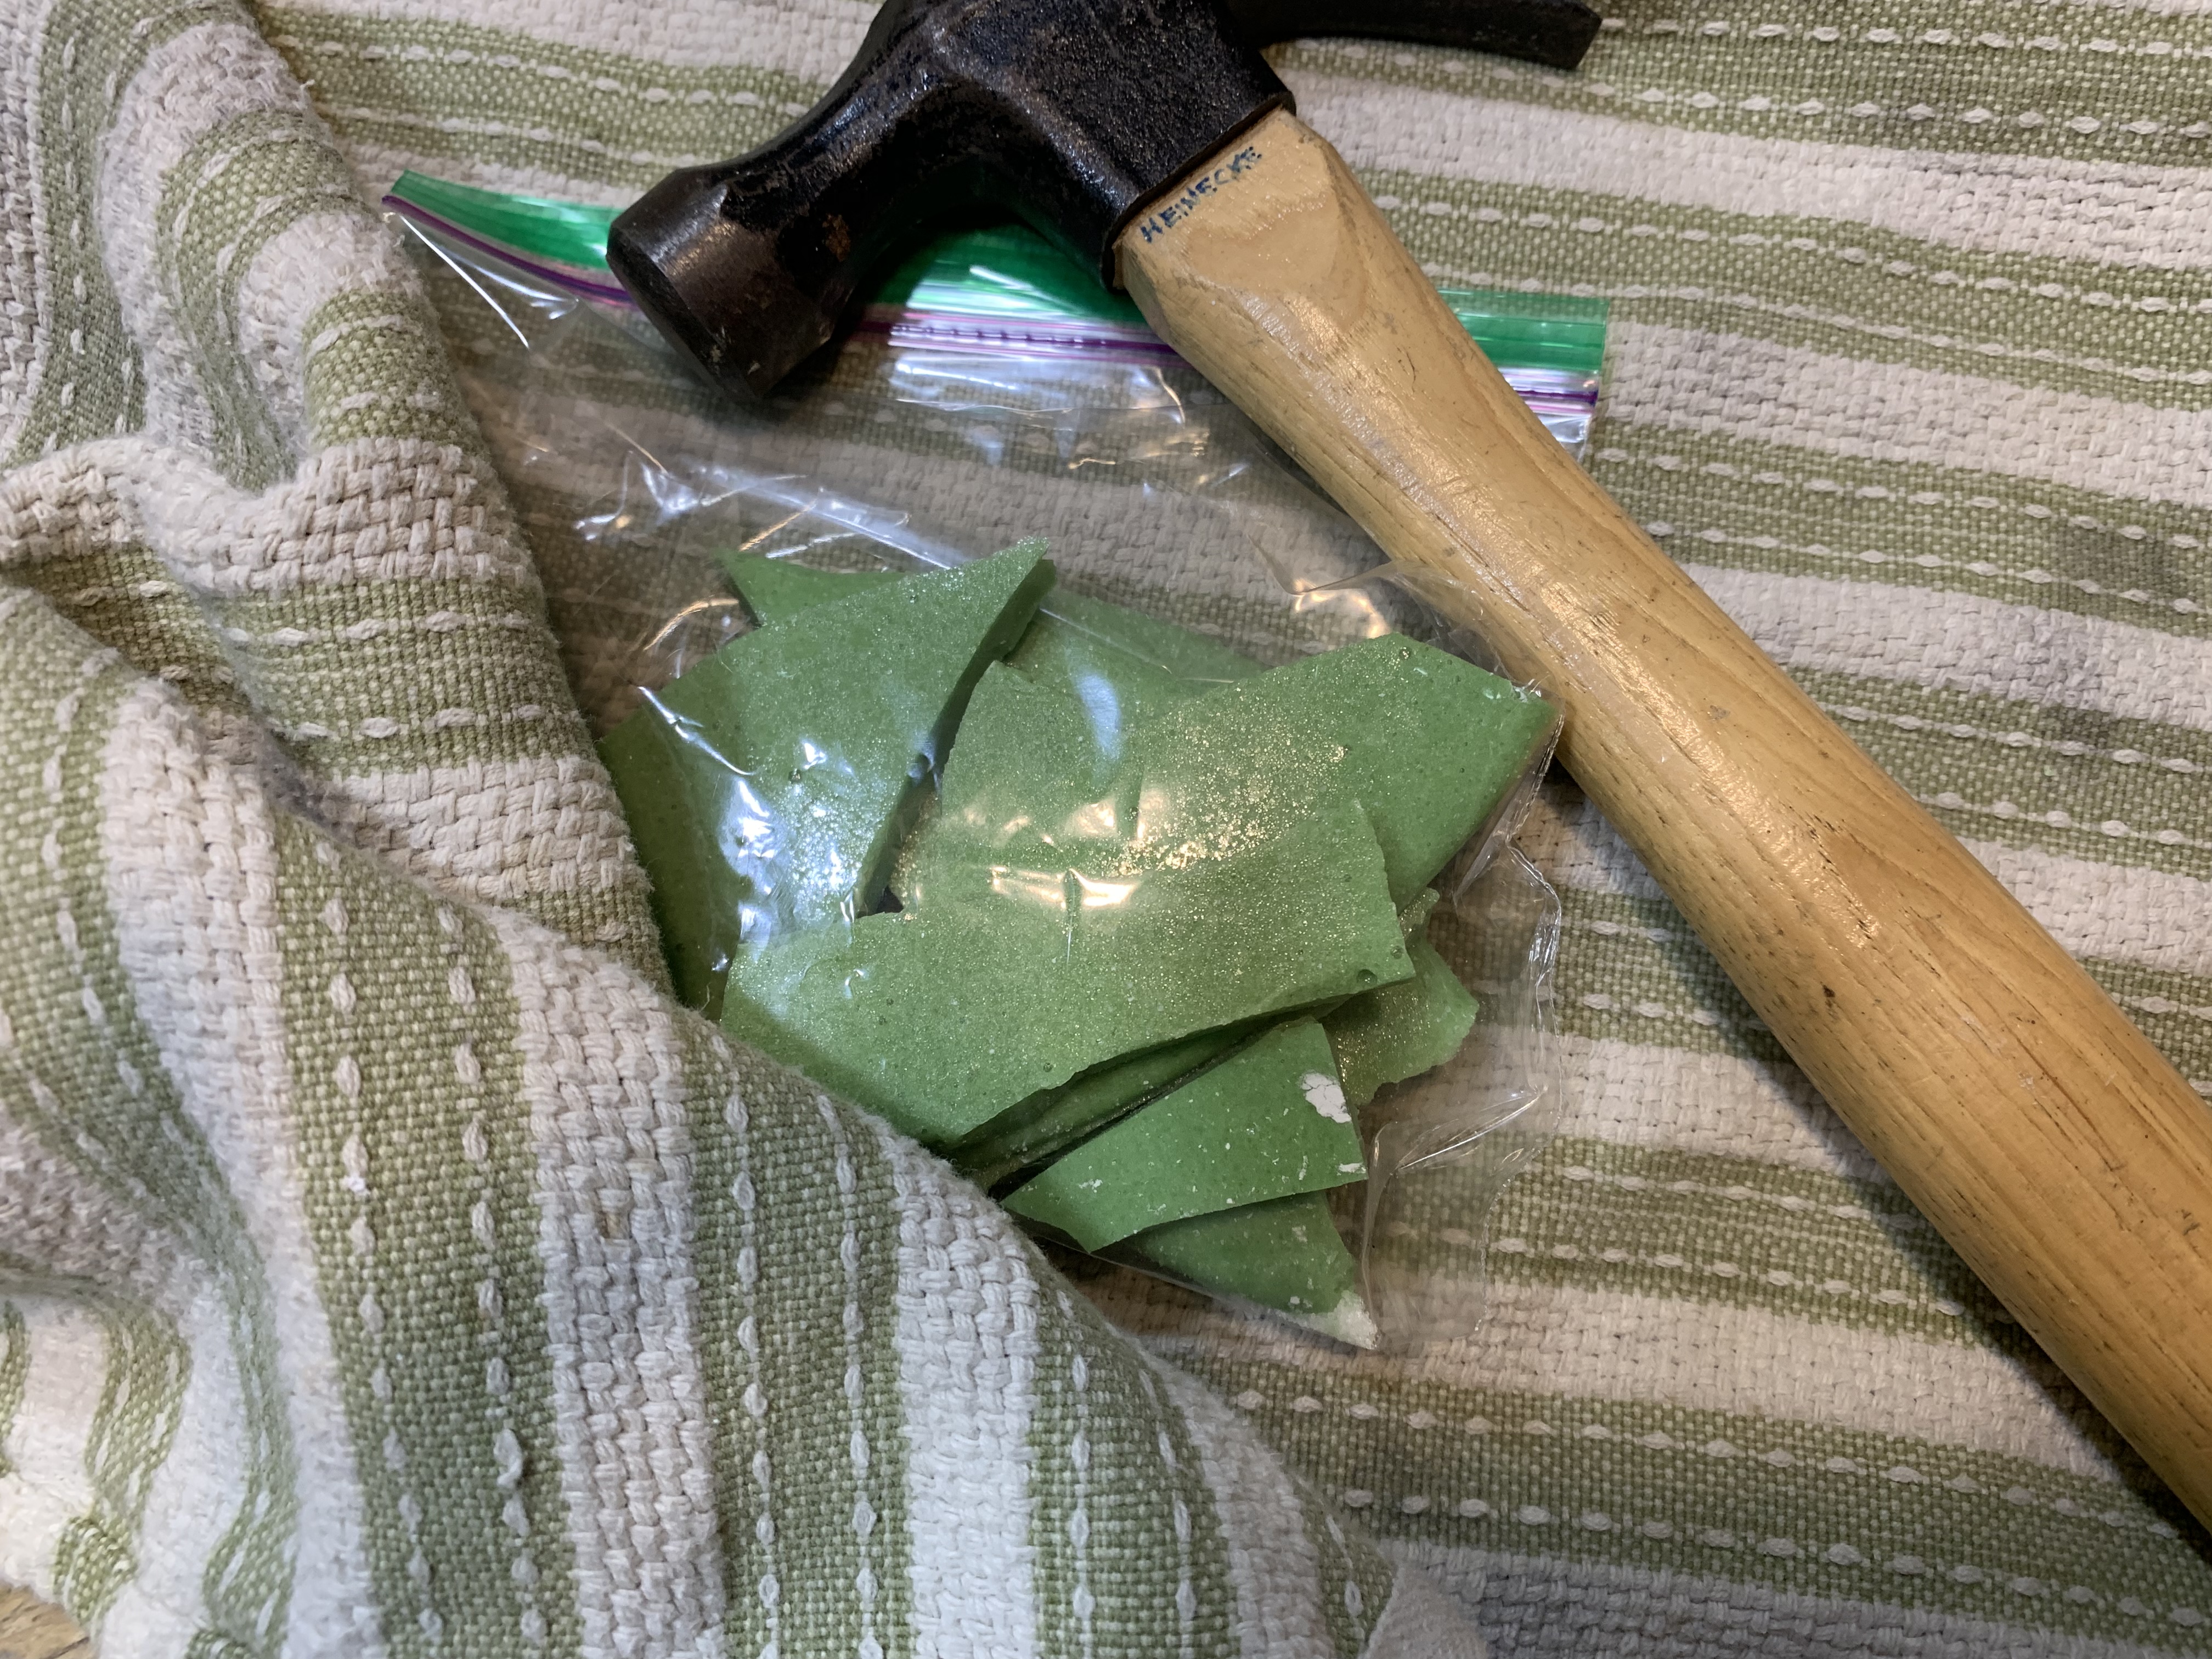
- Try crushing the candy before you melt it for different visual effects. What else could you try?
Stained Glass Candy “STEAM Lab for Kids” Quarry Books 2018
Halloween Candy Lava Lamps (Use chemistry to test whether candy contains citric acid.)
- by KitchenPantryScientist
Make mini “lava lamps” from water, baking soda and oil to test whether candy contains citric acid!
The science behind the fun: Oil floats on water because it is less dense. When citric acid in candy combines with baking soda, a chemical reaction occurs which produces carbon dioxide gas bubbles. As the bubbles move up through the oil, they carry water and food coloring with them. Once the gas escapes into the air, gravity pulls the water and food coloring back down through the oil.to the bottom of the container.
Leprechaun Pop Rocks (Carbon Dioxide Candy)
- by KitchenPantryScientist
Homemade pop rocks aren’t as fizzy as the ones you buy at the store, but they’re mighty tasty! Citric acid combines with baking soda to make carbon dioxide gas bubbles that get trapped in the candy. Adding extra citric acid and baking soda to the surface of the candy gives some extra fizz when you put them in your mouth. Trick your friends by adding a flavor that doesn’t match the color!
Leprechaun Pop Rocks (KitchenPantryScientist.com)
Warning: Ages 8 and up only. Extremely hot candy syrup. Adult supervision required.
You’ll need:
2 cups sugar
1/4 cup water
1/2 cup corn syrup
candy thermometer
baking sheet
corn starch
a few drops of food coloring
1 tsp flavoring, like orange or cherry
1/4 cup citric acid + 1 tsp to sprinkle on in final step
1 tsp baking soda plus some to sprinkle on the candy
Step 1. Coat a the bottom of an inverted baking sheet with cornstarch.
Step 2. Boil sugar, corn syrup, and water, stirring until it reaches 300 degrees F.
Step 3. Remove the hot, melted candy from heat. Stir in food coloring, flavoring, 1/4 cup citric acid and 1 tsp baking soda.
Step 4. Very carefully, pour the mixture onto the baking sheet. Do not touch!!! Sprinkle 1 tsp. citric acid evenly over the surface of the candy.
Step 5. Let the mixture cool for at least 30 minutes and the break it into small pieces. Put some of the fragments in a plastic zip lock bag and use a hammer or rolling pin to crush them into tiny pieces or powder.
Step 6. Sprinkle on a little more baking soda and shake up in the bag.
Step 7. Enjoy the leprechaun pop rocks!
Winter Science: Mouthwatering Maple Syrup Snow Candy
- by KitchenPantryScientist
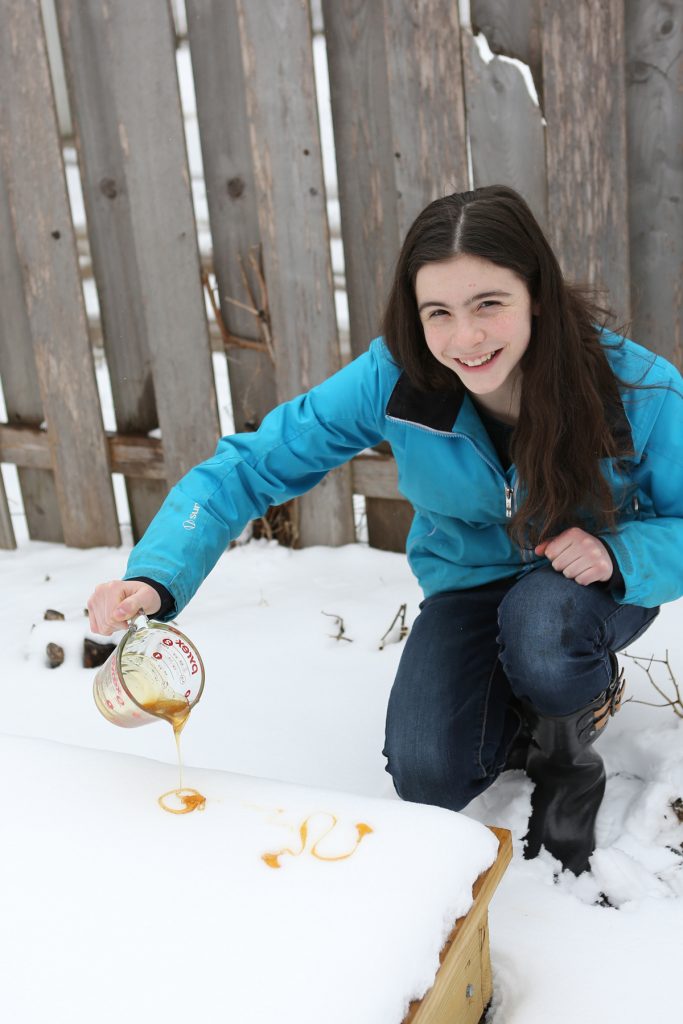
Maple Snow Candy from Outdoor Science Lab for Kids (Quarry Books 2016)
Remember this homemade snow candy from Laura Ingalls Wilder’s classic “Little House in the Big Woods?” You can make the same amazing maple treats using heat evaporation and quick cooling in the snow, or on crushed ice cubes.
Here’s how to make the candy, along with some candy-making science, straight from the pages of my new book, “Outdoor Science Lab for Kids,” which you can order from your favorite book retailer by clicking here.
You’ll need:
-1 cup pure maple syrup
-sauce pan
-candy thermometer
-fresh, clean snow
Safety Tips and Hints:
-Hot sugar syrup can cause burns. This experiment must be done with adult supervision.
-Allow candy to cool completely before tasting.
-Only use pure maple syrup for the best results.
Directions:
Step 1: Go outside and scout out a spot with some clean snow several inches deep for making your candy. Alternately, collect and pack down a few inches of fresh snow in a large, flat container, like a casserole dish. (You can use crushed ice cubes if you don’t have snow.)
Step 2. Boil the maple syrup in saucepan, stirring constantly until it reaches around 235-240 degrees F (soft ball stage.)
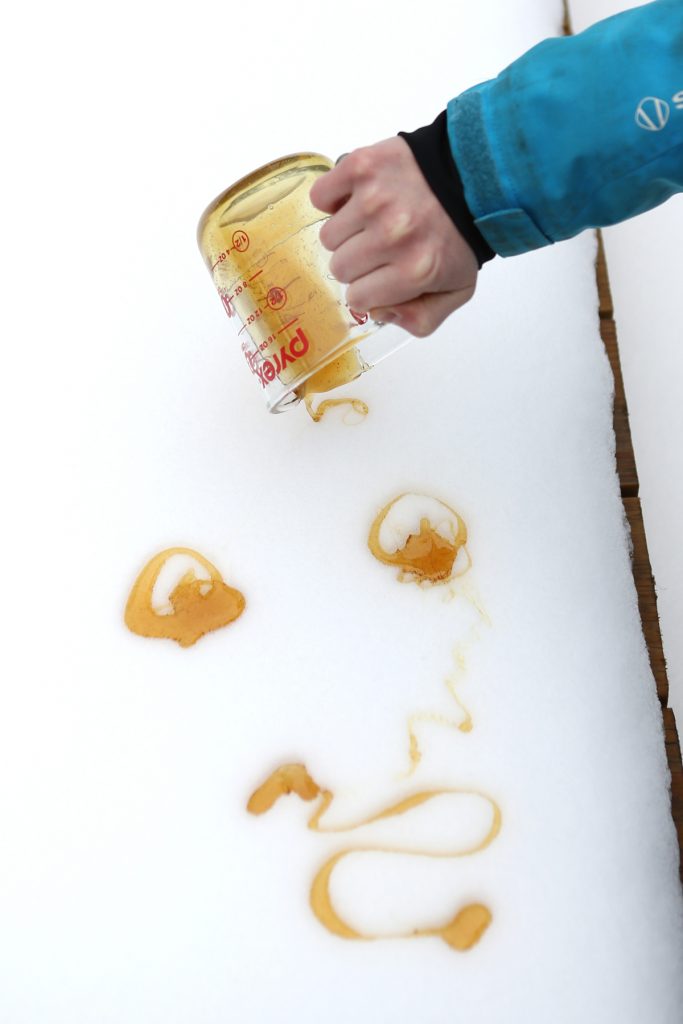
Step 3. Remove the maple syrup from the heat and carefully pour it into a heat-resistant container with a spout, like a Pyrex measuring cup.
Step 4. Pour wiggly candy lines into the snow to freeze them into shape.
Maple Snow Candy from Outdoor Science Lab for Kids (Quarry Books 2016)
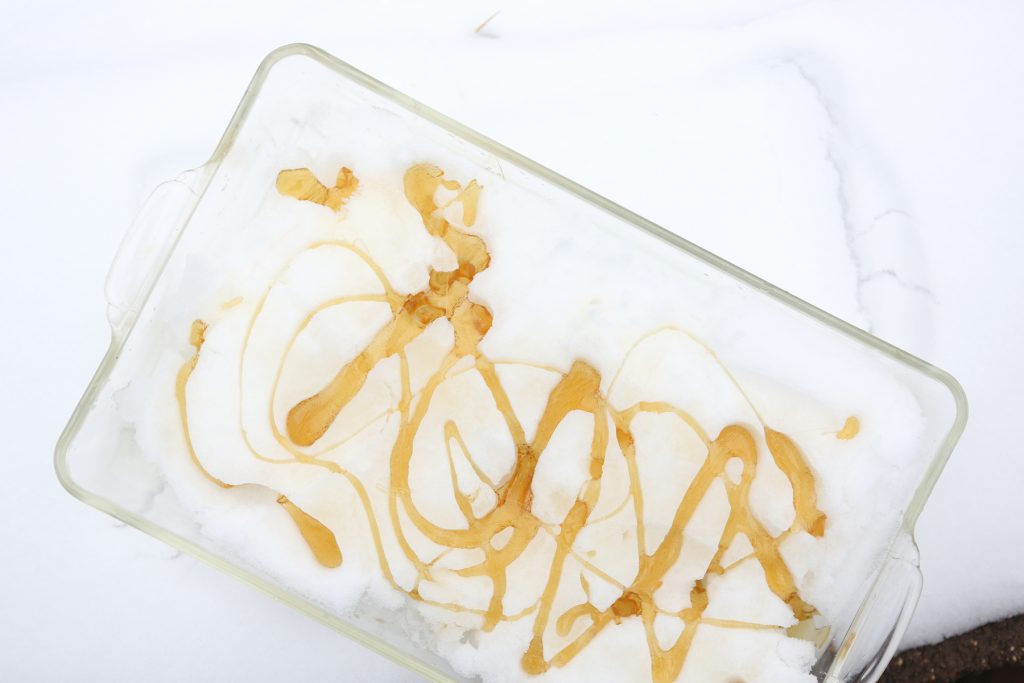
Alternately, make snow candy in a casserole dish filled with fresh snow or crushed ice.
Step 5. When you’re done, remove the candy from the snow with a fork.
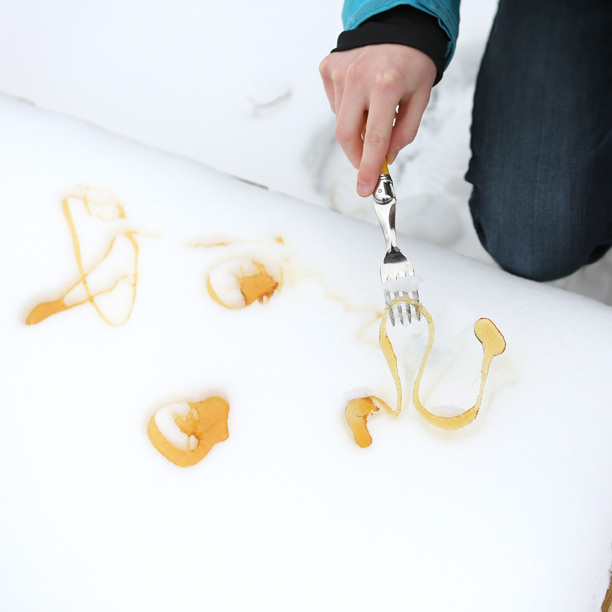
Maple Syrup Snow Candy from “Outdoor Science Lab for Kids” (Quarry Books 2016)
Step 6. Eat your candy right away, or let it warm up and wind it around sticks or skewers to make maple lollipops. Enjoy!
Maple Snow Candy from Outdoor Science Lab for Kids (Quarry Books 2016)
The Science Behind the Fun:
Maple syrup is made from watery tree sap boiled to evaporate most of the moisture it contains when it’s first tapped from a tree. Following evaporation, the syrup that remains is mostly made up of a sugar called sucrose, but it also contains smaller amounts of glucose and fructose.
Naturally, other organic compounds are also present in tree sap, giving syrup from different areas unique flavors. Syrup collected earlier in spring when it is cold tend to be light in color and have a mild flavor. As the days get warmer, microbes ferment some of the sugar in the syrup, making it darker and giving it a more robust taste.
In this experiment, you heat maple syrup, evaporating even more water. A super saturated solution forms, which holds more sugar molecules in the liquid than would be possible if you evaporated the water at room temperature.
When you pour the supersaturated sugar into the snow, it cools quickly, forming some sugar crystals to give the maple candy a soft, semi-solid consistency. Heating the syrup to a higher temperature will evaporate more water, resulting in even more crystal formation in the cooled syrup, making it harder to bite. If you carefully evaporate all of the water from maple syrup, you’ll be left with pure maple sugar crystals.
Creative Enrichment:
-Try collecting some syrup from your pan at several different temperatures and compare the resulting snow candy for texture, color and consistency.
-Can you do the same experiment with other sugar syrups, like molasses or corn syrup?
-Try to make maple sugar.
Candy Experiments
- by KitchenPantryScientist
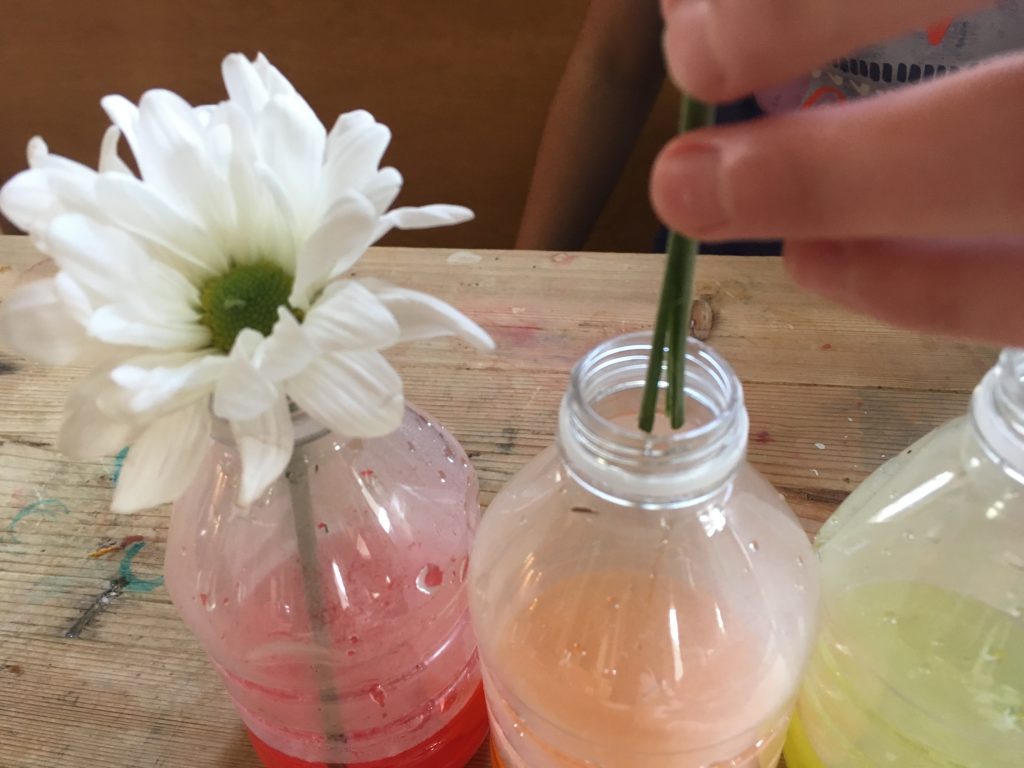
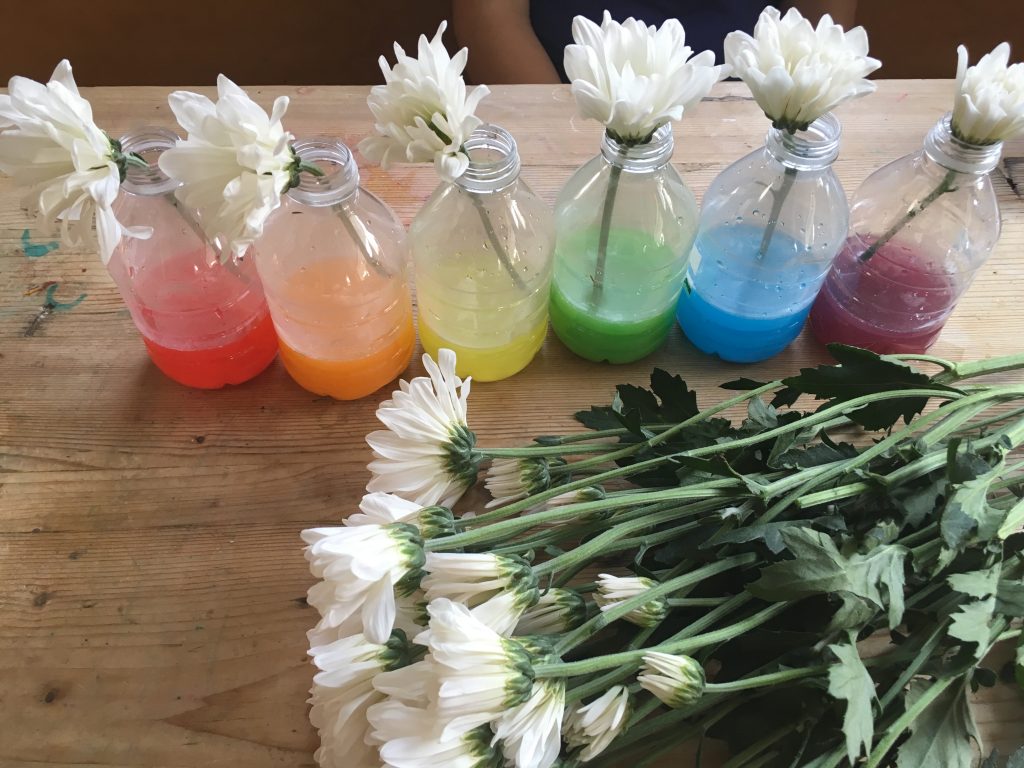
We have bags full of candy at our house, and I’d like to see them disappear as quickly as possible. Here are a few science experiments we tried, substituting candy for other ingredients:
Candy Chromatography: We put candy in water and used coffee filters to separate out the colors, via capillary action.
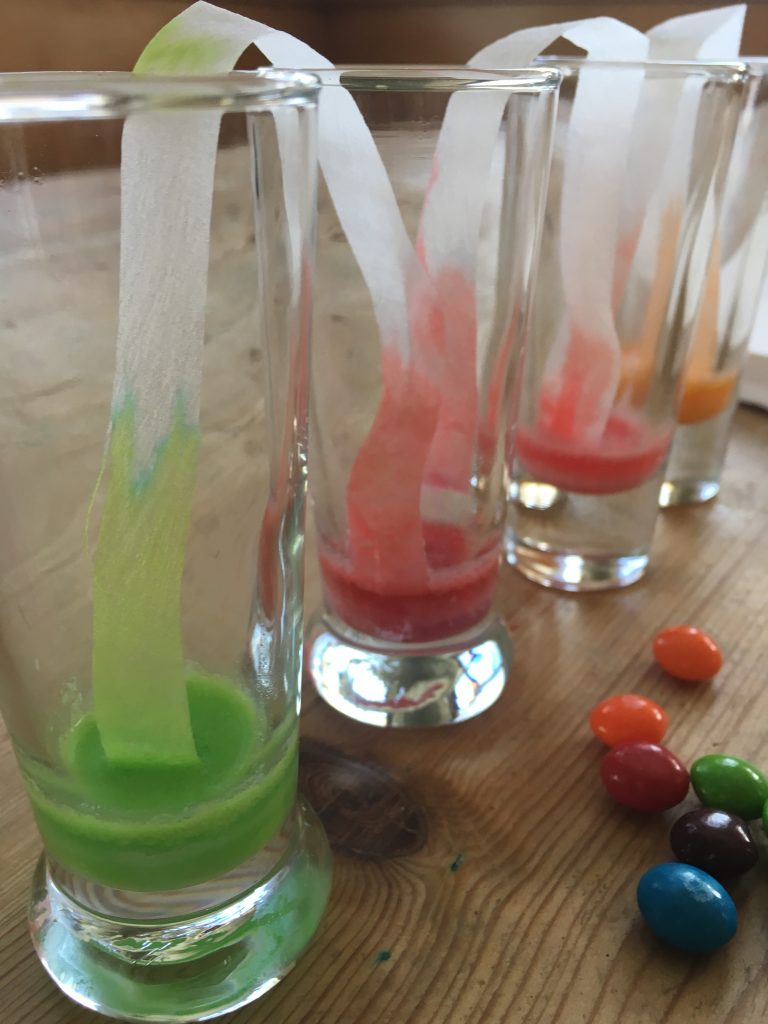
Skittles in water with coffee filter strips between cups…
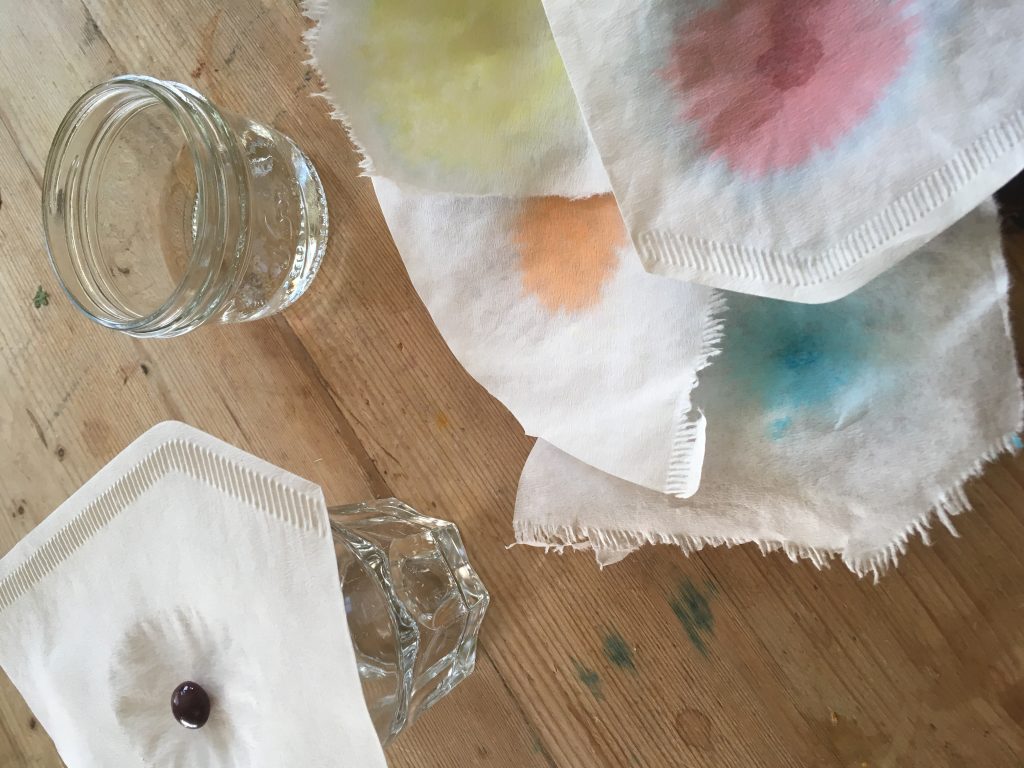
Coffee filters on cups, with water dripped onto a piece of candy.
Candy-drinking plants? We dissolved candy in warm water and added white carnations with cut/split stems to see whether they’d change color as the flowers drew the water up into their petals.
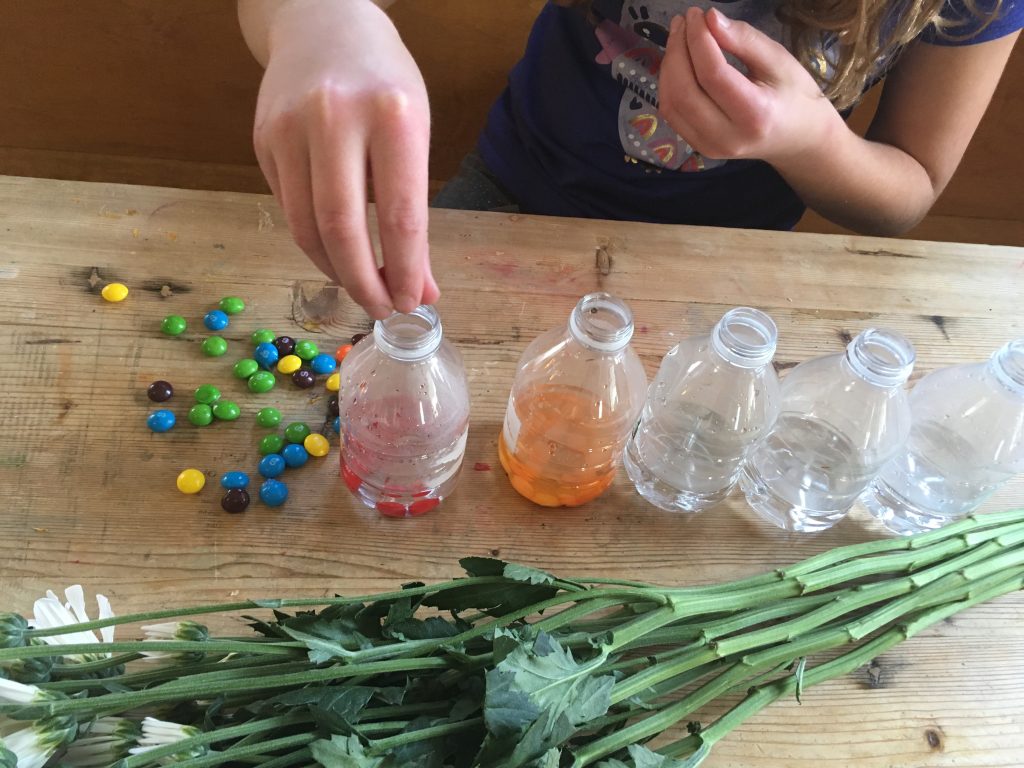
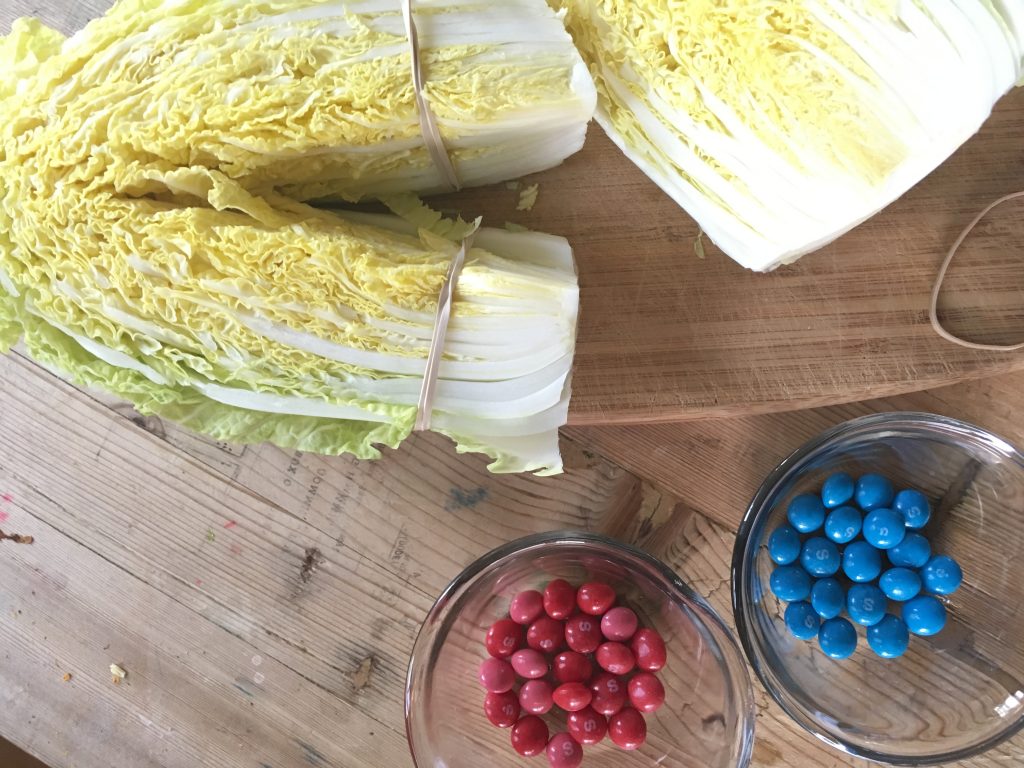
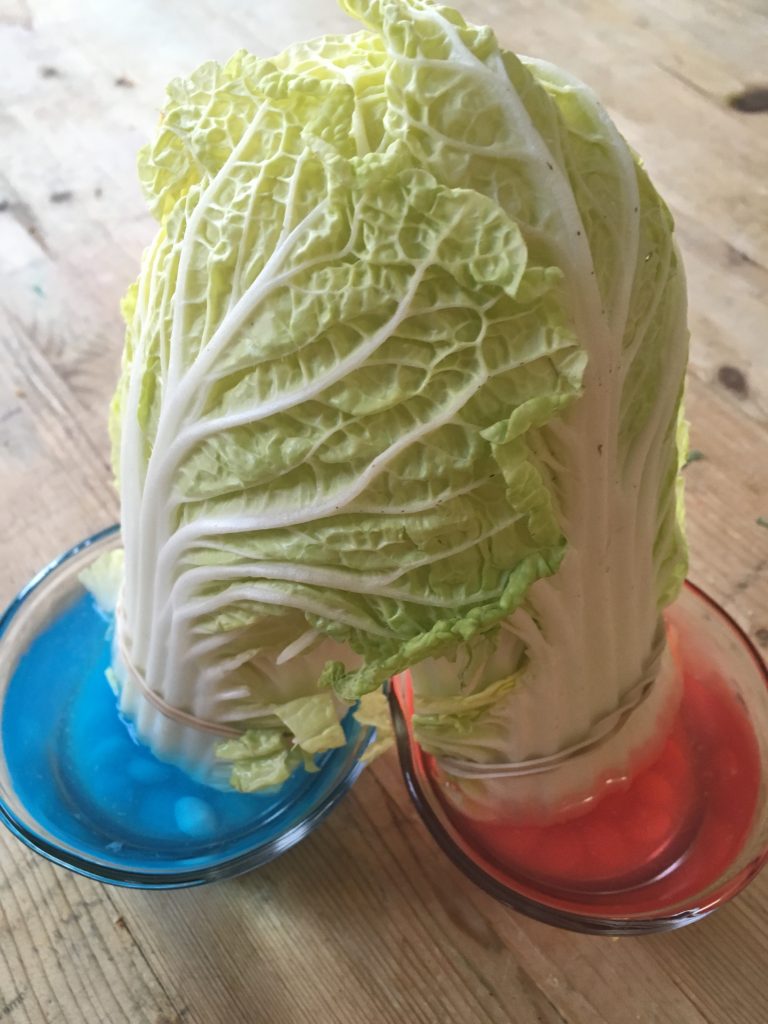
Candy Vegetable Vampires: We tried the same experiment with Napa Cabbage, via the Vampire Vegetables experiment in Kitchen Science Lab for Kids.
We’re also going to freeze candy in ice and make Tie Dye milk with Skittles!
What could you try with your candy?
Halloween Vampire Snacks
- by KitchenPantryScientist
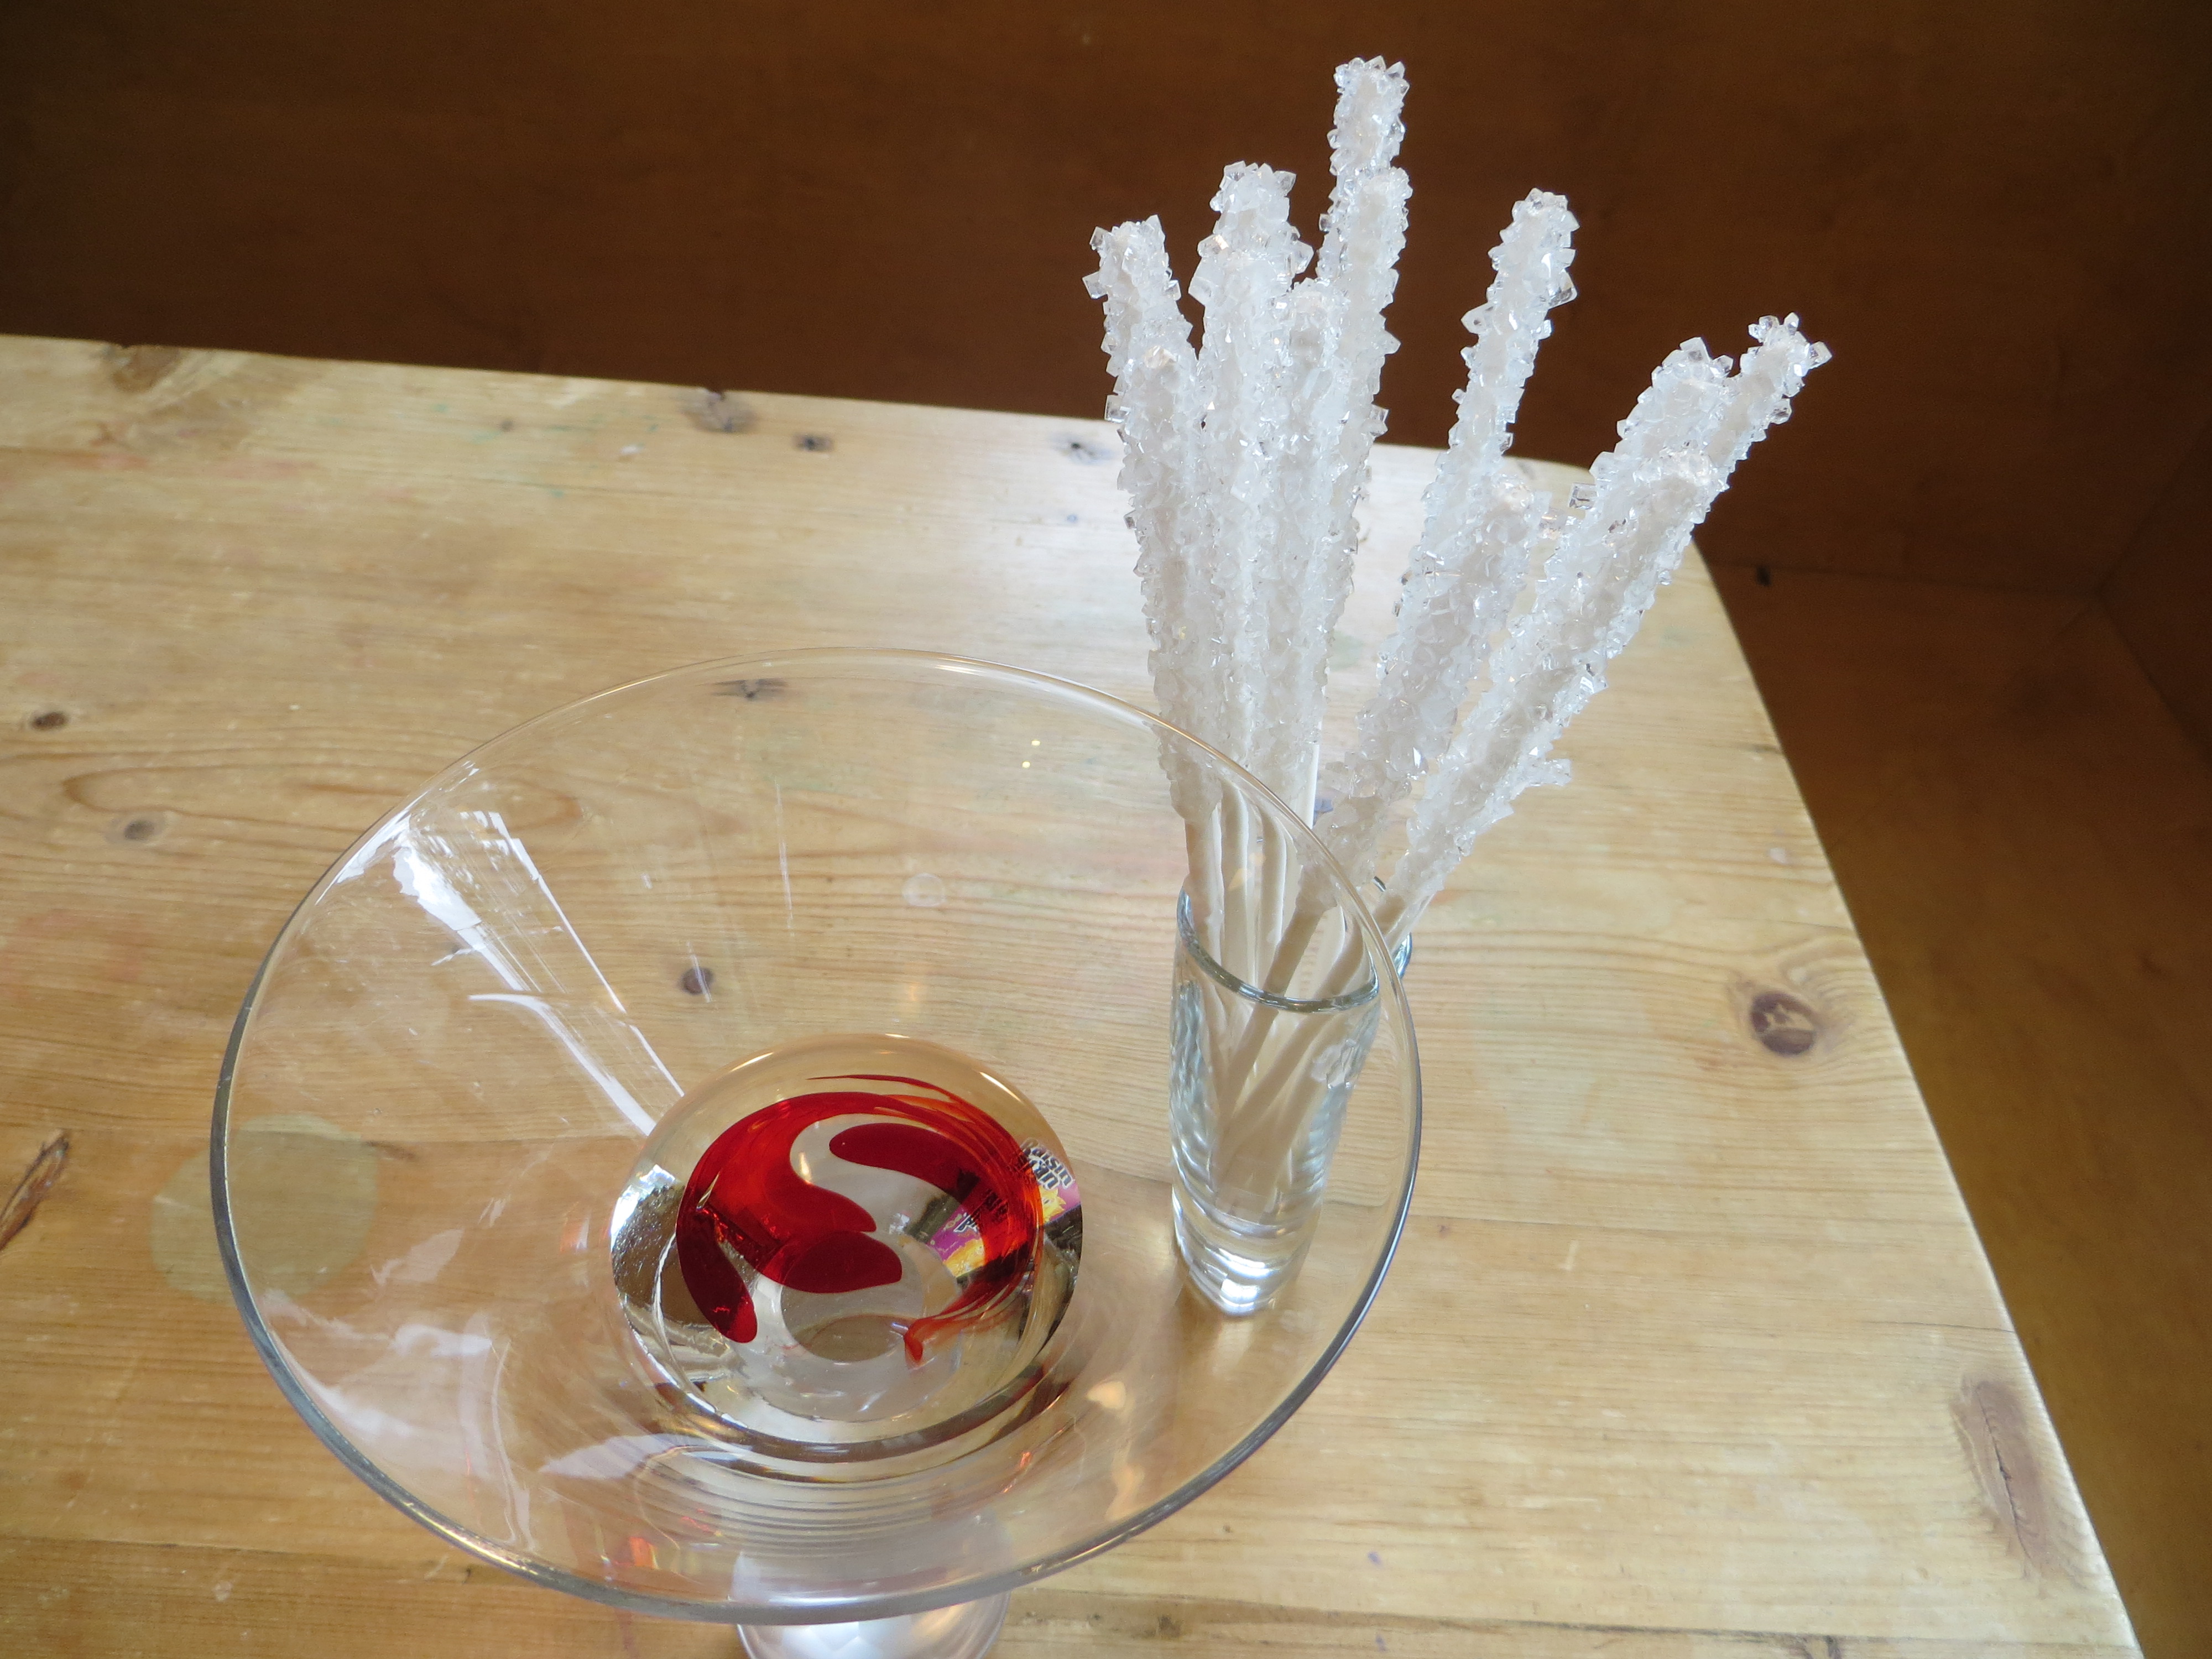
This bloody candy experiment takes a few weeks , but is worth the wait! If you start today, you’ll have gorgeously gruesome rock candy, dripping with sugary fake blood, in time for Halloween.

This experiment requires adult supervision for boiling and handling the hot sugar syrup. Once it’s cooled down, kids can take over.
To make 12-15 sticks, you’ll need the following:
-2 and 1/2 cups white granulated sugar
– 1 cup water
-cake pop sticks or wooden skewers
-red food coloring
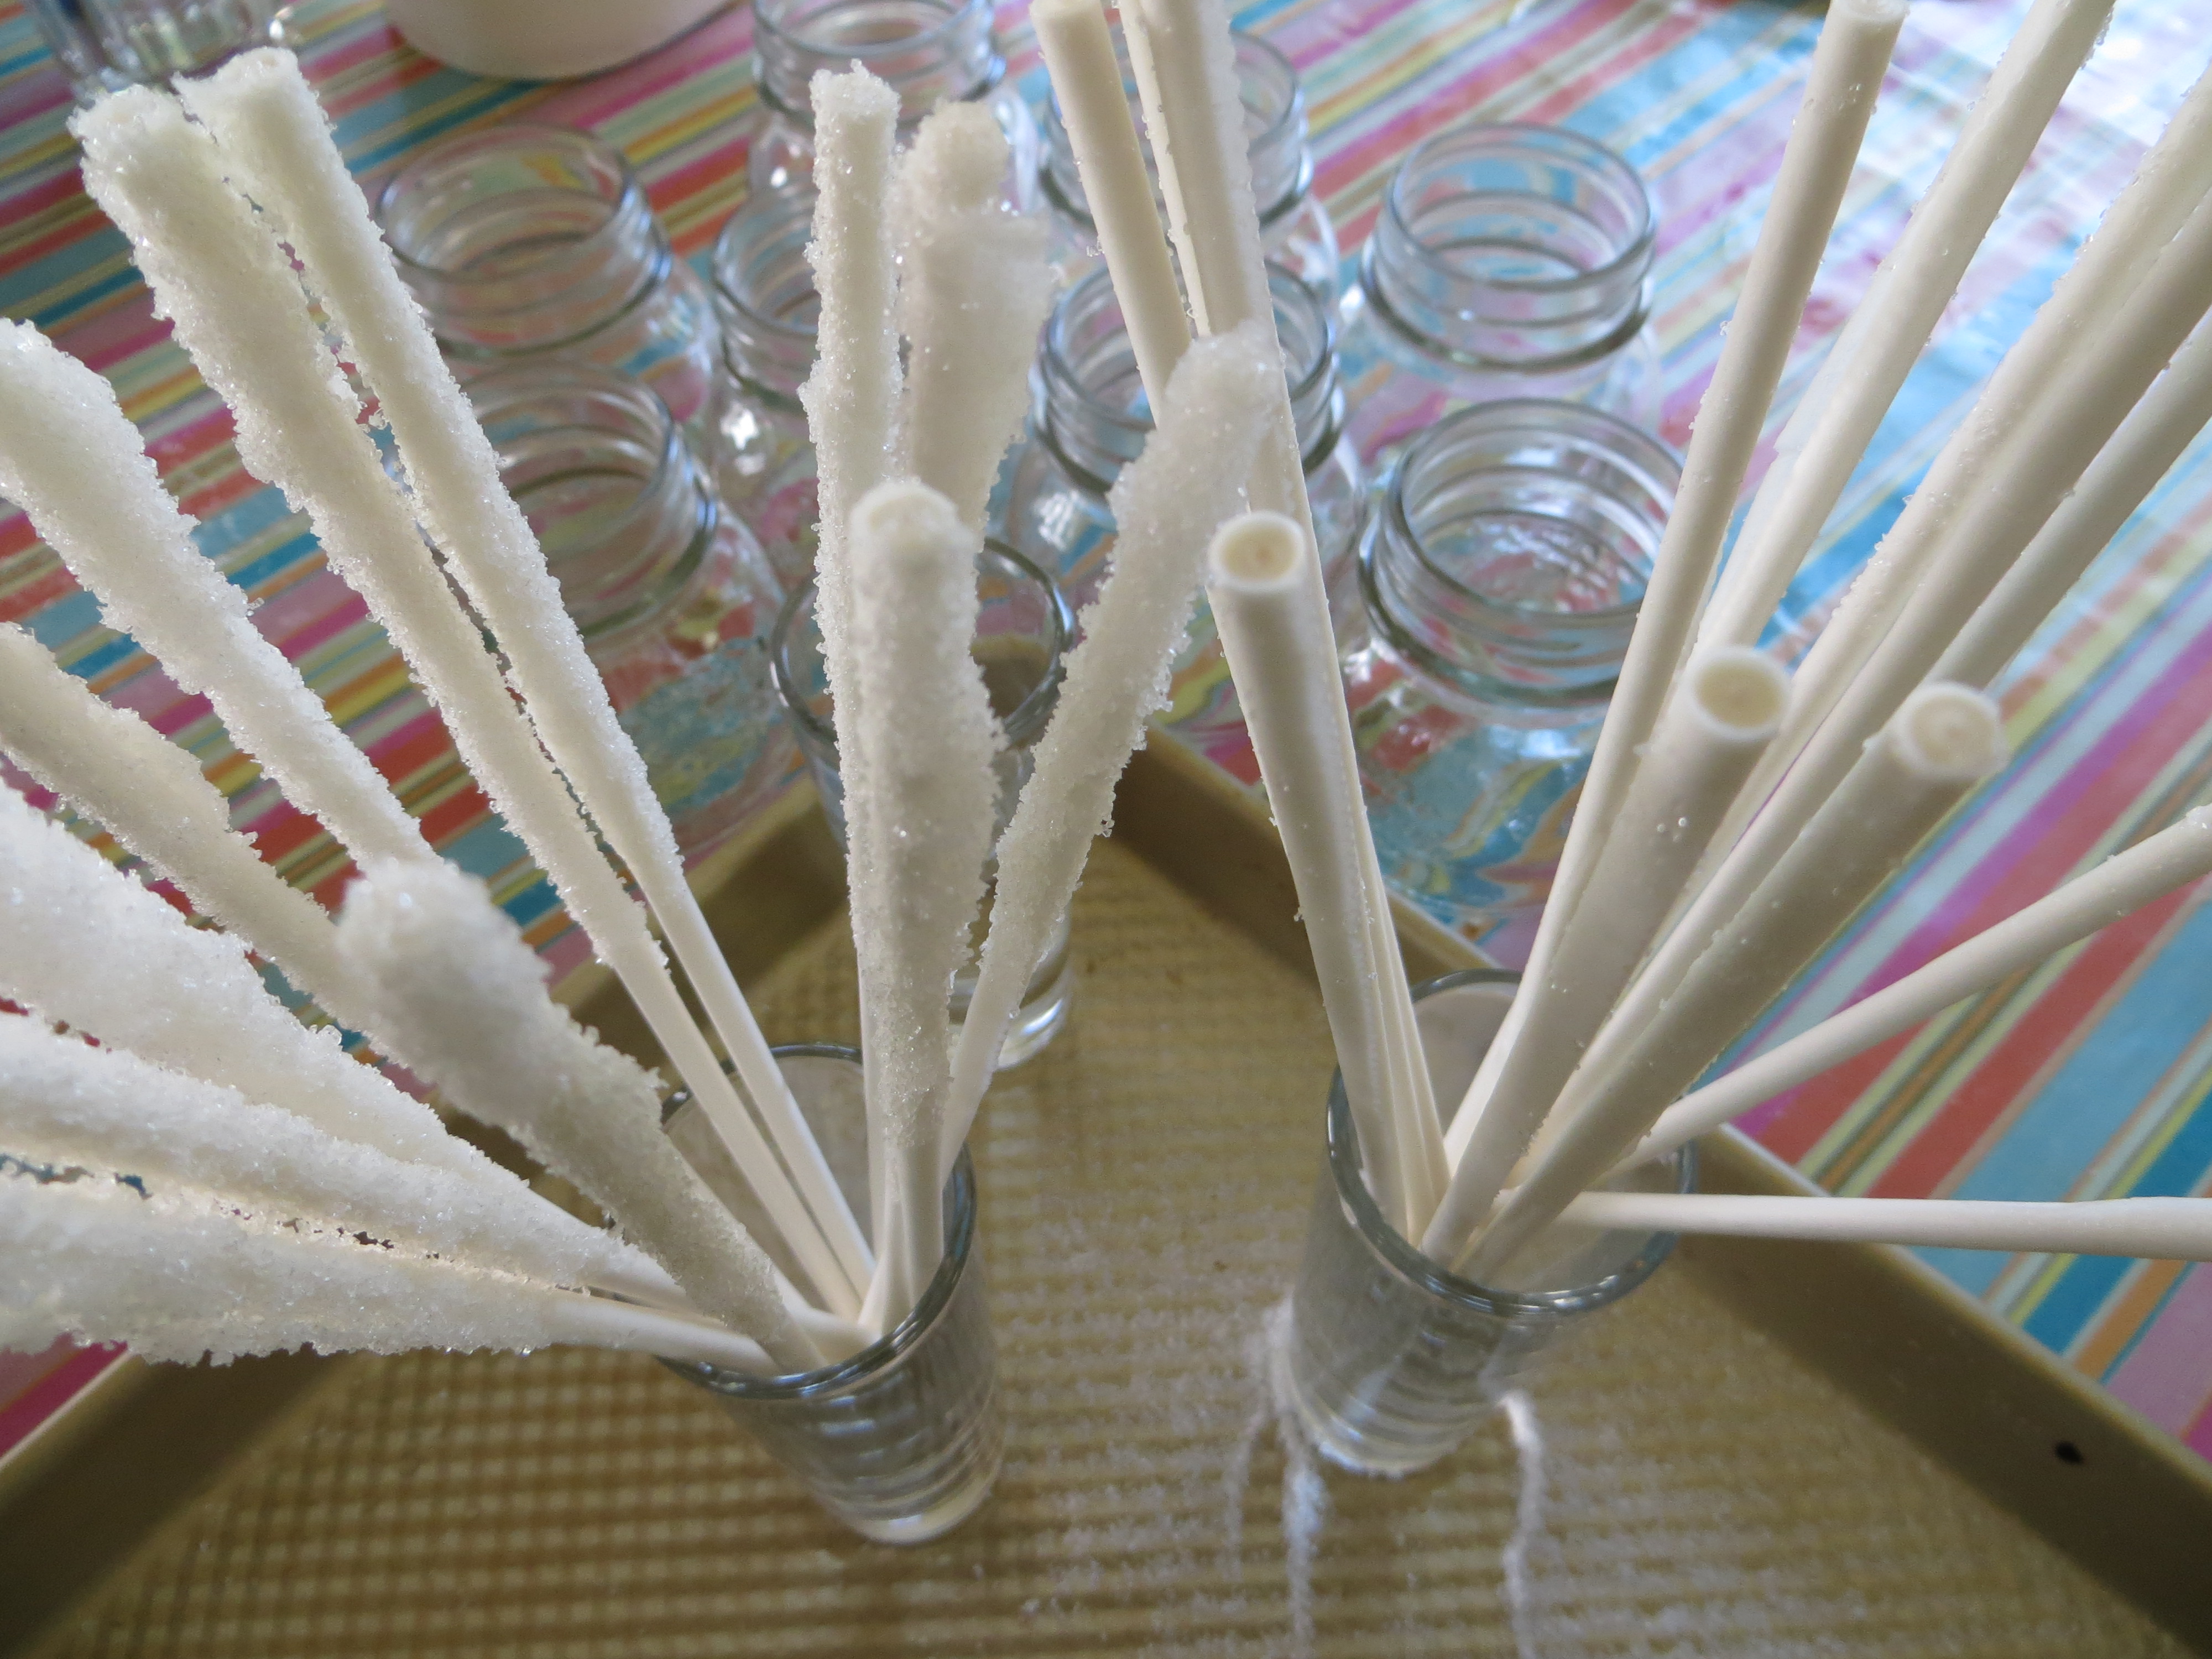
- Dip one end of cake-pop sticks or wooden skewers in water and then roll them in granulated white sugar.
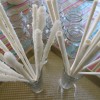 The sugar should cover 2-3 inches of the stick. Let them dry completely. These are the seeds for the sugar crystal growth.
- Boil 2 cups water and 5 cups sugar until sugar is dissolved as much as possible. It should look like syrup. Once it cools, this syrup is your supersaturated sugar solution.
- Let syrup sit until it is no longer hot and pour into a large glass jar or deep bowl.
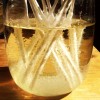
- When syrup is completely cool, set the sugary end of the sugar-seeded cake pops or skewers into the syrup, evenly spaced in the jar. Cover loosely with plastic wrap and let them sit for about a week. Gently move the sticks around occasionally, so they don’t stick to each other and the crystals in the bottom of the glass. If the glass container gets too full of crystals, pour the syrup into a new container and move your stick into the cleaner syrup to grow more crystals.
- When the rock candy is done, pull them from the syrup and let them dry. Save the syrup.
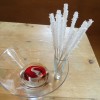
- To serve, pour a few cm of your sugar syrup into the bottom of a pretty glass and add a few drops of red food coloring. You can even add a little flavoring to the syrup (like cherry extract.) Stir.
- Put your rock candy, handle side up, into the glass. Be sure to give your guests napkins, so they don’t drip “blood” all over the house!

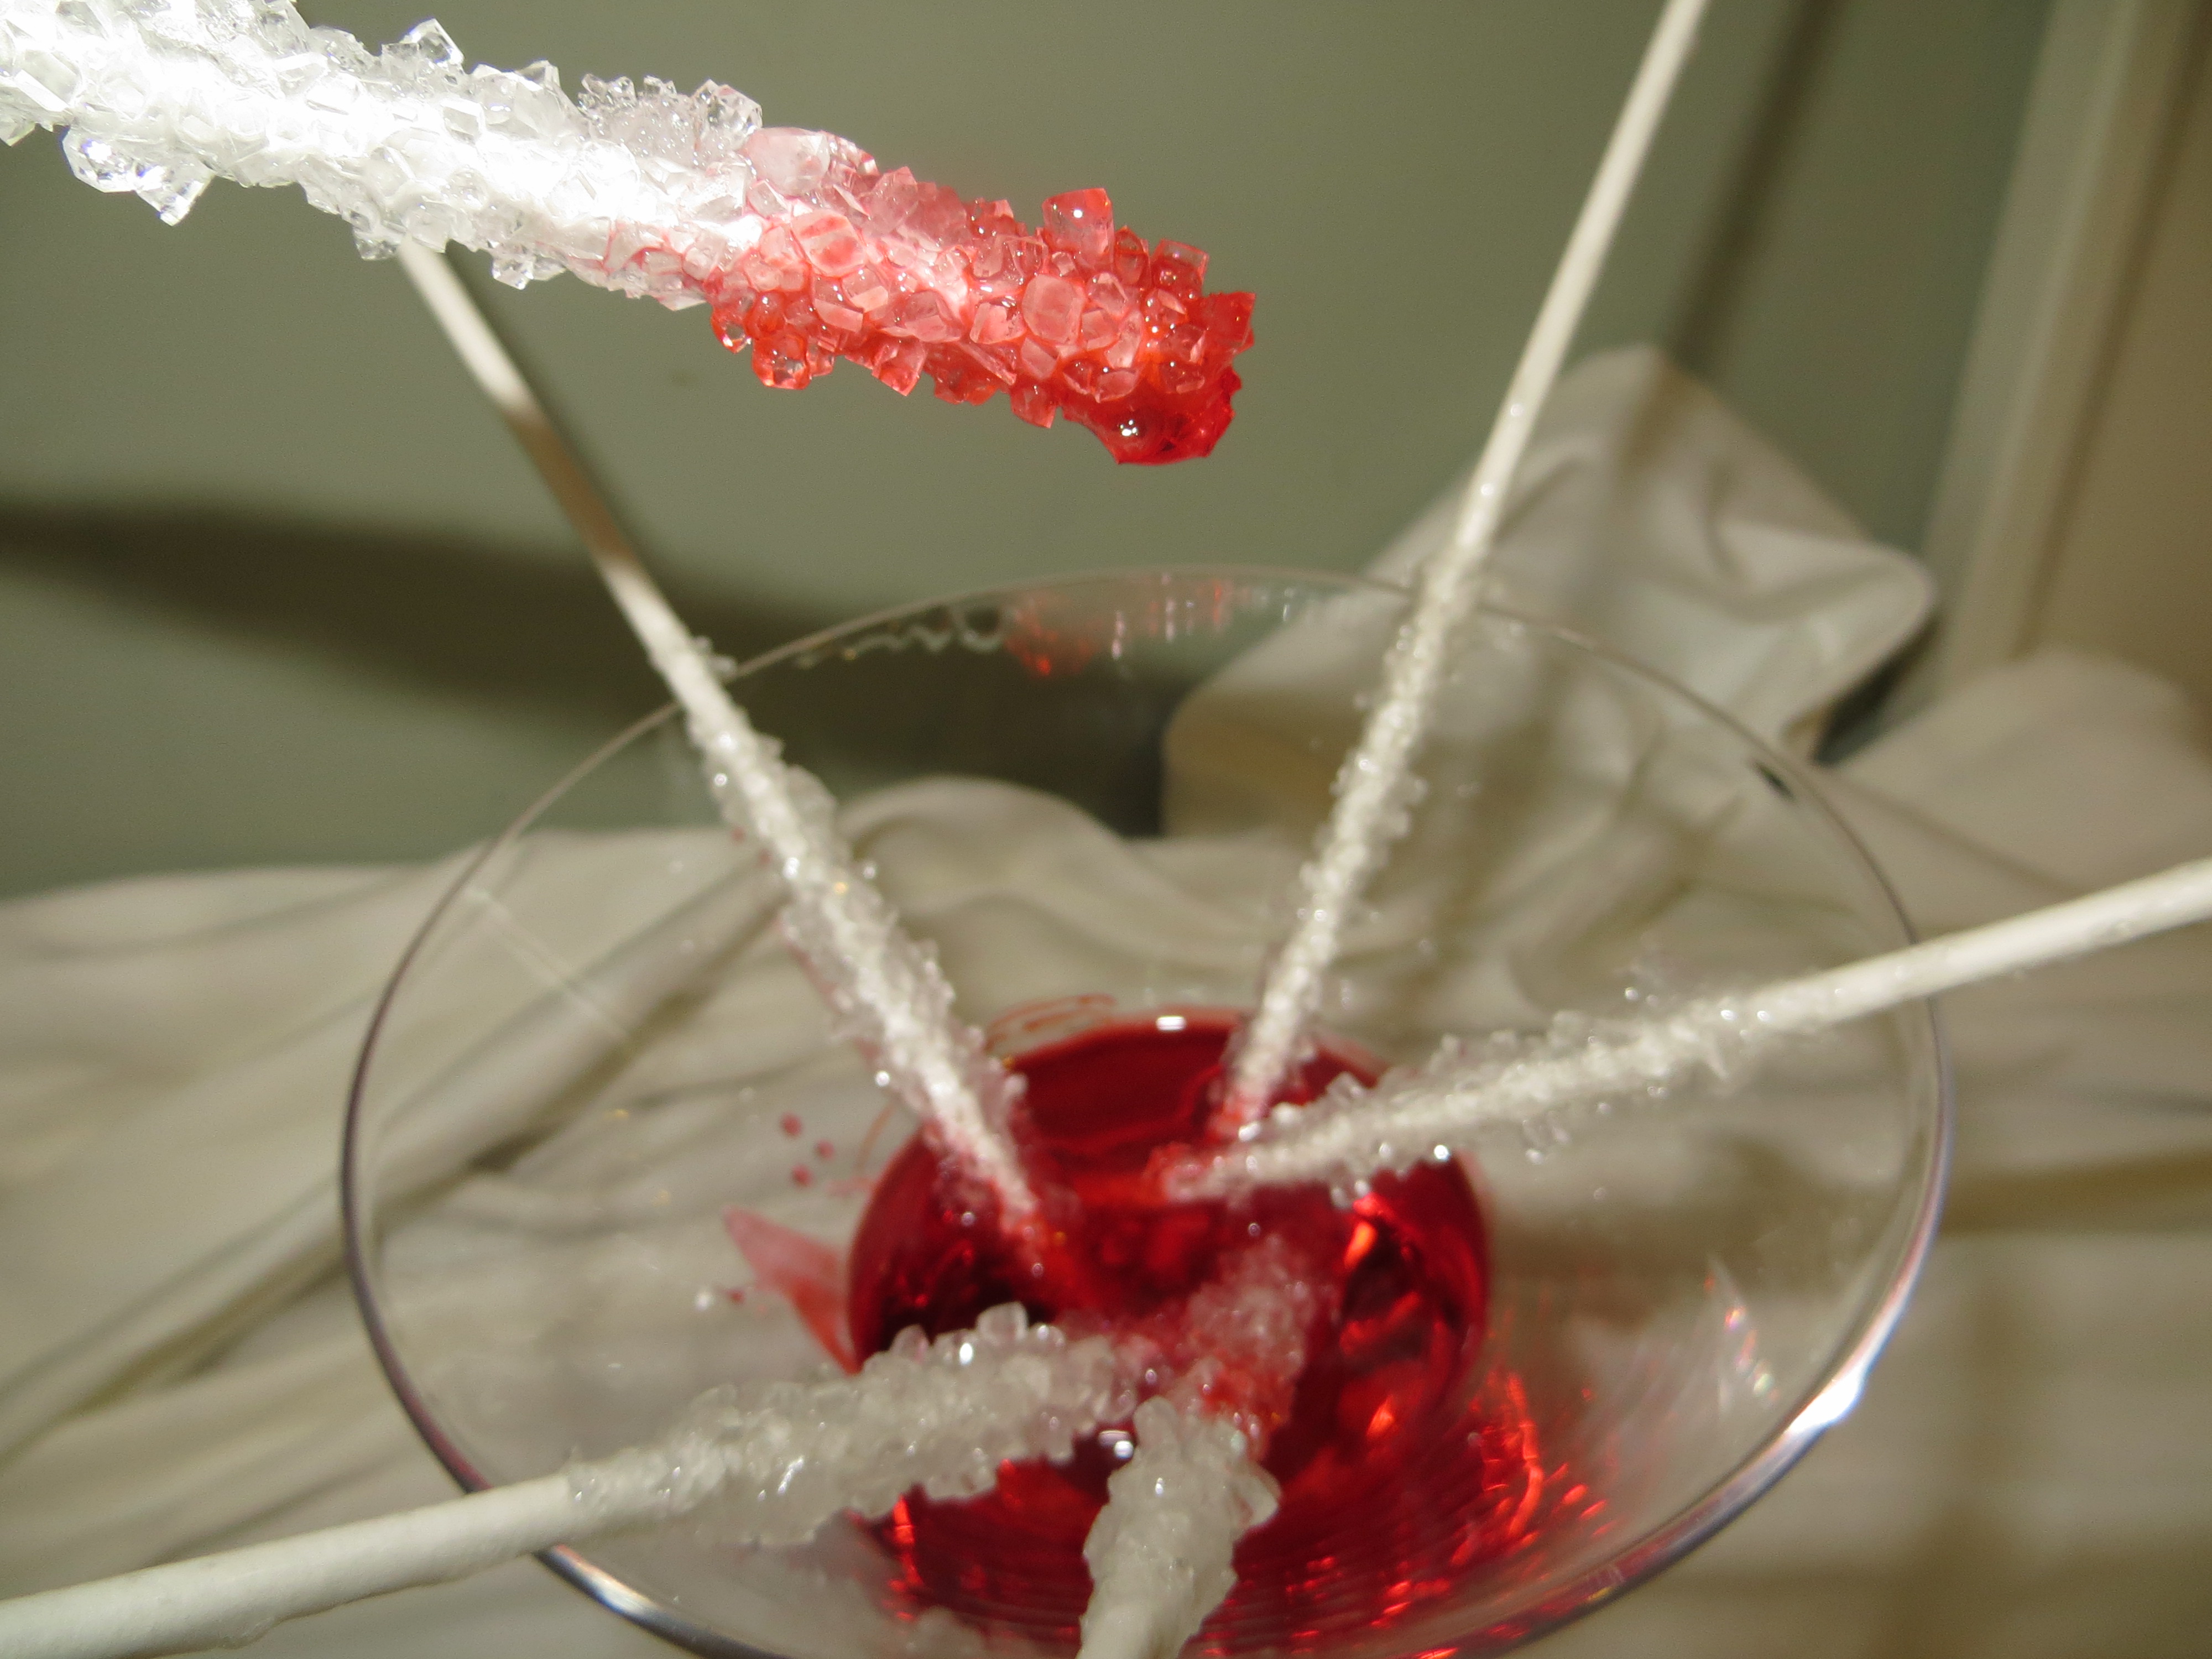
How do Crystal Grow?
Like bricks in a wall, crystals are solids formed by a network of repeating patterns of molecules. Instead of the mortar that holds brick together, the atoms and molecules are connected by atomic bonds.
Crystals that share the same chemical composition can be big or small, but the molecules always come together to form the same shape. Table sugar, or sucrose, is made up of a molecule composed of two sugars, glucose and fructose. Crystals formed by sucrose are hexagonal (six-sided) prisms, slanted at the ends.
The crystals on your rock candy sticks grow from the “seeds” of the sugar you rolled on the stick before you put them in the syrup.
Candy Science: Icy Worm Pond
- by KitchenPantryScientist
If you got any sour gummy worms for Halloween, they’re probably coated with sweet-sour powder made from citric acid and sugar crystals. Using the same science used to make rock candy, you can use sour gummy worms to crystallize sugar syrup and make an”icy worm pond.” It’s even more fun to add sugar cubes to your pond! After a few days, you can chip your worms out of the “ice” to see how they taste. I created this experiment for Imperial Sugar and Dixie Crystals. Check it out on their website (click here) for directions and to learn more about the science behind the fun!
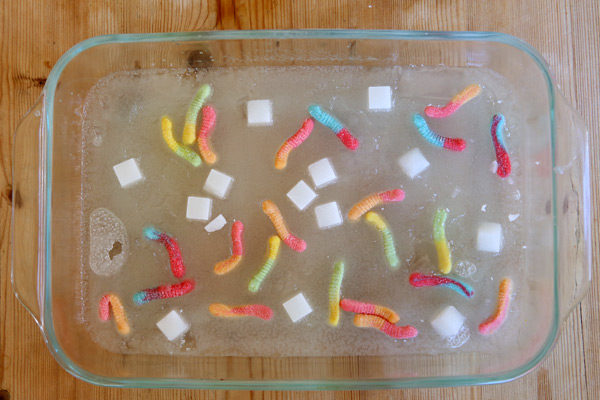
If you don’t have sour worms, try coating other (non-chocolate) candy with sugar by dipping it in water, rolling it in sugar and letting it dry before you add it to your pond. It would be fun to do this experiment with Swedish fish, or lifesavers!
Can you make up an experiment using Halloween Candy? Comment on this post with the experiment you created and you could win a copy of Kitchen Science Lab for Kids*!
*Winner will be chosen at random.
Halloween Science: Vampire Rock Candy
- by KitchenPantryScientist
Think Halloween science!
I’m going to post a spooky experiment every few days from now until Oct.31st. They’re great for school or home Halloween parties, and some even make groovy Halloween Decorations!
This bloody candy experiment takes a few weeks , but is worth the wait! If you start soon, you’ll have gorgeously gruesome rock candy, dripping with sugary fake blood, in time for Halloween.
This experiment requires adult supervision for boiling and handling the hot sugar syrup. Once it’s cooled down, kids can take over.
To make 12-15 sticks, you’ll need the following:
-2 and 1/2 cups white granulated sugar
– 1 cup water
-cake pop sticks or wooden skewers
-red food coloring
- Dip one end of cake-pop sticks or wooden skewers in water and then roll them in granulated white sugar. The sugar should cover 2-3 inches of the stick. Let them dry completely. These are the seeds for the sugar crystal growth.
- Boil 2 cups water and 5 cups sugar until sugar is dissolved as much as possible. It should look like syrup. Once it cools, this syrup is your supersaturated sugar solution.
- Let syrup sit until it is no longer hot and pour into a large glass jar or deep bowl.
- When syrup is completely cool, set the sugary end of the sugar-seeded cake pops or skewers into the syrup, evenly spaced in the jar. Cover loosely with plastic wrap and let them sit for about a week. Gently move the sticks around occasionally, so they don’t stick to each other and the crystals in the bottom of the glass. If the glass container gets too full of crystals, pour the syrup into a new container and move your stick into the cleaner syrup to grow more crystals.
- When the rock candy is done, pull them from the syrup and let them dry. Save the syrup.
- To serve, pour a few cm of your sugar syrup into the bottom of a pretty glass and add a few drops of red food coloring. You can even add a little flavoring to the syrup (like cherry extract.) Stir.
- Put your rock candy, handle side up, into the glass. Be sure to give your guests napkins, so they don’t drip “blood” all over the house!
How do Crystal Grow?
Like bricks in a wall, crystals are solids formed by a network of repeating patterns of molecules. Instead of the mortar that holds brick together, the atoms and molecules are connected by atomic bonds.
Crystals that share the same chemical composition can be big or small, but the molecules always come together to form the same shape. Table sugar, or sucrose, is made up of a molecule composed of two sugars, glucose and fructose. Crystals formed by sucrose are hexagonal (six-sided) prisms, slanted at the ends.
The crystals on your rock candy sticks grow from the “seeds” of the sugar you rolled on the stick before you put them in the syrup.