Category:Food Science’
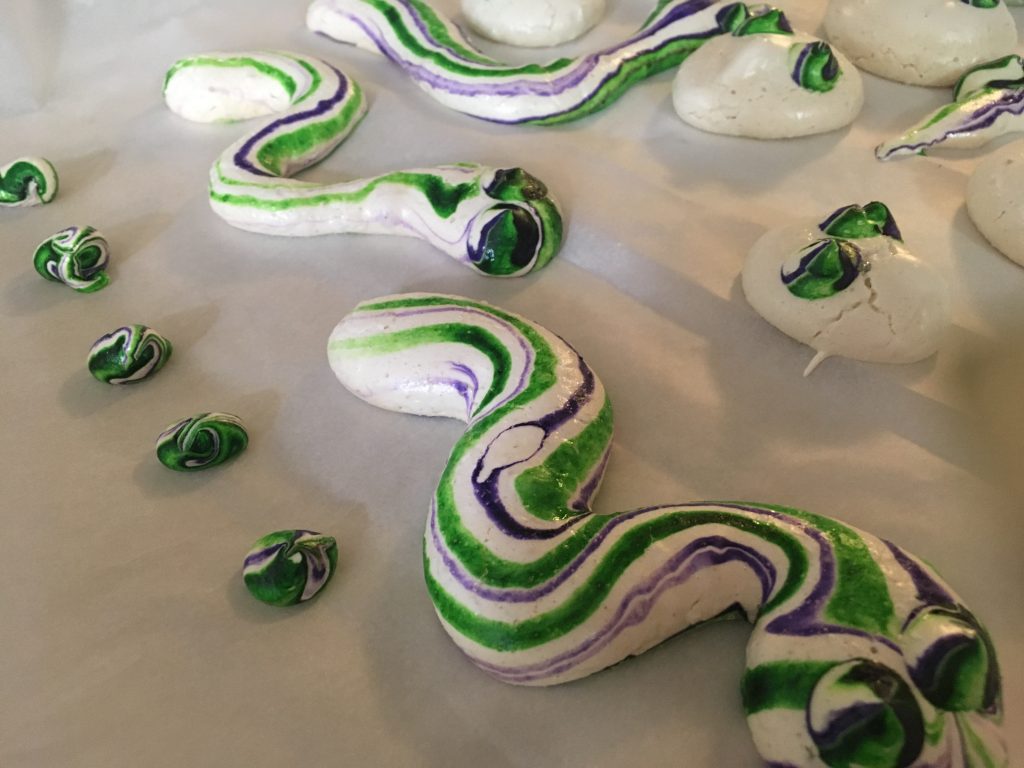
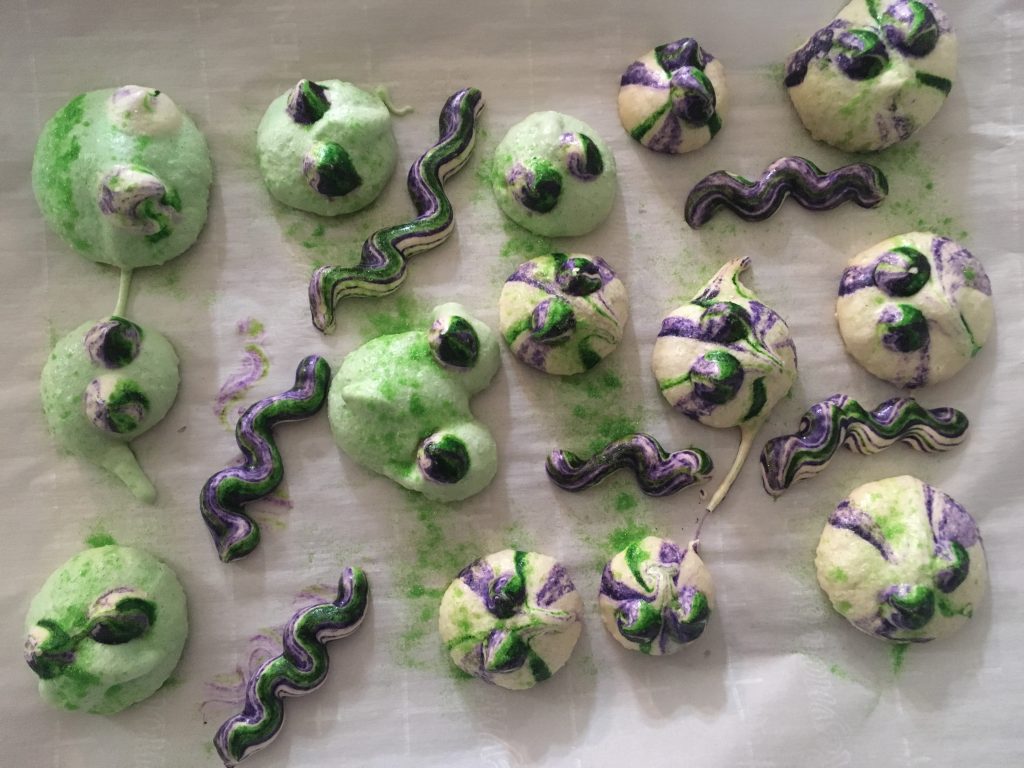
Halloween Meringues
- by KitchenPantryScientist
Eggs and sugar have great chemistry. Mix them together to create these sweet, crunch Halloween treats with a recipe from my upcoming book “Kitchen Science Lab for Kids: Edible Edition.“
They’ll take a few hours to bake, so plan ahead for this fun, edible science project.
KitchenPantryScientist.com Halloween meringues
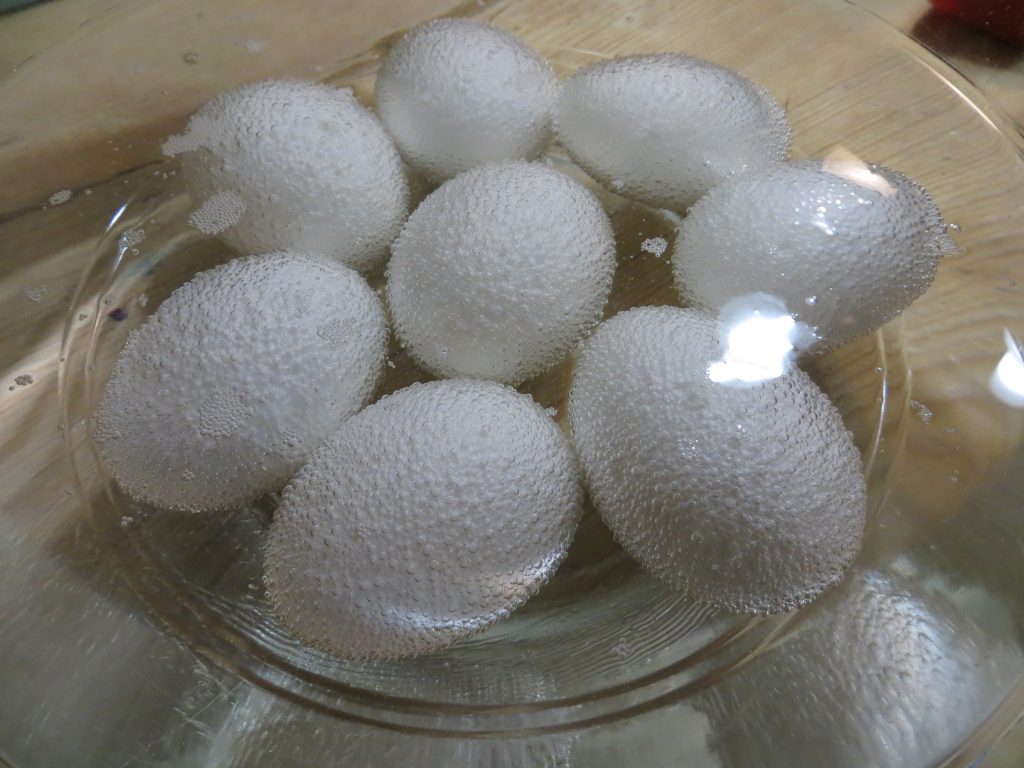
Meringues are simply egg whites whipped into sugary foams. As you whip air into the mix, glue-like egg white proteins stick to the bubbles, stabilizing them to form a thick foam. The sugar you add combines with water from the eggs to form a sweet syrup.
When you bake meringue at a low temperature for a long period of time, the sugar and protein are transformed from an elastic goo to a glassy state, creating a crunch mouthful of bubbles.
Hard meringues are made using ¼ cup sugar per egg white, with a pinch of cream of tartar. Don’t skip the cream of tartar (an acid.) It helps stabilize the egg whites in the meringue.
To make Halloween Meringues, you’ll need:
3 egg whites from extra large eggs
1/8 tsp cream of tartar
¾ cup granulated sugar
1/4 tsp Vanilla
Food coloring (gel works best)
Toothpicks
Sprinkles or dusting sugar (optional)
Parchment paper
Stand mixer or hand mixer
2 baking sheets
Pastry bags or large plastic zipper bags with the corners cut off
Round piping tips for pastry bag, if you have them
Recipe:
1. Pre-heat oven to 200 degrees F.
2. Line two baking sheets with parchment paper.
3. Beat three egg whites on medium until they start to foam.
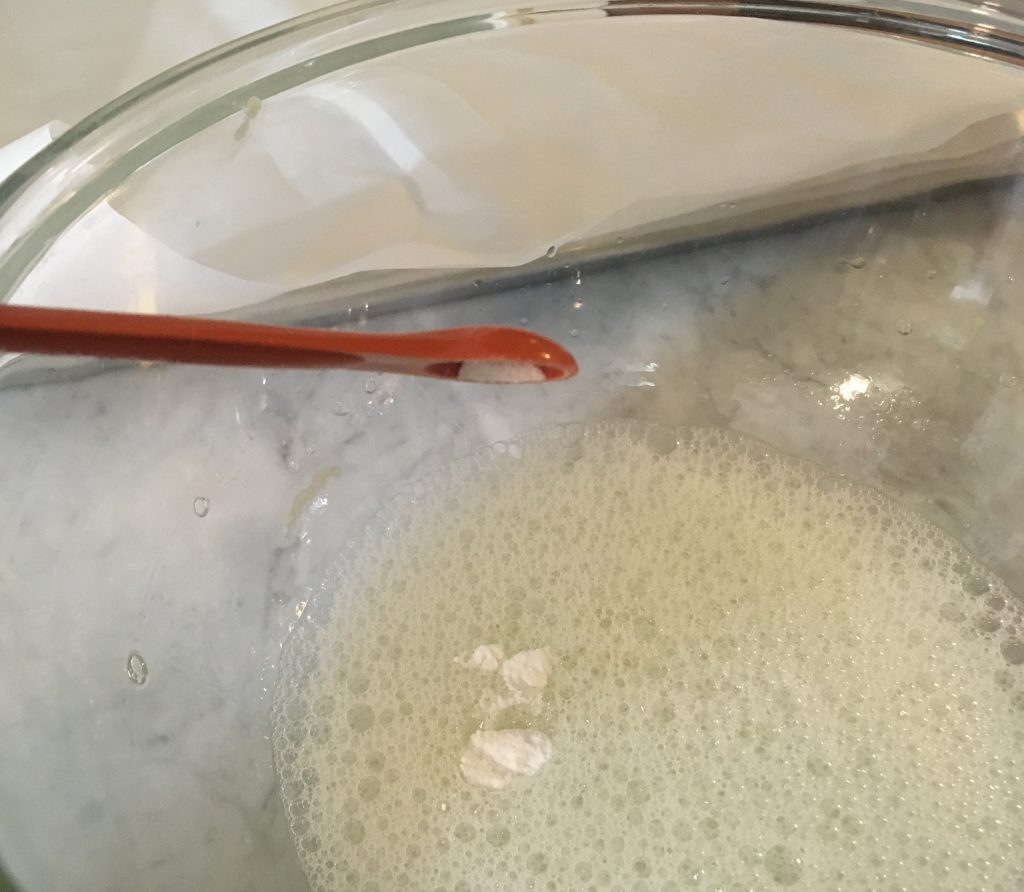
4. Add 1/8 tsp. cream of tartar and continue to beat the egg whites, increasing the speed to high.
5. When the foam gets thicker enough to form soft peaks, add 3/4 cup sugar, a tablespoon or so at a time as you beat the eggs. Add vanilla.
6. Continue beating the mixture until stiff, glossy peaks with rounded tips form. Don’t over-beat the meringue.
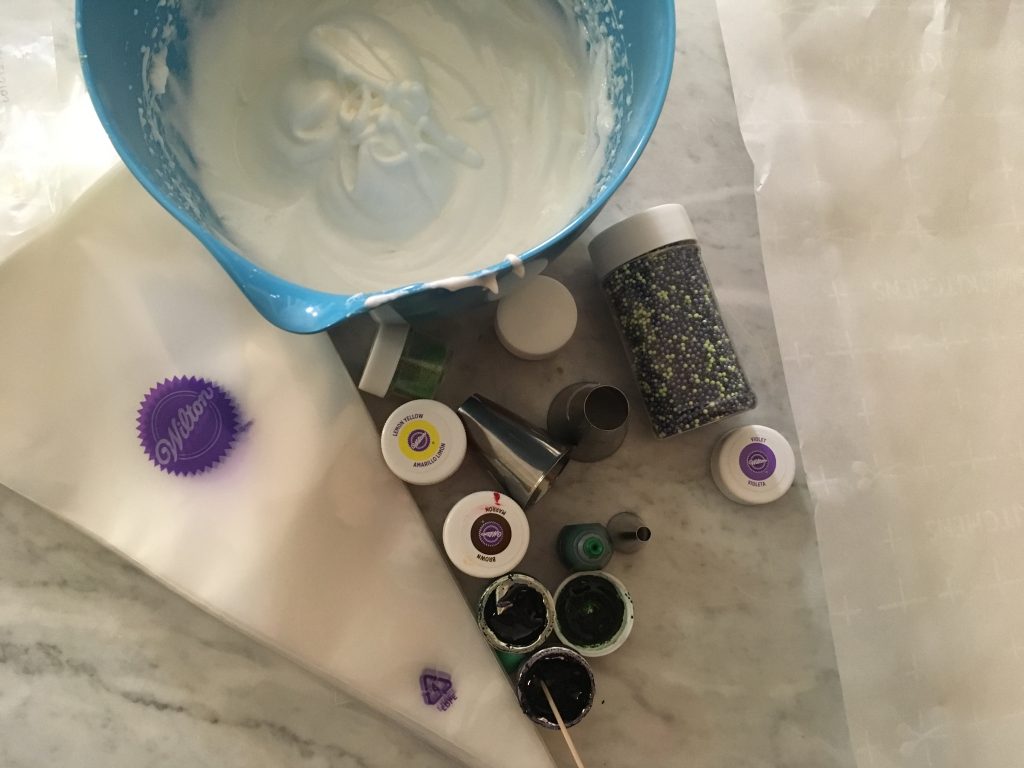
7. Add a round tip to the pastry or plastic bag. Fill the bag with the meringue you made.
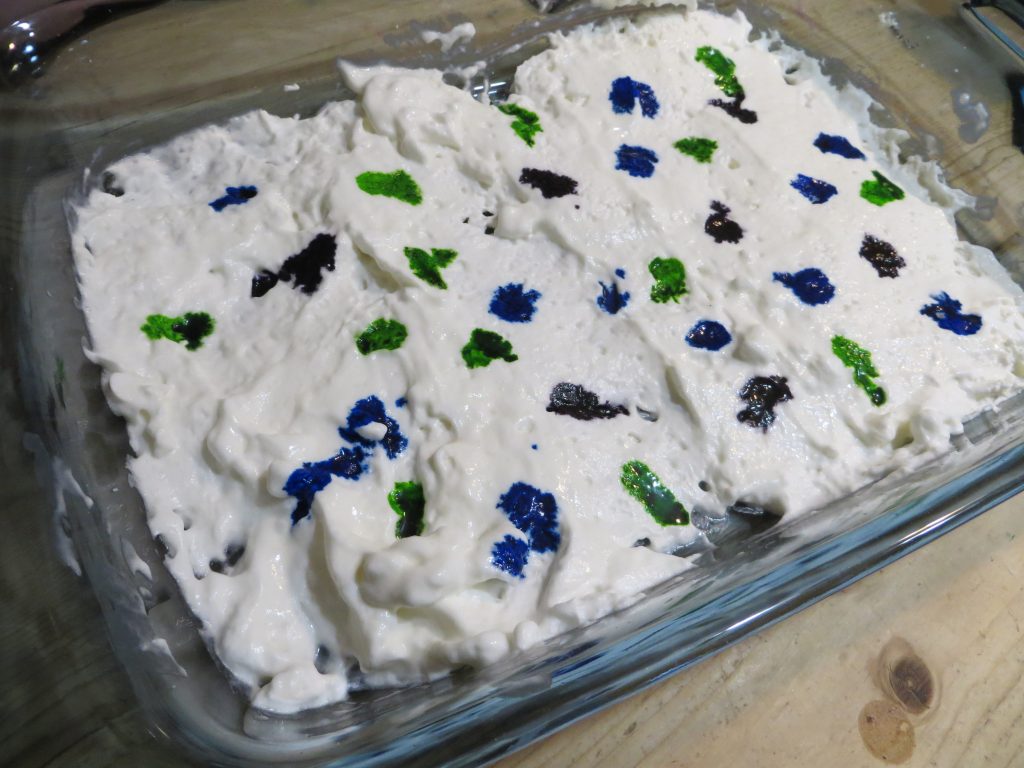
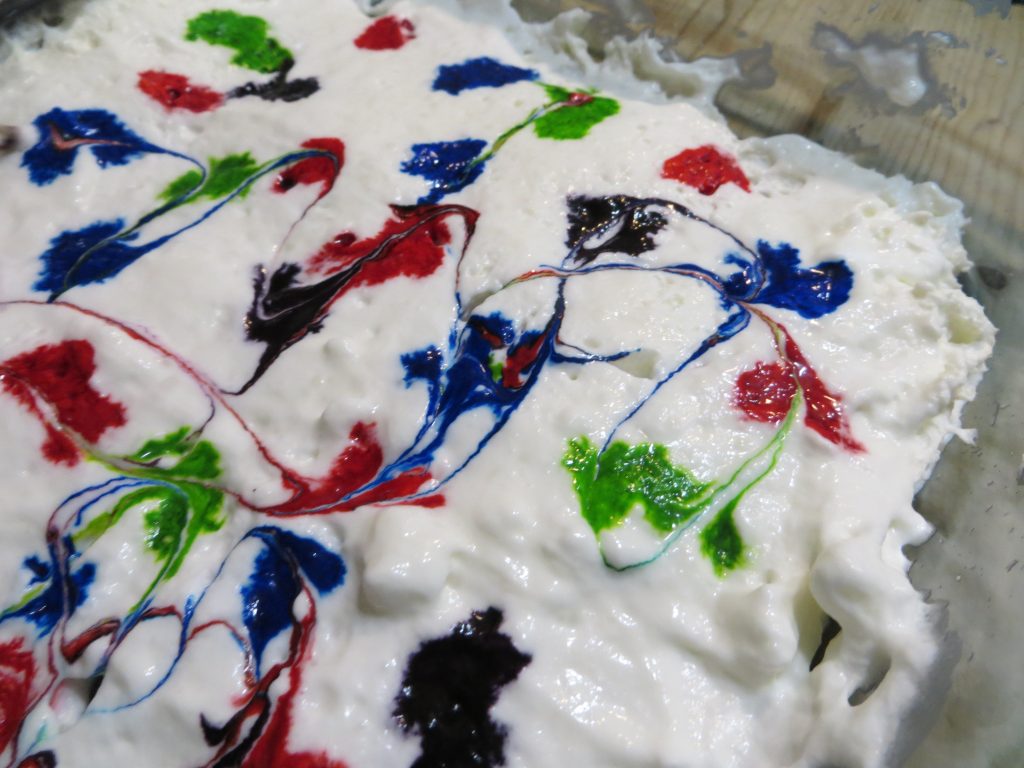
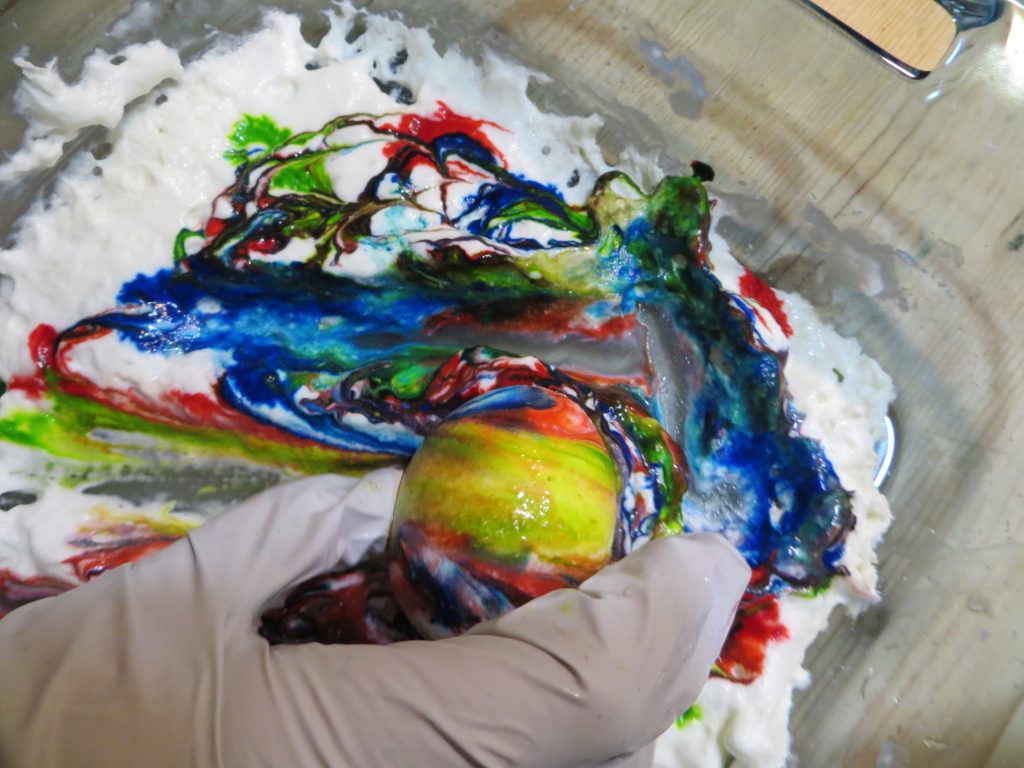
8.Use the bag and tip to pipe half of the meringue into blobs. You can color it with food coloring before piping it, if you wish.
9. Make some colorful streaks on the meringues by using a toothpick to smear food coloring on the inside of the pastry tip before putting it in the bag and piping the meringue. A small tip can be used to create eyes for the blobs, snakes and worms, or you can use sprinkles and dusting sugar to decorate.
10. Bake the meringues for 1-2 hours, until they feel dry and let them cool.
KitchenPantryScientist.com
Summer Food Science: Sorbet (No ice cream freezer needed!)
- by KitchenPantryScientist
Take your summer food game up a notch using… science! Sorbet recipe below. Vinaigrette recipe is in the post below this one.
&
Simple Freezer Strawberry Sorbet (adapted from Epicurious.com)
30 minutes hands-on prep time, 8 hours start to finish
*Parental supervision required for boiling sugar syrup
You’ll need:
a shallow dish
1 quart strawberries
1/3 cup lemon juice
1/3 cup orange juice
1 cup sugar
2 cups water
What to do:
- Make a sugar syrup by bringing 1 cup sugar and 2 cups water to a boil in a heavy sauce pan. Boil for 5 minutes.
- Puree strawberries in a blender or food processor until smooth.
- Add strawberries, lemon juice and orange juice to the sugar syrup.
- Pour mixture into a shallow dish and cool for 2 hours in the refrigerator.
- Put the chilled sorbet mix in the freezer for 6 hours, stirring every hour.
- Enjoy your sorbet!
The Science Behind the Fun:
In sorbet, sugar acts as an antifreeze agent, physically getting in the way of ice crystal formation to keep crystals small, so that you don’t end up with one big chunk of ice. Pre-chilling the mixture before freezing it allows it to freeze faster, which also encourages smaller crystals to form.
The Science of Emulsions: Vinaigrette and Mayonnaise
- by KitchenPantryScientist
“When I wasn’t at school, I was experimenting at home, and became a bit of a Mad Scientist. I did hours of research on mayonnaise, for instance, and although no one seemed to care about it, I thought it was utterly fascinating. When the weather turned cold, the mayo suddenly became a terrible struggle, because the emulsion kept separating, and it wouldn’t behave when there was a change in the olive oil or the room temperature. I finally got the upper hand by going back to the beginning of the process, studying each step scientifically, and writing it all down. By the end of my research, I believe, I had written more on the subject of mayonnaise than anyone in history. I made so much mayonnaise that Paul and I could hardly bear to eat it anymore, and I took to dumping my test batches down the toilet. What a shame. But in this way I had finally discovered a foolproof recipe, which was a glory.” Julia Child, from My Life in France

Julia’s secret for fool-proof mayo? Beat the mixture over a bowl of hot water to get the oil and eggs to form an emulsion, which is a mixture of two thing which are normally immiscible, like water and oil. In an emulsion, a bunch of one type of molecule will actually surround individuals or small groups of the other type of molecule (think ring-around the rosy with one or two people in the middle who would rather not be there.)
When you’re trying to make an emulsion, it also helps to add a mediator called a surfactant to get between and interact with the immiscible molecules to stabilize the mixture. In a vinaigrette prepared using oil, mustard and vinegar, the proteins in the mustard act as surfactants.
To make delicious vinaigrette:
- Using a fork or wire whisk, mix together: 1 Tbsp. vinegar and 1 Tbsp. mustard.
- Add 3 Tbsp. oil (olive, vegetable or your favorite), drop-by-drop, whisking until you see an emulsion form! You can tell when an emulsion begins to form, because the mixture will start to look lighter-colored and thicker as the molecules are rearranged and reflect light differently!

Try some variations on these kitchen experiments. Does it work better to use a cold egg, room temperature egg, or warm egg? What happens if you try to make mayo by setting your mixing bowl in a bowl of ICE water? Do you get an emulsion?

Can you see the difference between batches of vinaigrette? One was whipped over a bowl of ice water and the other over warm water.
When whipping up mayonnaise, adding a little water to the eggs before adding the oil helps make some of the proteins in the eggs more available to act as surfactants. Of course, adding a little mustard helps too and tastes great!

Here’s the New York Times recipe we used to make mayonnaise:
- 1 large egg yolk, at room temperature
- 2 teaspoons lemon juice
- 1 teaspoon Dijon mustard
- 1/4 teaspoon kosher salt
- 1 teaspoon cold water
- 3/4 cup neutral oil such as safflower or canola

- In a medium bowl, whisk together the egg yolk, lemon juice, mustard, salt and 1 teaspoon cold water until frothy. Whisking constantly, slowly dribble in the oil until mayonnaise is thick and oil is incorporated. When the mayonnaise emulsifies and starts to thicken, you can add the oil in a thin stream, instead of drop by drop.
*Remember that a bacteria called Salmonella enteriditis can lurk in raw eggs and make you sick, so it’s better to use pasteurized eggs for recipes like mayonnaise, where you don’t cook the eggs.
As Julia Child would say, “Bon Appetit!”
Candy Crush Stained Glass from “STEAM Lab for Kids”
- by KitchenPantryScientist
It’s hard to believe that my new book “STEAM Lab for Kids” is already in the Amazon book store! I studied both art and science in college, so this one was SO much fun to write!
Last summer, my publisher made a few videos of projects from the book for me to share with you. Here’s the first one, which features some sugar science!
Try it!
Edible Egg Marbling (with Food Coloring and Whipped Cream)
- by KitchenPantryScientist
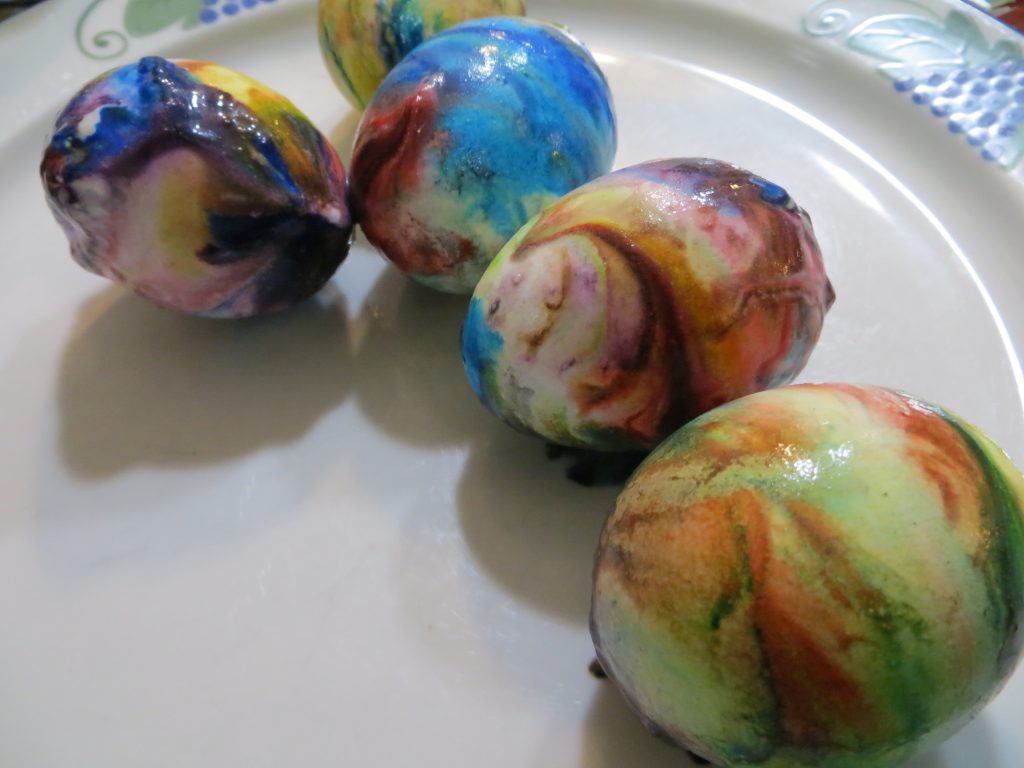
Want to take egg-dying up a notch the easy way? Marbling eggs using whipped cream and food coloring is a great project for little ones and the results are downright gorgeous!

KitchenPantryScientist.com
Hint: Wear disposable glove to prevent your fingers from getting stained.
You’ll need:
-hard boiled eggs
-vinegar
-a shallow container
-cool whip or whipped cream
-food coloring (neon, if you can get it)
-a chopstick or toothpick
1. Soak eggs in vinegar for 5 minutes.
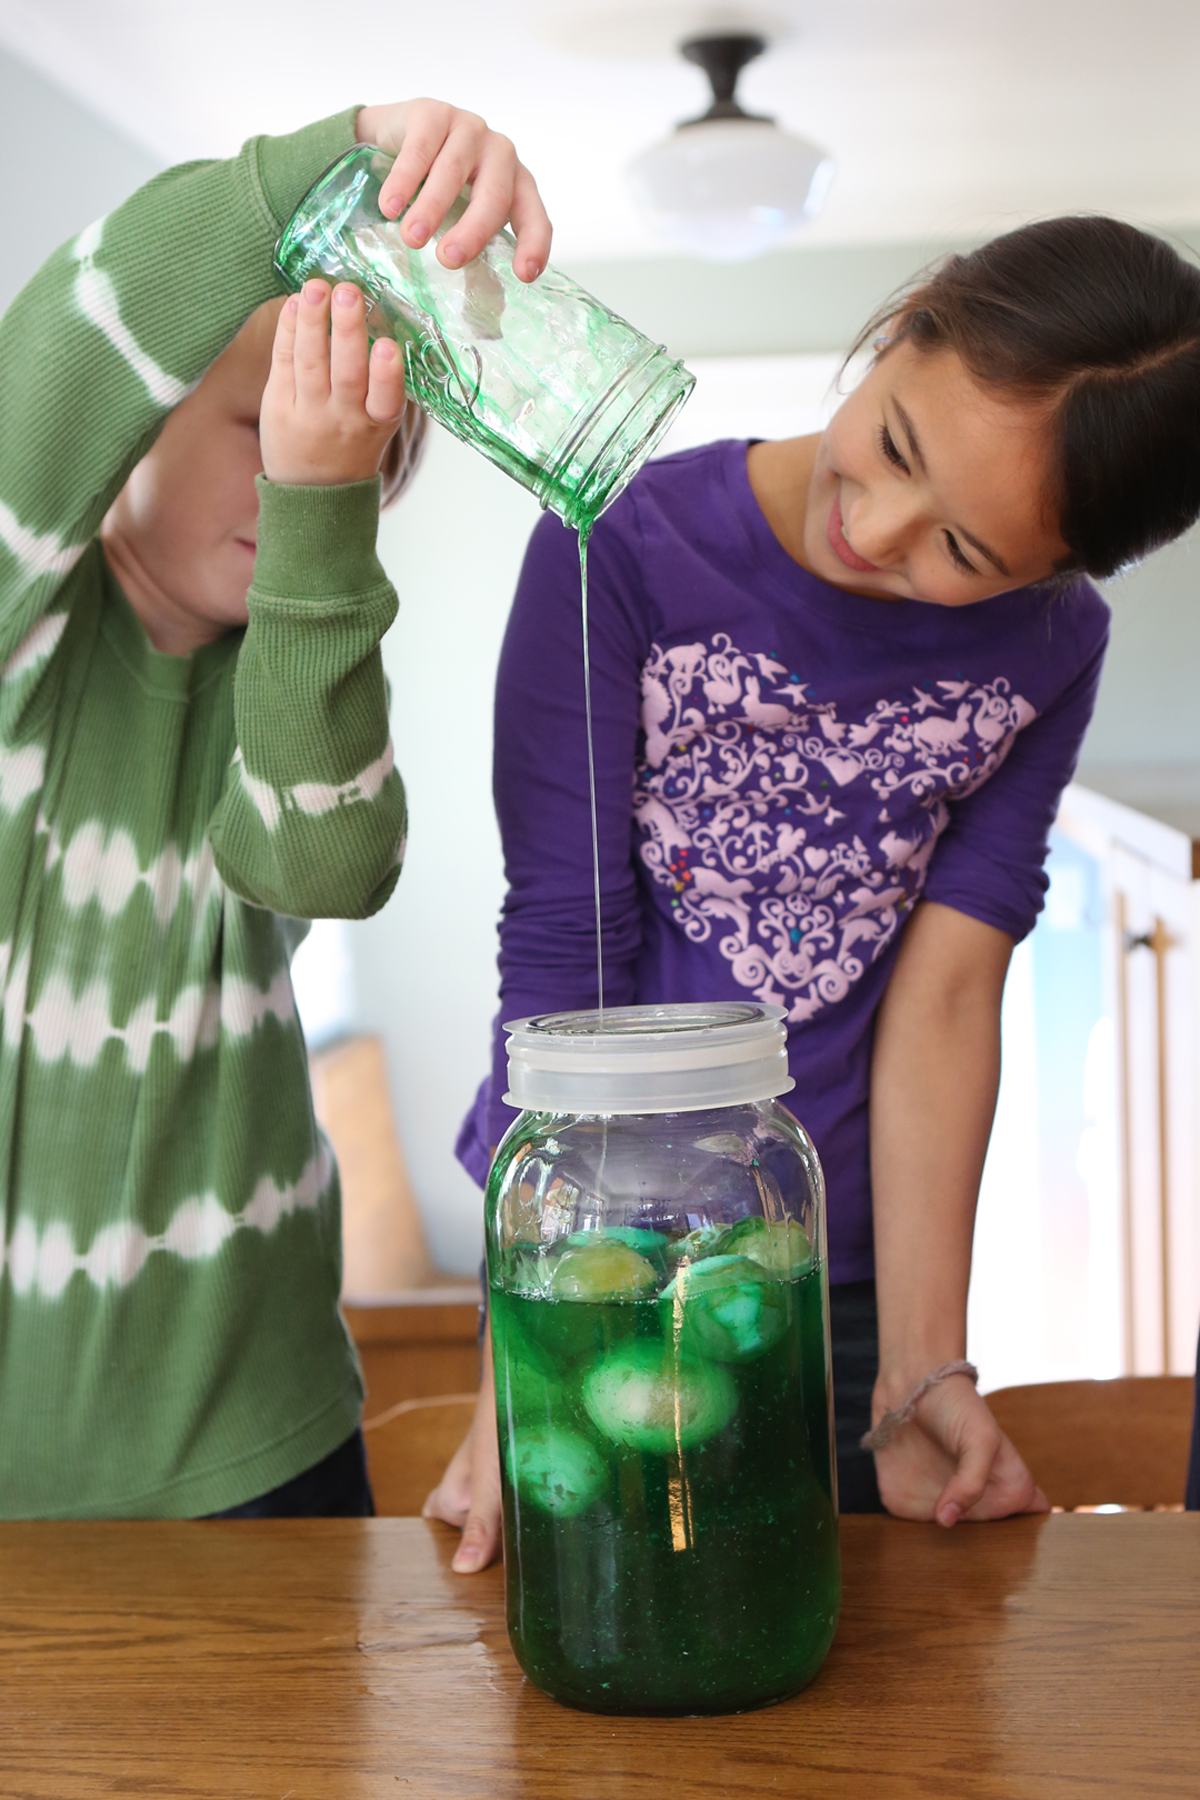
You’ll see carbon dioxide bubbles forming on the eggs as the vinegar reacts with the calcium carbonate in the egg shells.
2. Spread and smooth a layer of whipped cream across the bottom of the container and drip food coloring all over the whipped cream.
3. Swirl the drips into patterns using a toothpick or chopstick.
KitchenPantryScientist.com
4. Remove eggs from vinegar, blot them with a paper towel and roll them through the food coloring. Put them on a plate to dry.
KitchenPantryScientist.com
5. When the eggs are dry, wipe the excess whipped cream and color from the shells.
KitchenPantryScientist.com
The science behind the fun: Food coloring is an acid dye, so the vinegar (acetic acid) helps it form chemical bonds with the egg shell, dying the egg.
Winter Science: Mouthwatering Maple Syrup Snow Candy
- by KitchenPantryScientist
Maple Snow Candy from Outdoor Science Lab for Kids (Quarry Books 2016)
Remember this homemade snow candy from Laura Ingalls Wilder’s classic “Little House in the Big Woods?” You can make the same amazing maple treats using heat evaporation and quick cooling in the snow, or on crushed ice cubes.
Here’s how to make the candy, along with some candy-making science, straight from the pages of my new book, “Outdoor Science Lab for Kids,” which you can order from your favorite book retailer by clicking here.
You’ll need:
-1 cup pure maple syrup
-sauce pan
-candy thermometer
-fresh, clean snow
Safety Tips and Hints:
-Hot sugar syrup can cause burns. This experiment must be done with adult supervision.
-Allow candy to cool completely before tasting.
-Only use pure maple syrup for the best results.
Directions:
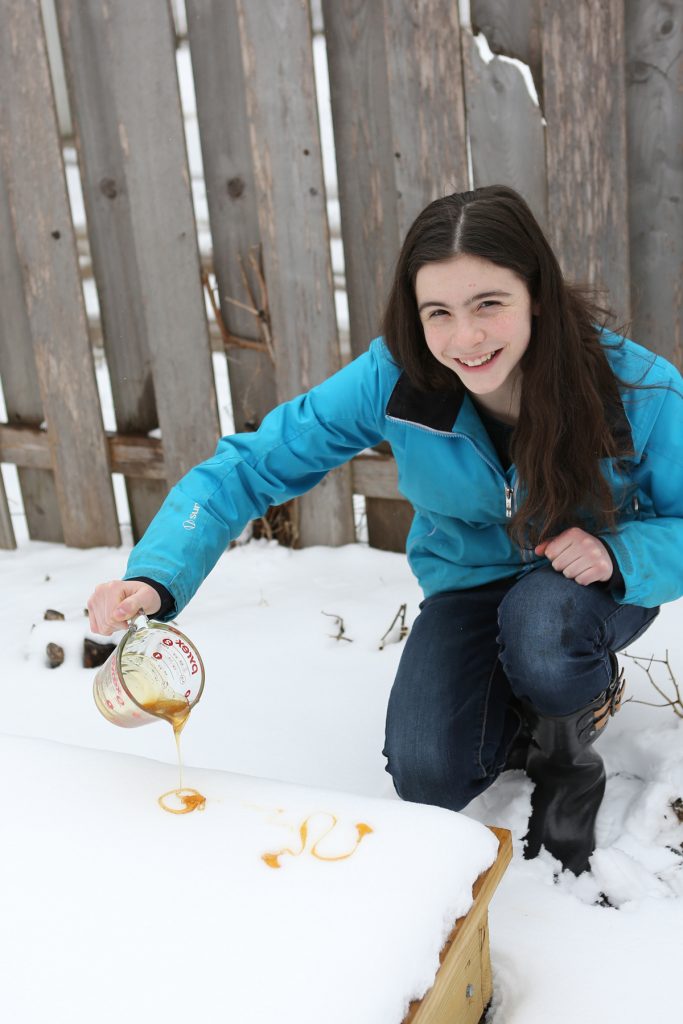
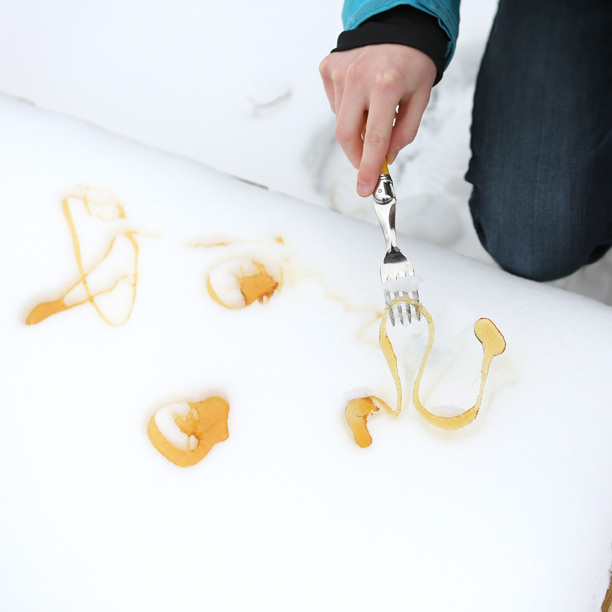
Step 1: Go outside and scout out a spot with some clean snow several inches deep for making your candy. Alternately, collect and pack down a few inches of fresh snow in a large, flat container, like a casserole dish. (You can use crushed ice cubes if you don’t have snow.)
Step 2. Boil the maple syrup in saucepan, stirring constantly until it reaches around 235-240 degrees F (soft ball stage.)
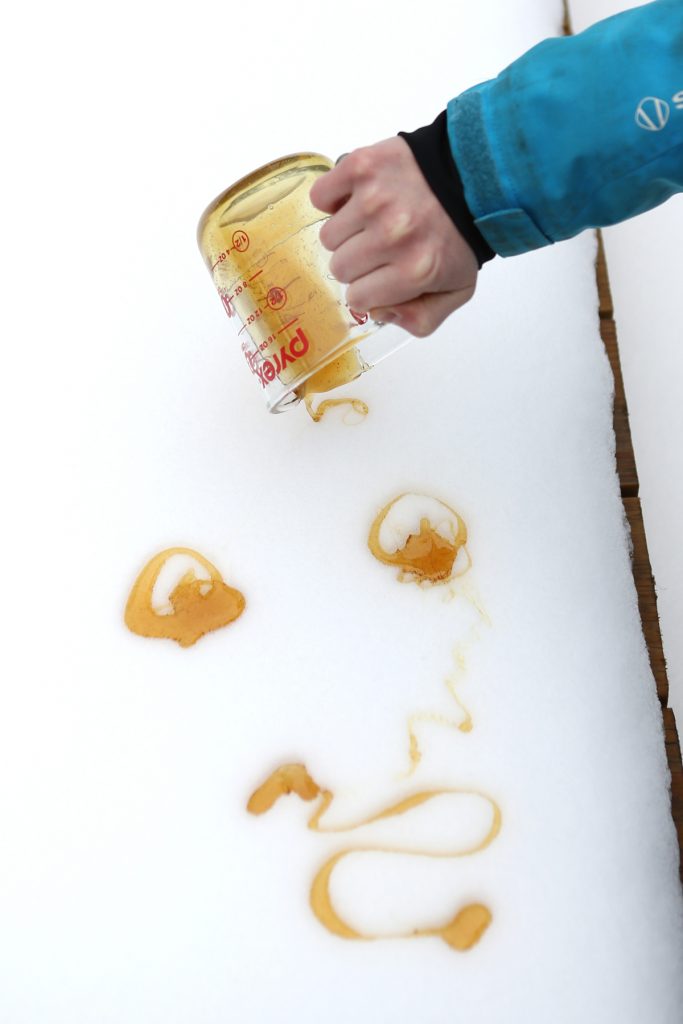
Step 3. Remove the maple syrup from the heat and carefully pour it into a heat-resistant container with a spout, like a Pyrex measuring cup.
Step 4. Pour wiggly candy lines into the snow to freeze them into shape.
Maple Snow Candy from Outdoor Science Lab for Kids (Quarry Books 2016)
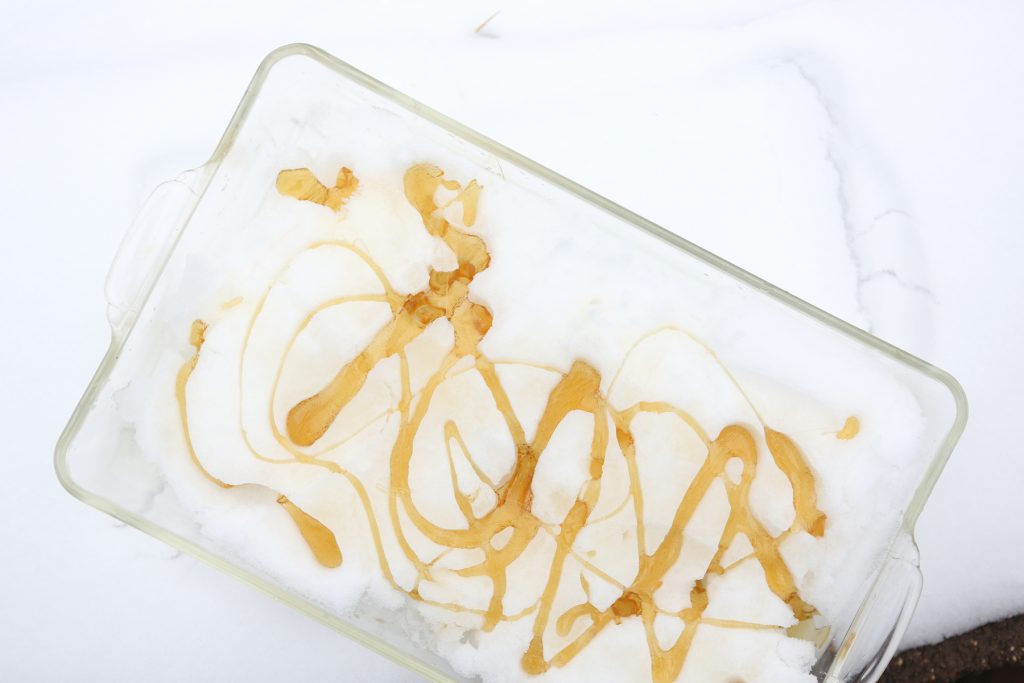
Alternately, make snow candy in a casserole dish filled with fresh snow or crushed ice.
Step 5. When you’re done, remove the candy from the snow with a fork.
Maple Syrup Snow Candy from “Outdoor Science Lab for Kids” (Quarry Books 2016)
Step 6. Eat your candy right away, or let it warm up and wind it around sticks or skewers to make maple lollipops. Enjoy!
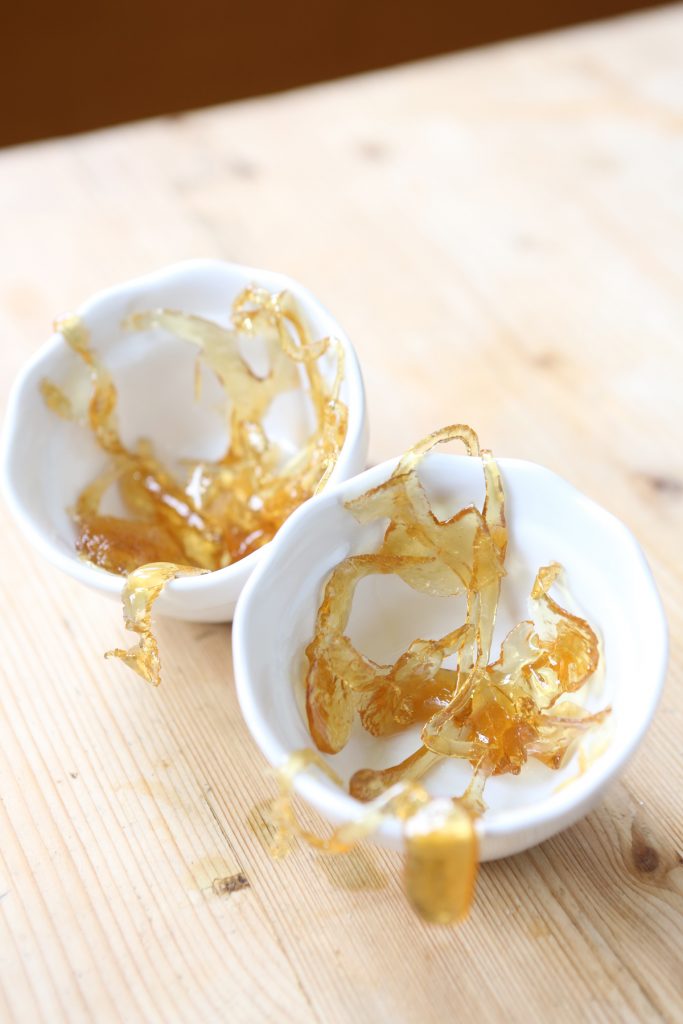
Maple Snow Candy from Outdoor Science Lab for Kids (Quarry Books 2016)
The Science Behind the Fun:
Maple syrup is made from watery tree sap boiled to evaporate most of the moisture it contains when it’s first tapped from a tree. Following evaporation, the syrup that remains is mostly made up of a sugar called sucrose, but it also contains smaller amounts of glucose and fructose.
Naturally, other organic compounds are also present in tree sap, giving syrup from different areas unique flavors. Syrup collected earlier in spring when it is cold tend to be light in color and have a mild flavor. As the days get warmer, microbes ferment some of the sugar in the syrup, making it darker and giving it a more robust taste.
In this experiment, you heat maple syrup, evaporating even more water. A super saturated solution forms, which holds more sugar molecules in the liquid than would be possible if you evaporated the water at room temperature.
When you pour the supersaturated sugar into the snow, it cools quickly, forming some sugar crystals to give the maple candy a soft, semi-solid consistency. Heating the syrup to a higher temperature will evaporate more water, resulting in even more crystal formation in the cooled syrup, making it harder to bite. If you carefully evaporate all of the water from maple syrup, you’ll be left with pure maple sugar crystals.
Creative Enrichment:
-Try collecting some syrup from your pan at several different temperatures and compare the resulting snow candy for texture, color and consistency.
-Can you do the same experiment with other sugar syrups, like molasses or corn syrup?
-Try to make maple sugar.
8 Spring Science Eggsperiments
- by KitchenPantryScientist
Spring is egg season. You may prefer dyed eggs, hard-boiled eggs, deviled eggs, or even dinosaur eggs. No matter what kind of eggs you like best, you’ll love these eggsperiments that let you play with the amazing architecture of eggs, dissolve their shells and even dye them with the pigments found in your refrigerator. Just click on experiments for directions and the science behind the fun!
Grow alum crystals in eggshells to create beautiful geode-like works of art.
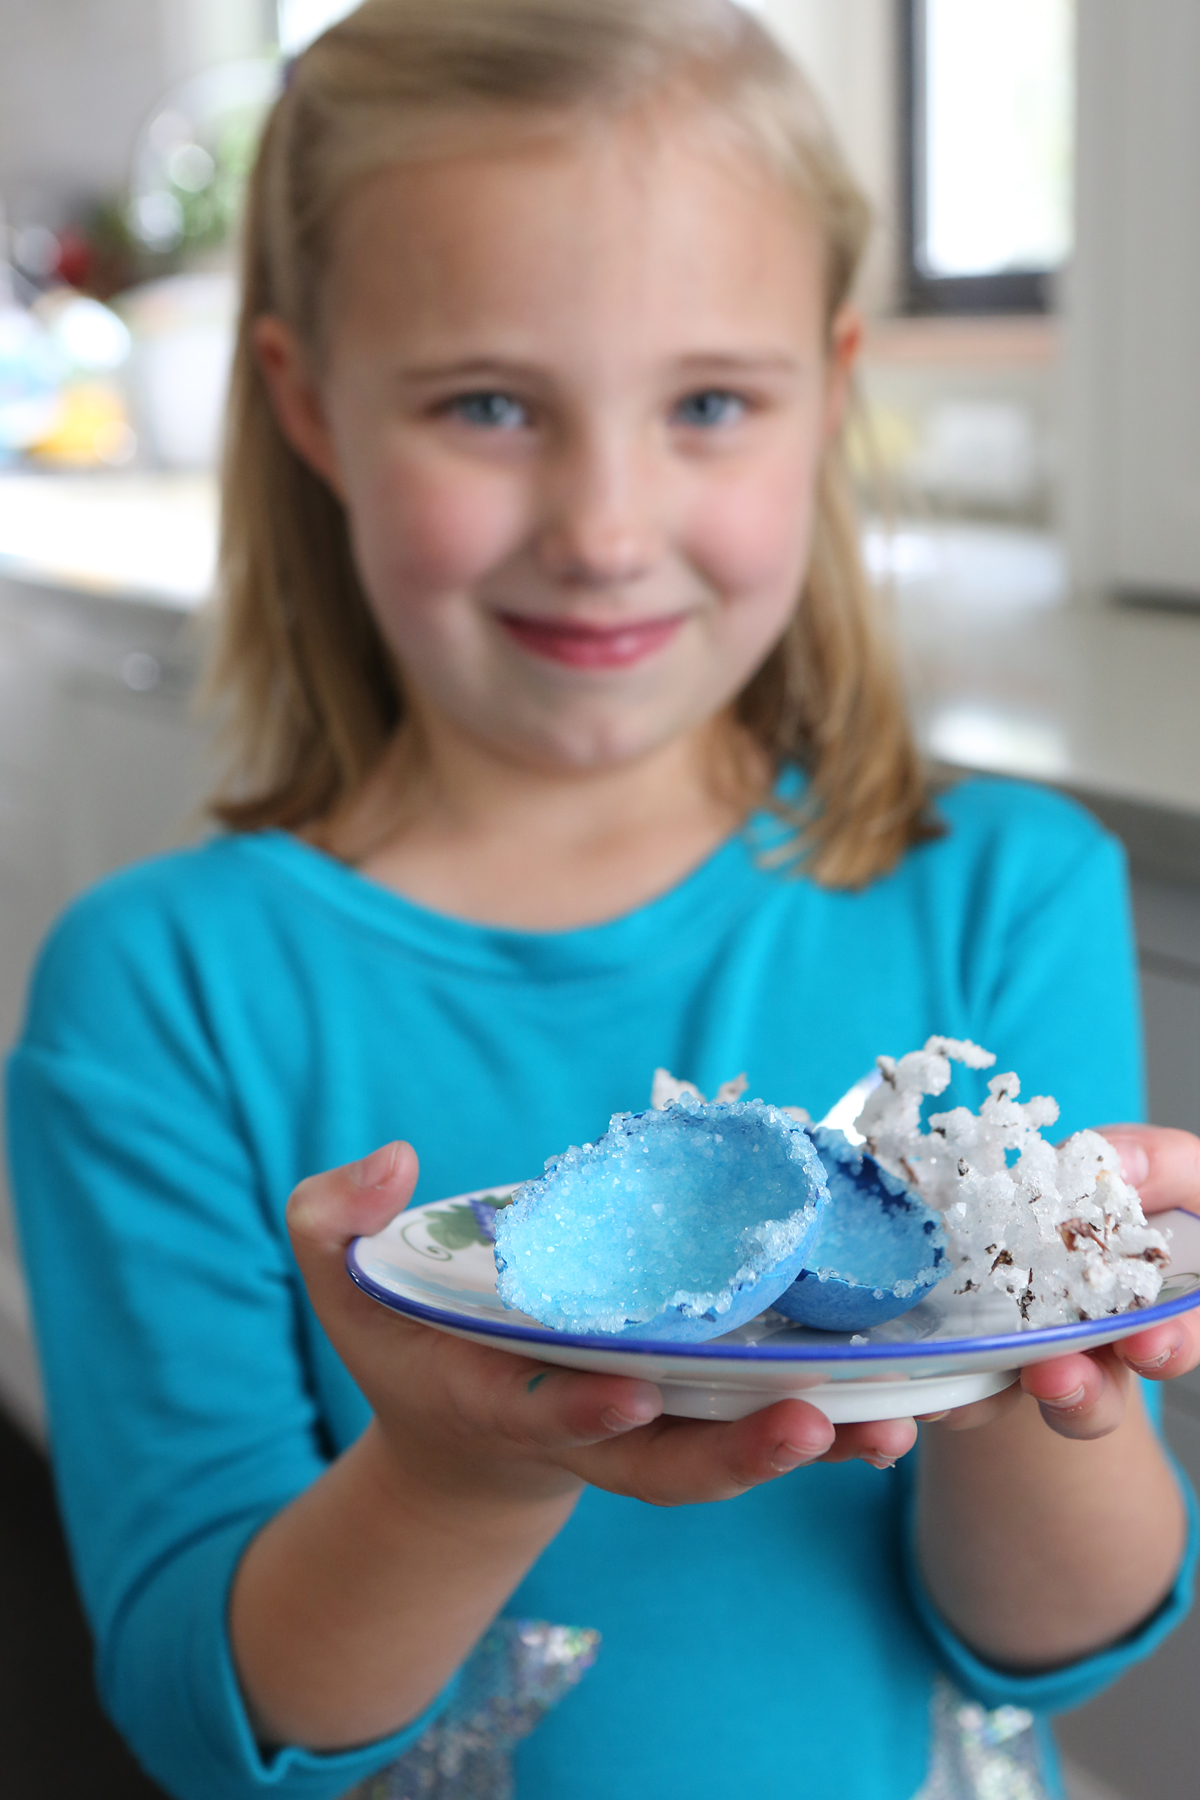
Egg Geode from Kitchen Science Lab for Kids (Quarry Books)
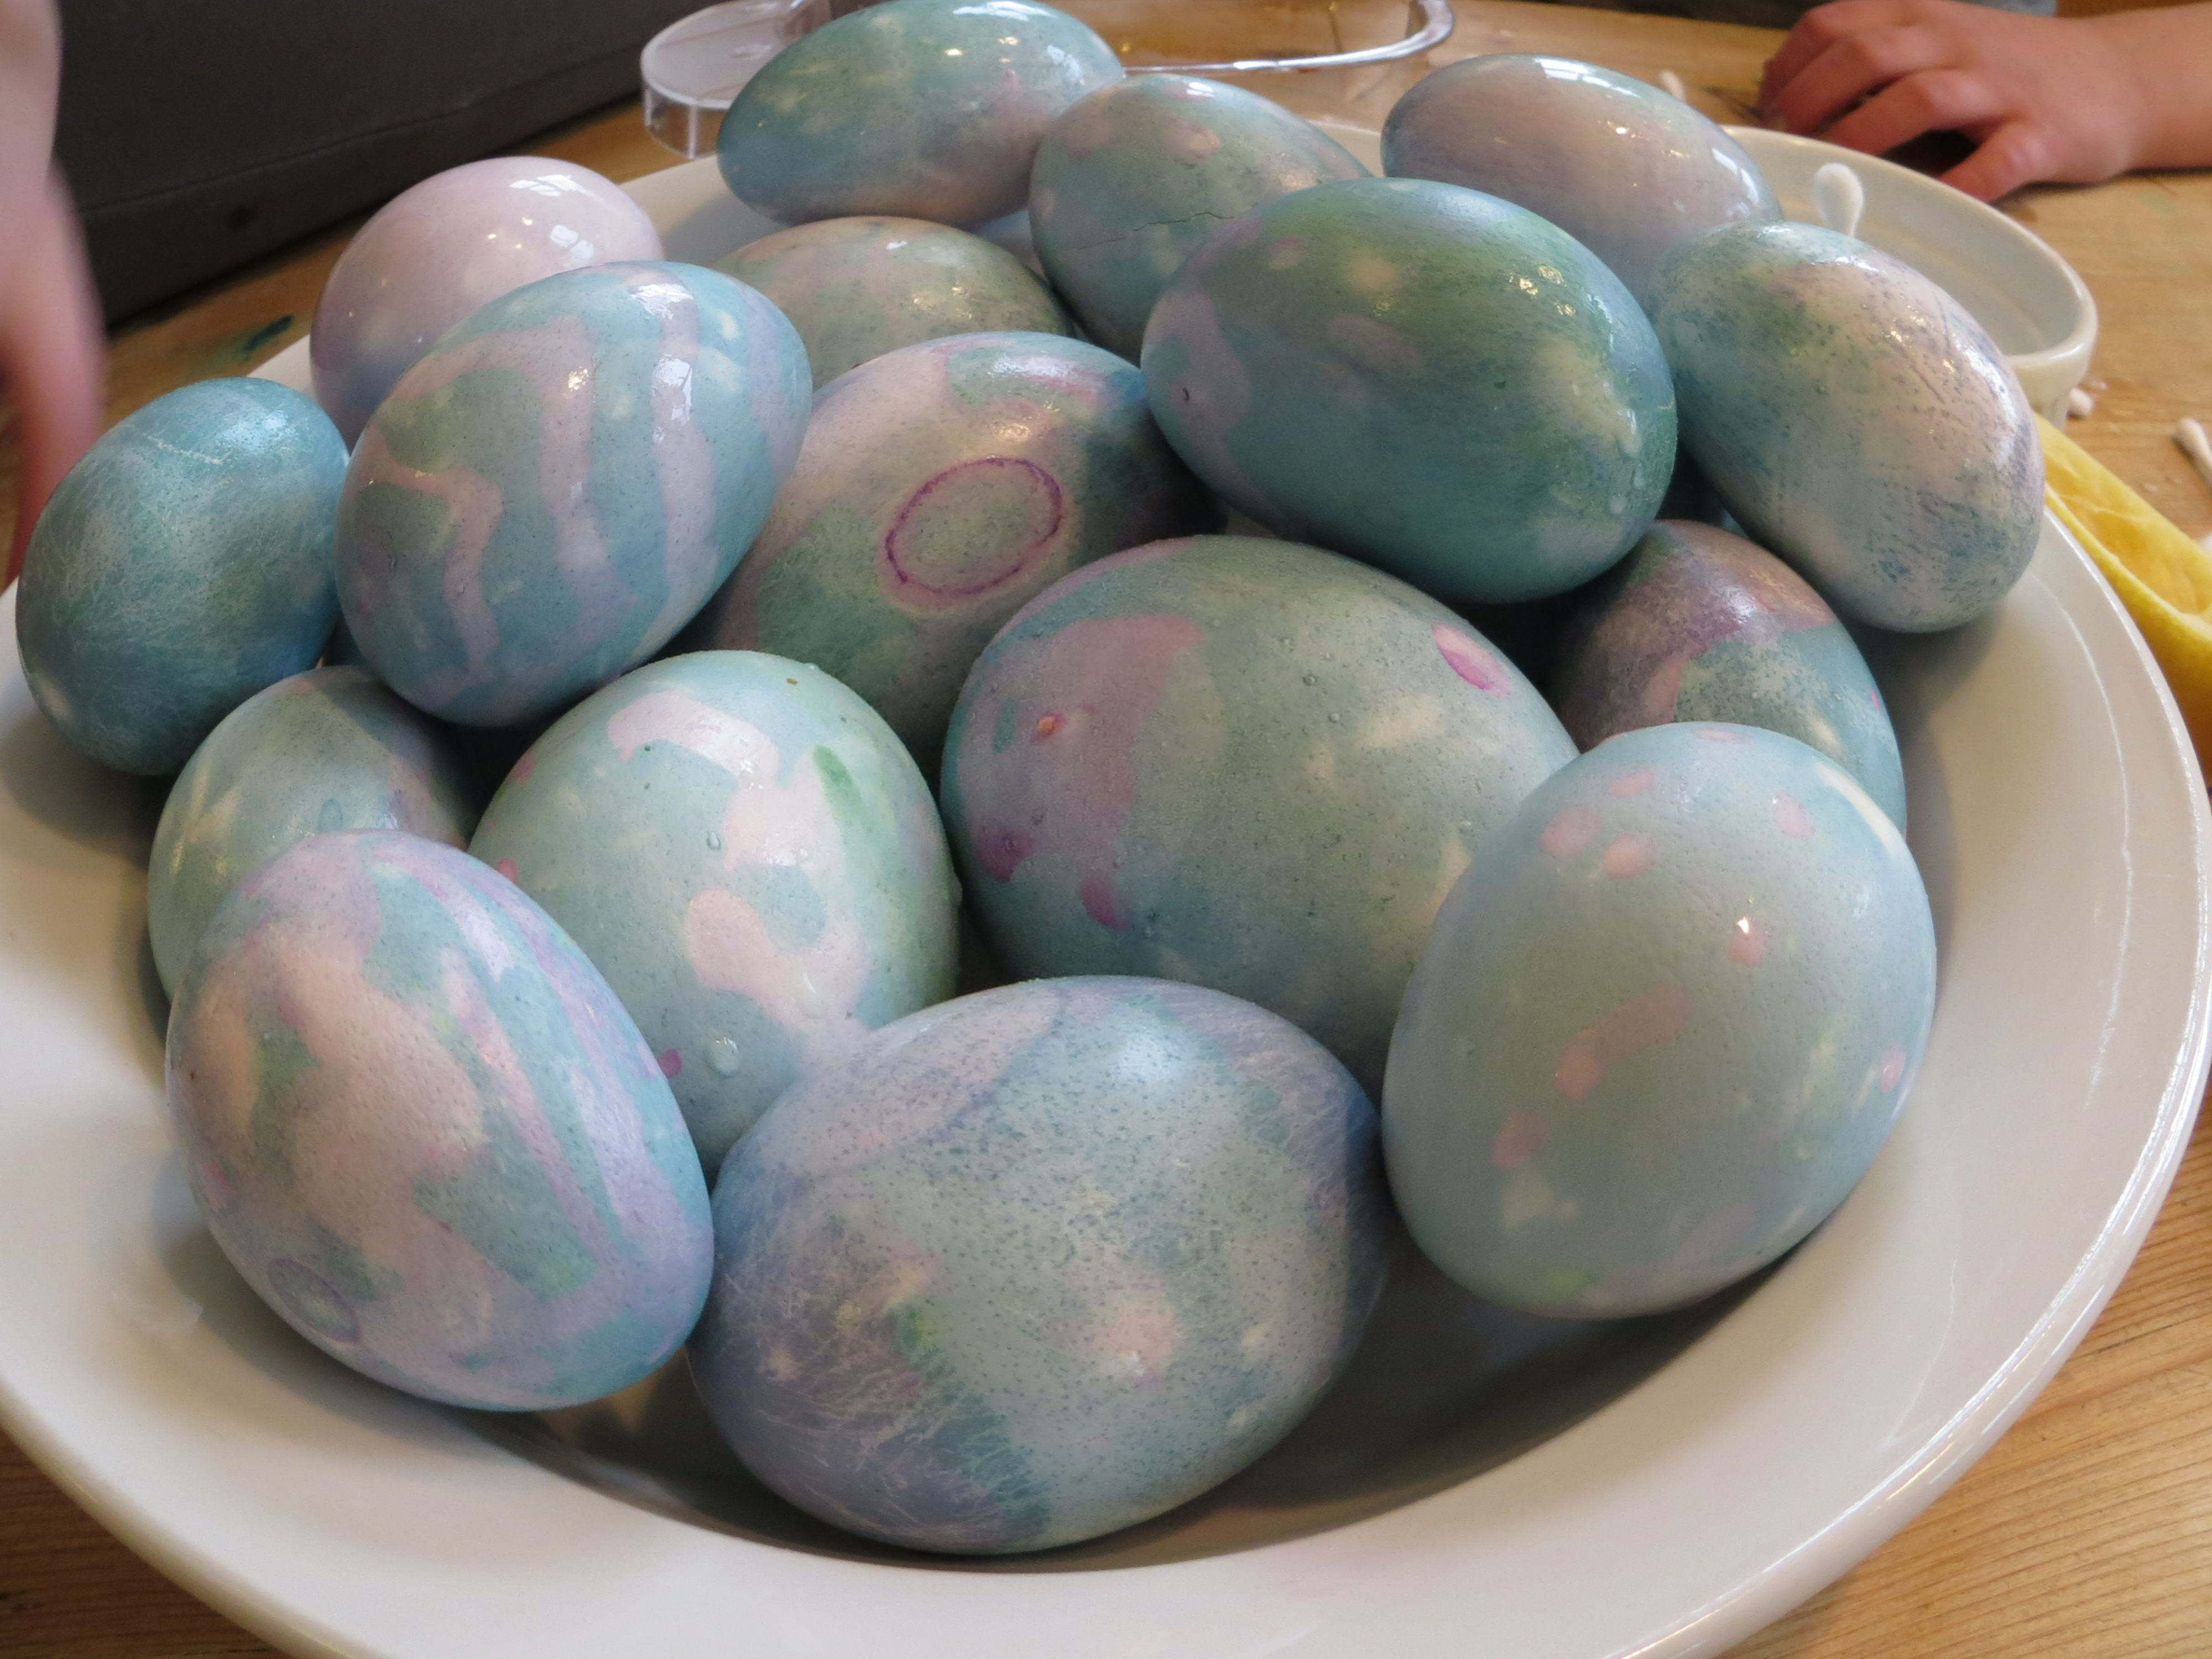
Dye eggs with spices, fruits and vegetables,
or dye them with red cabbage juice and use lemon juice and baking soda to paint them.
Dissolve eggshells with vinegar and play with osmosis when you make “Alien Monster Eggs.”
Alien Monster Eggs from Kitchen Science Lab for Kids (Quarry Books)
You can stand on a carton of eggs to test their strength.
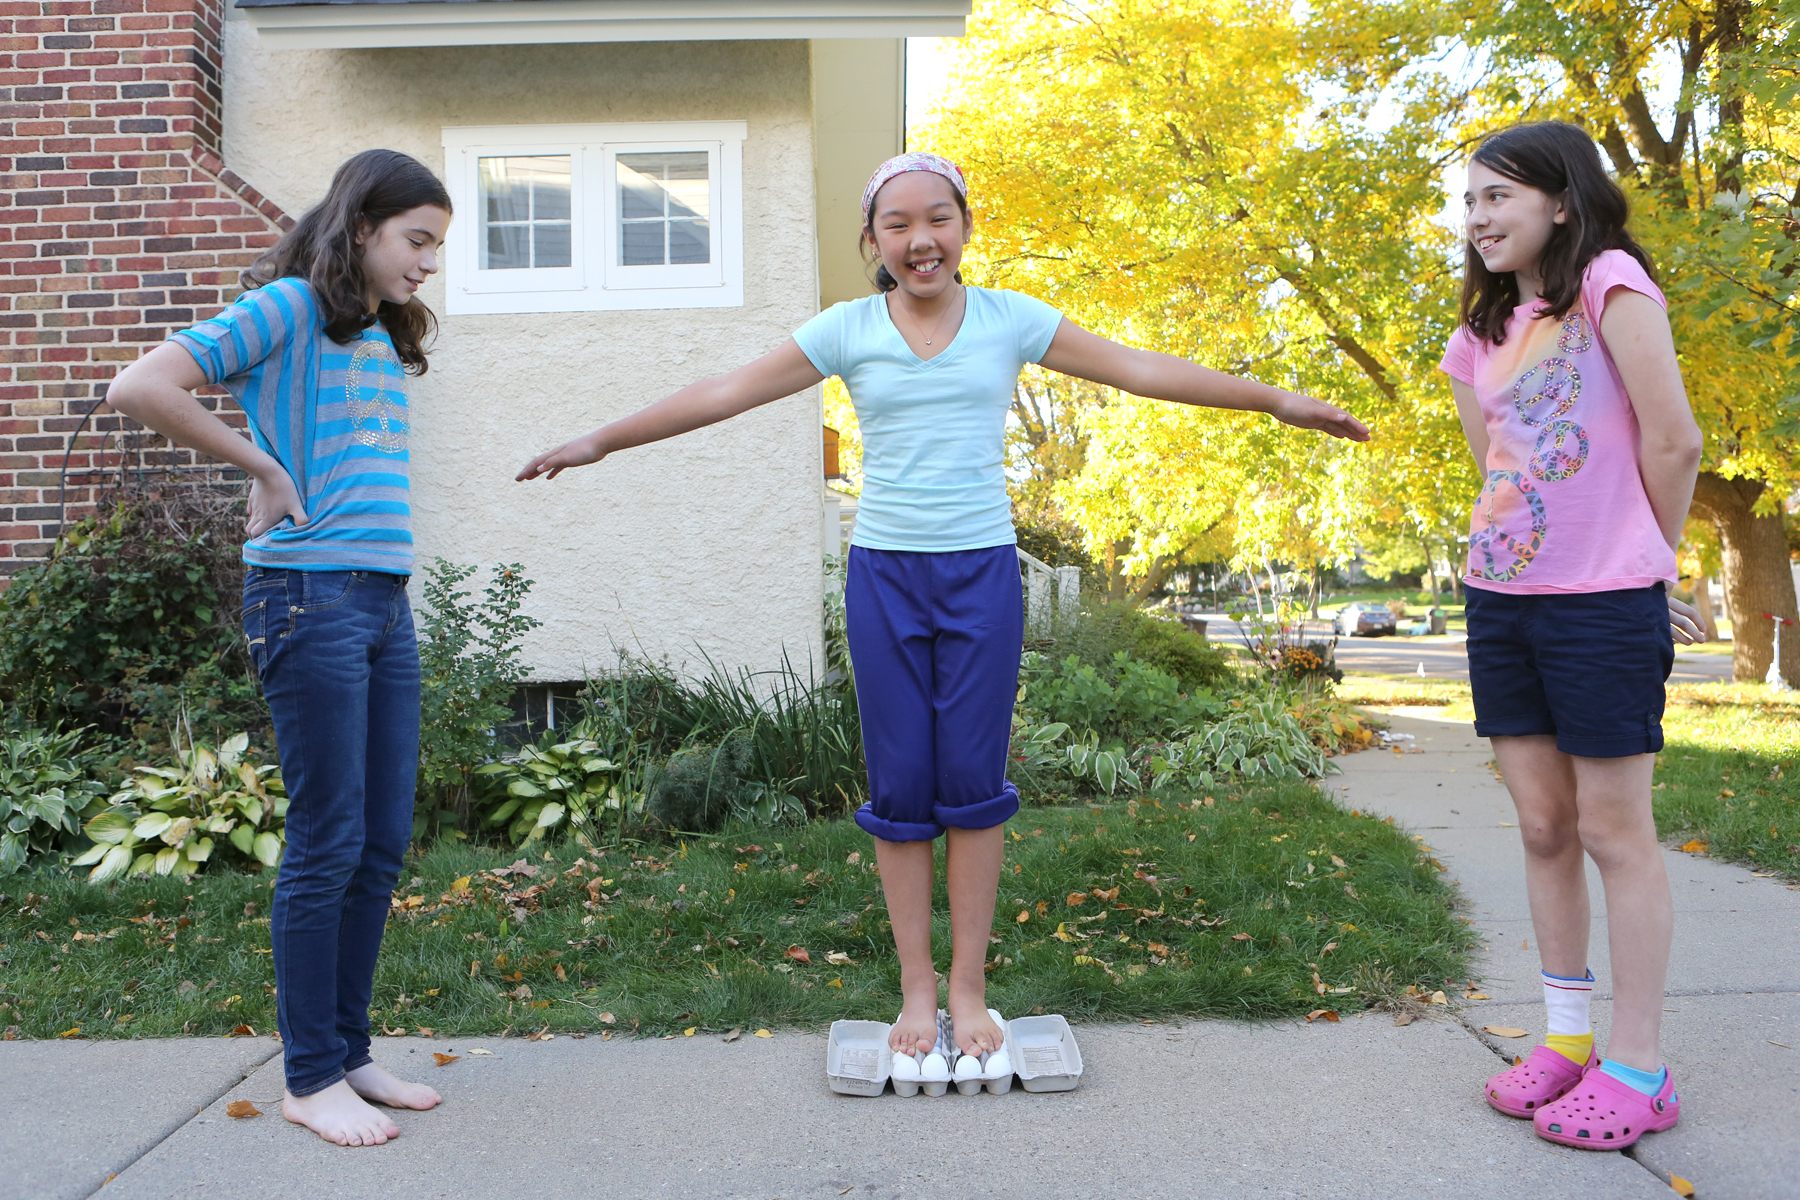
Standing on Eggs from Kitchen Science Lab for Kids (Quarry Books 2015)
For a fun physics experiment, throw eggs at a hanging sheet.
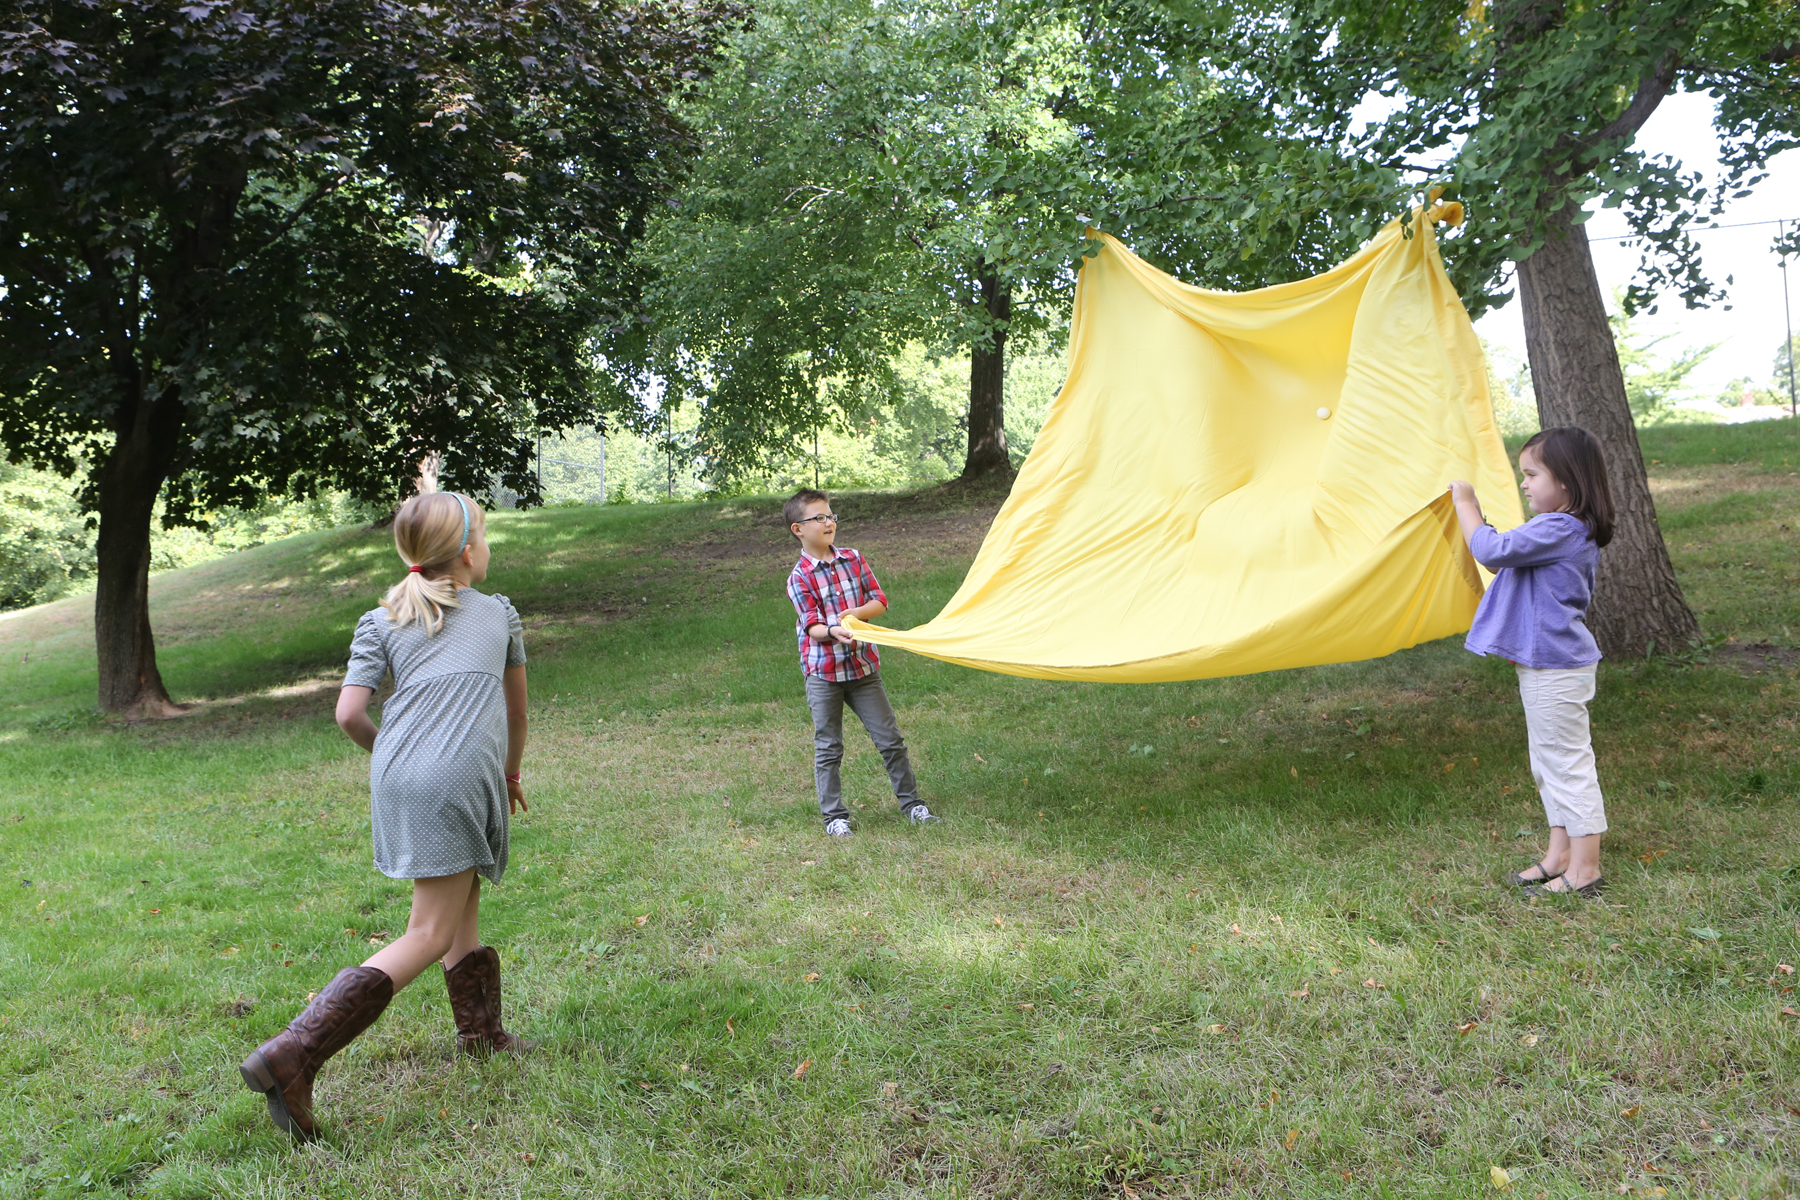
From “Kitchen Science Lab for Kids” Quarry Books
Make egg-eating monsters and watch atmospheric pressure push eggs up into a bottle.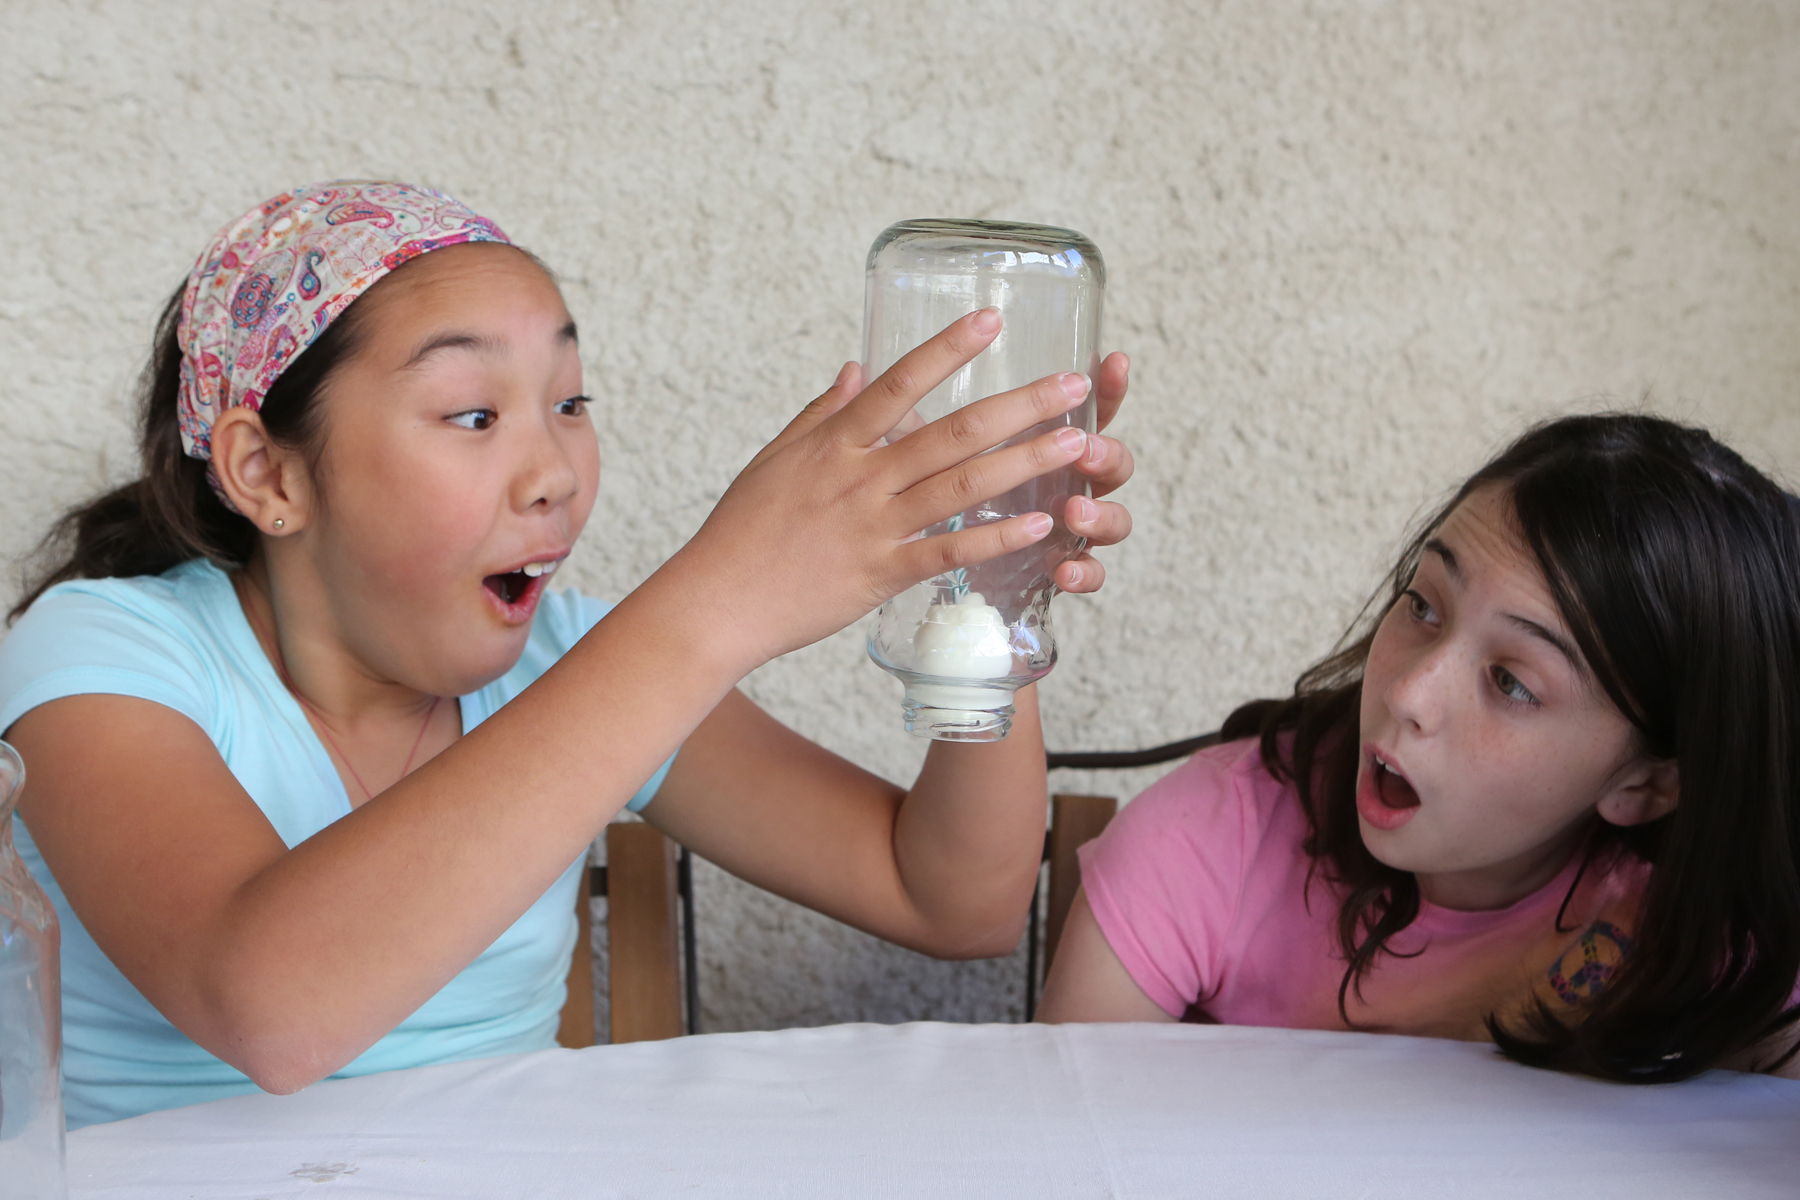
Egg drops are a fun way to test your engineering prowess.
And finally, here’s a little more about the science of hard-boiled eggs.
Epic Star Wars Themed Jell-O
- by KitchenPantryScientist
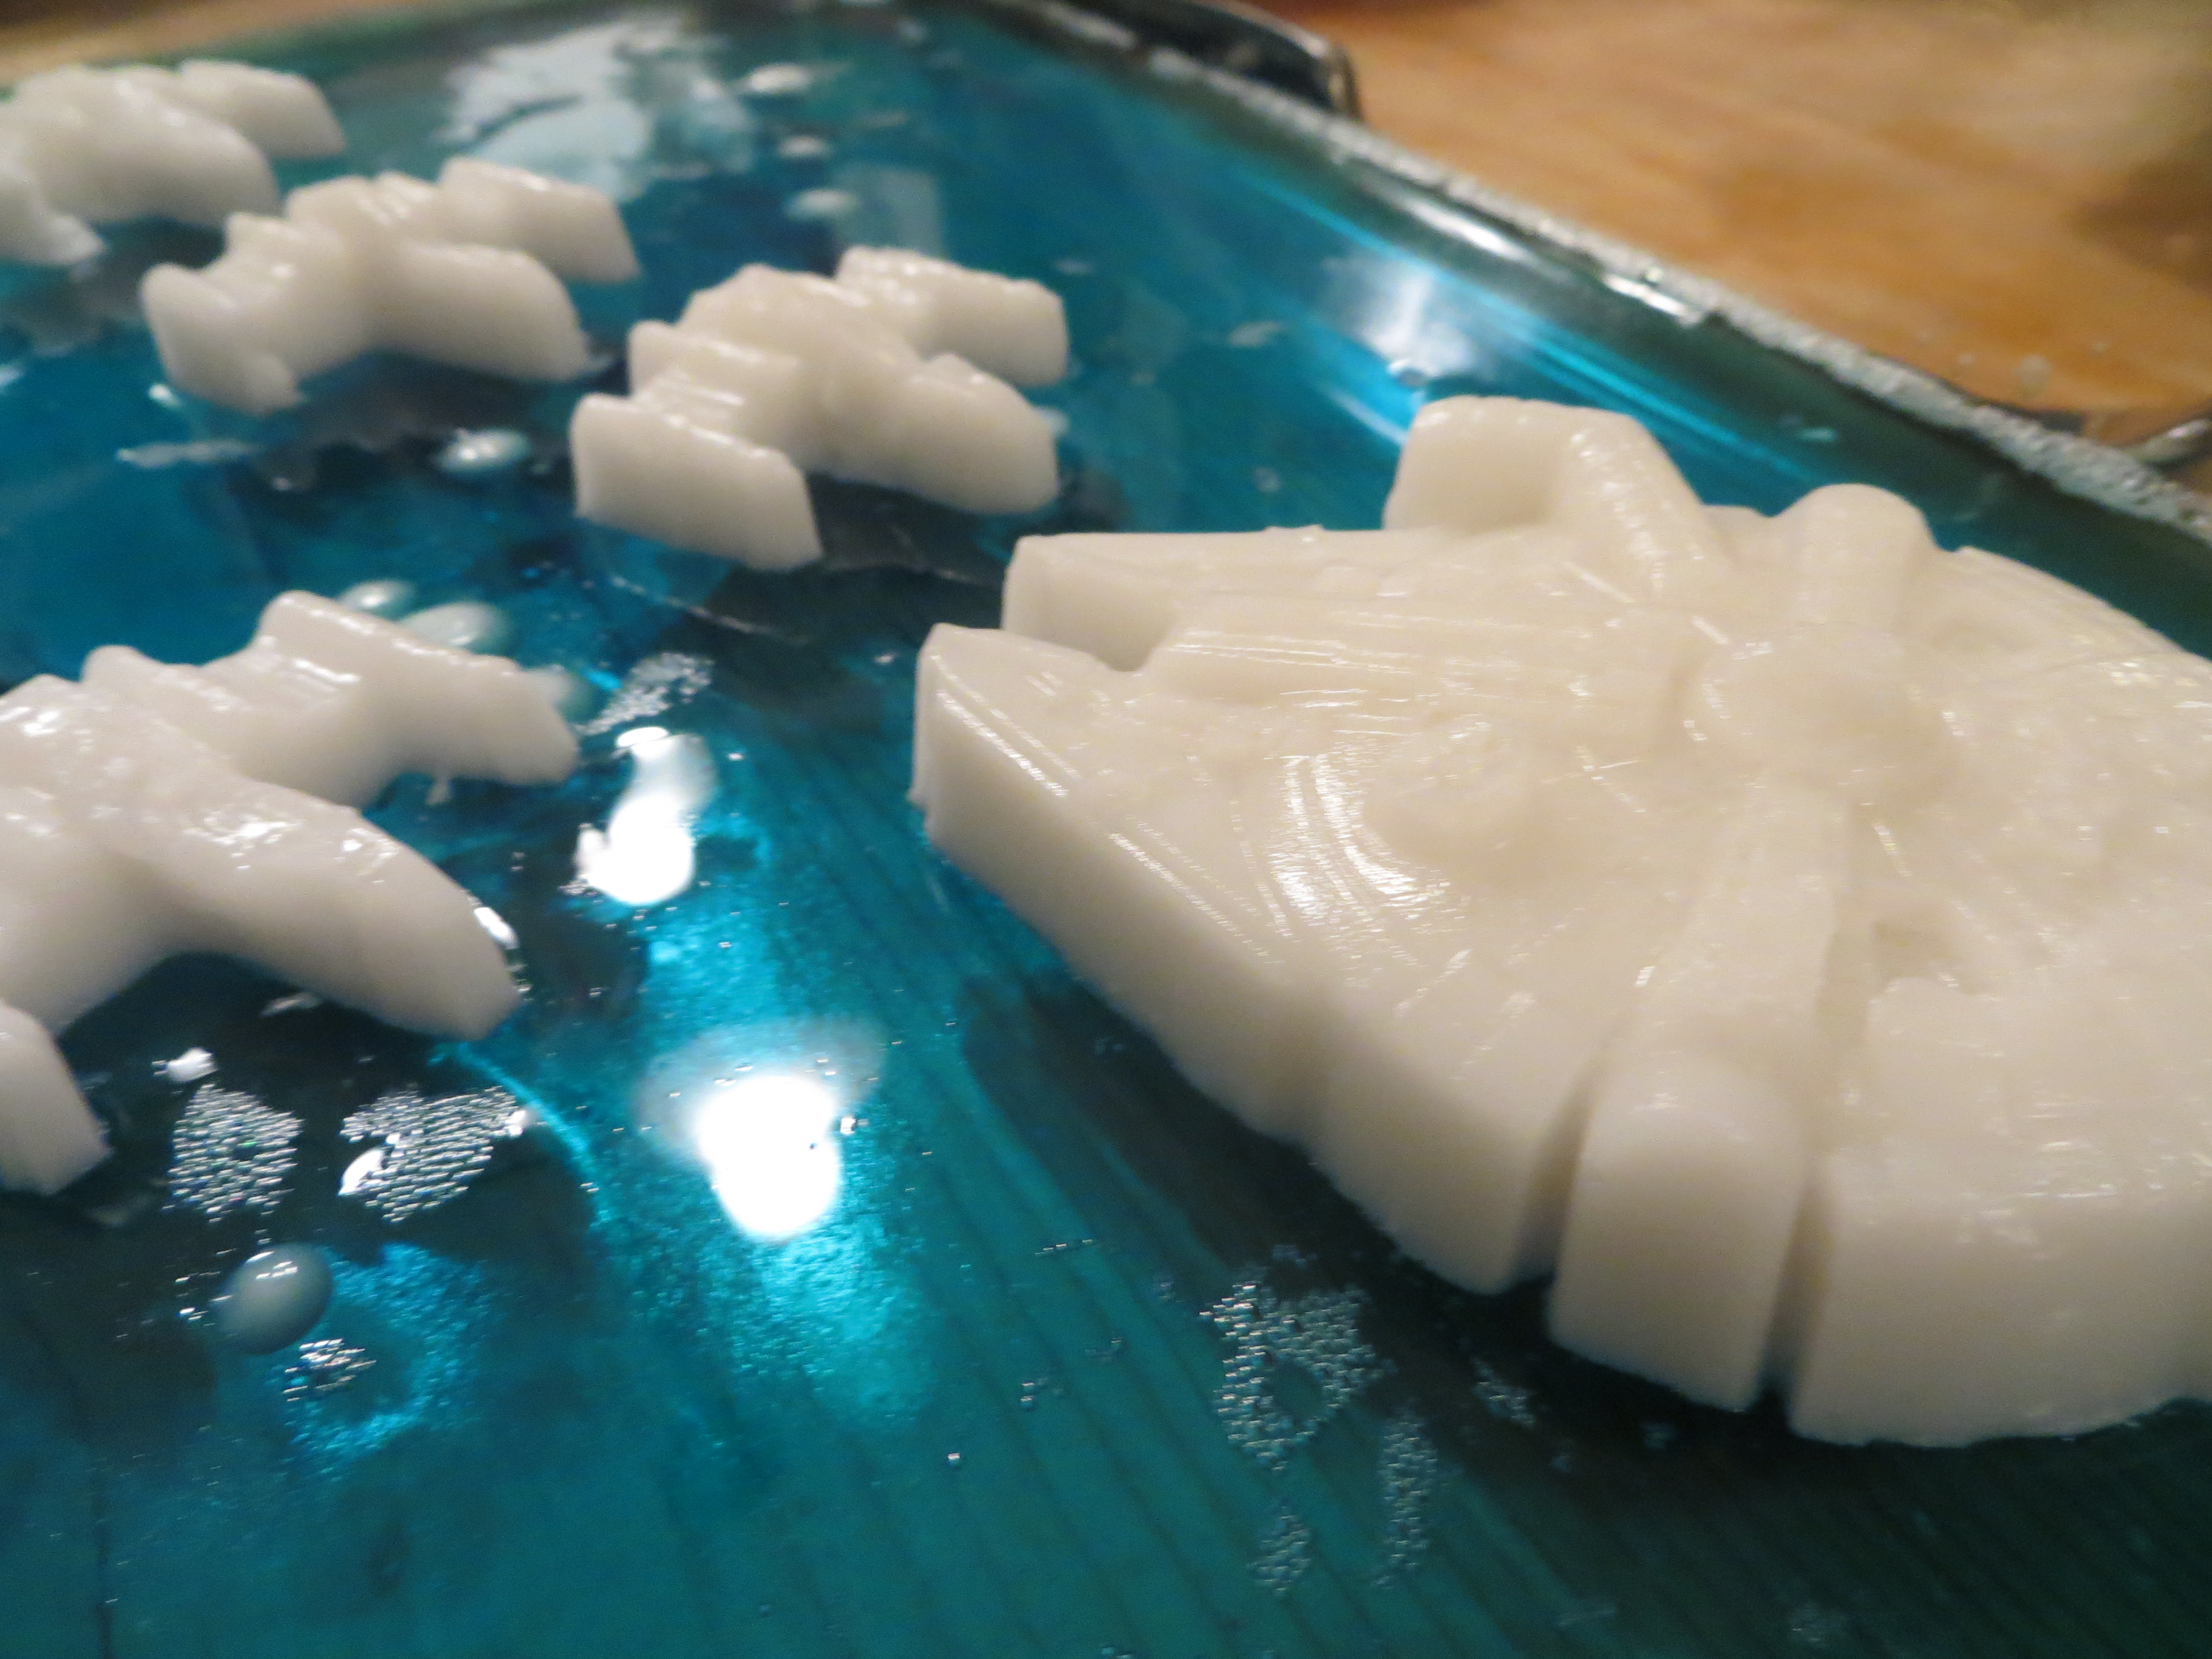
Did you know you can use science to make amazing works of art in Jell-O? I created this experiment to make Star Wars Jell-O, but you can take it in whatever direction you want. Remember, you’ll need agar, lots of Jell-O and some coconut milk to start experimenting! If your agar figures break, you can fill in the cracks with more melted agar! I ordered the silicone Star Wars molds on Amazon.com.

Star Wars Themed Jell-O : Educational Science Experiment created by KitchenPantryScientist.com
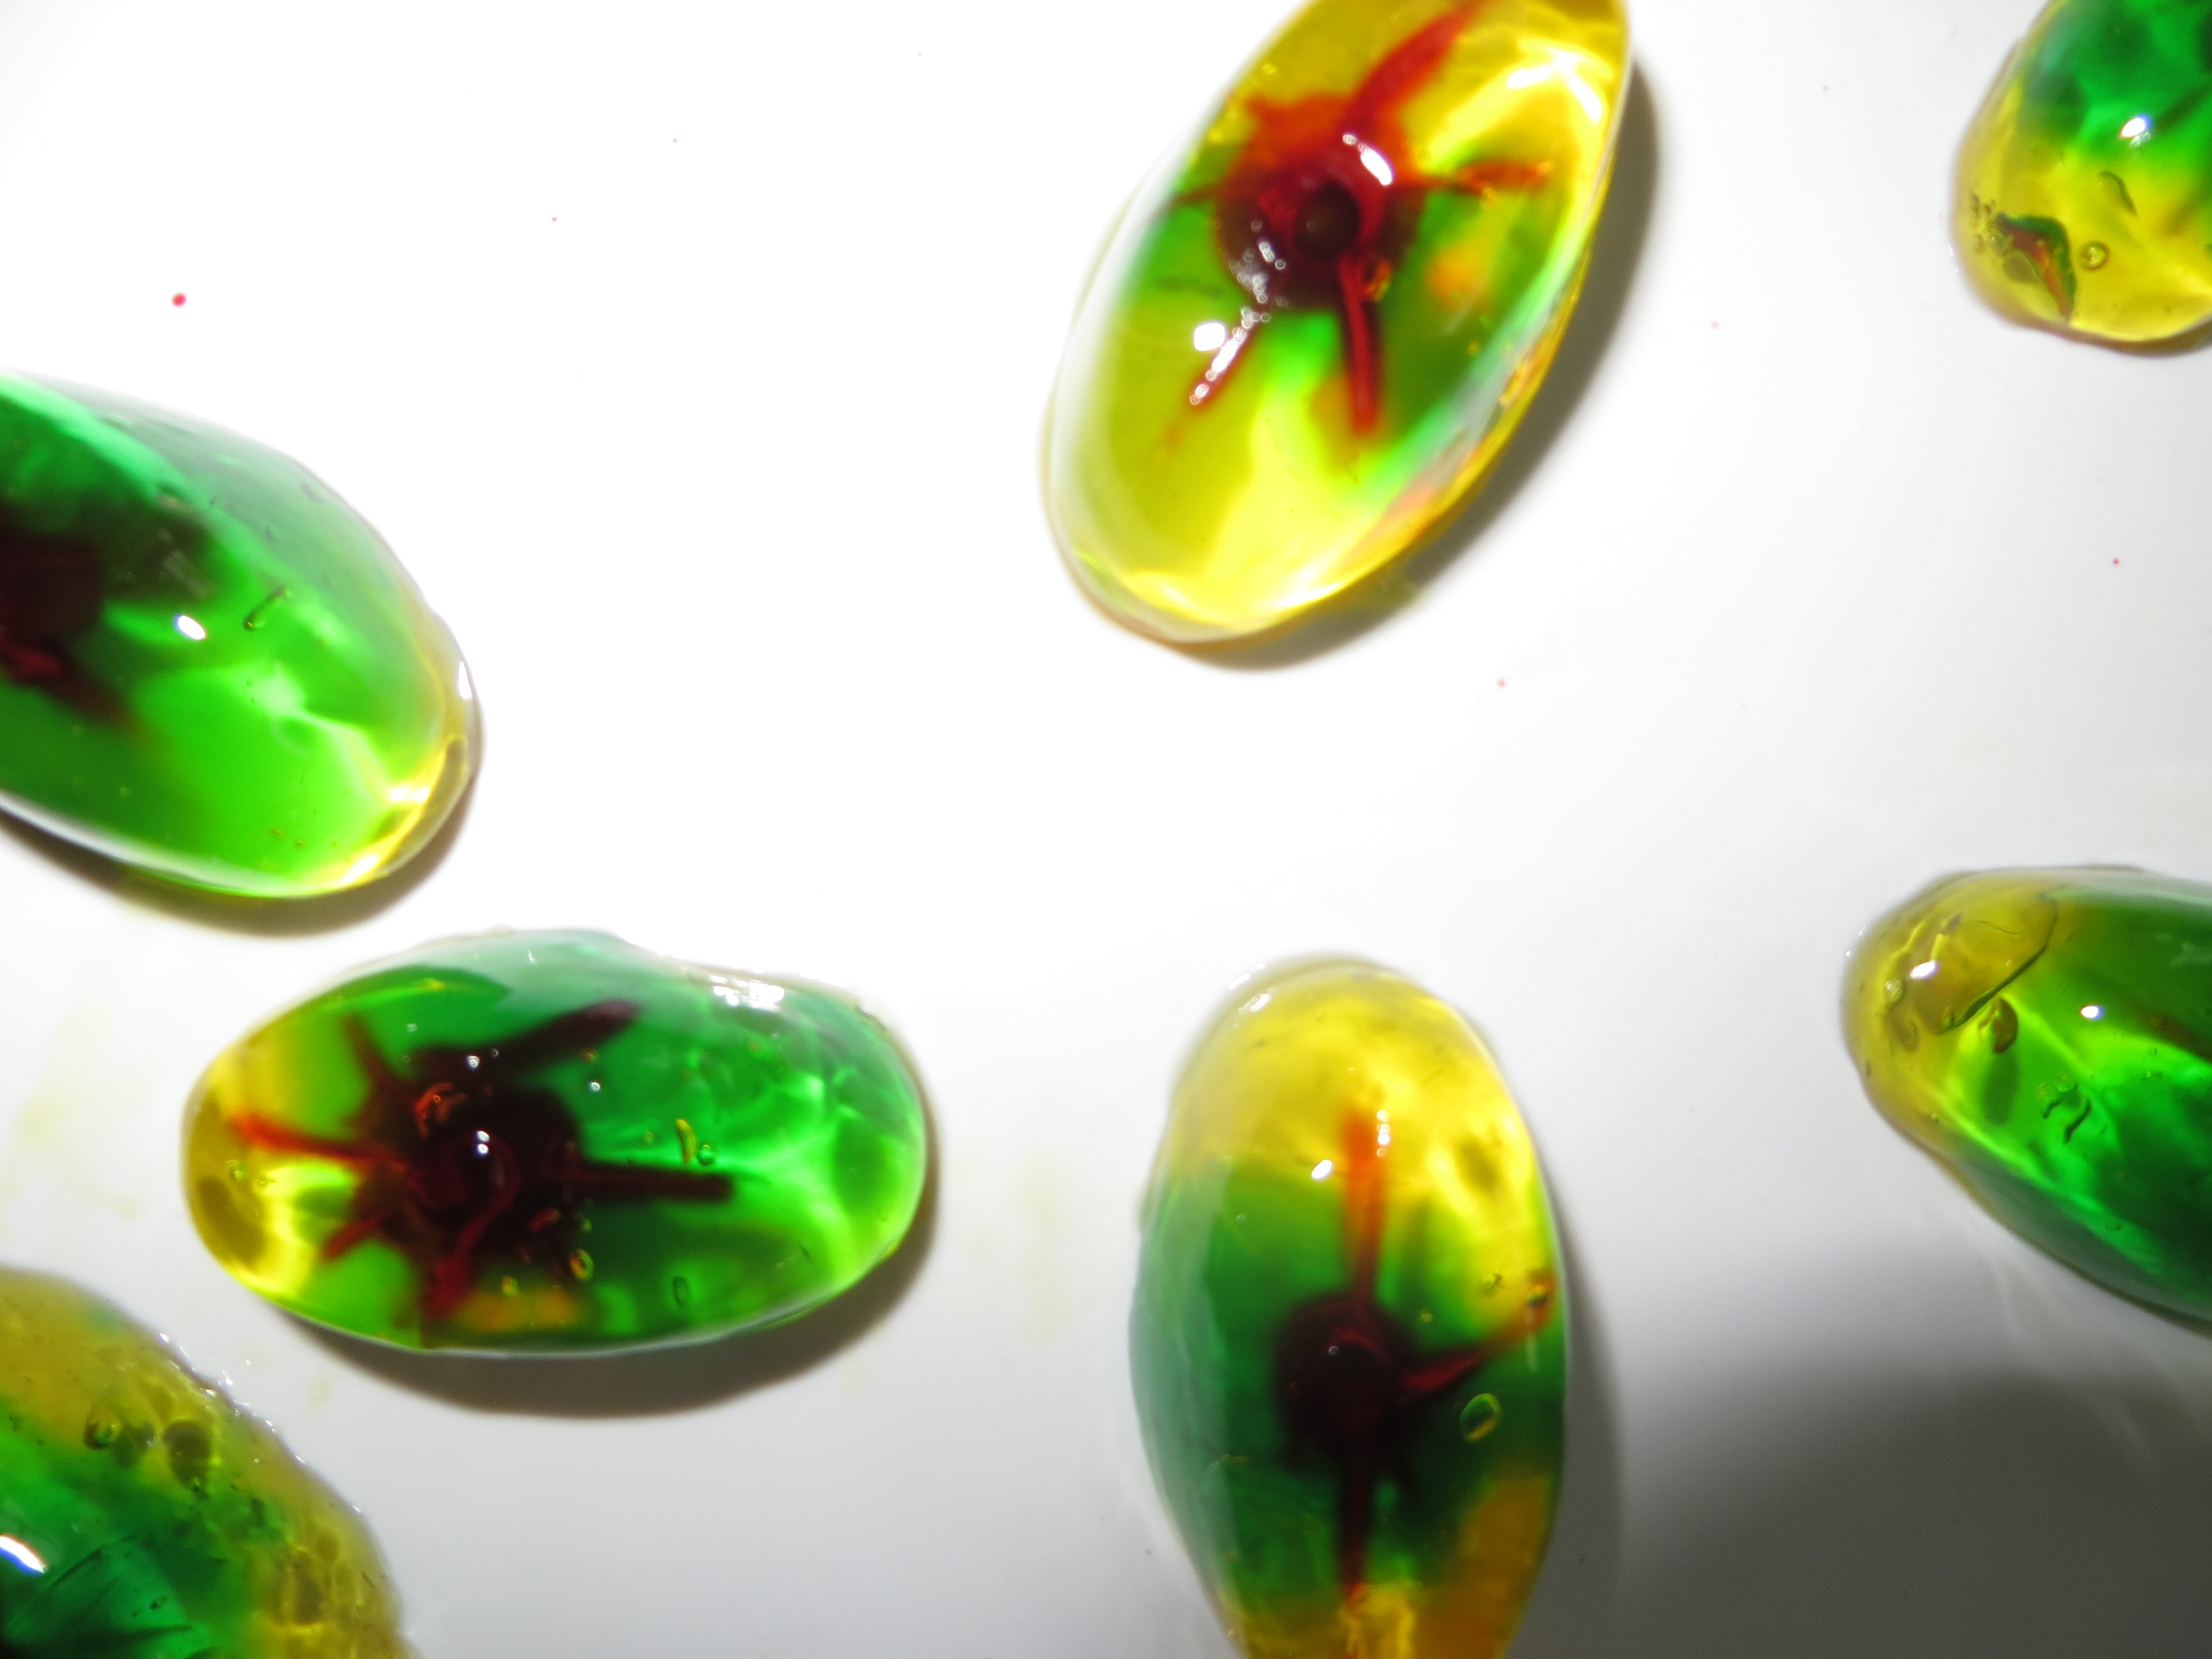
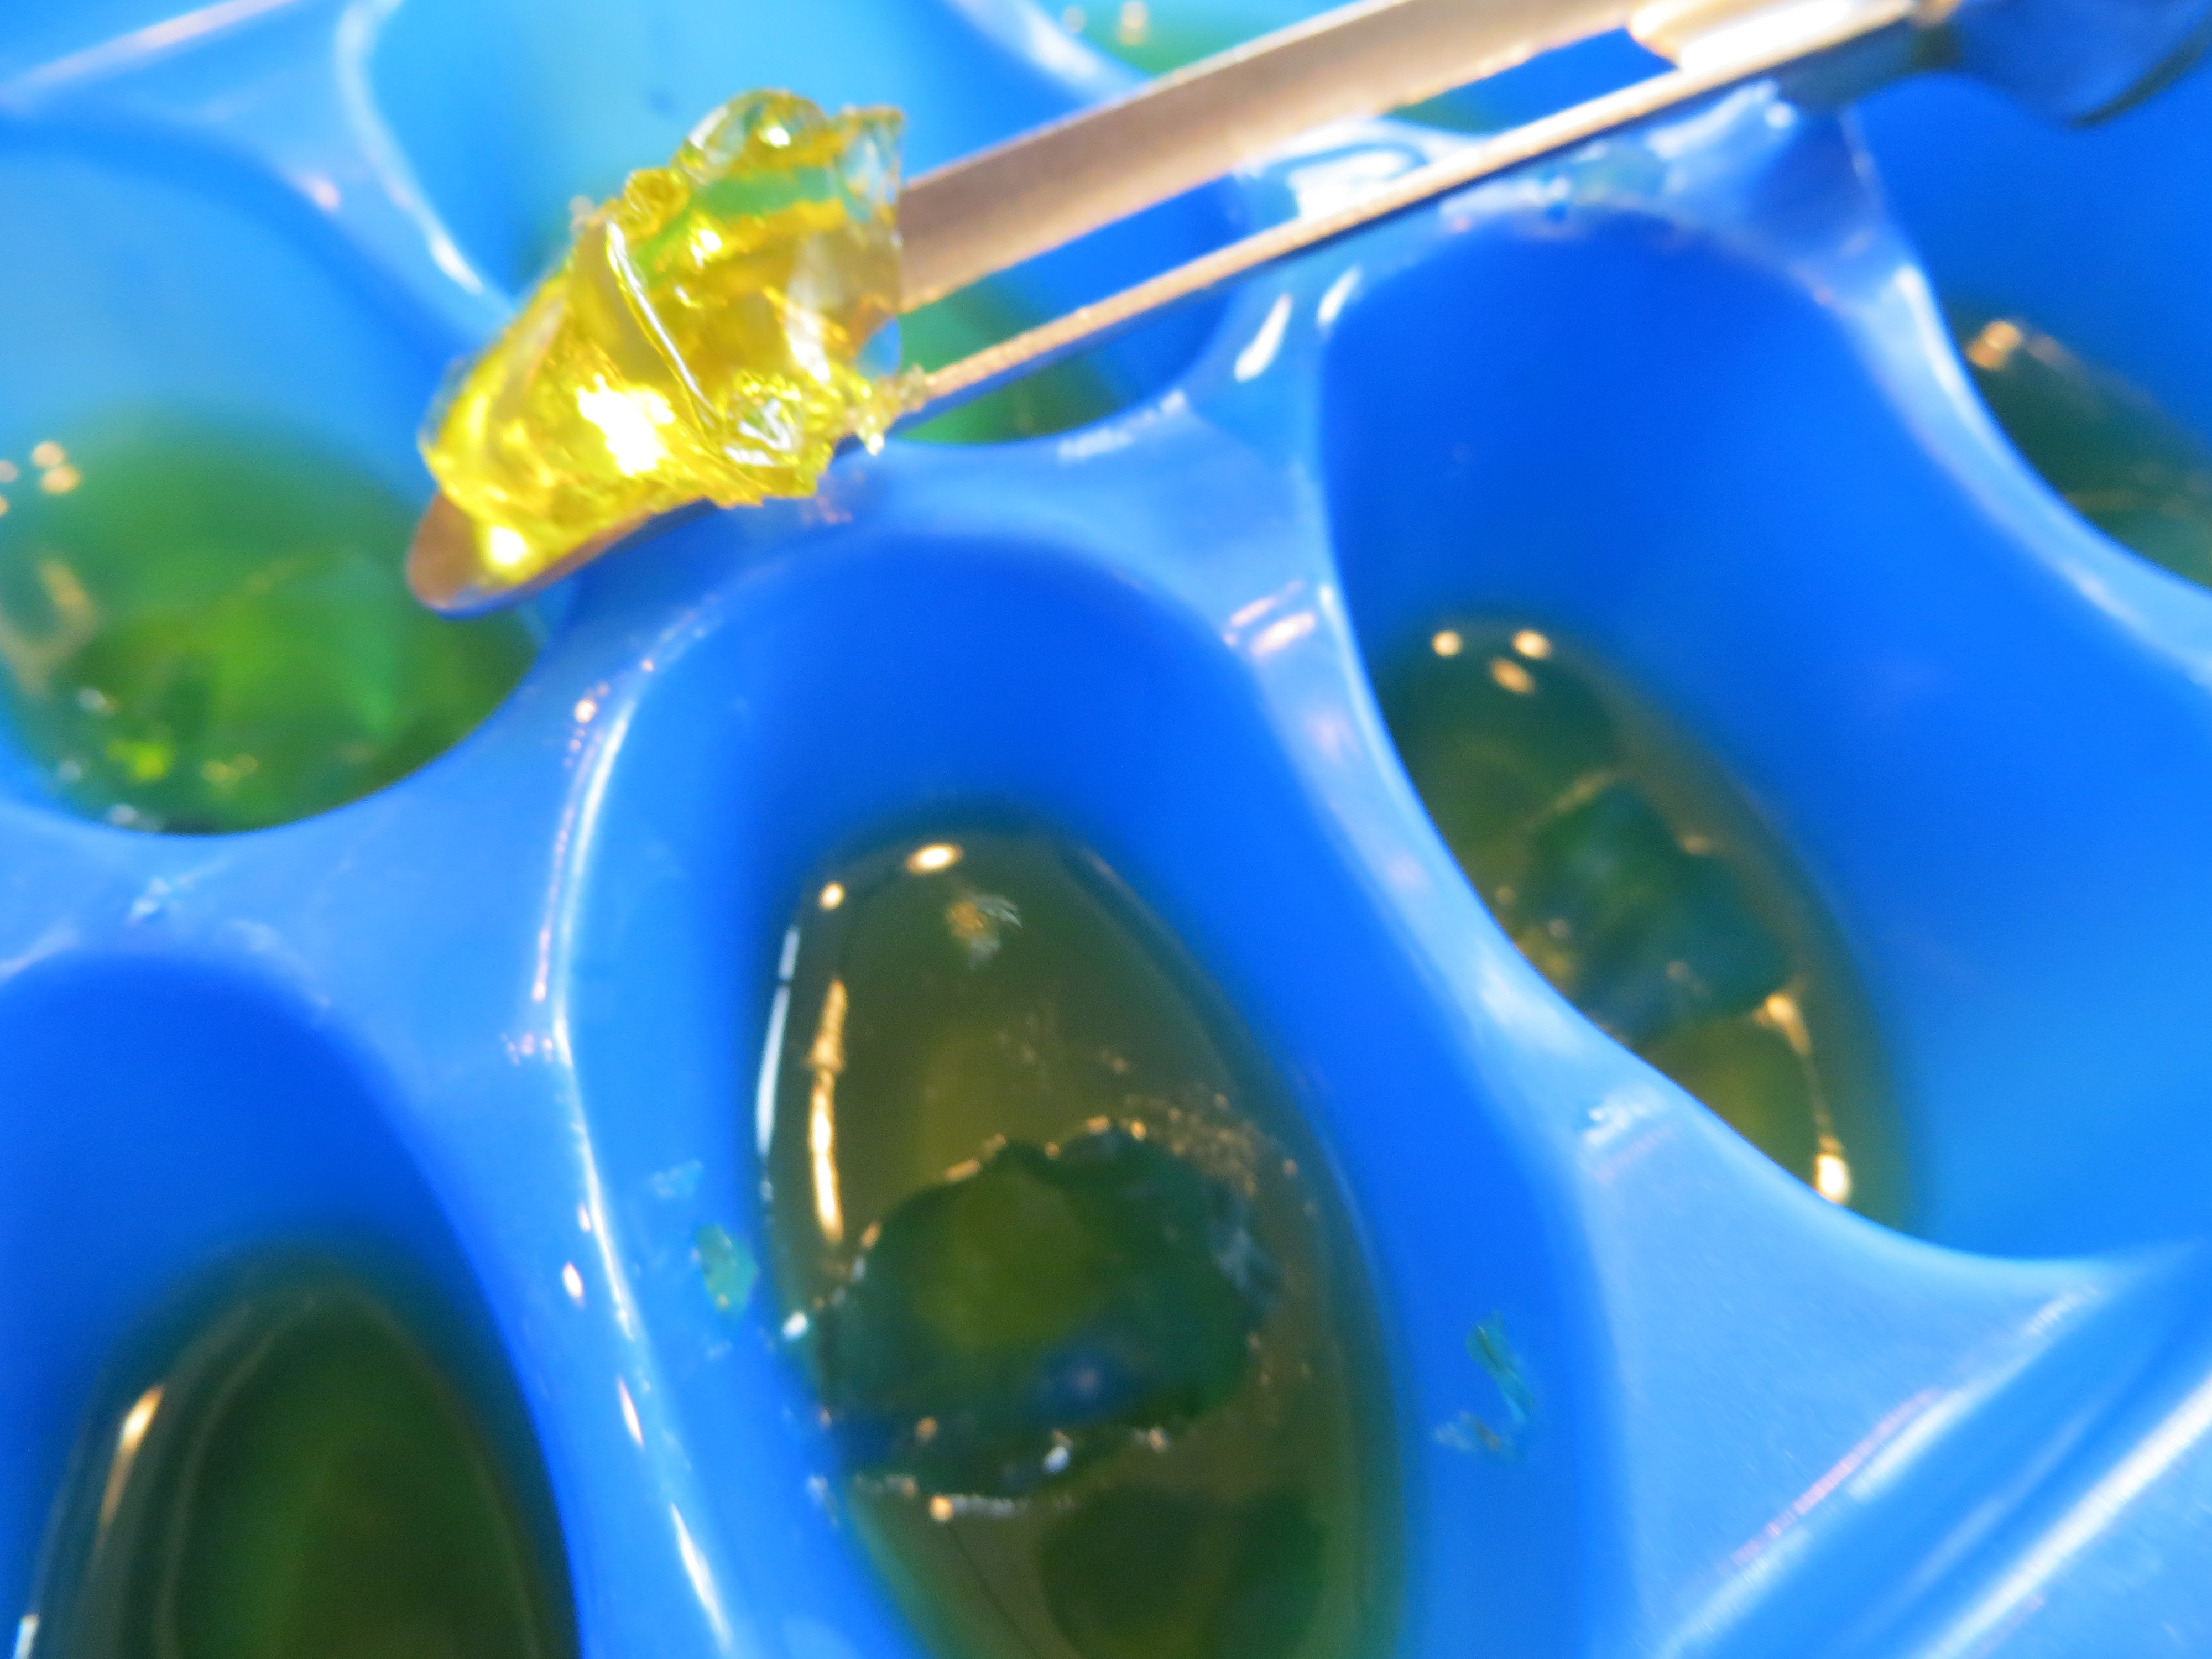
Here’s the science part: Agar is a substance extracted from the cell walls of red algae. It’s often used in cooking and science experiments. Agar has a higher melting temperature than the gelatin used to make Jell-O. So, if you put a piece of agar gel into melted Jell-O, the agar won’t melt unless the Jell-O is really hot (about 150 degrees Fahrenheit or 65 degrees Celsius!) That means you can create works of agar art to embed in your favorite Jell-O. We used silicone molds, cookie cutters and a molecular gastronomy technique called oil spherification to make our agar decorations. To make the orbs using spherification, you simple drip coconut milk agar through cold oil, forming perfect spheres that solidify as they fall. We talked with Astronaut Abby on Kare11 Sunrise about how you could make these orbs in space. Click here to see the segment.
Vegetarians like to eat agar, since it’s made from algae and not animals. In labs, scientists use agar to make petri dishes for growing microorganisms, since it won’t melt at high temperatures in incubators. They also use it to make gels for electrophoresis, to separate DNA and RNA molecules by size!
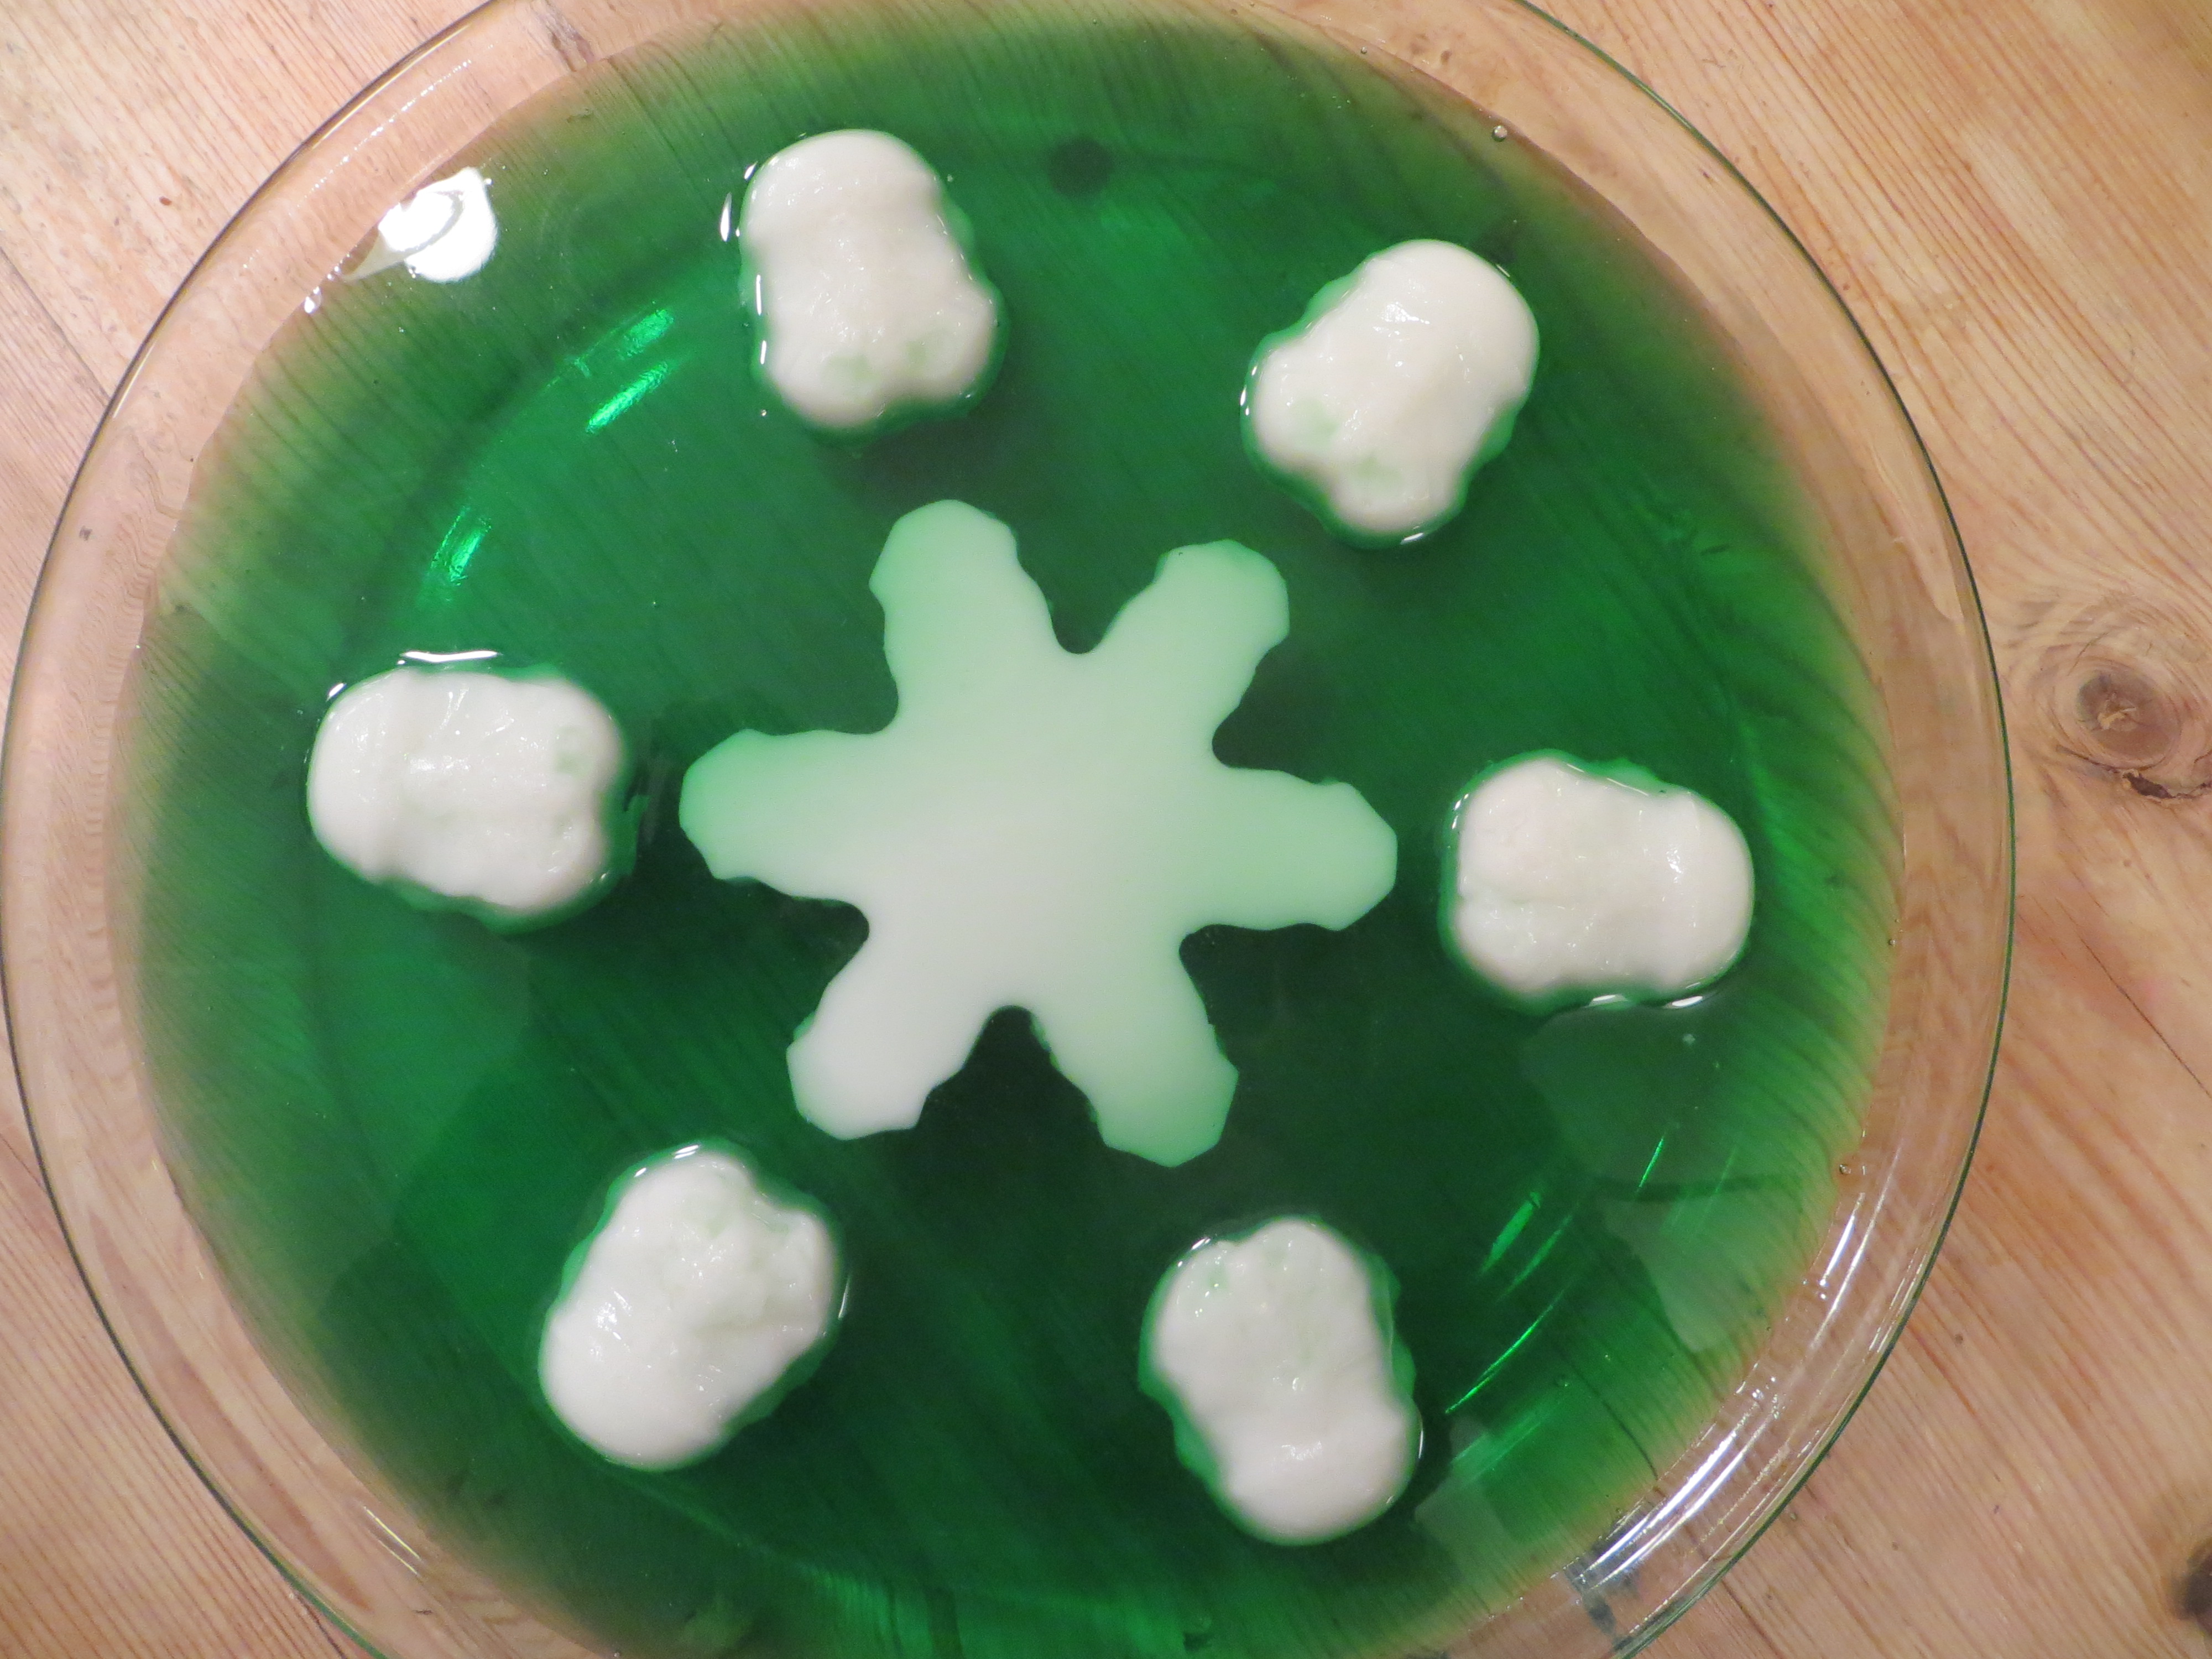
Snowflake and Storm Trooper Jell-O (KitchenPantryScientist.com)
INSTRUCTIONS:
*If you want to make white orbs from the coconut milk agar, you’ll need to plan ahead and chill tall jar or glass of vegetable oil in the freezer until it is thick and almost frozen. You’ll also need some squeeze bottles or clean eyedroppers.
Coconut Milk Agar -To create your white decorations and mini orbs, mix up this coconut milk agar dessert.
2 1/2 cups water
4 Tbs Agar flakes from Asian section of grocery store or COOP
1 cup coconut milk (not lowfat) Mix the coconut milk well before you measure it.
4 Tbs. sugar
In a sauce pan or the microwave, heat 4 Tbs. agar in 2 and 1/2 cups water until the agar is completely dissolved. Adult supervision required.
To the agar mixture, add 1 cup coconut milk and 4 Tbs. sugar. Mix Well. Pour into molds, pour into a pan to cut shapes out with cookie cutters, or pour some into a squeeze bottle to make white orbs.

Coconut Milk Orbs (optional cool science experiment
Slowly drip melted coconut milk agar (above) through ice-cold vegetable oil. As it fall through the oil, it should harden and form orbs. Collect the orbs with a slotted spoon and rinse before adding to your Jell-O.

Jello-O
Follow the directions on the package for the speed set method. If you make a double batch, pour half of it into the bottom of a large, glass casserole dish or bowl. If it’s a single batch, pour the whole thing in. If you made coconut milk orbs, put some in the melted Jell-O to see whether they float or sink. Let the Jell-O solidify and arrange your agar decorations on the Jell-O.
Set the coconut milk agar decorations on the first layer of Jell-O (KitchenPantryScientist.com)
Make or remelt more Jell-O. When it’s cooled down a bit, pour it over your decorations to trap them in the Jell-O. You may want to leave them sticking out a little, or cover them completely with Jell-O over them for effect.
What else could you try? What Jell-O masterpiece can you create?

Han Solo got a little cracked when we took him out of the mold, but we fixed him with some melted coconut milk agar! (KitchenPantryScientist.com)
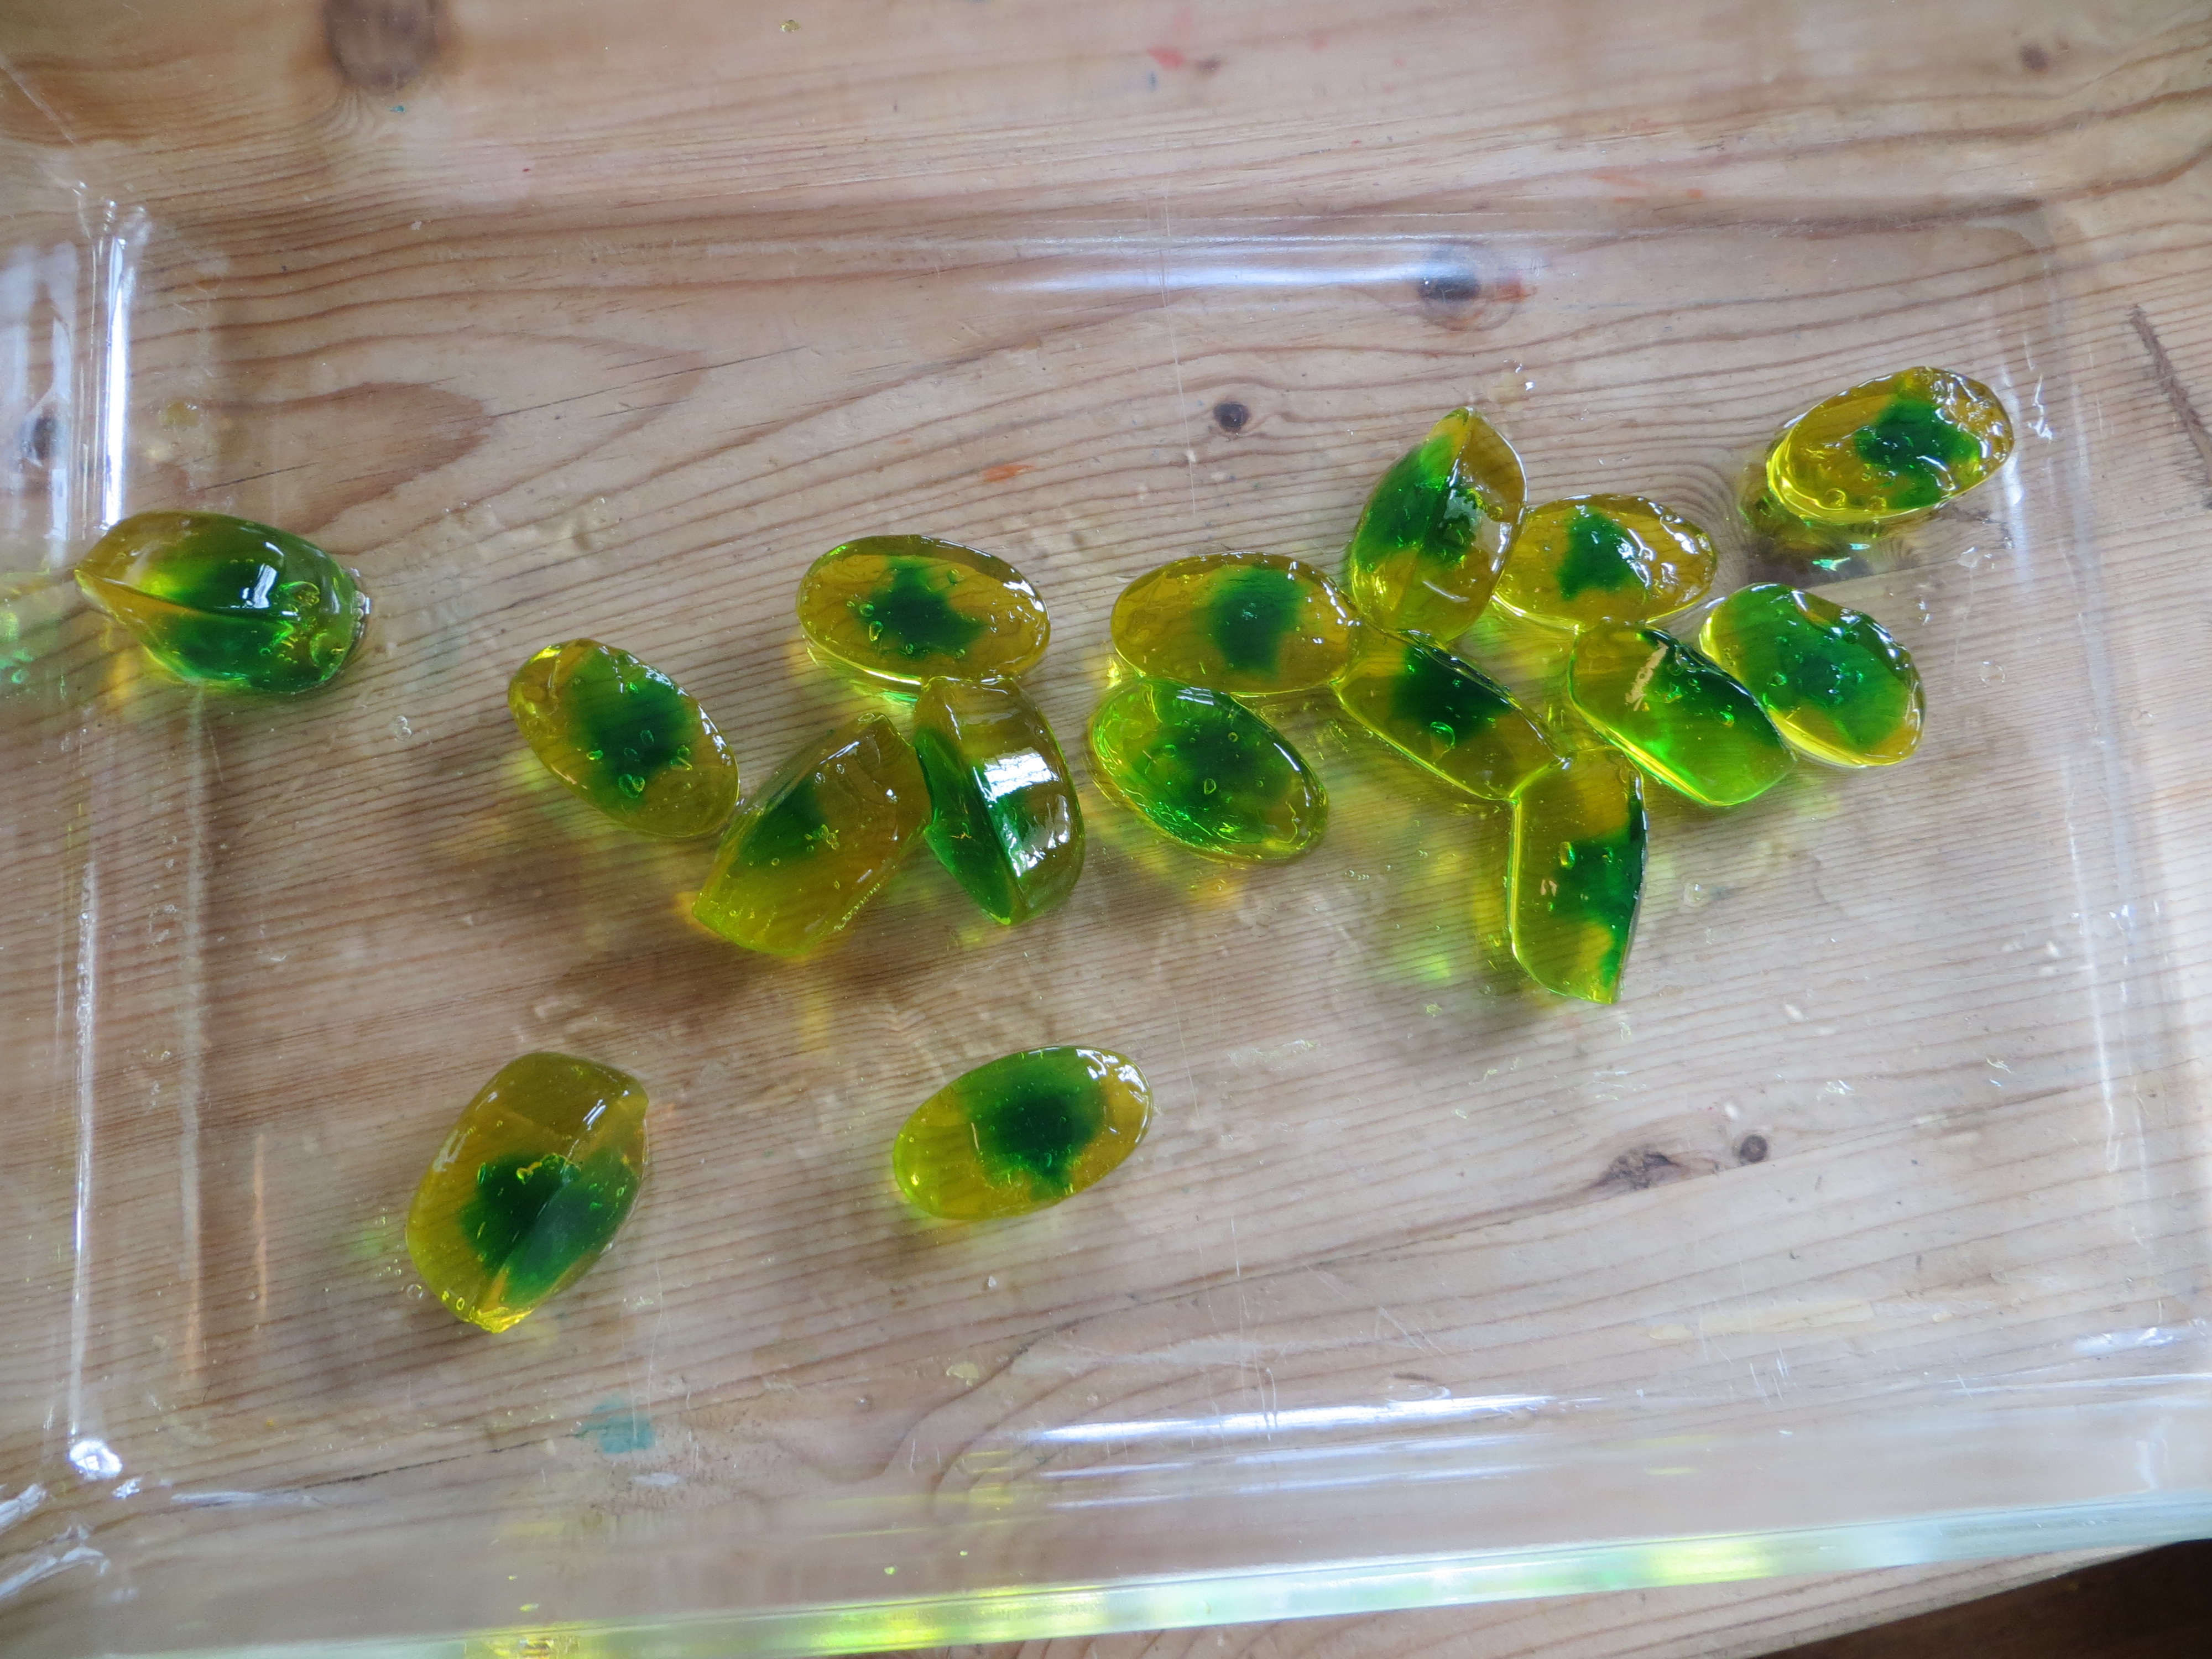
Edible Alien Eyeballs- A Diffusion Experiment for Halloween
- by KitchenPantryScientist
Molecules move from areas of high concentration, where there are lots of other similar molecules, to areas of low concentration, where there are fewer similar molecules in a process called DIFFUSION. When the molecules are evenly spread throughout the space, they have achieved EQUILIBRIUM.
Lots of things can affect how fast molecules diffuse, including temperature. When molecules are heated up, they vibrate faster and move around faster, which helps them reach equilibrium more quickly than they would if it were cold. Diffusion takes place in gases like air, liquids like water, and even solids.
You can watch food coloring molecules diffuse into gelatin (a colloid) when you do this fun, edible Halloween experiment.
Dissolve two 3oz packages of lemon Jell-O in 1 and 1/4 cups of boiling water. (Adult supervision required.) Allow it to cool briefly, and pour it into 2 ice-cube trays with oval-shaped holes. Refrigerate until firm.
Dissolve one 6oz package of Berry Blue Jell-O in 1 and 1/4 cups of boiling water. Cool briefly.
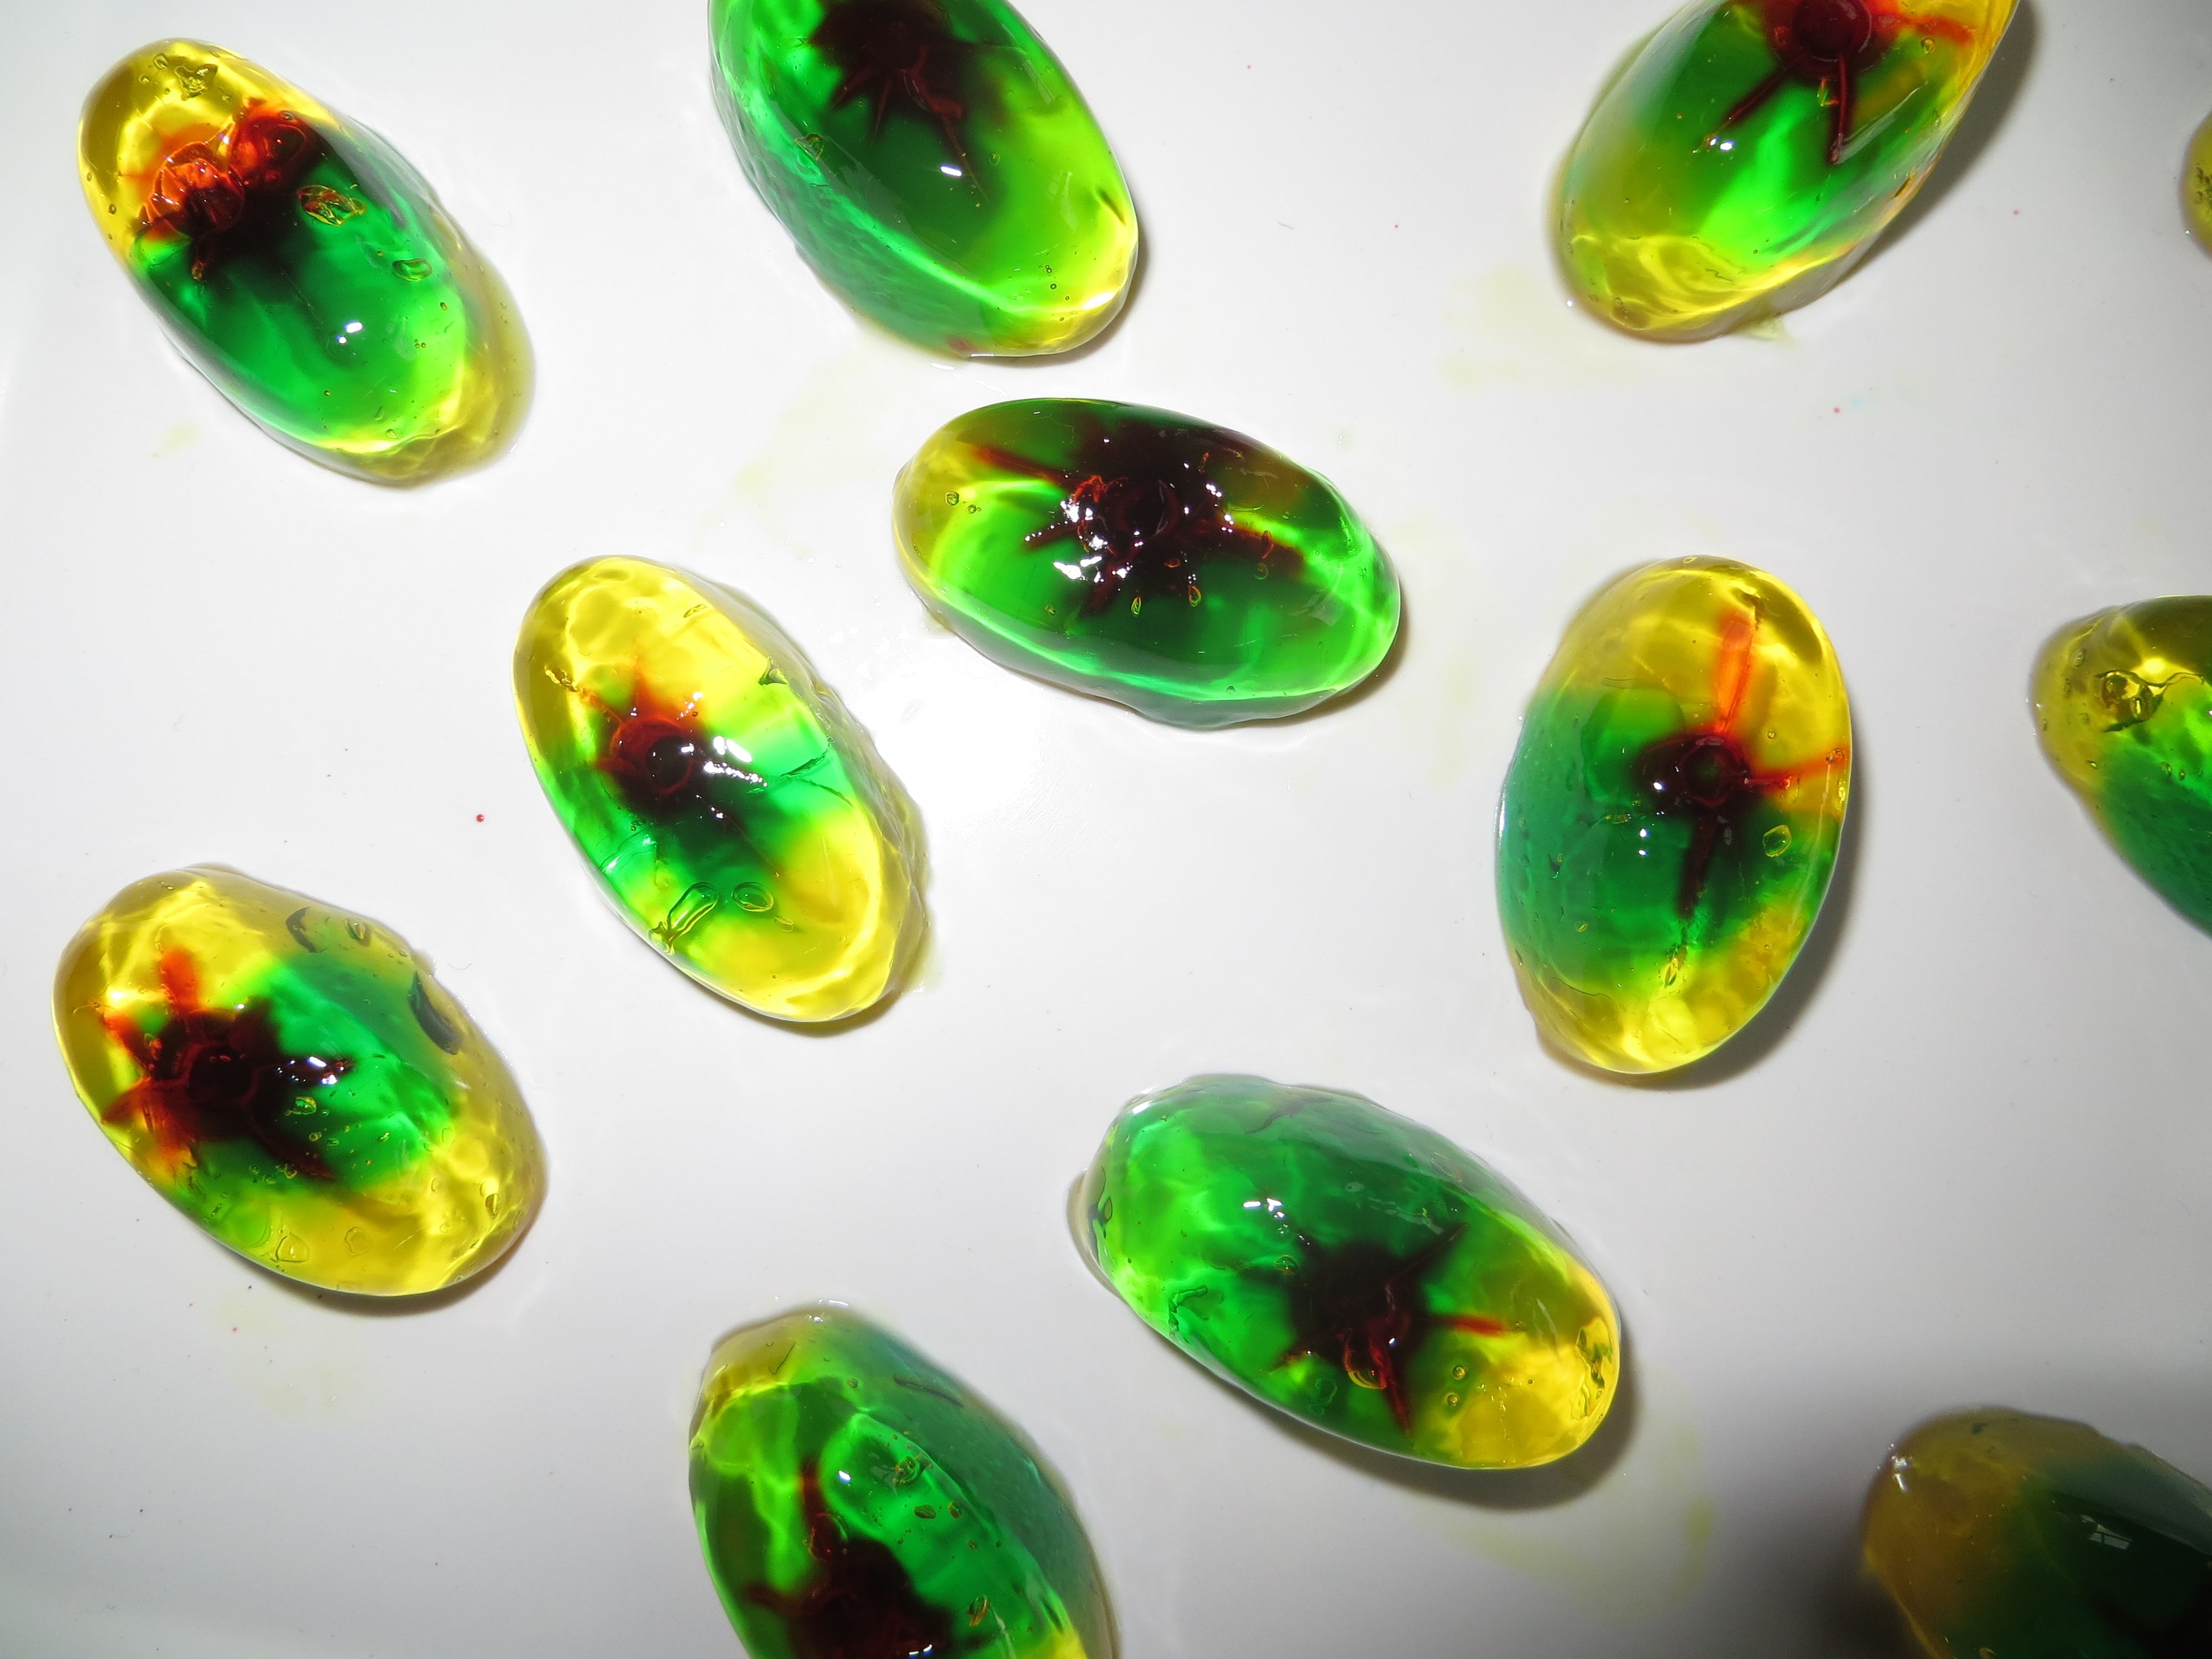
Using the end of a potato peeler or a strawberry corer to hollow out a circle in the middle of each yellow Jell-O “eyeball.” Carve the circle about halfway to the bottom of the gelatin. Use a toothpick or skewer to remove the Jell-O.
Fill the hollow with melted blue gelatin and return to the refrigerator to harden. The blue Jell-O will be the pupil of the eye.
Set ice cube trays containing Jell-O in a casserole dish of hot tap water for 1-2 minutes. Turn upside down in another dish to un-mold and then move your eyeballs to another serving dish.
Use a straw to add Kool-Aid liquid (like Cherry) to the center of each eyeball. Then, use a sharp skewer to draw lines out from the center.
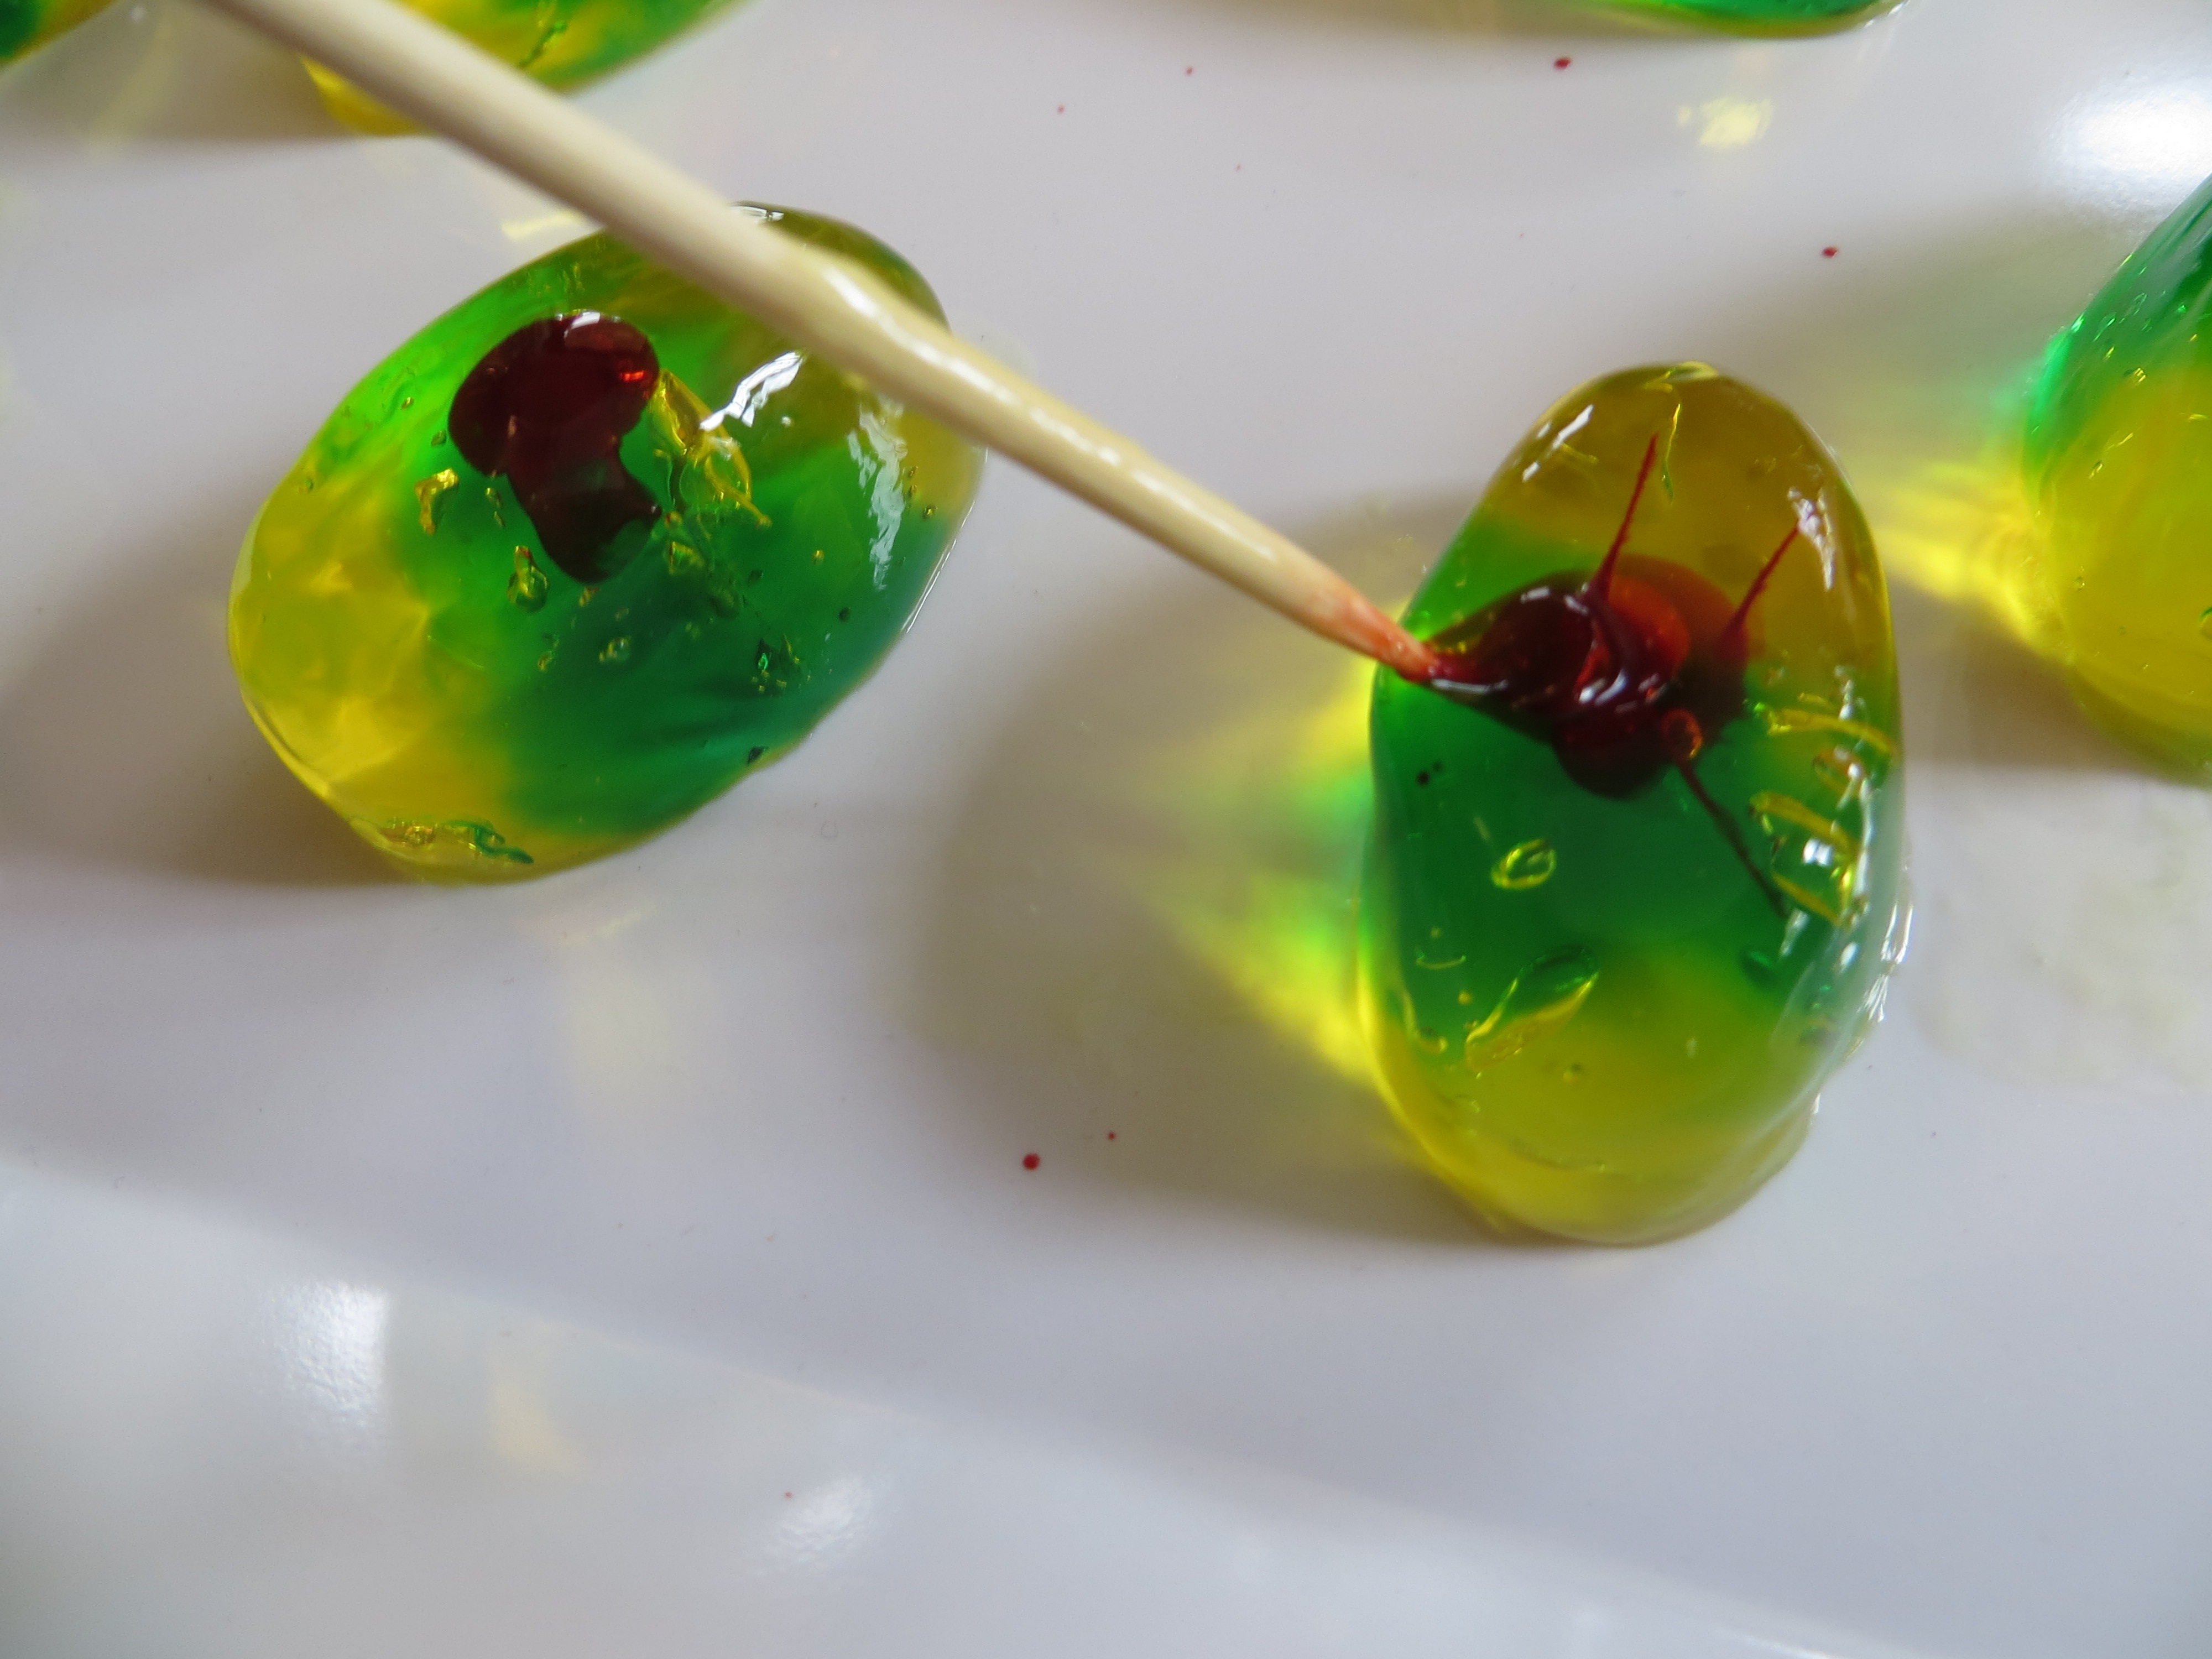
Cover with plastic wrap and let sit for a few hours so the Kool-Aid will start to diffuse.
Add a second color Kool-Aid drops (Like Blue Raspberry) to the center of the eye and repeat.
Cover and refrigerate until ready to serve. The Kool-Aid colors will continue to diffuse into the eyeballs!
Enjoy!
Homemade Root Beer
- by KitchenPantryScientist
I’ve been having fun with fermentation the last few weeks and my kids loved making root beer. In a week or two, I’ll post instructions, but here’s a general how-to demo I did on WCCO MidMorning.