Tag: project’
Two “Buggy” Biology Projects for Kids
- by KitchenPantryScientist
Summer is almost here, and so are the bugs! Here’s a short video segment featuring two inspiring scientists, paired with fun projects from my new book, “Biology for Kids” (available everywhere books are sold.)
Holiday Science: Candy Cane Art
- by KitchenPantryScientist
Crying over broken candy canes? Cry no more. Make art!
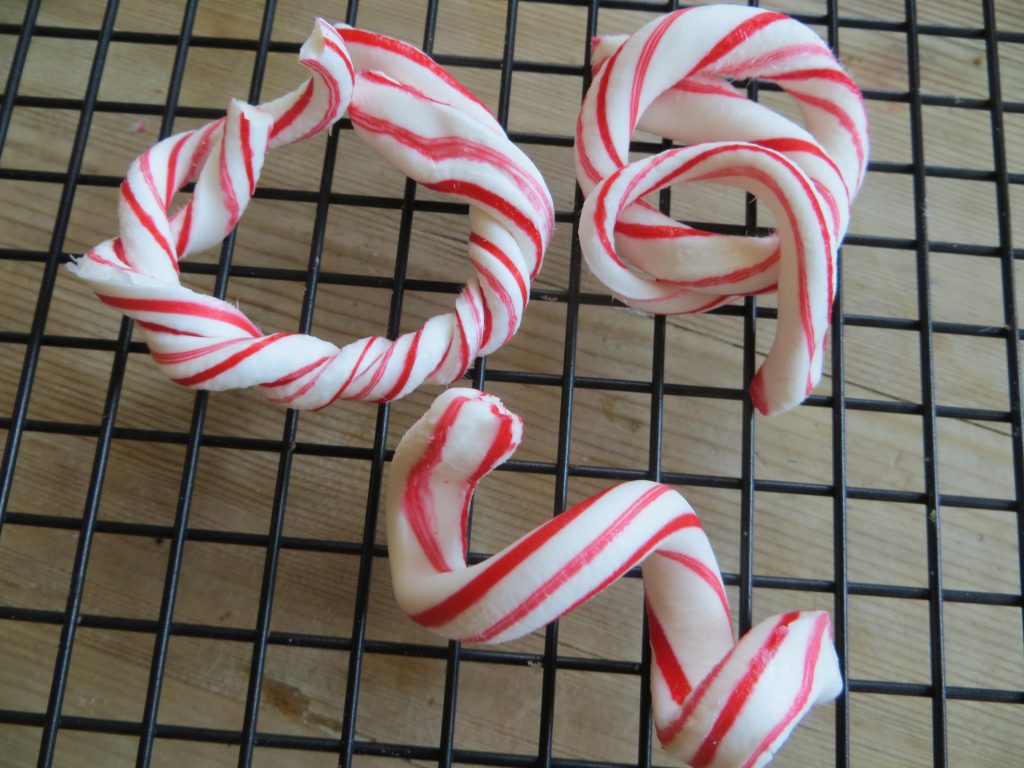
Candy Cane Art- image KitchenPantryScientist.com
This project is from “Amazing (Mostly) Edible Science,” by Andrew Schloss. For a cookbook full of delicious recipes and the Science-Behind-the-Fun, buy my book Kitchen Science Lab for Kids: Edible Edition here!
*Melted candy can get dangerously hot, so parental supervision is required!
You’ll need:
-candy canes (broken or whole), wrappers removed
-heavy-duty aluminum foil
-a cookie sheet
-a wire cooling rack
-an oven
What to do:
- Preheat oven to 250F.
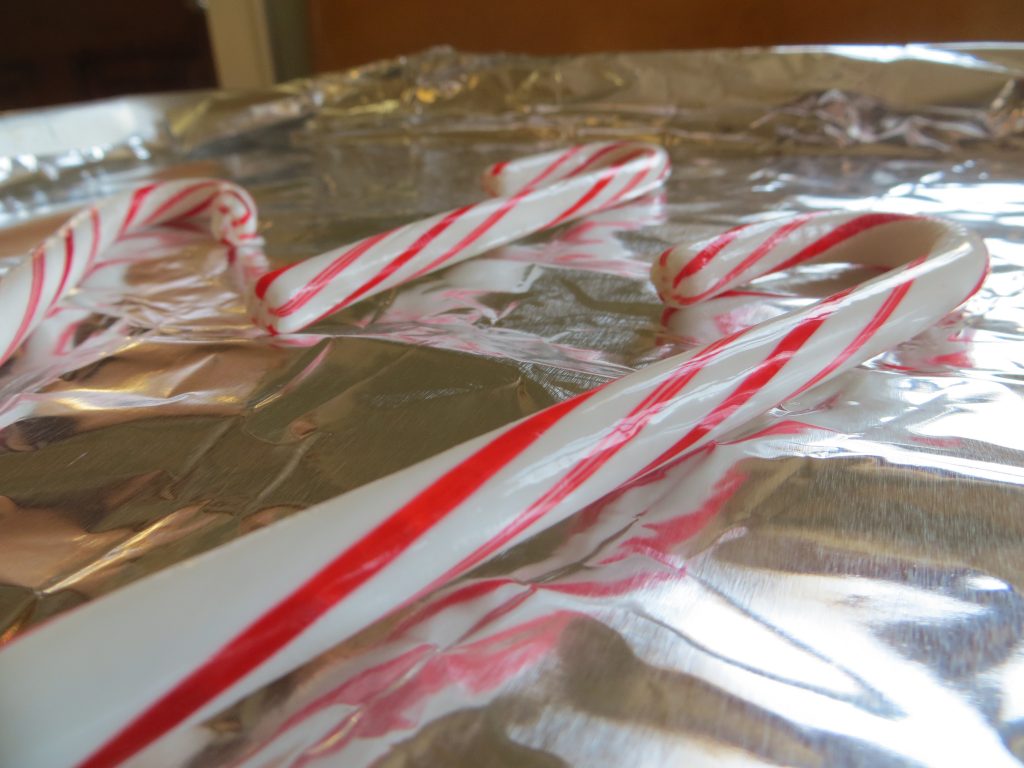
- Cover cookie sheet with foil
- Place candy canes on foil, not touching each other
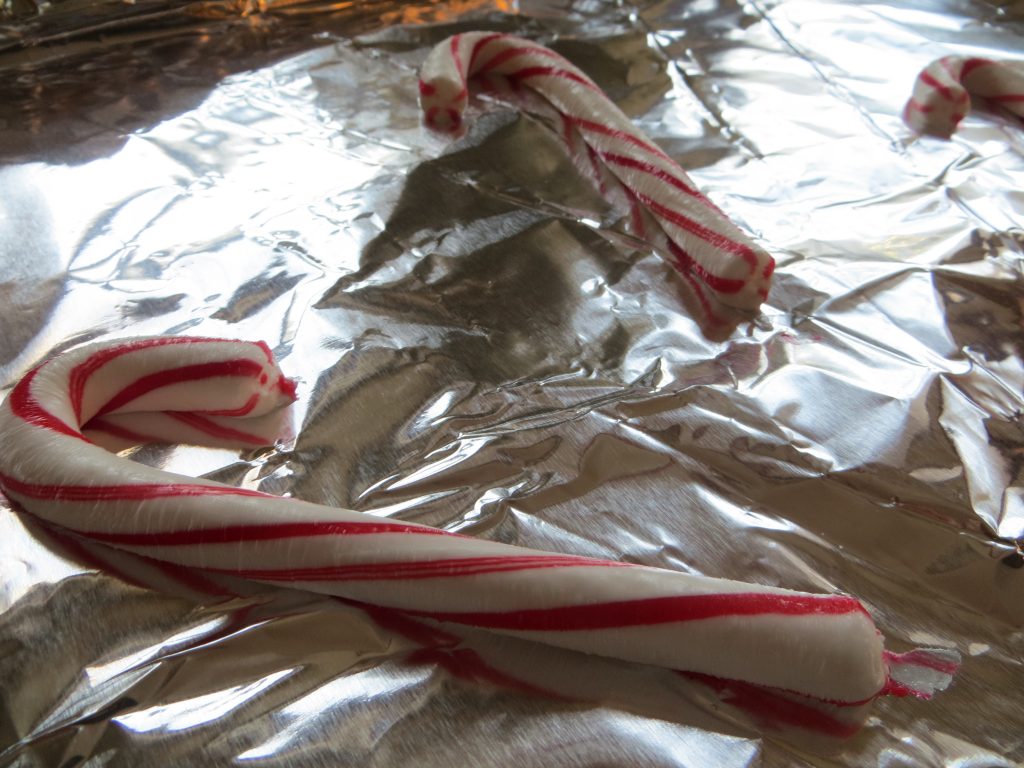
- Bake candy canes for around 10 minutes and have an adult check them. They should be stretchy, but not too hot to touch.
- When the candy canes are ready, bend, fold, twist and pull them into cool shapes. Try pulling one long and wrapping it around a chopstick to make a spiral. What else could you try?
- If the candy gets to brittle to work with, put it back in the oven for a few minutes to make it soft again.
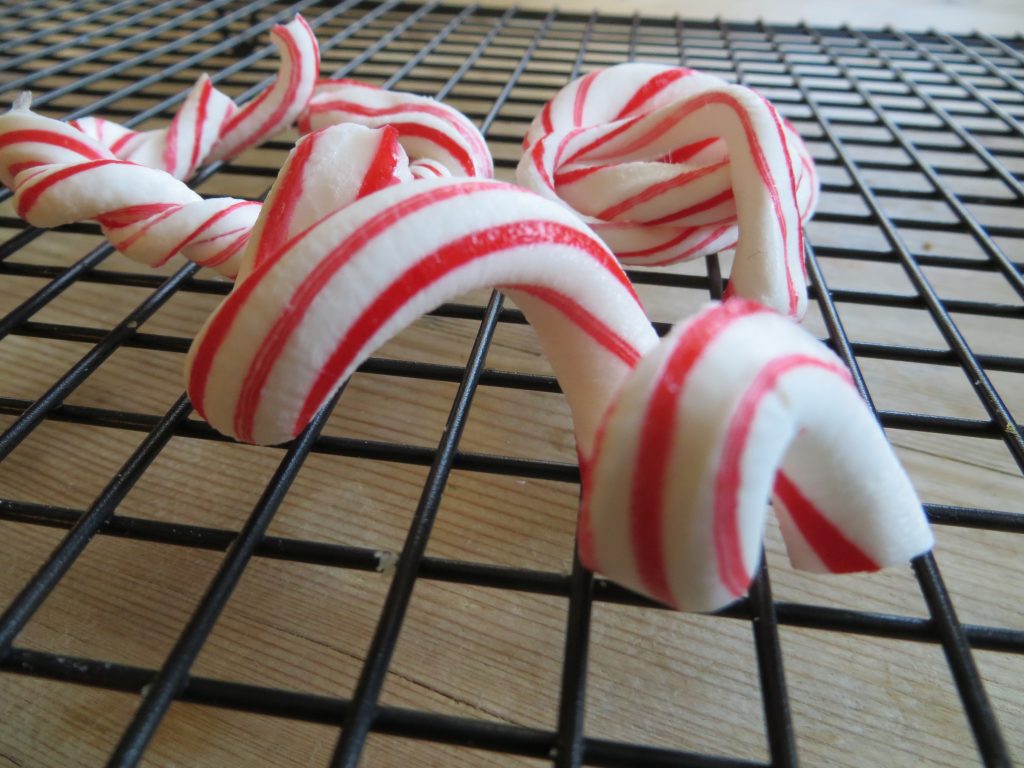
Candy Cane Art- image KitchenPantryScientistcom
The science behind the fun:
If you looks at the ingredients of candy canes, they’re usually made of table sugar (sucrose), corn syrup, flavoring, and food coloring. Glucose and fructose are sweet-tasting molecules that stick together to make up most of the sugars we eat, like table sugar (sucrose) and corn syrup. You can think of them as the building blocks of candy.
At room temperature, candy canes are hard and brittle, but adding heat changes the way the molecules behave. Both table sugar and corn syrup contain linked molecules of glucose and fructose, but corn syrup has much more fructose than glucose, and the fructose interferes with sugar crystal formation. According to Andrew Schloss, “the corn syrup has more fructose, which means the sugar crystals in the candy don’t fit tightly together. The crystals have space between them, which allows them to bend and move without cracking.”
Here’s a great article on the science of candy-making.
If you’re looking for holiday gifts for a science-loving kid, my books Chemistry Lab for Kids, Kitchen Science Lab for Kids and Outdoor Science Lab for Kids include over 100 fun family-friendly experiments! They’re available wherever books are sold.
TXT2012
- by KitchenPantryScientist
I spent an hour yesterday doing science with the girls at TXT2012 camp at Dakota County Technical College yesterday, where kids get to explore Technology, Science, Transportation, Health, Design, Technical/Industrial, and Business fields with hands-on projects. I showed them how to make a marshmallow slingshots (and talked about conservation of energy,) we talked about the fact that there are fun, safe experiments to do with kids you might be babysitting (with mom and dad’s permission, of course,) and then we played with red cabbage juice, and talked a little about pigments, flavenoids and anthocyanins. Finally, we did a hands-on chemical reaction using the cabbage juice, vinegar and baking soda.
Here are the experiments I demonstrated and mentioned: Marshmallow Slingshots, “Magic Potion” (Red Cabbage Juice chemical reaction,) Homemade Litumus Paper, CO2 breath test with red cabbage juice
and here are some fun, safe experiments for babysitters that can be done (under supervision) with young children: Tie-Dye Milk, Cornstarch Goo. If you have an iPhone or iPod Touch, these experiments are on the free (and Premium) version of KidScience app, so you can have them with you all the time.
Marker Chromatography
- by KitchenPantryScientist
 You can take this project in many different directions, which is what science is all about! Chances are, you already have all the supplies you need for this project in your kitchen: coffee filters or paper towels, magic markers, and water.
Fill the bottom of a bowl or glass with a little water. Then, cut paper towels or coffee filters into long strips. Draw a large dot of color (black works best) about an inch from the bottom of the strip of paper. Place the bottom of the paper, below the dot, into the water. Once the water starts moving, the paper will stick to the side. You can hook it over the top of the glass, like we did.
 The water will be wicked up the paper and through the dot, dissolving and taking some of the dye up the strip with it. You’ll be able to see colors separate as the dyes travel up the strip. It’s fun to see what colors make up different black inks. My kids tried it with colors other than black too. They even made dots comprised of several different colors and watched them separate in the water. Another variation is to put ink on a large piece of paper, drip water on it from a dropper or straw and watch the color travel out in a circle!
We taped some of the strips into our science notebooks. They’re very colorful. Older kids might enjoy trying a 10:1 mix of window cleaner and vinegar to separate the colors.
When you separate the colors from one another on the paper, you’re doing chromatography!
When paper is dipped in water, water molecules make it wet. The water molecules travel up the paper towel. When the water reaches the ink, it dissolves some of the dyes in the ink, and the dyes travel up the paper towel with the water. Some of the molecules that make up the dye are smaller and travel up the paper towel faster than the larger ones, so you can see some of the different colors that make up the ink separate from one another. The number of spots of color you see can tell you how many chemicals make up the color in your marker.
Most importantly, have fun!
Imagination Fair
- by KitchenPantryScientist

Our school’s Imagination Fair is one of my kids’ favorite events of the year. I love it too. One of the best things about this gathering is that it is not a competition. I also love that there are no rules and guidelines. My kids spend their days following rules and competing against others, whether it is in school or in sports. For the Imagination Fair, kids simply create, demonstrate, or show off something that interests them and then have a great time walking around and checking out everyone else’s projects.

Sugar cube castles towered over posters about magnets, and jars full of home-grown crystals stood next to Lego creations. There were plastic sharks wired to foam board, a cardboard reproduction of the Olympics half-pipe and a poster about money of the world. You could pet a bunny or “test your knowledge” to win a sucker. My four-year old especially loved the circut table, where one boy had inventions that spun and beeped when you made electrical connections.

I’m thinking of putting an “Imagination Fair” together this summer, in my back yard, for the neighborhood kids. What better way to let kids be kids?
Sweet (and Salty) Lava Lamps
- by KitchenPantryScientist

Pull out a jar, a bottle of vegetable oil, some food coloring, salt, sugar, and water to mix up this easy experiment! 
Fill the jar about halfway up with water and add a few drops of food coloring for contrast. Add about half as much vegetable oil to the jar and watch it float to the top. Now, a spoonful at a time, add salt to the jar. The salt will pull some of the oil down with it, but will release the oil as it dissolves and the oil will float back to the top. This will make your science experiment look like a real lava lamp. Keep adding salt to make it keep working. Now, try adding sugar or even sand. Kosher salt worked really well!
What worked the best for you? Do you know why oil floats to the top of the water? Email me your answers in the comments section of this post for a chance to win a KITCHENPANTRYSCIENTIST.COM tee shirt (size M.) I’ll do a drawing for a winner in two weeks! Thanks to PBSkids/DragonflyTV’s website for this fun idea. Check out their website for more great kids’ science!
How to Make Tie-Dye Milk Video
- by KitchenPantryScientist
Kids from two to twenty will have fun playing with this science project. Click here for my blog post on Tie-Dye Milk and to read more about surface tension
[vsw id=”SDjHnmhakzU” source=”youtube” width=”425″ height=”344″ autoplay=”no”]
Fingerprint Fun
- by KitchenPantryScientist

For this project, I thought that it would be fun to mix a little science and a little art. My sister told me that she heard you could make Valentine’s cards using fingerprints. I’ve also heard that it’s pretty easy to lift fingerprints using scotch tape, so I thought we’d give it a try. All you need for the science part is paper, scotch tape and a pencil. For the valentines, you will need an ink pad, paper and markers.
On www.wikieducator.org/Fabulous_Forensic_Fingerprints, I found a fingerprint-lifting technique that works well, even for very young children. Simply take a pencil and scribble on a piece of paper until a small area is covered with the graphite from the pencil lead. Have your child rub his or her finger around in the graphite until it is covered with gray. Then, have your child carefully place their finger on the sticky side of a piece of scotch tape and carefully lift their finger off of the tape. A clear fingerprint should be visible. Place the tape face-down on another piece of paper to preserve the fingerprint.


Your child can then inspect the fingerprint under a magnifying glass, or just with their naked eye. If you go to the wiki website I mentioned, your child can decipher whether they think their fingerprint is a whorl, a loop, or an arch. It is fun to have them trace their hand, fingerprint each finger and thumb, and tape their fingerprints to the appropriate fingers. Your child’s fingerprints would be a great addition to their science notebook! I’ve found that their notebooks are great keepsakes of their drawings and observations at different ages. The kids had a lot of fun with this project and could do it unassisted once I showed them what to do.
For the Valentines, have your children put two fingerprints or thumbprints together in the shape of a heart. Of course, they will also want to make fish, bugs, and who knows what else? I gave my kids some ideas to get them started and they went from there! (It’s fun to add details with markers.) Have fun!

Mad Scientist’s Green Slime
- by KitchenPantryScientist

What could be more fun than creating your own green slime to play with? It’s easy to synthesize your own green goo using only Elmer’s glue (the non-washable kind), Borax (found in the laundry detergent section of most stores), green food coloring and water.
In a bowl, have your child mix together about 1/3 cup glue and 1/3 cup water with a spoon or Popsicle stick. These measurements don’t have to be exact. Add a few drops of green food coloring and mix well.
To make the Borax solution, add around a cup of water to a jar. To the water, add about a Tablespoon of Borax. Have your child shake the jar to dissolve as much of the Borax as possible. You are making what is called a saturated solution, so it may not all dissolve! Don’t worry, it will work just fine.

Have your child add about a teaspoon at a time of the Borax solution to the glue/water mix. After each addition, have them stir the mixture together. You should see long strings begin to form and stick together. Keep adding Borax until the mixture doesn’t feel gluey any more. It will form sort of a shiny playdough-like substance. If you add too much Borax solution, it will feel wet. You should be able to just knead it a little to absorb the extra water! The slime is not toxic, but Borax is soap, so don’t let your kids eat it!
I am a biologist and not a chemist, but here is the science, as I understand it.
Mixing Elmer’s glue with water forms a substance called a polymer, which is a long chain of molecules. (A molecule is the smallest amount of a specific chemical substance that can exist alone, like H2O, a single water molecule). The polymer formed by water and glue is called polyvinyl acetate.
The Borax solution (sodium tetraborate) is a cross-linking substance that makes the polymer chains stick together. As more and more chains stick together, they can’t move around and the goo gets thicker and thicker. Eventually, all the chains are bound together and no more Borax solution can be incorporated.

You can store the slime in plastic bags. If you want to make a larger batch, just remember to mix equal amounts of glue and water and add as much Borax solution as needed.
To make your child feel like a “real” scientist, find an old, button up shirt for your child to use as his or her “lab coat”. It’s fun and will protect their clothes. You could even try to find some old safety goggles in your garage for your child to wear, although the ingredients for this project are relatively safe. (Very young children should always be supervised while doing science projects.)
Have fun!
Zooming Fish
- by KitchenPantryScientist

Here’s a fun, easy science project that I discovered a few years ago on pbskids.org/dragonflytv. My children will do it again and again. Even my three year-old joined in, cutting up construction paper into “fish food” and throwing it into the water.
You will need some sort of pan for water (a cake pan will work), construction paper, scissors, and dish soap. Have your child cut out some fish shapes from the paper (around two inches long works well.) See the photo below. Then, have them cut a small slit in the back of the tail. Put a few inches of water in the pan and add the fish. Before the paper soaks up too much water, have your child add a drop of dish soap behind the fish. The fish should zoom across the water. You will have to add fresh water tothe pan if you want to repeat the experiment.

The soap breaks the surface tension of the water. Tell your child to imagine that the surface of the water is a sheet of fabric and the soap is a pair of scissors. The soap cuts through the water, pushing the fish ahead of it. For a more scientific explanation, have your child look up surface tension or visit the dragonfly tv website!
Don’t forget those science notebooks! Have your children write the date, “surface tension” and record their results. They can try using different liquids (like lemon juice) to see if they will break the surface tension. My kids made some fish out of that foam that is used for craft projects so that they wouldn’t soak up the water! Hopefully, the zooming fish will keep your child interested and busy for a while! Click here to see a video on how to make zooming fish.