Category:Uncategorized’
Olympic Ice Skating Science
- by KitchenPantryScientist
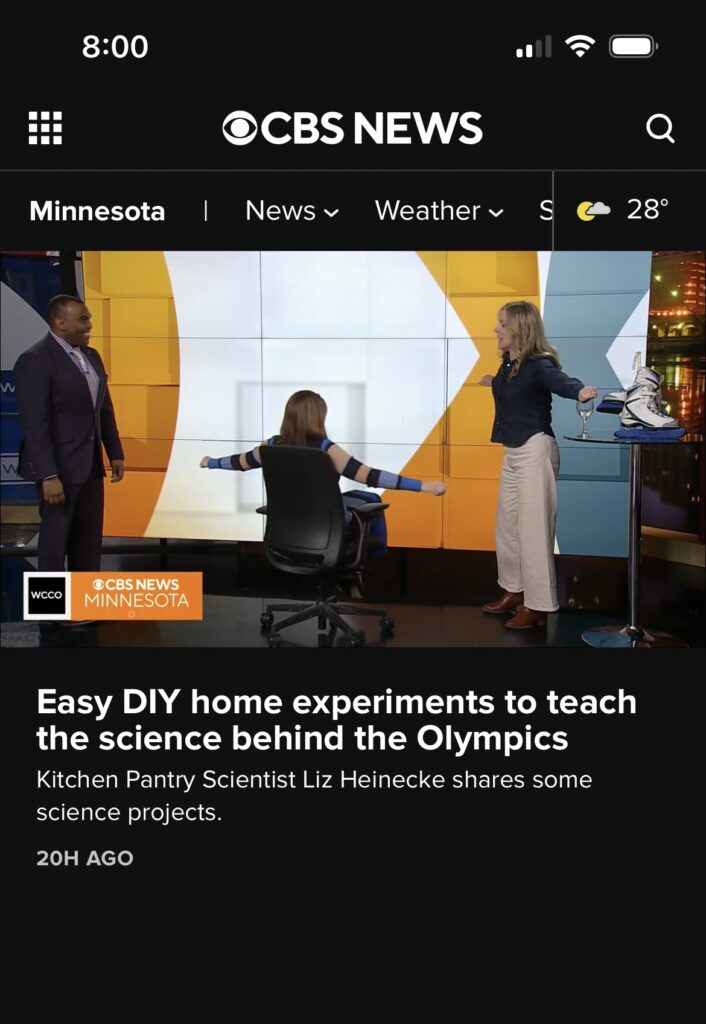
There’s lots of physics and biology involved in ice skating! By spinning on a chair, kids can learn about angular momentum and the science of why we get dizzy. I talked about it on CBS WCCO MidMorning yesterday!
Watch here! https://www.cbsnews.com/minnesota/video/easy-diy-home-experiments-to-teach-the-science-behind-the-olympics/
Frozen Bubbles
- by KitchenPantryScientist
Soap bubbles are made up of two layers of soap with a thin layer of water sandwiched between them. It’s fun to watch the beautiful crystal patterns that form in the water layer when bubbles freeze on a very cold day. Adding sugar and corn syrup to the soap stabilizes bubbles so that they won’t pop before they freeze. (Bubble recipe below video.)
To make frozen bubble solution:
- Dissolve 2 Tablespoons of sugar in I cup very warm water
- Stir in 2.5 Tablespoons of corn syrup.
- Add 2.5 Tablespoons of dish soap (Blue Dawn works well.)
- Mix well.
Find a spot out of the wind. Use a straw to blow a bubble on a smooth plate. Alternately fill a container with a narrow mouth, like a bubble solution bottle, with the mixture above and use a straw to blow a bubble right on top of the bottle.
If it’s below zero degrees Fahrenheit, the bubble will start freezing within seconds.
Tabletop Science Trick- Balancing Forks on a Toothpick
- by KitchenPantryScientist
Every object on earth, whether it’s a boat, a person on a bike, or two forks attached to a toothpick, has a single point called the center of gravity (or center of mass) which gravity acts on. This fun trick demonstrates how you can balance the mass of two forks and a toothpick sitting on the edge of a wineglass. The center of gravity on a curved glass exists in the space between the glass and the forks! Amazing!
If you light the toothpick inside the glass on fire, it will burn out when the flame hits the cooling glass. Because the toothpick is so light (has very little mass), the center of gravity doesn’t change much, so the forks remain balanced.
Sheet Pan Science
- by KitchenPantryScientist
I can’t believe it’s been so long since I last posted, but I’ve been busy writing new books! My latest, Sheet Pan Science, comes out on Sept.13 and is available now everywhere books are sold.
My motto for Sheet Pan Science is “Contain the mess, not the fun!” and I invented “Ice Globe Volcanoes” just for this book. (You can see the volcanoes on the cover below!) Amazon ordering link here.
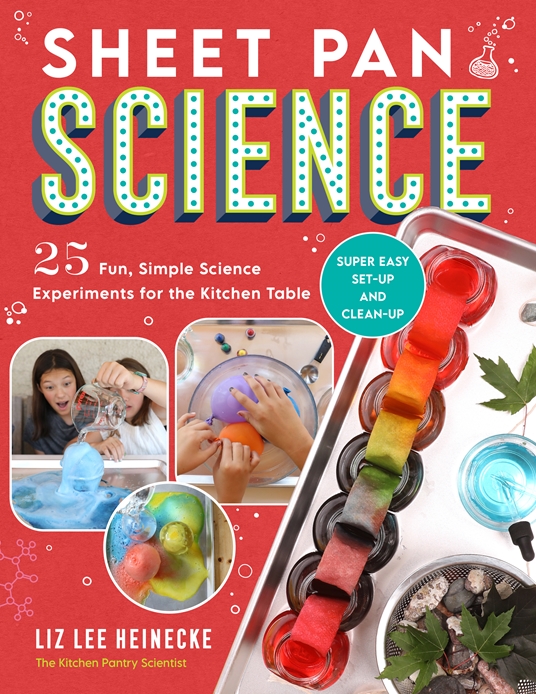
Check out some of the projects from Sheet Pan Science that I demo’d on television by clicking here or here.
3 Fun, Easy Halloween Science Projects for Kids
- by KitchenPantryScientist
Use on-hand ingredients to whip up some Halloween fun, with Vampire Vegetables, Fizzy Monster Heads and Bags of Blood!
Summer Science- Botany for Kids (pressing plants and making a plant collection)
- by KitchenPantryScientist
With summertime here, kids will be spending more time in parks, backyards and at cabins. Pressing plants to make a botanical collection and nature journaling get them outdoors to interact with the environment and discover the science all around them. Here’s a short video demonstrating how to press plants using cardboard, newspaper, watercolor (absorbent) paper and a heavy book.
(Project from The Kitchen Pantry Scientist, Biology for Kids Quarto Books, 2021)
Star Wars Science Projects from Star Wars Maker Lab
- by KitchenPantryScientist
Got a Star Wars fan in the house? May the Fourth is next week! I demonstrated a few science projects from my book “Star Wars Maker” Lab on WCCO | CBS Minnesota this morning!
#MayTheFourthBeWithYou
Earth Day Science projects from “The Kitchen Pantry Scientist-Biology for Kids”
- by KitchenPantryScientist
I demonstrated a couple of Earth Day science projects from my new book today on WCCO Midmorning! “The Kitchen Pantry Scientist- Biology for Kids” will be out May 11 and is available for pre-order now, everywhere books are sold.https://cbsloc.al/3dYOTUcHere’s how to make nature bracelets from duct tape and mason bee houses from empty cans, paper straws and rolled paper.
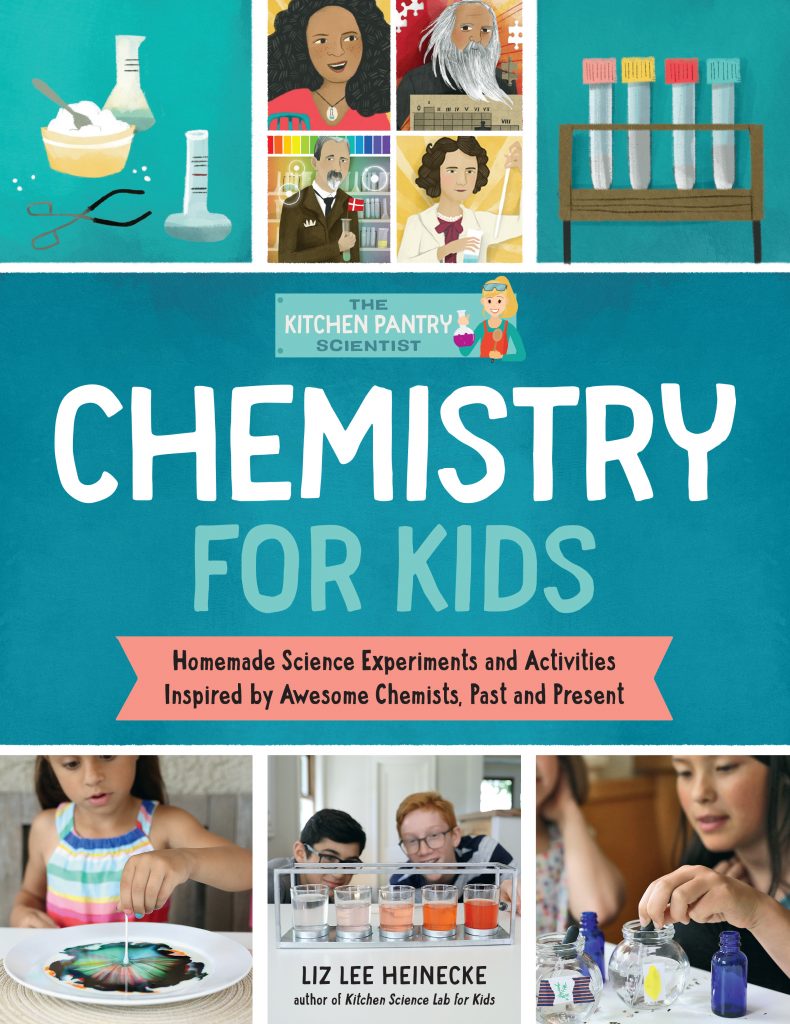
Science Books for Kids (Holidays 2020)
- by KitchenPantryScientist
If you’re looking for holiday gift ideas for the young scientist on your list, here’s Science Magazine’s 2020 list of science books for kids and teens! They’re all finalists for the AAAS (American Association for the Advancement of Science)/Subaru Science prize and I’m thrilled to have my latest book, Chemistry for Kids, included on the list.
Find the entire list here, along with descriptions and brief reviews of each book: https://blogs.sciencemag.org/books/2020/12/01/books-for-young-readers-2020/

From the Science Magazine review of Chemistry for Kids:
“If you were to choose 25 discoveries to document the progress of chemistry through millennia, what would you pick? In Chemistry for Kids, Liz Lee Heinecke takes us on such a journey, using familiar objects and simple scientific instruments to create straightforward chemistry experiments that chart the field’s evolution over time.
Each chapter is centered on a different experiment and begins with a vivid illustration that highlights a scientist and his or her work. A few paragraphs of engagingly written introduction are followed by colorful photographs of youngsters demonstrating the steps of the experiment. A brief explanation of the chemistry that underlies each experiment wraps up each chapter”
Science with Thanksgiving Food: Potato Porcupine
- by KitchenPantryScientist
As a kid, I was always fascinated by stories of pieces of straw from a field being driven into wooden planks in barns and houses by the swirling winds.

With a potato, plastic drinking straws and a glass of water, you can see for yourself how this happens. Like drinking straws, real straw is hollow and although a potato is much softer than a piece of wood, you’ll get the picture.
You’ll need a potato and some sturdy plastic drinking straws.
Begin by soaking a potato in a glass of water for about 30 minutes to soften the skin. We used a red, boiling potato, because that’s what I had on hand.

Then, grasp a straw tightly, near the middle and stab it into the potato as hard as you can. Try starting at different distances from the potato to see whether it makes a difference in how far the straw goes in. (You can mark it with a Sharpie and pull it out.)
We were surprised to find that, instead of breaking or bending, the straw can be driven surprisingly deep into a potato . This happens because objects in motion, like the straw, tend to stay in motion and objects at rest, like the potato, tend to stay at rest. (Newton’s First Law of Motion) This is called inertia. In addition, the paper-thin edges of a drinking straw don’t offer much resistance, and potatoes are composed of around 90% water.
